
Reactive is a programming paradigm where we apply a different way of thinking when developing our applications. Reactive programming is a powerful way of developing web apps that has gained wide acceptance. I would even say that it became fashionable a few years ago when any important conference had at least a few presentations discussing reactive apps. But like any other technology in software development, reactive programming doesn’t represent a solution applicable to every situation.
In some cases, a reactive approach is an excellent fit. In other cases, it might only complicate your life. But, in the end, the reactive approach exists because it addresses some limitations of imperative programming, and so is used to avoid such limitations. One of these limitations involves executing large tasks that can somehow be fragmented. With an imperative approach, you give the application a task to execute, and the application has the responsibility to solve it. If the task is large, it might take a substantial amount of time for the application to solve it. The client who assigned the task needs to wait for the task to be entirely solved before receiving a response. With reactive programming, you can divide the task so that the app has the opportunity to approach some of the subtasks concurrently. This way, the client receives the processed data faster.
In this chapter, we’ll discuss implementing application-level security in reactive applications with Spring Security. As with any other application, security is an important aspect of reactive apps. But because reactive apps are designed differently, Spring Security has adapted the way we implement features discussed previously in this book.
We’ll start with a short overview of implementing reactive apps with the Spring framework in section 19.1. Then, we’ll apply the security features you learned throughout this book on security apps. In section 19.2, we’ll discuss user management in reactive apps, and in section 19.3, w’lle continue with applying authorization rules. Finally, in section 19.4, you’ll learn how to implement reactive applications in a system designed over OAuth 2. You’ll learn what changes from the Spring Security perspective when it comes to reactive applications, and of course, you’ll learn how to apply this with examples.
19.1 What are reactive apps?
In this section, we briefly discuss reactive apps. This chapter is about applying security for reactive apps, so with this section, I want to make sure you grasp the essentials of reactive apps before going deeper into Spring Security configurations. Because the topic of reactive applications is big, in this section I only review the main aspects of reactive apps as a refresher. If you aren’t yet aware of how reactive apps work, or you need to understand them in more detail, I recommend you read chapter 10 of Spring in Action by Craig Walls (Manning, 2020):
https://livebook.manning.com/book/spring-in-action-sixth-edition/chapter-10/
When we implement reactive apps, we use two fashions to implement the functionalities. The following list elaborates on these approaches:
-
With the imperative approach, your app processes the bulk of your data all at once. For example, a client app calls an endpoint exposed by the server and sends all the data that needs to be processed to the backend. Say you implement a functionality where the user uploads files. If the user selects a number of files, and all of these are received by the backend app to be processed all at once, you’re working with an imperative approach.
-
With the reactive approach, your app receives and processes the data in fragments. Not all the data has to be fully available from the beginning to be processed. The backend receives and processes data as it gets it. Say the user selects some files, and the backend needs to upload and process them. The backend doesn’t wait to receive all the files at once before processing. The backend might receive the files one by one and process each while waiting for more files to come.
Figure 19.1 presents an analogy for the two programming approaches. Imagine a factory bottling milk. If the factory gets all the milk in the morning, and once it finishes the bottling, it delivers the milk, then we say it’s non-reactive (imperative). If the factory gets the milk throughout the day, and once it finishes bottling enough milk for an order, it delivers the order, then we say it’s reactive. Clearly, for the milk factory, it’s more advantageous to use a reactive approach rather than a non-reactive one.

Figure 19.1 Non-reactive vs. reactive. In a non-reactive approach, the milk factory gets all the milk to be packaged in the morning and delivers all the boxes in the evening. In a reactive approach, as the milk is brought to the factory, it’s packaged and then delivered. For this scenario, a reactive approach is better as it allows milk to be collected throughout the day and delivered sooner to the clients.
For implementing reactive apps, the Reactive Streams specification (http://www.reactive-streams.org/) provides a standard way for asynchronous stream processing. One of the implementations of this specification is the Project Reactor, which builds the foundations of Spring’s reactive programming model. Project Reactor provides a functional API for composing Reactive Streams.
To get a more hands-on feeling, let’s start a simple implementation of a reactive app. We’ll continue further with this same application in section 19.2 when discussing user management in reactive apps. I created a new project named ssia-ch19-ex1, and we’ll develop a reactive web app that exposes a demo endpoint. In the pom.xml file, we need to add the reactive web dependency as presented in the next code snippet. This dependency houses the Project Reactor and enables us to use its related classes and interfaces in our project:
<dependency>
   <groupId>org.springframework.boot</groupId>
   <artifactId>spring-boot-starter-webflux</artifactId>
</dependency>
Next, we define a simple HelloController to hold the definition of our demo endpoint. Listing 19.1 shows the definition of the HelloController class. In the definition of the endpoint, you’ll observe I used as a return type a Mono. Mono is one of the essential concepts defined by a Reactor implementation. When working with Reactor, you often use Mono and Flux, which both define publishers (sources of data). In the Reactive Streams specification, a publisher is described by the Publisher interface. This interface describes one of the essential contracts used with Reactive Streams. The other contract is the Subscriber. This contract describes the component consuming the data.
When designing an endpoint that returns something, the endpoint becomes a publisher, so it has to return a Publisher implementation. If using Project Reactor, this will be a Mono or a Flux. Mono is a publisher for a single value, while Flux is a publisher for multiple values. Figure 19.2 describes these components and the relationships among these.

Figure 19.2 In a reactive stream, a publisher produces values, and a subscriber consumes those values. Contracts defined by the Reactive Streams specification describe publishers and subscribers. Project Reactor implements the Reactive Streams specification and implements the Publisher and Subscriber contracts. In the figure, the components we use in the examples in this chapter are shaded.
To make this explanation even more precise, let’s go back to the milk factory analogy. The milk factory is a reactive backend implementation that exposes an endpoint to receive the milk to be processed. This endpoint produces something (bottled milk), so it needs to return a Publisher. If more than one bottle of milk is requested, then the milk factory needs to return a Flux, which is Project Reactor’s publisher implementation that deals with zero or more produced values.
Listing 19.1 The definition of the HelloController class
@RestController
public class HelloController {

  @GetMapping("/hello")
  public Mono<String> hello() {
    return Mono.just("Hello!");      ❶
  }
}
❶ Creates and returns a Mono stream source with one value on the stream
You can now start and test the application. The first thing you observe by looking in the app’s terminal is that Spring Boot doesn’t configure a Tomcat server anymore. Spring Boot used to configure a Tomcat for a web application by default, and you may have observed this aspect in any of the examples we previously developed in this book. Instead, now Spring Boot autoconfigures Netty as the default reactive web server for a Spring Boot project.
The second thing you may have observed when calling the endpoint is that it doesn’t behave differently from an endpoint developed with a non-reactive approach. You can still find in the HTTP response body the Hello! message that the endpoint returns in its defined Mono stream. The next code snippet presents the app’s behavior when calling the endpoint:
curl http://localhost:8080/hello
Hello!
But why is the reactive approach different in terms of Spring Security? Behind the scenes, a reactive implementation uses multiple threads to solve the tasks on the stream. In other words, it changes the philosophy of one-thread-per-request, which we use for a web app designed with an imperative approach (figure 19.3). And, from here, more differences:
-
The
SecurityContextimplementation doesn’t work the same way in reactive applications. Remember, theSecurityContextis based on aThreadLocal, and now we have more than one thread per request. (We discussed this component in chapter 5.) -
Because of the
SecurityContext, any authorization configuration is now affected. Remember that the authorization rules generally rely on theAuthenticationinstance stored in theSecurityContext. So now, the security configurations applied at the endpoint layer as well as the global method security functionality are affected. -
The
UserDetailsService, the component responsible for retrieving the user details, is a data source. Because of this, the user details service also needs to support a reactive approach. (We learned about this contract in chapter 2.)

Figure 19.3 In the figure, each arrow represents the timeline of a different thread, and squares represent the processed tasks from requests A, B, and C. Because in a reactive app, tasks from one request might be handled on multiple threads, the authentication details cannot be stored at the thread level anymore.
Fortunately, Spring Security offers support for reactive apps and covers all cases in which you can’t use the implementations for non-reactive apps anymore. We’ll continue in this chapter by discussing the way you implement security configurations with Spring Security for reactive apps. We’ll start in section 19.2 with implementing user management and continue in section 19.3 with applying endpoint authorization rules, where we’ll find out how security context works in reactive apps. We’ll then continue our discussion with reactive method security, which replaces the global method security of imperative apps.
19.2 User management in reactive apps
Often in applications, the way a user authenticates is based on a pair of username and password credentials. This approach is basic, and we discussed it, starting with the most straightforward application we implemented in chapter 2. But with reactive apps, the implementation of the component taking care of user management changes as well. In this section, we discuss implementing user management in a reactive app.
We continue the implementation of the ssia-ch19-ex1 application we started in section 19.1 by adding a ReactiveUserDetailsService to the context of the application. We want to make sure the /hello endpoint can be called only by an authenticated user. As its name suggests, the ReactiveUserDetailsService contract defines the user details service for a reactive app.
The definition of the contract is as simple as the one for UserDetailsService. The ReactiveUserDetailsService defines a method used by Spring Security to retrieve a user by its username. The difference is that the method described by the ReactiveUserDetailsService directly returns a Mono<UserDetails> and not the UserDetails as happens for UserDetailsService. The next code snippet shows the definition of the ReactiveUserDetailsService interface:
public interface ReactiveUserDetailsService {
  Mono<UserDetails> findByUsername(String username);
}
As in the case of the UserDetailsService, you can write a custom implementation of the ReactiveUserDetailsService to give Spring Security a way to obtain the user details. To simplify this demonstration, we use an implementation provided by Spring Security. The MapReactiveUserDetailsService implementation stores the user details in memory (same as the InMemoryUserDetailsManager that you learned about in chapter 2). We change the pom.xml file of the ssia-ch19-ex1 project and add the Spring Security dependency, as the next code snippet presents:
<dependency>
  <groupId>org.springframework.boot</groupId>
  <artifactId>spring-boot-starter-security</artifactId>
</dependency>
<dependency>
  <groupId>org.springframework.boot</groupId>
  <artifactId>spring-boot-starter-webflux</artifactId>
</dependency>
We then create a configuration class and add a ReactiveUserDetailsService and a PasswordEncoder to the Spring Security context. I named the configuration class ProjectConfig. You can find the definition of this class in listing 19.2. Using a ReactiveUserDetailsService, we then define one user with its username john, the password 12345, and an authority I named read. As you can observe, it’s similar to working with a UserDetailsService. The main difference in the implementation of the ReactiveUserDetailsService is that the method returns a reactive Publisher object containing the UserDetails instead of the UserDetails instance itself. Spring Security takes the rest of the duty for integration.
Listing 19.2 The ProjectConfig class
@Configuration
public class ProjectConfig {

  @Bean                                                    ❶
  public ReactiveUserDetailsService userDetailsService() {
    var  u = User.withUsername("john")                     ❷
              .password("12345")
              .authorities("read")
              .build();

    var uds = new MapReactiveUserDetailsService(u);        ❸

    return uds;
  }

  @Bean                                                    ❹
  public PasswordEncoder passwordEncoder() {
    return NoOpPasswordEncoder.getInstance();
  }
}
❶ Adds a ReactiveUserDetailsService to the Spring context
❷ Creates a new user with its username, password, and authorities
❸ Creates a MapReactiveUserDetailsService to manage the UserDetails instances
❹ Adds a PasswordEncoder to the Spring context
Starting and testing the application now, you might notice that you can call the endpoint only when you authenticate using the proper credentials. In our case, we can only use john with its password 12345, as it’s the only user record we added. The following code snippet shows you the behavior of the app when calling the endpoint with valid credentials:
curl -u john:12345 http://localhost:8080/hello
Hello!
Figure 19.4 explains the architecture we use in this application. Behind the scenes, an AuthenticationWebFilter intercepts the HTTP request. This filter delegates the authentication responsibility to an authentication manager. The authentication manager implements the ReactiveAuthenticationManager contract. Unlike non-reactive apps, we don’t have authentication providers. The ReactiveAuthenticationManager directly implements the authentication logic.

Figure 19.4 An AuthenticationWebFilter intercepts the request and delegates the authentication responsibility to a ReactiveAuthenticationManager. If the authentication logic involves users and passwords, the ReactiveAuthenticationManager uses a ReactiveUserDetailsService to find the user details and a PasswordEncoder to verify the password.
If you want to create your own custom authentication logic, implement the ReactiveAuthenticationManager interface. The architecture for reactive apps is not much different from the one we already discussed throughout this book for non-reactive applications. As presented in figure 19.4, if authentication involves user credentials, then we use a ReactiveUserDetailsService to obtain the user details and a PasswordEncoder to verify the password.
Moreover, the framework still knows to inject an authentication instance when you request it. You request the Authentication details by adding Mono<Authentication> as a parameter to the method in the controller class. Listing 19.3 presents the changes done to the controller class. Again, the significant change is that you use reactive publishers. Observe that we need to use Mono<Authentication> instead of the plain Authentication as we used in non-reactive apps.
Listing 19.3 The HelloController class
@RestController
public class HelloController {

  @GetMapping("/hello")
  public Mono<String> hello(
    Mono<Authentication> auth) {             ❶

    Mono<String> message =                   ❷
      auth.map(a -> "Hello " + a.getName());

    return message;
  }
}
❶ Requests the framework to provide the authentication object
❷ Returns the name of the principal in the response
Rerunning the application and calling the endpoint, you observe the behavior is as presented in the next code snippet:
curl -u john:12345 http://localhost:8080/hello
Hello john
And now, probably your question is, where did the Authentication object come from? Being that this is a reactive app, we can’t afford to use a ThreadLocal anymore because the framework is designed to manage the SecurityContext. But Spring Security offers us a different implementation of the context holder for reactive apps, ReactiveSecurityContextHolder. We use this to work with the SecurityContext in a reactive app. So we still have the SecurityContext, but now it’s managed differently. Figure 19.5 describes the end of the authentication process once the ReactiveAuthenticationManager successfully authenticates the request.

Figure 19.5 Once the ReactiveAuthenticationManager successfully authenticates the request, it returns the Authentication object to the filter. The filter stores the Authentication instance in the SecurityContext.
Listing 19.4 shows you how to rewrite the controller class if you want to get the authentication details directly from the security context. This approach is an alternative to allowing the framework to inject it through the method’s parameter. You find this change implemented in project ssia-ch19-ex2.
Listing 19.4 Working with a ReactiveSecurityContextHolder
@RestController
public class HelloController {

    @GetMapping("/hello")
    public Mono<String> hello() {
      Mono<String> message =
        ReactiveSecurityContextHolder.getContext()    ❶

          .map(ctx -> ctx.getAuthentication())        ❷

          .map(auth -> "Hello " + auth.getName());    ❸

      return message;
    }
}
❶ From the ReactiveSecurityContextHolder, takes a Mono<SecurityContext>
❷ Maps the SecurityContext to the Authentication object
❸ Maps the Authentication object to the returned message
If you rerun the application and test the endpoint again, you can observe it behaves the same as in the previous examples of this section. Here’s the command:
curl -u john:12345 http://localhost:8080/hello
Hello john
Now that you know Spring Security offers an implementation to properly manage the SecurityContext in a reactive environment, you know this is how your app applies the authorization rules. And these details that you just learned open the way to configuring the authorization rules, which we’ll discuss in section 19.3.
19.3 Configuring authorization rules in reactive apps
In this section, we discuss configuring authorization rules. As you already know from the previous chapters, authorization follows authentication. We discussed in sections 19.1 and 19.2 how Spring Security manages users and the SecurityContext in reactive apps. But once the app finishes authentication and stores the details of the authenticated request in the SecurityContext, it’s time for authorization.
As for any other application, you probably need to configure authorization rules when developing reactive apps as well. To teach you how to set authorization rules in reactive apps, we’ll discuss first in section 19.3.1 the way you make configurations at the endpoint layer. Once we finish discussing authorization configuration at the endpoint layer, you’ll learn in section 19.3.2 how to apply it at any other layer of your application using method security.
19.3.1 Applying authorization at the endpoint layer in reactive apps
In this section, we discuss configuring authorization at the endpoint layer in reactive apps. Setting the authorization rules in the endpoint layer is the most common approach for configuring authorization in a web app. You already discovered this while working on the previous examples in this book. Authorization configuration at the endpoint layer is essential--you use it in almost every app. Thus, you need to know how to apply it for reactive apps as well.
You learned from previous chapters to set the authorization rules by overriding the configure(HttpSecurity http) method of the WebSecurityConfigurerAdapter class. This approach doesn’t work in reactive apps. To teach you how to configure authorization rules for the endpoint layer properly for reactive apps, we start by working on a new project, which I named ssia-ch19-ex3.
In reactive apps, Spring Security uses a contract named SecurityWebFilterChain to apply the configurations we used to do by overriding one of the configure() methods of the WebSecurityConfigurerAdapter class, as discussed in previous chapters. With reactive apps, we add a bean of type SecurityWebFilterChain in the Spring context. To teach you how to do this, let’s implement a basic application having two endpoints that we secure independently. In the pom.xml file of our newly created ssia-ch19-ex3 project, add the dependencies for reactive web apps and, of course, Spring Security:
<dependency>
  <groupId>org.springframework.boot</groupId>
  <artifactId>spring-boot-starter-security</artifactId>
</dependency>
<dependency>
  <groupId>org.springframework.boot</groupId>
  <artifactId>spring-boot-starter-webflux</artifactId>
</dependency>
Create a controller class to define the two endpoints for which we configure the authorization rules. These endpoints are accessible at the paths /hello and /ciao. To call the /hello endpoint, a user needs to authenticate, but you can call the /ciao endpoint without authentication. The following listing presents the definition of the controller.
Listing 19.5 The HelloController class defining the endpoints to secure
@RestController
public class HelloController {

  @GetMapping("/hello")
  public Mono<String> hello(Mono<Authentication> auth) {
    Mono<String> message = auth.map(a -> "Hello " + a.getName());
    return message;
  }

  @GetMapping("/ciao")
  public Mono<String> ciao() {
    return Mono.just("Ciao!");
  }
}
In the configuration class, we make sure to declare a ReactiveUserDetailsService and a PasswordEncoder to define a user, as you learned in section 19.2. The following listing defines these declarations.
Listing 19.6 The configuration class declaring components for user management
@Configuration
public class ProjectConfig {

  @Bean
  public ReactiveUserDetailsService userDetailsService() {
    var  u = User.withUsername("john")
            .password("12345")
            .authorities("read")
            .build();

    var uds = new MapReactiveUserDetailsService(u);

    return uds;
  }

  @Bean
  public PasswordEncoder passwordEncoder() {
    return NoOpPasswordEncoder.getInstance();
  }

  // ...
}
In listing 19.7, we work in the same configuration class we declared in listing 19.6, but omit the declaration of the ReactiveUserDetailsService and the PasswordEncoder so that you can focus on the authorization configuration we discuss. In listing 19.7, you might notice that we add a bean of type SecurityWebFilterChain to the Spring context. The method receives as a parameter an object of type ServerHttpSecurity, which is injected by Spring. ServerHttpSecurity enables us to build an instance of SecurityWebFilterChain. ServerHttpSecurity provides methods for configuration similar to the ones you used when configuring authorization for non-reactive apps.
Listing 19.7 Configuring endpoint authorization for reactive apps
@Configuration
public class ProjectConfig {

  // Omitted code

  @Bean
  public SecurityWebFilterChain securityWebFilterChain(
    ServerHttpSecurity http) {

    return http.authorizeExchange()                      ❶
               .pathMatchers(HttpMethod.GET, "/hello")
                   .authenticated()                      ❷

               .anyExchange()                            ❸
                   .permitAll()                          ❹
               .and().httpBasic()                        ❺
               .and().build();                           ❻
    }
}
❶ Begins the endpoint authorization configuration
❷ Selects the requests for which we apply the authorization rules
❸ Configures the selected requests to only be accessible when authenticated
❺ Allows requests to be called without needing authentication
❻ Builds the SecurityWebFilterChain object to be returned
We start the authorization configuration with the authorizeExchange() method. We call this method similarly to the way we call the authorizeRequests() method when configuring endpoint authorization for non-reactive apps. Then we continue by using the pathMatchers() method. You can consider this method as the equivalent of using mvcMatchers() when configuring endpoint authorization for non-reactive apps.
As for non-reactive apps, once we use the matcher method to group requests to which we apply the authorization rule, we then specify what the authorization rule is. In our example, we called the authenticated() method, which states that only authenticated requests are accepted. You used a method named authenticated() also when configuring endpoint authorization for non-reactive apps. The methods for reactive apps are named the same to make them more intuitive. Similarly to the authenticated() method, you can also call these methods:
-
permitAll()--Configures the app to allow requests without authentication -
hasAuthority()andhasAnyAuthority()--Apply rules based on authorities
It looks like something’s missing, doesn’t it? Do we also have an access() method as we had for configuring authorization rules in non-reactive apps? Yes. But it’s a bit different, so we’ll work on a separate example to prove it. Another similarity in naming is the anyExchange() method that takes the role of what used to be anyRequest() in non-reactive apps.
NOTE Why is it called anyExchange(), and why didn’t the developers keep the same name for the method anyRequest()? Why authorizeExchange() and why not authorizeRequests()? This simply comes from the terminology used with reactive apps. We generally refer to communication between two components in a reactive fashion as exchanging data. This reinforces the image of data being sent as segmented in a continuous stream and not as a big bunch in one request.
We also need to specify the authentication method like any other related configuration. We do this with the same ServerHttpSecurity instance, using methods with the same name and in the same fashion you learned to use for non-reactive apps: httpBasic(), formLogin(), csrf(), cors(), adding filters and customizing the filter chain, and so on. In the end, we call the build() method to create the instance of SecurityWebFilterChain, which we finally return to add to the Spring context.
I told you earlier in this section that you can also use the access() method in the endpoint authorization configuration of reactive apps just as you can for non-reactive apps. But as I said when discussing the configuration of non-reactive apps in chapters 7 and 8, use the access() method only when you can’t apply your configuration otherwise. The access() method offers you great flexibility, but also makes your app’s configuration more difficult to read. Always prefer the simpler solution over the more complex one. But you’ll find situations in which you need this flexibility. For example, suppose you need to apply a more complex authorization rule, and using hasAuthority() or hasRole() and its companion methods isn’t enough. For this reason, I’ll also teach you how to use the access() method. I created a new project named ssia-ch19-ex4 for this example. In listing 19.8, you see how I built the SecurityWebFilterChain object to allow access to the /hello path only if the user has the admin role. Also, access can be done only before noon. For all other endpoints, I completely restrict access.
Listing 19.8 Using the access() method when implementing configuration rules
@Configuration
public class ProjectConfig {

  // Omitted code

  @Bean
  public SecurityWebFilterChain
    securityWebFilterChain(ServerHttpSecurity http) {


    return http.authorizeExchange()
        .anyExchange()                                   ❶
           .access(this::getAuthorizationDecisionMono)
        .and().httpBasic()
        .and().build();
   }

  private Mono<AuthorizationDecision>
    getAuthorizationDecisionMono(                        ❷
            Mono<Authentication> a,
            AuthorizationContext c) {

    String path = getRequestPath(c);                     ❸

    boolean restrictedTime =                             ❹
      LocalTime.now().isAfter(LocalTime.NOON);

    if(path.equals("/hello")) {                          ❺
      return  a.map(isAdmin())
               .map(auth -> auth && !restrictedTime)
               .map(AuthorizationDecision::new);
    }

      return Mono.just(new AuthorizationDecision(false));
  }

  // Omitted code
}
❶ For any request, applies a custom authorization rule
❷ The method defining the custom authorization rule receives the Authentication and the request context as parameters.
❸ From the context, obtains the path of the request
❺ For the /hello path, applies the custom authorization rule
It might look difficult, but it’s not that complicated. When you use the access() method, you provide a function receiving all possible details about the request, which are the Authentication object and the AuthorizationContext. Using the Authentication object, you have the details of the authenticated user: username, roles or authorities, and other custom details depending on how you implement the authentication logic. The AuthorizationContext provides the information on the request: the path, headers, query params, cookies, and so on.
The function you provide as a parameter to the access() method should return an object of type AuthorizationDecision. As you guessed, AuthorizationDecision is the answer that tells the app whether the request is allowed. When you create an instance with new AuthorizationDecision(true), it means that you allow the request. If you create it with new AuthorizationDecision(false), it means you disallow the request.
In listing 19.9, you find the two methods I omitted in listing 19.8 for your convenience: getRequestPath() and isAdmin(). By omitting these, I let you focus on the logic used by the access() method. As you can observe, the methods are simple. The isAdmin() method returns a function that returns true for an Authentication instance having the ROLE_ADMIN attribute. The getRequestPath() method simply returns the path of the request.
Listing 19.9 The definition of the getRequestPath() and isAdmin() methods
@Configuration
public class ProjectConfig {

  // Omitted code

  private String getRequestPath(AuthorizationContext c) {
    return c.getExchange()
            .getRequest()
            .getPath()
            .toString();
  }

  private Function<Authentication, Boolean> isAdmin() {
    return p ->
      p.getAuthorities().stream()
       .anyMatch(e -> e.getAuthority().equals("ROLE_ADMIN"));
  }
}
Running the application and calling the endpoint either results in a response status 403 Forbidden if any of the authorization rules we applied aren’t fulfilled or simply displays a message in the HTTP response body:
curl -u john:12345 http://localhost:8080/hello
Hello john
What happened behind the scenes in the examples in this section? When authentication ended, another filter intercepted the request. The AuthorizationWebFilter delegates the authorization responsibility to a ReactiveAuthorizationManager (figure 19.6).

Figure 19.6 After the authentication process successfully ends, another filter, named AuthorizationWebFilter, intercepts the request. This filter delegates the authorization responsibility to a ReactiveAuthorizationManager.
Wait! Does this mean we only have a ReactiveAuthorizationManager? How does this component know how to authorize a request based on the configurations we made? To the first question, no, there are actually multiple implementations of the ReactiveAuthorizationManager. The AuthorizationWebFilter uses the SecurityWebFilterChain bean we added to the Spring context. With this bean, the filter decides which ReactiveAuthorizationManager implementation to delegate the authorization responsibility to (figure 19.7).
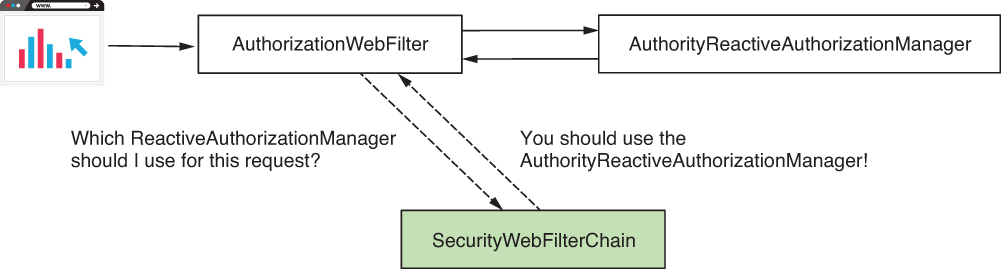
Figure 19.7 The AuthorizationFilter uses the SecurityWebFilterChain bean (shaded) that we added to the context to know which ReactiveAuthorizationManager to use.
19.3.2 Using method security in reactive apps
In this section, we discuss applying authorization rules for all layers of reactive apps. For non-reactive apps, we used global method security, and in chapters 16 and 17, you learned different approaches to apply authorization rules at the method level. Being able to apply authorization rules at layers other than the endpoint layer offers you great flexibility and enables you to apply authorization for non-web applications. To teach you how to use method security for reactive apps, we work on a separate example, which I named ssia-ch19-ex5.
Instead of global method security, when working with non-reactive apps, we call the approach reactive method security, where we apply authorization rules directly at the method level. Unfortunately, reactive method security isn’t a mature implementation yet and only enables us to use the @PreAuthorize and @PostAuthorize annotations. When using @PreFilter and @PostFilter annotations, an issue was added for the Spring Security team back in 2018, but it isn’t yet implemented. For more details, see
https://github.com/spring-projects/spring-security/issues/5249
For our example, we use @PreAuthorize to validate that a user has a specific role to call a test endpoint. To keep the example simple, we use the @PreAuthorize annotation directly over the method defining the endpoint. But you can use it the same way we discussed in chapter 16 for non-reactive apps: on any other component method in your reactive application. Listing 19.10 shows the definition of the controller class. Observe that we use @PreAuthorize, similar to what you learned in chapter 16. Using SpEL expressions, we declare that only an admin can call the annotated method.
Listing 19.10 The definition of the controller class
@RestController
public class HelloController {

  @GetMapping("/hello")
  @PreAuthorize("hasRole('ADMIN')")     ❶
  public Mono<String> hello() {
    return Mono.just("Hello");
  }
}
❶ Uses @PreAuthorize to restrict access to the method
Here, you find the configuration class in which we use the annotation @EnableReactiveMethodSecurity to enable the reactive method security feature. Similar to global method security, we need to explicitly use an annotation to enable it. Besides this annotation, in the configuration class, you also find the usual user management definition.
Listing 19.11 The configuration class
@Configuration
@EnableReactiveMethodSecurity       ❶
public class ProjectConfig {

  @Bean
  public ReactiveUserDetailsService userDetailsService() {
    var  u1 = User.withUsername("john")
            .password("12345")
            .roles("ADMIN")
            .build();

    var  u2 = User.withUsername("bill")
            .password("12345")
            .roles("REGULAR_USER")
            .build();

    var uds = new MapReactiveUserDetailsService(u1, u2);

    return uds;
  }

  @Bean
  public PasswordEncoder passwordEncoder() {
    return NoOpPasswordEncoder.getInstance();
  }
}
❶ Enables the reactive method security feature
You can now start the application and test the behavior of the endpoint by calling it for each of the users. You should observe that only John can call the endpoint because we defined him as the admin. Bill is just a regular user, so if we try to call the endpoint authenticating as Bill, we get back a response having the status HTTP 403 Forbidden. Calling the /hello endpoint authenticating with user John looks like this:
curl -u john:12345 http://localhost:8080/hello
Hello
Calling the /hello endpoint authenticating with user Bill looks like this:
curl -u bill:12345 http://localhost:8080/hello
Denied
Behind the scenes, this functionality works the same as for non-reactive apps. In chapters 16 and 17, you learned that an aspect intercepts the call to the method and implements the authorization. If the call doesn’t fulfill the specified prepreauthorization rules, the aspect doesn’t delegate the call to the method (figure 19.8).

Figure 19.8 When using method security, an aspect intercepts the call to a protected method. If the call doesn’t fulfill the preauthorization rules, the aspect doesn’t delegate the call to the method.
19.4 Reactive apps and OAuth 2
You’re probably wondering by now if we could use reactive applications in a system designed over the OAuth 2 framework. In this section, we discuss implementing a resource server as a reactive app. You learn how to configure your reactive application to rely on an authentication approach implemented over OAuth 2. Because using OAuth 2 is so common nowadays, you might encounter requirements where your resource server application needs to be designed as a reactive server. I created a new project named ssia-ch19-ex6, and we’ll implement a reactive resource server application. You need to add the dependencies in pom.xml, as the next code snippet illustrates:
<dependency>
  <groupId>org.springframework.boot</groupId>
  <artifactId>spring-boot-starter-webflux</artifactId>
</dependency>
<dependency>
  <groupId>org.springframework.boot</groupId>
  <artifactId>spring-boot-starter-security</artifactId>
</dependency>
<dependency>
  <groupId>org.springframework.cloud</groupId>
  <artifactId>spring-cloud-starter-oauth2</artifactId>
</dependency>
<dependency>
  <groupId>org.springframework.boot</groupId>
  <artifactId>spring-boot-starter-oauth2-resource-server</artifactId>
</dependency>
We need an endpoint to test the application, so we add a controller class. The next code snippet presents the controller class:
@RestController
public class HelloController {

  @GetMapping("/hello")
  public Mono<String> hello() {
    return Mono.just("Hello!");
  }
}
And now, the most important part of the example: the security configuration. For this example, we configure the resource server to use the public key exposed by the authorization server for token signature validation. This approach is the same as in chapter 18, when we used Keycloak as our authorization server. I actually used the same configured server for this example. You can choose to do the same, or you can implement a custom authorization server, as we discussed in chapter 13.
To configure the authentication method, we use the SecurityWebFilterChain, as you learned about in section 19.3. But instead of using the httpBasic() method, we call the oauth2ResourceServer() method. Then, by calling the jwt() method, we define the kind of token we use, and by using a Customizer object, we specify the way the token signature is validated. In listing 19.12, you find the definition of the configuration class.
Listing 19.12 The configuration class
@Configuration
public class ProjectConfig {

  @Value("${jwk.endpoint}")
  private String jwkEndpoint;

  @Bean
  public SecurityWebFilterChain securityWebFilterChain(
    ServerHttpSecurity http) {

    return http.authorizeExchange()
                  .anyExchange().authenticated()
               .and().oauth2ResourceServer()          ❶
                  .jwt(jwtSpec -> {                   ❷
                    jwtSpec.jwkSetUri(jwkEndpoint);
                  })
               .and().build();

    }
}
❶ Configures the resource server authentication method
❷ Specifies the way the token is validated
In the same way, we could’ve configured the public key instead of specifying an URI where the public key is exposed. The only change was to call the publicKey() method of the jwtSpec instance and provide a valid public key as a parameter. You can use any of the approaches we discussed in chapters 14 and 15, where we analyzed in detail approaches for the resource server to validate the access token.
Next, we change the application.properties file to add the value for the URI where the key set is exposed, as well as change the server port to 9090. This way, we allow Keycloak to run on 8080. In the next code snippet, you find the contents of the application.properties file:
server.port=9090
jwk.endpoint=http://localhost:8080/auth/realms/master/protocol/
➥ openid-connect/certs
Let’s run and prove the app has the expected behavior that we want. We generate an access token using the locally installed Keycloak server:
curl -XPOST 'http://localhost:8080/auth/realms/master/protocol/
➥ openid-connect/token'
-H 'Content-Type: application/x-www-form-urlencoded'
--data-urlencode 'grant_type=password'
--data-urlencode 'username=bill'
--data-urlencode 'password=12345'
--data-urlencode 'client_id=fitnessapp'
--data-urlencode 'scope=fitnessapp'
In the HTTP response body, we receive the access token as presented here:
{
    "access_token": "eyJhbGciOiJSUzI1NiIsInR5cCI...",
    "expires_in": 6000,
    "refresh_expires_in": 1800,
    "refresh_token": "eyJhbGciOiJIUzI1NiIsInR5c... ",
    "token_type": "bearer",
    "not-before-policy": 0,
    "session_state": "610f49d7-78d2-4532-8b13-285f64642caa",
    "scope": "fitnessapp"
}
Using the access token, we call the /hello endpoint of our application like this:
curl -H 'Authorization: Bearer
➥ eyJhbGciOiJSUzI1NiIsInR5cCIgOiAiSldUIiwia2lkIiA6ICJMSE9zT0VRSmJuTmJVbjhQb
➥ VpYQTlUVW9QNTZoWU90YzNWT2swa1V2ajVVIn...'
'http://localhost:9090/hello'
Hello!
Summary
-
Reactive applications have a different style for processing data and exchanging messages with other components. Reactive apps might be a better choice in some situations, like cases in which we can split the data into separate smaller segments for processing and exchanging.
-
As with any other application, you also need to protect reactive apps by using security configurations. Spring Security offers an excellent set of tools you can use to apply security configurations for reactive apps as well as for non-reactive ones.
-
To implement user management in reactive apps with Spring Security, we use the
ReactiveUserDetailsServicecontract. This component has the same purpose asUserDetailsServicehas for non-reactive apps: it tells the app how to get the user details. -
To implement the endpoint authorization rules for a reactive web application, you need to create an instance of type
SecurityWebFilterChainand add it to the Spring context. You create theSecurityWebFilterChaininstance by using theServerHttpSecuritybuilder. -
Generally, the names of the methods you use to define the authorization configurations are the same as for the methods you use for non-reactive apps. However, you find minor naming differences that are related to the reactive terminology. For example, instead of using
authorizeRequests(), the name of its counterpart for reactive apps isauthorizeExchange(). -
Spring Security also provides a way to define authorization rules at the method level called reactive method security, and it offers great flexibility in applying the authorization rules at any layer of a reactive app. It is similar to what we call global method security for non-reactive apps.
-
Reactive method security isn’t, however, an implementation as mature as gobal method security for non-reactive apps. You can already use the
@PreAuthorizeand@PostAuthorizeannotations, but the functionality for@PreFilterand@PostFilterstill awaits development.