-
Preauthorization of methods based on authorities, roles, and permissions
-
Postauthorization of methods based on authorities, roles, and permissions
Up to now, we discussed various ways of configuring authentication. We started with the most straightforward approach, HTTP Basic, in chapter 2, and then I showed you how to set form login in chapter 5. We covered OAuth 2 in chapters 12 through 15. But in terms of authorization, we only discussed configuration at the endpoint level. Suppose your app is not a web application--can’t you use Spring Security for authentication and authorization as well? Spring Security is a good fit for scenarios in which your app isn’t used via HTTP endpoints. In this chapter, you’ll learn how to configure authorization at the method level. We’ll use this approach to configure authorization in both web and non-web applications, and we’ll call it global method security (figure 16.1).

Figure 16.1 Global method security enables you to apply authorization rules at any layer of your application. This approach allows you to be more granular and to apply authorization rules at a specifically chosen level.
For non-web applications, global method security offers the opportunity to implement authorization rules even if we don’t have endpoints. In web applications, this approach gives us the flexibility to apply authorization rules on different layers of our app, not only at the endpoint level. Let’s dive into the chapter and learn how to apply authorization at the method level with global method security.
16.1 Enabling global method security
In this section, you learn how to enable authorization at the method level and the different options that Spring Security offers to apply various authorization rules. This approach provides you with greater flexibility in applying authorization. It’s an essential skill that allows you to solve situations in which authorization simply cannot be configured just at the endpoint level.
By default, global method security is disabled, so if you want to use this functionality, you first need to enable it. Also, global method security offers multiple approaches for applying authorization. We discuss these approaches and then implement them in examples in the following sections of this chapter and in chapter 17. Briefly, you can do two main things with global method security:
-
Call authorization--Decides whether someone can call a method according to some implemented privilege rules (preauthorization) or if someone can access what the method returns after the method executes (postauthorization).
-
Filtering--Decides what a method can receive through its parameters (prefiltering) and what the caller can receive back from the method after the method executes (postfiltering). We’ll discuss and implement filtering in chapter 17.
16.1.1 Understanding call authorization
One of the approaches for configuring authorization rules you use with global method security is call authorization. The call authorization approach refers to applying authorization rules that decide if a method can be called, or that allow the method to be called and then decide if the caller can access the value returned by the method. Often we need to decide if someone can access a piece of logic depending on either the provided parameters or its result. So let’s discuss call authorization and then apply it to some examples.
How does global method security work? What’s the mechanism behind applying the authorization rules? When we enable global method security in our application, we actually enable a Spring aspect. This aspect intercepts the calls to the method for which we apply authorization rules and, based on these authorization rules, decides whether to forward the call to the intercepted method (figure 16.2).
Plenty of implementations in Spring framework rely on aspect-oriented programming (AOP). Global method security is just one of the many components in Spring applications relying on aspects. If you need a refresher on aspects and AOP, I recommend you read chapter 5 of Pro Spring 5: An In-Depth Guide to the Spring Framework and Its Tools by Clarence Ho et al., (Apress, 2017). Briefly, we classify the call authorization as

Figure 16.2 When we enable global method security, an aspect intercepts the call to the protected method. If the given authorization rules aren't respected, the aspect doesn't delegate the call to the protected method.
-
Preauthorization--The framework checks the authorization rules before the method call.
-
Postauthorization--The framework checks the authorization rules after the method executes.
Let’s take both approaches, detail them, and implement them with some examples.
Using preauthorization to secure access to methods
Say we have a method findDocumentsByUser(String username) that returns to the caller documents for a specific user. The caller provides through the method’s parameters the user’s name for which the method retrieves the documents. Assume you need to make sure that the authenticated user can only obtain their own documents. Can we apply a rule to this method such that only the method calls that receive the username of the authenticated user as a parameter are allowed? Yes! This is something we do with preauthorization.
When we apply authorization rules that completely forbid anyone to call a method in specific situations, we call this preauthorization (figure 16.3). This approach implies that the framework verifies the authorization conditions before executing the method. If the caller doesn’t have the permissions according to the authorization rules that we define, the framework doesn’t delegate the call to the method. Instead, the framework throws an exception. This is by far the most often used approach to global method security.

Figure 16.3 With preauthorization, the authorization rules are verified before delegating the method call further. The framework won’t delegate the call if the authorization rules aren’t respected, and instead, throws an exception to the method caller.
Usually, we don’t want a functionality to be executed at all if some conditions aren’t met. You can apply conditions based on the authenticated user, and you can also refer to the values the method received through its parameters.
Using postauthorization to secure a method call
When we apply authorization rules that allow someone to call a method but not necessarily to obtain the result returned by the method, we’re using postauthorization (figure 16.4). With postauthorization, Spring Security checks the authorization rules after the method executes. You can use this kind of authorization to restrict access to the method return in certain conditions. Because postauthorization happens after method execution, you can apply the authorization rules on the result returned by the method.
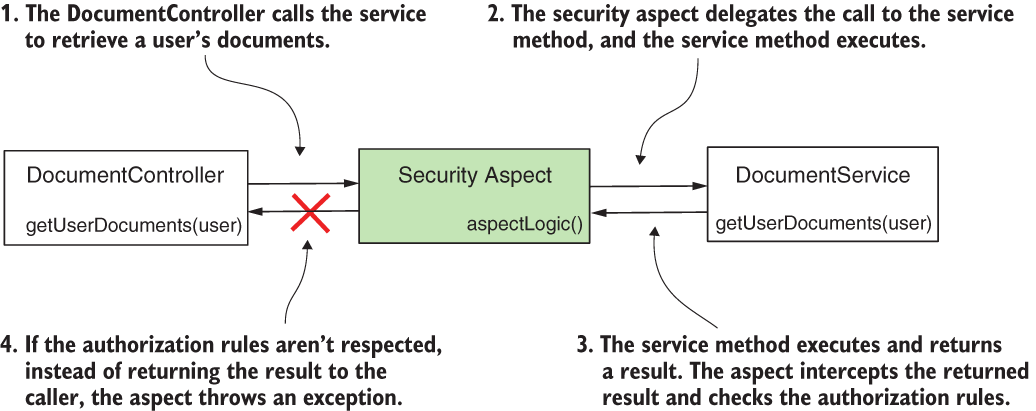
Figure 16.4 With postauthorization, the aspect delegates the call to the protected method. After the protected method finishes execution, the aspect checks the authorization rules. If the rules aren’t respected, instead of returning the result to the caller, the aspect throws an exception.
Usually, we use postauthorization to apply authorization rules based on what the method returns after execution. But be careful with postauthorization! If the method mutates something during its execution, the change happens whether or not authorization succeeds in the end.
NOTE Even with the @Transactional annotation, a change isn’t rolled back if postauthorization fails. The exception thrown by the postauthorization functionality happens after the transaction manager commits the transaction.
16.1.2 Enabling global method security in your project
In this section, we work on a project to apply the preauthorization and postauthorization features offered by global method security. Global method security isn’t enabled by default in a Spring Security project. To use it, you need to first enable it. However, enabling this functionality is straightforward. You do this by simply using the @EnableGlobalMethodSecurity annotation on the configuration class.
I created a new project for this example, ssia-ch16-ex1. For this project, I wrote a ProjectConfig configuration class, as presented in listing 16.1. On the configuration class, we add the @EnableGobalMethodSecurity annotation. Global method security offers us three approaches to define the authorization rules that we discuss in this chapter:
Because in almost all cases, pre-/postauthorization annotations are the only approach used, we discuss this approach in this chapter. To enable this approach, we use the prePostEnabled attribute of the @EnableGlobalMethodSecurity annotation. We present a short overview of the other two options previously mentioned at the end of this chapter.
Listing 16.1 Enabling global method security
@Configuration
@EnableGlobalMethodSecurity(prePostEnabled = true)
public class ProjectConfig {
}
You can use global method security with any authentication approach, from HTTP Basic authentication to OAuth 2. To keep it simple and allow you to focus on new details, we provide global method security with HTTP Basic authentication. For this reason, the pom.xml file for the projects in this chapter only needs the web and Spring Security dependencies, as the next code snippet presents:
<dependency>
   <groupId>org.springframework.boot</groupId>
   <artifactId>spring-boot-starter-security</artifactId>
</dependency>
<dependency>
   <groupId>org.springframework.boot</groupId>
   <artifactId>spring-boot-starter-web</artifactId>
</dependency>
16.2 Applying preauthorization for authorities and roles
In this section, we implement an example of preauthorization. For our example, we continue with the project ssia-ch16-ex1 started in section 16.1. As we discussed in section 16.1, preauthorization implies defining authorization rules that Spring Security applies before calling a specific method. If the rules aren’t respected, the framework doesn’t call the method.
The application we implement in this section has a simple scenario. It exposes an endpoint, /hello, which returns the string "Hello, " followed by a name. To obtain the name, the controller calls a service method (figure 16.5). This method applies a preauthorization rule to verify the user has write authority.

Figure 16.5 To call the getName() method of NameService, the authenticated user needs to have write authority. If the user doesn't have this authority, the framework won't allow the call and throws an exception.
I added a UserDetailsService and a PasswordEncoder to make sure I have some users to authenticate. To validate our solution, we need two users: one user with write authority and another that doesn’t have write authority. We prove that the first user can successfully call the endpoint, while for the second user, the app throws an authorization exception when trying to call the method. The following listing shows the complete definition of the configuration class, which defines the UserDetailsService and the PasswordEncoder.
Listing 16.2 The configuration class for UserDetailsService and PasswordEncoder
@Configuration
@EnableGlobalMethodSecurity(prePostEnabled = true)      ❶
public class ProjectConfig {

  @Bean                                                 ❷
  public UserDetailsService userDetailsService() {
    var service = new InMemoryUserDetailsManager();

    var u1 = User.withUsername("natalie")
              .password("12345")
              .authorities("read")
              .build();

    var u2 = User.withUsername("emma")
              .password("12345")
              .authorities("write")
              .build();

    service.createUser(u1);
    service.createUser(u2);

    return service;
  }

  @Bean                                                ❸
  public PasswordEncoder passwordEncoder() {
    return NoOpPasswordEncoder.getInstance();
  }
}
❶ Enables global method security for pre-/postauthorization
❷ Adds a UserDetailsService to the Spring context with two users for testing
❸ Adds a PasswordEncoder to the Spring context
To define the authorization rule for this method, we use the @PreAuthorize annotation. The @PreAuthorize annotation receives as a value a Spring Expression Language (SpEL) expression that describes the authorization rule. In this example, we apply a simple rule.
You can define restrictions for users based on their authorities using the hasAuthority() method. You learned about the hasAuthority() method in chapter 7, where we discussed applying authorization at the endpoint level. The following listing defines the service class, which provides the value for the name.
Listing 16.3 The service class defines the preauthorization rule on the method
@Service
public class NameService {

  @PreAuthorize("hasAuthority('write')")     ❶
  public String getName() {
    return "Fantastico";
  }
}
❶ Defines the authorization rule. Only users having write authority can call the method.
We define the controller class in the following listing. It uses NameService as a dependency.
Listing 16.4 The controller class implementing the endpoint and using the service
@RestController
public class HelloController {

  @Autowired                                    ❶
  private NameService nameService;

  @GetMapping("/hello")
  public String hello() {
    return "Hello, " + nameService.getName();   ❷
  }
}
❶ Injects the service from the context
❷ Calls the method for which we apply the preauthorization rules
You can now start the application and test its behavior. We expect only user Emma to be authorized to call the endpoint because she has write authorization. The next code snippet presents the calls for the endpoint with our two users, Emma and Natalie. To call the /hello endpoint and authenticate with user Emma, use this cURL command:
curl -u emma:12345 http://localhost:8080/hello
Hello, Fantastico
To call the /hello endpoint and authenticate with user Natalie, use this cURL command:
curl -u natalie:12345 http://localhost:8080/hello
{
  "status":403,
  "error":"Forbidden",
  "message":"Forbidden",
  "path":"/hello"
}
Similarly, you can use any other expression we discussed in chapter 7 for endpoint authentication. Here’s a short recap of them:
-
hasAnyAuthority()--Specifies multiple authorities. The user must have at least one of these authorities to call the method. -
hasRole()--Specifies a role a user must have to call the method. -
hasAnyRole()--Specifies multiple roles. The user must have at least one of them to call the method.
Let’s extend our example to prove how you can use the values of the method parameters to define the authorization rules (figure 16.6). You find this example in the project named ssia-ch16-ex2.

Figure 16.6 When implementing preauthorization, we can use the values of the method parameters in the authorization rules. In our example, only the authenticated user can retrieve information about their secret names.
For this project, I defined the same ProjectConfig class as in our first example so that we can continue working with our two users, Emma and Natalie. The endpoint now takes a value through a path variable and calls a service class to obtain the “secret names” for a given username. Of course, in this case, the secret names are just an invention of mine referring to a characteristic of the user, which is something that not everyone can see. I define the controller class as presented in the next listing.
Listing 16.5 The controller class defining an endpoint for testing
@RestController
public class HelloController {

  @Autowired                                             ❶
  private NameService nameService;

  @GetMapping("/secret/names/{name}")                    ❷
  public List<String> names(@PathVariable String name) {
      return nameService.getSecretNames(name);           ❸
  }
}
❶ From the context, injects an instance of the service class that defines the protected method
❷ Defines an endpoint that takes a value from a path variable
❸ Calls the protected method to obtain the secret names of the users
Now let’s take a look at how to implement the NameService class in listing 16.6. The expression we use for authorization now is #name == authentication.principal.username. In this expression, we use #name to refer to the value of the getSecretNames() method parameter called name, and we have access directly to the authentication object that we can use to refer to the currently authenticated user. The expression we use indicates that the method can be called only if the authenticated user’s username is the same as the value sent through the method’s parameter. In other words, a user can only retrieve its own secret names.
Listing 16.6 The NameService class defines the protected method
@Service
public class NameService {

  private Map<String, List<String>> secretNames =
    Map.of(
     "natalie", List.of("Energico", "Perfecto"),
     "emma", List.of("Fantastico"));

  @PreAuthorize                                       ❶
    ("#name == authentication.principal.username")
  public List<String> getSecretNames(String name) {
    return secretNames.get(name);
  }
}
❶ Uses #name to represent the value of the method parameters in the authorization expression+
We start the application and test it to prove it works as desired. The next code snippet shows you the behavior of the application when calling the endpoint, providing the value of the path variable equal to the name of the user:
curl -u emma:12345 http://localhost:8080/secret/names/emma
["Fantastico"]
When authenticating with the user Emma, we try to get Natalie’s secret names. The call doesn’t work:
curl -u emma:12345 http://localhost:8080/secret/names/natalie
{
  "status":403,
  "error":"Forbidden",
  "message":"Forbidden",
  "path":"/secret/names/natalie"
}
The user Natalie can, however, obtain her own secret names. The next code snippet proves this:
curl -u natalie:12345 http://localhost:8080/secret/names/natalie
["Energico","Perfecto"]
NOTE Remember, you can apply global method security to any layer of your application. In the examples presented in this chapter, you find the authorization rules applied for methods of the service classes. But you can apply authorization rules with global method security in any part of your application: repositories, managers, proxies, and so on.
16.3 Applying postauthorization
Now say you want to allow a call to a method, but in certain circumstances, you want to make sure the caller doesn’t receive the returned value. When we want to apply an authorization rule that is verified after the call of a method, we use postauthorization. It may sound a little bit awkward at the beginning: why would someone be able to execute the code but not get the result? Well, it’s not about the method itself, but imagine this method retrieves some data from a data source, say a web service or a database. You can be confident about what your method does, but you can’t bet on the third party your method calls. So you allow the method to execute, but you validate what it returns and, if it doesn’t meet the criteria, you don’t let the caller access the return value.
To apply postauthorization rules with Spring Security, we use the @PostAuthorize annotation, which is similar to @PreAuthorize, discussed in section 16.2. The annotation receives as a value the SpEL defining an authorization rule. We continue with an example in which you learn how to use the @PostAuthorize annotation and define postauthorization rules for a method (figure 16.7).
The scenario for our example, for which I created a project named ssia-ch16-ex3, defines an object Employee. Our Employee has a name, a list of books, and a list of authorities. We associate each Employee to a user of the application. To stay consistent with the other examples in this chapter, we define the same users, Emma and Natalie. We want to make sure that the caller of the method gets the details of the employee only if the employee has read authority. Because we don’t know the authorities associated with the employee record until we retrieve the record, we need to apply the authorization rules after the method execution. For this reason, we use the @PostAuthorize annotation.
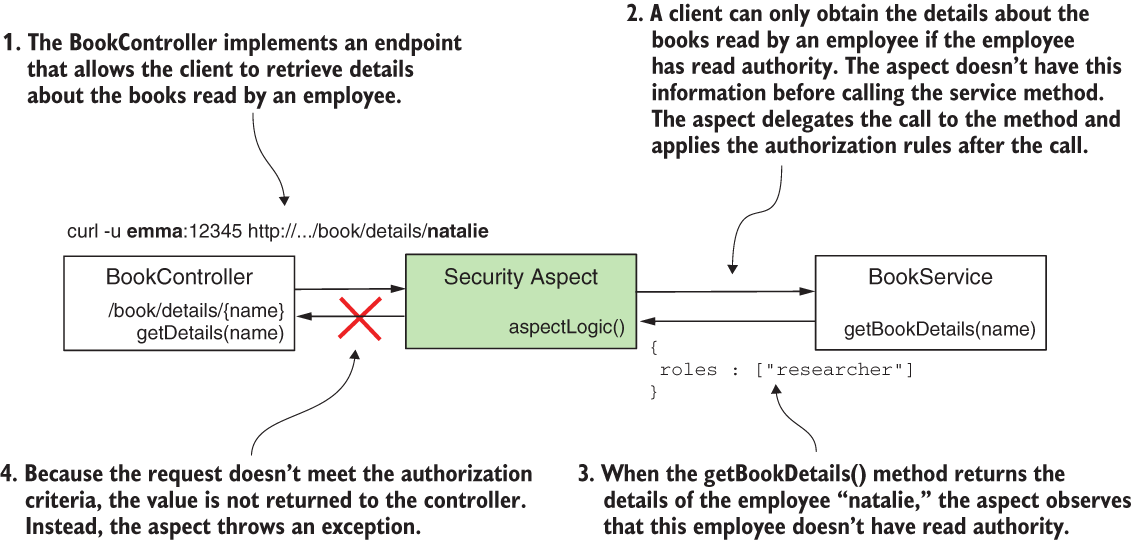
Figure 16.7 With postauthorization, we don't protect the method from being called, but we protect the returned value from being exposed if the defined authorization rules aren't respected.
The configuration class is the same as we used in the previous examples. But, for your convenience, I repeat it in the next listing.
Listing 16.7 Enabling global method security and defining users
@Configuration
@EnableGlobalMethodSecurity(prePostEnabled = true)
public class ProjectConfig {

  @Bean
  public UserDetailsService userDetailsService() {
    var service = new InMemoryUserDetailsManager();

    var u1 = User.withUsername("natalie")
                 .password("12345")
                 .authorities("read")
                 .build();

    var u2 = User.withUsername("emma")
                 .password("12345")
                 .authorities("write")
                 .build();

    service.createUser(u1);
    service.createUser(u2);

    return service;
  }

  @Bean
  public PasswordEncoder passwordEncoder() {
    return NoOpPasswordEncoder.getInstance();
  }
}
We also need to declare a class to represent the Employee object with its name, book list, and roles list. The following listing defines the Employee class.
Listing 16.8 The definition of the Employee class
public class Employee {

  private String name;
  private List<String> books;
  private List<String> roles;

  // Omitted constructor, getters, and setters
}
We probably get our employee details from a database. To keep our example shorter, I use a Map with a couple of records that we consider as our data source. In listing 16.9, you find the definition of the BookService class. The BookService class also contains the method for which we apply the authorization rules. Observe that the expression we use with the @PostAuthorize annotation refers to the value returned by the method returnObject. The postauthorization expression can use the value returned by the method, which is available after the method executes.
Listing 16.9 The BookService class defining the authorized method
@Service
public class BookService {

  private Map<String, Employee> records =
    Map.of("emma",
           new Employee("Emma Thompson",
               List.of("Karamazov Brothers"),
               List.of("accountant", "reader")),
           "natalie",
           new Employee("Natalie Parker",
               List.of("Beautiful Paris"),
               List.of("researcher"))
        );
  @PostAuthorize                                 ❶
  ➥ ("returnObject.roles.contains('reader')")
  public Employee getBookDetails(String name) {
      return records.get(name);
  }
}
❶ Defines the expression for postauthorization
Let’s also write a controller and implement an endpoint to call the method for which we applied the authorization rule. The following listing presents this controller class.
Listing 16.10 The controller class implementing the endpoint
@RestController
public class BookController {

  @Autowired
  private BookService bookService;

  @GetMapping("/book/details/{name}")
  public Employee getDetails(@PathVariable String name) {
    return bookService.getBookDetails(name);
  }
}
You can now start the application and call the endpoint to observe the app’s behavior. In the next code snippets, you find examples of calling the endpoint. Any of the users can access the details of Emma because the returned list of roles contains the string “reader”, but no user can obtain the details for Natalie. Calling the endpoint to get the details for Emma and authenticating with user Emma, we use this command:
curl -u emma:12345 http://localhost:8080/book/details/emma
{
  "name":"Emma Thompson",
  "books":["Karamazov Brothers"],
  "roles":["accountant","reader"]
}
Calling the endpoint to get the details for Emma and authenticating with user Natalie, we use this command:
curl -u natalie:12345 http://localhost:8080/book/details/emma
{
  "name":"Emma Thompson",
  "books":["Karamazov Brothers"],
  "roles":["accountant","reader"]
}
Calling the endpoint to get the details for Natalie and authenticating with user Emma, we use this command:
curl -u emma:12345 http://localhost:8080/book/details/natalie
{
  "status":403,
  "error":"Forbidden",
  "message":"Forbidden",
  "path":"/book/details/natalie"
}
Calling the endpoint to get the details for Natalie and authenticating with user Natalie, we use this command:
curl -u natalie:12345 http://localhost:8080/book/details/natalie
{
  "status":403,
  "error":"Forbidden",
  "message":"Forbidden",
  "path":"/book/details/natalie"
}
NOTE You can use both @PreAuthorize and @PostAuthorize on the same method if your requirements need to have both preauthorization and postauthorization.
16.4 Implementing permissions for methods
Up to now, you learned how to define rules with simple expressions for preauthorization and postauthorization. Now, let’s assume the authorization logic is more complex, and you cannot write it in one line. It’s definitely not comfortable to write huge SpEL expressions. I never recommend using long SpEL expressions in any situation, regardless if it’s an authorization rule or not. It simply creates hard-to-read code, and this affects the app’s maintainability. When you need to implement complex authorization rules, instead of writing long SpEL expressions, take the logic out in a separate class. Spring Security provides the concept of permission, which makes it easy to write the authorization rules in a separate class so that your application is easier to read and understand.
In this section, we apply authorization rules using permissions within a project. I named this project ssia-ch16-ex4. In this scenario, you have an application managing documents. Any document has an owner, which is the user who created the document. To get the details of an existing document, a user either has to be an admin or they have to be the owner of the document. We implement a permission evaluator to solve this requirement. The following listing defines the document, which is only a plain Java object.
Listing 16.11 The Document class
public class Document {

  private String owner;

  // Omitted constructor, getters, and setters
}
To mock the database and make our example shorter for your comfort, I created a repository class that manages a few document instances in a Map. You find this class in the next listing.
Listing 16.12 The DocumentRepository class managing a few Document instances
@Repository
public class DocumentRepository {

  private Map<String, Document> documents =      ❶
    Map.of("abc123", new Document("natalie"),
           "qwe123", new Document("natalie"),
           "asd555", new Document("emma"));

  public Document findDocument(String code) {
    return documents.get(code);                  ❷
  }
}
❶ Identifies each document by a unique code and names the owner
❷ Obtains a document by using its unique identification code
A service class defines a method that uses the repository to obtain a document by its code. The method in the service class is the one for which we apply the authorization rules. The logic of the class is simple. It defines a method that returns the Document by its unique code. We annotate this method with @PostAuthorize and use a hasPermission() SpEL expression. This method allows us to refer to an external authorization expression that we implement further in this example. Meanwhile, observe that the parameters we provide to the hasPermission() method are the returnObject, which represents the value returned by the method, and the name of the role for which we allow access, which is 'ROLE_admin'. You find the definition of this class in the following listing.
Listing 16.13 The DocumentService class implementing the protected method
@Service
public class DocumentService {

  @Autowired
  private DocumentRepository documentRepository;

  @PostAuthorize                                    ❶
  ("hasPermission(returnObject, 'ROLE_admin')")
  public Document getDocument(String code) {
    return documentRepository.findDocument(code);
  }
}
❶ Uses the hasPermission() expression to refer to an authorization expression
It’s our duty to implement the permission logic. And we do this by writing an object that implements the PermissionEvaluator contract. The PermissionEvaluator contract provides two ways to implement the permission logic:
-
By object and permission--Used in the current example, it assumes the permission evaluator receives two objects: one that’s subject to the authorization rule and one that offers extra details needed for implementing the permission logic.
-
By object ID, object type, and permission--Assumes the permission evaluator receives an object ID, which it can use to retrieve the needed object. It also receives a type of object, which can be used if the same permission evaluator applies to multiple object types, and it needs an object offering extra details for evaluating the permission.
In the next listing, you find the PermissionEvaluator contract with two methods.
Listing 16.14 The PermissionEvaluator contract definition
public interface PermissionEvaluator {

    boolean hasPermission(
              Authentication a,
              Object subject,
              Object permission);

    boolean hasPermission(
              Authentication a,
              Serializable id,
              String type,
              Object permission);
}
For the current example, it’s enough to use the first method. We already have the subject, which in our case, is the value returned by the method. We also send the role name 'ROLE_admin', which, as defined by the example’s scenario, can access any document. Of course, in our example, we could have directly used the name of the role in the permission evaluator class and avoided sending it as a value of the hasPermission() object. Here, we only do the former for the sake of the example. In a real-world scenario, which might be more complex, you have multiple methods, and details needed in the authorization process might differ between each of them. For this reason, you have a parameter that you can send the needed details for use in the authorization logic from the method level.
For your awareness and to avoid confusion, I’d also like to mention that you don’t have to pass the Authentication object. Spring Security automatically provides this parameter value when calling the hasPermission() method. The framework knows the value of the authentication instance because it is already in the SecurityContext. In listing 16.15, you find the DocumentsPermissionEvaluator class, which in our example implements the PermissionEvaluator contract to define the custom authorization rule.
Listing 16.15 Implementing the authorization rule
@Component
public class DocumentsPermissionEvaluator
  implements PermissionEvaluator {                   ❶

  @Override
  public boolean hasPermission(
    Authentication authentication,
    Object target,
    Object permission) {

    Document document = (Document) target;           ❷
    String p = (String) permission;                  ❸

    boolean admin =                                  ❹
      authentication.getAuthorities()
        .stream()
        .anyMatch(a -> a.getAuthority().equals(p));

    return admin ||                                  ❺
      document.getOwner()
        .equals(authentication.getName());

  }

  @Override
  public boolean hasPermission(Authentication authentication,
                               Serializable targetId,
                               String targetType,
                               Object permission) {
    return false;                                    ❻
  }
}
❶ Implements the PermissionEvaluator contract
❷ Casts the target object to Document
❸ The permission object in our case is the role name, so we cast it to a String.
❹ Checks if the authentication user has the role we got as a parameter
❺ If admin or the authenticated user is the owner of the document, grants the permission
❻ We don’t need to implement the second method because we don’t use it.
To make Spring Security aware of our new PermissionEvaluator implementation, we have to define a MethodSecurityExpressionHandler in the configuration class. The following listing presents how to define a MethodSecurityExpressionHandler to make the custom PermissionEvaluator known.
Listing 16.16 Configuring the PermissionEvaluator in the configuration class
@Configuration
@EnableGlobalMethodSecurity(prePostEnabled = true)
public class ProjectConfig
  extends GlobalMethodSecurityConfiguration {

  @Autowired
  private DocumentsPermissionEvaluator evaluator;

  @Override                                                             ❶
  protected MethodSecurityExpressionHandler createExpressionHandler() {
    var expressionHandler =                                             ❷
        new DefaultMethodSecurityExpressionHandler();

    expressionHandler.setPermissionEvaluator(
        evaluator);                                                     ❸

    return expressionHandler;                                           ❹
  }

  // Omitted definition of the UserDetailsService and PasswordEncoder beans
}
❶ Overrides the createExpressionHandler() method
❷ Defines a default security expression handler to set up the custom permission evaluator
❸ Sets up the custom permission evaluator
❹ Returns the custom expression handler
NOTE We use here an implementation for MethodSecurityExpressionHandler named DefaultMethodSecurityExpressionHandler that Spring Security provides. You could as well implement a custom MethodSecurityExpressionHandler to define custom SpEL expressions you use to apply the authorization rules. You rarely need to do this in a real-world scenario, and for this reason, we won’t implement such a custom object in our examples. I just wanted to make you aware that this is possible.
I separate the definition of the UserDetailsService and PasswordEncoder to let you focus only on the new code. In listing 16.17, you find the rest of the configuration class. The only important thing to notice about the users is their roles. User Natalie is an admin and can access any document. User Emma is a manager and can only access her own documents.
Listing 16.7 The full definition of the configuration class
@Configuration
@EnableGlobalMethodSecurity(prePostEnabled = true)
public class ProjectConfig
  extends GlobalMethodSecurityConfiguration {

  @Autowired
  private DocumentsPermissionEvaluator evaluator;

  @Override
  protected MethodSecurityExpressionHandler createExpressionHandler() {
    var expressionHandler =
        new DefaultMethodSecurityExpressionHandler();

    expressionHandler.setPermissionEvaluator(evaluator);

    return expressionHandler;
  }

  @Bean
  public UserDetailsService userDetailsService() {
    var service = new InMemoryUserDetailsManager();

    var u1 = User.withUsername("natalie")
             .password("12345")
             .roles("admin")
             .build();

     var u2 = User.withUsername("emma")
              .password("12345")
              .roles("manager")
              .build();

     service.createUser(u1);
     service.createUser(u2);

     return service;
  }

  @Bean
  public PasswordEncoder passwordEncoder() {
    return NoOpPasswordEncoder.getInstance();
  }
}
To test the application, we define an endpoint. The following listing presents this definition.
Listing 16.18 Defining the controller class and implementing an endpoint
@RestController
public class DocumentController {

  @Autowired
  private DocumentService documentService;

  @GetMapping("/documents/{code}")
  public Document getDetails(@PathVariable String code) {
    return documentService.getDocument(code);
  }
}
Let’s run the application and call the endpoint to observe its behavior. User Natalie can access the documents regardless of their owner. User Emma can only access the documents she owns. Calling the endpoint for a document that belongs to Natalie and authenticating with the user "natalie", we use this command:
curl -u natalie:12345 http://localhost:8080/documents/abc123
{
  "owner":"natalie"
}
Calling the endpoint for a document that belongs to Emma and authenticating with the user "natalie", we use this command:
curl -u natalie:12345 http://localhost:8080/documents/asd555
{
  "owner":"emma"
}
Calling the endpoint for a document that belongs to Emma and authenticating with the user "emma", we use this command:
curl -u emma:12345 http://localhost:8080/documents/asd555
{
  "owner":"emma"
}
Calling the endpoint for a document that belongs to Natalie and authenticating with the user "emma", we use this command:
curl -u emma:12345 http://localhost:8080/documents/abc123
{
  "status":403,
  "error":"Forbidden",
  "message":"Forbidden",
  "path":"/documents/abc123"
}
In a similar manner, you can use the second PermissionEvaluator method to write your authorization expression. The second method refers to using an identifier and subject type instead of the object itself. For example, say that we want to change the current example to apply the authorization rules before the method is executed, using @PreAuthorize. In this case, we don’t have the returned object yet. But instead of having the object itself, we have the document’s code, which is its unique identifier. Listing 16.19 shows you how to change the permission evaluator class to implement this scenario. I separated the examples in a project named ssia-ch16-ex5, which you can run individually.
Listing 16.19 Changes in the DocumentsPermissionEvaluator class
@Component
public class DocumentsPermissionEvaluator
  implements PermissionEvaluator {

  @Autowired
  private DocumentRepository documentRepository;

  @Override
  public boolean hasPermission(Authentication authentication,
                               Object target,
                               Object permission) {
    return false;                                              ❶
  }

  @Override
  public boolean hasPermission(Authentication authentication,
                                 Serializable targetId,
                                 String targetType,
                                 Object permission) {

    String code = targetId.toString();                         ❷
    Document document = documentRepository.findDocument(code);

    String p = (String) permission;

    boolean admin =                                            ❸
           authentication.getAuthorities()
              .stream()
              .anyMatch(a -> a.getAuthority().equals(p));

     return admin ||                                           ❹
       document.getOwner().equals(
         authentication.getName());
  }
}
❶ No longer defines the authorization rules through the first method.
❷ Instead of having the object, we have its ID, and we get the object using the ID.
❸ Checks if the user is an admin
❹ If the user is an admin or the owner of the document, the user can access the document.
Of course, we also need to use the proper call to the permission evaluator with the @PreAuthorize annotation. In the following listing, you find the change I made in the DocumentService class to apply the authorization rules with the new method.
Listing 16.20 The DocumentService class
@Service
public class DocumentService {

  @Autowired
  private DocumentRepository documentRepository;

  @PreAuthorize                                         ❶
   ("hasPermission(#code, 'document', 'ROLE_admin')")
  public Document getDocument(String code) {
    return documentRepository.findDocument(code);
  }
}
❶ Applies the preauthorization rules by using the second method of the permission evaluator
You can rerun the application and check the behavior of the endpoint. You should see the same result as in the case where we used the first method of the permission evaluator to implement the authorization rules. The user Natalie is an admin and can access details of any document, while the user Emma can only access the documents she owns. Calling the endpoint for a document that belongs to Natalie and authenticating with the user "natalie", we issue this command:
curl -u natalie:12345 http://localhost:8080/documents/abc123
{
  "owner":"natalie"
}
Calling the endpoint for a document that belongs to Emma and authenticating with the user "natalie", we issue this command:
curl -u natalie:12345 http://localhost:8080/documents/asd555
{
  "owner":"emma"
}
Calling the endpoint for a document that belongs to Emma and authenticating with the user "emma", we issue this command:
curl -u emma:12345 http://localhost:8080/documents/asd555
{
  "owner":"emma"
}
Calling the endpoint for a document that belongs to Natalie and authenticating with the user "emma", we issue this command:
curl -u emma:12345 http://localhost:8080/documents/abc123
{
  "status":403,
  "error":"Forbidden",
  "message":"Forbidden",
  "path":"/documents/abc123"
}
Summary
-
Spring Security allows you to apply authorization rules for any layer of the application, not only at the endpoint level. To do this, you enable the global method security functionality.
-
The global method security functionality is disabled by default. To enable it, you use the
@EnableGlobalMethodSecurityannotation over the configuration class of your application. -
You can apply authorization rules that the application checks before the call to a method. If these authorization rules aren’t followed, the framework doesn’t allow the method to execute. When we test the authorization rules before the method call, we’re using preauthorization.
-
To implement preauthorization, you use the
@PreAuthorizeannotation with the value of a SpEL expression that defines the authorization rule. -
If we want to only decide after the method call if the caller can use the returned value and if the execution flow can proceed, we use postauthorization.
-
To implement postauthorization, we use the
@PostAuthorizeannotation with the value of a SpEL expression that represents the authorization rule. -
When implementing complex authorization logic, you should separate this logic into another class to make your code easier to read. In Spring Security, a common way to do this is by implementing a
PermissionEvaluator. -
Spring Security offers compatibility with older specifications like the
@RolesAllowedand@Securedannotations. You can use these, but they are less powerful than@PreAuthorizeand@PostAuthorize, and the chances that you’ll find these annotations used with Spring in a real-world scenario are very low.