
In this chapter, we’ll discuss using JSON Web Tokens (JWTs) for token implementation. You learned in chapter 14 that the resource server needs to validate tokens issued by the authorization server. And I told you three ways to do this:
-
Using direct calls between the resource server and the authorization server, which we implemented in section 14.2
-
Using a shared database for storing the tokens, which we implemented in section 14.3
-
Using cryptographic signatures, which we’ll discuss in this chapter
Using cryptographic signatures to validate tokens has the advantage of allowing the resource server to validate them without needing to call the authorization server directly and without needing a shared database. This approach to implementing token validation is commonly used in systems implementing authentication and authorization with OAuth 2. For this reason, you need to know this way of implementing token validation. We’ll write an example for this method as we did for the other two methods in chapter 14.
15.1 Using tokens signed with symmetric keys with JWT
The most straightforward approach to signing tokens is using symmetric keys. With this approach, using the same key, you can both sign a token and validate its signature. Using symmetric keys for signing tokens has the advantage of being simpler than other approaches we’ll discuss later in this chapter and is also faster. As you’ll see, however, it has disadvantages too. You can’t always share the key used to sign tokens with all the applications involved in the authentication process. We’ll discuss these advantages and disadvantages when comparing symmetric keys with asymmetric key pairs in section 15.2.
For now, let’s start a new project to implement a system that uses JWTs signed with symmetric keys. For this implementation, I named the projects ssia-ch15-ex1-as for the authorization server and ssia-ch15-ex1-rs for the resource server. We start with a brief recap of JWTs that we detailed in chapter 11. Then, we implement these in an example.
15.1.1 Using JWTs
In this section, we briefly recap JWTs. We discussed JWTs in chapter 11 in detail, but I think it’s best if we start with a refresher on how JWTs work. We then continue with implementing the authorization server and the resource server. Everything we discuss in this chapter relies on JWTs, so this is why I find it essential to start with this refresher before going further with our first example.
A JWT is a token implementation. A token consists of three parts: the header, the body, and the signature. The details in the header and the body are represented with JSON, and they are Base64 encoded. The third part is the signature, generated using a cryptographic algorithm that uses as input the header and the body (figure 15.1). The cryptographic algorithm also implies the need for a key. The key is like a password. Someone having a proper key can sign a token or validate that a signature is authentic. If the signature on a token is authentic, that guarantees that nobody altered the token after it was signed.

Figure 15.1 A JWT is composed of three parts: the header, the body, and the signature. The header and the body contain details represented with JSON. These parts are Base64 encoded and then signed. The token is a string formed of these three parts separated by dots.
When a JWT is signed, we also call it a JWS (JSON Web Token Signed). Usually, applying a cryptographic algorithm for signing a token is enough, but sometimes you can choose to encrypt it. If a token is signed, you can see its contents without having any key or password. But even if a hacker sees the contents in the token, they can’t change a token’s contents because if they do so, the signature becomes invalid (figure 15.2). To be valid, a signature has to

Figure 15.2 A hacker intercepts a token and changes its content. The resource server rejects the call because the signature of the token no longer matches the content.
If a token is encrypted, we also call it a JWE (JSON Web Token Encrypted). You can’t see the contents of an encrypted token without a valid key.
15.1.2 Implementing an authorization server to issue JWTs
In this section, we implement an authorization server that issues JWTs to a client for authorization. You learned in chapter 14 that the component managing the tokens is the TokenStore. What we do in this section is use a different implementation of the TokenStore provided by Spring Security. The name of the implementation we use is JwtTokenStore, and it manages JWTs. We also test the authorization server in this section. Later, in section 15.1.3, we’ll implement a resource server and have a complete system that uses JWTs. You can implement token validation with JWT in two ways:
-
If we use the same key for signing the token as well as for verifying the signature, we say that the key is symmetric.
-
If we use one key to sign the token but a different one to verify the signature, we say that we use an asymmetric key pair.
In this example, we implement signing with a symmetric key. This approach implies that both the authorization server and the resource server know and use the same key. The authorization server signs the token with the key, and the resource server validates the signature using the same key (figure 15.3).

Figure 15.3 Using symmetric keys. Both the authorization server and the resource server share the same key. The authorization server uses the key to sign the tokens, and the resource server uses the key to validate the signature.
Let’s create the project and add the needed dependencies. In our case, the name of the project is ssia-ch15-ex1-as. The next code snippet presents the dependencies we need to add. These are the same ones that we used for the authorization server in chapters 13 and 14.
<dependency>
  <groupId>org.springframework.boot</groupId>
  <artifactId>spring-boot-starter-security</artifactId>
</dependency>
<dependency>
  <groupId>org.springframework.boot</groupId>
  <artifactId>spring-boot-starter-web</artifactId>
</dependency>
  <dependency>
  <groupId>org.springframework.cloud</groupId>
  <artifactId>spring-cloud-starter-oauth2</artifactId>
</dependency>
We configure a JwtTokenStore in the same way we did in chapter 14 for the Jdbc-TokenStore. Additionally, we need to define an object of type JwtAccessTokenConverter. With the JwtAccessTokenConverter, we configure how the authorization server validates tokens; in our case, using a symmetric key. The following listing shows you how to configure the JwtTokenStore in the configuration class.
Listing 15.1 Configuring the JwtTokenStore
@Configuration
@EnableAuthorizationServer
public class AuthServerConfig
  extends AuthorizationServerConfigurerAdapter {

  @Value("${jwt.key}")
  private String jwtKey;                                ❶

  @Autowired
  private AuthenticationManager authenticationManager;

  @Override
  public void configure(
    ClientDetailsServiceConfigurer clients)
    throws Exception {
      clients.inMemory()
             .withClient("client")
             .secret("secret")
             .authorizedGrantTypes("password", "refresh_token")
             .scopes("read");
    }

  @Override
  public void configure(
    AuthorizationServerEndpointsConfigurer endpoints) {
      endpoints
        .authenticationManager(authenticationManager)
        .tokenStore(tokenStore())                       ❷
        .accessTokenConverter(                          ❷
           jwtAccessTokenConverter());                  ❷
  }

  @Bean
  public TokenStore tokenStore() {
    return new JwtTokenStore(                           ❸
      jwtAccessTokenConverter());                       ❸
  }

  @Bean
  public JwtAccessTokenConverter jwtAccessTokenConverter() {
    var converter = new JwtAccessTokenConverter();
    converter.setSigningKey(jwtKey);                    ❹
    return converter;
  }
}
❶ Gets the value of the symmetric key from the application.properties file
❷ Configures the token store and the access token converter objects
❸ Creates a token store with an access token converter associated to it
❹ Sets the value of the symmetric key for the access token converter object
I stored the value of the symmetric key for this example in the application.properties file, as the next code snippet shows. However, don’t forget that the signing key is sensitive data, and you should store it in a secrets vault in a real-world scenario.
jwt.key=MjWP5L7CiD
Remember from our previous examples with the authorization server in chapters 13 and 14 that for every authorization server, we also define a UserDetailsServer and PasswordEncoder. Listing 15.2 reminds you how to configure these components for the authorization server. To keep the explanations short, I won’t repeat the same listing for all the following examples in this chapter.
Listing 15.2 Configuring user management for the authorization server
@Configuration
public class WebSecurityConfig
  extends WebSecurityConfigurerAdapter {

  @Bean
  public UserDetailsService uds() {
    var uds = new InMemoryUserDetailsManager();

    var u = User.withUsername("john")
                .password("12345")
                .authorities("read")
                .build();

    uds.createUser(u);

    return uds;
  }

  @Bean
  public PasswordEncoder passwordEncoder() {
    return NoOpPasswordEncoder.getInstance();
  }

  @Bean
  public AuthenticationManager authenticationManagerBean()
    throws Exception {
      return super.authenticationManagerBean();
  }
}
We can now start the authorization server and call the /oauth/token endpoint to obtain an access token. The next code snippet shows you the cURL command to call the /oauth/token endpoint:
curl -v -XPOST -u client:secret http://localhost:8080/oauth/token?grant_type=password&username=john&password=12345&scope=read
{
  "access_token":"eyJhbGciOiJIUzI1NiIsInR5cCI6IkpXV...",
  "token_type":"bearer",
  "refresh_token":"eyJhbGciOiJIUzI1NiIsInR5cCI6Ikp...",
  "expires_in":43199,
  "scope":"read",
  "jti":"7774532f-b74b-4e6b-ab16-208c46a19560"
}
You can observe in the response that both the access and the refresh tokens are now JWTs. In the code snippet, I have shortened the tokens to make the code snippet more readable. You’ll see in the response in your console that the tokens are much longer. In the next code snippet, you find the decoded (JSON) form of the token’s body:
{
  "user_name": "john",
  "scope": [
    "read"
  ],

  "generatedInZone": "Europe/Bucharest",
  "exp": 1583874061,
  "authorities": [
    "read"
  ],

  "jti": "38d03577-b6c8-47f5-8c06-d2e3a713d986",
  "client_id": "client"
}
Having set up the authorization server, we can now implement the resource server.
15.1.3 Implementing a resource server that uses JWT
In this section, we implement the resource server, which uses the symmetric key to validate tokens issued by the authorization server we set up in section 15.1.2. At the end of this section, you will know how to write a complete OAuth 2 system that uses JWTs signed using symmetric keys. We create a new project and add the needed dependencies to pom.xml, as the next code snippet presents. I named this project ssia-ch15-ex1-rs.
<dependency>
  <groupId>org.springframework.boot</groupId>
  <artifactId>spring-boot-starter-oauth2-resource-server</artifactId>
</dependency>
<dependency>
  <groupId>org.springframework.boot</groupId>
  <artifactId>spring-boot-starter-web</artifactId>
</dependency>
<dependency>
  <groupId>org.springframework.cloud</groupId>
  <artifactId>spring-cloud-starter-oauth2</artifactId>
</dependency>
I didn’t add any new dependencies to what we already used in chapters 13 and 14. Because we need one endpoint to secure, I define a controller and a method to expose a simple endpoint that we use to test the resource server. The following listing defines the controller.
Listing 15.3 The HelloController class
@RestController
public class HelloController {

  @GetMapping("/hello")
  public String hello() {
    return "Hello!";
  }
}
Now that we have an endpoint to secure, we can declare the configuration class where we configure the TokenStore. We’ll configure the TokenStore for the resource server as we do for the authorization server. The most important aspect is to be sure we use the same value for the key. The resource server needs the key to validate a token’s signature. The next listing defines the resource server configuration class.
Listing 15.4 The configuration class for the resource server
@Configuration
@EnableResourceServer
public class ResourceServerConfig
  extends ResourceServerConfigurerAdapter {

  @Value("${jwt.key}")                                       ❶
  private String jwtKey;

  @Override
  public void configure(ResourceServerSecurityConfigurer resources) {
    resources.tokenStore(tokenStore());                      ❷
  }

  @Bean
  public TokenStore tokenStore() {
    return new JwtTokenStore(                                ❸
                 jwtAccessTokenConverter());
  }

  @Bean
  public JwtAccessTokenConverter jwtAccessTokenConverter() {
    var converter = new JwtAccessTokenConverter();           ❹
    converter.setSigningKey(jwtKey);                         ❹
    return converter;                                        ❹
  }
}
❶ Injects the key value from the application.properties file
❸ Declares the TokenStore and adds it to the Spring context
❹ Creates an access token converter and sets the symmetric key used to validate token signatures
Note Don’t forget to set the value for the key in the application .properties file.
A key used for symmetric encryption or signing is just a random string of bytes. You generate it using an algorithm for randomness. In our example, you can use any string value, say “abcde.” In a real-world scenario, it’s a good idea to use a randomly generated value with a length, preferably, longer than 258 bytes. For more information, I recommend Real-World Cryptography by David Wong (Manning, 2020). In chapter 8 of David Wong’s book, you’ll find a detailed discussion on randomness and secrets:
https://livebook.manning.com/book/real-world-cryptography/chapter-8/
Because I run both the authorization server and the resource server locally on the same machine, I need to configure a different port for this application. The next code snippet presents the content of the application.properties file:
server.port=9090
jwt.key=MjWP5L7CiD
We can now start our resource server and call the /hello endpoint using a valid JWT that you obtained earlier from the authorization server. You have to add the token to the Authorization HTTP header on the request prefixed with the word “Bearer” in our example. The next code snippet shows you how to call the endpoint using cURL:
curl -H "Authorization:Bearer eyJhbGciOiJIUzI1NiIs..." http://localhost:9090/
➥ hello
Hello!
NOTE Remember that I truncate the JWTs in the examples of this book to save space and make the call easier to read.
You’ve just finished implementing a system that uses OAuth 2 with JWT as a token implementation. As you found out, Spring Security makes this implementation easy. In this section, you learned how to use a symmetric key to sign and validate tokens. But you might find requirements in real-world scenarios where having the same key on both authorization server and resource server is not doable. In section 15.2, you learn how to implement a similar system that uses asymmetric keys for token validation for these scenarios.
15.2 Using tokens signed with asymmetric keys with JWT
In this section, we implement an example of OAuth 2 authentication where the authorization server and the resource server use an asymmetric key pair to sign and validate tokens. Sometimes having only a key shared by the authorization server and the resource server, as we implemented in section 15.1, is not doable. Often, this scenario happens if the authorization server and the resource server aren’t developed by the same organization. In this case, we say that the authorization server doesn’t “trust” the resource server, so you don’t want the authorization server to share a key with the resource server. And, with symmetric keys, the resource server has too much power: the possibility of not just validating tokens, but signing them as well (figure 15.4).

Figure 15.4 If a hacker manages somehow to get a symmetric key, they can change tokens and sign them. That way, they get access to the user’s resources.
NOTE While working as a consultant on different projects, I see cases in which symmetric keys were exchanged by mail or other unsecured channels. Never do this! A symmetric key is a private key. One having such a key can use it to access the system. My rule of thumb is if you need to share the key outside your system, it shouldn’t be symmetric.
When we can’t assume a trustful relationship between the authorization server and the resource server, we use asymmetric key pairs. For this reason, you need to know how to implement such a system. In this section, we work on an example that shows you all the required aspects of how to achieve this goal.
What is an asymmetric key pair and how does it work? The concept is quite simple. An asymmetric key pair has two keys: one called the private key and another called the public key. The authorization server uses the private key to sign tokens, and someone can sign tokens only by using the private key (figure 15.5).
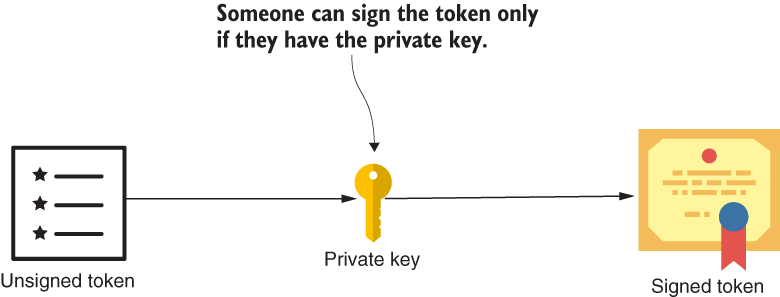
Figure 15.5 To sign the token, someone needs to use the private key. The public key of the key pair can then be used by anyone to verify the identity of the signer.
The public key is linked to the private key, and this is why we call it a pair. But the public key can only be used to validate the signature. No one can sign a token using the public key (figure 15.6).

Figure 15.6 If a hacker manages to obtain a public key, they won’t be able to use it tosign tokens. A public key can only be used to validate the signature.
15.2.1 Generating the key pair
In this section, I teach you how to generate an asymmetric key pair. We need a key pair to configure the authorization server and the resource server that we implemented in sections 15.2.2 and 15.2.3. This is an asymmetric key pair (which means it has a private part used by the authorization server to sign a token and a public part used by the resource server to validate the signature). To generate the key pair, I use keytool and OpenSSL, which are two simple-to-use command-line tools. Your JDK installs keytool, so you probably already have it on your computer. For OpenSSL, you need to download it from https://www.openssl.org/. If you use Git Bash, which comes with OpenSSL, you don’t need to install it separately. I always prefer using Git Bash for these operations because it doesn’t require me to install these tools separately. Once you have the tools, you need to run two commands to
Generating a private key
To generate a private key, run the keytool command in the next code snippet. It generates a private key in a file named ssia.jks. I also use the password “ssia123” to protect the private key and the alias “ssia” to give the key a name. In the following command, you can see the algorithm used to generate the key, RSA:
keytool -genkeypair -alias ssia -keyalg RSA -keypass ssia123 -keystore ssia.jks -storepass ssia123
Obtaining the public key
To get the public key for the previously generated private key, you can run the keytool command:
keytool -list -rfc --keystore ssia.jks | openssl x509 -inform pem -pubkey
You are prompted to enter the password used when generating the public key; in my case, ssia123. Then you should find the public key and a certificate in the output. (Only the value of the key is essential for us for this example.) This key should look similar to the next code snippet:
-----BEGIN PUBLIC KEY-----
MIIBIjANBgkqhkiG9w0BAQEFAAOCAQ8AMIIBCgKCAQEAijLqDcBHwtnsBw+WFSzG
VkjtCbO6NwKlYjS2PxE114XWf9H2j0dWmBu7NK+lV/JqpiOi0GzaLYYf4XtCJxTQ
DD2CeDUKczcd+fpnppripN5jRzhASJpr+ndj8431iAG/rvXrmZt3jLD3v6nwLDxz
pJGmVWzcV/OBXQZkd1LHOK5LEG0YCQ0jAU3ON7OZAnFn/DMJyDCky994UtaAYyAJ
7mr7IO1uHQxsBg7SiQGpApgDEK3Ty8gaFuafnExsYD+aqua1Ese+pluYnQxuxkk2
Ycsp48qtUv1TWp+TH3kooTM6eKcnpSweaYDvHd/ucNg8UDNpIqynM1eS7KpffKQm
DwIDAQAB
-----END PUBLIC KEY-----
That’s it! We have a private key we can use to sign JWTs and a public key we can use to validate the signature. Now we just have to configure these in our authorization and resource servers.
15.2.2 Implementing an authorization server that uses private keys
In this section, we configure the authorization server to use a private key for signing JWTs. In section 15.2.1, you learned how to generate a private and public key. For this section, I create a separate project called ssia-ch15-ex2-as, but I use the same dependencies in the pom.xml file as for the authorization server we implemented in section 15.1.
I copy the private key file, ssia.jks, in the resources folder of my application. I add the key in the resources folder because it’s easier for me to read it directly from the classpath. However, it’s not mandatory to be in the classpath. In the application.properties file, I store the filename, the alias of the key, and the password I used to protect the private key when I generated the password. We need these details to configure JwtTokenStore. The next code snippet shows you the contents of my application.properties file:
password=ssia123
privateKey=ssia.jks
alias=ssia
Compared with the configurations we did for the authorization server to use a symmetric key, the only thing that changes is the definition of the JwtAccessTokenConverter object. We still use JwtTokenStore. If you remember, we used JwtAccessTokenConverter to configure the symmetric key in section 15.1. We use the same JwtAccessTokenConverter object to set up the private key. The following listing shows the configuration class of the authorization server.
Listing 15.5 The configuration class for the authorization server and private keys
@Configuration
@EnableAuthorizationServer
public class AuthServerConfig
  extends AuthorizationServerConfigurerAdapter {

  @Value("${password}")                             ❶
  private String password;                          ❶
                                                    ❶
  @Value("${privateKey}")                           ❶
  private String privateKey;                        ❶
                                                    ❶
  @Value("${alias}")                                ❶
  private String alias;                             ❶

  @Autowired
  private AuthenticationManager authenticationManager;

  // Omitted code

  @Bean
  public JwtAccessTokenConverter jwtAccessTokenConverter() {
    var converter = new JwtAccessTokenConverter();

    KeyStoreKeyFactory keyStoreKeyFactory =         ❷
       new KeyStoreKeyFactory(                      ❷
           new ClassPathResource(privateKey),       ❷
                     password.toCharArray()         ❷
       );                                           ❷

    converter.setKeyPair(                           ❸
       keyStoreKeyFactory.getKeyPair(alias));

    return converter;
  }
}
❶ Injects the name of the private key file, the alias, and the password from the application.properties file
❷ Creates a KeyStoreKeyFactory object to read the private key file from the classpath
❸ Uses the KeyStoreKeyFactory object to retrieve the key pair and sets the key pair to the JwtAccessTokenConverter object
You can now start the authorization server and call the /oauth/token endpoint to generate a new access token. Of course, you only see a normal JWT created, but the difference is now that to validate its signature, you need to use the public key in the pair. By the way, don’t forget the token is only signed, not encrypted. The next code snippet shows you how to call the /oauth/token endpoint:
curl -v -XPOST -u client:secret "http://localhost:8080/oauth/token?grant_type=password&username=john&passwopa=12345&scope=read"
{
  "access_token":"eyJhbGciOiJSUzI1NiIsInR5...",
  "token_type":"bearer",
  "refresh_token":"eyJhbGciOiJSUzI1NiIsInR...",
  "expires_in":43199,
  "scope":"read",
  "jti":"8e74dd92-07e3-438a-881a-da06d6cbbe06"
}
15.2.3 Implementing a resource server that uses public keys
In this section, we implement a resource server that uses the public key to verify the token’s signature. When we finish this section, you’ll have a full system that implements authentication over OAuth 2 and uses a public-private key pair to secure the tokens. The authorization server uses the private key to sign the tokens, and the resource server uses the public one to validate the signature. Mind, we use the keys only to sign the tokens and not to encrypt them. I named the project we work on to implement this resource server ssia-ch15-ex2-rs. We use the same dependencies in pom.xml as for the examples in the previous sections of this chapter.
The resource server needs to have the public key of the pair to validate the token’s signature, so let’s add this key to the application.properties file. In section 15.2.1, you learned how to generate the public key. The next code snippet shows the content of my application.properites file:
server.port=9090
publicKey=-----BEGIN PUBLIC KEY-----MIIBIjANBghk...-----END PUBLIC KEY-----
I abbreviated the public key for better readability. The following listing shows you how to configure this key in the configuration class of the resource server.
Listing 15.6 The configuration class for the resource server and public keys
@Configuration
@EnableResourceServer
public class ResourceServerConfig
  extends ResourceServerConfigurerAdapter {

  @Value("${publicKey}")                           ❶
  private String publicKey;

  @Override
  public void configure(ResourceServerSecurityConfigurer resources) {
    resources.tokenStore(tokenStore());
  }

  @Bean
  public TokenStore tokenStore() {
    return new JwtTokenStore(                      ❷
       jwtAccessTokenConverter());                 ❷
  }

  @Bean
  public JwtAccessTokenConverter jwtAccessTokenConverter() {
    var converter = new JwtAccessTokenConverter();
    converter.setVerifierKey(publicKey);           ❸
    return converter;
  }
}
❶ Injects the key from the application.properties file
❷ Creates and adds a JwtTokenStore in the Spring context
❸ Sets the public key that the token store uses to validate tokens
Of course, to have an endpoint, we also need to add the controller. The next code snippet defines the controller:
@RestController
public class HelloController {

  @GetMapping("/hello")
  public String hello() {
    return "Hello!";
  }
}
Let’s run and call the endpoint to test the resource server. Here’s the command:
curl -H "Authorization:Bearer eyJhbGciOiJSUzI1NiIsInR5cCI6I..." http://localhost:9090/hello
Hello!
15.2.4 Using an endpoint to expose the public key
In this section, we discuss a way of making the public key known to the resource server--the authorization server exposes the public key. In the system we implemented in section 15.2, we use private-public key pairs to sign and validate tokens. We configured the public key at the resource server side. The resource server uses the public key to validate JWTs. But what happens if you want to change the key pair? It is a good practice not to keep the same key pair forever, and this is what you learn to implement in this section. Over time, you should rotate the keys! This makes your system less vulnerable to key theft (figure 15.7).

Figure 15.7 If the keys are changed periodically, the system is less vulnerable to key theft. But if the keys are configured in both applications, it’s more difficult to rotate them.
Up to now, we have configured the private key on the authorization server side and the public key on the resource server side (figure 15.7). Being set in two places makes the keys more difficult to manage. But if we configure them on one side only, you could manage the keys easier. The solution is moving the whole key pair to the authorization server side and allowing the authorization server to expose the public keys with an endpoint (figure 15.8).

Figure 15.8 Both keys are configured at the authorization server. To get the public key, the resource server calls an endpoint from the authorization server. This approach allows us to rotate keys easier, as we only have to configure them in one place.
We work on a separate application to prove how to implement this configuration with Spring Security. You can find the authorization server for this example in project ssia-ch15-ex3-as and the resource server of this example in project ssia-ch15-ex3-rs.
For the authorization server, we keep the same setup as for the project we developed in section 15.2.3. We only need to make sure we make accessible the endpoint, which exposes the public key. Yes, Spring Boot already configures such an endpoint, but it’s just that. By default, all requests for it are denied. We need to override the endpoint’s configuration and allow anyone with client credentials to access it. In listing 15.7, you find the changes you need to make to the authorization server’s configuration class. These configurations allow anyone with valid client credentials to call the endpoint to obtain the public key.
Listing 15.7 The configuration class for the authorization server exposing public keys
@Configuration
@EnableAuthorizationServer
public class AuthServerConfig
  extends AuthorizationServerConfigurerAdapter {

  // Omitted code

  @Override
  public void configure(
    ClientDetailsServiceConfigurer clients)
      throws Exception {

      clients.inMemory()
             .withClient("client")
             .secret("secret")
             .authorizedGrantTypes("password", "refresh_token")
             .scopes("read")
               .and()                              ❶
             .withClient("resourceserver")         ❶
             .secret("resourceserversecret");      ❶
    }

    @Override
    public void configure(
      AuthorizationServerSecurityConfigurer security) {
        security.tokenKeyAccess
                  ("isAuthenticated()");           ❷
    }
}
❶ Adds the client credentials used by the resource server to call the endpoint, which exposes the public key
❷ Configures the authorization server to expose the endpoint for the public key for any request authenticated with valid client credentials
You can start the authorization server and call the /oauth/token_key endpoint to make sure you correctly implement the configuration. The next code snippet shows you the cURL call:
curl -u resourceserver:resourceserversecret http://localhost:8080/oauth/token_key
{
  "alg":"SHA256withRSA",
  "value":"-----BEGIN PUBLIC KEY----- nMIIBIjANBgkq... -----END PUBLIC KEY-----"
}
For the resource server to use this endpoint and obtain the public key, you only need to configure the endpoint and the credentials in its properties file. The next code snippet defines the application.properties file of the resource server:
server.port=9090

security.oauth2.resource.jwt.key-uri=http://localhost:8080/oauth/token_key

security.oauth2.client.client-id=resourceserver
security.oauth2.client.client-secret=resourceserversecret
Because the resource server now takes the public key from the /oauth/token_key endpoint of the authorization server, you don’t need to configure it in the resource server configuration class. The configuration class of the resource server can remain empty, as the next code snippet shows:
@Configuration
@EnableResourceServer
public class ResourceServerConfig
  extends ResourceServerConfigurerAdapter {
}
You can start the resource server as well now and call the /hello endpoint it exposes to see that the entire setup works as expected. The next code snippet shows you how to call the /hello endpoint using cURL. Here, you obtain a token as we did in section 15.2.3 and use it to call the test endpoint of the resource server:
curl -H "Authorization:Bearer eyJhbGciOiJSUzI1NiIsInR5cCI..." http://localhost:9090/hello
Hello!
15.3 Adding custom details to the JWT
In this section, we discuss adding custom details to the JWT token. In most cases, you need no more than what Spring Security already adds to the token. However, in real-world scenarios, you’ll sometimes find requirements for which you need to add custom details in the token. In this section, we implement an example in which you learn how to change the authorization server to add custom details on the JWT and how to change the resource server to read these details. If you take one of the tokens we generated in previous examples and decode it, you see the defaults that Spring Security adds to the token. The following listing presents these defaults.
Listing 15.8 The default details in the body of a JWT issued by the authorization server
{
  "exp": 1582581543,                                 ❶
  "user_name": "john",                               ❷
  "authorities": [                                   ❸
    "read"
  ],
  "jti": "8e208653-79cf-45dd-a702-f6b694b417e7",     ❹
  "client_id": "client",                             ❺
  "scope": [                                         ❻
    "read"
  ]
}
❶ The timestamp when the token expires
❷ The user that authenticated to allow the client to access their resources
❸ The permissions granted to the user
❹ A unique identifier of the token
❺ The client that requested the token
❻ The permissions granted to the client
As you can see in listing 15.8, by default, a token generally stores all the details needed for Basic authorization. But what if the requirements of your real-world scenarios ask for something more? Some examples might be
-
You use an authorization server in an application where your readers review books. Some endpoints should only be accessible for users who have given more than a specific number of reviews.
-
You need to allow calls only if the user authenticated from a specific time zone.
-
Your authorization server is a social network, and some of your endpoints should be accessible only by users having a minimum number of connections.
For my first example, you need to add the number of reviews to the token. For the second, you add the time zone from where the client connected. For the third example, you need to add the number of connections for the user. No matter which is your case, you need to know how to customize JWTs.
15.3.1 Configuring the authorization server to add custom details to tokens
In this section, we discuss the changes we need to make to the authorization server for adding custom details to tokens. To make the example simple, I suppose that the requirement is to add the time zone of the authorization server itself. The project I work on for this example is ssia-ch15-ex4-as. To add additional details to your token, you need to create an object of type TokenEnhancer. The following listing defines the TokenEnhancer object I created for this example.
Listing 15.9 A custom token enhancer
public class CustomTokenEnhancer
  implements TokenEnhancer {                            ❶

  @Override
  public OAuth2AccessToken enhance(                     ❷
    OAuth2AccessToken oAuth2AccessToken,
    OAuth2Authentication oAuth2Authentication) {

    var token =                                         ❸
      new DefaultOAuth2AccessToken(oAuth2AccessToken);

      Map<String, Object> info =                        ❹
         Map.of("generatedInZone",
                ZoneId.systemDefault().toString());

      token.setAdditionalInformation(info);             ❺

      return token;                                     ❻
  }
}
❶ Implements the TokenEnhancer contract
❷ Overrides the enhance() method, which receives the current token and returns the enhanced token
❸ Creates a new token object based on the one we received
❹ Defines as a Map the details we want to add to the token
❺ Adds the additional details to the token
❻ Returns the token containing the additional details
The enhance() method of a TokenEnhancer object receives as a parameter the token we enhance and returns the “enhanced” token, containing the additional details. For this example, I use the same application we developed in section 15.2 and only change the configure() method to apply the token enhancer. The following listing presents these changes.
Listing 15.10 Configuring the TokenEnhancer object
@Configuration
@EnableAuthorizationServer
public class AuthServerConfig
  extends AuthorizationServerConfigurerAdapter {

// Omitted code

  @Override
     public void configure(
    AuthorizationServerEndpointsConfigurer endpoints) {

    TokenEnhancerChain tokenEnhancerChain
      = new TokenEnhancerChain();            ❶

    var tokenEnhancers =                     ❷
      List.of(new CustomTokenEnhancer(),
              jwtAccessTokenConverter());

    tokenEnhancerChain                       ❸
      .setTokenEnhancers(tokenEnhancers);

    endpoints
      .authenticationManager(authenticationManager)
      .tokenStore(tokenStore())
      .tokenEnhancer(tokenEnhancerChain);    ❹

   }
}
❶ Defines a TokenEnhancerChain
❷ Adds our two token enhancer objects to a list
❸ Adds the token enhancer’s list to the chain
❹ Configures the token enhancer objects
As you can observe, configuring our custom token enhancer is a bit more complicated. We have to create a chain of token enhancers and set the entire chain instead of only one object, because the access token converter object is also a token enhancer. If we configure only our custom token enhancer, we would override the behavior of the access token converter. Instead, we add both in a chain of responsibilities, and we configure the chain containing both objects.
Let’s start the authorization server, generate a new access token, and inspect it to see how it looks. The next code snippet shows you how to call the /oauth/token endpoint to obtain the access token:
curl -v -XPOST -u client:secret "http://localhost:8080/oauth/token?grant_type=password&username=john&password=12345&scope=read"
{
  "access_token":"eyJhbGciOiJSUzI...",
  "token_type":"bearer",
  "refresh_token":"eyJhbGciOiJSUzI1...",
  "expires_in":43199,
  "scope":"read",
  "generatedInZone":"Europe/Bucharest",
  "jti":"0c39ace4-4991-40a2-80ad-e9fdeb14f9ec"
}
If you decode the token, you can see that its body looks like the one presented in listing 15.11. You can further observe that the framework adds the custom details, by default, in the response as well. But I recommend you always refer to any information from the token. Remember that by signing the token, we make sure that if anybody alters the content of the token, the signature doesn’t get validated. This way, we know that if the signature is correct, nobody changed the contents of the token. You don’t have the same guarantee on the response itself.
Listing 15.11 The body of the enhanced JWT
{
  "user_name": "john",
  "scope": [
    "read"
  ],
  "generatedInZone": "Europe/Bucharest",     ❶
  "exp": 1582591525,
  "authorities": [
    "read"
  ],
  "jti": "0c39ace4-4991-40a2-80ad-e9fdeb14f9ec",
  "client_id": "client"
}
❶ The custom details we added appear in the token’s body.
15.3.2 Configuring the resource server to read the custom details of a JWT
In this section, we discuss the changes we need to do to the resource server to read the additional details we added to the JWT. Once you change your authorization server to add custom details to a JWT, you’d like the resource server to be able to read these details. The changes you need to do in your resource server to access the custom details are straightforward. You find the example we work on in this section in the ssia-ch15-ex4-rs project.
We discussed in section 15.1 that AccessTokenConverter is the object that converts the token to an Authentication. This is the object we need to change so that it also takes into consideration the custom details in the token. Previously, you created a bean of type JwtAccessTokenConverter, as shown in the next code snippet:
@Bean
public JwtAccessTokenConverter jwtAccessTokenConverter() {
  var converter = new JwtAccessTokenConverter();
  converter.setSigningKey(jwtKey);
  return converter;
}
We used this token to set the key used by the resource server for token validation. We create a custom implementation of JwtAccessTokenConverter, which also takes into consideration our new details on the token. The simplest way is to extend this class and override the extractAuthentication() method. This method converts the token in an Authentication object. The next listing shows you how to implement a custom AcessTokenConverter.
Listing 15.12 Creating a custom AccessTokenConverter
public class AdditionalClaimsAccessTokenConverter
  extends JwtAccessTokenConverter {

  @Override
  public OAuth2Authentication
         extractAuthentication(Map<String, ?> map) {

    var authentication =                 ❶
      super.extractAuthentication(map);

    authentication.setDetails(map);      ❷

    return authentication;               ❸

  }
}
❶ Applies the logic implemented by the JwtAccessTokenConverter class and gets the initial authentication object
❷ Adds the custom details to the authentication
❸ Returns the authentication object
In the configuration class of the resource server, you can now use the custom access token converter. The next listing defines the AccessTokenConverter bean in the configuration class.
Listing 15.13 Defining the new AccessTokenConverter bean
@Configuration
@EnableResourceServer
public class ResourceServerConfig
  extends ResourceServerConfigurerAdapter {

  // Omitted code

  @Bean
  public JwtAccessTokenConverter jwtAccessTokenConverter() {
    var converter =
      new AdditionalClaimsAccessTokenConverter();      ❶
    converter.setVerifierKey(publicKey);
    return converter;
  }
}
❶ Creates an instance of the new AccessTokenConverter object
An easy way to test the changes is to inject them into the controller class and return them in the HTTP response. Listing 15.14 shows you how to define the controller class.
Listing 15.1 The controller class
@RestController
public class HelloController {

  @GetMapping("/hello")
  public String hello(OAuth2Authentication authentication) {
    OAuth2AuthenticationDetails details =                        ❶
      (OAuth2AuthenticationDetails) authentication.getDetails();

    return "Hello! " + details.getDecodedDetails();              ❷
  }
}
❶ Gets the extra details that were added to the Authentication object
❷ Returns the details in the HTTP response
You can now start the resource server and test the endpoint with a JWT containing custom details. The next code snippet shows you how to call the /hello endpoint and the results of the call. The getDecodedDetails() method returns a Map containing the details of the token. In this example, to keep it simple, I directly printed the entire value returned by getDecodedDetails(). If you need to use only a specific value, you can inspect the returned Map and obtain the desired value using its key.
curl -H "Authorization:Bearer eyJhbGciOiJSUzI1NiIsInR5cCI6Ikp... " http://localhost:9090/hello
Hello! {user_name=john, scope=[read], generatedInZone=Europe/Bucharest, exp=1582595692, authorities=[read], jti=982b02be-d185-48de-a4d3-9b27337d1a46, client_id=client}
You can spot in the response the new attribute generatedInZone=Europe/Bucharest.
Summary
-
Using cryptographic signatures is frequently the way applications today validate tokens in an OAuth 2 authentication architecture.
-
When we use token validation with cryptographic signatures, JSON Web Token (JWT) is the most widely used token implementation.
-
You can use symmetric keys to sign and validate tokens. Although using symmetric keys is a straightforward approach, you cannot use it when the authorization server doesn’t trust the resource server.
-
If symmetric keys aren’t doable in your implementation, you can implement token signing and validation using asymmetric key pairs.
-
It’s recommended to change keys regularly to make the system less vulnerable to key theft. We refer to changing keys periodically as key rotation.
-
You can configure public keys directly at the resource server side. While this approach is simple, it makes key rotation more difficult.
-
To simplify key rotation, you can configure the keys at the authorization server side and allow the resource server to read them at a specific endpoint.
-
You can customize JWTs by adding details to their body according to the requirements of your implementations. The authorization server adds custom details to the token body, and the resource server uses these details for authorization.