
-
Separating authentication and authorization responsibilities in multiple apps
-
Using multiple custom filters and multiple
AuthenticationProviderobjects -
Choosing from various possible implementations for a scenario
We’ve come a long way, and you’re now in front of the second hands-on chapter of the book. It’s time again to put into action all you’ve learned in an exercise that shows you the big picture. Fasten your seat belts, open your IDEs, and get ready for an adventure!
In this chapter, we’ll design a system of three actors: the client, the authentication server, and the business logic server. From these three actors, we’ll implement the backend part of the authentication server and a business logic server. As you’ll observe, our examples are more complex. This is a sign that we are getting closer and closer to real-world scenarios.
This exercise is also a great chance to recap, apply, and better understand what you’ve already learned and to touch on new subjects like JSON Web Tokens (JWTs). You also see a first demonstration of separating the authentication and authorization responsibilities in a system. We’ll extend this discussion in chapters 12 through 15 with the OAuth 2 framework. Getting closer to what we’ll discuss in the following chapters is one of the reasons for the design I chose for the exercise in this chapter.
11.1 The scenario and requirements of the example
In this section, we discuss the requirements for the applications we develop together throughout this chapter. Once you understand what has to be done, we discuss how to implement the system and which are our best options in section 11.2. Then, we get our hands dirty with Spring Security and implement the scenario from head to toe in sections 11.3 and 11.4. The architecture of the system has three components. You’ll find these components illustrated in figure 11.1. The three components are
-
The client --This is the application consuming the backend. It could be a mobile app or the frontend of a web application developed using a framework like Angular, ReactJS, or Vue.js. We don’t implement the client part of the system, but keep in mind that it exists in a real-world application. Instead of using the client to call endpoints, we use cURL.
-
The authentication server --This is an application with a database of user credentials. The purpose of this application is to authenticate users based on their credentials (username and password) and send them a one-time password (OTP) through SMS. Because we won’t actually send an SMS in this example, we’ll read the value of the OTP from the database directly.
In this chapter, we implement this whole application without sending the SMS. Later, you can also extend it to send messages using a service of your choice, like AWS SNS (https://aws.amazon.com/sns/), Twillio (https://www .twilio.com/sms), or others.
-
The business logic server --This is the application exposing endpoints that our client consumes. We want to secure access to these endpoints. Before calling an endpoint, the user must authenticate with their username and password and then send an OTP. The user receives the OTP through an SMS message. Because this application is our target application, we secure it with Spring Security.
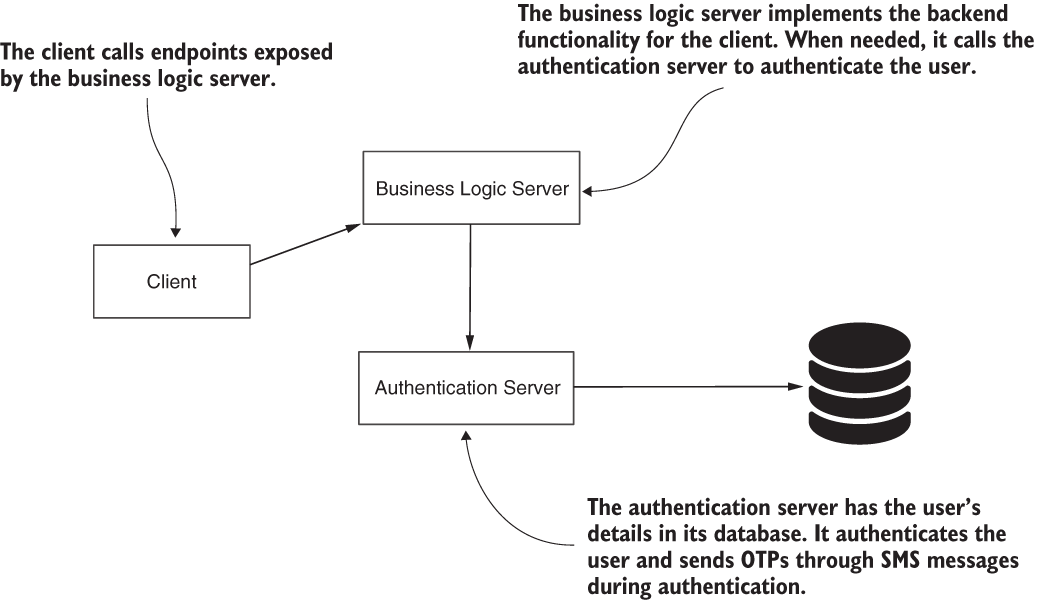
Figure 11.1 The client calls the endpoints exposed by the business logic server. To authenticate the user, the business logic server uses the responsibility implemented by the authentication server. The authentication server stores the user credentials in its database.
To call any endpoint on the business logic server, the client has to follow three steps:
-
Authenticate the username and password by calling the /login endpoint on the business logic server to obtain a randomly generated OTP.
-
Call any endpoint by adding the token received in step 2 to the
Authorizationheader of the HTTP request.
When the client authenticates the username and password, the business logic server sends a request for an OTP to the authentication server. After successful authentication, the authentication server sends a randomly generated OTP to the client via SMS (figure 11.2). This way of identifying the user is called multi-factor authentication (MFA), and it’s pretty common nowadays. We generally need users to prove who they are both by using their credentials and with another means of identification (for example, they own a specific mobile device).
In the second authentication step, once the client has the code from the received SMS, the user can call the /login endpoint, again with the username and the code. The business logic server validates the code with the authentication server. If the code is valid, the client receives a token that it can use to call any endpoint on the business logic server (figure 11.3). In section 11.2, we’ll talk in detail about what this token is, how we implement it, and why we use it.
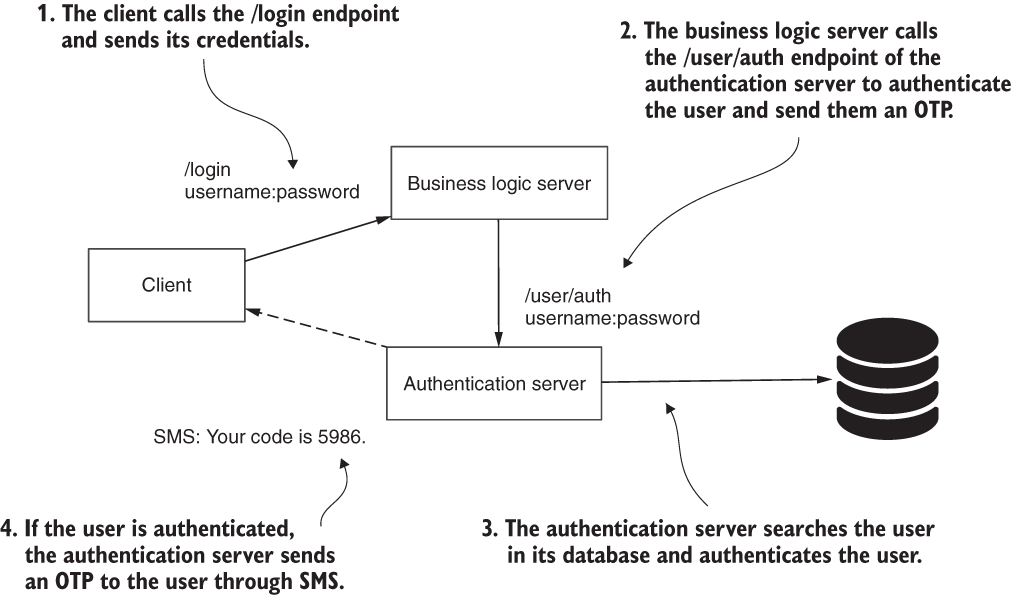
Figure 11.2 The first authentication step consists of identifying the user with their username and password. The user sends their credentials, and the authentication server returns an OTP for the second authentication step.

Figure 11.3 The second authentication step. The client sends the code they received through the SMS message, together with their username. The business logic server calls the authentication server to validate the OTP. If the OTP is valid, the business logic server issues a token back to the client. The client uses this token to call any other endpoint on the business logic server.

Figure 11.4 The third authentication step. To call any endpoint exposed by the business logic server, the client adds a valid token in the authorization HTTP request header.
In the third authentication step, the client can now call any endpoint by adding the token it receives in step 2 to the Authorization header of the HTTP request. Figure 11.4 illustrates this step.
NOTE This example allows us to work on a bigger application, which includes more of the concepts we discussed in previous chapters. To allow you to focus on the Spring Security concepts I want to include in the application, I simplify the architecture of the system. Someone could argue that this architecture uses vicious approaches as the client should only share passwords with the authentication server and never with the business logic server. This is correct! In our case, it’s just a simplification. In real-world scenarios, in general, we strive to keep credentials and secrets known by as few components in the system as possible. Also, someone could argue that the MFA scenario itself could be more easily implemented by using a third-party management system like Okta or something similar. Part of the purpose of the example is to teach you how to define custom filters. For this reason, I chose the hard way to implement, ourselves, this part in the authentication architecture.
11.2 Implementing and using tokens
A token is similar to an access card. An application obtains a token as a result of the authentication process and to access resources. Endpoints represent the resources in a web application. For a web application, a token is a string, usually sent through an HTTP header by clients that want to access a particular endpoint. This string can be plain like a pure universally unique identifier (UUID), or it might have a more complex shape like a JSON Web Token (JWT).
Today, tokens are often used in authentication and authorization architectures, and that’s why you need to understand them. As you’ll find out in chapter 12, these are one of the most important elements in the OAuth 2 architecture, which is also frequently used today. And as you’ll learn in this chapter, but also in chapters 12 through 15, tokens offer us advantages (like separation of responsibilities in the authentication and authorization architecture), help us make our architecture stateless, and provide possibilities to validate requests.
11.2.1 What is a token?
Tokens provide a method that an application uses to prove it has authenticated a user, which allows the user to access the application’s resources. In section 11.2.2, you’ll discover one of the most common token implementations used today: the JWT.
What are tokens? A token is just an access card, theoretically. When you visit an office building, you first go to the reception desk. There, you identify yourself (authentication), and you receive an access card (token). You can use the access card to open some doors, but not necessarily all doors. This way, the token authorizes your access and decides whether you’re allowed to do something, like opening a particular door. Figure 11.5 presents this concept.

Figure 11.5 To access the mothership (business logic server), Zglorb needs an access card (token). After being identified, Zglorb gets an access card. This access card (token) only allows him to access his room and his office (resources).
At the implementation level, tokens can even be regular strings. What’s most important is to be able to recognize these after you issue them. You can generate UUIDs and store them in memory or in a database. Let’s assume the following scenario:
-
The client proves its identity to the server with its credentials.
-
The server issues the client a token in the format of a UUID. This token, now associated with the client, is stored in memory by the server (figure 11.6).

Figure 11.6 When the client authenticates, the server generates a token and returns it to the client. This token is then used by the client to access resources on the server.
-
When the client calls an endpoint, the client provides the token and gets authorized. Figure 11.7 presents this step.
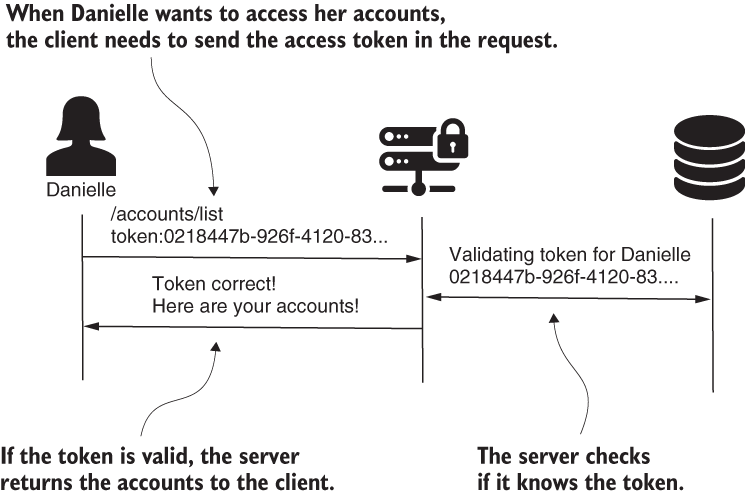
Figure 11.7 When the client needs to access a user resource, they must provide a valid token in the request. A valid token is one previously issued by the server when the user authenticates.
This is the general flow associated with using tokens in the authentication and authorization process. Which are its main advantages? Why would you use such a flow? Doesn’t it add more complexity than a simple login? (You can rely only on the user and the password anyway, you might think.) But tokens bring more advantages, so let’s enumerate them and then discuss them one by one:
-
You can invalidate tokens without invalidating the credentials.
-
Tokens can also store details like user authorities that the client needs to send in the request.
-
Tokens help you delegate the authentication responsibility to another component in the system.
Tokens help you avoid sharing credentials in all requests. In chapters 2 through 10, we worked with HTTP Basic as the authentication method for all requests. And this method, as you learned, assumes you send credentials for each request. Sending credentials with each request isn’t OK because it often means that you expose them. The more often you expose the credentials, the bigger the chances are that someone intercepts them. With tokens, we change the strategy. We send credentials only in the first request to authenticate. Once authenticated, we get a token, and we can use it to get authorized for calling resources. This way, we only have to send credentials once to obtain the token.
You can define tokens with a short lifetime. If a deceitful individual steals the token, they won’t be able to use it forever. Most probably, the token might expire before they find out how to use it to break into your system. You can also invalidate tokens. If you find out a token has been exposed, you can refute it. This way, it can’t be used anymore by anyone.
Tokens can also store details needed in the request. We can use tokens to store details like authorities and roles of the user. This way, we can replace a server-side session with a client-side session, which offers us better flexibility for horizontal scaling. You’ll see more about this approach in chapters 12 through 15 when we discuss the OAuth 2 flow.
Tokens help you separate the authentication responsibility to another component in the system. We might find ourselves implementing a system that doesn’t manage its own users. Instead, it allows users to authenticate using credentials from accounts they have on other platforms such as GitHub, Twitter, and so on. Even if we also choose to implement the component that does authentication, it’s to our advantage that we can make the implementation separate. It helps us enhance scalability, and it makes the system architecture more natural to understand and develop. Chapters 5 and 6 of API Security in Action by Neil Madden (Manning, 2020) are also good reads related to this topic. Here are the links to access these resources:
https://livebook.manning.com/book/api-security-in-action/chapter-5/
https://livebook.manning.com/book/api-security-in-action/chapter-6/
11.2.2 What is a JSON Web Token?
In this section, we discuss a more specific implementation of tokens--the JSON Web Token (JWT). This token implementation has benefits that make it quite common in today’s applications. This is why we discuss it in this section, and this is also why I’ve chosen to apply it within the hands-on example of this chapter. You’ll also find it in chapters 12 through 15, where we’ll discuss OAuth 2.
You already learned in section 11.2.1 that a token is anything the server can identify later: a UUID, an access card, and even the sticker you receive when you buy a ticket in a museum. Let’s find out what a JWT looks like, and why a JWT is special. It’s easy to understand a lot about JWTs from the name of the implementation itself:
A JWT has three parts, each part separated from the others by a dot (a period). You find an example in this code snippet:
                    ↓                               ↓
eyJhbGciOiJIUzI1NiJ9.eyJ1c2VybmFtZSI6ImRhbmllbGxlIn0.wg6LFProg7s_KvFxvnYGiZF-Mj4rr-0nJA1tVGZNn8U
The first two parts are the header and the body. The header (from the beginning of the token to the first dot) and the body (between the first and the second dot) are formatted as JSON and then are Base64 encoded. We use the header and the body to store details in the token. The next code snippet shows what the header and the body look like before these are Base64 encoded:
{
  "alg": "HS256"            ❶
}

{
  "username": "danielle"    ❷
}
In the header, you store metadata related to the token. In this case, because I chose to sign the token (as you’ll soon learn in the example), the header contains the name of the algorithm that generates the signature (HS256). In the body, you can include details needed later for authorization. In this case, we only have the username. I recommend that you keep the token as short as possible and that you don’t add a lot of data in the body. Even if, technically, there’s no limitation, you’ll find that
-
When you sign the token, the longer the token, the more time the cryptographic algorithm needs for signing it.
The last part of the token (from the second dot to the end) is the digital signature, but this part can be missing. Because you’ll usually prefer to sign the header and the body, when you sign the content of the token, you can later use the signature to check that the content hasn’t changed. Without a signature, you can’t be sure that someone didn’t intercept the token when transferred on the network and chang its content.
To sum it up, JWT is a token implementation. It adds the benefit of easily transferring data during authentication, as well as signing data to validate its integrity (figure 11.8). You’ll find a great discussion on JWT in chapter 7 and appendix H of Microservices Security in Action by Prabath Siriwardena and Nuwan Dias (Manning, 2020):
https://livebook.manning.com/book/microservices-security-in-action/chapter-7/
https://livebook.manning.com/book/microservices-security-in-action/h-json-web-token-jwt-/
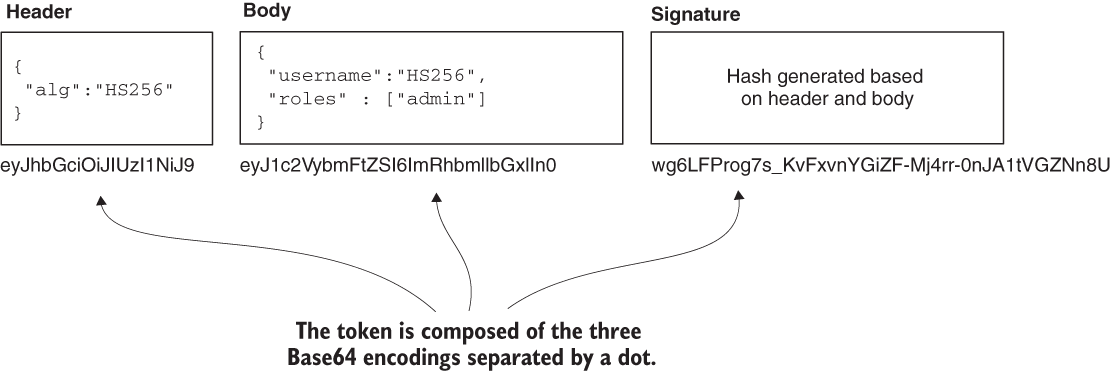
Figure 11.8 A JWT is composed of three parts: the header, the body, and the signature. The header and the body are JSON representations of the data stored in the token. To make these easy to send in a request header, they are Base64 encoded. The last part of the token is the signature. The parts are concatenated with dots.
In this chapter, we’ll use Java JSON Web Token (JJWT) as the library to create and parse JWTs. This is one of the most frequently used libraries to generate and parse JWT tokens in Java applications. Besides all the needed details related to how to use this library, on JJWT’s GitHub repository, I also found a great explanation of JWTs. You might find it useful to read as well:
https://github.com/jwtk/jjwt#overview
11.3 Implementing the authentication server
In this section, we start the implementation of our hands-on example. The first dependency we have is the authentication server. Even if it’s not the application on which we focus on using Spring Security, we need it for our final result. To let you focus on what’s essential in this hands-on, I take out some parts of the implementation. I mention these throughout the example and leave these for you to implement as an exercise.
In our scenario, the authentication server connects to a database where it stores the user credentials and the OTPs generated during request authentication events. We need this application to expose three endpoints (figure 11.9):
-
/user/add--Adds a user that we use later for testing our implementation.
-
/user/auth--Authenticates a user by their credentials and sends an SMS with an OTP. We take out the part that sends the SMS, but you can do this as an exercise.
-
/otp/check--Verifies that an OTP value is the one that the authentication server generated earlier for a specific user.
For a refresher on how to create REST endpoints, I recommend that you read chapter 6 in Spring in Action, 6th ed., by Craig Walls:
https://livebook.manning.com/book/spring-in-action-sixth-edition/chapter-6/
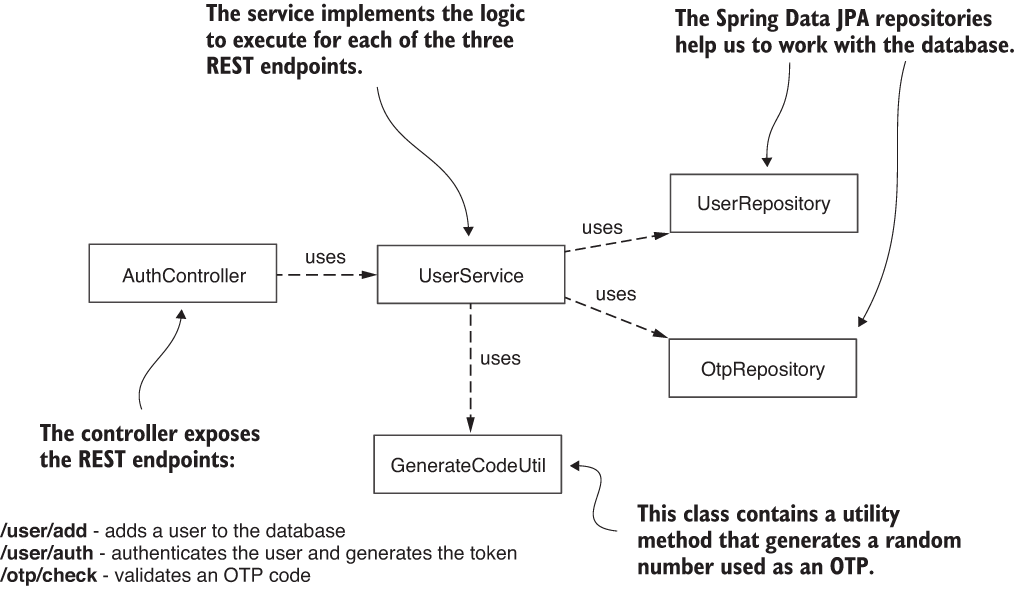
Figure 11.9 The class design for an authentication server. The controller exposes REST endpoints that call the logic defined in a service class. The two repositories are the access layer to the database. We also write a utility class to separate the code that generates the OTP to be sent through SMS.
We create a new project and add the needed dependencies as the next code snippet shows. You can find this app implemented in the project ssia-ch11-ex1-s1.
<dependency>
  <groupId>org.springframework.boot</groupId>
  <artifactId>spring-boot-starter-web</artifactId>
</dependency>
<dependency>
  <groupId>org.springframework.boot</groupId>
  <artifactId>spring-boot-starter-security</artifactId>
</dependency>
<dependency>
  <groupId>org.springframework.boot</groupId>
  <artifactId>spring-boot-starter-data-jpa</artifactId>
</dependency>
<dependency>
  <groupId>mysql</groupId>
  <artifactId>mysql-connector-java</artifactId>
  <scope>runtime</scope>
</dependency>
We also need to make sure we create the database for the application. Because we store user credentials (username and password), we need a table for this. And we also need a second table to store the OTP values associated with authenticated users (figure 11.10).
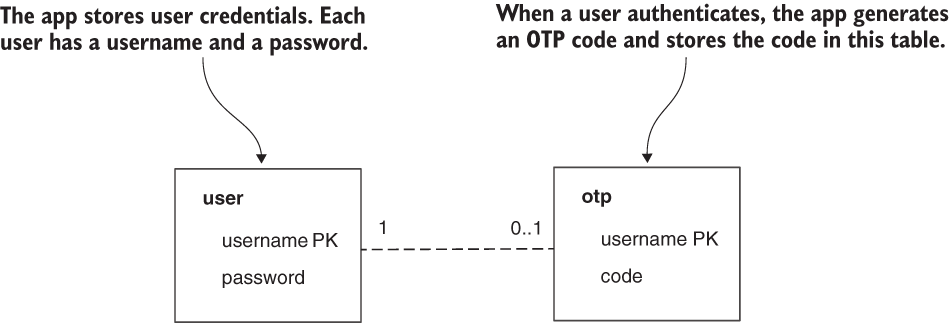
Figure 11.10 The app database has two tables. In one of the tables, the app stores user credentials, while in the second one, the app stores the generated OTP codes.
I use a database named spring and add the scripts to create the two tables required in a schema.sql file. Remember to place the schema.sql file in the resources folder of your project as this is where Spring Boot picks it up to execute the scripts. In the next code snippet, you find the content of my schema.sql file. (If you don’t like the approach with the schema.sql file, you can create the database structure manually anytime or use any other method you prefer.)
CREATE TABLE IF NOT EXISTS `spring`.`user` (
    `username` VARCHAR(45) NULL,
    `password` TEXT NULL,
    PRIMARY KEY (`username`));

CREATE TABLE IF NOT EXISTS `spring`.`otp` (
    `username` VARCHAR(45) NOT NULL,
    `code` VARCHAR(45) NULL,
    PRIMARY KEY (`username`));
In the application.properties file, we provide the parameters needed by Spring Boot to create the data source. The next code snippet shows the content of the application.properties file:
spring.datasource.url=jdbc:mysql://localhost/spring
spring.datasource.username=root
spring.datasource.password=
spring.datasource.initialization-mode=always
I added Spring Security to the dependencies as well for this application. The only reason I did this for the authentication server is to have the BCryptPasswordEncoder that I like to use to hash the users’ passwords when stored in the database. To keep the example short and relevant to our purpose, I don’t implement authentication between the business logic server and the authentication server. But I’d like to leave this to you as an exercise later, after finishing with the hands-on example. For the implementation we work on in this chapter, the configuration class for the project looks like the one in listing 11.1.
Exercise Change the applications from this hands-on chapter to validate the requests between the business logic server and the authentication server:
To solve the exercise, you might find it useful to review the example we worked on in section 9.2.
Listing 11.1 The configuration class for the authentication server
@Configuration
public class ProjectConfig
  extends WebSecurityConfigurerAdapter {

  @Bean                                                          ❶
  public PasswordEncoder passwordEncoder() {                     ❶
    return new BCryptPasswordEncoder();                          ❶
  }

  @Override
  protected void configure(HttpSecurity http) throws Exception {
    http.csrf().disable();                                       ❷
    http.authorizeRequests()                                     ❸
          .anyRequest().permitAll();                             ❸
  }
}
❶ Defines a password encoder to hash the passwords stored in the database
❷ Disables CSRF so we can call all the endpoints of the application directly
❸ Allows all the calls without authentication
With the configuration class in place, we can continue with defining the connection to the database. Because we use Spring Data JPA, we need to write the JPA entities and then the repositories, and because we have two tables, we define two JPA entities and two repository interfaces. The following listing shows the definition of the User entity. It represents the user table where we store user credentials.
@Entity
public class User {

  @Id
  private String username;
  private String password;

  // Omitted getters and setters
}
The next listing presents the second entity, Otp. This entity represents the otp table where the application stores the generated OTPs for authenticated users.
@Entity
public class Otp {

  @Id
  private String username;
  private String code;

  // Omitted getters and setters
}
Listing 11.4 presents the Spring Data JPA repository for the User entity. In this interface, we define a method to retrieve a user by their username. We need this for the first step of authentication, where we validate the username and password.
Listing 11.4 The UserRepository interface
public interface UserRepository extends JpaRepository<User, String> {

  Optional<User> findUserByUsername(String username);
}
Listing 11.5 presents the Spring Data JPA repository for the Otp entity. In this interface, we define a method to retrieve the OTP by username. We need this method for the second authentication step, where we validate the OTP for a user.
Listing 11.5 The OtpRepository interface
public interface OtpRepository extends JpaRepository<Otp, String> {

  Optional<Otp> findOtpByUsername(String username);
}
With the repositories and entities in place, we can work on the logic of the application. For this, I create a service class that I call UserService. As shown in listing 11.6, the service has dependencies on the repositories and the password encoder. Because we use these objects to implement the application logic, we need to autowire them.
Listing 11.6 Autowiring the dependencies in the UserService class
@Service
@Transactional
public class UserService {

  @Autowired
  private PasswordEncoder passwordEncoder;

  @Autowired
  private UserRepository userRepository;

  @Autowired
  private OtpRepository otpRepository;

}
Next, we need to define a method to add a user. You can find the definition of this method in the following listing.
Listing 11.7 Defining the addUser() method
@Service
@Transactional
public class UserService {

  // Omitted code

  public void addUser(User user) {
    user.setPassword(passwordEncoder.encode(user.getPassword()));
    userRepository.save(user);
  }
}
What does the business logic server need? It needs a way to send a username and password to be authenticated. After the user is authenticated, the authentication server generates an OTP for the user and sends it via SMS. The following listing shows the definition of the auth() method, which implements this logic.
Listing 11.8 Implementing the first authentication step
@Service
@Transactional
public class UserService {

  // Omitted code

  public void auth(User user) {
    Optional<User> o =                                      ❶
      userRepository.findUserByUsername(user.getUsername());

    if(o.isPresent()) {                                     ❷
        User u = o.get();
        if (passwordEncoder.matches(
                user.getPassword(),
                u.getPassword())) {
           renewOtp(u);                                     ❸
        } else {
           throw new BadCredentialsException
                      ("Bad credentials.");                 ❹
        }
    } else {
       throw new BadCredentialsException
                  ("Bad credentials.");                     ❹
    }
  }

  private void renewOtp(User u) {
    String code = GenerateCodeUtil
           .generateCode();                                 ❺

    Optional<Otp> userOtp =                                 ❻
      otpRepository.findOtpByUsername(u.getUsername());

    if (userOtp.isPresent()) {                              ❼
      Otp otp = userOtp.get();                              ❼
      otp.setCode(code);                                    ❼
    } else {                                                ❽
      Otp otp = new Otp();                                  ❽
      otp.setUsername(u.getUsername());                     ❽
      otp.setCode(code);                                    ❽
      otpRepository.save(otp);                              ❽
    }
  }

  // Omitted code

}
❶ Searches for the user in the database
❷ If the user exists, verifies its password
❸ If the password is correct, generates a new OTP
❹ If the password is not correct or username doesn’t exist, throws an exception
❺ Generates a random value for the OTP
❻ Searches the OTP by username
❼ If an OTP exists for this username, updates its value
❽ If an OTP doesn’t exist for this username, creates a new record with the generated value
The next listing presents the GenerateCodeUtil class. We used this class in listing 11.8 to generate the new OTP value.
Listing 11.9 Generating the OTP
public final class GenerateCodeUtil {

  private GenerateCodeUtil() {}

  public static String generateCode() {
    String code;

    try {
      SecureRandom random =
        SecureRandom.getInstanceStrong();               ❶

      int c = random.nextInt(9000) + 1000;              ❷

      code = String.valueOf(c);                         ❸
    } catch (NoSuchAlgorithmException e) {
      throw new RuntimeException(
           "Problem when generating the random code.");
    }

   return code;
  }
}
❶ Creates an instance of SecureRandom that generates a random int value
❷ Generates a value between 0 and 8,999. We add 1,000 to each generated value. This way, we get values between 1,000 and 9,999 (4-digit random codes).
❸ Converts the int to a String and returns it
The last method we need to have in the UserService is one to validate the OTP for a user. You find this method in the following listing.
Listing 11.10 Validating an OTP
@Service
@Transactional
public class UserService {
  // Omitted code

  public boolean check(Otp otpToValidate) {
    Optional<Otp> userOtp =                                   ❶
      otpRepository.findOtpByUsername(
         otpToValidate.getUsername());

    if (userOtp.isPresent()) {                                ❷
      Otp otp = userOtp.get();                                ❷
      if (otpToValidate.getCode().equals(otp.getCode())) {    ❷
         return true;                                         ❷
      }
    }

     return false;                                            ❸
  }

  // Omitted code
}
❶ Searches the OTP by username
❷ If the OTP exists in the database, and it is the same as the one received from the business logic server, it returns true.
Finally, in this application, we expose the logic presented with a controller. The following listing defines this controller.
Listing 11.11 The definition of the AuthController class
@RestController
public class AuthController {

  @Autowired
  private UserService userService;

  @PostMapping("/user/add")
  public void addUser(@RequestBody User user) {
    userService.addUser(user);
  }

  @PostMapping("/user/auth")
  public void auth(@RequestBody User user) {
    userService.auth(user);
  }

  @PostMapping("/otp/check")
  public void check(@RequestBody Otp otp, HttpServletResponse response) {
    if (userService.check(otp)) {                                         ❶
      response.setStatus(HttpServletResponse.SC_OK);
    } else {
      response.setStatus(HttpServletResponse.SC_FORBIDDEN);
    }
  }
}
❶ If the OTP is valid, the HTTP response returns the status 200 OK; otherwise, the value of the status is 403 Forbidden.
With this setup, we now have the authentication server. Let’s start it and make sure that the endpoints work the way we expect. To test the functionality of the authentication server, we need to
-
Add a new user to the database by calling the /user/add endpoint
-
Validate that the user was correctly added by checking the users table in the database
-
Validate that the application generates and stores an OTP in the otp table
-
Use the OTP generated in step 3 to validate that the /otp/check endpoint works as desired
We begin by adding a user to the database of the authentication server. We need at least one user to use for authentication. We can add the user by calling the /user/add endpoint that we created in the authentication server. Because we didn’t configure a port in the authentication server application, we use the default one, which is 8080. Here’s the call:
curl -XPOST
-H "content-type: application/json"
-d "{"username":"danielle","password":"12345"}"
http://localhost:8080/user/add
After using the curl command presented by the previous code snippet to add a user, we check the database to validate that the record was added correctly. In my case, I can see the following details:
Username: danielle
Password: $2a$10$.bI9ix.Y0m70iZitP.RdSuwzSqgqPJKnKpRUBQPGhoRvHA.1INYmy
The application hashed the password before storing it in the database, which is the expected behavior. Remember, we used BCryptPasswordEncoder especially for this purpose in the authentication server.
NOTE Remember that in our discussion from chapter 4, BCryptPasswordEncoder uses bcrypt as the hashing algorithm. With bcrypt, the output is generated based on a salt value, which means that you obtain different outputs for the same input. For this example, the hash of the same password is a different one in your case. You can find more details and a great discussion on hash functions in chapter 2 of Real-World Cryptography by David Wong (Manning, 2020): http://mng.bz/oRmy.
We have a user, so let’s generate an OTP for the user by calling the /user/auth endpoint. The next code snippet provides the cURL command that you can use:
curl -XPOST
-H "content-type: application/json"
-d "{"username":"danielle","password":"12345"}"
http:/./localhost:8080/user/auth
In the otp table in our database, the application generates and stores a random four-digit code. In my case, its value is 8173.
The last step for testing our authentication server is to call the /otp/check endpoint and verify that it returns an HTTP 200 OK status code in the response when the OTP is correct and 403 Forbidden if the OTP is wrong. The following code snippets show you the test for the correct OTP value, as well as the test for a wrong OTP value. If the OTP value is correct:
curl -v -XPOST -H "content-type: application/json" -d "{"username":"danielle","code":"8173"}" http:/./localhost:8080/otp/check
...
< HTTP/1.1 200
...
curl -v -XPOST -H "content-type: application/json" -d "{"username":"danielle","code":"9999"}" http:/./localhost:8080/otp/check
...
< HTTP/1.1 403
...
We just proved that the authentication server components work! We can now dive into the next element for which we write most of the Spring Security configurations for our current hands-on example--the business logic server.
11.4 Implementing the business logic server
In this section, we implement the business logic server. With this application, you’ll recognize a lot of the things we discussed up to this point in the book. I’ll refer here and there to sections where you learned specific aspects in case you want to go back and review those. With this part of the system, you learn to implement and use JWTs for authentication and authorization. As well, we implement communication between the business logic server and the authentication server to establish the MFA in your application. To accomplish our task, at a high level, we need to
-
Create an endpoint that represents the resource we want to secure.
-
Implement the first authentication step in which the client sends the user credentials (username and password) to the business logic server to log in.
-
Implement the second authentication step in which the client sends the OTP the user receives from the authentication server to the business logic server. Once authenticated by the OTP, the client gets back a JWT, which it can use to access a user’s resources.
-
Implement authorization based on the JWT. The business logic server validates the JWT received from a client and, if valid, allows the client to access the resource.
Technically, to achieve these four high-level points, we need to
-
Create the business logic server project. I name it ssia-ch11-ex1-s2
. -
Implement the
Authenticationobjects that have the role of representing the two authentication steps. -
Implement a proxy to establish communication between the authentication server and the business logic server.
-
Define the
AuthenticationProviderobjects that implement the authentication logic for the two authentication steps using theAuthenticationobjects defined in step 2. -
Define the custom filter objects that intercept the HTTP request and apply the authentication logic implemented by the
AuthenticationProviderobjects.
We start with the dependencies. The next listing shows the dependencies you need to add to the pom.xml file. You can find this application in the project ssia-ch11-ex1-s2.
Listing 11.12 The dependencies needed for the business logic server
<dependency>
   <groupId>org.springframework.boot</groupId>
   <artifactId>spring-boot-starter-security</artifactId>
</dependency>
<dependency>
   <groupId>org.springframework.boot</groupId>
   <artifactId>spring-boot-starter-web</artifactId>
</dependency>
<dependency>                                      ❶
   <groupId>io.jsonwebtoken</groupId>             ❶
   <artifactId>jjwt-api</artifactId>              ❶
   <version>0.11.1</version>                      ❶
</dependency>                                     ❶
<dependency>                                      ❶
   <groupId>io.jsonwebtoken</groupId>             ❶
   <artifactId>jjwt-impl</artifactId>             ❶
   <version>0.11.1</version>                      ❶
   <scope>runtime</scope>                         ❶
</dependency>                                     ❶
<dependency>                                      ❶
   <groupId>io.jsonwebtoken</groupId>             ❶
   <artifactId>jjwt-jackson</artifactId>          ❶
   <version>0.11.1</version>                      ❶
   <scope>runtime</scope>                         ❶
</dependency>                                     ❶
<dependency>                                      ❷
   <groupId>jakarta.xml.bind</groupId>            ❷
   <artifactId>jakarta.xml.bind-api</artifactId>  ❷
   <version>2.3.2</version>                       ❷
</dependency>                                     ❷
<dependency>                                      ❷
   <groupId>org.glassfish.jaxb</groupId>          ❷
   <artifactId>jaxb-runtime</artifactId>          ❷
   <version>2.3.2</version>                       ❷
</dependency>                                     ❷
❶ Adds the jjwt dependency for generating and parsing JWTs
❷ You need this if you use Java 10 or above.
In this application, we only define a /test endpoint. Everything else we write in this project is to secure this endpoint. The /test endpoint is exposed by the TestController class, which is presented in the following listing.
Listing 11.13 The TestController class
@RestController
public class TestController {

  @GetMapping("/test")
  public String test() {
    return "Test";
  }
}
To secure the app now, we have to define the three authentication levels:
-
Authentication with username and password to receive an OTP (figure 11.11)
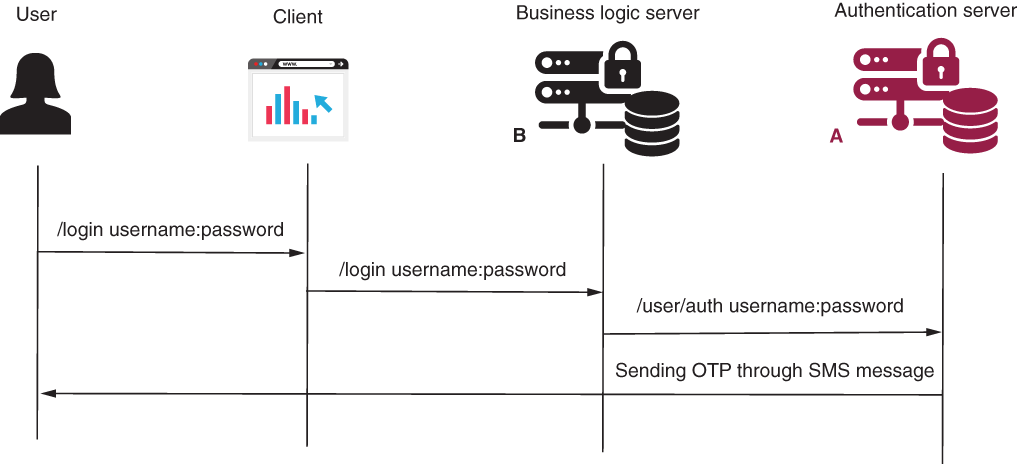
Figure 11.11 The first authentication step. The user sends their credentials for authentication. The authentication server authenticates the user and sends an SMS message containing the OTP code.
-
Authentication with OTP to receive a token (figure 11.12)

Figure 11.12 The second authentication step. The user sends the OTP code they received as a result of the first authentication step. The authentication server validates the OTP code and sends back a token to the client. The client uses the token to access the user’s resources.
-
Authentication with the token to access the endpoint (figure 11.13).

Figure 11.13 The last authentication step. The client uses the token obtained in step 2 to access resources exposed by the business logic server.
With the given requirements for this example, which is more complex and assumes multiple authentication steps, HTTP Basic authentication can’t help us anymore. We need to implement special filters and authentication providers to customize the authentication logic for our scenario. Fortunately, you learned how to define custom filters in chapter 9, so let’s review the authentication architecture in Spring Security (figure 11.14).

Figure 11.14 The authentication architecture in Spring Security. The authentication filter, which is part of the filter chain, intercepts the request and delegates authentication responsibility to the authentication manager. The authentication manager uses an authentication provider to authenticate the request.
Often, when developing an application, there’s more than one good solution. When designing an architecture, you should always think about all possible implementations and choose the best fit for your scenario. If more than one option is applicable and you can’t decide which is the best to implement, you should write a proof-of-concept for each option to help you decide which solution to choose. For our scenario, I present two options, and then we continue the implementation with one of these. I leave the other choice as an exercise for you to implement.
The first option for us is to define three custom Authentication objects, three custom AuthenticationProvider objects, and a custom filter to delegate to these by making use of the AuthenticationManager (figure 11.15). You learned how to implement the Authentication and AuthenticationProvider interfaces in chapter 5.
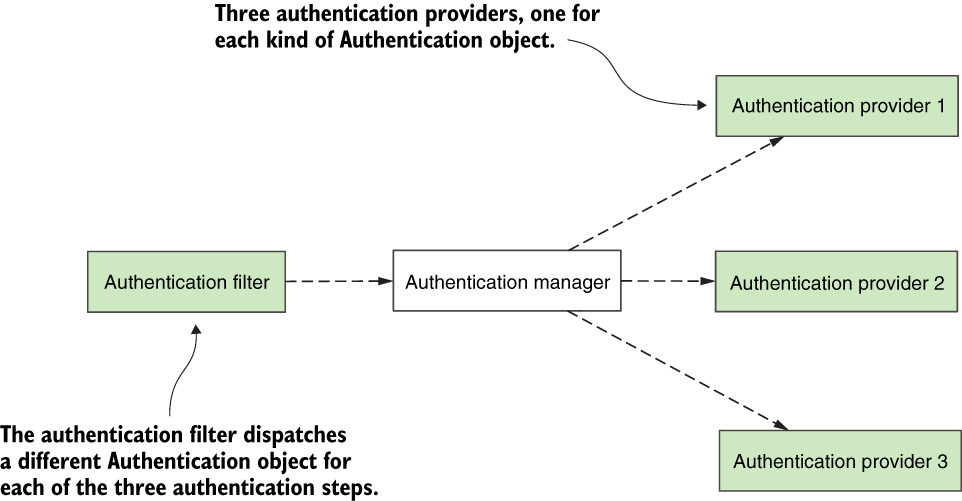
Figure 11.15 The first option for implementing our application. The AuthenticationFilter intercepts the request. Depending on the authentication step, it creates a specific Authentication object and dispatches it to the AuthenticationManager. An Authentication object represents each authentication step. For each authentication step, an Authentication provider implements the logic. In the figure, I shaded the components that we need to implement.
The second option, which I chose to implement in this example, is to have two custom Authentication objects and two custom AuthenticationProvider objects. These objects can help us apply the logic related to the /login endpoint. These will
Then we implement the validation of the token with a second filter. Figure 11.16 presents this approach.
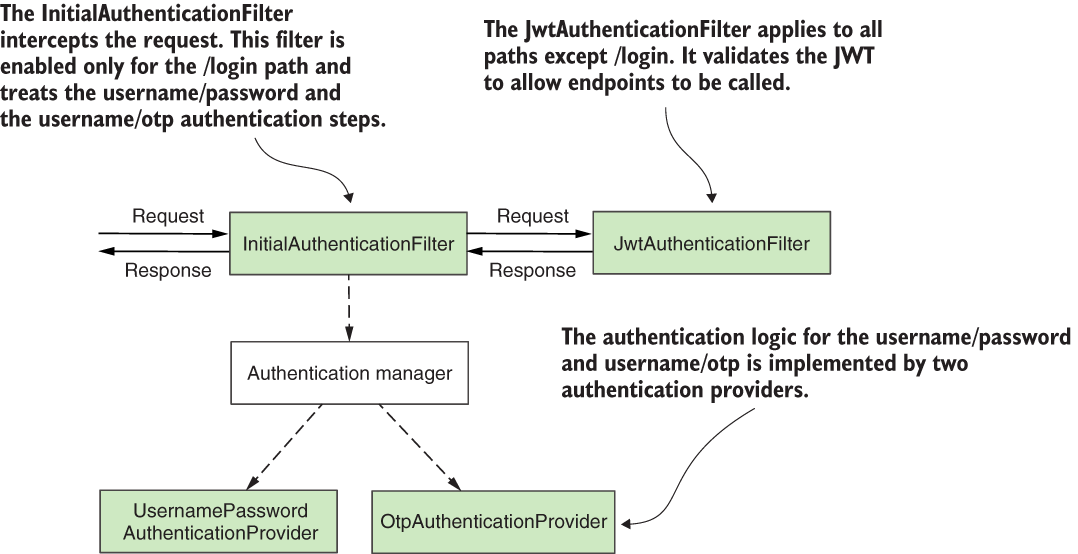
Figure 11.16 The second option for implementing our application. In this scenario, the authentication process separates responsibilities with two filters. The first treats requests on the /login path and takes care of the two initial authentication steps. The other takes care of the rest of the endpoints for which the JWT tokens need to be validated.
Both approaches are equally good. I describe both of these only to illustrate that you can find cases in which you have multiple ways to develop the same scenario, especially because Spring Security offers quite a flexible architecture. I chose the second one because it offers me the possibility to recap more things, like having multiple custom filters and using the shouldNotFilter() method of the OncePerRequestFilter class. We briefly discussed this class in section 9.5, but I didn’t have the chance to apply the shouldNotFilter() method with an example. We take this opportunity now.
Exercise Implement the business logic server with the first approach described in this section and presented by figure 11.15.
11.4.1 Implementing the Authentication objects
In this section, we implement the two Authentication objects we need for our solution to develop the business logic server. At the beginning of section 11.4, we created the project and added the needed dependencies. We also created an endpoint that we want to secure and decided on how to implement the class design for our example. We need two types of Authentication objects, one to represent authentication by username and password and a second to represent authentication by OTP. As you learned in chapter 5, the Authentication contract represents the authentication process for a request. It can be a process in progress or after its completion. We need to implement the Authentication interface for both cases in which the application authenticates the user with their username and password, as well as for a OTP.
In listing 11.14, you find the UsernamePasswordAuthentication class, which implements authentication with username and password. To make the classes shorter, I extend the UsernamePasswordAuthenticationToken class and, indirectly, the Authentication interface. You saw the UsernamePasswordAuthenticationToken class in chapter 5, where we discussed applying custom authentication logic.
Listing 11.14 The UsernamePasswordAuthentication class
public class UsernamePasswordAuthentication
  extends UsernamePasswordAuthenticationToken {

  public UsernamePasswordAuthentication(
    Object principal,
    Object credentials,
    Collection<? extends GrantedAuthority> authorities) {

    super(principal, credentials, authorities);
  }

  public UsernamePasswordAuthentication(
    Object principal,
    Object credentials) {

    super(principal, credentials);
  }
}
Note that I define both constructors in this class. There’s a big difference between these: when you call the one with two parameters, the authentication instance remains unauthenticated, while the one with three parameters sets the Authentication object as authenticated. As you learned in chapter 5, when the Authentication instance is authenticated it means that the authentication process ends. If the Authentication object is not set as authenticated, and no exception is thrown during the process, the AuthenticationManager tries to find a proper AuthenticationProvider object to authenticate the request.
We used the constructor with two parameters when we initially build the Authentication object, and it’s not yet authenticated. When an AuthenticationProvider object authenticates the request, it creates an Authentication instance using the constructor with three parameters, which creates an authenticated object. The third parameter is the collection of granted authorities, which is mandatory for an authentication process that has ended.
Similarly to the UsernamePasswordAuthentication, we implement the second Authentication object for the second authentication step with OTP. I name this class OtpAuthentication. Listing 11.15 demonstrates that class extends the UsernamePasswordAuthenticationToken. We can use the same class because we treat the OTP as a password. Because it’s similar, we use the same approach to save some lines of code.
Listing 11.15 The OtpAuthentication class
public class OtpAuthentication
  extends UsernamePasswordAuthenticationToken {

  public OtpAuthentication(Object principal, Object credentials) {
    super(principal, credentials);
  }

  public OtpAuthentication(
          Object principal,
          Object credentials,
          Collection<? extends GrantedAuthority> authorities) {
    super(principal, credentials, authorities);
  }
}
11.4.2 Implementing the proxy to the authentication server
In this section, we build a way to call the REST endpoint exposed by the authentication server. Immediately after defining the Authentication objects, we usually implement the AuthenticationProvider objects (figure 11.17). We know, however, that to complete authentication, we need a way to call the authentication server. I continue now with implementing a proxy for the authentication server before implementing the AuthenticationProvider objects.
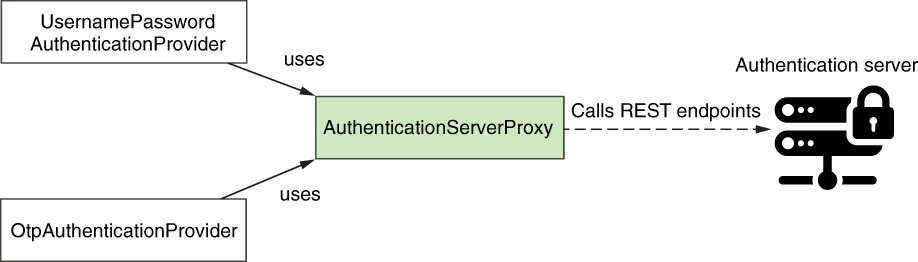
Figure 11.17 The authentication logic implemented by the authentication providers uses the AuthenticationServerProxy to call the authentication server.
For this implementation, we need to
-
Define a model class
User, which we use to call the REST services exposed by the authentication server -
Declare a bean of type
RestTemplate, which we use to call the REST endpoints exposed by the authentication server -
Implement the proxy class, which defines two methods: one for username/password authentication and the other for username/otp authentication
The following listing presents the User model class.
Listing 11.16 The User model class
public class User {

  private String username;
  private String password;
  private String code;

    // Omitted getters and setters
}
The next listing presents the application configuration class. I name this class ProjectConfig and define a RestTemplate bean for the proxy class that we develop next.
Listing 11.17 The ProjectConfig class
@Configuration
public class ProjectConfig {

  @Bean
  public RestTemplate restTemplate() {
    return new RestTemplate();
  }
}
We can now write the AuthenticationServerProxy class, which we use to call the two REST endpoints exposed by the authentication server application. The next listing presents this class.
Listing 11.18 The AuthenticationServerProxy class
@Component
public class AuthenticationServerProxy {

  @Autowired
  private RestTemplate rest;

  @Value("${auth.server.base.url}")           ❶
  private String baseUrl;

  public void sendAuth(String username,
                         String password) {

    String url = baseUrl + "/user/auth";

    var body = new User();
    body.setUsername(username);               ❷
    body.setPassword(password);               ❷

    var request = new HttpEntity<>(body);

    rest.postForEntity(url, request, Void.class);
  }

  public boolean sendOTP(String username,
                         String code) {

     String url = baseUrl + "/otp/check";

     var body = new User();                  ❸
     body.setUsername(username);             ❸
     body.setCode(code);                     ❸

     var request = new HttpEntity<>(body);

     var response = rest.postForEntity(url, request, Void.class);

     return response                         ❹
             .getStatusCode()                ❹
               .equals(HttpStatus.OK);       ❹
  }
}
❶ Takes the base URL from the application.properties file
❷ The HTTP request body needs the username and the password for this call.
❸ The HTTP request body needs the username and the code for this call.
❹ Returns true if the HTTP response status is 200 OK and false otherwise
These are just regular calls on REST endpoints with a RestTemplate. If you need a refresher on how this works, a great choice is chapter 7 of Spring in Action, 6th ed., by Craig Walls (Manning, 2018):
https://livebook.manning.com/book/spring-in-action-sixth-edition/chapter-7/
Remember to add the base URL for the authentication server to your application.properties file. I also change the port for the current application here because I expect to run the two server applications on the same system for my tests. I keep the authentication server on the default port, which is 8080, and I change the port for the current app (the business logic server) to 9090. The next code snippet shows the content for the application.properties file:
server.port=9090
auth.server.base.url=http://localhost:8080
11.4.3 Implementing the AuthenticationProvider interface
In this section, we implement the AuthenticationProvider classes. Now we have everything we need to start working on the authentication providers. We need these because this is where we write the custom authentication logic.
We create a class named UsernamePasswordAuthenticationProvider to serve the UsernamePasswordAuthentication type of Authentication, as described by listing 11.19. Because we design our flow to have two authentication steps, and we have one filter that takes care of both steps, we know that authentication doesn’t finish with this provider. We use the constructor with two parameters to build the Authentication object: new UsernamePasswordAuthenticationToken (username, password). Remember, we discussed in section 11.4.1 that the constructor with two parameters doesn’t mark the object as being authenticated.
Listing 11.19 The UsernamePasswordAuthentication class
@Component
public class UsernamePasswordAuthenticationProvider
  implements AuthenticationProvider {

  @Autowired
  private AuthenticationServerProxy proxy;

  @Override
  public Authentication authenticate
                    (Authentication authentication)
                     throws AuthenticationException {

    String username = authentication.getName();
    String password = String.valueOf(authentication.getCredentials());

    proxy.sendAuth(username, password);                                  ❶

    return new UsernamePasswordAuthenticationToken(username, password);
  }

  @Override
  public boolean supports(Class<?> aClass) {                             ❷
    return UsernamePasswordAuthentication.class.isAssignableFrom(aClass);
  }
}
❶ Uses the proxy to call the authentication server. It sends the OTP to the client through SMS.
❷ Designs this AuthenticationProvider for the UsernamePasswordAuthentication type of Authentication
Listing 11.20 presents the authentication provider designed for the OtpAuthentication type of Authentication. The logic implemented by this AuthenticationProvider is simple. It calls the authentication server to find out if the OTP is valid. If the OTP is correct and valid, it returns an instance of Authentication. The filter sends back the token in the HTTP response. If the OTP isn’t correct, the authentication provider throws an exception.
Listing 11.20 The OtpAuthenticationProvider class
@Component
public class OtpAuthenticationProvider
  implements AuthenticationProvider {

  @Autowired
  private AuthenticationServerProxy proxy;

  @Override
  public Authentication authenticate
                     (Authentication authentication)
                      throws AuthenticationException {

    String username = authentication.getName();
    String code = String.valueOf(authentication.getCredentials());

    boolean result = proxy.sendOTP(username, code);

    if (result) {
      return new OtpAuthentication(username, code);
    } else {
      throw new BadCredentialsException("Bad credentials.");
    }
  }

  @Override
  public boolean supports(Class<?> aClass) {
    return OtpAuthentication.class.isAssignableFrom(aClass);
  }
}
11.4.4 Implementing the filters
In this section, we implement the custom filters that we add to the filter chain. Their purpose is to intercept requests and apply authentication logic. We chose to implement one filter to deal with authentication done by the authentication server and another one for authentication based on the JWT. We implement an InitialAuthenticationFilter class, which deals with the first authentication steps that are done using the authentication server.
In the first step, the user authenticates with their username and password to receive an OTP (figure 11.18). You saw these graphics also in figures 11.11 and 11.12, but I add these again so that you don’t need to flip back through the pages and search for them.

Figure 11.18 First, the client needs to authenticate the user using their credentials. If successful, the authentication server sends an SMS message to the user with a code.
In the second step, the user sends the OTP to prove they really are who they claim to be, and after successful authentication, the app provides them with a token to call any endpoint exposed by the business logic server (figure 11.19).

Figure 11.19 The second authentication step. The user sends the OTP code they receive as a result of the first authentication step. The authentication server validates the OTP code and sends back a token to the client. The client uses the token to access user resources.
Listing 11.21 presents the definition of the InitialAuthenticationFilter class. We start by injecting the AuthenticationManager to which we delegate the authentication responsibility, override the doFilterInternal() method, which is called when the request reaches this filter in the filter chain, and override the shouldNotFilter() method. As we discussed in chapter 9, the shouldNotFilter() method is one of the reasons why we would choose to extend the OncePerRequestFilter class instead of implementing the Filter interface directly. When we override this method, we define a specific condition on when the filters execute. In our case, we want to execute any request only on the /login path and skip all others.
Listing 11.21 The InitialAuthenticationFilter class
@Component
public class InitialAuthenticationFilter
  extends OncePerRequestFilter {

  @Autowired                                     ❶
  private AuthenticationManager manager;

  @Override
  protected void doFilterInternal(               ❷
      HttpServletRequest request,
      HttpServletResponse response,
      FilterChain filterChain)
         throws ServletException, IOException {
      // ...
  }

  @Override
  protected boolean shouldNotFilter(
    HttpServletRequest request) {

    return !request.getServletPath()
                      .equals("/login");         ❸
  }
}
❶ Autowires the AuthenticationManager, which applies the correct authentication logic
❷ Overrides doFilterInternal() to require the correct authentication based on the request
❸ Applies this filter only to the /login path
We continue writing the InitialAuthenticationFilter class with the first authentication step, the one in which the client sends the username and password to obtain the OTP. We assume that if the user doesn’t send an OTP (a code), we have to do authentication based on username and password. We take all the values from the HTTP request header where we expect them to be, and if a code wasn’t sent, we call the first authentication step by creating an instance of UsernamePasswordAuthentication (listing 11.22) and forwarding the responsibility to the AuthenticationManager.
We know (since chapter 2) that next, the AuthenticationManager tries to find a proper AuthenticationProvider. In our case, this is the UsernamePassword-AuthenticationProvider we wrote in listing 11.19. It’s the one triggered because its supports() method states that it accepts the UsernamePasswordAuthentication type.
Listing 11.22 Implementing the logic for UsernamePasswordAuthentication
@Component
public class InitialAuthenticationFilter
  extends OncePerRequestFilter {

  // Omitted code

  @Override
  protected void doFilterInternal(
       HttpServletRequest request,
       HttpServletResponse response,
       FilterChain filterChain)
         throws ServletException, IOException {

    String username = request.getHeader("username");
    String password = request.getHeader("password");
    String code = request.getHeader("code");

    if (code == null) {                                         ❶
      Authentication a =
        new UsernamePasswordAuthentication(username, password);
      manager.authenticate(a);                                  ❷
    }
  }

  // Omitted code
}
❶ If the HTTP request doesn’t contain an OTP, we assume we have to authenticate based on username and password.
❷ Calls the AuthenticationManager with an instance of UsernamePasswordAuthentication
If, however, a code is sent in the request, we assume it’s the second authentication step. In this case, we create an OtpAuthentication object to call the AuthenticationManager (listing 11.23). We know from our implementation of the OtpAuthenticationProvider class in listing 11.20 that if authentication fails, an exception is thrown. This means that the JWT token will be generated and attached to the HTTP response headers only if the OTP is valid.
Listing 11.23 Implementing the logic for OtpAuthentication
@Component
public class InitialAuthenticationFilter
  extends OncePerRequestFilter {

  @Autowired
  private AuthenticationManager manager;

  @Value("${jwt.signing.key}")                                 ❶
  private String signingKey;                                   ❶

  @Override
  protected void doFilterInternal(
         HttpServletRequest request,
         HttpServletResponse response,
         FilterChain filterChain)
    throws ServletException, IOException {

    String username = request.getHeader("username");
    String password = request.getHeader("password");
    String code = request.getHeader("code");

    if (code == null) {
      Authentication a =
        new UsernamePasswordAuthentication(username, password);
      manager.authenticate(a);
    } else {                                                   ❷
      Authentication a =
        new OtpAuthentication(username, code);                 ❸
                                                               ❸
      a = manager.authenticate(a);                             ❸

      SecretKey key = Keys.hmacShaKeyFor(
        signingKey.getBytes(
          StandardCharsets.UTF_8));

      String jwt = Jwts.builder()                              ❹
                    .setClaims(Map.of("username", username))
                    .signWith(key)

                    .compact();

        response.setHeader("Authorization", jwt);              ❺
    }
  }

  // Omitted code
}
❶ Takes the value of the key used to sign the JWT token from the properties file
❷ Adds the branch for the case in which the OTP code is not null. We consider, in this case, that the client sent an OTP for the second authentication step.
❸ For the second authentication step, creates an instance of type OtpAuthentication and sends it to the AuthenticationManager, which finds a proper provider for it
❹ Builds a JWT and stores the username of the authenticated user as one of its claims. We use the key to sign the token.
❺ Adds the token to the Authorization header of the HTTP response
NOTE I wrote a minimal implementation of our example, and I skipped some details like treating exceptions and logging the event. These aspects aren’t essential for our example now, where I only ask you to focus on Spring Security components and architecture. In a real-world application, you should also implement all these details.
The following code snippet builds the JWT. I use the setClaims() method to add a value in the JWT body and the signWith() method to attach a signature to the token. For our example, I use a symmetric key to generate the signature:
SecretKey key = Keys.hmacShaKeyFor(
    signingKey.getBytes(StandardCharsets.UTF_8));

String jwt = Jwts.builder()
                 .setClaims(Map.of("username", username))
                 .signWith(key)
                 .compact();
This key is known only by the business logic server. The business logic server signs the token and can use the same key to validate the token when the client calls an endpoint. For simplicity of the example, I use here one key for all users. In a real-world scenario, however, I would have a different key for each user, but as an exercise, you can change this application to use different keys. The advantage of using individual keys for users is that if you need to invalidate all the tokens for a user, you need only to change its key.
Because we inject the value of the key used to sign the JWT from the properties, we need to change the application.properties file to define this value. My application.properties file now looks like the one in the next code snippet. Remember, if you need to see the full content of the class, you can find the implementation in the project ssia-ch11-ex1-s2.
server.port=9090
auth.server.base.url=http://localhost:8080
jwt.signing.key=ymLTU8rq83...
We also need to add the filter that deals with the requests on all paths other than /login. I name this filter JwtAuthenticationFilter. This filter expects that a JWT exists in the authorization HTTP header of the request. This filter validates the JWT by checking the signature, creates an authenticated Authentication object, and adds it to the SecurityContext. The following listing presents the implementation of the JwtAuthenticationFilter.
Listing 11.24 The JwtAuthenticationFilter class
@Component
public class JwtAuthenticationFilter
  extends OncePerRequestFilter {

  @Value("${jwt.signing.key}")
  private String signingKey;

  @Override
  protected void doFilterInternal(
       HttpServletRequest request,
       HttpServletResponse response,
       FilterChain filterChain)
         throws ServletException, IOException {

    String jwt = request.getHeader("Authorization");

    SecretKey key = Keys.hmacShaKeyFor(
      signingKey.getBytes(StandardCharsets.UTF_8));

    Claims claims = Jwts.parserBuilder()                        ❶
                        .setSigningKey(key)                     ❶
                        .build()                                ❶
                        .parseClaimsJws(jwt)                    ❶
                        .getBody();                             ❶

    String username = String.valueOf(claims.get("username"));

    GrantedAuthority a = new SimpleGrantedAuthority("user");    ❷
    var auth = new UsernamePasswordAuthentication(              ❷
                          username,                             ❷
                          null,                                 ❷
                          List.of(a));                          ❷

    SecurityContextHolder.getContext()
            .setAuthentication(auth);                           ❸

    filterChain.doFilter(request, response);                    ❹
  }

  @Override
  protected boolean shouldNotFilter(
    HttpServletRequest request) {

    return request.getServletPath()
                     .equals("/login");                         ❺
  }
}
❶ Parses the token to obtain the claims and verifies the signature. An exception is thrown if the signature isn’t valid.
❷ Creates the Authentication instance that we add to the SecurityContext
❸ Adds the Authentication object in the SecurityContext
❹ Calls the next filter in the filter chain
❺ Configures this filter not to be triggered on requests for the /login path
NOTE A signed JWT is also called JWS (JSON Web Token Signed). This is why the name of the method we use is parseClaimsJws().
11.4.5 Writing the security configurations
In this section, we finalize writing the application by defining the security configurations (listing 11.25). We have to do a few configurations so that our entire puzzle is coherent:
-
Add the filters to the filter chain as you learned in chapter 9.
-
Disable CSRF protection because, as you learned in chapter 10, this doesn’t apply when using different origins. Here, using a JWT replaces the validation that would be done with a CSRF token.
-
Add the
AuthenticationProviderobjects so that theAuthenticationManagerknows them. -
Use matcher methods to configure all the requests that need to be authenticated, as you learned in chapter 8.
-
Add the
AuthenticationManagerbean in the Spring context so that we can inject it from theInitialAuthenticationFilterclass, as you saw in listing 11.23.
Listing 11.25 The SecurityConfig class
@Configuration
public class SecurityConfig
  extends WebSecurityConfigurerAdapter {                           ❶

  @Autowired                                                       ❷
  private InitialAuthenticationFilter initialAuthenticationFilter;

  @Autowired                                                       ❷
  private JwtAuthenticationFilter jwtAuthenticationFilter;

  @Autowired                                                       ❷
  private OtpAuthenticationProvider otpAuthenticationProvider;

  @Autowired                                                       ❷
  private UsernamePasswordAuthenticationProvider
  ➥ usernamePasswordAuthenticationProvider;

  @Override
  protected void configure(
    AuthenticationManagerBuilder auth) {

    auth.authenticationProvider(                                   ❸
           otpAuthenticationProvider)                              ❸
        .authenticationProvider(                                   ❸
           usernamePasswordAuthenticationProvider);                ❸
  }

  @Override
  protected void configure(HttpSecurity http)
    throws Exception {

    http.csrf().disable();                                         ❹

    http.addFilterAt(                                              ❺
           initialAuthenticationFilter,                            ❺
            BasicAuthenticationFilter.class)                       ❺
        .addFilterAfter(                                           ❺
           jwtAuthenticationFilter,                                ❺
            BasicAuthenticationFilter.class                        ❺
        );


    http.authorizeRequests()                                       ❻
           .anyRequest()                                           ❻
             .authenticated();                                     ❻
  }

  @Override
  @Bean                                                            ❼
  protected AuthenticationManager authenticationManager()
    throws Exception {
      return super.authenticationManager();
  }
}
❶ Extends the WebSecurityConfigurerAdapter to override the configure() methods for the security configurations
❷ Autowires the filters and the authentication providers that we set up in the configuration
❸ Configures both authentication providers to the authentication manager
❺ Adds both custom filters into the filter chain
❻ Ensures that all requests are authenticated
❼ Adds the AuthenticationManager to the Spring context so that we can autowire it from the filter class
11.4.6 Testing the whole system
In this section, we test the implementation of the business logic server. Now that everything is in place, it’s time to run the two components of our system, the authentication server and the business logic server, and examine our custom authentication and authorization to see if this works as desired.
For our example, we added a user and checked that the authentication server works properly in section 11.3. We can try the first step to authenticaton by accessing the endpoints exposed by the business logic server with the user we added in section 11.3. The authentication server opens port 8080, and the business logic server uses port 9090, which we configured earlier in the application.properties file of the business logic server. Here’s the cURL call:
curl -H "username:danielle" -H "password:12345" http://localhost:9090/login
Once we call the /login endpoint, providing the correct username and password, we check the database for the generated OTP value. This should be a record in the otp table where the value of the username field is danielle. In my case, I have the following record:
Username: danielle
Code: 6271
We assume this OTP was sent in an SMS message, and the user received it. We use it for the second authentication step. The cURL command in the next code snippet shows you how to call the /login endpoint for the second authentication step. I also add the -v option to see the response headers where I expect to find the JWT:
curl -v -H "username:danielle" -H "code:6271" http:/./localhost:9090/login
. . .
< HTTP/1.1 200
< Authorization: eyJhbGciOiJIUzI1NiJ9.eyJ1c2VybmFtZSI6ImRhbmllbGxlIn0.wg6LFProg7s_KvFxvnYGiZF-Mj4rr-0nJA1tVGZNn8U
. . .
The JWT is right there where we expected it to be: in the authorization response header. Next, we use the token we obtained to call the /test endpoint:
curl -H "Authorization:eyJhbGciOiJIUzI1NiJ9.eyJ1c2VybmFtZSI6ImRhbmllbGxlIn0.wg6LFProg7s_KvFxvnYGiZF-Mj4rr-0nJA1tVGZNn8U" http:/./localhost:9090/test
Test
Awesome! You finished the second hands-on chapter! You managed to write a whole backend system and secure its resources by writing custom authentication and authorization. And you even used JWTs for this, which takes you a significant step forward and prepares you for what’s coming in the next chapters--the OAuth 2 flow.
Summary
-
When implementing custom authentication and authorization, always rely on the contracts offered by Spring Security. These are the
AuthenticationProvider,AuthenticationManager,UserDetailsService, and so forth. This approach helps you implement an easier-to-understand architecture and makes your application less error prone. -
A token is an identifier for the user. It can have any implementation as long as the server recognizes it after it’s generated. Examples of tokens from real-world scenarios are an access card, a ticket, or the sticker you receive at the entrance of a museum.
-
While an application can use a simple universally unique identifier (UUID) as a token implementation, you more often find tokens implemented as JSON Web Tokens (JWTs). JWTs have multiple benefits: they can store data exchanged on the request, and you can sign them to ensure they weren’t changed while transferred.
-
A JWT token can be signed or might be completely encrypted. A signed JWT token is called a JSON Web Token Signed (JWS) and one that has its details encrypted is called a JSON Web Token Encrypted (JWE).
-
Avoid storing too many details within your JWT. When signed or encrypted, the longer the token is, the more time is needed to sign or encrypt it. Also, remember that we send the token in the header of the HTTP request. The longer the token is, the more data you add to each request, which can affect the performance of your application.
-
We prefer to decouple responsibilities in a system to make it easier to maintain and scale. For this reason, for the hands-on example, we separated the authentication in a different app, which we called the authentication server. The backend application serving the client, which we called the business logic server, uses the separate authentication server when it needs to authenticate a client.
-
Multi-factor authentication (MFA) is an authentication strategy in which, to access a resource, the user is asked to authenticate multiple times and in different ways. In our example, the user has to use their username and password and then prove that they have access to a specific phone number by validating an OTP received through an SMS message. This way, the user’s resources are better protected against credentials theft.
-
In many cases, you find more than one good solution for solving a problem. Always consider all possible solutions and, if time allows, implement proof-of-concepts for all options to understand which better fits your scenario.