
In this chapter, we’ll discuss implementing an authorization server with Spring Security. As you learned in chapter 12, the authorization server is one of the components acting in the OAuth 2 architecture (figure 13.1). The role of the authorization server is to authenticate the user and provide a token to the client. The client uses this token to access resources exposed by the resource server on behalf of the user. You also learned that the OAuth 2 framework defines multiple flows for obtaining a token. We call these flows grants. You choose one of the different grants according to your scenario. The behavior of the authorization server is different depending on the chosen grant. In this chapter, you’ll learn how to configure an authorization server with Spring Security for the most common OAuth 2 grant types:
You’ll also learn to configure the authorization server to issue refresh tokens. A client uses refresh tokens to obtain new access tokens. If an access token expires, the client has to get a new one. To do so, the client has two choices: reauthenticate using the user credentials or use a refresh token. We discussed the advantages of using refresh tokens over user credentials in section 12.3.4.

Figure 13.1 The authorization server is one of the OAuth 2 actors. It identifies the resource owner and provides an access token to the client. The client needs the access token to access resources on behalf of the user.
For months, rumors said the authorization server development with Spring Security would no longer be supported (http://mng.bz/v9lm). Finally, the Spring Security OAuth 2 dependency was deprecated. With this action, we have alternatives (the ones you learn in this book) for implementing the client and the resource server, but not for an authorization server. Luckily, the Spring Security team announced a new authorization server is being developed: http://mng.bz/4Be5. I also recommend that you stay aware of the implemented features in different Spring Security projects using this link: http://mng.bz/Qx01.
Naturally, it takes time for the new Spring Security authorization server to mature. Until then, the only choice we have for developing a custom authorization server with Spring Security is the way we’ll implement the server in this chapter. Implementing a custom authorization server helps you better understand how this component works. Of course, it’s also the only way at present to implement an authorization server.
I see this approach applied by developers in their projects. If you have to deal with a project that implements the authorization server this way, it’s still important you understand it before you can use the new implementation. And, say you want to start a new authorization server implementation: it’s still the only way to go using Spring Security because you simply don’t have another choice.
Instead of implementing a custom authorization server, you could go with a third-party tool like Keycloak or Okta. In chapter 18, we’ll use Keycloak in our hands-on example. But in my experience, sometimes stakeholders won’t accept using such a solution, and you need to go with implementing custom code. Let’s learn how to do this and better understand the authorization server in the following sections of this chapter.
13.1 Writing your own authorization server implementation
There’s no OAuth 2 flow without an authorization server. As I said earlier, OAuth 2 is mainly about obtaining an access token. And the authorization server is the component of the OAuth 2 architecture that issues access tokens. So you’ll first need to know how to implement it. Then, in chapters 14 and 15, you learn how the resource server authorizes requests based on the access token a client obtains from the authorization server. Let’s start building an authorization server. To begin with, you need to create a new Spring Boot project and add the dependencies in the following code snippet. I named this project ssia-ch13-ex1.
<dependency>
  <groupId>org.springframework.boot</groupId>
  <artifactId>spring-boot-starter-security</artifactId>
</dependency>
<dependency>
  <groupId>org.springframework.boot</groupId>
  <artifactId>spring-boot-starter-web</artifactId>
</dependency>
<dependency>
  <groupId>org.springframework.cloud</groupId>
  <artifactId>spring-cloud-starter-oauth2</artifactId>
</dependency>
Inside the project tag, you also need to add the dependencyManagement tag for the spring-cloud-dependencies artifact ID. The next code snippet shows this:
<dependencyManagement>
  <dependencies>
    <dependency>
      <groupId>org.springframework.cloud</groupId>
      <artifactId>spring-cloud-dependencies</artifactId>
      <version>Hoxton.SR1</version>
      <type>pom</type>
      <scope>import</scope>
    </dependency>
  </dependencies>
</dependencyManagement>
We can now define a configuration class, which I call AuthServerConfig. Besides the classic @Configuration annotation, we also need to annotate this class with @EnableAuthorizationServer. This way, we instruct Spring Boot to enable the configuration specific to the OAuth 2 authorization server. We can customize this configuration by extending the AuthorizationServerConfigurerAdapter class and overriding specific methods that we’ll discuss in this chapter. The following listing presents the AuthServerConfig class.
Listing 13.1 The AuthServerConfig class
@Configuration
@EnableAuthorizationServer
public class AuthServerConfig
   extends AuthorizationServerConfigurerAdapter {
}
We already have the minimal configuration for our authorization server. This is awesome! However, to make it usable, we still have to implement user management, register at least one client, and decide which grant types to support.
13.2 Defining user management
In this section, we discuss user management. The authorization server is the component that deals with authenticating a user in the OAuth 2 framework. So, naturally, it needs to manage users. Fortunately, the user management implementation hasn’t changed from what you learned in chapters 3 and 4. We continue to use the UserDetails, UserDetailsService, and UserDetailsManager contracts to manage credentials. And to manage passwords, we continue to use the PasswordEncoder contract. Here, these have the same roles and work the same as you learned in chapters 3 and 4. Behind the scenes is the standard authentication architecture, which we discussed throughout previous chapters.
Figure 13.2 reminds you of the main components acting in the authentication process in Spring Security. What you should observe differently from the way we described the authentication architecture until now is that we don’t have a SecurityContext in this diagram anymore. This change happened because the result of authentication is not stored in the SecurityContext. The authentication is instead managed with a token from a TokenStore. You’ll learn more about the TokenStore in chapter 14, where we discuss the resource server.

Figure 13.2 The authentication process. A filter intercepts the user request and delegates the authentication responsibility to an authentication manager. Further, the authentication manager uses an authentication provider that implements the authentication logic. To find the user, the authentication provider uses a UserDetailsService, and to verify the password, the authentication provider uses a PasswordEncoder.
Let’s find out how to implement user management in our authorization server. I always prefer to separate the responsibilities of the configuration classes. For this reason, I chose to define a second configuration class in our application, where I only write the configurations needed for user management. I named this class WebSecurityConfig, and you can see its implementation in the following listing.
Listing 13.2 Configurations for user management in the WebSecurityConfig class
@Configuration
public class WebSecurityConfig {

  @Bean
  public UserDetailsService uds() {
    var uds = new InMemoryUserDetailsManager();

    var u = User.withUsername("john")
                .password("12345")
                .authorities("read")
                .build();

    uds.createUser(u);

    return uds;
  }

  @Bean
  public PasswordEncoder passwordEncoder() {
    return NoOpPasswordEncoder.getInstance();
  }
}
As you saw in listing 13.2, I declare an InMemoryUserDetailsManager as my User-DetailsService, and I use the NoOpPasswordEncoder as the PasswordEncoder. You can use any implementation of your choice for these components, as you may recall from chapters 3 and 4. But I keep these as simple as possible in my implementation to let you focus on the OAuth 2 aspects of the app.
Now that we have users, we only need to link user management to the authorization server configuration. To do this, I expose the AuthenticationManager as a bean in the Spring context, and then I use it in the AuthServerConfig class. The next listing shows you how to add the AuthenticationManager as a bean in the Spring context.
Listing 13.3 Adding the AuthenticationManager instance in the Spring context
@Configuration
public class WebSecurityConfig
  extends WebSecurityConfigurerAdapter {            ❶

  @Bean
  public UserDetailsService uds() {
    var uds = new InMemoryUserDetailsManager();

    var u = User.withUsername("john")
                .password("12345")
                .authorities("read")
                .build();

    uds.createUser(u);

    return uds;
  }

  @Bean
  public PasswordEncoder passwordEncoder() {
    return NoOpPasswordEncoder.getInstance();
  }

  @Bean                                             ❷
  public AuthenticationManager authenticationManagerBean()
    throws Exception {
    return super.authenticationManagerBean();
  }
}
❶ Extends the WebSecurityConfigurerAdapter to access the AuthenticationManager instance
❷ Adds the AuthenticationManager instance as a bean in the Spring context
We can now change the AuthServerConfig class to register the AuthenticationManager with the authorization server. The next listing shows you the changes you need to make in the AuthServerConfig class.
Listing 13.4 Registering the AuthenticationManager
@Configuration
@EnableAuthorizationServer
public class AuthServerConfig
  extends AuthorizationServerConfigurerAdapter {

  @Autowired                                           ❶
  private AuthenticationManager authenticationManager;

  @Override                                            ❷
  public void configure(
    AuthorizationServerEndpointsConfigurer endpoints) {
      endpoints.authenticationManager(authenticationManager);
  }
}
❶ Injects the AuthenticationManager instance from the context
❷ Overrides the configure() method to set the AuthenticationManager
With these configurations in place, we now have users who can authenticate at our authentication server. But the OAuth 2 architecture implies that users grant privileges to a client. It is the client that uses resources on behalf of a user. In section 13.3, you’ll learn how to configure the clients for the authorization server.
13.3 Registering clients with the authorization server
In this section, you learn how to make your clients known to the authorization server. To call the authorization server, an app acting as a client in the OAuth 2 architecture needs its own credentials. The authorization server also manages these credentials and only allows requests from known clients (figure 13.3).
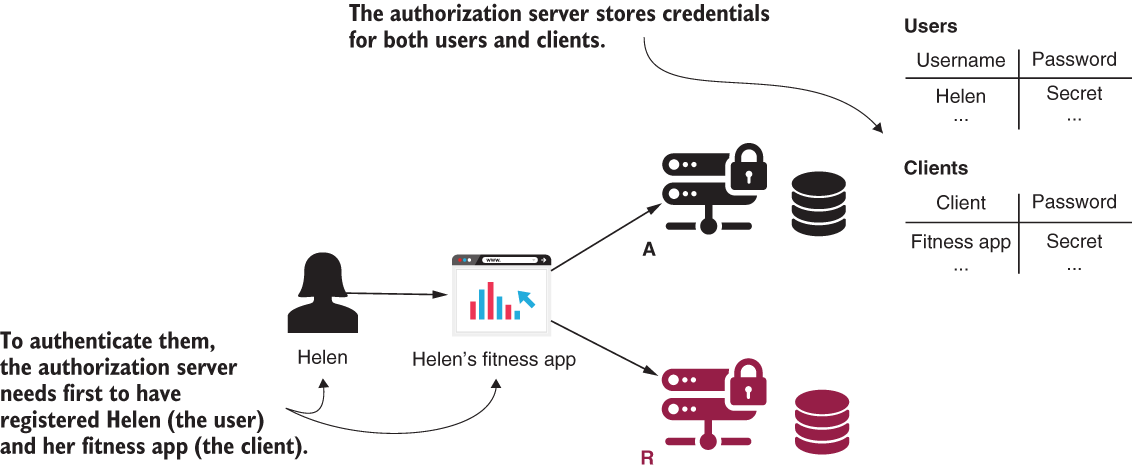
Figure 13.3 The authorization server stores the user’s and client’s credentials. It uses the client credentials so that it only allows known applications to be authorized by it.
Do you remember the client application we developed in chapter 12? We used GitHub as our authentication server. GitHub needed to know about the client app, so the first thing we did was register the application at GitHub. We then received a client ID and a client secret: the client credentials. We configured these credentials, and our app used them to authenticate with the authorization server (GitHub). The same applies in this case. Our authorization server needs to know its clients because it accepts requests from them. Here the process should become familiar. The contract that defines the client for the authorization server is ClientDetails. The contract defining the object to retrieve ClientDetails by their IDs is ClientDetailsService.
Do these names sound familiar? These interfaces work like the UserDetails and the UserDetailsService interfaces, but these represent the clients. You’ll find that many of the things we discussed in chapter 3 work similarly for ClientDetails and ClientDetailsService. For example, our InMemoryClientDetailsService is an implementation of the ClientDetailsService interface, which manages ClientDetails in memory. It works similarly to the InMemoryUserDetailsManager class for UserDetails. Likewise, JdbcClientDetailsService is similar to JdbcUserDetailsManager. Figure 13.4 shows these classes and interfaces, and the relationships among these.

Figure 13.4 The dependencies between classes and interfaces that we use to define the client management for the authorization server
We can sum up these similarities in a few points that you can easily remember:
-
ClientDetailsis for the client whatUserDetailsis for the user. -
ClientDetailsServiceis for the client whatUserDetailsServiceis for the user. -
InMemoryClientDetailsServiceis for the client whatInMemoryUser-DetailsManageris for the user. -
JdbcClientDetailsServiceis for the client whatJdbcUserDetailsManageris for the user.
Listing 13.5 shows you how to define a client configuration and set it up using InMemoryClientDetailsService. The BaseClientDetails class I use in the listing is an implementation of the ClientDetails interface provided by Spring Security. In listing 13.6, you can find a shorter way of writing the same configuration.
Listing 13.5 Using InMemoryClientDetailsService to configure a client
@Configuration
@EnableAuthorizationServer
public class AuthServerConfig
   extends AuthorizationServerConfigurerAdapter {

   // Omitted code

  @Override                                             ❶
  public void configure(
    ClientDetailsServiceConfigurer clients)
    throws Exception {

    var service = new InMemoryClientDetailsService();   ❷

    var cd = new BaseClientDetails();                   ❸
    cd.setClientId("client");                           ❸
    cd.setClientSecret("secret");                       ❸
    cd.setScope(List.of("read"));                       ❸
    cd.setAuthorizedGrantTypes(List.of("password"));    ❸

    service.setClientDetailsStore(
                Map.of("client", cd));                  ❹

    clients.withClientDetails(service);                 ❺
  }
}
❶ Overrides the configure() method to set up the ClientDetailsService instance
❷ Creates an instance using the ClientDetailsService implementation
❸ Creates an instance of ClientDetails and sets the needed details about the client
❹ Adds the ClientDetails instance to InMemoryClientDetailsService
❺ Configures ClientDetailsService for use by our authorization server
Listing 13.6 presents a shorter method for writing the same configuration. This enables us to avoid repetition and to write cleaner code.
Listing 13.6 Configuring ClientDetails in memory
@Configuration
@EnableAuthorizationServer
public class AuthServerConfig
  extends AuthorizationServerConfigurerAdapter {

  // Omitted code

  @Override
  public void configure(
    ClientDetailsServiceConfigurer clients)
      throws Exception {

      clients.inMemory()                        ❶
             .withClient("client")              ❷
             .secret("secret")                  ❷
             .authorizedGrantTypes("password")  ❷
             .scopes("read");                   ❷
    }
}
❶ Uses a ClientDetailsService implementation to manage the ClientDetails stored in memory
❷ Builds and adds an instance of ClientDetails
To write less code, I prefer using the shorter version over the more detailed one in listing 13.5. But if you write an implementation where you store client details in a database, which is mainly the case for real-world scenarios, then it’s best to use the contracts from listing 13.5.
Exercise Write an implementation to manage client details in a database. You can use an implementation similar to the UserDetailsService we worked on in section 3.3.
NOTE As we did for UserDetailsService, in this example we use an implementation that manages the details in memory. This approach only works for examples and study purposes. In a real-world scenario, you’d use an implementation that persists these details, usually in a database.
13.4 Using the password grant type
In this section, we use the authorization server with the OAuth 2 password grant. Well, we mainly test if it’s working, because with the implementation we did in sections 13.2 and 13.3, we already have a working authorization server that uses the password grant type. I told you it’s easy! Figure 13.5 reminds you of the password grant type and the place of the authorization server within this flow.
Now, let’s start the application and test it. We can request a token at the /oauth/token endpoint. Spring Security automatically configures this endpoint for us. We use the client credentials with HTTP Basic to access the endpoint and send the needed details as query parameters. As you know from chapter 12, the parameters we need to send in this request are

Figure 13.5 The password grant type. The authorization server receives the user credentials and authenticates the user. If the credentials are correct, the authorization server issues an access token that the client can use to call resources that belong to the authenticated user.
In the next code snippet, you see the cURL command:
"curl -v -XPOST -u client:secret http://localhost:8080/oauth/
➥ token?grant_type=password&username=john&password=12345&scope=read"
Running this command, you get this response:
{
  "access_token":"693e11d3-bd65-431b-95ff-a1c5f73aca8c",
  "token_type":"bearer",
  "expires_in":42637,
  "scope":"read"
}
Observe the access token in the response. With the default configuration in Spring Security, a token is a simple UUID. The client can now use this token to call the resources exposed by the resource server. In section 13.2, you learned how to implement the resource server and also, there, you learned more about customizing tokens.
13.5 Using the authorization code grant type
In this section, we discuss configuring the authorization server for the authorization code grant type. You used this grant type with the client application we developed in chapter 12, and you know it’s one of the most commonly used OAuth 2 grant types. It’s essential to understand how to configure your authorization server to work with this grant type as it’s highly probable that you’ll find this requirement in a real-world system. In this section, therefore, we write some code to prove how to make it work with Spring Security. I created another project named ssia-ch13-ex2. From figure 13.6, you can recall how the authorization code grant type works and how the authorization server interacts with the other components in this flow.

Figure 13.6 In the authorization code grant type, the client redirects the user to the authorization server for authentication. The user directly interacts with the authorization server and, once authenticated, the authorization server returns to the client a redirect URI. When it calls back to the client, it also provides an authorization code. The client uses the authorization code to obtain an access token.
As you learned in section 13.3, it’s all about how you register the client. So, all you need to do to use another grant type is set it up in the client registration, as presented in listing 13.7. For the authorization code grant type, you also need to provide the redirect URI. This is the URI to which the authorization server redirects the user once it completes authentication. When calling the redirect URI, the authorization server also provides the access code.
Listing 13.7 Setting the authorization code grant type
@Configuration
@EnableAuthorizationServer
public class AuthServerConfig
  extends AuthorizationServerConfigurerAdapter {

    // Omitted code

  @Override
  public void configure(
    ClientDetailsServiceConfigurer clients)
      throws Exception {

      clients.inMemory()
         .withClient("client")
         .secret("secret")
         .authorizedGrantTypes("authorization_code")
         .scopes("read")
         .redirectUris("http://localhost:9090/home");
  }

  @Override
  public void configure(
    AuthorizationServerEndpointsConfigurer endpoints) {
      endpoints.authenticationManager(authenticationManager);
  }
}
You can have multiple clients, and each might use different grants. But it’s also possible to set up multiple grants for one client. The authorization server acts according to the client’s request. Take a look at the following listing to see how you can configure different grants for different clients.
Listing 13.8 Configuring clients with different grant types
@Configuration
@EnableAuthorizationServer
public class AuthServerConfig
  extends AuthorizationServerConfigurerAdapter {

    // Omitted code

  @Override
  public void configure(
    ClientDetailsServiceConfigurer clients)
      throws Exception {

       clients.inMemory()

         .withClient("client1")
         .secret("secret1")
         .authorizedGrantTypes(               ❶
           "authorization_code")
         .scopes("read")
         .redirectUris("http://localhost:9090/home")
           .and()

         .withClient("client2")
         .secret("secret2")
         .authorizedGrantTypes(              ❷
           "authorization_code", "password", "refresh_token")
         .scopes("read")
         .redirectUris("http://localhost:9090/home");
    }

    @Override
    public void configure(
      AuthorizationServerEndpointsConfigurer endpoints) {
        endpoints.authenticationManager(authenticationManager);
    }
}
❶ Client with ID client1 can only use the authorization_code grant
❷ Client with ID client2 can use any of authorization_code, password, and refresh tokens

When sharing client credentials, multiple clients use the same credentials to obtain access tokens from the authorization server.
clients.inMemory()
       .withClient("client")
       .secret("secret")
       .authorizedGrantTypes(
         "authorization_code",
         "client_credentials")
       .scopes("read")
clients.inMemory()
       .withClient("client")
       .secret("secret")
       .authorizedGrantTypes("password", "hocus_pocus")
       .scopes("read")
Let’s start the application using the configuration presented in listing 13.9. When we want to accept the authorization code grant type, the server also needs to provide a page where the client redirects the user for login. We implement this page using the form-login configuration you learned in chapter 5. You need to override the configure() method as presented in the following listing.
Listing 13.9 Configuring form-login authentication for the authorization server
@Configuration
public class WebSecurityConfig
  extends WebSecurityConfigurerAdapter {

  // Omitted code

  @Override
  protected void configure(HttpSecurity http)
    throws Exception {
      http.formLogin();
  }
}
You can now start the application and access the link in your browser as presented by the following code snippet. Then you are redirected to the login page as presented in figure 13.7.
http://localhost:8080/oauth/authorize?response_type=code&client_id=client&scope=read

Figure 13.7 The authorization server redirects you to the login page. After it authenticates you, it redirects you to the provided redirect URI.
After logging in, the authorization server explicitly asks you to grant or reject the requested scopes. Figure 13.8 shows this form.

Figure 13.8 After authentication, the authorization server asks you to confirm the scopes you want to authorize.
Once you grant the scopes, the authorization server redirects you to the redirect URI and provides an access token. In the next code snippet, you find the URL to which the authorization server redirected me. Observe the access code the client got through the query parameter in the request:
http://localhost:9090/home?code=qeSLSt ❶
❶ This is the authorization code.
Your application can use the authorization code now to obtain a token calling the /oauth/token endpoint:
curl -v -XPOST -u client:secret "http://localhost:8080/oauth/token?grant_type=authorization_code&scope=read&code=qeSLSt"
{
  "access_token":"0fa3b7d3-e2d7-4c53-8121-bd531a870635",
  "token_type":"bearer",
  "expires_in":43052,
  "scope":"read"
}
Mind that an authorization code can only be used once. If you try to call the /oauth/token endpoint using the same code again, you receive an error like the one displayed in the next code snippet. You can only obtain another valid authorization code by asking the user to log in again.
{
  "error":"invalid_grant",
  "error_description":"Invalid authorization code: qeSLSt"
}
13.6 Using the client credentials grant type
In this section, we discuss implementing the client credentials grant type. You may remember from chapter 12 that we use this grant type for backend-to-backend authentications. It’s not mandatory in this case, but sometimes we see this grant type as an alternative to the API key authentication method we discussed in chapter 8. We might use the client credentials grant type also when we secure an endpoint that’s unrelated to a specific user and for which the client needs access. Let’s say you want to implement an endpoint that returns the status of the server. The client calls this endpoint to check the connectivity and eventually displays a connection status to the user or an error message. Because this endpoint only represents a deal between the client and the resource server, and is not involved with any user-specific resource, the client should be able to call it without needing the user to authenticate. For such a scenario, we use the client credentials grant type. Figure 13.9 reminds you how the client credentials grant type works and how the authorization server interacts with the other components in this flow.

Figure 13.9 The client credentials grant type doesn’t involve the user. Generally, we use this grant type for authentication between two backend solutions. The client needs only its credentials to authenticate and obtain an access token.
NOTE Don’t worry for the moment about how the resource server validates tokens. We’ll discuss all possible scenarios for this in detail in chapters 14 and 15.
As you’d expect, to use the client credentials grant type, a client must be registered with this grant. I defined a separate project called ssia-ch13-ex3 to prove this grant type. In the next listing, you can find the client’s configuration, which uses this grant type.
Listing 13.10 The client registration for the client credentials grant type
@Configuration
@EnableAuthorizationServer
public class AuthServerConfig
  extends AuthorizationServerConfigurerAdapter {

  // Omitted code

  @Override
  public void configure(
    ClientDetailsServiceConfigurer clients)
        throws Exception {

    clients.inMemory()
              .withClient("client")
              .secret("secret")
              .authorizedGrantTypes("client_credentials")
              .scopes("info");
  }
}
You can start the application now and call the /oauth/token endpoint to get an access token. The next code snippet shows you how to obtain this:
"curl -v -XPOST -u client:secret "http://localhost:8080/oauth/token?grant_type=client_credentials&scope=info""
{
  "access_token":"431eb294-bca4-4164-a82c-e08f56055f3f",
  "token_type":"bearer",
  "expires_in":4300,
  "scope":"info"
}
Be careful with the client credentials grant type. This grant type only requires the client to use its credentials. Make sure that you don’t offer it access to the same scopes as flows that require user credentials. Otherwise, you might allow the client access to the users’ resources without needing the permission of the user. Figure 13.10 presents such a design in which the developer created a security breach by allowing the client to call a user’s resource endpoint without needing the user to authenticate first.

Figure 13.10 A vicious design of the system. The developers wanted to offer the client the possibility to call the /info endpoint without the need for the user’s permission. But because these used the same scope, they’ve now allowed the client to also call the /transactions endpoint, which is a user’s resource.
13.7 Using the refresh token grant type
In this section, we discuss using refresh tokens with the authorization server developed with Spring Security. As you may recall from chapter 12, refresh tokens offer several advantages when used together with another grant type. You can use refresh tokens with the authorization code grant type and with the password grant type (figure 13.11).
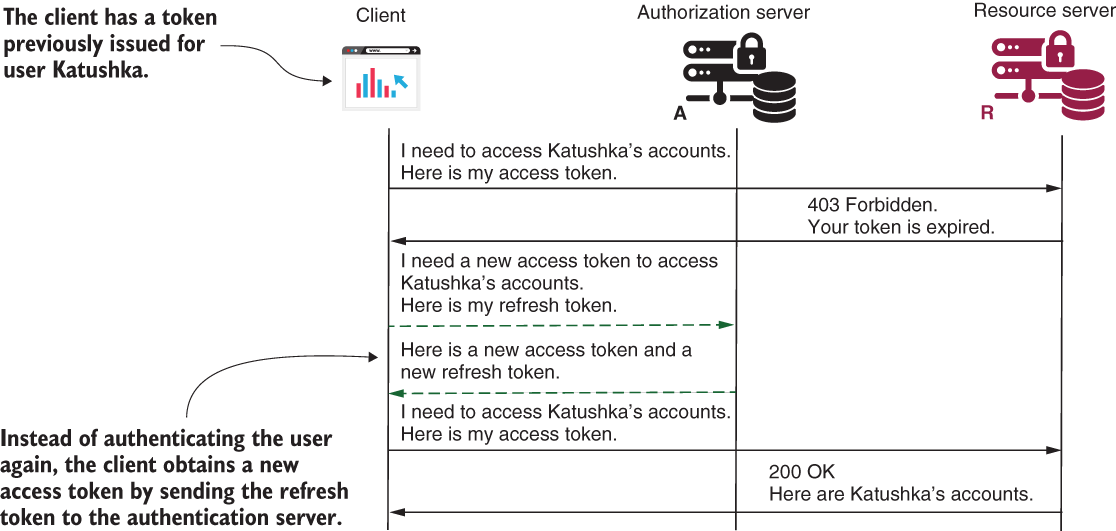
Figure 13.11 When the user authenticates, the client also receives a refresh token besides the access token. The client uses the refresh token to get a new access token.
If you want your authorization server to support refresh tokens, you need to add the refresh token grant to the grant list of the client. For example, if you want to change the project we created in section 13.4 to prove the refresh token grant, you would change the client as presented in the next listing. This change is implemented in project ssia-ch13-ex4.
Listing 13.11 Adding the refresh token
@Configuration
@EnableAuthorizationServer
public class AuthServerConfig
  extends AuthorizationServerConfigurerAdapter {

  // Omitted code

  @Override
  public void configure(
    ClientDetailsServiceConfigurer clients) throws Exception {
      clients.inMemory()
        .withClient("client")
        .secret("secret")
        .authorizedGrantTypes(
           "password",
           "refresh_token")      ❶
        .scopes("read");
  }
}
❶ Adds refresh_token in the authorized grant types list of the client
Now try the same cURL command you used in section 13.4. You’ll see the response is similar but now includes a refresh token:
"curl -v -XPOST -u client:secret http://localhost:8080/oauth/token?grant_type=password&username=john&password=12345&scope=read"
The next code snippet presents the response of the previous command:
{
  "access_token":"da2a4837-20a4-447d-917b-a22b4c0e9517",
  "token_type":"bearer",
  "refresh_token":"221f5635-086e-4b11-808c-d88099a76213",       ❶
  "expires_in":43199,
  "scope":"read"
}
❶ The app added the refresh token to the response.
Summary
-
The
ClientRegistrationinterface defines the OAuth 2 client registration in Spring Security. TheClientRegistrationRepositoryinterface describes the object responsible for managing client registrations. These two contracts allow you to customize how your authorization server manages client registrations. -
For the authorization server implemented with Spring Security, the client registration dictates the grant type. The same authorization server can offer different grant types to different clients. This means that you don’t have to implement something specific in your authorization server to define multiple grant types.
-
For the authorization code grant type, the authorization server has to offer to the user the possibility to log in. This requirement is a consequence of the fact that in the authorization code flow, the user (resource owner) directly authenticates itself at the authorization server to grant access to the client.
-
A
ClientRegistrationcan request multiple grant types. This means that a client can use, for example, both password and authorization code grant types in different circumstances. -
We use the client credentials grant type for backend-to-backend authorization. It’s technically possible, but uncommon, that a client requests the client credentials grant type together with another grant type.
-
We can use the refresh token together with the authorization code grant type and with the password grant type. By adding the refresh token to the client registration, we instruct the authorization server to also issue a refresh token besides the access token. The client uses the refresh token to obtain a new access token without needing to authenticate the user again.