
If you already work with OAuth 2, I know what you’re thinking: the OAuth 2 framework is a vast subject that could take an entire book to cover. And I can’t argue with that, but in four chapters, you’ll learn everything you need to know about applying OAuth 2 with Spring Security. We’ll start this chapter with an overview, where you’ll discover that the main actors in the OAuth 2 framework are the user, the client, the resource server, and the authorization server. After the general introduction, you’ll learn how to use Spring Security to implement the client. Then, in chapters 13 through 15, we’ll discuss implementing the last two components: the resource server and the authorization server. I’ll give you examples and apps you can adapt to any of your real-world scenarios.
To reach this goal, in this chapter, we’ll discuss what OAuth 2 is, and then we’ll apply it to an application focused on authentication with single sign-on (SSO). The reason why I like teaching this subject with the example of an SSO is that it’s very simple but also very useful. It provides an overview of OAuth 2, and it gives you the satisfaction of implementing a fully working application without writing too much code.
In chapters 13 through 15, we’ll apply what is covered in this chapter in code examples that you are already familiar with from previous chapters of this book. Once we finish these four chapters, you’ll have an excellent overview of the things you need for implementing OAuth 2 with Spring Security in your applications.
As OAuth 2 is such a big subject, I’ll refer, where appropriate, to different resources I consider essential. However, I won’t scare you (at least, not intentionally). Spring Security makes the development of applications with OAuth 2 easy. The only prerequisites you need to get started are chapters 2 through 11 of this book, in which you learned the general architecture of authentication and authorization in Spring Security. What we’ll discuss about OAuth 2 is based on the same foundation of the standard authorization and authentication architecture of Spring Security.
12.1 The OAuth 2 framework
In this section, we discuss the OAuth 2 framework. Today, OAuth 2 is commonly used in securing web applications, so you’ve probably already heard about it. The chances are that you’ll need to apply OAuth 2 in your applications. And this is why we need to discuss applying OAuth 2 in Spring applications with Spring Security. We start with a little bit of theory and then move on to apply it with an application using SSO.
In most cases, OAuth 2 is referred to as an authorization framework (or a specification framework) whose primary purpose is to allow a third-party website or app access to a resource. Sometimes people refer to OAuth 2 as a delegation protocol. Whatever you choose to call it, it’s important to remember that OAuth 2 is not a specific implementation or a library. You could, as well, apply the OAuth 2 flow definitions with other platforms, tools, or languages. In this book, you’ll find out how to implement OAuth 2 with Spring Boot and Spring Security.
I think that a great way to understand what OAuth 2 is and its usefulness is to start the discussion with examples we’ve already analyzed in this book. The most trivial way to authenticate, which you saw in plenty of examples up to now, is the HTTP Basic authentication method. Isn’t this enough for our systems such that we don’t have to add more complexity? No. With HTTP Basic authentication, we have two issues we need to take into consideration:
-
Sending credentials for each and every request (figure 12.1)
-
Having the credentials of the users managed by a separate system

Figure 12.1 When using HTTP Basic authentication, you need to send credentials and repeat authentication logic with all requests. This approach implies sharing credentials often over the network.
Sending credentials for each and every request might work with isolated cases, but that’s generally undesirable because it implies
-
Having the client (browser, in case of a web application) store credentials somehow so that the client can send those to the server with the request to get authenticated and authorized
We want to get rid of these two points from our applications’ architecture because they weaken security by making credentials vulnerable. Most often, we want to have a separate system manage user credentials. Imagine, that you have to configure and use separate credentials for all the applications you work with in your organization (figure 12.2).

Figure 12.2 In an organization, you work with multiple applications. Most of these need you to authenticate to use them. It would be challenging for you to know multiple passwords and for the organization to manage multiple sets of credentials.
It would be better if we isolated the responsibility for credential management in one component of our system. Let’s call it, for now, the authorization server (figure 12.3).

Figure 12.3 An easier-to-maintain architecture keeps credentials separately and allows all applications to use the same set of credentials for its users.
This approach eliminates the duplication of credentials representing the same individual. In this way, the architecture becomes simpler and easier to maintain.
12.2 The components of the OAuth 2 authentication architecture
In this section, we discuss the components that act in OAuth 2 authentication implementations. You need to know these components and the role they play, as we refer to them throughout the next sections. I also refer to them throughout the rest of the book wherever we write an implementation related to OAuth 2. But in this section, we only discuss what these components are and their purpose (figure 12.4). As you’ll learn in section 12.3, there are more ways in which these components “talk” to each other. And, in that section, you’ll also learn about different flows that cause different interactions between these components.
As mentioned, OAuth 2 components include
-
The resource server --The application hosting resources owned by users. Resources can be users’ data or their authorized actions.
-
The user (also known as the resource owner) --The individual who owns resources exposed by the resource server. A user generally has a username and a password that they use to identify themselves.

Figure 12.4 The main components of the OAuth 2 architecture are the resource owner, the client, the authorization server, and the resource server. Each of these has its own responsibility, which is essential in the authentication and authorization process.
-
The client --The application that accesses the resources owned by the user on their behalf. The client uses a client ID and a client secret to identify itself. Be careful, these credentials are not the same as the user credentials. The client needs its own credentials to identify itself when making a request.
-
The authorization server --The application that authorizes the client to access the user’s resources exposed by the resource server. When the authorization server decides that a client is authorized to access a resource on behalf of the user, it issues a token. The client uses this token to prove to the resource server that it was authorized by the authorization server. The resource server allows the client to access the resource it requested if it has a valid token.
12.3 Implementation choices with OAuth 2
In this section, we discuss how to apply OAuth 2, depending on the architecture of your application. As you’ll learn, OAuth 2 implies multiple possible authentication flows, and you need to know which one applies to your case. In this section, I take the most common cases and evaluate these. It’s important to do this before starting with the first implementation so that you know what you’re implementing.
So how does OAuth 2 work? What does it mean to implement OAuth 2 authentication and authorization? Mainly, OAuth 2 refers to using tokens for authorization. Remember from section 11.2 that tokens are like access cards. Once you obtain a token, you can access specific resources. But OAuth 2 offers multiple possibilities for obtaining a token, called grants. Here are the most common OAuth 2 grants you can choose from:
When starting an implementation, we need to choose our grant. Do we select it randomly? Of course not. We need to know how tokens are created for each type of grant. Then, depending on our application requirements, we choose one of them. Let’s analyze each one and look at where it applies. You can also find an excellent discussion about grant types in section 6.1 of OAuth 2 In Action by Justin Richer and Antonio Sanso (Manning, 2017):
https://livebook.manning.com/book/oauth-2-in-action/chapter-6/6
12.3.1 Implementing the authorization code grant type
In this section, we discuss the authorization code grant type (figure 12.5). We’ll also use it in the application we’ll implement in section 12.5. This grant type is one of the most commonly used OAuth 2 flows, so it’s quite important to understand how it works and how to apply it. There’s a high probability that you’ll use it in applications you develop.

Figure 12.5 The authorization code grant type. The client asks the user to interact directly with the authorization server to grant it permission for the user’s request. Once authorized, the authorization server issues a token that the client uses to access the user’s resources.
NOTE The arrows in figure 12.5 don’t necessarily represent HTTP requests and responses. These represent messages exchanged among the actors of OAuth 2. For example, when the client tells the user (second arrow from the top of the diagram), “Tell the authorization server you allow me to do this action,” the client then redirects the user to the authorization server login page. When the authorization server gives the client an access token, the authorization server actually calls the client on what we call a redirect URI. You’ll learn all these details in chapters 12 through 15, so don’t worry about them for now. With this note, I wanted to make you aware that these sequence diagrams are not just representing HTTP requests and responses. These are a simplified description of communication among OAuth 2 actors.
Here’s how the authorization code grant type works. Following this, we dive into the details about each step.
Step 1: Making the authentication request with the authorization code grant type
The client redirects the user to an endpoint of the authorization server where they need to authenticate. You can imagine you are using app X, and you need to access a protected resource. To access that resource for you, app X needs you to authenticate. It opens a page for you with a login form on the authorization server that you must fill in with your credentials.
NOTE What’s really important to observe here is that the user interacts directly with the authorization server. The user doesn’t send the credentials to the client app.
Technically, what happens here is that when the client redirects the user to the authorization server, the client calls the authorization endpoint with the following details in the request query:
-
response_typewith the valuecode, which tells the authorization server that the client expects a code. The client needs the code to obtain an access token, as you’ll see in the second step. -
client_idwith the value of the client ID, which identifies the application itself. -
redirect_uri, which tells the authorization server where to redirect the user after successful authentication. Sometimes the authorization server already knows a default redirect URI for each client. For this reason, the client doesn’t need to send the redirect URI. -
scope, which is similar to the granted authorities we discussed in chapter 5. -
state, which defines a cross-site request forgery (CSRF) token used for the CSRF protection we discussed in chapter 10.
After successful authentication, the authorization server calls back the client on the redirect URI and provides a code and the state value. The client checks that the state value is the same as the one it sent in the request to confirm that it was not someone else attempting to call the redirect URI. The client uses the code to obtain an access token as presented in step 2.
Step 2: Obtaining an access token with the authorization code grant type
To allow the user to access resources, the code resulting from step 1 is the client’s proof that the user authenticated. You guessed correctly, this is why this is called the authorization code grant type. Now the client calls the authorization server with the code to get the token.
NOTE In the first step, the interaction was between the user and the authorization server. In this step, the interaction is between the client and the authorization server (figure 12.6).
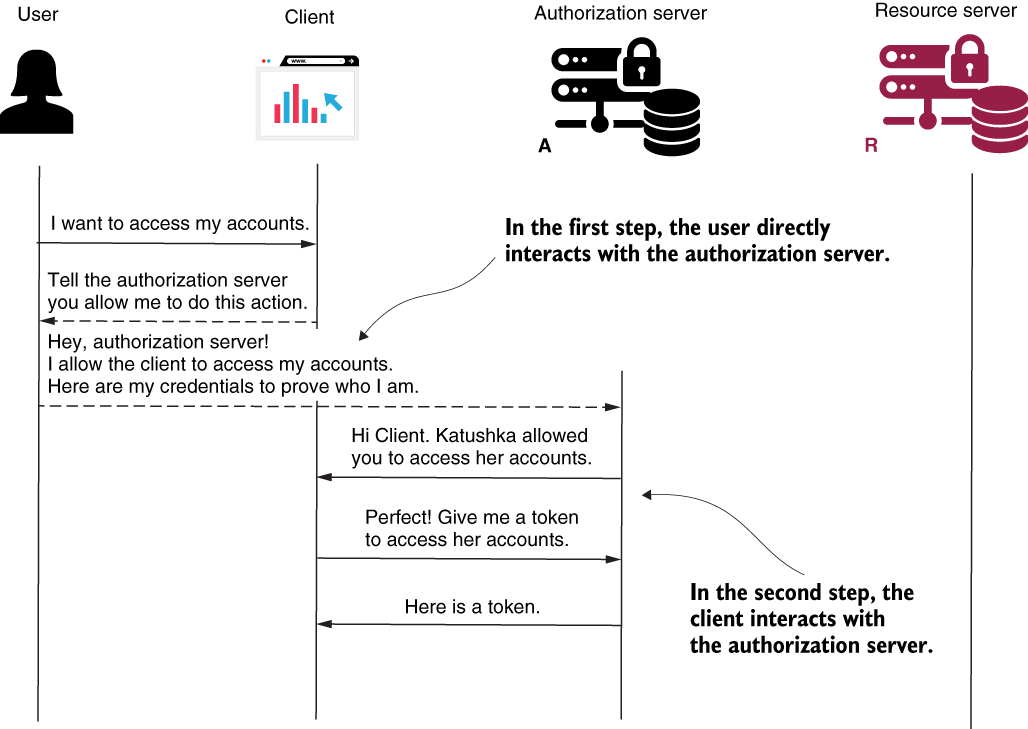
Figure 12.6 The first step implies direct interaction between the user and the authorization server. In this, the second step, the client requests an access token from the authorization server and provides the authorization code obtained in step 1.
In many cases, these first two steps create confusion. People are generally puzzled about why the flow needs two calls to the authorization server and two different tokens--the authorization code and an access token. Take a moment to understand this:
-
The authorization server generates the first code as proof that the user directly interacted with it. The client receives this code and has to authenticate again using it and its credentials to obtain an access token.
-
The client uses the second token to access resources on the resource server.
So why didn’t the authorization server directly return the second token (access token)? Well, OAuth 2 defines a flow called the implicit grant type where the authorization server directly returns an access token. The implicit grant type is not enumerated in this section because it’s usage is not recommended, and most authorization servers today don’t allow it. The simple fact that the authorization server would call the redirect URI directly with an access token without making sure that it was indeed the right client receiving that token makes the flow less secure. By sending an authorization code first, the client has to prove again who they are by using their credentials to obtain an access token. The client makes a final call to get an access token and sends
-
The authorization code, which proves the user authorized them
-
Their credentials, which proves they really are the same client and not someone else who intercepted the authorization codes
To return to step 2, technically, the client now makes a request to the authorization server. This request contains the following details:
-
code, which is the authorization code received in step 1. This proves that the user authenticated. -
redirect_uri, which is the same one used in step 1 for validation. -
grant_typewith the valueauthorization_code, which identifies the kind of flow used. A server might support multiple flows, so it’s essential always to specify which is the current executed authentication flow.
As a response, the server sends back an access_token. This token is a value that the client can use to call resources exposed by the resource server.
Step 3: Calling the protected resource with the authorization code grant type
After successfully obtaining the access token from the authorization server, the client can now call for the protected resource. The client uses an access token in the authorization request header when calling an endpoint of the resource server.
An analogy for the grant type authorization code
I end this section with an analogy for this flow. I sometimes buy books from a small shop I’ve known for ages. I have to order books in advance and then pick them up a couple of days later. But the shop isn’t on my daily route, so sometimes I can’t go myself to pick up the books. I usually ask a friend who lives near me to go there and collect them for me. When my friend asks for my order, the lady from the shop calls me to confirm I’ve sent someone to fetch my books. After my confirmation, my friend collects the package and brings it to me later in the day.
In this analogy, the books are the resources. I own them, so I’m the user (resource owner). My friend that picks them up for me is the client. The lady selling the books is the authorization server. (We can also consider her or the book store as being the resource server.) Observe that to grant permission to my friend (client) to collect the books (resources), the lady (authorization server) selling the books calls me (user) directly. This analogy describes the processes of the authorization code and implicit grant types. Of course, because we have no token in the story, the analogy is partial and describes both cases.
NOTE The authorization code grant type has the great advantage of enabling the user to allow a client to execute specific actions without needing to share their credentials with the client. But this grant type has a weakness: what happens if someone intercepts the authorization code? Of course, the client needs to authenticate with its credentials, as we discussed previously. But what if the client credentials are also stolen somehow? Even if this scenario isn’t easy to achieve, we can consider it a vulnerability of this grant type. To mitigate this vulnerability, you need to rely on a more complex scenario as presented by the Proof Key for Code Exchange (PKCE) authorization code grant type. You can find an excellent description of the PKCE authorization code grant type directly in the RFC 7636: https://tools.ietf.org/html/rfc7636. For an excellent discussion on this subject, I also recommend you read section 7.3.2 of API Security in Action by Neil Madden (Manning, 2020): http://mng.bz/nzvV.
12.3.2 Implementing the password grant type
In this section, we discuss the password grant type (figure 12.7). This grant type is also known as the resource owner credentials grant type. Applications using this flow assume that the client collects the user credentials and uses these to authenticate and obtain an access token from the authorization server.
Remember our hands-on example in chapter 11? The architecture we implemented is quite close to what happens in the password grant type. We also implement a real OAuth 2 password grant type architecture with Spring Security in chapters 13 through 15.
NOTE You might wonder at this point about how the resource server knows whether a token is valid. In chapters 13 and 14, we’ll discuss the approaches a resource server uses to validate a token. For the moment, you should focus on the grant type discussion, because we only refer to how the authorization server issues access tokens.
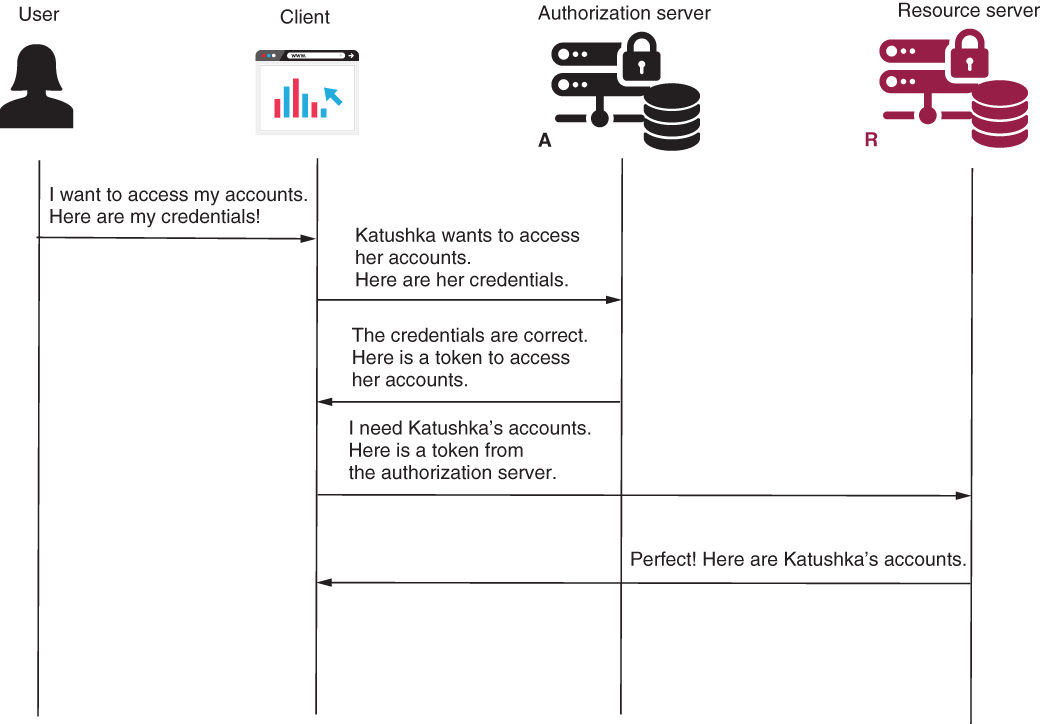
Figure 12.7 The password grant type assumes that the user shares their credentials with the client. The client uses these to obtain a token from the authorization server. It then accesses the resources from the resource server on behalf of the user.
You use this authentication flow only if the client and authorization server are built and maintained by the same organization. Why? Let’s assume you build a microservices system, and you decide to separate the authentication responsibility as a different microservice to enhance scalability and keep responsibilities separated for each service. (This separation is used widely in many systems.)
Let’s assume further that your system’s users use either a client web application developed with a frontend framework like Angular, ReactJS, or Vue.js, or they use a mobile app. In this case, users might consider it strange to be redirected from your system to the same system for authentication and then back again. This is what would happen with a flow like the authorization code grant type. With the password grant type, you would instead expect to have the application present a login form to the user, and let the client take care of sending the credentials to the server to authenticate. The user doesn’t need to know how you designed the authentication responsibility in your application. Let’s see what happens when using the password grant type. The two tasks are as follows:
Step 1: Requesting an access token when using the password grant type
The flow is much simpler with the password grant type. The client collects the user credentials and calls the authorization server to obtain an access token. When requesting the access token, the client also sends the following details in the request:
-
client_idandclient_secret, which are the credentials used by the client to authenticate itself. -
usernameandpassword, which are the user credentials. These are sent in plain text as values of the request header.
The client receives back an access token in the response. The client can now use the access token to call the endpoints of the resource server.
Step 2: Using an access token to call resources when using the password grant type
Once the client has an access token, it uses the token to call the endpoints on the resource server, which is exactly like the authorization code grant type. The client adds the access token to the requests in the authorization request header.
An analogy for the password grant type
To refer back to the analogy I made in section 12.3.1, imagine the lady selling the books doesn’t call me to confirm I want my friend to get the books. I would instead give my ID to my friend to prove that I delegated my friend to pick up the books. See the difference? In this flow, I need to share my ID (credentials) with the client. For this reason, we say that this grant type applies only if the resource owner “trusts” the client.
NOTE The password grant type is less secure than the authorization code grant type, mainly because it assumes sharing the user credentials with the client app. While it’s true that it’s more straightforward than the authorization code grant type and this is the main reason you also find it used plenty in theoretical examples, try to avoid this grant type in real-world scenarios. Even if the authorization server and the client are both built by the same organization, you should first think about using the authorization code grant type. Take the password grant type as your second option.
12.3.3 Implementing the client credentials grant type
In this section, we discuss the client credentials grant type (figure 12.8). This is the simplest of the grant types described by OAuth 2. You can use it when no user is involved; that is, when implementing authentication between two applications. I like to think about the client credentials grant type as being a combination of the password grant type and an API key authentication flow. We assume you have a system that implements authentication with OAuth 2. Now you need to allow an external server to authenticate and call a specific resource that your server exposes.

Figure 12.8 The client credentials grant type. We use this flow if a client needs to access a resource but not on behalf of a resource owner. This resource can be an endpoint that isn’t owned by a user.
In chapter 9, we discussed filter implementations. You learned how to create a custom filter to augment your implementation with authentication using an API key. You can still apply this approach using an OAuth 2 flow. And if your implementation uses OAuth 2, it’s undoubtedly cleaner to use the OAuth 2 framework in all cases rather than augment it with a custom filter that lies outside of the OAuth 2 framework.
The steps for the client credentials grant type are similar to the password grant type. The only exception is that the request for an access token doesn’t need any user credentials. Here are the steps to implement this grant type:
Step 1: Requesting an access token with the client credential grant type
To obtain an access token, the client sends a request to the authorization server with the following details:
In response, the client receives an access token. The client can now use the access token to call the endpoints of the resource server.
Step 2: Using an access token to call resources with the client credential grant type
Once the client has an access token, it uses that token to call the endpoints on the resource server, which is exactly like the authorization code grant type and the password grant type. The client adds the access token to the requests in the authorization request header.
12.3.4 Using refresh tokens to obtain new access tokens
In this section, we discuss refresh tokens (figure 12.9). Up to now, you learned that the result of an OAuth 2 flow, which we also call grant, is an access token. But we didn’t say much about this token. In the end, OAuth 2 doesn’t assume a specific implementation for tokens. What you’ll learn now is that a token, no matter how it’s implemented, can expire. It’s not mandatory--you can create tokens with an infinite lifespan--but, in general, you should make these as short lived as possible. The refresh tokens that we discuss in this section represent an alternative to using credentials for obtaining a new access token. I show you how refresh tokens work in OAuth 2, and you’ll also see these implemented with an application in chapter 13.
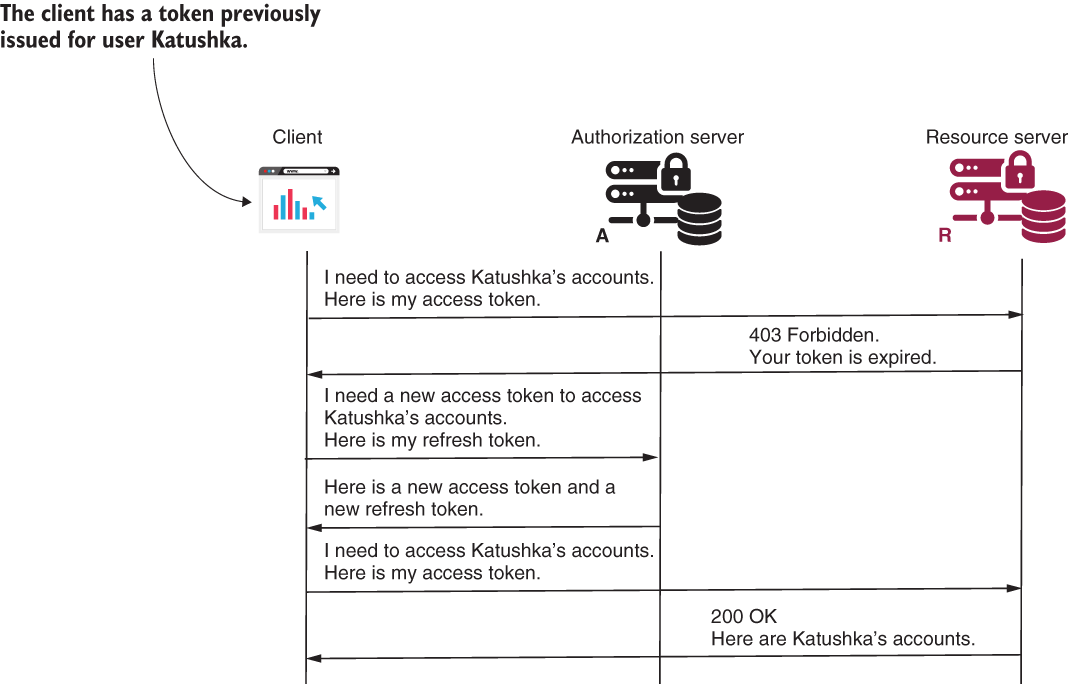
Figure 12.9 The refresh token. The client has an access token that expired. To avoid forcing the user to log in again, the client uses a refresh token to issue a new access token.
Let’s assume in your app, you implement tokens that never expire. That means that the client can use the same token again and again to call resources on the resource server. What if the token is stolen? In the end, don’t forget that the token is attached as a simple HTTP header on each and every request. If the token doesn’t expire, someone who gets their hands on the token can use it to access resources. A token that doesn’t expire is too powerful. It becomes almost as powerful as user credentials. We prefer to avoid this and make the token short lived. This way, at some point, an expired token can’t be used anymore. The client has to obtain another access token.
To obtain a new access token, the client can rerun the flow, depending on the grant type used. For example, if the grant type is authentication code, the client would redirect the user to the authorization server login endpoint, and the user must again fill in their username and password. Not really user friendly, is it? Imagine that the token has a 20-minute lifespan and you work for a couple of hours with the online app. During that time, the app would redirect you back about six times to log in again. (Oh no! That app logged me out again!) To avoid the need to reauthenticate, the authorization server can issue a refresh token, which has a different value and purpose than an access token. The app uses the refresh token to obtain a new access token instead of having to reauthenticate.
Refresh tokens also have advantages over reauthentication in the password grant type. Even if with the password grant type, if we don’t use refresh tokens, we would either have to ask the user to authenticate again or store their credentials. Storing the user credentials when using the password grant type is one of the biggest mistakes you can make! And I’ve seen this approach used in real applications! Don’t do it! If you store the username and password (and assuming you save these as plaintext or something reversible because you have to be able to reuse them), you expose those credentials. Refresh tokens help you solve this problem easily and safely. Instead of unsafely storing credentials and without needing to redirect the user every time, you can store a refresh token and use it to obtain a new access token when needed. Storing the refresh token is safer because you can revoke it if you find that it was exposed. Moreover, don’t forget that people tend to have the same credentials for multiple apps. So losing credentials is worse than losing a token that one could use with a specific application.
Finally, let’s look at how to use a refresh token. Where do you get a refresh token from? The authorization server returns a refresh token together with an access token when using a flow like the authorization code or password grant types. With the client credentials grant, there’s no refresh token because this flow doesn’t need user credentials. Once the client has a refresh token, the client should issue a request with the following details when the access token expires:
-
scope, which defines the same granted authorities or less. If more granted authorities need to be authorized, a reauthentication is needed.
In response to this request, the authorization server issues a new access token and a new refresh token.
12.4 The sins of OAuth 2
In this section, we discuss possible vulnerabilities of OAuth 2 authentication and authorization. It’s important to understand what can go wrong when using OAuth 2 so that you can avoid these scenarios. Of course, like anything else in software development, OAuth 2 isn’t bulletproof. It has its vulnerabilities of which we must be aware and which we must consider when building our applications. I enumerate here some of the most common:
-
Using cross-site request forgery (CSRF) on the client--With a user logged in, CSRF is possible if the application doesn’t apply any CSRF protection mechanism. We had a great discussion on CSRF protection implemented by Spring Security in chapter 10.
-
Stealing client credentials--Storing or transferring unprotected credentials can create breaches that allow attackers to steal and use them.
-
Replaying tokens--As you’ll learn in chapters 13 and 14, tokens are the keys we use within an OAuth 2 authentication and authorization architecture to access resources. You send these over the network, but sometimes, they might be intercepted. If intercepted, they are stolen and can be reused. Imagine you lose the key from your home’s front door. What could happen? Somebody else could use it to open the door as many times as they like (replay). We’ll learn in chapter 14 more about tokens and how to avoid token replaying.
-
Token hijacking--Implies someone interferes with the authentication process and steals tokens that they can use to access resources. This is also a potential vulnerability of using refresh tokens, as these as well can be intercepted and used to obtain new access tokens. I recommend this helpful article:
http://blog.intothesymmetry.com/2015/06/on-oauth-token-hijacks-for-fun-and.html
Remember, OAuth 2 is a framework. The vulnerabilities are the result of wrongly implementing functionality over it. Using Spring Security already helps us mitigate most of those vulnerabilities in our applications. When implementing an application with Spring Security, as you’ll see in this chapter, we need to set the configurations, but we rely on the flow as implemented by Spring Security.
For more details on vulnerabilities related to the OAuth 2 framework and how a deceitful individual can exploit them, you’ll find a great discussion in part 3 of OAuth 2 In Action by Justin Richer and Antonio Sanso (Manning, 2017). Here’s the link:
https://livebook.manning.com/book/oauth-2-in-action/part-3
12.5 Implementing a simple single sign-on application
In this section, we implement the first application of our book that uses the OAuth 2 framework with Spring Boot and Spring Security. This example shows you a general overview of how to apply OAuth 2 with Spring Security and teaches you some of the first contracts you need to know. A single sign-on (SSO) application is, as the name suggests, one in which you authenticate through an authorization server, and then the app keeps you logged in, using a refresh token. In our case, it represents only the client from the OAuth 2 architecture.
In this application (figure 12.10), we use GitHub as the authorization and resource servers, and we focus on the communication between the components with the authorization code grant type. In chapters 13 and 14, we’ll implement both an authorization server and a resource server in an OAuth 2 architecture.

Figure 12.10 Our application takes the role of the client in the OAuth 2 architecture. We use GitHub as the authorization server, but it also takes the role of the resource server, which allows us to retrieve the user’s details.
12.5.1 Managing the authorization server
In this section, we configure the authorization server. In this chapter, we won’t implement our own authorization server, but instead, we use an existing one: GitHub. In chapter 13, you’ll learn how to implement your own authorization server.
So what should we do to use a third-party like GitHub as an authorization server? This means that, in the end, our application won’t manage its users, and that anyone can log in to our application using their GitHub account. Like any other authorization server, GitHub needs to know the client application to which it issues tokens. Remember in section 12.3, where we discussed the OAuth 2 grants, that requests used a client ID and a client secret. A client uses these credentials to authenticate itself at the authorization server, so the OAuth application must be registered with the GitHub authorization server. To do this, we complete a short form (figure 12.11) using the following link:
https://github.com/settings/applications/new
When you add a new OAuth application, you need to specify a name for the application, the homepage, and the link to which GitHub will make the call back to your application. The OAuth 2 grant type on which this works is the authorization code grant type. This grant type assumes that the client redirects the user to the authorization server (GitHub, in our case) for login, and then the authorization server calls the client back at a defined URL, as we discussed in section 12.3.1. This is why you need to identify the callback URL here. Because I run the example on my system, I use the localhost in both cases. And because I don’t change the port (which is 8080 by default, as you already know), this makes http://localhost:8080 my homepage URL. I use the same URL for the callback.
NOTE The client side of GitHub (your browser) calls the localhost. This is how you can test your application locally.

Figure 12.11 To use your application as an OAuth 2 client with GitHub as the authorization server, you must register it first. You do this by filling in the form to add a new OAuth application on GitHub.

Figure 12.12 When you register an OAuth application with GitHub, you receive the credentials for your client. You use these in your application configuration.
Once you fill out the form and choose Register Application, GitHub provides you with a client ID and a client secret (figure 12.12).
NOTE I deleted the application you see in the image. Because these credentials offer access to confidential information, I cannot let these stay alive. For this reason, you can’t reuse the credentials; you’ll need to generate your own as presented in this section. Also, be careful when writing an application using such credentials, especially if you use a public Git repository to store them.
This configuration is everything we need to do for the authorization server. Now that we have the client credentials, we can start working on our application.
12.5.2 Starting the implementation
In this section, we begin implementing an SSO application. You can find this example in the project ssia-ch12-ex1. We create a new Spring Boot application and add the following dependencies to the pom.xml file:
<dependency>
   <groupId>org.springframework.boot</groupId>
   <artifactId>spring-boot-starter-oauth2-client</artifactId>
</dependency>
<dependency>
   <groupId>org.springframework.boot</groupId>
   <artifactId>spring-boot-starter-security</artifactId>
</dependency>
<dependency>
   <groupId>org.springframework.boot</groupId>
   <artifactId>spring-boot-starter-web</artifactId>
</dependency>
We need first to have something to secure: a web page. To do that, we create a controller class and a simple HTML page that represents our application. The following listing presents the MainController class, which defines the single endpoint of our app.
Listing 12.1 The controller class
@Controller
public class MainController {

  @GetMapping("/")
  public String main() {
    return "main.html";
  }
}
I also define the main.html page in the resources/static folder of my Spring Boot project. It contains only heading text so that I can observe the following when I access the page:
<h1>Hello there!</h1>
And now the real job! Let’s set the security configurations to allow our application to use the login with GitHub. We start by writing a configuration class, as we’re used to. We extend the WebSecurityConfigurerAdapter and override the configure (HttpSecurity http) method. And now a difference: instead of using httpBasic() or formLogin() as you learned in chapter 4, we call a different method named oauth2Login(). This code is presented in the following listing.
TListing 12.2 he configuration class
@Configuration
public class ProjectConfig
  extends WebSecurityConfigurerAdapter {

  @Override
  protected void configure(HttpSecurity http) throws Exception {
    http.oauth2Login();          ❶

    http.authorizeRequests()     ❷
          .anyRequest()          ❷
            .authenticated();    ❷
  }
}
❶ Sets the authentication method
❷ Specifies that a user needs to be authenticated to make a request
In listing 12.2, we call a new method on the HttpSecurity object: the oauth2Login(). But you know what’s going on. As with httpBasic() or formLogin(), oauth2Login() simply adds a new authentication filter to the filter chain. We discussed filters in chapter 9, where you learned that Spring Security has some filter implementations, and you can also add custom ones to the filter chain. In this case, the filter that the framework adds to the filter chain when you call the oauth2Login() method is the OAuth2LoginAuthenticationFilter (figure 12.13). This filter intercepts requests and applies the needed logic for OAuth 2 authentication.

Figure 12.13 By calling the oauth2Login() method on the HttpSecurity object, we add the OAuth2LoginAuthenticationFilter to the filter chain. It intercepts the request and applies OAuth 2 authentication logic.
12.5.3 Implementing ClientRegistration
In this section, we discuss implementing the link between the OAuth 2 client and the authorization server. This is vital if you want your application to really do something. If you start it as is right now, you won’t be able to access the main page. The reason why you can’t access the page is that you have specified that for any request, the user needs to authenticate, but you didn’t provide any way to authenticate. We need to establish that GitHub is our authorization server. For this purpose, Spring Security defines the ClientRegistration contract.
The ClientRegistration interface represents the client in the OAuth 2 architecture. For the client, you need to define all its needed details, among which we have
You might remember from section 12.3 that the application needs all these details for the authentication process. Spring Security also offers an easy way to create an instance of a builder, similar to the one that you already used to build UserDetails instances starting with chapter 2. Listing 12.3 shows how to build such an instance representing our client implementation with the builder Spring Security provides. In the following listing, I show how to provide all the details, but for some providers, you’ll learn later in this section that it’s even easier than this.
Listing 12.3 Creating a ClientRegistration instance
ClientRegistration cr =
   ClientRegistration.withRegistrationId("github")
     .clientId("a7553955a0c534ec5e6b")
     .clientSecret("1795b30b425ebb79e424afa51913f1c724da0dbb")
     .scope(new String[]{"read:user"})
     .authorizationUri(
        "https://github.com/login/oauth/authorize")
     .tokenUri("https://github.com/login/oauth/access_token")
     .userInfoUri("https://api.github.com/user")
     .userNameAttributeName("id")
     .clientName("GitHub")
     .authorizationGrantType(AuthorizationGrantType.AUTHORIZATION_CODE)
     .redirectUriTemplate("{baseUrl}/{action}/oauth2/code/{registrationId}")
     .build();
Oh! Where did all those details come from? I know listing 12.3 might look scary at first glance, but it’s nothing more than setting up the client ID and secret. Also, in listing 12.3, I define the scopes (granted authorities), a client name, and a registration ID of my choice. Besides these details, I had to provide the URLs of the authorization server:
-
Authorization URI--The URI to which the client redirects the user for authentication
-
Token URI--The URI that the client calls to obtain an access token and a refresh token, as discussed in section 12.3
-
User info URI--The URI that the client can call after obtaining an access token to get more details about the user
Where did I get all those URIs? Well, if the authorization server is not developed by you, as in our case, you need to get them from the documentation. For GitHub, for example, you can find them here:
https://developer.github.com/apps/building-oauth-apps/authorizing-oauth-apps/
Wait! Spring Security is even smarter than this. The framework defines a class named CommonOAuth2Provider. This class partially defines the ClientRegistration instances for the most common providers you can use for authentication, which include:
If you use one of these providers, you can define your ClientRegistration as presented in the next listing.
Listing 12.4 Using the CommonOAuth2Provider class
ClientRegistration cr =
   CommonOAuth2Provider.GITHUB               ❶
     .getBuilder("github")                   ❷
       .clientId("a7553955a0c534ec5e6b")     ❸
       .clientSecret("1795b30b42. . .")      ❸
       .build();                             ❹
❶ To have the corresponding URIs already set, selects the GitHub provider
❷ Provides an ID for the client registration
❹ Builds the ClientRegistration instance
As you can see, this is much cleaner, and you don’t have to find and set the URLs for the authorization server manually. Of course, this applies only to common providers. If your authorization server is not among the common providers, then you have no other option but to define ClientRegistration entirely as presented in listing 12.3.
NOTE Using the values from the CommonOAuth2Provider class also means that you rely on the fact that the provider you use won’t change the URLs and the other relevant values. While this is not likely, if you want to avoid this situation, the option is to implement ClientRegistration as presented in listing 12.3. This enables you to configure the URLs and related provider values in a configuration file.
We end this section by adding a private method to our configuration class, which returns the ClientRegistration object as presented in the following listing. In section 12.5.4, you’ll learn how to register this client registration object for Spring Security to use it for authentication.
Listing 12.5 Building the ClientRegistration object in the configuration class
@Configuration
public class ProjectConfig
  extends WebSecurityConfigurerAdapter {

  private ClientRegistration clientRegistration() {         ❶
    return CommonOAuth2Provider.GITHUB                      ❷
            .getBuilder("github")

            .clientId(
         "a7553955a0c534ec5e6b")                           ❸
            .clientSecret(
         "1795b30b425ebb79e424afa51913f1c724da0dbb")       ❸
            .build();
  }

  @Override
  protected void configure(HttpSecurity http) throws Exception {
    http.oauth2Login();

    http.authorizeRequests()
           .anyRequest()
             .authenticated();
  }
}
❶ Calls this method later to obtain the returned ClientRegistration
❷ Starts from the configuration Spring Security provides for the GitHub common provider
❸ Provides our client credentials
NOTE The client ID and client secret are credentials, which makes them sensitive data. In a real-world application, they should be obtained from a secrets vault, and you should never directly write credentials in the source code.
12.5.4 Implementing ClientRegistrationRepository
In this section, you learn how to register the ClientRegistration instances for Spring Security to use for authentication. In section 12.5.3, you learned how to represent the OAuth 2 client for Spring Security by implementing the ClientRepository contract. But you also need to set it up to use it for authentication. For this purpose, Spring Security uses an object of type ClientRegistrationRepository (figure 12.14).

Figure 12.14 ClientRegistrationRepository retrieves the ClientRegistration details (client ID, client secret, URLs, scopes, and so on). The authentication filter needs these details for the authentication flow.
The ClientRegistrationRepository interface is similar to the UserDetails-Service interface, which you learned about in chapter 2. In the same way that a UserDetailsService object finds UserDetails by its username, a ClientRegistrationRepository object finds ClientRegistration by its registration ID.
You can implement the ClientRegistrationRepository interface to tell the framework where to find the ClientRegistration instances. Spring Security offers us an implementation for ClientRegistrationRepository, which stores in memory the instances of ClientRegistration: InMemoryClientRegistrationRepository. As you guessed, this works similarly to how InMemoryUserDetails-Manager works for the UserDetails instances. We discussed InMemoryUserDetailsManager in chapter 3.
To end our application implementation, I define a ClientRegistrationRepository using the InMemoryClientRegistrationRepository implementation and register it as a bean in the Spring context. I add the ClientRegistration instance we built in section 12.5.3 to InMemoryClientRegistrationRepository by providing it as a parameter to the InMemoryClientRegistrationRepository constructor. You can find this code in the next listing.
Listing 12.6 Registering the ClientRegistration object
@Configuration
public class ProjectConfig
  extends WebSecurityConfigurerAdapter {

  @Bean                                                     ❶
  public ClientRegistrationRepository clientRepository() {
    var c = clientRegistration();
    return new InMemoryClientRegistrationRepository(c);
  }

  private ClientRegistration clientRegistration() {
    return CommonOAuth2Provider.GITHUB.getBuilder("github")
            .clientId("a7553955a0c534ec5e6b")
            .clientSecret("1795b30b425ebb79e424afa51913f1c724da0dbb")
            .build();
  }

  @Override
  protected void configure(HttpSecurity http) throws Exception {
    http.oauth2Login();

    http.authorizeRequests()
            .anyRequest().authenticated();
  }
}
❶ Adds a bean of type ClientRegistrationRepository to the Spring context. The bean contains the reference to a ClientRegistration.
As you can see, adding ClientRegistrationRepository as a bean in the Spring context is enough for Spring Security to find it and work with it. As an alternative to this way of registering ClientRegistrationRepository, you can use a Customizer object as a parameter of the oauth2Login() method of the HttpSecurity object. You’ve learned to do something similar with the httpBasic() and formLogin() methods in chapters 7 and 8 and then with the cors() and csrf() methods in chapter 10. The same principle applies here. You’ll find this configuration in the next listing. I also separated it into a project named ssia-ch12-ex2.
Listing 12.7 Configuring ClientRegistrationRepository with a Customizer
@Configuration
public class ProjectConfig
  extends WebSecurityConfigurerAdapter {

  @Override
  protected void configure(HttpSecurity http) throws Exception {
    http.oauth2Login(c -> {                                       ❶
        c.clientRegistrationRepository(clientRepository());
    });

    http.authorizeRequests()
           .anyRequest()
             .authenticated();
  }

  private ClientRegistrationRepository clientRepository() {
    var c = clientRegistration();
    return new InMemoryClientRegistrationRepository(c);
  }

  private ClientRegistration clientRegistration() {
    return CommonOAuth2Provider.GITHUB.getBuilder("github")
            .clientId("a7553955a0c534ec5e6b")
            .clientSecret("1795b30b425ebb79e424afa51913f1c724da0dbb")
            .build();
  }
}
❶ Uses a Customizer to set the ClientRegistrationRepository instance
NOTE One configuration option is as good as the other, but remember what we discussed in chapter 2. To keep your code easy to understand, avoid mixing configuration approaches. Either use an approach where you set everything with beans in the context or use the code inline configuration style.
12.5.5 The pure magic of Spring Boot configuration
In this section, I show you a third approach to configuring the application we built earlier in this chapter. Spring Boot is designed to use its magic and build the ClientRegistration and ClientRegistrationRepository objects directly from the properties file. This approach isn’t unusual in a Spring Boot project. We see this happening with other objects as well. For example, often we see data sources configured based on the properties file. The following code snippet shows how to set the client registration for our example in the application.properties file:
spring.security.oauth2.client
➥ .registration.github.client-id=a7553955a0c534ec5e6b

spring.security.oauth2.client
➥ .registration.github.client-secret=
➥ 1795b30b425ebb79e424afa51913f1c724da0dbb
In this snippet, I only need to specify the client ID and client secret. Because the name for the provider is github, Spring Boot knows to take all the details regarding the URIs from the CommonOAuth2Provider class. Now my configuration class looks like the one presented in the following listing. You also find this example in a separate project named ssia-ch12-ex3.
Listing 12.8 The configuration class
@Configuration
public class ProjectConfig
  extends WebSecurityConfigurerAdapter {

  @Override
  protected void configure(HttpSecurity http) throws Exception {
    http.oauth2Login();

    http.authorizeRequests()
           .anyRequest()
             .authenticated();
  }
}
We don’t need to specify any details about ClientRegistration and ClientRegistrationRepository because they are created automatically by Spring Boot based on the properties file. If we use a provider other than the common ones known by Spring Security, we need to also specify the details for the authorization server using the property group starting with spring.security.oauth2.client.provider. The next code snippet provides you with an example:
spring.security.oauth2.client.provider
.myprovider.authorization-uri=<some uri>

spring.security.oauth2.client.provider
.myprovider.token-uri=<some uri>
With everything I need to have one or more authentication providers in memory, as we do in the current example, I prefer to configure it as I presented in this section. It’s cleaner and more manageable. But if we need something different, like storing the client registration details in a database or obtaining them from a web service, then we would need to create a custom implementation of ClientRegistrationRepository. In that case, we need to set it up as you learned in section 12.5.5.
Exercise Change the current application to store the authorization server details in a database.
12.5.6 Obtaining details about an authenticated user
In this section, we discuss getting and using details of an authenticated user. You’re already aware that in the Spring Security architecture, it’s the SecurityContext that stores the details of an authenticated user. Once the authentication process ends, the responsible filter stores the Authentication object in the SecurityContext. The application can take user details from there and use them when needed. The same happens with an OAuth 2 authentication as well.
The implementation of the Authentication object used by the framework is named OAuth2AuthenticationToken in this case. You can take it directly from the SecurityContext or let Spring Boot inject it for you in a parameter of the endpoint, as you learned in chapter 6. The following listing shows how I changed the controller to receive and print details about a user in the console.
Listing 12.9 Using details of a logged in user
@Controller
public class MainController {

  private Logger logger =
    Logger.getLogger(MainController.class.getName());

  @GetMapping("/")
  public String main(
    OAuth2AuthenticationToken token) {       ❶

    logger.info(String.valueOf(token.getPrincipal()));
    return "main.html";
  }
}
❶ Spring Boot automatically injects the Authentication object representing the user in the method’s parameter.
12.5.7 Testing the application
In this section, we test the app we worked on in this chapter. Together with checking functionality, we follow the steps of the OAuth 2 authorization code grant type (figure 12.15) to make sure you understood it correctly, and you observe how Spring Security applies it with the configuration we made. You can use any of the three projects we wrote in this chapter. These define the same functionality with different ways of writing the configuration, but the result is the same.

Figure 12.15 The application uses GitHub as an authorization server and also as a resource server. When the user wants to log in, the client redirects the user to the GitHub login page. When the user logs in successfully, GitHub calls back to our application with an authorization code. Our application uses the authorization code to request an access token. The application can then access the user details from the resource server (GitHub) by providing the access token. The response from the resource server provides the user details along with the URL for the main page.
I first make sure I’m not logged in to GitHub. I also make sure I open a browser console to check the history of request navigation. This history gives me an overview of the steps that happen in the OAuth 2 flow, the steps we discussed in section 12.3.1. If I am authenticated, then the application directly logs me. Then I start the app and access the main page of our application in the browser:
http://localhost:8080/
The application redirects me to the URL in the following code snippet (and presented in figure 12.16). This URL is configured in the CommonOauth2Provider class for GitHub as the authorization URL.
https://github.com/login/oauth/authorize?response_type=code&client_id=a7553955a0c534ec5e6b&scope=read:user&state=fWwg5r9sKal4BMubg1oXBRrNn5y7VDW1A_rQ4UITbJk%3D&redirect_uri=http://localhost:8080/login/oauth2/code/github

Figure 12.16 After accessing the main page, the browser redirects us to the GitHub login. In the Chrome console tool, we can see the calls to the localhost and then to the authorization endpoint of GitHub.
Our application attaches the needed query parameters to the URL, as we discussed in section 12.3.1. These are
We use our GitHub credentials and log in to our application with GitHub. We are authenticated and redirected back, as you can see in figure 12.17.

Figure 12.17 After filling in our credentials, GitHub redirects us back to our application. We can see the main page now, and the application can access the user details from GitHub by making use of the access token.
The following code snippet shows the URL on which GitHub calls us back. You can observe that GitHub provides the authorization code that our application uses to request an access token:
http://localhost:8080/login/oauth2/code/github?code=a3f20502c182164a4086&state=fWwg5r9sKal4BMubg1oXBRrNn5y7VDW1A_rQ4UITbJk%3D
We won’t see the calls to the token endpoint from the browser as this happens directly from our application. But we can trust that the application managed to get a token because we can see the user details printed in the console. This means the app managed to call the endpoint to retrieve the user details. The next code snippet shows you part of this output:
Name: [43921235],
Granted Authorities: [[ROLE_USER, SCOPE_read:user]], User Attributes: [{login=lspil, id=43921235, node_id=MDQ6VXNlcjQzOTIxMjM1, avatar_url=https://avatars3.githubusercontent.com/u/43921235?v=4, gravatar_id=, url=https://api.github.com/users/lspil, html_url=https://github.com/lspil, followers_url=https://api.github.com/users/lspil/followers, following_url=https://api.github.com/users/lspil/following{/other_user}, ...
Summary
-
The OAuth 2 framework describes ways to allow an entity to access resources on behalf of somebody else. We use it in applications to implement the authentication and authorization logic.
-
The different flows an application can use to obtain an access token are called grants. Depending on the system architecture, you need to choose a suitable grant type:
-
The authentication code grant type works by allowing the user to directly authenticate at the authorization server, which enables the client to obtain an access token. We choose this grant type when the user doesn’t trust the client and doesn’t want to share their credentials with it.
-
The password grant type implies that the user shares its credentials with the client. You should apply this only if you can trust the client.
-
The client credentials grant type implies that the client obtains a token by authenticating only with its credentials. We choose this grant type when the client needs to call an endpoint of the resource server that isn’t a resource of the user.
-
-
Spring Security implements the OAuth 2 framework, which allows you to configure it in your application with few lines of code.
-
In Spring Security, you represent a registration of a client at an authorization server using an instance of
ClientRegistration. -
The component of the Spring Security OAuth 2 implementation responsible for finding a specific client registration is called
ClientRegistrationRepository. You need to define aClientRegistrationRepositoryobject with at least oneClientRegistrationavailable when implementing an OAuth 2 client with Spring Security.