In chapter 16, you learned how to apply authorization rules using global method security. We worked on examples using the @PreAuthorize and @PostAuthorize annotations. By using these annotations, you apply an approach in which the application either allows the method call or it completely rejects the call. Suppose you don’t want to forbid the call to a method, but you want to make sure that the parameters sent to it follow some rules. Or, in another scenario, you want to make sure that after someone calls the method, the method’s caller only receives an authorized part of the returned value. We name such a functionality filtering, and we classify it in two categories:
-
Prefiltering--The framework filters the values of the parameters before calling the method.
-
Postfiltering--The framework filters the returned value after the method call.

Figure 17.1 The client calls the endpoint providing a value that doesn’t follow the authorization rule. With preauthorization, the method isn’t called at all and the caller receives an exception. With prefiltering, the aspect calls the method but only provides the values that follow the given rules.
Filtering works differently than call authorization (figure 17.1). With filtering, the framework executes the call and doesn’t throw an exception if a parameter or returned value doesn’t follow an authorization rule you define. Instead, it filters out elements that don’t follow the conditions you specify.
It’s important to mention from the beginning that you can only apply filtering to collections and arrays. You use prefiltering only if the method receives as a parameter an array or a collection of objects. The framework filters this collection or array according to rules you define. Same for postfiltering: you can only apply this approach if the method returns a collection or an array. The framework filters the value the method returns based on rules you specify.
17.1 Applying prefiltering for method authorization
In this section, we discuss the mechanism behind prefiltering, and then we implement prefiltering in an example. You can use filtering to instruct the framework to validate values sent via the method parameters when someone calls a method. The framework filters values that don’t match the given criteria and calls the method only with values that do match the criteria. We name this functionality prefiltering (figure 17.2).
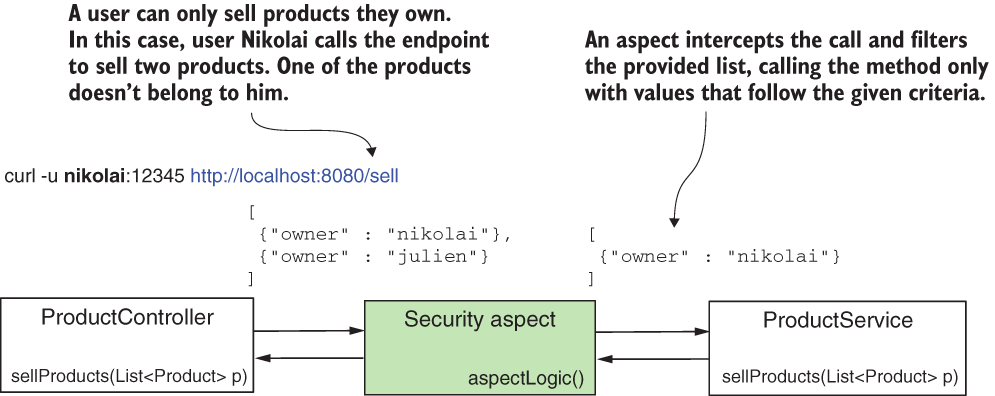
Figure 17.2 With prefiltering, an aspect intercepts the call to the protected method. The aspect filters the values that the caller provides as the parameter and sends to the method only values that follow the rules you define.
You find requirements in real-world examples where prefiltering applies well because it decouples authorization rules from the business logic the method implements. Say you implement a use case where you process only specific details that are owned by the authenticated user. This use case can be called from multiple places. Still, its responsibility always states that only details of the authenticated user can be processed, regardless of who invokes the use case. Instead of making sure the invoker of the use case correctly applies the authorization rules, you make the case apply its own authorization rules. Of course, you might do this inside the method. But decoupling authorization logic from business logic enhances the maintainability of your code and makes it easier for others to read and understand it.
As in the case of call authorization, which we discussed in chapter 16, Spring Security also implements filtering by using aspects. Aspects intercept specific method calls and can augment them with other instructions. For prefiltering, an aspect intercepts methods annotated with the @PreFilter annotation and filters the values in the collection provided as a parameter according to the criteria you define (figure 17.3).

Figure 17.3 With prefiltering, we decouple the authorization responsibility from the business implementation. The aspect provided by Spring Security only takes care of the authorization rules, and the service method only takes care of the business logic of the use case it implements.
Similar to the @PreAuthorize and @PostAuthorize annotations we discussed in chapter 16, you set authorization rules as the value of the @PreFilter annotation. In these rules, which you provide as SpEL expressions, you use filterObject to refer to any element inside the collection or array that you provide as a parameter to the method.
To see prefiltering applied, let’s work on a project. I named this project ssia-ch17-ex1. Say you have an application for buying and selling products, and its backend implements the endpoint /sell. The application’s frontend calls this endpoint when a user sells a product. But the logged-in user can only sell products they own. Let’s implement a simple scenario of a service method called to sell the products received as a parameter. With this example, you learn how to apply the @PreFilter annotation, as this is what we use to make sure that the method only receives products owned by the currently logged-in user.
Once we create the project, we write a configuration class to make sure we have a couple of users to test our implementation. You find the straightforward definition of the configuration class in listing 17.1. The configuration class that I call ProjectConfig only declares a UserDetailsService and a PasswordEncoder, and I annotate it with @GlobalMethodSecurity(prePostEnabled=true). For the filtering annotation, we still need to use the @GlobalMethodSecurity annotation and enable the pre-/postauthorization annotations. The provided UserDetailsService defines the two users we need in our tests: Nikolai and Julien.
Listing 17.1 Configuring users and enabling global method security
@Configuration
@EnableGlobalMethodSecurity(prePostEnabled = true)
public class ProjectConfig {

  @Bean
  public UserDetailsService userDetailsService() {
    var uds = new InMemoryUserDetailsManager();

    var u1 = User.withUsername("nikolai")
            .password("12345")
            .authorities("read")
            .build();

    var u2 = User.withUsername("julien")
            .password("12345")
            .authorities("write")
            .build();

    uds.createUser(u1);
    uds.createUser(u2);

    return uds;
  }

  @Bean
    public PasswordEncoder passwordEncoder() {
    return NoOpPasswordEncoder.getInstance();
  }
}
I describe the product using the model class you find in the next listing.
Listing 17.2 The Product class definition
public class Product {

  private String name;
  private String owner;       ❶

  // Omitted constructor, getters, and setters
}
❶ The attribute owner has the value of the username.
The ProductService class defines the service method we protect with @PreFilter. You can find the ProductService class in listing 17.3. In that listing, before the sellProducts() method, you can observe the use of the @PreFilter annotation. The Spring Expression Language (SpEL) used with the annotation is filterObject .owner == authentication.name, which allows only values where the owner attribute of the Product equals the username of the logged-in user. On the left side of the equals operator in the SpEL expression; we use filterObject. With filterObject, we refer to objects in the list as parameters. Because we have a list of products, the filterObject in our case is of type Product. For this reason, we can refer to the product’s owner attribute. On the right side of the equals operator in the expression; we use the authentication object. For the @PreFilter and @PostFilter annotations, we can directly refer to the authentication object, which is available in the SecurityContext after authentication (figure 17.4).

Figure 17.4 When using prefiltering by filterObject, we refer to the objects inside the list that the caller provides as a parameter. The authentication object is the one stored after the authentication process in the security context.
The service method returns the list exactly as the method receives it. This way, we can test and validate that the framework filtered the list as we expected by checking the list returned in the HTTP response body.
Listing 17.3 Using the @PreFilter annotation in the ProductService class
@Service
public class ProductService {

  @PreFilter                                           ❶
  ➥ ("filterObject.owner == authentication.name")
  public List<Product> sellProducts(List<Product> products) {
    // sell products and return the sold products list
    return products;                                   ❷
  }
}
❶ The list given as a parameter allows only products owned by the authenticated user.
❷ Returns the products for test purposes
To make our tests easier, I define an endpoint to call the protected service method. Listing 17.4 defines this endpoint in a controller class called ProductController. Here, to make the endpoint call shorter, I create a list and directly provide it as a parameter to the service method. In a real-world scenario, this list should be provided by the client in the request body. You can also observe that I use @GetMapping for an operation that suggests a mutation, which is non-standard. But know that I do this to avoid dealing with CSRF protection in our example, and this allows you to focus on the subject at hand. You learned about CSRF protection in chapter 10.
Listing 17.4 The controller class implementing the endpoint we use for tests
@RestController
public class ProductController {

  @Autowired
  private ProductService productService;

  @GetMapping("/sell")
  public List<Product> sellProduct() {
    List<Product> products = new ArrayList<>();

    products.add(new Product("beer", "nikolai"));
    products.add(new Product("candy", "nikolai"));
    products.add(new Product("chocolate", "julien"));

    return productService.sellProducts(products);
  }
}
Let’s start the application and see what happens when we call the /sell endpoint. Observe the three products from the list we provided as a parameter to the service method. I assign two of the products to user Nikolai and the other one to user Julien. When we call the endpoint and authenticate with user Nikolai, we expect to see in the response only the two products associated with her. When we call the endpoint and we authenticate with Julien, we should only find in the response the one product associated with Julien. In the following code snippet, you find the test calls and their results. To call the endpoint /sell and authenticate with user Nikolai, use this command:
curl -u nikolai:12345 http://localhost:8080/sell
[
  {"name":"beer","owner":"nikolai"},
  {"name":"candy","owner":"nikolai"}
]
To call the endpoint /sell and authenticate with user Julien, use this command:
curl -u julien:12345 http://localhost:8080/sell
[
  {"name":"chocolate","owner":"julien"}
]
What you need to be careful about is the fact that the aspect changes the given collection. In our case, don’t expect it to return a new List instance. In fact, it’s the same instance from which the aspect removed the elements that didn’t match the given criteria. This is important to take into consideration. You must always make sure that the collection instance you provide is not immutable. Providing an immutable collection to be processed results in an exception at execution time because the filtering aspect won’t be able to change the collection’s contents (figure 17.5).

Figure 17.5 The aspect intercepts and changes the collection given as the parameter. You need to provide a mutable instance of a collection so the aspect can change it.
Listing 17.5 presents the same project we worked on earlier in this section, but I changed the List definition with an immutable instance as returned by the List.of() method to test what happens in this situation.
Listing 17.5 Using an immutable collection
@RestController
public class ProductController {

  @Autowired
  private ProductService productService;

  @GetMapping("/sell")
  public List<Product> sellProduct() {
    List<Product> products = List.of(            ❶
            new Product("beer", "nikolai"),
            new Product("candy", "nikolai"),
            new Product("chocolate", "julien"));

    return productService.sellProducts(products);
  }
}
❶ List.of() returns an immutable instance of the list.
I separated this example in project ssia-ch17-ex2 folder so that you can test it yourself as well. Running the application and calling the /sell endpoint results in an HTTP response with status 500 Internal Server Error and an exception in the console log, as presented by the next code snippet:
curl -u julien:12345 http://localhost:8080/sell
{
  "status":500,
  "error":"Internal Server Error",
  "message":"No message available",
  "path":"/sell"
}
In the application console, you can find an exception similar to the one presented in the following code snippet:
java.lang.UnsupportedOperationException: null
        at java.base/java.util.ImmutableCollections.uoe(ImmutableCollections.java:73) ~[na:na]
...
17.2 Applying postfiltering for method authorization
In this section, we implement postfiltering. Say we have the following scenario. An application that has a frontend implemented in Angular and a Spring-based backend manages some products. Users own products, and they can obtain details only for their products. To get the details of their products, the frontend calls endpoints exposed by the backend (figure 17.6).

Figure 17.6 Postfiltering scenario. A client calls an endpoint to retrieve data it needs to display in the frontend. A postfiltering implementation makes sure that the client only gets data owned by the currently authenticated user.
On the backend in a service class the developer wrote a method List<Product> findProducts() that retrieves the details of products. The client application displays these details in the frontend. How could the developer make sure that anyone calling this method only receives products they own and not products owned by others? An option to implement this functionality by keeping the authorization rules decoupled from the business rules of the application is called postfiltering. In this section, we discuss how postfiltering works and demonstrate its implementation in an application.
Similar to prefiltering, postfiltering also relies on an aspect. This aspect allows a call to a method, but once the method returns, the aspect takes the returned value and makes sure that it follows the rules you define. As in the case of prefiltering, postfiltering changes a collection or an array returned by the method. You provide the criteria that the elements inside the returned collection should follow. The post-filter aspect filters from the returned collection or array those elements that don’t follow your rules.
To apply postfiltering, you need to use the @PostFilter annotation. The @PostFilter annotation works similar to all the other pre-/post- annotations we used in chapter 14 and in this chapter. You provide the authorization rule as a SpEL expression for the annotation’s value, and that rule is the one that the filtering aspect uses as shown in figure 17.7. Also, similar to prefiltering, postfiltering only works with arrays and collections. Make sure you apply the @PostFilter annotation only for methods that have as a return type an array or a collection.

Figure 17.7 Postfiltering. An aspect intercepts the collection returned by the protected method and filters the values that don’t follow the rules you provide. Unlike postauthorization, postfiltering doesn’t throw an exception to the caller when the returned value doesn’t follow the authorization rules.
Let’s apply postfiltering in an example. I created a project named ssia-ch17-ex3 for this example. To be consistent, I kept the same users as in our previous examples in this chapter so that the configuration class won’t change. For your convenience, I repeat the configuration presented in the following listing.
Listing 17.6 The configuration class
@Configuration
@EnableGlobalMethodSecurity(prePostEnabled = true)
public class ProjectConfig {

  @Bean
  public UserDetailsService userDetailsService() {
    var uds = new InMemoryUserDetailsManager();

    var u1 = User.withUsername("nikolai")
            .password("12345")
            .authorities("read")
            .build();

    var u2 = User.withUsername("julien")
            .password("12345")
            .authorities("write")
            .build();

    uds.createUser(u1);
    uds.createUser(u2);

    return uds;
  }

  @Bean
  public PasswordEncoder passwordEncoder() {
    return NoOpPasswordEncoder.getInstance();
  }
}
The next code snippet shows that the Product class remains unchanged as well:
public class Product {

  private String name;
  private String owner;

  // Omitted constructor, getters, and setters
}
In the ProductService class, we now implement a method that returns a list of products. In a real-world scenario, we assume the application would read the products from a database or any other data source. To keep our example short and allow you to focus on the aspects we discuss, we use a simple collection, as presented in listing 17.7.
I annotate the findProducts() method, which returns the list of products, with the @PostFilter annotation. The condition I add as the value of the annotation, filterObject.owner == authentication.name, only allows products to be returned that have the owner equal to the authenticated user (figure 17.8). On the left side of the equals operator, we use filterObject to refer to elements inside the returned collection. On the right side of the operator, we use authentication to refer to the Authentication object stored in the SecurityContext.
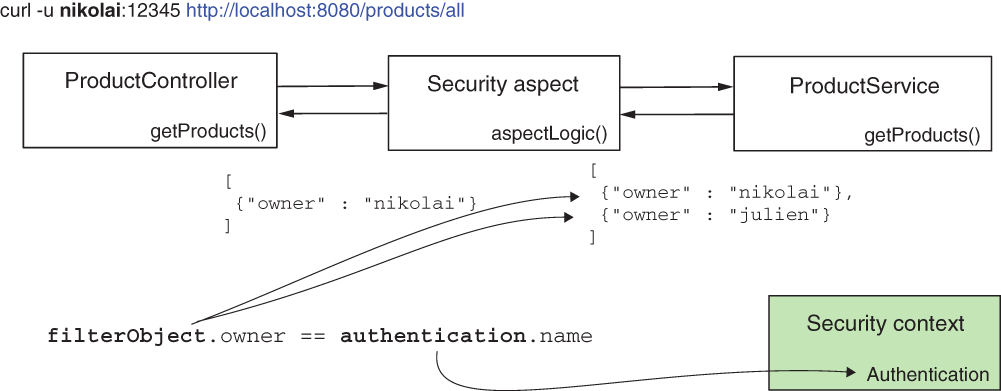
Figure 17.8 In the SpEL expression used for authorization, we use filterObject to refer to the objects in the returned collection, and we use authentication to refer to the Authentication instance from the security context.
Listing 17.7 The ProductService class
@Service
public class ProductService {

  @PostFilter                                      ❶
  ➥ ("filterObject.owner == authentication.name")
  public List<Product> findProducts() {
    List<Product> products = new ArrayList<>();

    products.add(new Product("beer", "nikolai"));
    products.add(new Product("candy", "nikolai"));
    products.add(new Product("chocolate", "julien"));

    return products;
  }
}
❶ Adds the filtering condition for the objects in the collection returned by the method
We define a controller class to make our method accessible through an endpoint. The next listing presents the controller class.
Listing 17.8 The ProductController class
@RestController
public class ProductController {

  @Autowired
  private ProductService productService;

  @GetMapping("/find")
  public List<Product> findProducts() {
    return productService.findProducts();
  }
}
It’s time to run the application and test its behavior by calling the /find endpoint. We expect to see in the HTTP response body only products owned by the authenticated user. The next code snippets show the result for calling the endpoint with each of our users, Nikolai and Julien. To call the endpoint /find and authenticate with user Julien, use this cURL command:
curl -u julien:12345 http://localhost:8080/find
[
  {"name":"chocolate","owner":"julien"}
]
To call the endpoint /find and authenticate with user Nikolai, use this cURL command:
curl -u nikolai:12345 http://localhost:8080/find
[
  {"name":"beer","owner":"nikolai"},
  {"name":"candy","owner":"nikolai"}
]
17.3 Using filtering in Spring Data repositories
In this section, we discuss filtering applied with Spring Data repositories. It’s important to understand this approach because we often use databases to persist an application’s data. It is pretty common to implement Spring Boot applications that use Spring Data as a high-level layer to connect to a database, be it SQL or NoSQL. We discuss two approaches for applying filtering at the repository level when using Spring Data, and we implement these with examples.
The first approach we take is the one you learned up to now in this chapter: using the @PreFilter and @PostFilter annotations. The second approach we discuss is direct integration of the authorization rules in queries. As you’ll learn in this section, you need to be attentive when choosing the way you apply filtering in Spring Data repositories. As mentioned, we have two options:
Using the @PreFilter annotation in the case of repositories is the same as applying this annotation at any other layer of your application. But when it comes to postfiltering, the situation changes. Using @PostFilter on repository methods technically works fine, but it’s rarely a good choice from a performance point of view.
Say you have an application managing the documents of your company. The developer needs to implement a feature where all the documents are listed on a web page after the user logs in. The developer decides to use the findAll() method of the Spring Data repository and annotates it with @PostFilter to allow Spring Security to filter the documents such that the method returns only those owned by the currently logged-in user. This approach is clearly wrong because it allows the application to retrieve all the records from the database and then filter the records itself. If we have a large number of documents, calling findAll() without pagination could directly lead to an OutOfMemoryError. Even if the number of documents isn’t big enough to fill the heap, it’s still less performant to filter the records in your application rather than retrieving at the start only what you need from the database (figure 17.9).
At the service level, you have no other option than to filter the records in the app. Still, if you know from the repository level that you need to retrieve only records owned by the logged-in user, you should implement a query that extracts from the database only the required documents.
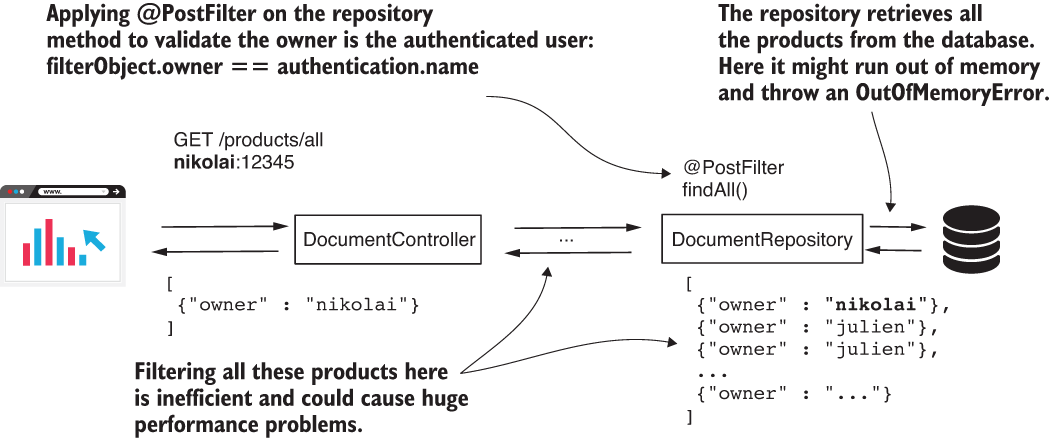
Figure 17.9 The anatomy of a bad design. When you need to apply filtering at the repository level, it’s better to first make sure you only retrieve the data you need. Otherwise, your application can face heavy memory and performance issues.
NOTE In any situation in which you retrieve data from a data source, be it a database, a web service, an input stream, or anything else, make sure the application retrieves only the data it needs. Avoid as much as possible the need to filter data inside the application.
Let’s work on an application where we first use the @PostFilter annotation on the Spring Data repository method, and then we change to the second approach where we write the condition directly in the query. This way, we have the opportunity to experiment with both approaches and compare them.
I created a new project named ssia-ch17-ex4, where I use the same configuration class as for our previous examples in this chapter. As in the earlier examples, we write an application managing products, but this time we retrieve the product details from a table in our database. For our example, we implement a search functionality for the products (figure 17.10). We write an endpoint that receives a string and returns the list of products that have the given string in their names. But we need to make sure to return only products associated with the authenticated user.
We use Spring Data JPA to connect to a database. For this reason, we also need to add to the pom.xml file the spring-boot-starter-data-jpa dependency and a connection driver according to your database management server technology. The next code snippet provides the dependencies I use in the pom.xml file:
<dependency>
   <groupId>org.springframework.boot</groupId>
   <artifactId>spring-boot-starter-data-jpa</artifactId>
</dependency>
<dependency>
   <groupId>org.springframework.boot</groupId>
   <artifactId>spring-boot-starter-security</artifactId>
</dependency>
<dependency>
   <groupId>org.springframework.boot</groupId>
   <artifactId>spring-boot-starter-web</artifactId>
</dependency>
<dependency>
   <groupId>mysql</groupId>
   <artifactId>mysql-connector-java</artifactId>
   <scope>runtime</scope>
</dependency>

Figure 17.10 In our scenario, we start by implementing the application using @PostFilter to filter products based on their owner. Then we change the implementation to add the condition directly on the query. This way, we make sure the application only gets from the source the needed records.
In the application.properties file, we add the properties Spring Boot needs to create the data source. In the next code snippet, you find the properties I added to my application.properties file:
spring.datasource.url=jdbc:mysql://localhost/spring
➥ ?useLegacyDatetimeCode=false&serverTimezone=UTC
spring.datasource.username=root
spring.datasource.password=
spring.datasource.initialization-mode=always
We also need a table in the database for storing the product details that our application retrieves. We define a schema.sql file where we write the script for creating the table, and a data.sql file where we write queries to insert test data in the table. You need to place both files (schema.sql and data.sql) in the resources folder of the Spring Boot project so they will be found and executed at the start of the application. The next code snippet shows you the query used to create the table, which we need to write in the schema.sql file:
CREATE TABLE IF NOT EXISTS `spring`.`product` (
  `id` INT NOT NULL AUTO_INCREMENT,
  `name` VARCHAR(45) NULL,
  `owner` VARCHAR(45) NULL,
  PRIMARY KEY (`id`));
In the data.sql file, I write three INSERT statements, which the next code snippet presents. These statements create the test data that we need later to prove the application’s behavior.
INSERT IGNORE INTO `spring`.`product` (`id`, `name`, `owner`) VALUES ('1', 'beer', 'nikolai');
INSERT IGNORE INTO `spring`.`product` (`id`, `name`, `owner`) VALUES ('2', 'candy', 'nikolai');
INSERT IGNORE INTO `spring`.`product` (`id`, `name`, `owner`) VALUES ('3', 'chocolate', 'julien');
NOTE Remember, we used the same names for tables in other examples throughout the book. If you already have tables with the same names from previous examples, you should probably drop those before starting with this project. An alternative is to use a different schema.
To map the product table in our application, we need to write an entity class. The following listing defines the Product entity.
Listing 17.9 The Product entity class
@Entity
public class Product {

    @Id
    @GeneratedValue(strategy = GenerationType.IDENTITY)
    private int id;
    private String name;
    private String owner;

    // Omitted getters and setters
}
For the Product entity, we also write a Spring Data repository interface defined in the next listing. Observe that this time we use the @PostFilter annotation directly on the method declared by the repository interface.
Listing 17.10 The ProductRepository interface
public interface ProductRepository
        extends JpaRepository<Product, Integer> {

    @PostFilter                                        ❶
    ➥ ("filterObject.owner == authentication.name")
    List<Product> findProductByNameContains(String text);
}
❶ Uses the @PostFilter annotation for the method declared by the Spring Data repository
The next listing shows you how to define a controller class that implements the endpoint we use for testing the behavior.
Listing 17.11 The ProductController class
@RestController
public class ProductController {

  @Autowired
  private ProductRepository productRepository;

  @GetMapping("/products/{text}")
  public List<Product> findProductsContaining(@PathVariable String text) {

    return productRepository.findProductByNameContains(text);
  }
}
Starting the application, we can test what happens when calling the /products/{text} endpoint. By searching the letter c while authenticating with user Nikolai, the HTTP response only contains the product candy. Even if chocolate contains a c as well, because Julien owns it, chocolate won’t appear in the response. You find the calls and their responses in the next code snippets. To call the endpoint /products and authenticate with user Nikolai, issue this command:
curl -u nikolai:12345 http://localhost:8080/products/c
[
  {"id":2,"name":"candy","owner":"nikolai"}
]
To call the endpoint /products and authenticate with user Julien, issue this command:
curl -u julien:12345 http://localhost:8080/products/c
[
  {"id":3,"name":"chocolate","owner":"julien"}
]
We discussed earlier in this section that using @PostFilter in the repository isn’t the best choice. We should instead make sure we don’t select from the database what we don’t need. So how can we change our example to select only the required data instead of filtering data after selection? We can provide SpEL expressions directly in the queries used by the repository classes. To achieve this, we follow two simple steps:
-
We add an object of type
SecurityEvaluationContextExtensionto the Spring context. We can do this using a simple@Beanmethod in the configuration class. -
We adjust the queries in our repository classes with the proper clauses for selection.
In our project, to add the SecurityEvaluationContextExtension bean in the context, we need to change the configuration class as presented in listing 17.12. To keep all the code associated with the examples in the book, I use here another project that named ssia-ch17-ex5.
Listing 17.12 Adding the SecurityEvaluationContextExtension to the context
@Configuration
@EnableGlobalMethodSecurity(prePostEnabled = true)
public class ProjectConfig {

  @Bean                                         ❶
  public SecurityEvaluationContextExtension
    securityEvaluationContextExtension() {

    return new SecurityEvaluationContextExtension();
  }

    // Omitted declaration of the UserDetailsService and PasswordEncoder
}
❶ Adds a SecurityEvaluationContextExtension to the Spring context
In the ProductRepository interface, we add the query prior to the method, and we adjust the WHERE clause with the proper condition using a SpEL expression. The following listing presents the change.
Listing 17.13 Using SpEL in the query in the repository interface
public interface ProductRepository
        extends JpaRepository<Product, Integer> {

    @Query("SELECT p FROM Product p
    ➥ WHERE p.name LIKE %:text% AND                    ❶
          ➥ p.owner=?#{authentication.name}")
    List<Product> findProductByNameContains(String text);
}
❶ Uses SpEL in the query to add a condition on the owner of the record
We can now start the application and test it by calling the /products/{text} endpoint. We expect that the behavior remains the same as for the case where we used @PostFilter. But now, only the records for the right owner are retrieved from the database, which makes the functionality faster and more reliable. The next code snippets present the calls to the endpoint. To call the endpoint /products and authenticate with user Nikolai, we use this command:
curl -u nikolai:12345 http://localhost:8080/products/c
[
  {"id":2,"name":"candy","owner":"nikolai"}
]
To call the endpoint /products and authenticate with user Julien, we use this command:
curl -u julien:12345 http://localhost:8080/products/c
[
  {"id":3,"name":"chocolate","owner":"julien"}
]
Summary
-
Filtering is an authorization approach in which the framework validates the input parameters of a method or the value returned by the method and excludes the elements that don’t fulfill some criteria you define. As an authorization approach, filtering focuses on the input and output values of a method and not on the method execution itself.
-
You use filtering to make sure that a method doesn’t get other values than the ones it’s authorized to process and can’t return values that the method’s caller shouldn’t get.
-
When using filtering, you don’t restrict access to the method, but you restrict what can be sent via the method’s parameters or what the method returns. This approach allows you to control the input and output of the method.
-
To restrict the values that can be sent via the method’s parameters, you use the
@PreFilterannotation. The@PreFilterannotation receives the condition for which values are allowed to be sent as parameters of the method. The framework filters from the collection given as a parameter all values that don’t follow the given rule. -
To use the
@PreFilterannotation, the method’s parameter must be a collection or an array. From the annotation’s SpEL expression, which defines the rule, we refer to the objects inside the collection usingfilterObject. -
To restrict the values returned by the method, you use the
@PostFilterannotation. When using the@PostFilterannotation, the returned type of the method must be a collection or an array. The framework filters the values in the returned collection according to a rule you define as the value of the@PostFilterannotation. -
You can use the
@PreFilterand@PostFilterannotations with Spring Data repositories as well. But using@PostFilteron a Spring Data repository method is rarely a good choice. To avoid performance problems, filtering the result should be, in this case, done directly at the database level. -
Spring Security easily integrates with Spring Data, and you use this to avoid issuing
@PostFilterwith methods of Spring Data repositories.