In Spring Security, HTTP filters delegate the different responsibilities that apply to an HTTP request. In chapters 3 through 5, where we discussed HTTP Basic authentication and authorization architecture, I often referred to filters. You learned about a component we named the authentication filter, which delegates the authentication responsibility to the authentication manager. You learned as well that a certain filter takes care of authorization configuration after successful authentication. In Spring Security, in general, HTTP filters manage each responsibility that must be applied to the request. The filters form a chain of responsibilities. A filter receives a request, executes its logic, and eventually delegates the request to the next filter in the chain (figure 9.1).

Figure 9.1 The filter chain receives the request. Each filter uses a manager to apply specific logic to the request and, eventually, delegates the request further along the chain to the next filter.
The idea is simple. When you go to the airport, from entering the terminal to boarding the aircraft, you go through multiple filters (figure 9.2). You first present your ticket, then your passport is verified, and afterward, you go through security. At the airport gate, more “filters” might be applied. For example, in some cases, right before boarding, your passport and visa are validated once more. This is an excellent analogy to the filter chain in Spring Security. In the same way, you customize filters in a filter chain with Spring Security that act on HTTP requests. Spring Security provides filter implementations that you add to the filter chain through customization, but you can also define custom filters.
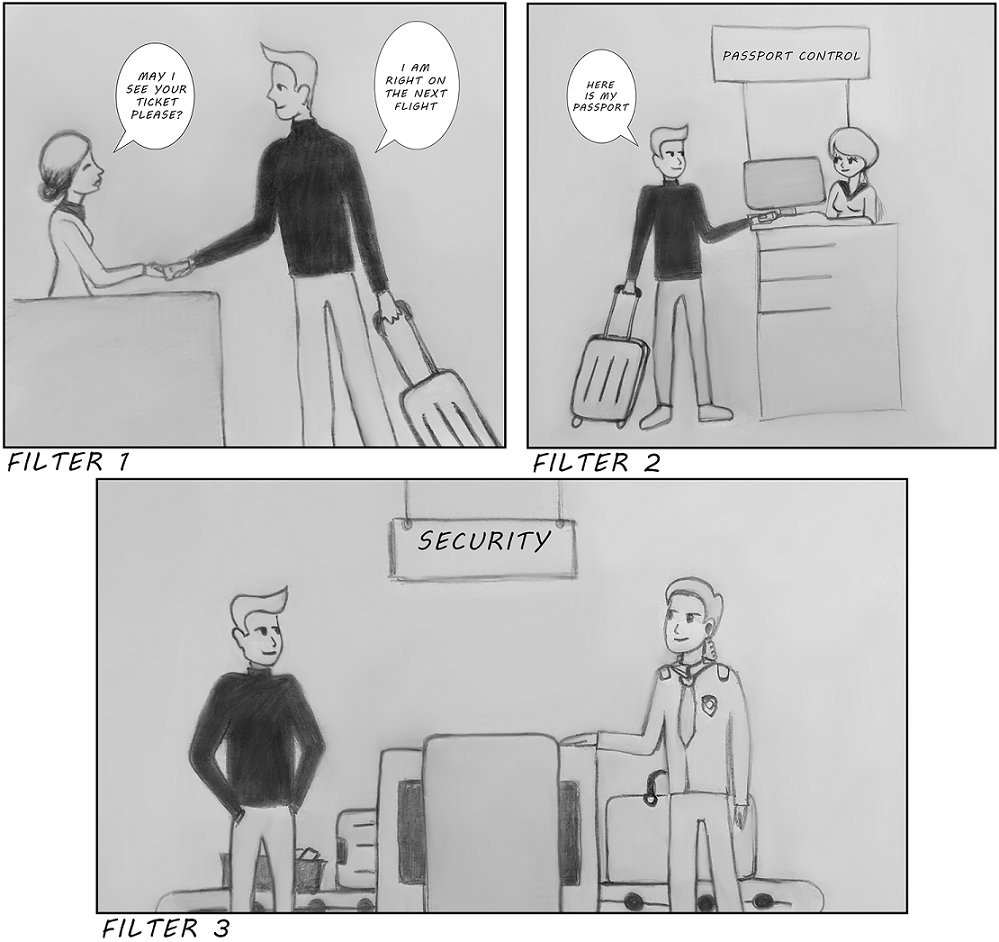
Figure 9.2 At the airport, you go through a filter chain to eventually board the aircraft. In the same way, Spring Security has a filter chain that acts on the HTTP requests received by the application.
In this chapter, we’ll discuss how you can customize filters that are part of the authentication and authorization architecture in Spring Security. For example, you might want to augment authentication by adding one more step for the user, like checking their email address or using a one-time password. You can, as well, add functionality referring to auditing authentication events. You’ll find various scenarios where applications use auditing authentication: from debugging purposes to identifying a user’s behavior. Using today’s technology and machine learning algorithms can improve applications, for example, by learning the user’s behavior and knowing if somebody hacked their account or impersonated the user.
Knowing how to customize the HTTP filter chain of responsibilities is a valuable skill. In practice, applications come with various requirements, where using default configurations doesn’t work anymore. You’ll need to add or replace existing components of the chain. With the default implementation, you use the HTTP Basic authentication method, which allows you to rely on a username and password. But in practical scenarios, there are plenty of situations in which you’ll need more than this. Maybe you need to implement a different strategy for authentication, notify an external system about an authorization event, or simply log a successful or failed authentication that’s later used in tracing and auditing (figure 9.3). Whatever your scenario is, Spring Security offers you the flexibility of modeling the filter chain precisely as you need it.
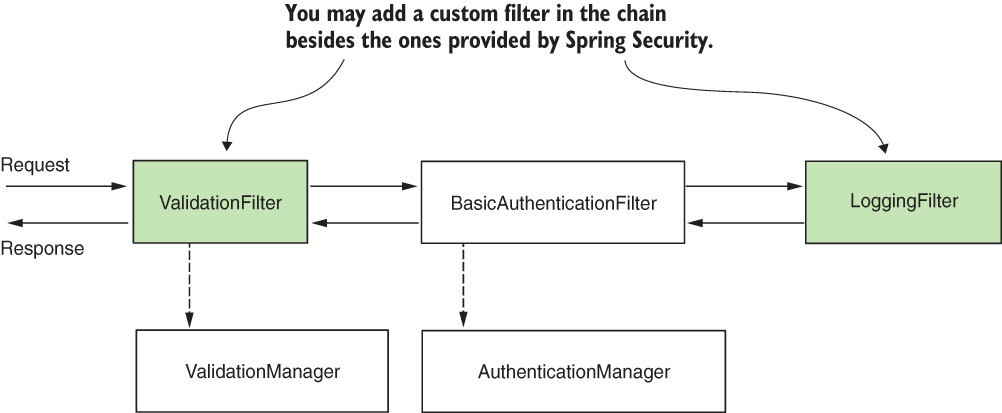
Figure 9.3 You can customize the filter chain by adding new filters before, after, or at the position of existing ones. This way, you can customize authentication as well as the entire process applied to request and response.
9.1 Implementing filters in the Spring Security architecture
In this section, we discuss the way filters and the filter chain work in Spring Security architecture. You need this general overview first to understand the implementation examples we work on in the next sections of this chapter. You learned in the previous chapters that the authentication filter intercepts the request and delegates authentication responsibility further to the authorization manager. If we want to execute certain logic before authentication, we do this by inserting a filter before the authentication filter.
The filters in Spring Security architecture are typical HTTP filters. We can create filters by implementing the Filter interface from the javax.servlet package. As for any other HTTP filter, you need to override the doFilter() method to implement its logic. This method receives as parameters the ServletRequest, ServletResponse, and FilterChain:
-
ServletRequest--Represents the HTTP request. We use theServletRequestobject to retrieve details about the request. -
ServletResponse--Represents the HTTP response. We use theServletResponseobject to alter the response before sending it back to the client or further along the filter chain. -
FilterChain--Represents the chain of filters. We use theFilterChainobject to forward the request to the next filter in the chain.
The filter chain represents a collection of filters with a defined order in which they act. Spring Security provides some filter implementations and their order for us. Among the provided filters
-
BasicAuthenticationFiltertakes care of HTTP Basic authentication, if present. -
CsrfFiltertakes care of cross-site request forgery (CSRF) protection, which we’ll discuss in chapter 10. -
CorsFiltertakes care of cross-origin resource sharing (CORS) authorization rules, which we’ll also discuss in chapter 10.
You don’t need to know all of the filters as you probably won’t touch these directly from your code, but you do need to understand how the filter chain works and to be aware of a few implementations. In this book, I only explain those filters that are essential to the various topics we discuss.
It is important to understand that an application doesn’t necessarily have instances of all these filters in the chain. The chain is longer or shorter depending on how you configure the application. For example, in chapters 2 and 3, you learned that you need to call the httpBasic() method of the HttpSecurity class if you want to use the HTTP Basic authentication method. What happens is that if you call the httpBasic() method, an instance of the BasicAuthenticationFilter is added to the chain. Similarly, depending on the configurations you write, the definition of the filter chain is affected.

Figure 9.4 Each filter has an order number. This determines the order in which filters are applied to a request. You can add custom filters along with the filters provided by Spring Security.
You add a new filter to the chain relative to another one (figure 9.4). Or, you can add a filter either before, after, or at the position of a known one. Each position is, in fact, an index (a number), and you might find it also referred to as “the order.”
You can add two or more filters in the same position (figure 9.5). In section 9.4, we’ll encounter a common case in which this might occur, one which usually creates confusion among developers.
NOTE If multiple filters have the same position, the order in which they are called is not defined.

Figure 9.5 You might have multiple filters with the same order value in the chain. In this case, Spring Security doesn’t guarantee the order in which they are called.
9.2 Adding a filter before an existing one in the chain
In this section, we discuss applying custom HTTP filters before an existing one in the filter chain. You might find scenarios in which this is useful. To approach this in a practical way, we’ll work on a project for our example. With this example, you’ll easily learn to implement a custom filter and apply it before an existing one in the filter chain. You can then adapt this example to any similar requirement you might find in a production application.
For our first custom filter implementation, let’s consider a trivial scenario. We want to make sure that any request has a header called Request-Id (see project ssia-ch9-ex1). We assume that our application uses this header for tracking requests and that this header is mandatory. At the same time, we want to validate these assumptions before the application performs authentication. The authentication process might involve querying the database or other resource-consuming actions that we don’t want the application to execute if the format of the request isn’t valid. How do we do this? To solve the current requirement only takes two steps, and in the end, the filter chain looks like the one in figure 9.6:
-
Implement the filter. Create a
RequestValidationFilterclass that checks that the needed header exists in the request. -
Add the filter to the filter chain. Do this in the configuration class, overriding the
configure()method.

Figure 9.6 For our example, we add a RequestValidationFilter, which acts before the authentication filter. The RequestValidationFilter ensures that authentication doesn’t happen if the validation of the request fails. In our case, the request must have a mandatory header named Request-Id.
To accomplish step 1, implementing the filter, we define a custom filter. The next listing shows the implementation.
Listing 9.1 Implementing a custom filter
public class RequestValidationFilter
  implements Filter {                     ❶

  @Override
  public void doFilter(
     ServletRequest servletRequest,
     ServletResponse servletResponse,
     FilterChain filterChain)
     throws IOException, ServletException {
     // ...
  }
}
❶ To define a filter, this class implements the Filter interface and overrides the doFilter() method.
Inside the doFilter() method, we write the logic of the filter. In our example, we check if the Request-Id header exists. If it does, we forward the request to the next filter in the chain by calling the doFilter() method. If the header doesn’t exist, we set an HTTP status 400 Bad Request on the response without forwarding it to the next filter in the chain (figure 9.7). Listing 9.2 presents the logic.
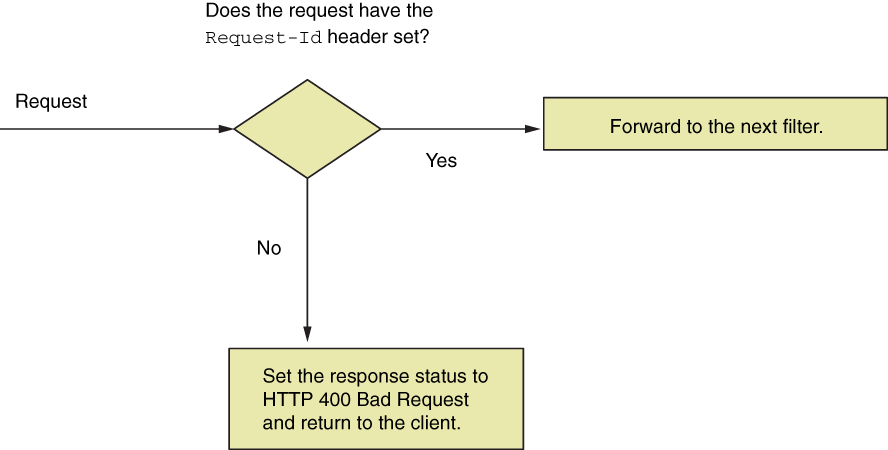
Figure 9.7 The custom filter we add before authentication checks whether the Request-Id header exists. If the header exists on the request, the application forwards the request to be authenticated. If the header doesn’t exist, the application sets the HTTP status 400 Bad Request and returns to the client.
Listing 9.2 Implementing the logic in the doFilter() method
@Override
public void doFilter(
  ServletRequest request,
  ServletResponse response,
  FilterChain filterChain)
    throws IOException,
           ServletException {

  var httpRequest = (HttpServletRequest) request;
  var httpResponse = (HttpServletResponse) response;

  String requestId = httpRequest.getHeader("Request-Id");

  if (requestId == null || requestId.isBlank()) {
      httpResponse.setStatus(HttpServletResponse.SC_BAD_REQUEST);
      return;                                                     ❶
  }

  filterChain.doFilter(request, response);                        ❷

}
❶ If the header is missing, the HTTP status changes to 400 Bad Request, and the request is not forwarded to the next filter in the chain.
❷ If the header exists, the request is forwarded to the next filter in the chain.
To implement step 2, applying the filter within the configuration class, we use the addFilterBefore() method of the HttpSecurity object because we want the application to execute this custom filter before authentication. This method receives two parameters:
-
An instance of the custom filter we want to add to the chain--In our example, this is an instance of the
RequestValidationFilterclass presented in listing 9.1. -
The type of filter before which we add the new instance--For this example, because the requirement is to execute the filter logic before authentication, we need to add our custom filter instance before the authentication filter. The class
Basic-AuthenticationFilterdefines the default type of the authentication filter.
Until now, we have referred to the filter dealing with authentication generally as the authentication filter. You’ll find out in the next chapter that Spring Security also configures other filters. In chapter 10, we’ll discuss cross-site request forgery (CSRF) protection and cross-origin resource sharing (CORS), which also rely on filters.
Listing 9.3 shows how to add the custom filter before the authentication filter in the configuration class. To make the example simpler, I use the permitAll() method to allow all unauthenticated requests.
Listing 9.3 Configuring the custom filter before authentication
@Configuration
public class ProjectConfig extends WebSecurityConfigurerAdapter {

  @Override
  protected void configure(HttpSecurity http) throws Exception {
    http.addFilterBefore(                                         ❶
            new RequestValidationFilter(),
            BasicAuthenticationFilter.class)
        .authorizeRequests()
            .anyRequest().permitAll();
  }
}
❶ Adds an instance of the custom filter before the authentication filter in the filter chain
We also need a controller class and an endpoint to test the functionality. The next listing defines the controller class.
Listing 9.4 The controller class
@RestController
public class HelloController {

  @GetMapping("/hello")
  public String hello() {
    return "Hello!";
  }
}
You can now run and test the application. Calling the endpoint without the header generates a response with HTTP status 400 Bad Request. If you add the header to the request, the response status becomes HTTP 200 OK, and you’ll also see the response body, Hello! To call the endpoint without the Request-Id header, we use this cURL command:
curl -v http://localhost:8080/hello
This call generates the following (truncated) response:
...
< HTTP/1.1 400
...
To call the endpoint and provide the Request-Id header, we use this cURL command:
curl -H "Request-Id:12345" http://localhost:8080/hello
This call generates the following (truncated) response:
Hello!
9.3 Adding a filter after an existing one in the chain
In this section, we discuss adding a filter after an existing one in the filter chain. You use this approach when you want to execute some logic after something already existing in the filter chain. Let’s assume that you have to execute some logic after the authentication process. Examples for this could be notifying a different system after certain authentication events or simply for logging and tracing purposes (figure 9.8). As in section 9.1, we implement an example to show you how to do this. You can adapt it to your needs for a real-world scenario.
For our example, we log all successful authentication events by adding a filter after the authentication filter (figure 9.8). We consider that what bypasses the authentication filter represents a successfully authenticated event and we want to log it. Continuing the example from section 9.1, we also log the request ID received through the HTTP header.
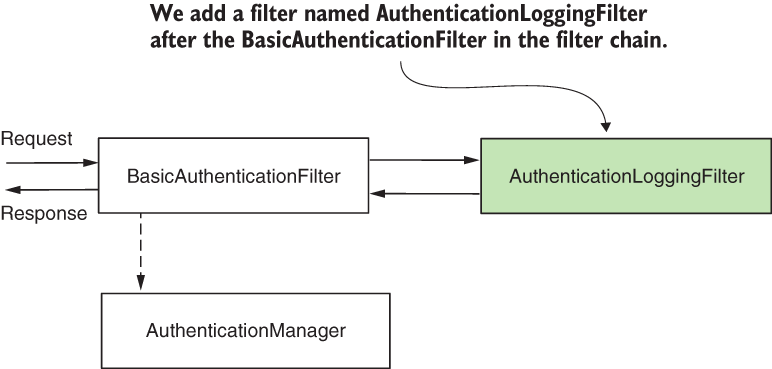
Figure 9.8 We add the AuthenticationLoggingFilter after the BasicAuthenticationFilter to log the requests that the application authenticates.
The following listing presents the definition of a filter that logs requests that pass the authentication filter.
Listing 9.5 Defining a filter to log requests
public class AuthenticationLoggingFilter implements Filter {

  private final Logger logger =
          Logger.getLogger(
          AuthenticationLoggingFilter.class.getName());

  @Override
  public void doFilter(
    ServletRequest request,
    ServletResponse response,
    FilterChain filterChain)
      throws IOException, ServletException {

      var httpRequest = (HttpServletRequest) request;

      var requestId =
        httpRequest.getHeader("Request-Id");         ❶

      logger.info("Successfully authenticated        ❷
                   request with id " +  requestId);  ❷

      filterChain.doFilter(request, response);       ❸
  }
}
❶ Gets the request ID from the request headers
❷ Logs the event with the value of the request ID
❸ Forwards the request to the next filter in the chain
To add the custom filter in the chain after the authentication filter, you call the addFilterAfter() method of HttpSecurity. The next listing shows the implementation.
Listing 9.6 Adding a custom filter after an existing one in the filter chain
@Configuration
public class ProjectConfig extends WebSecurityConfigurerAdapter {

  @Override
  protected void configure(HttpSecurity http) throws Exception {
    http.addFilterBefore(
            new RequestValidationFilter(),
            BasicAuthenticationFilter.class)
        .addFilterAfter(                          ❶
            new AuthenticationLoggingFilter(),
            BasicAuthenticationFilter.class)
        .authorizeRequests()
            .anyRequest().permitAll();
    }
}
❶ Adds an instance of AuthenticationLoggingFilter to the filter chain after the authentication filter
Running the application and calling the endpoint, we observe that for every successful call to the endpoint, the application prints a log line in the console. For the call
curl -H "Request-Id:12345" http://localhost:8080/hello
Hello!
In the console, you can see a line similar to this:
INFO 5876 --- [nio-8080-exec-2] c.l.s.f.AuthenticationLoggingFilter: Successfully authenticated request with id 12345
9.4 Adding a filter at the location of another in the chain
In this section, we discuss adding a filter at the location of another one in the filter chain. You use this approach especially when providing a different implementation for a responsibility that is already assumed by one of the filters known by Spring Security. A typical scenario is authentication.
Let’s assume that instead of the HTTP Basic authentication flow, you want to implement something different. Instead of using a username and a password as input credentials based on which the application authenticates the user, you need to apply another approach. Some examples of scenarios that you could encounter are
-
Identification based on a static header value for authentication
-
Using a symmetric key to sign the request for authentication
-
Using a one-time password (OTP) in the authentication process
In our first scenario, identification based on a static key for authentication, the client sends a string to the app in the header of HTTP request, which is always the same. The application stores these values somewhere, most probably in a database or a secrets vault. Based on this static value, the application identifies the client.
This approach (figure 9.9) offers weak security related to authentication, but architects and developers often choose it in calls between backend applications for its simplicity. The implementations also execute fast because these don’t need to do complex calculations, as in the case of applying a cryptographic signature. This way, static keys used for authentication represent a compromise where developers rely more on the infrastructure level in terms of security and also don’t leave the endpoints wholly unprotected.
Figure 9.9 The request contains a header with the value of the static key. If this value matches the one known by the application, it accepts the request.
In our second scenario, using symmetric keys to sign and validate requests, both client and server know the value of a key (client and server share the key). The client uses this key to sign a part of the request (for example, to sign the value of specific headers), and the server checks if the signature is valid using the same key (figure 9.10). The server can store individual keys for each client in a database or a secrets vault. Similarly, you can use a pair of asymmetric keys.

Figure 9.10 The Authorization header contains a value signed with a key known by both client and server (or a private key for which the server has the public pair). The application checks the signature and, if correct, allows the request.
And finally, for our third scenario, using an OTP in the authentication process, the user receives the OTP via a message or by using an authentication provider app like Google Authenticator (figure 9.11).

Figure 9.11 To access the resource, the client has to use a one-time password (OTP). The client obtains the OTP from a third-party authentication server. Generally, applications use this approach during login when multifactor authentication is required.
Let’s implement an example to demonstrate how to apply a custom filter. To keep the case relevant but straightforward, we focus on configuration and consider a simple logic for authentication. In our scenario, we have the value of a static key, which is the same for all requests. To be authenticated, the user must add the correct value of the static key in the Authorization header as presented in figure 9.12. You can find the code for this example in the project ssia-ch9-ex2.

Figure 9.12 The client adds a static key in the Authorization header of the HTTP request. The server checks if it knows the key before authorizing the requests.
We start with implementing the filter class, named StaticKeyAuthenticationFilter. This class reads the value of the static key from the properties file and verifies if the value of the Authorization header is equal to it. If the values are the same, the filter forwards the request to the next component in the filter chain. If not, the filter sets the value 401 Unauthorized to the HTTP status of the response without forwarding the request in the filter chain. Listing 9.7 defines the StaticKeyAuthenticationFilter class. In chapter 11, which is the next hands-on exercise, we’ll examine and implement a solution in which we apply cryptographic signatures for authentication as well.
Listing 9.7 The definition of the StaticKeyAuthenticationFilter class
@Component                                           ❶
public class StaticKeyAuthenticationFilter
  implements Filter {                                ❷

  @Value("${authorization.key}")                     ❸
  private String authorizationKey;

  @Override
  public void doFilter(ServletRequest request,
                       ServletResponse response,
                       FilterChain filterChain)
    throws IOException, ServletException {

    var httpRequest = (HttpServletRequest) request;
    var httpResponse = (HttpServletResponse) response;

    String authentication =                          ❹
           httpRequest.getHeader("Authorization");

    if (authorizationKey.equals(authentication)) {
        filterChain.doFilter(request, response);
    } else {
        httpResponse.setStatus(
                         HttpServletResponse.SC_UNAUTHORIZED);
    }
  }
}
❶ To allow us to inject values from the properties file, adds an instance of the class in the Spring context
❷ Defines the authentication logic by implementing the Filter interface and overriding the doFilter() method
❸ Takes the value of the static key from the properties file using the @Value annotation
❹ Takes the value of the Authorization header from the request to compare it with the static key
Once we define the filter, we add it to the filter chain at the position of the class Basic-AuthenticationFilter by using the addFilterAt() method (figure 9.13).
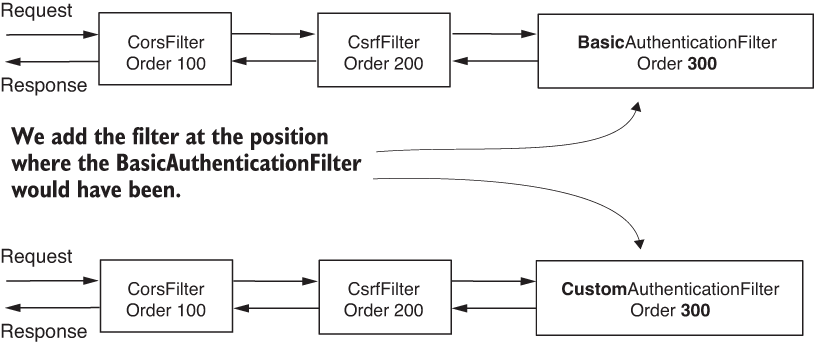
Figure 9.13 We add our custom authentication filter at the location where the class BasicAuthenticationFilter would have been if we were using HTTP Basic as an authentication method. This means our custom filter has the same ordering value.
But remember what we discussed in section 9.1. When adding a filter at a specific position, Spring Security does not assume it is the only one at that position. You might add more filters at the same location in the chain. In this case, Spring Security doesn’t guarantee in which order these will act. I tell you this again because I’ve seen many people confused by how this works. Some developers think that when you apply a filter at a position of a known one, it will be replaced. This is not the case! We must make sure not to add filters that we don’t need to the chain.
NOTE I do advise you not to add multiple filters at the same position in the chain. When you add more filters in the same location, the order in which they are used is not defined. It makes sense to have a definite order in which filters are called. Having a known order makes your application easier to understand and maintain.
In listing 9.8, you can find the definition of the configuration class that adds the filter. Observe that we don’t call the httpBasic() method from the HttpSecurity class here because we don’t want the BasicAuthenticationFilter instance to be added to the filter chain.
Listing 9.8 Adding the filter in the configuration class
@Configuration
public class ProjectConfig extends WebSecurityConfigurerAdapter {

  @Autowired                                       ❶
  private StaticKeyAuthenticationFilter filter;

  @Override
  protected void configure(HttpSecurity http) throws Exception {
    http.addFilterAt(filter,                       ❷
           BasicAuthenticationFilter.class)
        .authorizeRequests()
           .anyRequest().permitAll();
  }
}
❶ Injects the instance of the filter from the Spring context
❷ Adds the filter at the position of the basic authentication filter in the filter chain
To test the application, we also need an endpoint. For that, we define a controller, as given in listing 9.4. You should add a value for the static key on the server in the application.properties file, as shown in this code snippet:
authorization.key=SD9cICjl1e
NOTE Storing passwords, keys, or any other data that is not meant to be seen by everybody in the properties file is never a good idea for a production application. In our examples, we use this approach for simplicity and to allow you to focus on the Spring Security configurations we make. But in real-world scenarios, make sure to use a secrets vault to store such kinds of details.
We can now test the application. We expect that the app allows requests having the correct value for the Authorization header and rejects others, returning an HTTP 401 Unauthorized status on the response. The next code snippets present the curl calls used to test the application. If you use the same value you set on the server side for the Authorization header, the call is successful, and you’ll see the response body, Hello! The call
curl -H "Authorization:SD9cICjl1e" http:/ /localhost:8080/hello
Hello!
With the following call, if the Authorization header is missing or is incorrect, the response status is HTTP 401 Unauthorized:
curl -v http://localhost:8080/hello
...
< HTTP/1.1 401
...
In this case, because we don’t configure a UserDetailsService, Spring Boot automatically configures one, as you learned in chapter 2. But in our scenario, you don’t need a UserDetailsService at all because the concept of the user doesn’t exist. We only validate that the user requesting to call an endpoint on the server knows a given value. Application scenarios are not usually this simple and often require a UserDetailsService. But, if you anticipate or have such a case where this component is not needed, you can disable autoconfiguration. To disable the configuration of the default UserDetailsService, you can use the exclude attribute of the @SpringBootApplication annotation on the main class like this:
@SpringBootApplication(exclude =
  {UserDetailsServiceAutoConfiguration.class })
9.5 Filter implementations provided by Spring Security
In this section, we discuss classes provided by Spring Security, which implement the Filter interface. In the examples in this chapter, we define the filter by implementing this interface directly.
Spring Security offers a few abstract classes that implement the Filter interface and for which you can extend your filter definitions. These classes also add functionality your implementations could benefit from when you extend them. For example, you could extend the GenericFilterBean class, which allows you to use initialization parameters that you would define in a web.xml descriptor file where applicable. A more useful class that extends the GenericFilterBean is OncePerRequestFilter. When adding a filter to the chain, the framework doesn’t guarantee it will be called only once per request. OncePerRequestFilter, as the name suggests, implements logic to make sure that the filter’s doFilter() method is executed only one time per request.
If you need such functionality in your application, use the classes that Spring provides. But if you don’t need them, I’d always recommend you to go as simple as possible with your implementations. Too often, I’ve seen developers extending the GenericFilterBean class instead of implementing the Filter interface in functionalities that don’t require the custom logic added by the GenericFilterBean class. When asked why, it seems they don’t know. They probably copied the implementation as they found it in examples on the web.
To make it crystal clear how to use such a class, let’s write an example. The logging functionality we implemented in section 9.3 makes a great candidate for using OncePerRequestFilter. We want to avoid logging the same requests multiple times. Spring Security doesn’t guarantee the filter won’t be called more than once, so we have to take care of this ourselves. The easiest way is to implement the filter using the OncePerRequestFilter class. I wrote this in a separate project called ssia-ch9-ex3.
In listing 9.9, you find the change I made for the AuthenticationLoggingFilter class. Instead of implementing the Filter interface directly, as was the case in the example in section 9.3, now it extends the OncePerRequestFilter class. The method we override here is doFilterInternal().
Listing 9.9 Extending the OncePerRequestFilter class
public class AuthenticationLoggingFilter
  extends OncePerRequestFilter {             ❶

  private final Logger logger =
          Logger.getLogger(
            AuthenticationLoggingFilter.class.getName());

  @Override
  protected void doFilterInternal(           ❷
    HttpServletRequest request,              ❸
    HttpServletResponse response,            ❸
    FilterChain filterChain) throws
      ServletException, IOException {

      String requestId = request.getHeader("Request-Id");

      logger.info("Successfully authenticated request with id " +
                   requestId);

      filterChain.doFilter(request, response);
  }
}
❶ Instead of implementing the Filter interface, extends the OncePerRequestFilter class
❷ Overrides doFilterInternal(), which replaces the purpose of the doFilter() method of the Filter interface
❸ The OncePerRequestFilter only supports HTTP filters. This is why the parameters are directly given as HttpServletRequest and HttpServletResponse.
A few short observations about the OncePerRequestFilter class that you might find useful:
-
It supports only HTTP requests, but that’s actually what we always use. The advantage is that it casts the types, and we directly receive the requests as
HttpServlet-RequestandHttpServletResponse. Remember, with theFilterinterface, we had to cast the request and the response. -
You can implement logic to decide if the filter is applied or not. Even if you added the filter to the chain, you might decide it doesn’t apply for certain requests. You set this by overriding the
shouldNotFilter(HttpServletRequest)method. By default, the filter applies to all requests. -
By default, a
OncePerRequestFilterdoesn’t apply to asynchronous requests or error dispatch requests. You can change this behavior by overriding the meth- odsshouldNotFilterAsyncDispatch()andshouldNotFilterErrorDispatch().
If you find any of these characteristics of the OncePerRequestFilter useful in your implementation, I recommend you use this class to define your filters.
Summary
-
The first layer of the web application architecture, which intercepts HTTP requests, is a filter chain. As for other components in Spring Security architecture, you can customize them to match your requirements.
-
You can customize the filter chain by adding new filters before an existing one, after an existing one, or at the position of an existing filter.
-
You can have multiple filters at the same position of an existing filter. In this case, the order in which the filters are executed is not defined.
-
Changing the filter chain helps you customize authentication and authorization to match precisely the requirements of your application.