
- Switching to the Mac Lion Edition: The Missing Manual®
- Dedication
- A Note Regarding Supplemental Files
- The Missing Credits
- Introduction
- I. Welcome to Macintosh
- 1. How the Mac Is Different
- 2. Folders, Dock & Windows
- Getting into Mac OS X
- The Four Window Views
- Icon View
- List View
- Column View
- Cover Flow View
- Quick Look
- The Dock
- The Finder Toolbar
- Getting Help in Mac OS X
- 3. Files, Icons & Spotlight
- 4. Documents, Programs & Mission Control
- A Word About Lion Apps
- The Mac App Store
- Other Ways to Get Mac Software
- Opening Mac OS X Programs
- Launchpad
- Windows that Auto-Reopen
- The Application Menu
- Quitting Programs
- The “Heads-Up” Program Switcher
- Mission Control: Death to Window Clutter
- Dashboard
- Exposé
- Hiding Programs the Old-Fashioned Way
- How Documents Know Their Parents
- Keyboard Control
- The Save and Open Dialog Boxes
- Auto Save and Versions
- 5. Entering, Moving & Backing Up Data
- II. Making the Move
- 6. Transferring Your Files to the Mac
- 7. Special Software, Special Problems
- ACDSee
- Acrobat Reader
- ACT
- Ad Subtract (Pop-up Stopper)
- Adobe [your favorite program here]
- America Online
- AIM (AOL Instant Messenger)
- Children’s Software
- Easy CD Creator
- Encarta
- Eudora
- Excel
- Firefox
- Games
- Google Desktop Search
- Google Earth
- Google Chrome
- ICQ
- Internet Explorer
- iTunes
- LimeWire
- McAfee VirusScan
- Microsoft Access
- Microsoft Money
- Microsoft Office
- Microsoft Publisher
- Microsoft Visio
- Minesweeper
- MSN Messenger
- NaturallySpeaking
- Netscape
- Newsgroup Readers
- Norton AntiVirus
- Norton Utilities
- Notepad
- Outlook/Outlook Express/Windows Mail
- Paint Shop Pro
- Palm Desktop
- Picasa
- PowerPoint
- QuickBooks
- Quicken
- RealPlayer
- RssReader
- Skype
- SnagIt
- Solitaire
- Street Atlas USA
- TaxCut, TurboTax
- WinAmp, MusicMatch
- Windows Media Player
- WinZip
- Word
- WordPerfect
- Yahoo Messenger
- 8. Windows on Macintosh
- 9. Hardware on the Mac
- Printers and Printing
- Making the Printout
- Managing Printouts
- Printer Sharing
- Faxing
- PDF Files
- Fonts—and Font Book
- Digital Cameras
- Disks
- iTunes: The Digital Jukebox
- DVD Movies
- Keyboard
- Mouse
- Scanners
- III. Making Connections
- 10. Internet Setup & iCloud
- 11. Mail & Address Book
- Checking Your Mail
- Writing Messages
- Stationery
- Reading Email
- The Anti-Spam Toolkit
- RSS Feeds
- Notes
- Address Book
- 12. Safari & iChat
- Browsing Basics
- Tips for Better Surfing
- Reader
- The Reading List
- Full Screen and Gestures
- The Download Manager
- Graphics Worth Saving
- SnapBack
- Stifle Pop-Ups and Pop-Unders
- Five Ways to Magnify a Page
- Keyboard Control
- Viewing Web Pages Offline
- Where Am I?
- Sending a Page to a Friend
- Expanding Web Forms
- Designate Your Start Page
- Finding Text on Web Pages
- The History Menu
- PDF Pages Online
- Tabbed Browsing
- RSS: The Missing Manual
- iChat
- Many Chat Networks
- Setting Up Your Chat Account(s)
- The Buddy List
- Making a List
- Let the Chat Begin
- Text Chatting
- Audio Chats
- Video Chats
- Juggling Chats and Windows
- Sharing Your Screen
- iChat Theater
- IV. Putting Down Roots
- 14. Networking, File Sharing & Screen Sharing
- 15. System Preferences
- The System Preferences Window
- Bluetooth
- CDs & DVDs
- Date & Time
- Desktop & Screen Saver
- Displays
- Dock
- Energy Saver
- General
- iCloud
- Keyboard
- Language & Text
- Mail, Contacts & Calendars
- Mission Control
- MobileMe
- Mouse
- Network
- Parental Controls
- Print & Scan
- Security & Privacy
- Sharing
- Software Update
- Sound
- Speech
- Spotlight
- Startup Disk
- Time Machine
- Trackpad
- Universal Access
- Users & Groups
- 16. The Freebie Programs
- Your Free Mac OS X Programs
- Address Book
- App Store
- Automator
- Calculator
- Chess
- Dashboard
- Dictionary
- DVD Player
- FaceTime
- Font Book
- GarageBand
- iCal
- iChat
- iDVD
- Image Capture
- iMovie, iPhoto
- iTunes
- Launchpad
- Mission Control
- Photo Booth
- Preview
- QuickTime Player
- Safari
- Stickies
- System Preferences
- TextEdit
- Time Machine
- Utilities: Your Mac OS X Toolbox
- Activity Monitor
- AirPort Utility
- AppleScript Editor
- Audio MIDI Setup
- Bluetooth File Exchange
- Boot Camp Assistant
- ColorSync Utility
- Console
- DigitalColor Meter
- Disk Utility
- Grab
- Grapher
- Java Preferences
- Keychain Access
- Migration Assistant
- Network Utility
- Podcast Capture
- RAID Utility
- System Information
- Terminal
- VoiceOver Utility
- V. Appendixes
- A. Installation
- B. Troubleshooting
- C. The “Where’d-It-Go?” Dictionary
- About [this program]
- Accessibility Options control panel
- Active Desktop
- Add Hardware control panel
- Add or Remove Programs control panel
- All Programs
- Alt key
- Automatic Update
- Backspace key
- Battery level
- BIOS
- Briefcase
- Calculator
- Camera and Scanner Wizard
- CDs
- Character Map
- Clean Install
- Clipboard
- Command line
- Control Panel
- Copy, Cut, Paste
- Ctrl key
- Date and Time
- Delete Key (Forward Delete)
- Desktop
- Directories
- Disk Defragmenter
- Disks
- Display control panel
- DLL files
- DOS prompt
- Drivers
- End Task dialog box
- Exiting programs
- Explorer
- Favorites
- Faxing
- File Sharing
- Floppy disks
- Folder Options
- Fonts
- Help and Support
- Hibernation
- Internet Explorer
- Internet Options
- IRQs
- Java
- Keyboard control panel
- Logging in
- Mail control panel
- Maximize button
- Menus
- Minimize button
- Mouse control panel
- (My) Computer
- (My) Documents, (My) Pictures, (My) Music
- (My) Network Places
- Network Neighborhood
- Notepad
- Personal Web Server
- Phone and Modem Options control panel
- Power Options
- Printer Sharing
- Printers and Faxes
- PrntScrn key
- Program Files folder
- Properties dialog box
- Recycle Bin
- Regional and Language Options control panel
- Registry
- Run command
- Safe Mode
- ScanDisk
- Scheduled Tasks
- Scrap files
- Screen saver
- Search
- Shortcut menus
- Shortcuts
- Sounds and Audio Devices
- Speech control panel
- Standby mode
- Start menu
- Startup folder
- System control panel
- System Tray
- Taskbar
- Taskbar and Start Menu control panel
- “Three-fingered salute”
- ToolTips
- TweakUI
- User Accounts control panel
- Windows (or WINNT) folder
- Windows logo key
- Windows Media Player
- Windows Messenger
- WordPad
- Zip files
- D. The Master Mac OS X Keystroke List
- Index
- About the Author
- Colophon
- Copyright
Microsoft has abandoned its Money personal-finance program, so you would have had to export your Money data to Quicken whether you switched to the Mac or not.
It’s easy enough to export your Money data into Quicken for the Mac, although not every scrap of information comes through alive. You’ll lose your Money abbreviations, comments, and Lifetime Planner information. Fortunately, the important stuff—your accounts and the transactions in them, including categories, classes, and stocks that you’ve set up—come through in one piece.
Unfortunately, you have to export one account at a time. Furthermore, you’ll be creating something called a QIF (Quicken Interchange Format) file as an intermediary between Windows and the Mac—and this file format can’t handle category names longer than 15 characters. Before you begin, then, you might want to take a moment either to shorten them or to make a note of which ones might get truncated in the transfer.
Ready? Fire up Money on your Windows PC and then proceed like this:
Choose File→Export.
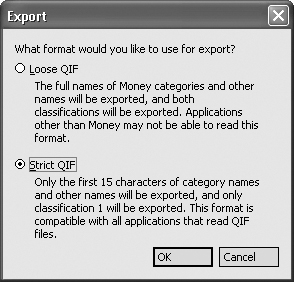
The Export dialog box appears. It wants to know if you are exporting your information to another version of Money (“Loose QIF”) or to some other, rival financial program that shall, as far as Microsoft is concerned, remain nameless.
In the resulting dialog box (Figure 7-2), choose Strict QIF, and then click OK.
Now you’re supposed to name and save the exported file. Make sure you give each account a descriptive name (like Citibank Savings).
Specify a name and a folder on your PC for the exported file, and then click OK.
Repeat these three steps for each of your Money accounts.
Specify the kind of account (usually you’ll want Regular, not Investment), and which one of your accounts to export.
Click OK when the exporting is done.
Transfer the exported files to the Mac.
You can do it via network, email, or any of the other techniques described in Chapter 6. Then move to the Macintosh, open Quicken, and create a new file (see the Quicken instructions). Then, once you’ve got an empty “check register” before you, continue like this:
Choose File→Import QIF. In the “Select a QIF file” dialog box, navigate to, and open, the first exported account file.
When the dust settles, you’ll see your Money transactions safely ensconced in Quicken. (If you see a message that some transactions couldn’t be completed, don’t worry; it’s usually just telling you that some of your category names were longer than 15 characters and have been marked with asterisks to help you spot them.)
If you have more than one account, choose File→New Account to set it up, and then repeat from step 4 to bring in your other Money accounts.
-
No Comment