
You get new mail and send mail you’ve already written using the Get Mail command. You can trigger it in any of several ways:
Right-click Mail’s Dock icon, and choose Get New Mail from the shortcut menu. (You can use this method from within any program, as long as Mail is already open.)
Wait. Mail comes set to check your email automatically every few minutes. To adjust its timing or to turn this feature off, choose Mail→Preferences, click General, and then choose a time interval from the “Check for new messages” pop-up menu.
Now Mail contacts the mail servers listed in the Accounts pane of Mail’s preferences, retrieving new messages and downloading any files attached to those messages. It also sends any outgoing messages that couldn’t be sent when you wrote them.
The mailboxes panel, the leftmost list on the screen, isn’t just for mailboxes. Categories like Reminders and RSS Feeds can appear there, too, as shown in Figure 11-1. But the top half of this gray-blue column on the left side lists all your email accounts’ folders (and subfolders, and sub-subfolders) for easy access. Mail looks quite a bit like iTunes (and iPhoto, and the Finder)—except here you have mailboxes where your iTunes Library and connected iPods would be.
Tip
You can also collapse or expand the various sections of the mailboxes list (On My Mac and Reminders, for example) by clicking the Hide or Show button next to each one. That button doesn’t appear, however, until you point to the section title (like Mailboxes or On My Mac).

Figure 11-1. Click an icon in the mailboxes column to see its contents in the messages list. The messages list shows you the first couple of lines of each message, along with photos of the senders, if available in your Address Book. Click one of the column headings (From, Subject, and so on) to sort your mail collection by that criterion.
Under the Mailboxes heading, you may find these folders:
Inbox holds mail you’ve received. If you have more than one email account, you can expand the triangles to see separate folders for each of your accounts. You’ll see this pattern repeated with the Sent, Junk, and other mailboxes, too—separate accounts have separate subheadings.
Tip
If Mail has something to tell you about your Inbox (like, for instance, that Mail can’t connect to it), a tiny warning triangle (
 ) appears on the right side of the
Mailboxes heading. Click it to see what Mail is griping
about.
) appears on the right side of the
Mailboxes heading. Click it to see what Mail is griping
about.If you see a wavy
 icon, that’s Mail’s way of announcing
that you’re offline. Click the icon to try to connect to the
Internet.
icon, that’s Mail’s way of announcing
that you’re offline. Click the icon to try to connect to the
Internet.Outbox holds mail you’ve written but haven’t yet sent (because you were on an airplane when you wrote it, for example). If you have no mail waiting to be sent, the Outbox disappears.
Drafts holds messages you’ve started but haven’t yet finished and don’t want to send just yet.
Sent, unsurprisingly, holds copies of messages you’ve sent.
Trash works a lot like the Trash on your desktop, in that messages you put there don’t actually disappear. They remain in the Trash folder until you permanently delete them or move them somewhere else—or until Mail’s automatic trash-cleaning service deletes them for you.
Junk appears automatically when you use Mail’s spam filter, as described later in this chapter.
Reminders. Any Notes you’ve jotted down while working in Mail are here. If you’ve flagged any messages, the flag headings appear here, too. (Notes and flags are both described later in this chapter.)
RSS Feeds. Who needs to bop into a Web browser to keep up with the news? Mail brings it right to you while you’re corresponding, as described in a moment.
Mail Activity. You don’t need to summon a separate window to see how much more of that message with the giant attachment the program still has to send. To reveal the Mail activity panel, click the tiny
 icon below the Mailboxes list.
In a program made for managing lists and reading messages, you need all the room you can get. In Mail, you can choose either the Lion layout (three columns) or the Classic layout (list above, message below). The following pages offer advice in modifying the design of either layout.
The Lion layout is the three-column view shown at top in Figure 11-2.
Here’s some of the plastic surgery you can perform:
Try full-screen mode. Click the
 in the upper-right corner of the
window to make the Mail window expand to fill your monitor.
(See Note for details on
full-screen mode.) Full-screen is a natural for space-hungry
email, especially on a small screen (like the 11-inch
MacBook Air).
in the upper-right corner of the
window to make the Mail window expand to fill your monitor.
(See Note for details on
full-screen mode.) Full-screen is a natural for space-hungry
email, especially on a small screen (like the 11-inch
MacBook Air).Figure 11-2. In Lion, Mail can have several different layouts. In the new, standard three-column view (top), all your information sources—mailboxes, Notes, and RSS feeds—are grouped tidily in the far-left column. You can hide that column, though, so that you have more space for reading (middle). You can also return to the pre-Lion layout (bottom), in which the messages list is above the message body.
Install folders onto the Favorites bar. You can drag any icon in the mailboxes list onto the Favorites toolbar, where it becomes a button or a pop-up menu. The button works exactly like a folder: For example, you can drag a message onto one to file it there, or you can click one of these folder buttons (or use its pop-up menu) to see what’s inside.
The Favorites bar comes with starter buttons already installed, like Inbox, Sent, Notes, and so on. But you can, and should, install your own favorites there, and remove the ones you don’t want. (To move a button around,
 -drag it. To get rid of it, just drag it
away from the toolbar.)
-drag it. To get rid of it, just drag it
away from the toolbar.)Hide the mailboxes panel completely. To do that, click the
 button above it. Now you have much
more screen space to work with.
button above it. Now you have much
more screen space to work with.Tip
Hey, here’s a thought! Combine the previous two ideas. Install the most important folders onto the Favorites bar, so you can get at them, and then hide the mailboxes list. Now you have easy access to the most important folders, but your mailboxes list isn’t eating up a lot of screen space. This glorious, space-efficient result is shown back in Figure 11-2, center.
Label the toolbar buttons. Out of the box, the buttons on the toolbar (
 ,
,  , and so on) have no labels. But if
you right-click the toolbar, you get a pop-up menu that
offers you other styles for those buttons: Icon & Text,
Icon Only, Text Only (which is very
space-efficient), and None (which is even more
space-efficient—provided you know the keyboard shortcuts for
all the buttons you’ve just hidden away).
, and so on) have no labels. But if
you right-click the toolbar, you get a pop-up menu that
offers you other styles for those buttons: Icon & Text,
Icon Only, Text Only (which is very
space-efficient), and None (which is even more
space-efficient—provided you know the keyboard shortcuts for
all the buttons you’ve just hidden away).Change the type size/icon size for the folders in the mailboxes panel. To do that, open System Preferences→General. Use the “Sidebar icon size” pop-up menu to choose Small, Medium, or Large.
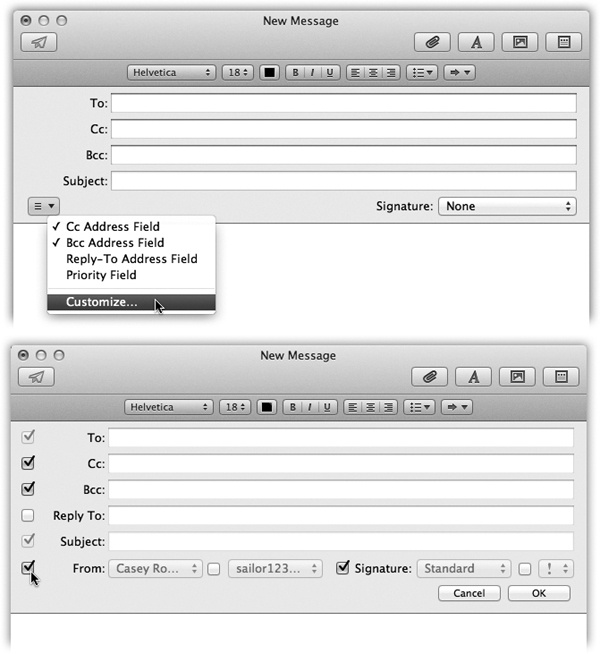
Redesign the New Message window. What signature do you want stamped on every outgoing message? Do you want the “Cc:” and “Bcc:” lines to show up? How about the Priority pop-up menu?
You can make all these settings using the little
 menu in the New Message window; see
Figure 11-3.
menu in the New Message window; see
Figure 11-3.Adjust the message window width. Drag the very right edge of the window inward or outward to adjust the width of the message itself. Double-click the edge of the messages list to hide the message completely. Now you have only the mailboxes list and the very wide messages list; to read a message, you have to double-click it to open it into a new window. (Double-click the right edge of the window to restore the message-reading pane.)
Adjust the width of the mailboxes or messages list. Similarly, you can drag the right edges of the first two columns to adjust their width. Or double-click the right edge to make the column exactly as wide as Mail thinks it should be.
Change what morsels show up in the messages list. The messages list (center column) usually shows the sender’s name, subject line, and the first few lines of the message itself (an iPhone/iPad feature brought to the Mac). But you can add additional info displays to the list—message size, mailbox, date sent, and so on—by choosing from the View→Message Attributes submenu.
Change what details show up in the header. The header is the top part of a message, where you see the details of how the message reached you. Ordinarily, Mail shields you from the geekiest details of the header; if you really want to see it all, choose View→Message→All Headers.
But if you’d rather, you can tailor the standard header so that Mail always shows you exactly the information you want. In Mail→Preferences→Viewing, use the “Show header detail” pop-up menu to choose Custom. Now you can add just the details you always want to see: Attachments, BCC, CC, Flag, From, Reply-To, Resent-CC, and so on.
Control how many lines of preview text appear. In Mail→Preferences→Viewing, you can use the List Preview pop-up menu to control how many lines of each message you want to appear, in light gray, as a preview of what’s in the message itself. You can choose up to five lines, or choose None to hide the preview completely.
Sort the messages. Use the “Sort by” pop-up menu above the messages list (by Date, by Attachment, by Unread, and so on). Use the bottom two commands—Ascending or Descending—to control which way the sorting goes (A to Z, Z to A, or whatever).
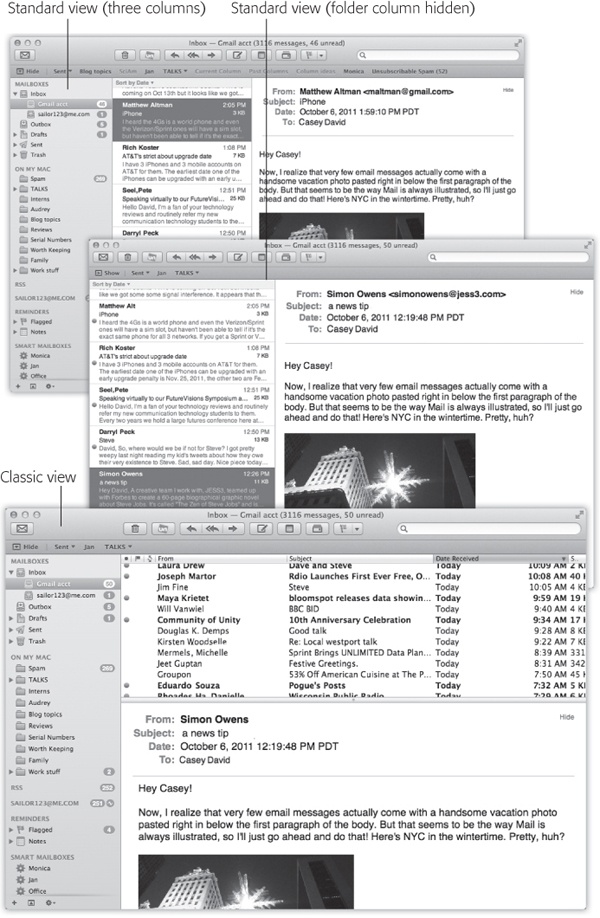
Out of the box, Mail assumes a new three-column layout (Figure 11-2, top): mailboxes list at left, messages list in the middle, and the message itself at right.
But if you hate it, you can use the older layout, shown at bottom in Figure 11-2, by choosing Mail→Preferences→Viewing and turning on “Show Classic layout.”
You have a bunch of customization options here, too:
Adjust the columns. You can make a column in the messages list narrower or wider by dragging the right edge of its column heading, or rearrange the columns by dragging their titles. Similarly, you can sort your email by clicking these column headings, exactly as in the Finder. Click a second time to reverse the sorting order. You can also control which columns appear using the commands in the View→Columns menu.
Hide the message body. You can get rid of the message-reading pane altogether by double-clicking the divider line, double-clicking just above the vertical scroll bar, or dragging the divider line’s handle all the way to the bottom of the screen. Bring it back by dragging the divider line up from the bottom.
Control the mailboxes pane. Drag the thin vertical line that separates this tinted column from the white messages area to make the column wider or narrower. You can make the column disappear or reappear by choosing View→Hide Mailbox List (or View→Show Mailbox List), or by pressing Shift-
-M.
In either layout—Lion or Classic—you have full
control over the toolbar, which works much like the Finder
toolbar. You can rearrange or remove icon buttons (by
![]() -dragging them); add interesting new buttons
to the toolbar (by choosing View→Customize Toolbar); change its
display to show just text labels or just icons (choose
View→Customize Toolbar, and then use the Show pop-up menu); or
hide the toolbar entirely (using the View→Hide Toolbar
command).
-dragging them); add interesting new buttons
to the toolbar (by choosing View→Customize Toolbar); change its
display to show just text labels or just icons (choose
View→Customize Toolbar, and then use the Show pop-up menu); or
hide the toolbar entirely (using the View→Hide Toolbar
command).