What you see depends on whether you installed Lion onto a Snow Leopard drive or an empty drive.
If you installed onto a Snow Leopard drive that already had stuff on it—accounts, files, settings, and so on—then after the Mac restarts, all you have to do is log in as usual. Enjoy the box that warns you about Lion’s upside-down scrolling habit (Note). Click Start Using Lion, and start using Lion.
Note
It’s possible, at this point, that Lion will display a message warning you that it found some incompatible software on your Mac during the installation. You’ll discover that this outdated software has been summarily tossed into a folder called Incompatible Software in your startup disk’s main window.
If you installed Lion onto an empty drive, the Setup Assistant is a little more involved.
Once again, you’re in for a click-through-the-screens experience, this time with the aim of setting up your Mac’s various options. After answering the questions on each screen, click Continue.
The number and sequence of information screens you encounter may vary, but here are some of the possibilities:
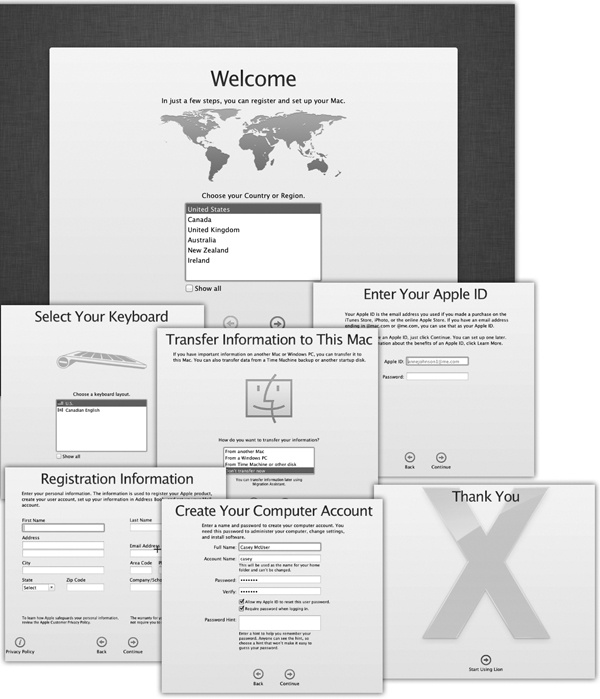
Welcome. Click the name of the country you’re in.
Select Your Keyboard. Different countries require different keyboard layouts. For example, if you choose the Canadian layout, pressing the ] key on a U.S. keyboard produces the ç symbol. Click Continue.
Select a Network Connection. This is your chance to introduce the Mac to any networks in the vicinity. Click the name of the WiFi hot spot you want to join, for example. If there’s no wireless hot spot at all—hey, it could happen—click Different Network Setup to specify, say, a wired or cellular network hookup.
Transfer Information to This Mac. This is one of Apple’s slickest tricks. The Setup Assistant can suck all your old programs, files, folders, and settings from the old Mac to the new one—or even from an old Windows PC to your new Mac. You’re about to meet the Mac OS X Migration Assistant, shown in Figure A-3.
Your choices here are From another Mac (connect your old Mac to this one over a network, even a wireless one); From a Windows PC (see Transfers by Apple Genius); From Time Machine or other disk (connect your new Mac to your backup drive); and Don’t Transfer now.
Tip
If you’re in a hurry, you can always perform this rather sluggish task later. Just open the Migration Assistant program, which sits in your Applications→Utilities folder, whenever it’s a better time. See Transfers by Apple Genius for more on migrating from Windows.
If you choose one of the first options and then click Transfer, the data-copying process begins. It can take a wicked long time.
Enter Your Apple ID. Here you’re offered the chance to type in an Apple ID (an email address and password for all your Apple dealings), which is more essential in Lion than ever before. If you don’t have one, just click Continue; you can get one and fill it in later.
Registration Information. This is your chance to become a grain of sand on the great beach of the Apple database (and to set up your own “card” in Mac OS X’s Address Book program).
Create Your Computer Account. Most of the steps up to this point have been pretty inconsequential, but this is a big moment. You’re about to create your account—your Administrator account, in fact, as described in Chapter 13.
All you have to do is make up a name, usually a short variation of your name, and a password. Choose carefully, because you can’t easily change your account name later.
What you come up with here is extremely important, especially if several people use this Mac at different times, or if other people connect to it on a network. See Note for details on creating a password and a hint that will help you remember it.
If you’re the only one who uses your Mac, it’s perfectly OK to leave the password blank empty.
Select a Picture For This Account. If your Mac has a built-in camera (laptops and iMacs do), you can take a photo of yourself to use as your account icon. Just click “Take a video snapshot.” You get a 3-second countdown, and then the Mac snaps your photo. (You can always reshoot it.) Adjust the cropping by dragging inside the photo, and adjust the size by dragging the slider beneath it.
If you’re camera-shy, of course, you can choose “Choose from the picture library” and find an Apple-provided icon instead.
Thank You. When you click Start Using Lion, you wind up at the Mac OS X desktop, just as described in Chapter 2.