
When you’re done wiring (or not wiring, as the case may be), your network is ready. Your Mac should “see” any Ethernet or shared USB printers, in readiness to print (Chapter 9). You can now play network games or use a network calendar. And you can now turn on File Sharing, one of the most useful features of all.
In File Sharing, you can drag files back and forth between different Macs (or even PCs) on the network, exactly as though the other computer’s folder or disk is a hard drive connected to your own machine. You can see the idea in Figure 14-2.
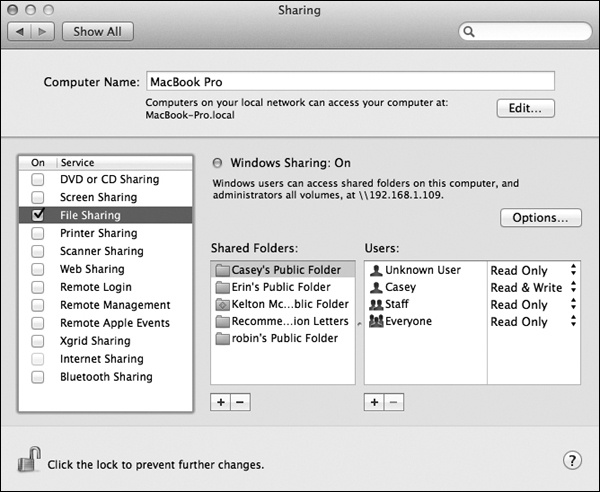
Figure 14-2. Here’s the master switch that makes your Public folder (and any other folders you designate) available to other people on the network. You can edit the Computer Name, if you like. Your Mac will appear on the network with this name. Make it nice and descriptive, such as Front Desk iMac.
The thing is, it’s not easy being Apple. You have to write one operating system that’s supposed to please everyone, from the self-employed first-time newbie to the network administrator for NASA. You have to design a networking system simple enough for the laptop owner who just wants to copy things to a desktop Mac when returning from a trip, yet secure and flexible enough for the network designer at a large corporation.
Clearly, different people have different attitudes toward the need for security and flexibility.
That’s why Lion offers three ways to share files, striking three different positions along the Simplicity-to-Flexibility Spectrum:
The easiest way: AirDrop. This Lion feature is dreamy—if there are other people in your house or office who have wireless Macs running Lion or Mountain Lion. Imagine this: You open the AirDrop folder, where you see everybody else’s icons. To give someone a file, you drop its icon on that person’s face. Done.
What used to be the easiest way: the Public folder. Every account holder has a Public folder. It’s free for anyone else on the network to access. Like a grocery store bulletin board, there’s no password required. Super-convenient, super-easy.
There’s only one downside, and you may not care about it: You have to move or copy files into the Public folder before anyone else can see them. Depending on how many files you want to share, this can get tedious, disrupt your standard organizational structure, and eat up disk space.
The flexible way: any folder. You can also make any file, folder, or disk available for inspection by other people on the network. This method means that you don’t have to move files into the Public folder, for starters. It also gives you elaborate control over who is allowed to do what to your files. You might want to permit your company’s executives to see and edit your documents, but allow the peons in Accounting just to see them. And Andy, that unreliable goofball in Sales? You don’t want him even seeing what’s in your shared folder.
Of course, setting up all those levels of control means more work and more complexity.
The following pages tackle these three methods one at a time.