
QuickTime is Apple’s preferred video file format (like WMV files on Windows). Like any movie, it creates the illusion of motion by flashing many individual frames (photos) per second before your eyes, while also playing a synchronized soundtrack.
The cornerstone of Mac OS X’s built-in movie-playback software is QuickTime Player, which sits in your Applications folder. Despite the name, QuickTime Player lets you edit videos as well. You can chop them up, rearrange the chunks, tack on new movies, and trim the ends. In fact, you can even record new video, either using your Mac’s built-in camera or by recording screen activity. Finally, when everything looks good, you can post your masterpiece to YouTube, Facebook, Vimeo, or another online site.
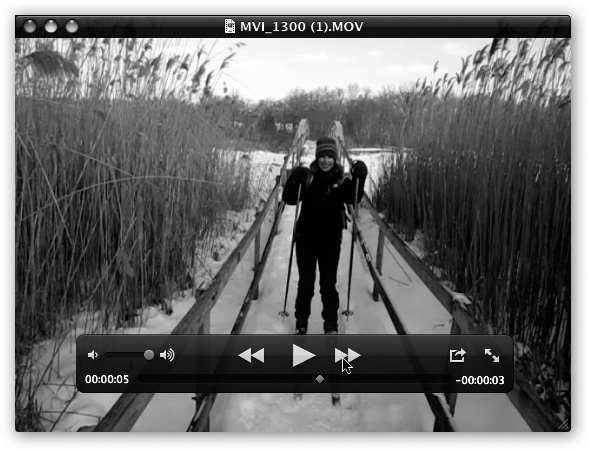
You can open a movie file by double-clicking it. When QuickTime Player first opens, you get a very cool, borderless playback window. Just hit the space bar to play the movie.
There’s a control toolbar at the bottom of the window (Figure 16-20), but it fades away after a few seconds—or immediately, if you move the cursor out of the frame. The toolbar reappears anytime your mouse moves back into the movie frame. These are the controls:
Rotate or flip. The Edit menu contains commands for Rotate Right, Rotate Left, Flip Horizontal, and Flip Vertical. Those commands can be handy when a movie turns out to be flipped or rotated—or when you want to flip or rotate it for creative purposes.
Volume slider (
 ...
... ). Click
in the slider, or drag the dot, to adjust the volume—although it’s
actually easier to just tap the ↑ or ↓ keys.
). Click
in the slider, or drag the dot, to adjust the volume—although it’s
actually easier to just tap the ↑ or ↓ keys.Rewind, Fast-forward (
 ). By clicking one of these
buttons, you get to speed through your movie at double speed,
backward or forward, complete with sound. Click again for 4X
speed, again for 8X.
). By clicking one of these
buttons, you get to speed through your movie at double speed,
backward or forward, complete with sound. Click again for 4X
speed, again for 8X.Play/Pause (
 ). Click ▸ to start playback,
 to pause/stop. Or just tap the space bar
for both functions.
to pause/stop. Or just tap the space bar
for both functions.Scroll bar. Drag the little diamond, or just click inside its track, to jump to a different spot in the movie. The counters at the beginning and end of the scroll bar tell you, in “hours:minutes:seconds” format, how far your playhead cursor has moved into the movie, and how far you are from the end. (Click the right-hand readout to see the total movie duration.)
Window edges. Drag any edge, or the lower-right corner, to make the window bigger or smaller. QuickTime Player always maintains the same aspect ratio (relative dimensions) of the original movie, so you won’t accidentally squish it.
Share button (
 ). Click
for a pop-up menu of choices for passing on this video to your
adoring fans: iTunes, YouTube, Vimeo, Flickr, Facebook, Mail, or
iCloud. The iMovie option lets you shoot the video over to iMovie
for more in-depth editing, and the Trim command is here, too. All
of these options are described below.
). Click
for a pop-up menu of choices for passing on this video to your
adoring fans: iTunes, YouTube, Vimeo, Flickr, Facebook, Mail, or
iCloud. The iMovie option lets you shoot the video over to iMovie
for more in-depth editing, and the Trim command is here, too. All
of these options are described below.Full Screen (
 ). Click
to make the video fill your entire monitor, just as though you’d
chosen View→Enter Full Screen. And what if the proportions of the
movie don’t quite match your screen? If you make the menu bar
return by pointing to the top of your screen, you can handle this
problem using one of the choices in the View menu, described
next.
). Click
to make the video fill your entire monitor, just as though you’d
chosen View→Enter Full Screen. And what if the proportions of the
movie don’t quite match your screen? If you make the menu bar
return by pointing to the top of your screen, you can handle this
problem using one of the choices in the View menu, described
next.
Nobody knows for sure what Apple was thinking when it created some of these additional features—exactly how often do you want your movie to play backward?—but here they are:
Change the screen size. As noted above, you can drag the window to any size using the edges as handles. But the View menu commands are handy, too.
Actual size represents the movie on your screen at its real size—no larger. (If it’s truly huge, larger than your screen, it may be scaled smaller to fit. But that’s a rarity.) Fit to Screen fills your screen without cropping or distorting; the menu bar and other windows remain visible.
Fill Screen is especially satisfying, because it turns your entire monitor into a movie playback area. Panoramic squishes the outer edges of the video, distorting them slightly, so that nothing gets chopped off and the movie fills the screen. (These two options are available only in Full Screen mode.)
Tip
These same options are available via keyboard shortcuts—
 -3, -4, and -5. There’s even a little button on the
control bar, second from right, that switches back and forth
between Fit to Screen and Fill Screen. (This button appears
only when you’re already in Full Screen mode.)
-3, -4, and -5. There’s even a little button on the
control bar, second from right, that switches back and forth
between Fit to Screen and Fill Screen. (This button appears
only when you’re already in Full Screen mode.)Making the window larger may also make the movie coarser, because QuickTime Player simply enlarges every dot that was present in the original. Still, when you want to show a movie to a group of people more than a few feet back from the screen, these larger sizes are perfectly effective.
Play more than one movie. You can open several movies at once and run them simultaneously. (Of course, the more movies you try to play at once, the jerkier the playback gets.)
Loop the movie. When you choose View→Loop and then click Play, the movie repeats endlessly until you make it stop.
Navigate chapters. A few movies, like the ones you buy or rent from Apple, come with built-in chapter markers, just like a DVD. They let you jump around in the film at your whim.
QuickTime Player is actually QuickTime Editor. The program still doesn’t offer selection handles, so you might think there’s no way to select a portion of the middle of a movie (to chop it out, for example). But in fact, the commands for trimming, splitting, and merging video clips let you perform just about any editing trick you can imagine. Read on.
Trimming video from the ends. You can very easily trim dead space off the ends of a video. Figure 16-21 shows how.
Tip
Once you’re in Trim mode, the Edit menu sprouts a very cool command: Select All Excluding Silence. It automatically adjusts the yellow trim handles so that they cut out any silent portions of the video (at the beginning or end). That’s a handy shortcut if you, like many impromptu videographers, let the camera roll a bit before and after the main event.
Figure 16-21. Top: To trim a video, choose Edit→Trim, or press
-T. Drag the yellow handles inward to
isolate the chunk you want to preserve. (You can click ▸ or
tap the space bar to check your work.) When everything looks
good, click Trim or press Return. Bottom: If you
choose View→Show Audio Track, then you can use the
soundwaves as a guide to your precision editing.You don’t have to worry about damaging the original video when trimming—you couldn’t modify the original if you tried. The instant you use the Trim command, QuickTime Player peels off the shortened version as a new, untitled movie, which you’ll have to name and save separately (choose File→Export).
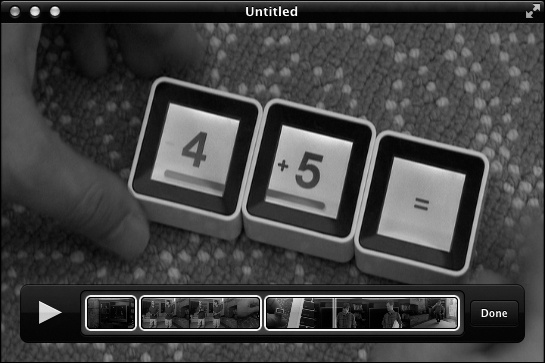
Splitting a clip. The Lion edition of QuickTime Player introduces the new concept of clips: sub-sections of a movie. To chop a movie in two, move the playhead to the spot where you want the movie to split, and then choose Edit→Split Clip. As shown in Figure 16-22, a clips map appears at the bottom of the window, showing the two resulting clips.
Figure 16-22. The new Split Clip command chops the video into two clips—and produces the map shown at bottom. If you click a clip and then press the space bar to play the video, you’ll see the red vertical line that represents the playhead. To chop one of your clips up into further sub-clips, move that red line into position, and then use the Split Clip command again.
Chopping video out of the middle. If you want to trim some video from the middle of a movie, first open up the clips map. Then split the movie as described above. Once you’ve split a movie into a couple of clips, you can double-click one of the clips to produce trim handles just for it. In this way, you can cut unwanted sections from the middle of a video.
Or just split the clip into three chunks—and delete the middle one.
Rearranging clips. Once you’ve chopped up a video into sub-clips using the Split Clip command, you can drag them around within the map. (If you don’t see the map, shown in Figure 16-22, then choose View→Show Clips.)
You can use the Cut, Copy, and Paste commands in the Edit menu, too, to move chunks around—even among different movies. (Just remember to first split the target movie at the spot where you want to paste the new clip. The pasted material appears just after whatever clip is currently highlighted.)
Combining movies. Combining clips, as described above, is one way to merge videos together. But you can also merge entire movie files that are sitting in the Finder.
Start by opening the first movie. If you want the second movie to appear at the end of it, just choose Edit→Add Clip to End.
The Open dialog box now appears. Find and double-click the clip you want to tack on. Repeat as necessary.
You can also drag movie clips’ icons from the desktop right into a movie window. QuickTime Player adds them to the end of the existing movie.
If you want the second movie to appear somewhere in the middle of the first movie, open up the clip map (View→Show Clips). Click the clip that appears right before the spot where the new movie will go. Choose Edit→Insert Clip After Selection; in the resulting dialog box, find and double-click the movie file you want to bring in.
Or drag a movie file from the Finder directly into the gap between two sub-clips.
Tip
QuickTime Player automatically shrinks or crops the incoming movies so that they fit the same “screen size” as the original. If they’re not exactly the same size or proportions, you can then use the Edit→Clip Alignment submenu (Top, Left, Center, and so on) to specify which edge of the movie frame the imported video should hug.

QuickTime Player does more than play movies; it can also record them. Yes, your Mac is now a camcorder, and a darned handy one; you can pop out quick video greetings, gross out your former roommates, impress your coworkers with a dress rehearsal of your pitch, and so on.
Laptops and iMacs, of course, have a video camera built right in, above the screen. If you have another model, you can attach a Webcam, an old iSight camera, or even a FireWire camcorder.
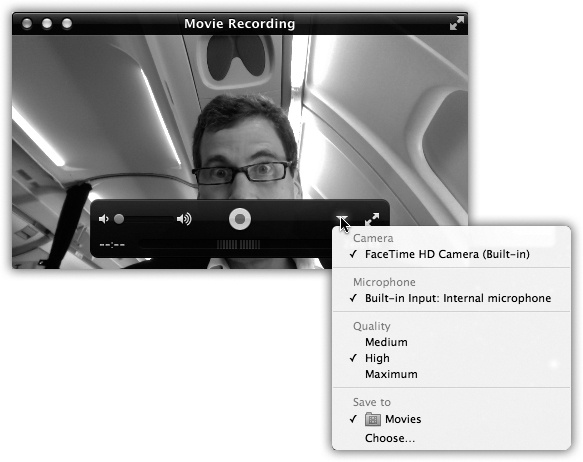
Then open QuickTime Player and choose File→New Movie Recording. The preview window appears. Use the pop-up menu shown in Figure 16-23 to specify what mike and camera you want to use (in the unlikely event that you have more than one), what video quality you want, and where you want to store the result.
Then, to record, click the red Record button (or press the space bar). Do your schtick. Press the space bar again to stop recording.
Your new video appears in its own playback window. Check it out, trim it if necessary, and then shoot it off to iTunes, Vimeo, YouTube, or whatever.
You can also record movies of the screen.
Why is it useful to capture screen activity as a video? Because you can make mini-tutorials to give little lessons to techno-clueless relatives. You can make video podcasts that show how to do things in your software programs. You can preserve Web animations that you used to think you had no way to capture.
There are limitations. Your movies don’t include the Mac’s own sounds (game soundtracks and so on), so forget about capturing videos playing on YouTube. (It can record from the mike, though, so you can narrate what you’re doing.)
But who cares? It’s fantastically handy. And in Lion, you can now capture only a portion of the screen—one particular window, for example—instead of being stuck with the entire monitor’s worth.
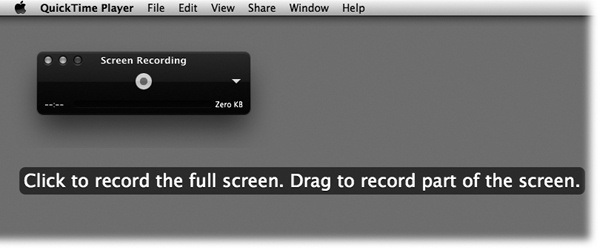
To make a screen recording, choose File→New Screen Recording. Use the pop-up menu on the resulting Screen Recording panel to turn the microphone on or off, to choose a quality setting, and to indicate where you want the finished movie stored.
Tip
This pop-up menu also contains Show Mouse Clicks in Recording. It helps your viewers understand when and where you actually clicked the mouse during the tutorial—by briefly displaying a little circle around the cursor each time you click. (It appears only in playback—not while you’re recording.)
Finally, click the red Record button (or press Return), and then proceed as shown in Figure 16-24.
Press Return, or click Start Recording, to begin the capture. When you finally click the ▀ button in the floating Screen Recording window, your finished movie appears in a regular playback window, ready to trim or to send away to your fans.
You can also make audio-only files. Choose File→New Audio Recording. Use the pop-up menu to specify the audio quality and sound source (Figure 16-25). Click the round, red Record button and begin to speak; click the square Stop button to finish up. Now you can use the volume slider and the ▸ button to listen to your masterpiece.
Tip
Don’t adjust the tiny volume slider in the Audio Recording window unless you’re wearing headphones. This slider lets you monitor the sound—and turning it up while the Mac’s speakers are live risks producing the hideous shriek known as feedback.
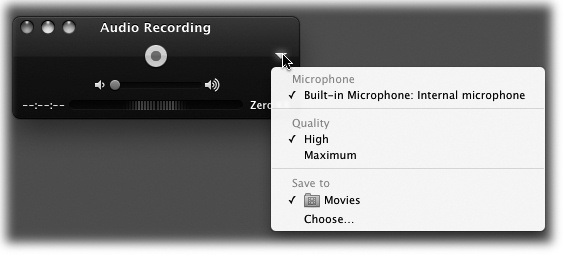
Figure 16-25. There’s a lot going on in this tiny window. The pop-up menu lets you choose audio quality and audio input. At bottom, as you record, you see a VU meter (audio level) and an indication of the recording’s length and file size.
Behind the scenes, the Mac has created a new AAC audio file called Audio Recording.mov in your Home→Movies folder. (Additional recordings are called Audio Recording 2, 3, 4, and so on.) You can double-click it to open it right back up into QuickTime Player for trimming (read on). Or, if you think it needs more in-depth editing, you can open it with GarageBand and really go to town.
One of QuickTime Player’s most important talents is sharing a video: posting it directly to YouTube or Flickr; converting it to the right format for an iPod, iPhone, or cellphone; stashing it in iTunes for easy transfer to your iPod/iPhone; handing it off to iMovie for further editing; saving it to the hard drive as a double-clickable movie; and so on.
Let us count the ways.
The main reason you’d want to send your video to iTunes is because you have an iPod, iPhone, iPad, or Apple TV. Once it’s in iTunes, you can sync your video easily to that other Apple gadget and have it ready to view at all times.
To make this transfer happen, choose Share→iTunes. Or click
the ![]() icon on the control bar and choose iTunes
from the pop-up menu.
icon on the control bar and choose iTunes
from the pop-up menu.
Either way, you see the dialog box in Figure 16-26. Click the appropriate gadget/screen size, and then click Share. When it’s all over, your video will appear safely nestled in iTunes, in the Videos category, ready to watch or sync.
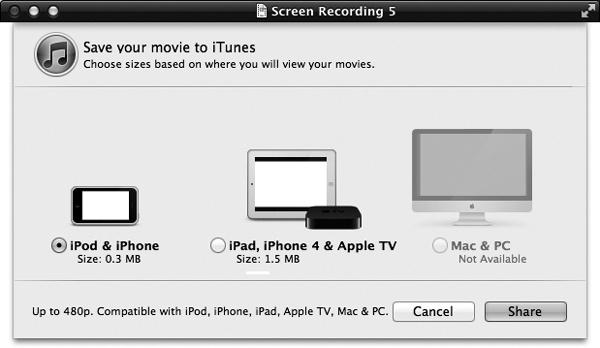
Figure 16-26. This dialog box gives you three size choices for the movie you’re exporting, which correspond to the screen sizes of the three Apple gadgets available. (The Computer option is just there in case you like to play videos right in iTunes, right on the screen. It’s dimmed if the original movie isn’t big enough to fill the screen.)
The Share menu offers one-click commands for posting to
YouTube (the world’s most popular and famous Web site for short
videos), Vimeo (a less well-known, but classier, more high-def
video-sharing site), Flickr (mainly a photo-sharing site, but
handles videos too), or Facebook (the most visited Web site on
earth). Instead of using the Share menu, you can also click the
![]() icon on the control bar and then choose
from the pop-up menu.
icon on the control bar and then choose
from the pop-up menu.
All of these services require that you first sign up for a free account. (You do that online, not in QuickTime Player.)
Then, with your movie open in QuickTime Player, choose from the Share menu. You’re asked for your name and password for the service. If you turn on “Remember this password in my keychain,” you won’t have to enter it the next time.
Finally, click Sign In. On the next screen, type a title and description for the movie. Enter keywords (search categories like “funny” or “sports”) so people on that service will find your video when they search.
Work through the remaining upload screens; click Share. In a few minutes, your video will be live for the whole world to see—no charge.
The Share→iMovie command hands off your QuickTime Player video to iMovie, where you can add music, opening credits, crossfades, and other fancy edits. From there, you can post the masterpiece online.
Most email systems have fairly tight limits on the sizes of file attachments. In other words, sending a movie by email doesn’t work unless your movie is pretty small. “Small,” in this context, refers to both the size of the movie’s “screen” and to the quality of the video.
To email your video, choose Share→Mail. QuickTime Player asks if you want to send the movie as actual size (its original form) or in 480p format, which has limited dimensions and video quality. Make your choice and click Share; QuickTime Player goes to work, scaling the video if necessary, and then hands off the result to a new, outgoing message in Mail.
Even if you choose 480p, though, there’s no guarantee that the resulting movie file will be small enough. You’ll be allowed to send it just fine, but the recipient’s email system may reject it as being too big. You’ll get a “bounce back” message, in that case.
Maybe that’ll teach you to adopt more concise filming and editing habits.
After you’ve edited a movie (or not), you can use one of the two Export commands to specify a new name for your masterpiece—and, if you wish, to convert it to a different format, depending on what kind of machine will be playing it.
Here are your options if you choose File→Export:
480p. You’re creating a video in H.264 format, with a resolution of 640 × 480 pixels (standard-definition TV size). It requires 3 megabits per second of Internet speed, which means that almost anyone can watch it online.
720p. You’re saving a high-definition H.264 video (1280 × 720 pixels). Requires more bandwidth to watch online: 7.5 Mbits per second.
1080p. An even higher-def high-def movie (1920 × 1080). Requires 10 Mbits per second.
iPod Touch & iPhone 3GS. This option makes a 480p copy of the movie, in MPEG format. Perfect size for the iPhone 3GS and iPod touch (third generation or later). Also plays on computers and Apple TV.
iPad, iPhone 4 & Apple TV. Creates a 720p (high-def) copy of the movie. Sized for the higher-resolution screens of the iPod touch (fourth generation), iPhone 4 or 4S, iPad, and Apple TV (second generation).
Audio Only. This option lets you export just the audio from a movie. That’s handy if you want to listen on your phone or iPod, post an interview online, or use the audio track in another movie.
Tip
Most people think that those are the only options—but there are a few more choices that can handle earlier gadgets. To see them, press Option as you open the Format pop-up menu. Now you also get choices for older iPods and iPhones (and for slower Internet connections—1.5 megabits a second), and first-generation Apple TVs.
There’s also the File→Export for Web command. It produces a dialog box with three options: WiFi, Cellular, and Broadband. Turn on as many of them as you like.
An Export Progress dialog box appears, and the Mac chews away at the job of creating differently sized versions of the movie, at different frame and data rates, for the different kinds of visitors your Web site might encounter.
When it’s over, the dialog box displays a link to a Web page (an HTML document) that’s been saved to your hard drive. Click the link to see user-friendly instructions for embedding this movie on your own Web site (well, as user-friendly as HTML code fragments get). There’s even a playable preview, so you can try the finished product before you post it online.