
If your Mac is connected wirelessly or, um, wirefully to a cable modem, DSL, or office network, you’re one of the lucky ones. You have a high-speed broadband connection to the Internet that’s always available, always on. You never have to wait to dial.
Most broadband connections require no setup
whatsoever. Take a new Mac out of the box, plug in the
Ethernet cable to your cable modem—or choose a wireless network from
the ![]() menulet—and you can begin surfing the Web
instantly.
menulet—and you can begin surfing the Web
instantly.
That’s because most cable modems, DSL boxes, and wireless base stations use DHCP. It stands for dynamic host configuration protocol, but what it means is: “We’ll fill in your Network pane of System Preferences automatically.” (Including techie specs like IP address and DNS Server addresses.)
If, for some reason, you’re not able to surf the Web or check email the first time you try, it’s remotely possible that your broadband modem or your office network doesn’t offer DHCP. In that case, you may have to fiddle with the Network pane of System Preferences.

Figure 10-3. Here’s the setup for a cable-modem account with a static IP address, which means you have to type in all these numbers yourself.
On the Network pane, click your Internet connection (Wi-Fi, Built-in Ethernet, cellular modem, whatever). Click Advanced; click TCP/IP. Now you see something like Figure 10-3. Don’t be alarmed by the morass of numbers and periods—it’s all in good fun. (If you find TCP/IP fun, that is.)
To get the information to fill in here, you can call your Internet provider (cable or TV company) for help—or you can copy your Windows configuration onto the Mac.Read on.
Your first task is to get to the Properties dialog box for your connection:
Windows 2000. Choose Start→Settings→Network and Dial-up Connections.
Windows XP. Choose Start→Control Panel. Open Network Connections.
Windows Vista. Choose Start→Control Panel. Open Network and Sharing Center. Click “Manage network connections.”
Windows 7. Choose Start→Control Panel. Open Network and Sharing Center. Click “Change adapter settings.”
You wind up with a window full of icons that represent the various ways you can connect (3G Connection, Wireless Network Connection, Local Area Connection—that is, Ethernet cable—and so on).

Figure 10-4. Here’s another way to fill in your Mac’s network settings: copy them, blank by blank, from your old Windows PC.
Continue by right-clicking the icon for your broadband connection; from the shortcut menu, choose Properties. (In Windows Vista, you get an “Are you sure?” box at this point; click Continue.)
In the resulting dialog box, click the row that says “Internet Protocol (TCP/IP).”
If the resulting screen says “Obtain an IP address automatically” (see Figure 10-4), then leave Using DHCP selected in the Mac’s Configure pop-up menu; your Mac should teach itself the correct settings automatically.
If the Windows screen says, “Use the following IP address” instead, then select Manually from the Mac’s Configure pop-up menu, and copy the relevant numbers into the Mac’s Network panel (see Figure 10-4).
Similarly, if the Internet Protocol (TCP/IP Properties) dialog box says, “Use the following DNS server addresses,” then type the numbers from the “Preferred DNS server” and “Alternate DNS server” boxes into the Mac’s DNS Servers text box. (Press Return to make a new line for the second number.)
Choose Start→Settings→Control Panel. In the Control Panel window, double-click Network. Double-click the TCP/IP row that identifies how your PC is connected to the broadband modem. (It may say “TCP/IP→3Com Ethernet Adapter,” for example.)
Click the IP Address tab. If it says “Specify an IP address,” then copy the IP Address and Subnet Mask numbers into the same ones on the Mac’s Network panel. Then click the Gateway tab, and copy the “Installed gateway” number into the Mac’s Router box.
Finally, click the DNS Configuration tab. Copy the strings of numbers you see here into the Mac’s DNS Servers text box. (Press Return to make a new line for the second number, if necessary.)
The beauty of Ethernet connections is that they’re super-fast and super-secure. No bad guys sitting across the coffee shop, armed with shareware “sniffing” software, can intercept your email and chat messages, as they theoretically can when you’re on wireless.
And 99 percent of the time, connecting to an Ethernet network is as simple as connecting the cable to the Mac. That’s it. You’re online, quickly and securely, and you never have to worry about connecting or disconnecting.
WiFi is the friendlier term for 802.11 wireless networking technology. It’s the radio-wave technology that lets your Mac communicate with a wireless base station up to 300 feet away, much like a cordless phone. Doing so lets you surf the Web from your laptop in a hotel room, for example, or share files with someone across the building from you.
Chapter 14 has much more information about setting up a WiFi network. The real fun begins, however, when it comes time to join one.
Sometimes you just want to join a friend’s WiFi network. Sometimes you’ve got time to kill in an airport, and it’s worth a $7 splurge for half an hour. And sometimes, at some street corners in big cities, WiFi signals bleeding out of apartment buildings might give you a choice of several free hot spots to join.
Your Mac joins WiFi hot spots like this:
First, it sniffs around for a WiFi network you’ve used before. If it finds one, it connects quietly and automatically. You’re not asked for permission, a password, or anything else; you’re just online. (It’s that way, for example, when you come home with your laptop every day.) For details on this memorization feature, see the box on the facing page.
Figure 10-5. Top: Congratulations—your Mac has discovered new WiFi hot spots all around you! You even get to see the signal strength right in the menu. Double-click one to join it. But if you see a
 icon next to the hot spot’s name,
beware: It’s been protected by a password. If you don’t know
it, then you won’t be able to connect. Bottom: Later,
you can always switch networks using the WiFi menulet.
icon next to the hot spot’s name,
beware: It’s been protected by a password. If you don’t know
it, then you won’t be able to connect. Bottom: Later,
you can always switch networks using the WiFi menulet.If the Mac can’t find a known hot spot, but it detects a new hot spot or two, a message appears on the screen, displaying their names (see Figure 10-5). Double-click one to connect.
If you’re in the presence of a commercial hot spot—one that requires payment or reading some kind of insipid legal agreement—Lion opens a miniature Web page, shoving it right into your face, even if your Web browser isn’t open; see Figure 10-6.
Figure 10-6. Lion auto-opens a page like this whenever it senses that you’re in a commercial WiFi network, one that requires you to sign in. (That’s a big improvement from the old way, where you’d join a network and then have no clue that you wouldn’t be able to get any further until you opened up your Web browser to find that login screen.)
If you missed the opportunity to join a hot spot when the message appeared, or if you joined the wrong one or a non-working one, then you have another chance. You can always choose a hot spot’s name from the
 menulet, as shown in Figure 10-5. A
icon indicates a hot spot that requires a
password, so you don’t waste your time trying to join it
(unless, of course, you have the
password).
menulet, as shown in Figure 10-5. A
icon indicates a hot spot that requires a
password, so you don’t waste your time trying to join it
(unless, of course, you have the
password).


Tip
It always takes a computer a few seconds—maybe 5 or
10—to connect to the Internet over WiFi. In Mac OS X, the
![]() menulet itself pulses,
or rather ripples, with a black-and-gray animation to let you know
you’re still in the connection process. It’s an anti-frustration
aid. (Oh, and also, each hot spot’s signal strength appears right
in the menulet.)
menulet itself pulses,
or rather ripples, with a black-and-gray animation to let you know
you’re still in the connection process. It’s an anti-frustration
aid. (Oh, and also, each hot spot’s signal strength appears right
in the menulet.)
Before you get too excited, though, some lowering of
expectations is in order. There are a bunch of reasons why your
![]() menulet might indicate that you’re in a hot
spot, but you can’t actually get online:
menulet might indicate that you’re in a hot
spot, but you can’t actually get online:
It’s locked. If there’s a
next to the hot spot’s name in your
menulet, then the hot spot has been
password protected. That’s partly to prevent hackers from
“sniffing” the transmissions and intercepting messages, and
partly to keep random passersby like you off the
network.The signal isn’t strong enough. Sometimes the WiFi signal is strong enough to make the hot spot’s name show up in your
menu but not strong enough for an
actual connection.You’re not on the list. Sometimes, for security, hot spots are rigged to permit only specific computers to join, and yours isn’t one of them.
You haven’t logged in yet. Commercial hot spots (the ones you have to pay for) don’t connect you to the Internet until you’ve supplied your payment details on a special Web page that appears automatically when you open your browser, as described below.
Power Users’ Clinic: The Super-Secret Hot-Spot Management Box
If you open System Preferences→Network, click Wi-Fi in the left-side list, and then click Advanced, you see the dialog box shown here. It lets you manage the list of WiFi hot spots that Mac OS X has memorized on your travels.
For example, you can delete the old ones. Or you can drag the hot spots’ names up and down the list to establish a priority for making connections when more than one is available.
Ordinarily, Mac OS X memorizes the names of the various hot spots you join on your travels. It’s kind of nice, actually, because it means you’re interrupted less often by the “Do you want to join?” box.
But if you’re alarmed at the massive list of hot spots Mac OS X has memorized—for privacy reasons, say—here’s where you turn off “Remember networks this computer has joined.”
Finally, for added security on your Mac, you can turn on checkboxes that prevent the unauthorized from making changes (creating computer-to-computer networks, changing networks, turning WiFi on or off) without an administrator’s password.
The router’s on, but the Internet’s not connected. Sometimes wireless routers are broadcasting, but their Internet connection is down. It’d be like a cordless phone that has a good connection back to the base station in the kitchen—but the phone cord isn’t plugged into the base station.

Choosing the name of the hot spot you want to join is generally all you have to do—if it’s a home WiFi network.
Unfortunately, joining a commercial WiFi hot spot—one that requires a credit card number (in a hotel room or airport, for example)—requires more than just connecting to it. You also have to sign into it before you can send so much as a single email message.
To do that, open your Web browser—if, in fact, Lion doesn’t auto-open the sign-up screen. You’ll see the “Enter your payment information” screen either immediately or as soon as you try to open a Web page of your choice. (Even at free hot spots, you might have to click OK on a welcome page to initiate the connection.)
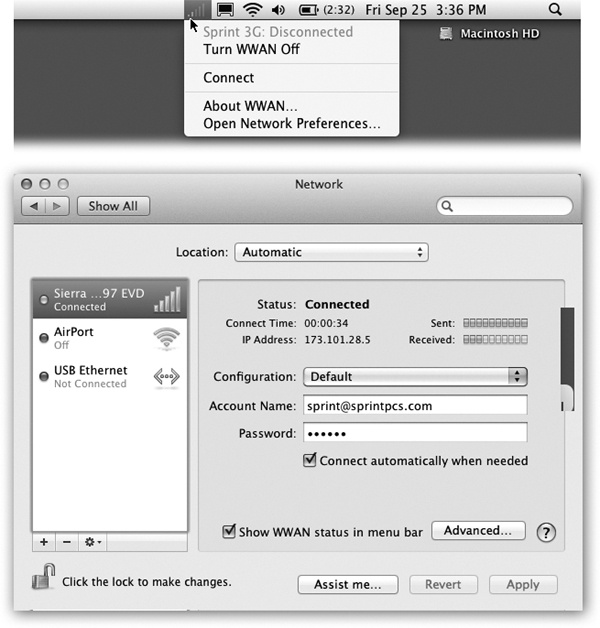
Figure 10-7. In System Preferences→Network, click your cellular modem’s icon (below). Click Connect to get online—or, better yet, turn on “Show WWAN status in menu bar.” (It stands for wireless wide-area network, if that helps.) Next time, you’ll be able to connect by choosing Connect from this menulet (above) instead of lumbering off to System Preferences.
Supply your credit card information or (if you have a membership to this WiFi chain, like Boingo or T-Mobile) your name and password. Click Submit or Proceed, try not to contemplate how this $8 per hour is pure profit for somebody, and enjoy your surfing.