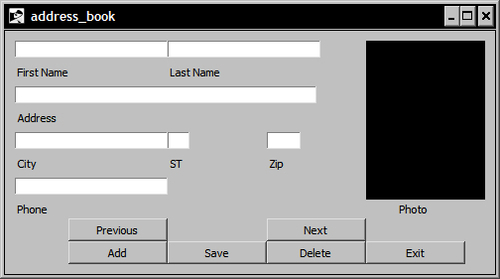
In the following example, we will create an address book interface containing button, entry, label, and frame widgets. This will be the basis for the final application and illustrate how to use the grid and pack commands to create a more complex layout. The interface design is as follows:
|
Column 0 |
Column 1 |
Column 2 |
Column 3 | |||
|
Row 0 |
First Name Entry |
Last Name Entry |
Photo Label | |||
|
Row 1 |
First Name Label |
Last Name Label | ||||
|
Row 2 |
Address Entry | |||||
|
Row 3 |
Address Label | |||||
|
Row 4 |
City Entry |
State Entry |
Zip Entry | |||
|
Row 5 |
City Label |
State Label |
Zip Label | |||
|
Row 6 |
Phone Entry | |||||
|
Row 7 |
Phone Label |
Photo Label | ||||
|
Row 8 |
Previous Button |
Next Button | ||||
|
Row 9 |
Add Button |
Save Button |
Delete Button |
Exit Button |
To complete the following example, open the text editor of your choice and enter the following text. Then save the file in your path with the name address_book.tcl.
# Load the Tk Package
package require Tk
# Main Frame
frame .main -borderwidth 1 -relief solid -padx 10 -pady 10
# Entry Widgets
entry .main.efirst -width 25
entry .main.elast -width 25
entry .main.eaddress -width 50
entry .main.ecity -width 25
entry .main.estate -width 3
entry .main.ezip -width 5
entry .main.ephone -width 25
# Label Widgets
label .main.first -text "First Name"
label .main.last -text "Last Name"
label .main.address -text "Address"
label .main.city -text "City"
label .main.state -text "ST"
label .main.zip -text "Zip"
label .main.phone -text "Phone"
label .main.photo -text "Photo" -width 15
# Frame for Photo Widget
label .main.picture -width 120 -height 160 -borderwidth 3 -background black
# Button Widgets
button .main.previous -text "Previous" -width 15
button .main.next -text "Next" -width 15
button .main.add -text "Add" -width 15
button .main.save -text "Save" -width 15
button .main.delete -text "Delete" -width 15
button .main.exit -text "Exit" -width 15 -command exit
# Pack Command
pack .main
# Grid command
grid .main.efirst -row 0 -column 0 -sticky nw
grid .main.elast -row 0 -column 1 -columnspan 2 -sticky nw
grid .main.picture -row 0 -column 3 -rowspan 7 -sticky nw
grid .main.first -row 1 -column 0 -sticky nw
grid .main.last -row 1 -column 1 -columnspan 2 -sticky nw
grid .main.eaddress -row 2 -column 0 -columnspan 3 -sticky nw
grid .main.address -row 3 -column 0 -columnspan 3 -sticky nw
grid .main.ecity -row 4 -column 0 -sticky nw
grid .main.estate -row 4 -column 1 -sticky nw
grid .main.ezip -row 4 -column 2 -sticky nw
grid .main.city -row 5 -column 0 -sticky nw
grid .main.state -row 5 -column 1 -sticky nw
grid .main.zip -row 5 -column 2 -sticky nw
grid .main.ephone -row 6 -column 0 -columnspan 2 -sticky nw
grid .main.phone -row 7 -column 0 -columnspan 2 -sticky nw
grid .main.photo -row 7 -column 3 -sticky nw
grid .main.previous -row 8 -column 0 -sticky ne
grid .main.next -row 8 -column 2 -sticky nw
grid .main.add -row 9 -column 0 -sticky ne
grid .main.save -row 9 -column 1 -sticky nw
grid .main.delete -row 9 -column 2 -sticky nw
grid .main.exit -row 9 -column 3 -sticky nw