
We will now add a more complex menu to our data entry application. This menu will allow the user to manage the functionality of the application via the menu in the same manner as they would when using the buttons.
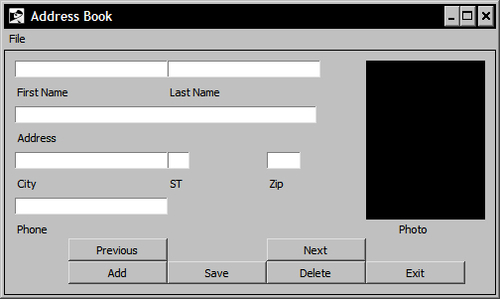
In the following example, we will create a menu that contains an option to exit a window. Create the following text file and save it in your working path with the name address_book.tcl:
# Load the Tk Package
package require Tk
# Main Frame
frame .main -borderwidth 1 -relief solid -padx 10 -pady 10
# Entry Widgets
entry .main.efirst -width 25
entry .main.elast -width 25
entry .main.eaddress -width 50
entry .main.ecity -width 25
entry .main.estate -width 3
entry .main.ezip -width 5
entry .main.ephone -width 25
# Label Widgets
label .main.first -text "First Name"
label .main.last -text "Last Name"
label .main.address -text "Address"
label .main.city -text "City"
label .main.state -text "ST"
label .main.zip -text "Zip"
label .main.phone -text "Phone"
label .main.photo -text "Photo" -width 15
# Frame for Photo Widget
frame .main.picture -width 120 -height 160 -borderwidth 3 -background
black
# Button Widgets
button .main.previous -text "Previous" -width 15
button .main.next -text "Next" -width 15
button .main.add -text "Add" -width 15
button .main.save -text "Save" -width 15
button .main.delete -text "Delete" -width 15
button .main.exit -text "Exit" -width 15 -command exit
# Pack Command
pack .main
# Grid command
grid configure .main.efirst -row 0 -column 0 -sticky nw
grid configure .main.elast -row 0 -column 1 -columnspan 2 -sticky nw
grid configure .main.picture -row 0 -column 3 -rowspan 7 -sticky nw
grid configure .main.first -row 1 -column 0 -sticky nw
grid configure .main.last -row 1 -column 1 -columnspan 2 -sticky nw
grid configure .main.eaddress -row 2 -column 0 -columnspan 3 -sticky
nw
grid configure .main.address -row 3 -column 0 -columnspan 3 -sticky nw
grid configure .main.ecity -row 4 -column 0 -sticky nw
grid configure .main.estate -row 4 -column 1 -sticky nw
grid configure .main.ezip -row 4 -column 2 -sticky nw
grid configure .main.city -row 5 -column 0 -sticky nw
grid configure .main.state -row 5 -column 1 -sticky nw
grid configure .main.zip -row 5 -column 2 -sticky nw
grid configure .main.ephone -row 6 -column 0 -columnspan 2 -sticky nw
grid configure .main.phone -row 7 -column 0 -columnspan 2 -sticky nw
grid configure .main.photo -row 7 -column 3 -sticky nw
grid configure .main.previous -row 8 -column 0 -sticky ne
grid configure .main.next -row 8 -column 2 -sticky nw
grid configure .main.add -row 9 -column 0 -sticky ne
grid configure .main.save -row 9 -column 1 -sticky nw
grid configure .main.delete -row 9 -column 2 -sticky nw
grid configure .main.exit -row 9 -column 3 -sticky nw
# Menu Creation
menu .menubar
. configure -menu .menubar
# Add the first item
set File [menu .menubar.myfile]
.menubar add cascade -label File -menu .menubar.myfile
# Add entries
$File add command -label "Add Record" -command addRecord
$File add command -label "Save Record" -command saveRecord
$File add command -label "Delete Record" -command deleteRecord
$File add separator
$File add command -label "Quit" -command exit
set Edit [menu .menubar.myedit]
.menubar add cascade -label Edit -menu .menubar.myedit
$Edit add command -label "Find" -command findRecord
Now launch the program by invoking the following command line.
tclsh85 address_book.tcl
You should now see the following window:
..................Content has been hidden....................
You can't read the all page of ebook, please click here login for view all page.