
Developing games for the Cardboard SDK or any other VR component is not similar to other Android games. Let's have a quick look at the basics of Cardboard development styles and standards through these points:
- Launching and exiting the VR game
- VR device adaptation
- Display properties
- In-game components
- Game controls
- Game audio setup
- User focus assistance
- Ultimate VR experience
Normally, after launching an Android game, it performs a few automated tasks and takes the user to the menu to choose an action. In the case of VR games, it takes time to mount the Android device to a VR headset properly, so the developer does not perform any automated task just after launching the game. The game should wait for the user to start it after it is in the perfect situation for running.
For better and common experience, the game should prompt the user with a VR sign or button to start the VR game.
There are two possible exits for a standard VR game:
- Hitting the Back button
- Hitting the Home button
If the VR has a 2D interface to show popups for exiting, then using the Back button is the best idea. While playing an Android VR game, there is no chance of hitting the back button accidentally as the device is mounted in the VR headset. It is very common to use a single hit on the back button to exit the game, because of the mentioned criteria. Otherwise, an exit popup can serve the purpose, similarly to a non-VR game.
A VR game for Android using the Cardboard SDK should adapt the physical characteristics of the VR headset. The Google Cardboard SDK has a feature to carry out this job automatically. The developer can rely on the SDK to adjust application settings and configuration according to the VR headset. The Cardboard SDK itself contains adjustment settings for few specific Cardboard devices. The SDK can configure stereo settings and correct distortion for few specific lenses of a VR headset.
It is recommended that the developers use the Cardboard SDK feature to support the maximum possible VR headsets with a single game to provide users with the best possible VR experience without any hassle.
In many Android devices, there is a feature called Lights Out. In those devices, the Home, Menu, and Back controls are hidden under the Lights Out feature. VR games use a slip-screen technology to generate a 3D experience through VR headset lenses. That is why it is extremely necessary to run the VR games in full-screen mode. System controls or a status bar may actually appear in the user's peripheral vision, blocking or distracting them from the actual VR experience.
Normally, the VR game experience lies within the environment through the device screen. It is very unlikely to trigger any popups and other unwanted components on the screen during gameplay.
Developers must not call any API that will trigger any popup or any unwanted interruption during gameplay. Android currently does not support any 2D component rendering. Forcefully rendered 2D elements may cause disorientation of the VR display. Even if it does not, the user needs to take the device out from the VR headset and then perform the desired action to get rid of the popup, which is not at all convenient.
An Android VR headset contains only one button. That's why control design in VR games does not follow the conventional way. Let's take a look at the control scheme of VR games.
UI controls generally appear at the launch of the game. Developers should place the UI controls in the initial field of view so that users can locate them to start the gameplay. If the controls are not in the visible range, then users might get confused. In that case, they might look around for the controls or simply leave the game. In both cases, users may lose interest in the game.
While playing the game, if there is any user interface, those controls need to move along with the field of view. Otherwise, users might have to go back to the place where the UI element was.
Although the headset device has only one control unit, there might be several ways to use the button and a few other options as well. The most popular types of controls are as follows:
- Fuse button
- Visual countdown
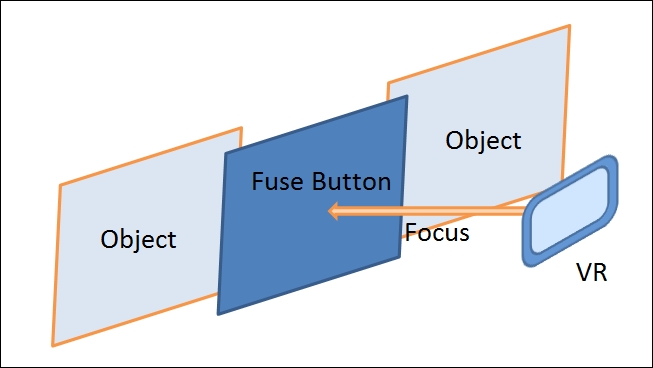
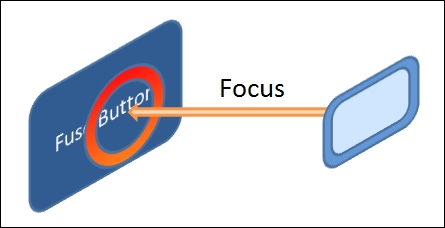
A Cardboard VR headset has only one button on the side of the device. It can be used to click on targets. One of the uses of this button is to trigger a virtual button in the VR world which will fuse. This means a corresponding task will trigger after some time of focusing on the virtual fusing button. However, it may be frustrating, as the user needs to wait for that amount of time. To overcome this problem, the developer should give an option to click on that virtual button immediately wherever possible:
While using a fuse button with a timer, there is a fair chance that the user might focus on the button unknowingly, and after a certain amount of time, it changes the game state. In this case, the user might get confused and not be able to continue the same game experience. The developer should indicate the countdown visually to show the user that something is going to happen within a certain amount of time:
We already know that 2D UI buttons are not supported by VR games. So, developers use fuse buttons. A fuse button can be any element inside the gameplay. There must be an indication to direct the user to focus on a particular fuse button. Then, the action can be performed on countdown or by click.
For example, developers often use some glow, shine, shake, or other dynamic mechanism to make the object visible for clicking. The respective task or action is defined by the surroundings to indicate the task.