
Once upon a time, gaming on the mobile platform was limited to black-and-white pixel games, and other mediums of gaming were also heavily dependent on pixel graphics. Times have changed now. 3D games are running on handhelds with ease. However, the requirement of 2D assets has not changed yet. Even in a hardcore 3D game, 2D assets are mandatory. Few games are fully 2D.
We will discuss the performance of 2D and 3D games here with the help of the following topics:
- 2D game development constraints
- 3D game development constraints
- The rendering pipeline in Android
- Rendering through OpenGL
- Optimizing 2D assets
- Optimizing 3D assets
- Common game development mistakes
- 2D/3D performance comparison
From the perspective of 2D game development, the main constraints are as follows:
- 2D art assets
- 2D rendering system
- 2D mapping
- 2D physics
Art asset constraints are mainly limited to graphical or visual assets, which include images, sprites, and fonts. It is not difficult to understand that a larger asset will take more time to process and render than a smaller asset, resulting in less performance quality.
It is not possible to deliver maximum display quality with a single set of assets in Android game development. This is the reason most Android game developers choose high-resolution assets as their base build. This normally performs well for high-configuration hardware platforms, but does not provide quality performance on low-configuration devices. Many developers opt for the option of porting for multiple resolution hardware platforms. This again takes time to complete the project.
Many times, developers choose to ignore a set of hardware platforms. Mostly, in the mobile gaming industry, it is a common practice to choose higher resolution art assets and fit them into lower resolution devices by scaling down. Nowadays, most hardware platforms have better RAM. Hence, this process has become convenient for developers.
Game performance does not always depend on the asset size; it also depends on the number of assets that are being drawn on screen. The concept of a sprite sheet has evolved to reduce the number of drawing elements on screen.
Generally, the system issues a call for a draw instruction for a single art asset. As the number of assets increases, it takes more such draw instructions to complete the rendering in each game loop cycle. Obviously, this process slows down the processor, and the game performance becomes poor.
A sprite sheet can consist of multiple assets within a single image. So, it takes only one draw instruction to render all the assets of the sprites. However, the physical size of the sprite sheet is restricted. The maximum size varies for different devices with different hardware platforms. Most conveniently, 1024x1024 sprites are the safest option to use, as they are supported by almost all the available devices in the current scenario.
Almost every game uses custom or special fonts other than the default system font of Android. In those cases, the font source file has to be included in the game build. There are multiple ways to use different fonts. We will discuss three of them here:
- Sprite font
- Bitmap font
- TrueType font
This is a typical old school technique but is still effective in some cases. The developer creates a sprite sheet that contains all the necessary characters. All the characters are mapped within a data file. This mapping is used to clip each character and form words accordingly.
Here are some advantages of this font:
- Developers have total control of mapping
- Character stylization can be customized as per requirement
- Fast processing speed can be achieved; however, it will depend on development efficiency
Here are some disadvantages of this font:
- They increase development overhead
- The system efficiency entirely depends on the developer's skill set
- It is very difficult to map characters in the case of multi-language support
- Any change takes a lot of iteration to achieve perfection
This style is not usually used nowadays as we have many designer and stylish fonts available.
The bitmap font system is inherited from the sprite font. It is updated with a predefined mapping style and a library to support development process. It also uses one or more sprite sheets with one data file. The working principle of bitmap font is the same as sprite font. There are a lot of tools available to create such fonts with a bit of stylization directly from the TrueType font.
Here are some advantages of this font:
- It is compatible with any existing codebase, irrespective of the rendering framework, whether it is OpenGL, DirectX, Direct Draw, or GDI+
- It is easy to integrate
- It can manipulate the style of the existing TrueType font
Here are some disadvantages of this font:
- The same disadvantages of the sprite font are applicable here, only with less development overhead
- Scaling up the bitmap font results in blurry output
This is the universal format of font that is supported by most platforms, including Android. It is the fastest way to integrate various fonts in games.
Here are some advantages of this font:
- Universal font style
- Maximum platform support
- Easy multi-language implementation
- This is a vector font, so it has no scaling issue
- Easy special character availability
Here are some disadvantages of this font:
- Using this font style may cost a few kilobytes extra to the game
- Not all scripting languages are supported by TTF
Android provides a scope to render 2D assets onto the canvas through an API framework. Canvas can be used with Drawable objects in View or SurfaceView.
Canvas acts as an interface of the actual drawing surface upon which all the graphical objects can be drawn. Draw on the canvas happens within the onDraw() callback method. The developer just needs to specify graphical objects along with their position on the canvas.
Canvas itself has a set of default drawing methods to render almost each type of graphical objects. Here are some examples:
- The
drawBitmap()method is used to draw image objects in the bitmap format. However, images need not be in bitmap format. - The
drawRect()anddrawLine()methods are used to draw primitive shapes on the canvas. - The
drawText()method can be used to render text on canvas using a specific font style.
Canvas can be used within a view in the Android architecture.
2D mapping is based on a simple 2D coordinate system. The only difference is the opposite y axis in comparison with the conventional coordinate system:
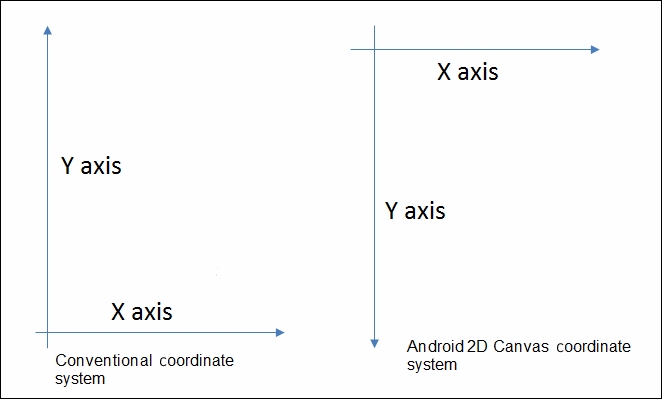
In Android 2D, the origin is located in the top-left corner of the canvas. All the geometrical calculations are based on this mapping. However, it has no direct effect on the performance like the 2D canvas-based application has. Many developers are used to mapping their graphic assets based on the conventional system, and they reverse the vertical axis to render it on the canvas. This requires some additional calculation.
There is one more performance constraint regarding the 2D rendering systems. A common development approach across the world is to have a minimum set of graphic assets and use them as much as possible. Often, this leads to rendering the same pixel multiple times. This affects the processing speed and hence the FPS.
For example, bitmap A, bitmap B, bitmap C, and bitmap D are being rendered on a canvas in such a way that A, B, and C overlap each other, and D remains separate. The following happens:
- Pixels in the region R0 where only one bitmap is drawn will be rendered once
- Pixels in region R1 where two bitmaps are overlapping will be rendered twice
- Pixels in region R2 where three bitmaps are overlapping will be rendered three times
This is shown here:
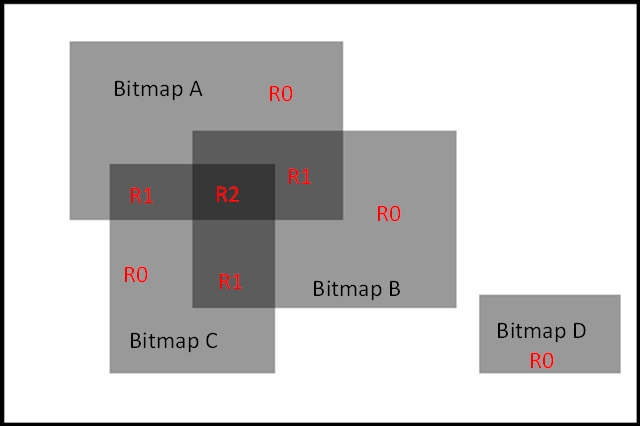
Now, in regions R1 and R2, all the pixels are rendered multiple times. In this system, the pixel data information will append to the previous data, resulting in the final pixel value. In this system, the processing overhead increases. Hence, performance decreases.
Even today, it is a common practice for 2D game programming. The reasons are as follows:
- Transparency blending
- Modular graphical assets
- Low build size
- Easy construction of screens by overlapping multiple assets
Sometimes, there may be a scenario where a device has a very low-performing graphics processor, and rendering the same pixel multiple times has a major impact on performance. In this scenario, the double buffer mechanism helps a lot.
The double buffering system refers to creating a buffered displayable asset in which the display screen is created using graphic assets. Then, this buffered object is drawn on the screen only once. It prevents the following issues:
- Flickering of screen
- Multiple draws of one pixel
- Tearing of assets
2D physics takes only the x-y plane into consideration for all the calculations. There are plenty of 2D physics engines available in market. Box2D is the most popular one. A physics engine consists of every mechanism and calculation of real-time physics.
Real-time physics calculation is much complicated than is required in games. Let's discuss a few available physics engines.
Box2D is an open source physics engine based on C++. It consists of almost every aspect of solid physics that can be used in various games. A few of its mentionable features are as follows:
- Dynamic collision detection of rigid bodies
- Collision state callbacks, such as collision enter, exit, stay, and so on
- Polygonal collision
- Vertical, horizontal, and projectile motion
- Friction physics
- Torque and momentum physics
- Gravity effects based on pivot point and joints
LiquidFun is a physics engine with all aspects of liquid physics. This engine is actually based on Box2D. Google released this open source physics engine to cover the liquid physics formula and mechanism. LiquidFun can be used for Android, iOS, Windows, and a few other popular platforms. LiquidFun supports every feature of Box2D, along with liquid particle physics. This includes the following:
- Wave simulation
- Liquid fall and particle simulation
- Liquid stir simulation
- Solid and liquid dynamic collision
- Liquid mixing
Collision detection is a costly process. Multi-edge and polygonal collisions increase the process overhead. The number of rigid bodies and collision surfaces have the maximum impact on performance. This is why liquid physics is slower than solid physics.
Let's have a look at the major impacts:
- Each transformation of any rigid body requires a refresh on the collision check of the entire system
- The physics engine is responsible for repetitive transform change, which is responsible for heavy processes
Each and every possible force on the rigid body is calculated in the physics engine. Not all the games require every calculation. Game development does not always required real-time implementation of physics. However, real-time visualization is required for games.
Most games use the box-colliding system to detect most collisions. Rectangular collision detection is the cheapest possible method, which can be used inside games to detect collisions.
Sometimes, triangular and circular collision detection is also used for 2D games for collision detection accuracy. There needs to be a balance of using such methods.
For example, if we need to detect the collision between two circles, we can opt for any of these systems:
- Considering each circle a rectangle and detecting the collision between them
- Considering one circle a rectangle and detecting the collision between the circle and rectangle
- Applying the actual circular collision detection method
Let's consider two circles having origins O1 and O2 and diameters R1 and R2:
O1 is located at (Ox1, Oy1)
O2 is located at (Ox2, Oy2)
If we imagine the circles as rectangles on a 2D canvas, then it will look like this:

Rectangular collision detection refers to this formula.
Input feed will be as follows:
xMin1 = x1 (minimum co-ordinate on x axis of first rectangle)
yMin1 = y1 (minimum co-ordinate on y axis of the first rectangle)
xMax1 = x1m (maximum co-ordinate on x axis of the first rectangle)
yMax1 = y1m (maximum co-ordinate on y axis of the first rectangle)
xMin2 = x2 (minimum co-ordinate on x axis of the second rectangle)
yMin2 = y2 (minimum co-ordinate on y axis of the second rectangle)
xMax2 = x2m (maximum co-ordinate on x axis of the second rectangle)
yMax2 = y2m (maximum co-ordinate on y axis of the second rectangle)
In the given circumstances, we will have the following:
x1 = Ox1 – (R1 / 2)
y1 = Oy1 – (R1 / 2)
x1m = Ox1 + (R1 / 2) = x1 + R1
y1m = Oy1 + (R1 / 2) = y1 + R1
x2 = Ox2 – (R2 / 2)
y2 = Oy2 – (R2 / 2)
x2m = Ox2 + (R2 / 2) = x2 + R2
y2m = Oy2 + (R2 / 2) = y2 + R2
The condition for colliding or not colliding these two rectangles will be as follows:
if( x1m < x2 )
{
  // Not Collide
}
else if( y1m < y2 )
{
  // Not collide
}
else if( x1 > x2m )
{
  //Not collide
}
else if( y1 > y2m )
{
  //Not collide
}
else
{
  //Successfully collide
}Now, considering only the second circle as a rectangle, we will have this:
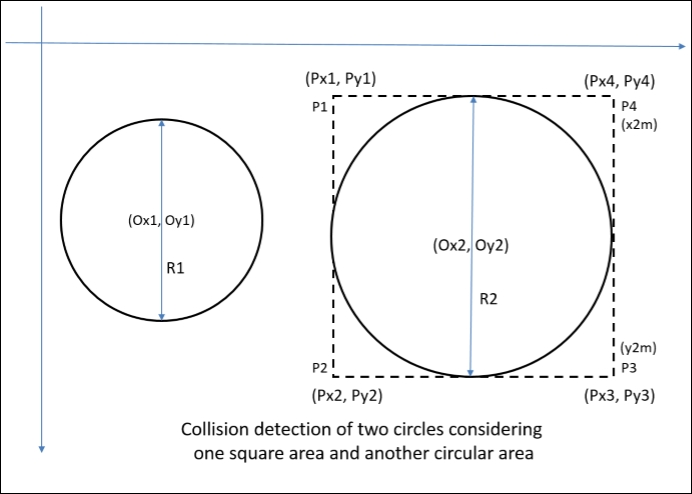
As we have already discussed the general idea of the coordinate system for the same system, we can directly derive the values:
Px1 = Ox2 – (R2 / 2)
Py1 = Oy2 – (R2 / 2)
Px2 = Ox2 – (R2 / 2)
Py2 = Oy2 + (R2 / 2)
Px3 = Ox2 + (R2 / 2)
Py3 = Oy2 + (R2 / 2)
Px4 = Ox2 + (R2 / 2)
Py4 = Oy2 – (R2 / 2)
x2m = Ox2 + (R2 / 2) = x2 + R2
y2m = Oy2 + (R2 / 2) = y2 + R2
radius1 = (R1 / 2)
distanceP1 = squareRoot(((Px1 – Ox1)* (Px1 – Ox1)) + ((Py1 – Oy1)* (Py1 – Oy1)))
distanceP2 = squareRoot(((Px2 – Ox1)* (Px2 – Ox1)) + ((Py2 – Oy1)* (Py2 – Oy1)))
distanceP3 = squareRoot(((Px3 – Ox1)* (Px3 – Ox1)) + ((Py3 – Oy1)* (Py3 – Oy1)))
distanceP4 = squareRoot(((Px4 – Ox1)* (Px4 – Ox1)) + ((Py4 – Oy1)* (Py4 – Oy1)))
The colliding and non-colliding condition would be as follows:
if ( (Ox1 + radius1) < x2 )
{
  //Not collide
}
else if ( Ox1 > x2m )
{
  //Not collide
}
else if ( (Oy1 + radius1) < y2 )
{
  //Not collide
}
else if ( Oy1 > y2m )
{
  //Not collide
}
else
{
if (distanceP1 <= radius1)
{
  //Successfully collide
}
else if (distanceP2 <= radius1)
{
  //Successfully collide
}
else if (distanceP3 <= radius1)
{
  //Successfully collide
}
else if (distanceP4 <= radius1)
{
  //Successfully collide
}
else if ( Ox1 >= Px1 && Ox1 <= x2m &&
(Oy1 + radius1) >= Py1 && (Oy1 <= y2m))
{
  //Successfully collide
}
else if ( Oy1 >= Py1 && Oy1 <= y2m &&
(Ox1 + radius1) >= Px1 && (Ox1 <= x2m))
{
  //Successfully collide
}
else
{
  //Not collide
}Finally, the actual collision detection system is between the circle and circle collision:
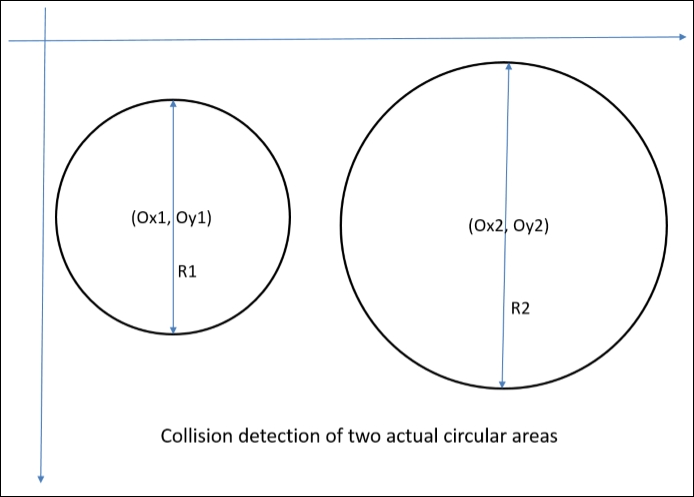
Logically, this is the simplest procedure to find out the circular collision.
First, calculate the distance between the two origins of the circles:
originDistance = squareRoot ( ((Ox2 – Ox1)* (Ox2 – Ox1)) + ((Ox2 – Ox1)* (Ox2 – Ox1)))
Now, we need to check whether the distance is less than or equal to the sum of the radius of the two circles:
if (originDistance <= ((R1 + R2) / 2))
{
  //Successfully Collide
}
else
{
  //Not Collide
}For the first approach, it will take a minimum clock cycle to execute the checking. However, it is not that accurate. Particularly when developers work with a bigger circle, the lack in accuracy becomes visible.
The third approach is perfectly accurate, but takes more time to process. In the case of many circles colliding in runtime, this process and mathematical calculation may cause performance delay.
The second approach is, overall, the worst possible way to solve this problem. However, this approach may be used in a very specific situation. When a developer wants to detect circle and rectangle collisions accurately, then only this approach can be tried.
Detecting these sorts of collision may have multiple solutions. The approaches and solutions you have learned here are few of the most efficient solutions from the point of view of performance.
When detecting rectangle and circle collisions accurately, there is one more popular approach by creating a bigger round rectangle by increasing the width and height by the diameter of the circle. This procedure is heavier but more accurate.