
The elements mentioned in the previous sections are the minimum requirement for Android development, with which a full application can be created. However, the development process can become much easier with the support of a few other tools. Let's have a look at a few of such tools. These tools are not mandatory for Android development, but they are recommended to be used for a better development process.
Although Eclipse is not the only Java development environment that can be used to develop Android applications, it is by far the most popular. This is partially due to its cost (free!), but mostly due to the strong integration of Android tools with Eclipse. This integration is achieved with the ADT plugin for Eclipse, which can be downloaded from the Android website.
Use of Eclipse for Android development is a well-known practice for many developers. Some of the reasons for this are as follows:
- Free Eclipse IDE
- Direct Android plugin support
- Direct DDMS support
- Simple interface
- Android NDK support
The launch of Android Studio reduced the popularity of Eclipse among Android developers, because Android Studio has everything inbuilt to support any Android development. Moreover, it is a much simplified tool to use in design view. Google itself is promoting the new tool massively.
There are a few drawbacks in Eclipse Android development, because it uses Android SDK as a third-party tool. The significant drawbacks are as follows:
Eclipse is an excellent standalone IDE, but when it comes to Android development, Android Studio wins the race.
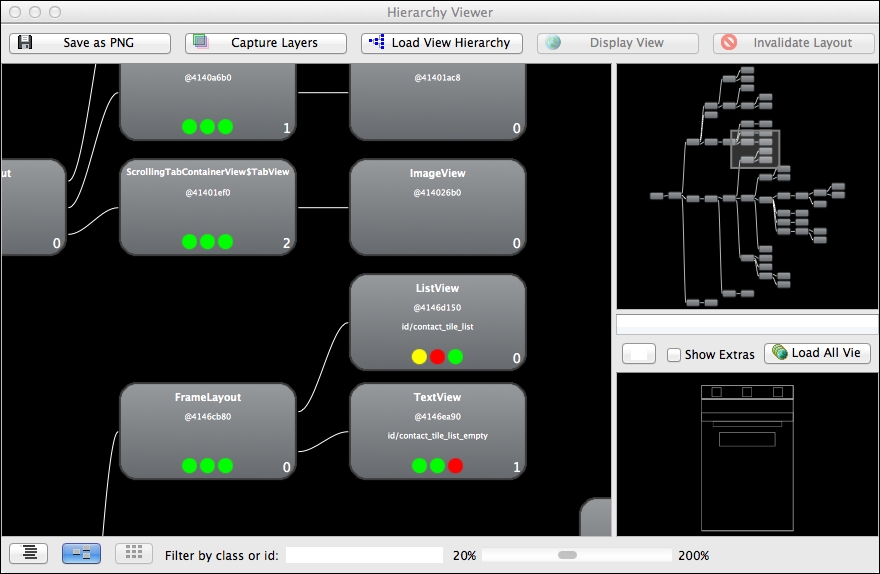
Hierarchy Viewer, whether it's accessed through the standalone application or the relatively new Eclipse perspective, is used to see how your layouts and screens resolve at runtime.
It provides a graphical representation of the layout and view hierarchy of your application, and can be used to diagnose layout problems (image source: https://media-mediatemple.netdna-ssl.com/wp-content/uploads/2012/03/da_hierarchy_viewer.png):
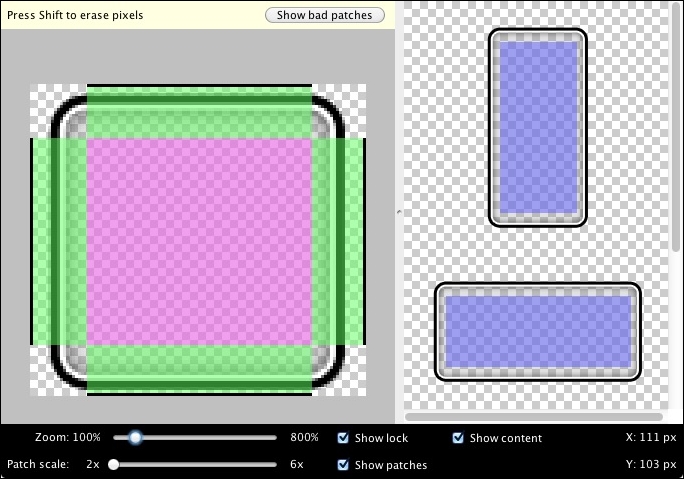
When it comes to graphics design, the Draw 9-patch tool comes in handy. This tool allows you to convert traditional PNG graphic files into stretchable graphics that are more flexible and efficient for mobile development use. The tool simplifies the creation of NinePatch files in an environment that instantly displays the results:
ProGuard is not directly associated with Android development, but it helps in protecting the intellectual property of the developer. It is a very common practice for Android game developers to use ProGuard.
ProGuard basically wraps the members and methods to a non-readable code structure. This tool can be configured to obfuscate the resulting binary. ProGuard also helps in optimizing the binary, so that the overall package size is reduced.
ProGuard can be difficult to use when developers try to integrate pre-compiled JARs into the Android project. Sometimes conflicts are created in class structures if the JAR is already optimized through ProGuard. In those situations, ProGuard must be configured to exclude the precompiled JARs in order to achieve a successful build.
It is always recommended to use ProGuard to protect the game classes from reverse engineering or decompilation.
We all know the vast range of Android hardware configurations. It is always necessary to optimize the assets to reduce runtime memory usage and unnecessary data processing. In games, graphical assets take most of the storage and memory.
An unoptimized asset may hold some unnecessary data, like transparency information in an opaque asset, EXIF data, unused color information, extra bit depth, and so on.
Asset optimizer tools help to get rid of this burden. However, it is tricky to use such tools as the asset quality may be lost. A developer should be very cautious while using these tools.
For example, if an asset is supposed to be at 24 bit, but was optimized with an 8 bit optimizer tool, it will surely lose its visual quality. So, over-optimization is never recommended for any games, and it is the developer's responsibility to use proper optimization techniques to maintain the game quality.
The following are a few such asset optimizer tools:
- PNGOUT
- TinyPNG
- RIOT
- JPEGmini
- PNGGauntlet
With the help of such tools, art assets can be optimized up to 80-90% of their size. But many developers don't prefer to use them on a regular basis because of the following reasons:
In many cases, it is noticed that a large number of small art assets are being used in games individually. This may cause critical performance lag for the game. It is recommended to use a sprite building tool to merge those assets into one to save space and time. SpriteBuilder and TexturePacker are two good examples of such tools.