46
Shooting for 3D
Tony Bruno
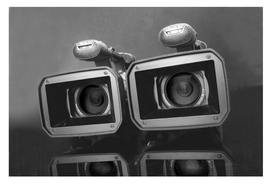
Figure 46-1
No matter the movie at the multiplex, chances are you’ll be offered the chance to see it while wearing big funky glasses that would have looked really hip back when bellbottoms were in style. With that much exposure, it’s only a matter of time before a client will ask the question, “Can this be delivered in 3D?” Not so surprisingly, the answer to that question is, “Yes.” Just like any other new technology, though, there are some new terms and rules that have to be learned to deliver the best video possible.
Simple to Pick Up, Difficult to Master
One of the most dangerous things about shooting in 3D is that it’s deceptively easy. After all, anybody can strap two video cameras side-by-side and shoot some test footage. Then load the output into a non-linear editor, slap a red filter over the left camera’s output, and a cyan filter over the right camera’s output, render and voilà! A cheap pair of paper 3D glasses and a computer monitor is all that’s needed to enjoy the newly-minted 3D video. Unfortunately, it doesn’t look that good. The world looks like it’s a tiny model, or worse, gigantic? Meanwhile everything in the foreground seems to float in space, while the background elements rest on the screen. What went wrong?
Back to School
Answering these questions involves learning a bit of new vocabulary and a couple of new techniques. Oh, and not a little bit of patience. There are two terms that any 3D videographer needs to know: interocular distance and convergence.
Interocular Distance
Try this experiment. Grab a ruler and measure the distance from the center of your left eye to the center of your right eye. The number will probably be pretty close to 2.5". This separation between eyes is known as the interocular distance, and it is, in part, why we see the world in three dimensions.
In order for your footage to best simulate what viewers would see with their own eyes, it’s important to match the human interocular distance as closely as possible. This means that the distance between the centers of your camera lenses should be approximately 2.5".
Ignoring the interocular distance can result in some surprising and even unpleasant effects. Move the cameras too far apart, and the world will look like it’s been miniaturized. Move them too close together, and suddenly the smallest object appears gigantic. 2.5"—learn it; live it; love it.
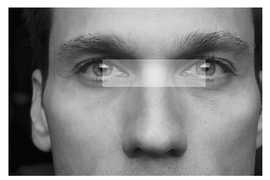
Figure 46-2 The interocular distance is the distance between camera lenses. The ideal distance is 2.5", similar to the distance between the irises in our eyes.
Convergence
Now that you’ve got this interocular distance thing down, you decide to shoot some piece of test footage. You take your son and daughter out to a scenic overlook and frame a nice 3D shot. You place your son close to the lenses, your daughter further back, while in the distance you have a mountain range to complete the shot.
After your post-production and rendering work, you pop on your glasses to check out your handiwork. Unfortunately, things are still not right. The depth in the shot is all wrong. Your son and your daughter both appear to float off the screen, while the mountains in the distance appear to be on the screen itself. What gives?
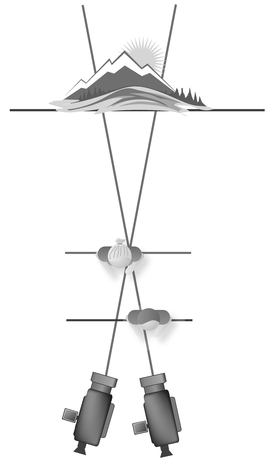
Figure 46-3 The point of convergence is where both lenses are focused to meet, known as the convergence place.
The reason is that both of your lenses are aimed straight forward. This parallel focus plane results in objects of infinite distance (the mountain range) appearing to be on the screen, while all other closer objects (your son and daughter) seem to pop off the screen into space. In order to get more depth to the shot, both cameras have to be rotated slightly inward. This converges the main image plane, and provides more 3D data to the camera.
To get the best effect, the image planes for both cameras need to be centered on the subject that is intended to appear to be on the screen during 3D playback. Objects closer to the lenses than the image plane will appear to come off the screen, while objects in the distance will appear to be behind the screen. With this new knowledge, you take your kids back to the same spot, and frame it as before, but with the cameras converged on your daughter. Result? Your son, being close to the lens, pops off the screen, while your daughter appears to rest on the surface of your display. Finally, the mountains rest comfortably behind the surface of the screen.
The Devil is in the Details
Given the added complexity of any 3D shoot, planning becomes even more critical than normal. There are, however, some pre-production steps you can take to ease the whole process:
- 3D Location scouting—shoot 3D stills of the locations in your film using a pair of digital still cameras. What better time to work out the best convergence angles for your shots than in pre-production?
- 3D storyboards—as helpful as 3D location images are, a 3D storyboard— created in part from the 3D location images—will be an enormous boon for the entire project. Getting the most impact from your 3D landscape can be planned in this way far before the first shot is lit.
- 3D pre-visualization—once the 3D storyboards are locked, bring them into your non-linear editor and produce a timed, 3D pre-viz cut of your project. Once rendered, you can not only judge the flow of the project better, but you can also show it to your clients, ensuring that they are happy with the intended use of 3D.
Unlearn what You have Learned
So you’ve got your cameras set, your 3D storyboards put together, and you’ve even cut a 3D pre-viz video. Why, then, does the whole thing still seem off? The 3D is disorienting; the images still seem somewhat flat, and for some reason the project is harder to follow than a normal 2D video. What’s wrong? The problem is that, no matter how many years you’ve spent behind the camera, shooting in 3D is a new experience. Rules that work well in 2D actually hurt 3D projects.
To better get acclimatize to the process, here are some simple rules to help you get started:
- Put some “D” into your 3D shots: make sure that all of your shots have real depth. Good foreground, midground and background information, while important in normal cinematography, is critical in 3D shots. Oh, and if you get the urge to have a sharp pokey thing fly straight at the camera to scare the audience, do yourself a favor: Don’t. It didn’t work in 1955, and it doesn’t work now.
- Cut back: 3D information takes longer to process in the human brain than 2D images. To allow for that, consider the following for your shots and edits:
- No fast camera moves.
- Avoid jump cuts.
- Don’t hit audiences with any sudden changes in the depth-of-field from shot-to-shot.
- Slow down the pace of editing.
- No zoom-zoom: nothing is worse than 3D elements that look like they are cardboard cutouts pasted at different distances away from the camera. Using zoom lenses during 3D shoots can cause this effect. Save yourself the headache. Don’t use zoom lenses on 3D projects.
- Wide open: with the added complexity of the interocular distance and convergence, focus becomes not merely another checklist item, but a genuine nuisance. Simplify your project by using wide-angle lenses and focusing to infinity. It might not be as artsy as a shot with lovely depth of field, but you’ll avoid a few more gray hairs in the process.
Figure 46-4 Creating depth is extremely important when composing 3D shots, more so than in 2D. Depth will help sell the 3D experience and make it more enjoyable for your audience.
World of Tomorrow
With 3D entering the home market, the argument about whether it is just a passing fad or not is rapidly becoming moot. Though it’s a difficult to master medium, it’s better to learn its strengths and foibles now, when time is still a luxury, rather than later, when it’s a short-deadlined necessity.