
Before we begin to create an in-depth game project like Barrel Hopper, we will first return to the good old Hello World idea. We are going to be creating something very similar to what we created in Chapter 1, Introduction to Unreal Engine 4 yet, this time, purely in C++! We can start by creating a new C++ project. Open Unreal Engine 4.10 via the Epic Games Launcher then select the New Project tab like we did before, however this time we are going to be choosing the C++ tab. From the collection of project templates, select Basic Code.
Call this project Hello Code. There will be a small waiting period while the engine prepares your project. Once finished you will be presented with an editor window and a Visual Studio project will have opened. The first thing we are going to do is add a new code class to our project. Do this by selecting New C++ Class… from the File dropdown located in the top left-hand corner of the main editor window.
This will open the class creation wizard. You will see that it prompts you to choose a parent class for the new object. We are going to be creating another hello sphere, this time using C++. As we are going to be creating an object that exists in the game world as an interactable and visible entity, we need to extend this object from the AActor base class. The reason for this will be explained soon.
Tick the checkbox Show All Classes in the top right-hand side of the class creation wizard then select Actor from the shown classes. You can also use the search bar provided at the top of the class creation wizard to find the desired base class. Hit the green Next button at the bottom of the wizard and you will be asked to name the class. Call this class HelloSphere then click the green Create Class button. The wizard will then generate an .h and .cpp file for us.
You will notice that the source for the new HelloSphere object has been added to your Visual Studio project automatically and can be found under the source filter Source | HelloCode.

As you can see, it has been included alongside your project source files and a default HelloCodeGameMode object. Before we start to write anything, let's first break down what is presented to you by default so we can better understand the workings of an UE Object. Let's address the HelloSphere.h header file. There is not too much here to begin with, you should be presented with the following:
// Fill out your copyright notice in the Description page of Project Settings.
#pragma once

#include "GameFramework/Actor.h"
#include "HelloSphere.generated.h"

UCLASS()
class HELLOCODE_API AHelloSphere : public AActor
{
    GENERATED_BODY()

public:
    // Sets default values for this actor's properties
    AHelloSphere();

    // Called when the game starts or when spawned
    virtual void BeginPlay() override;

    // Called every frame
    virtual void Tick(float DeltaSeconds) override;
};As you can see, #pragma once is specified by default, this is a pre-processor instruction informing the compiler to only compile this header file once when building the project. The first thing that you may notice is the include list for the header file. As you can see, the header file for the object's parent class (AActor) is included. Underneath this however is #include "HelloSphere.generated.h". This line is very important as this allows the Unreal Build Tool (UBT) to generate code for our custom object.
The UBT is a very core aspect of the Unreal C++ workflow. It is through this tool that the engine is able to create associations between our custom objects and the core facilities of the engine. You may have seen something similar with other engines. The UBT does its work during something called a Pre-Compile stage, which makes sense as it generates code based on what is already in your object, before they are compiled by the standard compiler. How we interact with UBT will be detailed as we continue to learn about using C++ with UE4.
Unlike a standard C++ object, you will see some macros being used outside and inside the class definition. Macros are simply keywords that are swapped out for previously constructed code at compile time. In our case, these macros are going to be picked up by the UBT and replaced with generated code.
The first one that we encounter is UCLASS(), located just before the definition of the object. This macro is responsible for informing the engine of this object and any meta data associated with this object. As you can see, this macro includes an empty parameter list denoted by (), it is with this that you may also include something called specifiers. Specifiers act like parameters for the macro and will change how the class is interpreted by the engine. We will be utilizing these specifiers later in the chapter. For now we can leave the UCLASS() macro empty.
Predominantly, the presence of these macros are found in object header files with the Class definition, as it is here where you will be detailing most of the association between your code objects and UE4, which is why they are so prolific in this small 9-line class definition. The other two macros present are HELLOCODE_API, found within the class definition itself, and GENERATED_BODY().
HELLOCODE_API is used to define code set to which this object belongs and is used as an organizational tool when building the project. The macro itself will always follow the same format [ProjectName]_API, all capitalized. In this case the line class HELLOCODE_API AHelloSphere : public AActor can be interpreted as, this a class AHelloSphere that inherits from AActor publically that is part of the HelloCode project API.
GENERATED_BODY() is simply a macro that allows for code generation to be inserted within the body of the object by the UBT itself before the main compile stage.
The rest of the object is fairly simple, it includes a default constructor AHelloSphere() and two virtual functions, BeginPlay() and Tick(). BeginPlay() is called when the actor is spawned in the level and functions in exactly the same way as Event BeginPlay in Blueprint. This function has been declared as virtual in the AActor base class, therefore we can override this function to execute our own functionality when this actor is spawned in a level. The other function Tick() is also virtual and provides us with the delta tick for the current frame via the float DeltaSeconds input parameter.
These two functions are included by default by the class wizard, as it is assumed that, at the very least, these two functions will be overridden by all custom objects that inherit from the AActor base class. Let's now look at the HelloSphere.cpp file. You are provided with basic function definitions for the default methods that were generated by the C++ class wizard.
Before we begin to break down each of these function definitions, let's first look at the include list for this .cpp:
#include "HelloCode.h"
#include "HelloSphere.h"
As you can see, the include list for the .cpp of this object also includes the header file for the project (HelloCode.h). This provides access to the engine code base within this cpp, meaning we can make use of things such as object creators, object finders, and logging, among other very important features. Ok, let's now take a look at the definition for the default constructor of our AHelloSphere object:
// Sets default values
AHelloSphere::AHelloSphere()
{
    // Set this actor to call Tick() every frame.
    // You can turn this off to improve performance.
    PrimaryActorTick.bCanEverTick = true;
}
When working with UE objects it is within the default constructor that you will specify a majority of your object initialization functionality, as it is here that you are able to populate and initialize your object components. The reason we do this in the constructor and not in BeginPlay() is we wish the components to be added and initialized before our project is playing at what we could call Editor time. This means our object's components will be created and initialized when the project is run. We will then be able to work with these components within the editor, much like we have done so far in this book.
Within the definition of the default constructor (AHelloSphere::AHelloSpehre()) you will note the inclusion of PrimaryActorTick.bCanEverTick = true. This line flags this actor to be scrutinized for Tick calls. It is very important to include this line for any objects that you wish to Tick during runtime.
Now let's look at the two virtual functions that have been provided by default:
// Called when the game starts or when spawned
void AHelloSphere::BeginPlay()
{
   Super::BeginPlay();
}

// Called every frame
void AHelloSphere::Tick(float DeltaTime)
{
   Super::Tick(DeltaTime);
}
You may have noticed that both of the definitions for the virtual functions include the line Super::[FunctionName]. This line of code executes the parent functionality of the same function. This is a very important tool as it means you are able to override parent functions without worrying about missing any core functionality that takes place in that parent call. This emphasizes the previous point of extensibility in C++. You are able to override the functions found in UE objects, call them, and write your own extension functionality.
The first thing we want to do is add components to our new object so that we may duplicate the Hello Sphere functionality we had in Chapter 1, Introduction to Unreal Engine 4, Components are created via a template function titled CreateDefaultSubobject(). There are many object creation methods such as CreateDefaultSubobject() that will be used when working with the engine. One of the main reasons we will use these object creation methods is so that we utilize Unreal Engine's memory management systems.
These object creation methods will invoke UE4's memory managers, identifying and allocating the most efficient memory location for our objects. They will also register the UObjects we are trying to create with the Unreal Garbage Collector. The garbage collector automatically cleans up any UObjects that are no longer being referenced or have fallen out of scope. Because of this we do not have to worry about memory leaks and inefficient memory allocations.
Now let's begin writing some C++ code. We are going to be adding all of the components needed to recreate the HelloSphere from Chapter 1, Introduction to Unreal Engine 4 We are going to require a UStaticMeshComponent for our sphere visual mesh, a USphereComponent so we may check for overlap events, a UParticleSystemComponent for our fire particles, and a UTextRenderComponent for our HelloWorld text. When adding components to an object we do not always need to include a code side handle in our class member variables. This is because CreateDefaultSubobject() will register our components with the base class. Unless we wish to reference a component outside of the class constructor, we can save on memory and not include a handle to the component in our class definition.
The only component that we will need access to after initialization is the UTextRenderComponent. We will want to change the text of the component when the default pawn overlaps the sphere component of the AHelloSphere actor. Navigate to HelloSphere.h now and add a handle to this component in our AHelloSphere class definition as a member variable:
protected:
class UTextRenderComponent* TextRenderComponent;
It's important to note that this has not created the component, we have merely added a handle in the form of a pointer that is of type UTextRenderComponent. We have also specified this handle to be encapsulated at a protected level as this handle will not be accessed outside of this object. You may have noticed the keyword class being used here. This is known as inline forward declaration. It is always advised to forward declare object types that may not be known to your class definition. This is to reduce including overheads in our .h files. Before we populate this handle with an initialized component, let's first create our other required components and initialize those with the appropriate values.
Navigate back to HelloSphere.cpp and within the definition of our default constructor (AHelloSphere::AHelloSphere()) add the following code:
// Our root component will be a sphere component that will inform us of overlaps and collisions
USphereComponent* SphereComponent = CreateDefaultSubobject<USphereComponent>(TEXT("RootComponent"));

RootComponent = SphereComponent;

// Assign properties to sphere component
SphereComponent->InitSphereRadius(220.0f);

SphereComponent->
SetCollisionProfileName(TEXT("OverlapAllDynamic"));
Here we are creating and initializing the sphere component that will be used to detect overlaps and collisions with the HelloSphere actor. As you can see, here we are utilizing the CreateDefaultSubobject() template function. This function will create a component of the templated type and return a handle to the newly created component. You can specify the component name as a parameter to this function via the TEXT macro. We are then assigning the newly created component into a temporary handle so we may access the component and change some of its properties. It is also important to note that we set the SphereComponent as our RootComponent by assigning it to the provided RootComponent variable handle.
Instead of using a Details panel to change properties on a component, we have instead used member functions and variables to set these values. In the previous example, we are setting the sphere radius to 220.0f via InitSphereRadius() and then setting the collision profile to OverlapAllDynamic via SetCollisionProfileName(). The latter takes in an FName representing the collision profile you wish to change to. It will make any changes to the collision settings required to match this profile. This is very similar to what you would do in the collision section of the Details panel.
Tip
I would strongly recommend that every time you are working with an Unreal Object for the first time, you research that object using the Unreal Engine Reference API found here at https://docs.unrealengine.com/latest/INT/API/index.html.
The next thing we are going to do is add our static mesh component that will be used to draw the sphere geometry of the object. We need to create a UStaticMeshComponent and then assign it a static mesh asset we have in our content browser. Unlike Blueprint, we do not have access to the drag-and-drop functionality of the content browser to create asset associations. Instead we must use a template object provided by the Engine.h header file (this header is included in the HelloCode.h by default). This template object is called a FObjectFinder and is part of the ConstructorHelpers namespace. You can initialize this object with the type of asset you wish to find as the template type, then provide a path to the asset you wish to populate the object with as a FName parameter to the object constructor. The following is the code that creates the appropriate static mesh component then uses a FObjectFinder object to assign the correct asset. Add the following code to the default constructor definition now:
// Create and attach a sphere mesh
UStaticMeshComponent* SphereVisual = CreateDefaultSubobject<UStaticMeshComponent>(TEXT("SphereMesh"));
SphereVisual->AttachTo(RootComponent);

// Assign mesh to static mesh component through construction helper
ConstructorHelpers::FObjectFinder<UStaticMesh> SphereAsset(TEXT("/Game/StarterContent/Shapes/Shape_Sphere.Shape_Sphere"));


// Adjust properties of the mesh if mesh asset was found
if (SphereAsset.Succeeded())
{
    SphereVisual->SetStaticMesh(SphereAsset.Object);
    SphereVisual->SetRelativeLocation(FVector(0.0f, 0.0f, -50.0f));
}
Here we have created a temporary handle (SphereVisual) to the UStaticMeshComponent. We then call AttachTo() on this newly created component. This function takes in a handle to the component we wish to attach to, in our case this is the RootComponent handle that currently points to the SphereComponent we created earlier. This attaching is the same as dragging one component onto another in the Components panel of the Blueprint Editor.
Next we create an FObjectFinder with the template type of UStaticMesh called SphereAsset. We then use the constructor of the FObjectFinder to initialize the finder with the path to a sphere asset in our content browser. This will then invoke the FObjectFinder to locate and assign the asset at the provided path to itself.
When providing the path to any given asset in the content browser, the easiest way is navigating to the asset in the Content Browser, right-clicking the desired asset, and selecting Copy Reference. This method can be seen as follows, along with the yielding result:

This will yield—StaticMesh'/Game/StarterContent/Shapes/Shape_Sphere.Shape_Sphere.
Everything following the object type surrounded by the (') character is the path you must provide to the FObjectFinder constructor.
Following the construction of the FObjectFinder we ensure that this asset assignment was successful. We do this via the Succeeded() method. The FObjectFinder object includes the function Succeeded(), which returns a bool that represents whether the asset path provided at construction was valid and the asset has been found. If this function returns true, we assign the found static mesh to the UStaticMeshComponent we just created and adjust its relative position slightly.
We can assign the Mesh asset via the Object member of FObjectFinder. This member will be of the template type specified when creating the FObjectFinder, in this case UStaticMesh. We can use Object as an input parameter to the SetStaticMesh() function of the UStaticMeshComponent. We then slightly change the relative location of the sphere Mesh with SetRelativeLocation(), this is so that it sits in the center of our root sphere component. It is important to note that we are adjusting the relative location of the component. This means the position adjustment will be maintained as the HelloSphere object as a whole travels through world space.
Alright! Now let's build our code for the first time. You may have noticed that our open Visual Studio project is not currently running our Editor (as no project instance is running). Close your UE Editor now but leave Visual Studio open. Ensure the HelloCode project is set as the start-up project by right-clicking on the project in the Solution Explorer and selecting Set as Startup Project…, also ensure that your Solution Configuration is set to Development Editor and Solution Platforms is set to Win64. You should see the following at the top of your IDE window:
Now, build the project by clicking the Local Windows Debugger button or pressing F5 and behold the glory of your (and Epic's) compiled code! If your project does not build cleanly, address the Output panel of the IDE for any errors or warnings you need to clear up.
Upon successful compilation you will be presented with the Level Editor, as you would if you had simply opened the project via the Project Browser. There will be one key difference however, our new Hello Sphere object will be included in the class lists! To see our C++ classes in the content browser there is a small button that will show or hide the sources panel. It is highlighted in the following image:

As you can see, our HelloSphere object can be located under the C++ Classes | HelloCode filter. Drag and drop our old friend into your level now and you will be presented with a sphere Mesh and sphere collider! Select this HelloSphere entry in the content browser and drag it into the level scene!
Ok, now we are going to finish creating the AHelloSphere object. We are going to be making edits to the code, however do not stop running the build of our project from the IDE. We are going to be Hot Compiling the following code modifications. What that is will be detailed soon. For now, let's set the HelloSphere on fire!
We are going to set the sphere on fire by adding a UParticleSystemComponent to our object and then assigning this component a particle template in the same way we assigned a sphere mesh to the UStaticMeshComponent. Navigate to HelloSphere.cpp and add the following code to the AHelloSphere::AHelloSphere() constructor:
// Create the fire particle system
UParticleSystemComponent* FireParticles = CreateDefaultSubobject<UParticleSystemComponent>(TEXT("FireParticles"));

FireParticles->AttachTo(SphereVisual);
FireParticles->bAutoActivate = true;

// Assign fire particle system to component
ConstructorHelpers::FObjectFinder<UParticleSystem> FireVisual(TEXT("/Game/StarterContent/Particles/P_Fire.P_Fire"));

if (FireVisual.Succeeded())
{
    FireParticles->SetTemplate(FireVisual.Object);
}
We are creating the component via CreateDefaultSubobject as per usual. We are then attaching the newly created UParticleSystemComponent to the UStaticMeshComponent we created earlier. This is because we wish the particle system to move with the mesh when translated. We also ensure that the bAutoActivate member of UParticleSystemComponent is set to true as we want it to start playing as soon as the object is spawned in the level. We then use another FObjectFinder, this time of type UParticleSystem, to retrieve the P_Fire particle system template provided by the Unreal Starter content.
The next step is very similar to the assignment of the mesh asset to UStaticMeshComponent. Again we use the Succeeded() function to gauge the success of asset retrieval. If it succeeds, we provide the Object member of the FObjectFinder FireVisual to the SetTemplate() function of the UParticleSystemComponent. Because we created FireVisual with UParticleSystem as the template type, the Object member will be of type UParticleSystem, thus it is compatible as an input parameter for the SetTemplate() function. This is a great example of effective template use when working with C++ and UE4.
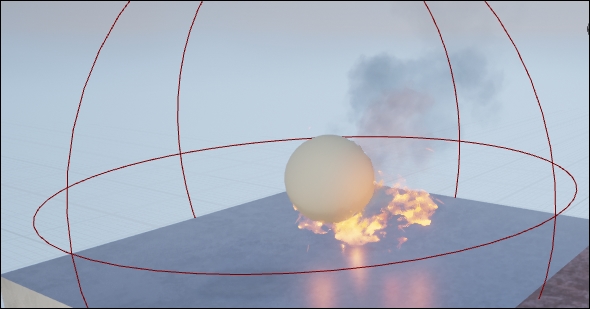
Now that we have made a change to the codebase, let's quickly demonstrate the power of Hot Compilation. Hot Compilation allows the developer to make changes to the codebase of an object without having to rebuild the entire project. To perform a hot compile, you must press the Compile button located in the Toolbar of the Level Editor. Ensure you have the HelloSphere object present in the viewport and then press the Compile button. You will notice a small popup appear in the bottom right-hand side of the screen that states Compiling C++ Code…. When the code compilation is successful you will see the Hello Sphere object in the level update to the latest version of the compiled asset! How can we tell the object has been updated? Well, it should not be aflame like so:
If the object has not updated properly, ensure that the code compiled successfully. If it did and the object has still not updated, simply re-drag the HelloSphere object into the scene and delete the original. This Hot Compilation feature is a very powerful tool as we do not have to worry about re-building the entire project whenever we make small changes to the codebase. However, large refactors or additions to the codebase will require a full re-compile from Visual Studio, especially with regards to changes made to header files, as this may have a direct impact on how the object associates with the engine. If you do experience any strange bugs after a Hot Compilation, be sure to recompile the project to see whether the bug still remains.
Now it is time to finally add the 3D text that gives AHelloSphere a little personality. If you remember, the way we did this in Blueprint was simply by changing the text of a TextRenderComponent upon receiving an OnBeginOverlap event. We have to do this a little differently in code, instead of overriding the event function call in our AHelloSphere object or waiting for an event to be hit, we are going to be creating a function and binding it to the event delegate. The reason for this will be explained soon, for now let's add our UTextRenderComponent to the object.
Navigate back to HelloSphere.cpp and, within the constructor definition (AHelloSphere::AHelloSpehre()) underneath the code we just added for the particle system, add the following code:
// Initialize Text Render component
TextRenderComponent = CreateDefaultSubobject<UTextRenderComponent>(TEXT("Text"));

TextRenderComponent->AttachTo(SphereVisual);

TextRenderComponent->SetRelativeLocation(FVector(0.0f, 0.0f, 110.0f));

TextRenderComponent->SetHorizontalAlignment(EHTA_Center);
TextRenderComponent->SetYScale(2.0f);
TextRenderComponent->SetXScale(2.0f);
TextRenderComponent->SetVisibility(true);
TextRenderComponent->SetText(NSLOCTEXT("AnyNs", "Any", "HelloWorld"));
Here we create the UTextRenderComponent via the CreateDefaultSubobject() function, then attach it to the UStaticMeshComponent using AttachTo() and the SphereVisual handle. We then change some of the properties of the text render component. We want to have the text float above the sphere, thus we are changing the relative offset of the text by 110.0f on the Z axis via SetRelativeLocation(). We then want to ensure that the text aligns so that it is centered around its location in 3D space. We do this by changing the alignment type via SetHorizontalAllignment() to EHTA_Center. We then change the scale of the text and ensure the text is visible.
The way we set the text is fairly interesting, however we do this by using the macro NSLOCTEXT. This macro creates and returns an FText object for us to parse into the SetText() function. We only wish our text to say HelloWorld so why have we also provided the strings AnyNS and Any? In short, Any is a key and AnyNS is a namespace.
FText as an object has been designed with localization support in mind. This means you are able to easily localize your projects to whichever country you are building for. Because of this, when creating an FText object you need to provide not only a string value to write but also a key. The key will be used by the localization tools to identify the text value, even after the language has changed. Meaning that HelloWorld could be changed to こんにちは世界 if you were building to Japan via the localization tools, but the key Any will remain the same. Namespaces are simply used to group keys together so you may localize one namespace grouping of text but not another. If you do not wish to use FText you can use an FString object or FName object via the TEXT macro but this will result in a warning from the compiler.
Tip
If you want to learn more about FText and the localization tools, go here https://docs.unrealengine.com/latest/INT/Programming/UnrealArchitecture/StringHandling/FText/index.html.
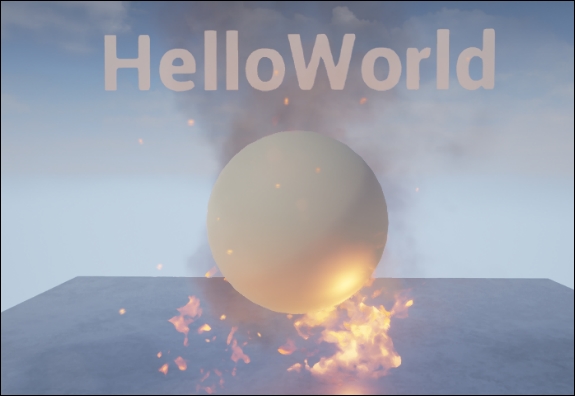
Ok, perform another hot compile and see the new text floating above our spherical friend:
Let's look into how we are going to be receiving the BeginOverlap event in our AHelloSphere code object. We have to add code to both our class definition in the HelloSphere.h file as well as the default constructor definition in the HelloSphere.cpp. We are going to be creating two functions MyOnBeginOverlap() and MyOnEndOverlap(). We are then going to provide these two functions to the corresponding delegates found in the AActor base class. Delegates are objects that act in a similar way to Event Dispatchers in Blueprint. We are able to provide multiple function handles to a delegate and have them all invoked when the delegate is instructed to broadcast.
Delegate objects are declared with a given function signature. A function signature is what defines the make-up of a function, for example the function void Multiply(int a, int b) has a function signature that looks like this void function (int, int) or void Function ( <Param1>, <Param2>). Meaning a function that takes in two integer numbers as input parameters and does not return anything. You could then create a delegate called MathDelegate specifying this function signature at declaration. You would then be able to bind Multiply() to MathDelegate as well as any other functions with a matching function signature. When the MathDelegate is instructed to Broadcast Multiply(), any other bound functions will be invoked.
We can see the benefits of this delegate system when we utilize those provided by the AActor base class. For us to have the functionality to execute when an actor overlaps our sphere component, we need to create a function that we will bind to a delegate called OnActorBeginOverlap. We are then going to have to do the same thing with a different function for the OnActorEndOverlap delegate. The reason this has to be done via delegates instead of say, virtual functions, is so that we may have multiple functions bound to these delegates throughout the object's hierarchy, including those declared in Blueprints. You may have guessed already that whenever you add an event node to a blueprint graph you are really binding a new function to a backend code delegate of a similar name!
Let's first create the functions we are going to bind by adding the following code to the HelloSphere.h file within the class definition, just above the declaration of the UTextRenderComponent handle under the protected keyword:
// On Overlap implementation
UFUNCTION()
void MyOnBeginOverlap(AActor* OtherActor);

// On End Overlap implementation
UFUNCTION()
void MyOnEndOverlap(AActor* OtherActor);
Here we have created two functions that have the same signature void function (AActor*). This is important as this is the signature of the OnActorBeginOverlap and OnActorEndOverlap delegates. We have also encountered a new pre-compiler macro UFUNCITON(). The UFUNCITON() macro lets us inform the engine of any crucial functions that we wish the engine to know about. We may also specify any unique properties of the function via specifiers but let's not get ahead of ourselves. The UFUNCTION() macro is present here as it is required if we wish to bind these functions to any delegates.
Next we need to actually bind these functions to the aforementioned delegates. Let's do this now by adding the following code to the definition of the constructor in the HelloSphere.cpp underneath the UTextRenderComponent initialization:
// Bind delegates
OnActorBeginOverlap.AddDynamic(this, &AHelloSphere::MyOnBeginOverlap);
OnActorEndOverlap.AddDynamic(this, &AHelloSphere::MyOnEndOverlap);
What we are doing here is adding the functions we just declared to the corresponding delegates via the AddDynaminc function. This function takes in a handle to the object that will invoke the function we are binding, and a handle to the function that is to be called. We are doing this via the this keyword and the address of the respective function.
The next thing we need to do is define the functions we just bound so they perform meaningful functionality. We can do this by adding the following code to the HelloSphere.cpp. Note that these function definitions are outside the scope of the constructor definition:
void AHelloSphere::MyOnBeginOverlap(AActor* OtherActor)
{
   FString outputString;
   outputString = "Hello " + OtherActor->GetName() + "!";
   TextRenderComponent->SetText(FText::FromString(outputString));
}

void AHelloSphere::MyOnEndOverlap(AActor* OtherActor)
{
   TextRenderComponent->SetText(NSLOCTEXT("AnyNs", "Any", "HelloWorld"));
}
The function MyOnBeginOverlap() will now concatenate an FString based on Hello, the name of the offending actor, and ! will then convert this string to an FText value via FText::FromString. It will then set the text value of the UTextRenderComponent to the resultant FText value. MyOnEndOverlap() simply sets the text back to HelloWorld in the same way we did upon the initial creation of the UTextRenderComponent.
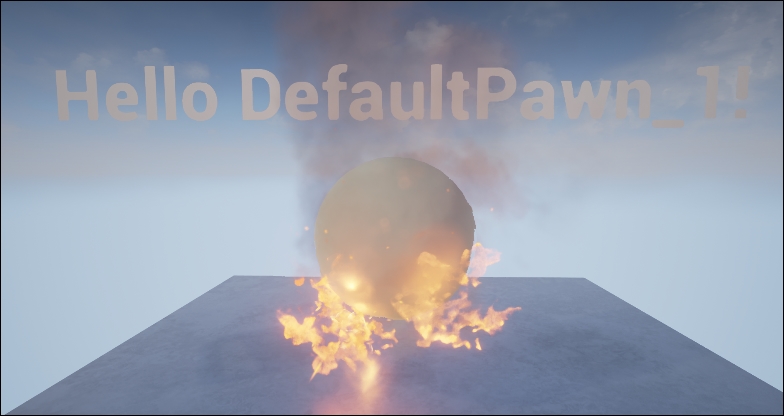
Hot compile our new changes and run the project! When you encroach on the Hello sphere it will greet our pawn object. You should see something similar to the following:
Tip
If you want to learn more about delegates now, go to https://docs.unrealengine.com/latest/INT/Programming/UnrealArchitecture/Delegates/index.html.
There are a few more things we need to do before our C++ Hello Sphere is the same as the Blueprint one we made earlier. We need to add that Unreal Factor and give our sphere that nice metallic sheen that made it glisten in the light of its own fire.
We are going to have to change a property of the UStaticMeshComponent we created after we have set the mesh of the object. This is very easy to do, all we need is another FObjectFinder that will be able to find the material object we require, then simply set the material value of the UStaticMeshComponent. This can be done by modifying our original UStaticMeshComponent initialization code in the HelloSphere.cpp within the constructor definition, to appear as follows:
// Assign mesh to static mesh component through constructions helper
ConstructorHelpers::FObjectFinder<UStaticMesh> SphereVisualAsset(TEXT("/Game/StarterContent/Shapes/Shape_Sphere.Shape_Sphere"));

ConstructorHelpers::FObjectFinder<UMaterial> SphereMaterial(TEXT("/Game/StarterContent/Materials/M_Metal_Burnished_Steel.M_Metal_Burnished_Steel"));

// Adjust properties of the mesh if mesh was created successfully
if (SphereVisualAsset.Succeeded() && SphereMaterial.Succeeded())
{
    SphereVisual->SetStaticMesh(SphereVisualAsset.Object);
    SphereVisual->SetMaterial(0, SphereMaterial.Object);
    SphereVisual->SetRelativeLocation(FVector(0.0f, 0.0f, -40.0f));
}
As you can see, all we needed to do was create another FObjectFinder of type UMaterial and ensure we check the result of the retrieval of this asset alongside that of the UMesh, and then simply set the material via the SetMaterial() function. It is important to note that the first parameter of the SetMaterial() function is the index of the material you wish to change. This is important when setting materials of meshes that have multiple material indexes.
With the previous code in place and compiled, we can finally say hello to a finished HelloSphere made entirely in C++!