It's time to add Angular routing to our application.
We have two options for implementing routing:
- We can use the Angular CLI to add routing during the creation of the project
- Or we can add Angular routing manually into our applications
First, let's explore the easy way, using the Angular CLI to add routing.
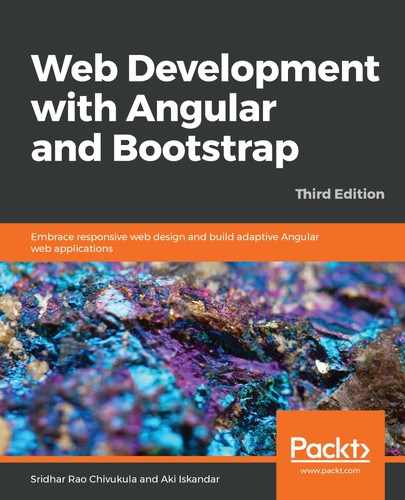
The Angular CLI provides us with an easy way to add routing capabilities to our Angular application. While generating a new project, the Angular CLI will prompt us to select if we want to add routing to our app.
The following screenshot shows the option displayed in the CLI for adding Angular routing:
When we choose the option to add routing in our app, we are using the Angular CLI to create files, import the required modules, and create the route's rulesets.
Now, let's add routing to our project manually. Let's see how we can configure routing in our app.
In order to configure our routing, we need to follow these steps:
- Open the app.module.ts file
- Add the following import statement to the import section at the top of the file:
import { NgModule } from '@angular/core';
import { Routes, RouterModule } from '@angular/router';
RouterModule contains the router service and router directives.
The Routes module defiles the routes type (remember, TypeScript adds variable typing to JavaScript).
- Write a few routes and ruleset in the app-routing.module.ts file:
const appRoutes: Routes = [
  { path: ‘home’, component: HomeComponent },
  ...
  { path: ‘’, redirectTo: ‘/home’, pathMatch: ‘full’ },
  { path: ‘**’, component: PageNotFoundComponent  }
];
This code only shows three mappings:
- Mapping for HomeComponent
- Mapping for a redirection
- Mapping for a wildcard, or catch-all, the URL request
The first mapping object is the simplest case. A URL path (that is, the part of the URL that comes after the domain name) maps to one component, without any parameters (note routes can be parameterized, and we'll look at that in the Parameterized routes section shortly). What this route does is instruct Angular to render the HomeComponent template when the path in the requested URL ends in the home.
The second mapping object is an example of how to get one path to redirect to another URL, and, thus, route. This is typically referred to as route redirection. In our case, the path is an empty string, which means that when only the domain name is entered into the browser location bar, Angular's routing mechanism will redirect the request (that is, change the path in the URL) to /home. And since there is a mapping object that deals with /home, it will get triggered, thus rendering the HomeComponent template. This is a common practice for websites—entering just the domain name typically brings the user to the home or index web page. In our case, since we're building an SPA (which is what Angular web applications are), there is no home page, but rather a home component, meaning that the home component's template is rendered to simulate a home page.
The third mapping object is an example of a wildcard match and is placed as the last mapping object. When Angular's routing mechanism parses the requested URL, it compares it to the mapping objects from the top down. If the URL does not match any of the mapping rulesets, this last mapping object is triggered. What this means for our application is that, if there are no matches, the PageNotFoundComponent template will be rendered.
- Now it's time to import our appRoutes; this is how we tell Angular about our routes. appRoutes is a constant that holds our route mapping, so let's create that next:
imports: [
 BrowserModule,
 RouterModule.forRoot(appRoutes)
]
- Finally, we will need to import the app-routing.module.ts file into app.module.ts.
We have added the routes directly into app.module.ts file. It's a good practice to always separate out the route config file separately. Even better, always use the Angular CLI to add routing directly when you create the project.
That's it; we have implemented routing in our project. In the next section, we will learn in detail about adding more routes, adding parameters to our routes, and creating child routes.