Angular provides a lot of built-in powerful directives, such as ngFor, ngIf, and so on, which can be used to extend the behavior and functionality of the native HTML elements. We learned about the Angular templates and directives in Chapter 7, Templates, Directives, and Pipes. A quick recap has never hurt anyone. Angular offers us two types of directives that we can use to develop and extend the behavior of elements:
- Built-in directives
- Custom-defined directives
The focus of this section is to learn how to write test scripts for built-in Angular directives, such as ngIf, ngFor, ngSwitch, and ngModel. Before we start writing our test scripts, we need to do some groundwork to update our component so that we can start writing the test use cases. We will write a few variables, which will hold various types of data. We will display the data in our template using ngFor and also write some conditional checks using ngIf.
We will continue to use the same component, AutoListComponent, which we created in the previous section. Let's start the party. Our starting point will be the AutoListComponent class, so let's modify the auto-list.component.ts file:
import { Component, OnInit } from '@angular/core';

@Component({
 selector: 'app-auto-list',
 templateUrl: './auto-list.component.html',
 styleUrls: ['./auto-list.component.scss']
})
export class AutoListComponent implements OnInit {

cars = [
 { 'id': '1', 'name': 'BMW' },
 { 'id': '2', 'name': 'Force Motors' },
 { 'id': '3', 'name': 'Audi' }
 ];

 tab = "1";

 constructor() { }

 ngOnInit() {
 }

 findAuto() {
     console.log("Method findAuto has been called");
  }

}
In the preceding code, we are adding a variable of a JSON object type called cars and assigning data to it. We will use this data by displaying it in the template. We are also declaring a variable, tab, and assigning a value, 1. We will use the tab variable for conditional checks in the template. Finally, we are adding a method, findAuto, and just displaying the output in the console.
We have modified our component class. We will also need to update our template file in order to process the data inside the component. The following is the sample code that we will add in our template file, auto-list.component.html:
<h4 class="c2">ngFor directive</h4>
<ul class="cars-list">
 <li *ngFor="let car of cars">
 <a [routerLink]="[car.id]">{{ car.name }}</a>
 </li>
</ul>

<h4 class="c1">ngIf directive</h4>
<div *ngIf="cars.length" id="carLength">
 <p>You have {{cars.length}} vehicles</p>
</div>

<h4 class="c3">ngSwitch directive</h4>
<div [ngSwitch]="tab" class="data-tab">
 <p>This is ngSwitch example</p>
 <div *ngSwitchCase="1">ngSwitch Case 1</div>
 <div *ngSwitchCase="2">ngSwitch Case 2</div>
</div>
<hr>

<button (click)="findAuto()" id="btn">Click to findAutoDealers</button>
In the preceding code, we are making the changes to the template file. First, we are using the ngFor directive to loop the rows and display the cars. Next, we are adding an ngIf condition to check whether the length of the car is more than 0, and then we will display the count of the carLength element. We have added an ngSwitch directive to check whether the value of the tab variable is set and, based on the value of the tab, we will display the respective tab, accordingly. In our case, since the value assigned to the tab is 1, we will display the first tab. Finally, we have added a button and associated the findAuto method with the click event.
Beautiful. Our component and template are ready, and now it's time to write some good test scripts to test the preceding logic and, especially, the Angular built-in directives. Some of the use cases we will test include testing the count of cars displayed in the UI, testing which tab is active, verifying the content inside an element, and many more. Some of the use cases follow, and we will learn how to write test scripts for the use cases:
Use case #1: We have a list of cars and we want to verify that the total count is 3:
// ngFor test case to test the count is 4
 it('Should have 3 Brands coming from ngFor directive', async(() => {
 const fixture = TestBed.createComponent(AutoListComponent);
 fixture.detectChanges();
 const el = fixture.debugElement.queryAll(By.css('.cars-list > li'));
 expect(el.length).toBe(3);
 }));
In the preceding code, we are creating a fixture of the AutoListComponent component.
We have already learned how to target an element using debugElement and, in this test spec, we are using the queryAll method to get the list of elements with className .cars-list > li. Finally, we are writing an expect statement to assert if the total count equals 3.
Run the tests using the ng test command. We should see the following output:

Use case #2: We want to verify that the text inside an HTML element contains the vehicles keyboard:
// ngIf test script
 it('Test ngIf directive in component', async(() => {
 const fixture = TestBed.createComponent(AutoListComponent);
 fixture.detectChanges();
 const compiled = fixture.debugElement.nativeElement;
 const el = compiled.querySelector('#carLength');
 fixture.detectChanges();
 const content = el.textContent;
 expect(content).toContain('vehicles', 'vehicles');
 }));
There are some important things to note in the preceding code. We continue to use the same fixture element of the component, AutoListComponent. This time, using the debugElement interface, we are using the querySelector method to find an element that has its identifier as carLength. Finally, we are writing an expect statement to assert if the text content contains the vehicles keyword.
Let's run the tests again using the ng test command. We should see the following output:

Use case #3: We want to use ngSwitch to verify that tab1 is selected and, if so, display the corresponding div:
// ngSwitch test script
 it('Test ngSwitch directive in component', async(() => {
 const fixture = TestBed.createComponent(AutoListComponent);
 fixture.detectChanges();
 const compiled = fixture.debugElement.nativeElement;
 const el = compiled.querySelector('.data-tab > div');
 const content = el.textContent;
 expect(content).toContain('ngSwitch Case 1');
 }));
In the preceding code, we continue to use the fixture element of the AutoListComponent component. Using the debugElement and querySelector methods, we are targeting the element using className '.data-tab > div'. We are asserting whether the ngSwitch condition is true and the corresponding div is displayed. Since we have set the value of the tab to 1 in our component, tab1 is displayed on the screen and the test spec passes:

Use case #4: Test the methods defined inside AutoListComponent and assert whether the method has been called:
// Test button is clicked
 it('should test the custom directive', async(() => {
 const fixture = TestBed.createComponent(AutoListComponent);
 component = fixture.componentInstance;
 fixture.detectChanges();
 spyOn(component, 'findAuto');
 component.findAuto();
 expect(component.findAuto).toHaveBeenCalled();

}));
In the preceding code, we are creating a fixture of the AutoListComponent component. We are using the spyOn method to spy on the component instance. We are calling the findAuto() method. Finally, we are writing an expect statement to assert whether the findAuto method, using toHaveBeenCalled, has been called or not.
Run the tests using the ng test command. We should see the following output:
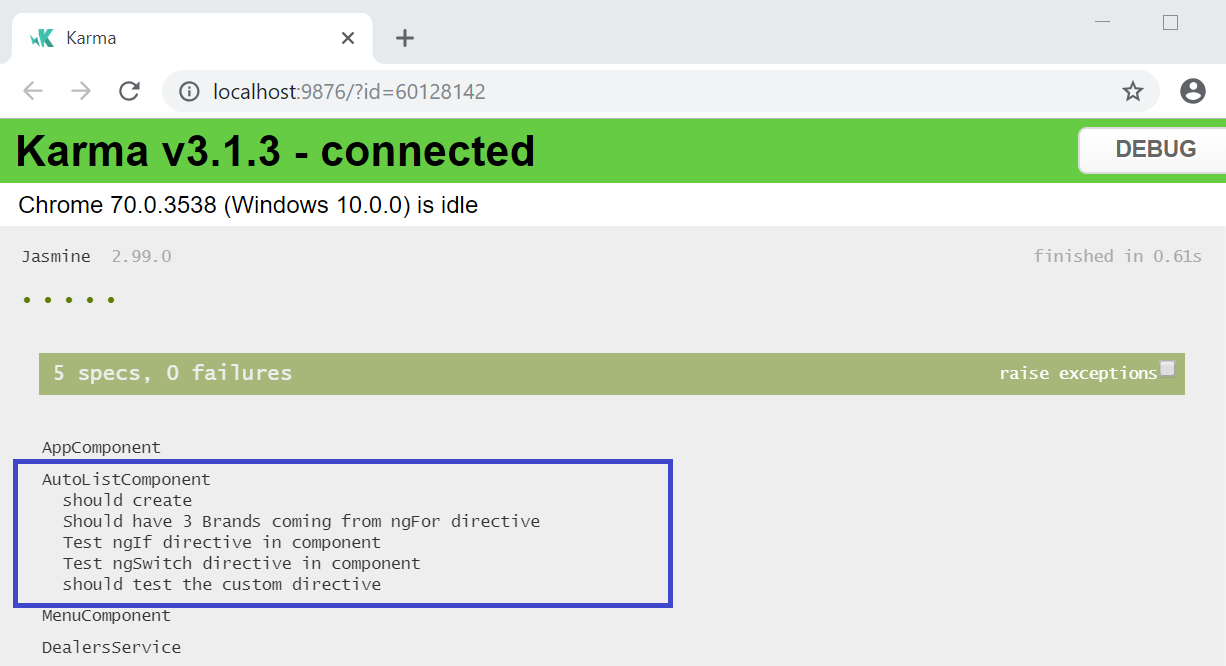
In this section, we learned how to write unit test scripts for testing Angular built-in directives, such as ngFor, ngIf, ngSwitch, and finally, asserting whether a method was clicked and called.
In the next section, we will learn about testing Angular routing.