
Chapter 11. Secure Sockets Layer
The Secure Sockets Layer is so important to network security that we have devoted this entire chapter to it. SSL is the de facto standard for secure Internet transactions. It has achieved this status by being not only secure, but being highly generic and imminently practical as well. SSL exists in the network layer between TCP and your application, providing blanket security to all data transferred over the network. The API for an SSL implementation is typically very similar to the standard network sockets API (POSIX-style). For this reason, it is simple to transform any plain TCP/IP application into a secure Internet application with very little effort.
The standard is very flexible in algorithm choice and features, so it is easy to pick and choose the features from a requirement list. Most PC-based implementations of SSL are monolithic—all features are compiled into every application. However, we will look at a more modular approach that can be used in embedded applications, allowing the developer to enable only the features that are needed, leaving the rest out of the final binary.
Aside from looking at structural procedures for making SSL work on embedded machines, we will also look at optimizations. We will look at hardware assistance as well, since SSL makes use of public-key cryptography, and some vendors have chosen to implement part or all of SSL in a hardware solution. We will also look at implementing SSL in hardware, as part of an FPGA, or as a stand-alone chip. Again, the advantage of hardware implementations is the ability to use larger keys and achieve the same or better performance. We will look at the tradeoffs between these hardware solutions, and a more flexible software implementation.
11.1. SSL History
SSL had a modest beginning as a project at Netscape Inc. in the mid-1990s to secure Web transactions for their (then-dominant) Netscape Navigator web browser. SSL version 1 was an internal project that was never released. Version 2 was publicly released and quickly became a standard way of conducting secure web transactions, eventually beating out other secure offerings from companies such as Microsoft. Unfortunately, some poor decisions in Netscape’s implementation of SSL version 2 led a couple of grad students to successfully break the encryption, utilizing attacks on the random number seeds chosen (which included the system clock value—a number that is easily predicted and controlled). The attack revealed that an SSL-secured connection could be broken by a clever attacker in a manner of minutes. As a result of the compromise, SSL version 2 was deemed insecure and unfit for any real transactions. Despite this enormous shortcoming, SSL version 2 is still included in many popular web browsers, though it is now often turned off by default. You should never enable it, unless you want to try your own hand at breaking it.
In the aftermath of the SSL version 2 compromise, Netscape scrambled to provide a fixed implementation of SSL. SSL version 3 was born. At the time SSL version 3 was started, the Internet Engineering Task Force (IETF) began a project to implement a standard version of SSL that was designed to become the eventual standard. The standard, called Transport Layer Security, or TLS (a name generally disliked by the committee members but not hated as much as the other contenders), is now complete and described in RFC 2246. Due to the time it takes for a committee-designed standard to be completed, however, the Netscape version was introduced to the industry much faster than TLS, and version 3 soon became the dominant secure web protocol. TLS is structurally identical to SSL version 3, with a few minor enhancements to the way cryptography is handled, so it is sometimes referred to as SSL version 3.1. SSL version 3 to this day has not been compromised (at least as far as anyone can tell), but it is generally assumed that TLS is more secure and should be used for all new development. TLS is beginning to become the dominant standard, but SSL version 3 is still widely used and is still considered a practical way to secure web transactions. Due to the close similarity to TLS, SSL version 3 can be supported in a TLS implementation with a minimum of effort. From this point on, we will refer to TLS and SSL version 3 collectively as “SSL.”
11.2. Pesky PKI
The SSL protocol provides blanket security for network communications by utilizing the advantages of both public-key cryptography and symmetric-key cryptography. As discussed earlier, there are definite benefits to public-key algorithms because we don’t have to figure out how to safely exchange keys with the person (or system) with which we wish to communicate. We can just send out our public-key and in receiving keys from others, we can communicate freely and securely. Well, that’s not entirely true, since someone could potentially provide a public-key and lie about who they really are in order to entice you into communicating sensitive information to them. This exact problem is at the heart of how SSL is typically deployed in web browsers and servers. Before we delve into the deep technical aspects of SSL implementation, we will take a short detour and look at the authentication mechanism provided by SSL, and how this mechanism is used in practice to provide a notion of trust. However, keep in mind that the way SSL is currently used does not mean it is the only method of authentication that can be used—in fact, the mechanism by which SSL certificates are distributed has nothing to do with the SSL protocol. However, SSL is most frequently paired with the distribution mechanism described below, so we will spend a little time looking at it before talking in depth about SSL.
To solve the issue of authentication (namely, the secure distribution of SSL certificates), a few companies put their reputations on the line to provide the public with signing services. Companies such as Verisign provide these services then contract with browser and server makers to provide a “known” public-key in those applications. Assuming that “In Verisign we trust” can be taken as relatively true, then we have a relatively high confidence that any certificate we receive that has been signed by Verisign is valid and correct, and has been sent by the person or organization identified by said certificate.
The whole concept of Public-Key Infrastructures (or PKI) relies on the inherent trust in companies like Verisign to do a satisfactory amount of due-diligence on each certificate they sign. Assuming that Verisign is relatively trustworthy, then this is not a terrible system. In fact, it pretty much represents the backbone of e-commerce as we know it. Any time you browse to your favorite online stores, you are effectively saying that you trust Verisign and the browser and server makers with your financial well-being. This method by which SSL certificates are deployed makes some security experts nervous, but it has proven to be highly effective in promoting “secure” transactions on the Web.
SSL makes PKI possible through the construction of the digital certificates it uses for authentication. Since signing a digital certificate with a private RSA key, for example, is able to be chained any number of times back to a common root, one company can provide that root certificate as part of standard web application implementations and extend their trust to numerous third parties. SSL is designed to use any number of root certificates for authentication, so just a few companies provide root certificates, and everyone can use the system.
To bring this discussion back into focus for the purposes of embedded systems development, let’s ask the obvious question: Just how many of these “root” certificates are there, and does my embedded application need to store all of them? It turns out that, like almost everything we have looked at in this book, it depends on the application itself. If your application is a webserver that will be deployed on the public Internet, then all you need to do is store a single certificate that you pay to have signed. If your device is designed to connect to any number of public Internet access points, then you will probably need to store at least a dozen or two root certificates, which unfortunately can be as large as a few kilobytes each. It is quite possible that a public SSL client would need as much as a megabyte of space to store all the relevant certificates to assure the highest probability of compatibility with any unknown server. However, it is likely that most embedded applications will either be an SSL server implementation, or they will not need to connect to every server ever created. For this reason, we will look at other methods for distributing SSL certificates that are more practical for embedded systems.
11.3. PKI Alternatives
As it turns out, the PKI system used for e-commerce on the Web is not the only way to deploy SSL certificates. A lucky thing that is, too, since many embedded applications would be hard-pressed to provide the space required to store all the root certificates. PKI is simply one implementation that has been pushed by large companies for web browsers, but we have the power to do things differently. In order to provide authentication for SSL in embedded applications, we will look at a couple of different options for deploying certificates that in many cases are more applicable and practical than PKI. In Figure 11.1 we can see the relative differences in the different deployments.
Figure 11.1. PKI alternatives
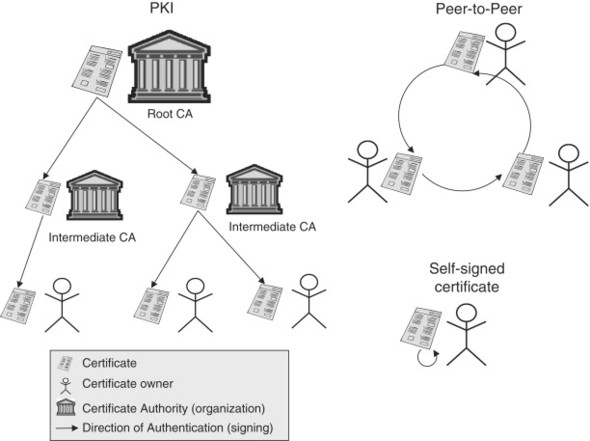
The simplest path to SSL authentication is to create your own self-signed certificate. This essentially means that you will create a certificate with the appropriate public-key/private-key pair, put the public-key in the certificate, and sign it using the private one. As it turns out, you don’t have to use Verisign after all! Once you deploy your application, authentication is simply a matter of using the private key you created to authenticate the certificate being provided by your application. If your application is a web server, then you can install the certificate into the browser’s root certificate cache—from that point forward, the browser will always accept that certificate (assuming it hasn’t been tampered with or corrupted). Alternatively, if your application is an SSL client, then your server can provide a certificate signed using the same private key, which the application can then verify directly using the single certificate. For simple applications, a self-signed certificate is the only way to go.
So we can create a self-signed certificate, but what if we have to deploy hundreds of devices, each with a unique certificate? Well, you could pay anywhere from $100 to over $1000 to get each certificate signed by a public signing company or organization, or you can do it for free and be your own CA. How does that work? Remember that we can self-sign a certificate, so there is nothing keeping us from signing other certificates. All you need to do is to create a single root certificate (which simply means it is self-signed and will be used to sign other certificates), and then use that certificate’s private key counterpart to sign all your other certificates. If you install your single root certificate in a web browser, then you have automatic authentication for all the certificates you create and sign using that certificate. As you might have guessed, this particular method of certificate distribution is quite useful in venues other than embedded systems, such as providing authentication on a corporate intranet, for example.
Creating a self-signed certificate and going into the business of being your own CA are both very reasonable ways to provide basic SSL authentication for your application. However, it may be that neither those methods nor PKI are suitable for what you are looking for. Fortunately, there are some other ways of distributing trust in the form of certificates, and most of them center on some concept of peer-to-peer networking.
There are various implementations of peer-to-peer authentication, and the idea hasn’t caught on for e-commerce, so we will just stick to the basic ideas behind peer-to-peer authentication mechanisms. The basic idea is that of extending trust. As an example, start with someone you know and trust. Assuming that person is trustworthy, you can then assume that someone they say is trustworthy is probably trustworthy. This is fine unless that third party deceived your friend, but then again, the liar could deceive you as well. Back to the point, though—if you can extend your “network of trust” by using mutual friends to verify new people that enter the network, you can extend trust to just about anyone. Figure 11.2 shows a simple peer-to-peer PKI example.
Figure 11.2. Peer-to-peer PKI

11.4. SSL under the Hood
Now that we have covered the basics of authentication in SSL, it is time to dig in and look at what makes SSL tick. To start off, we will look at the basic structure of the communications layer of the protocol, starting with the backward-compatibility handshake.
One of the issues with SSL is keeping backward-compatibility with older versions. After all, it would be better to communicate using SSL version 2 than nothing at all (well, not much better, if your information had any value, but you get the point). The other action that can occur is that two SSL implementations may actually both speak newer versions of SSL or TLS, and they can negotiate up to the most recent version they both support. This backward-compatibility feature can be optional, allowing for newer implementations to communicate directly, but the feature is required at the very beginning of the SSL handshake, so we will look at it first.
The SSL handshake begins with a network connection of some variety; in most cases the connection is a simple TCP/IP network connection (the lower-level and physical layers do not matter). SSL is essentially a TCP/IP application, and for the most part does not require any knowledge of the underlying network mechanism. That being said, SSL does rely on the network protocol being used to handle dropped packets, so a reliable protocol like TCP will work just fine for the lower level, but an unreliable protocol like UDP will not. This requirement of SSL does not reduce the security of the protocol or cause any other problems, even if the TCP connection is compromised. SSL will be able to detect any attempt to corrupt the information using the message digest authentication mechanism (discussed later in this chapter), and the encryption prevents eavesdropping. The problem with using an unreliable protocol under SSL is that SSL will flag every dropped packet as a potential attack.
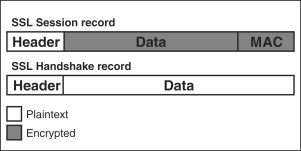
Once the network connection has been established, the SSL handshake itself can begin. The SSL communication layer is similar to other network protocols in that it consists of a header containing protocol information and a body that contains the information being transmitted. In SSL, these units are called records (see Figure 11.3) and can be thought of as being analogous to the TCP frame and IP packet. In the handshake, the SSL records are unencrypted, since the encrypted connection, called the SSL session, has not yet been established. The backward-compatibility handshake begins with an unencrypted SSL record called the Client Hello, which is sent by the SSL client wishing to establish the SSL session with a particular server. By convention, the application initializing an SSL connection is always the client, and follows a specific set of actions that correspond to actions on the SSL server.
Figure 11.3. SSL record
The Client Hello message kicks off the whole thing, as we see in Figure 11.4. In backward-compatibility mode, the Client Hello is actually an SSL version 2 message in an SSL version 2 record, which differs slightly from the record in later versions. Originally, SSL used some fairly simplistic methods for generating the encryption keys and verifying that the handshake was not tampered with. As a result of the simplistic nature of these methods, SSL version 2 was compromised as we mentioned earlier. In SSL version 3 and TLS, the methods were improved, resulting in a more complex handshake protocol. With the backward-compatibility mode, the initial version 2 Client Hello message is translated into a version 3 (or TLS) Client Hello, and the handshake proceeds as usual. If the client truly supports only SSL version 2, then the connection will be aborted when the server sends a Server Hello back to the client indicating that it supports only SSL version 3 or TLS.
Figure 11.4. SSL handshake part 1
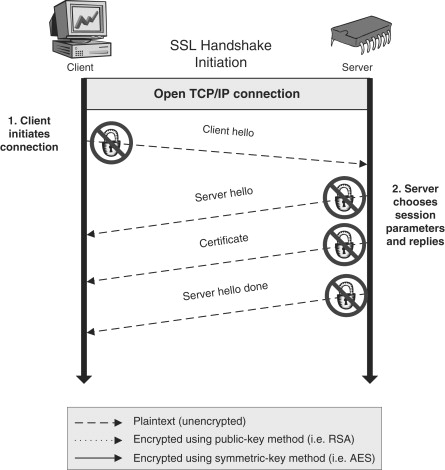
The Server Hello is a message that is built by the server upon receiving a Client Hello. The Client Hello message contains a number of ciphersuites that the client supports and is willing to use. A ciphersuite is simply a collection of algorithms and some specifications for the algorithms represented by an enumeration. For SSL, the ciphersuites consist of a public-key algorithm, such as RSA, a symmetric-key algorithm such as AES (also called the bulk cipher), and a hashing algorithm. The Client Hello also contains a string of random data that is used as a seed for generating the session keys later (we will explain what session keys are and how they are generated a bit later when we get to the key-generation phase of the SSL handshake).
The server selects the ciphersuite it wants to use based upon its capabilities and the priorities set by the application designer or user for selecting cryptographic algorithms. This is the negotiation phase of the handshake—the ciphers actually used for the communication are determined by a combination of what the client offers and what the server can support. The server stores away the information from the client (such as the random data used later for seeding the session key generation) and generates a Server Hello message, which is sent back to the client. The Server Hello message contains the ciphersuite selection, a server-generated string of random data used in combination with the client random data for seeding the key generation, and some additional information to get the session started. Another thing that both the client and server do in this initial phase is to begin a hash that will eventually represent all of the messages in the entire handshake. When we get to the Finished messages at the end of the handshake, we will see how these hashes are used to determine the integrity of the handshake process.
Following the Server Hello message, the server sends a message containing its digital certificate. The SSL certificate contains authentication information about the server that the client can use to verify the authenticity of the server, as well as additional information about the server and, most importantly, the certificate contains the public-key that will be used to exchange the information used to generate the session keys used by the secure SSL tunnel once the handshake is complete and the session is established. The certificate also contains a digital signature (an encrypted hash) that the client can use to verify the information in the certificate. The digital signature is usually signed by a third-party Certificate Authority (CA) using the reverse-RSA operation (encrypting using the private key, decrypting using the public-key). The client stores a number of digital certificates from different CA entities, and uses the public-keys stored therein to decrypt incoming server certificate signatures. In this manner, a client can verify an unknown server through the concept of distributed trust. If the client trusts the CA, and the CA trusts the server, then the client can trust the server as well. As long as the CA is reputable and checks up on all the servers it signs certificates for, this system works pretty well.
SSL is designed so that the server can send any number of certificates to the client, the idea being that the client should be able to use one of the certificates to authenticate the server. For this reason, the server Certificate message can be duplicated any number of times, once for each certificate the server sends to the client. In order for the client to know that the server is done sending certificates, the server sends a final message called the “Server Hello Done” message, indicating to the client that all certificates have been sent and the next phase of the handshake can begin.
The second phase of the SSL handshake begins when the server has sent the Server Hello Done message and the client begins the key exchange phase, as seen in Figure 11.5. The first thing the client does is to parse the server’s digital certificate and verify the server’s authenticity. It does this by first decrypting the digital signature using a locally-stored public-key (from a CA certificate), and comparing the decrypted hash to its own hash of the server certificate’s contents. If the hashes check out, the client then proceeds to check the certificates Common Name with the address (URL or IP address) of the server for additional verification. It also checks a field in the certificate that indicates the effective date range that the certificate is valid for. If the address does not match the Common Name, or if the certificate has expired, the SSL connection is dropped. Optionally, and what is usually done in web browsers supporting HTTPS, the client can opt to continue the handshake even if one or all of the authentication checks fails. This usually results in a dialog box warning the user of the browser that something is amiss. If the user chooses to ignore the warnings by selecting to proceed anyway, or if the checks are all successful, the handshake proceeds.
Figure 11.5. SSL handshake part 2

The client uses the information from the client and server Hello messages to generate the session keys, which will be used with the bulk cipher to securely send data back and forth once the handshake is complete. The client generates a random string, called the Pre-Master Secret, which is then encrypted using the server’s public-key (obtained from the server’s digital certificate). The encrypted Pre-Master Secret is then sent to the server in the Client Key Exchange message. Upon receiving the message, the server can decrypt the data using its private key (the complimentary half of the public-key sent in the certificate earlier). Following the Client Key Exchange message, the client sends the last message in the handshake that is not encrypted using the session keys (which we will talk about in a moment). This message is called the Change Cipher Spec message, and it indicates to the server that all following messages will be encrypted using the session keys. The final handshake message sent by the client is called the Finished message, which is encrypted using the session keys. In a bit, we will talk about what the Finished message entails and how the server ends the handshake, but first, where do these session keys come from?
Looking back at the beginning of the handshake, we mentioned that the client and server both generate a random string of data that is communicated in the initial “hello” messages. We also said that the client generates a string of random data called the Pre-Master Secret that is used for generating session keys later. The Pre-Master Secret is small enough to be easily encrypted with the public-key algorithm being employed in the handshake, but large enough that it is not easily broken (64 bytes is a perfect size for a single 512-bit RSA-encrypted block, for example). The Pre-Master Secret and the random data sent during the initial handshake messages are used to construct the Master Secret on both the client and server—it is generated on the client as soon as the Pre-Master Secret is created, and on the server after the public-key decryption is performed (thus revealing the Pre-Master secret to the server). The Master Secret is essentially a cryptographically secure hash of the other data that is always 48 bytes in length. The Master Secret is used to generate what is called the key material block, essentially an arbitrary-length expansion of the Master Secret from which the session keys are derived as seen in Figure 11.6.
Figure 11.6. Key material block from master secret

Generation of the key material block is done using a hash expansion algorithm that differs slightly between SSL version 3 and TLS (we will not cover what SSL version 2 does). In SSL version 3, the hash expansion is defined as part of the protocol. TLS uses a method called P_hash, which is composed of 2 hash algorithms, MD5 and SHA-1, and a hash wrapper called HMAC. HMAC, described in RFC 2104, provides a mechanism to add keying to hash functions. Essentially, both the SSL version 3 and TLS mechanisms are the same—the SSL version 3 mechanism is based on an early draft of HMAC. Both mechanisms do the same thing, which is to take the Master Secret and expand it into the arbitrary-length key material block. For typical SSL implementations, the key block is a little over 100 bytes, which requires 5 or 6 iterations of the key generation mechanism, the output of SHA-1 is 20 bytes (even with HMAC), so the algorithm strings several output strings together. The keys for HMAC (and the SSL version 3 mechanism) are part of the initial data from the Master Secret and serve to provide an additional level of security. Finally, the results of the expansion (using P_hash in TLS) are run through a final process that in TLS is called the pseudo-random function, or PRF. The result of the PRF operation is the final key material block.
The key material block represents the raw material of the session keys. Once the block is generated, the SSL/TLS protocol divides it up into pieces, each of which is used for a session key or other purpose. A general SSL session using a stream cipher will extract 2 MAC secrets, which are used to seed the integrity Message Authentication Codes (discussed below), and two session keys, one each for reading and writing. If a block cipher is used, the key block is further partitioned to produce two initialization vectors for the block cipher to use. You will notice that SSL generates two of everything, which is additional security precaution. It assumes that if one direction of communication (i.e. client to server) is broken by breaking the key, the other direction will still be relatively safe since it uses a separate key entirely. The same thought goes into the MAC secrets and the block cipher initialization vectors.
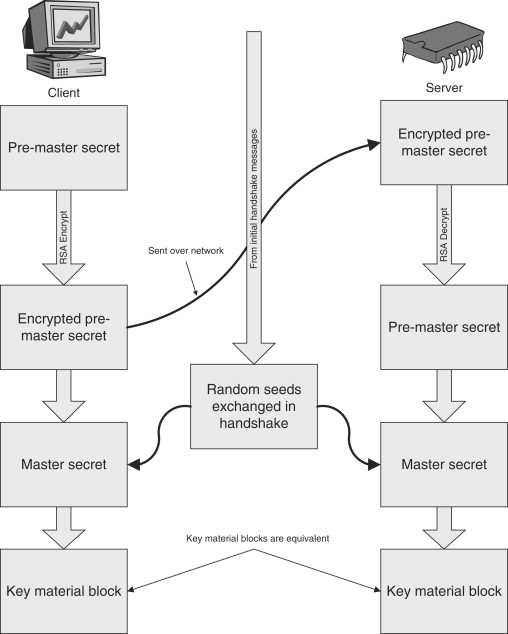
Now we go back to the handshake. The client has generated the keys and MAC secrets by the time the Pre-Master Secret is sent, so that it can immediately send its Change Cipher Spec message and begin the encrypted session by sending its Finished message to the server (the first message that is actually encrypted using the generated session keys). Upon receiving the public-key encrypted message from the client, the server generates the same key material and session keys from the Pre-Master Secret as the client as seen in Figure 11.7. This last point is key (pun intended)—even though the relatively small Pre-Master Secret is the only “secret” data shared by the server and client, they utilize identical methods to derive the same exact key material block, which is what allows them to communicate later. Once the server is done generating keys, it sends its own Change Cipher Spec message back to the client, indicating that it has generated its own session keys and is ready to initiate the secure session.
Figure 11.7. Simultaneous generation of keys on client and server
Finally, to close out the handshake process, the Finished messages are sent, one from the client, one from the server, as seen in Figure 11.8. The Finished message for both theclient and server contains a hash of all the previous handshake messages (note that the server hashes the client’s Finished message for inclusion in its own Finished hash). The message is the first to be encrypted using the newly generated session keys to avoid tampering. Both the client and server have a local hash of the handshake messages and the hash received in the other’s Finished messages. Comparing the local hash to the remote hash (after the messages are decrypted) provides a final check that the handshake was not corrupted or tampered with in any way. Assuming the hashes check out, at long last the encrypted session begins.
Figure 11.8. SSL handshake 3

11.5. The SSL Session
The handshake makes up the bulk of the SSL protocol, since it is the basis for all the security of the session. The session itself is fairly boring, since all that really happens is an encryption using the session keys derived during the handshake. One difference between a “regular” encrypted message and an SSL message (the SSL Record) is the use of a Message Authentication Code, or MAC, for verifying the integrity of messages. The MAC is a simple hash using an algorithm determined by the ciphersuite being used—a couple examples of hashes used are SHA-1 and MD5. The SSL MAC is slightly more than a hash of the data being sent, since it is actually seeded using the MAC secrets derived along with the session keys. The purpose of the MAC is simply to verify that the data in the SSL record was not compromised or tampered with, both things an attacker could do to disrupt communications without needing to break the actual encryption.
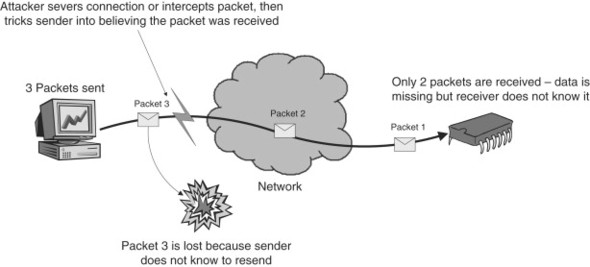
The session continues as long as both sides are willing to talk. At the end of the session, either the client or the server sends an alert to the other side to confirm that it is finished communicating. An SSL alert is simply an SSL record containing an encrypted message (again using the session keys) that usually indicates something abnormal has happened. In the case of the final alert, called close_notify, it is actually expected behavior and in fact it serves an important purpose. Without the final alert to confirm that communications are to be halted, an attacker could perform a truncation attack as seen in Figure 11.9, which basically means that not all of the data gets to its destination. This may not immediately seem like a major issue, but think of bank transactions—you probably wouldn’t be too happy if the last few deposits you made simply disappeared since no one knew to check for them. The close_notify alert allows both the server and client to verify that all information has safely made it to its destination.
Figure 11.9. Truncation attack
11.6. SSL in Practice
SSL is a fantastically successful protocol. Implemented in almost every web browser and web server, it provides the security backbone for the majority of Internet transactions. As the latest incarnation of SSL, TLS is being used even in other protocols as a fundamental building block for security in wireless and mobile applications. One reason for the success of SSL is the fact that it has an answer for just about every attack out there and provides multiple layers of redundant security, making it a robust and provably safe protocol. Another reason SSL is so widely implemented is that the protocol is flexible—it defines how cryptography should work together to provide security without actually defining what “cryptography” should be. Even the key generation, which uses standard hash algorithms, can be changed if needed.