
Chapter 20. Implementing Basic Wireless Security
20.1. Introduction
This chapter looks at how to configure the basic security settings on the four most popular access points currently deployed for wireless home use (Linksys WAP11, BEFW11SR, and WRT54G, and the D-Link DI-624). It covers the practical steps for implementing wireless security for home systems.
There are four very simple steps that are sufficient for most home users:
- Use a unique Service Set Identifier (SSID).
- Disable SSID broadcast.
- Enable Wired Equivalent Privacy (WEP) encryption.
- Filter access by Media Access Control (MAC) address.
20.2. Enabling Security Features on a Linksys WAP11 802.11 b Access Point
The Linksys Wireless Access Point (WAP) 11 802.11b access point was one of the first access points deployed by a large number of people. The WAP11 was the wireless access point many users purchased that already had a home network with a router set up. The WAP11 requires a separate router in order to allow access to any non-wireless devices, to include Internet access. This section details the minimum steps you should take to configure the WAP11 securely. All of the steps outlined in this section should be done from a computer that is connected to your wired network. This is because as you make changes the access point will need to reset. When the access point resets, you will likely lose your wireless connection momentarily.
20.2.1. Setting a Unique SSID
The first step you need to take is to set a unique SSID for your access point. When you log in to your access point, by default there is no username assigned to the WAP11 and the password is admin. This brings up the initial setup screen (Figure 20.1).
Figure 20.1. The Linksys WAP11 initial setup screen

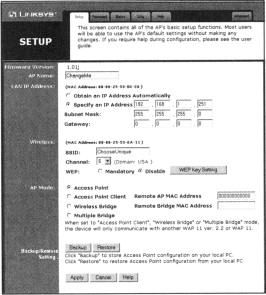
In the AP Name field, choose a name for your access point. This is NOT the SSID, but it is prudent to set this to a unique name. Many access points are named after the address of the owner or the company name, making them easier for an attacker to target. Next, replace “Linksys” with a unique SSID. This can be anything that you want, though it is not a good idea to use your address, phone number, social security number, or any other information that identifies you specifically. Figure 20.2 depicts the setup screen after a unique AP Name and SSID have been chosen.
Figure 20.2. A unique AP name and SSID are set
Once these are set, click Apply and your changes are stored. Setting a unique SSID is a good first step for practicing security, but without taking additional steps it is relatively useless. A unique SSID will contain a combination of upper- and lowercase letters, numbers, and special characters. Additionally, using nonprintable characters will cause some WarDriving applications to crash or identify the SSID incorrectly.
20.2.2. Disabling SSID Broadcast
After you have set a unique SSID on your access point, the next step is to disable the SSID broadcast. By default, access points transmit a beacon to let wireless users know that they are there. Active scanners such as NetStumbler rely on this beacon to find access points. By disabling the SSID broadcast, you have effectively placed your access point in stealth, also known as cloaked, mode.
To disable the SSID broadcast, first click the Advanced tab on the initial setup screen. This will take you to the screen shown in Figure 20.3.
Figure 20.3. The advanced settings
Next, click the Wireless tab to bring up the advanced wireless settings, as shown in Figure 20.4.
Figure 20.4. The advanced wireless settings

Select the Disable radio button, and then click Apply to save your settings. Passive scanners, such as Kismet and AirSnort, have the ability to detect cloaked access points, but disabling SSID broadcast is one more step toward an effective overall security posture.
20.2.3. Enabling WEP
After you have set a unique SSID and disabled SSID broadcast, the next step is to enable WEP encryption. The flaws associated with WEP have been widely publicized and discussed. Inasmuch, because it is possible to crack WEP keys, you should not rely on WEP alone, but use WEP as a part of your overall security posture.
Although WEP is flawed, actually cracking the WEP key is not a simple process on a home network, for two primary reasons.
- The amount of traffic that must be generated in order to successfully crack the WEP key.
- Vendors have taken steps to eliminate or reduce the number of Weak Initialization Vectors (IVs) that are transmitted.
It usually requires at least 1200 Weak IVs to be collected before a WEP key is cracked. On a home network it can take days, weeks, or even months to generate enough traffic to capture that many Weak IVs. It is highly unlikely that an attacker will invest that amount of time into attacking a simple home network, especially when there are so many networks that don’t have WEP enabled.
Many vendors have also developed firmware upgrades that reduce or eliminate the number of Weak IVs that are generated. This further increases the amount of time it takes to successfully crack a WEP key.
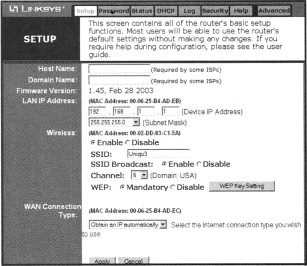
To enable WEP on the Linksys WAP11, on the main setup screen select the Mandatory radio button, as shown in Figure 20.5.
Figure 20.5. Making WEP mandatory on the Linksys WAP11

Next, click WEP Key Setting to open the WEP Key Setting window, as shown in Figure 20.6.
Figure 20.6. The WEP key setting window
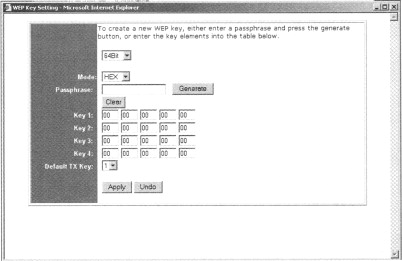
In the WEP Key Setting window, change 64Bit to 128Bit in the drop-down box (as shown in Figure 20.7) to require 128-bit WEP keys. As the number of bits implies, 128-bit WEP provides a stronger, harder to crack key than 64-bit.
Figure 20.7. Select 128-bit WEP
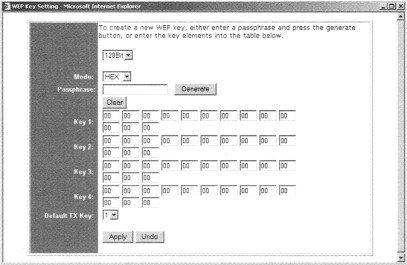
Leave the Mode set to HEX and choose a strong passphrase to generate your keys. A strong passphrase consists of a combination of upper- and lowercase letters, numbers, and special characters. Once chosen, enter your passphrase in the Passphrase text box and click Generate. This will create four WEP keys. See Figure 20.8.
Figure 20.8. Generating WEP keys
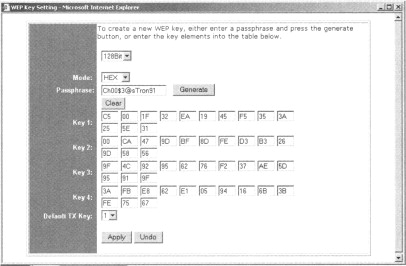
Since four keys are generated, you need to decide which one your client should use. Set the Default TX Key to the number (1–4) that you want to use on your network. Once you have generated your WEP keys and chosen the key to transmit, click Apply to save your settings.
Information on configuring your client software is provided later in the “Configuring Security Features on Wireless Clients” section of this chapter.
20.3. Filtering by Media Access Control (MAC) Address
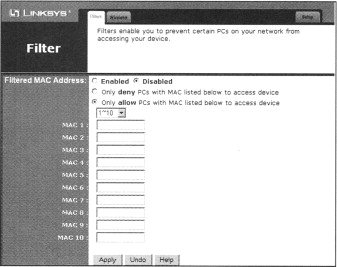
Once you have set a unique SSID, disabled SSID broadcast, and required the use of WEP encryption, you should take at least one more step: filtering by Media Access Control (MAC) address. To enable MAC address filtering on the Linksys WAP11, from the main setup screen click the Advanced tab to display the Advanced wireless settings (Figure 20.9). Click the Enabled radio button to enable MAC address filtering. Next, select the radio button for Only Allow PCs With MAC Listed Below To Access Device. Finally, in the text boxes labeled MAC 1 thru MAC 10, list the MAC addresses of any wireless clients that are allowed to access your wireless network. Click Apply to save and enable your settings. Instructions for finding the MAC address of your card are provided in the “Tools & Traps” sidebar in this chapter.
Tools & Traps…
Finding the Media Access Control (MAC) Address of Wireless Cards
Finding the Media Access Control (MAC) address of your wireless card is a simple process. The easiest way is to look at the back of the card itself, as every wireless card has a label on the back that provides information like: the FCC ID, the encryption standard that is supported, and the MAC address. Figure 20.10 shows this label.
Figure 20.10. Finding the MAC address on the card label
Windows 2000 and XP users can find the MAC address using the ipconfig/all command.
The Physical Address highlighted in Figure 20.11 is the MAC address for the wireless card. Linux users can determine the MAC address of their card using ifconfig <interface> command.
Figure 20.11. Using ipconfig/all in Windows to determine the MAC address
The highlighted HWaddr shown in Figure 20.12 is the MAC address of the wireless card.
Figure 20.12. Using ifconfig to determine the MAC address in Linux


Figure 20.9. Enable MAC address filtering

20.4. Enabling Security Features on a Linksys BEFW11 SR 802.11 b Access Point/Router
The most popular 802.11b access point currently deployed is the Linksys BEFW11SR Access Point/Router. The BEFW11SR gained popularity because it combined both a wireless access point and a wired router into one device. This section details the minimum steps you should take to configure the BEFW11SR securely. All of the steps outlined in this section should be done from a computer that is connected to your wired network. This is because, as you make changes, the access point will need to reset. When the access point resets, you will likely lose your wireless connection momentarily.
20.4.1. Setting a Unique SSID
The first step you need to take is to assign a unique SSID to your access point. When you log in, you’ll find, by default, that BEFW11SR has no username and the password is admin. This brings up the initial setup screen (see Figure 20.13).
Figure 20.13. The Linksys BEFW11SR initial setup screen

Next, enter a unique SSID in the SSID textbox, as shown in Figure 20.14.
Figure 20.14. Entering a unique SSlD
Finally, click the Apply button to save your new SSID.
20.4.2. Disabling SSID Broadcast
After you have assigned a unique SSID to your BEFW11SR, you should disable SSID broadcast. Disabling SSID broadcast prevents active wireless scanners like NetStumbler from finding your access point.
From the initial setup screen, select the Disable radio button next to SSID Broadcast. Next, click the Apply button to save your settings and disable SSID broadcast, as shown in Figure 20.15.
Figure 20.15. Disable SSID broadcast on the Linksys BEFW11SR

20.4.3. Enabling WEP
Once you have set a unique SSID and disabled SSID broadcast, the next security measure you should enable is WEP encryption. On the initial setup screen, select the Mandatory radio button next to WEP, as shown in Figure 20.16.
Figure 20.16. Select the mandatory radio button

Next, click the WEP Key Setting button to open the WEP Key Setting window. Enter a strong passphrase in the Passphrase textbox and click the Generate button. This generates a WEP key for your network, as shown in Figure 20.17.
Figure 20.17. Generate a WEP key

Next, click the Apply button to save your settings. You also need to configure any wireless clients that use the BEFWllSR with the same WEP key. Instructions for setting up wireless clients are presented in the “Configuring Security Features on Wireless Clients” section later in this chapter.
20.4.4. Filtering by Media Access Control (MAC) Address
After you have set a unique SSID, disabled SSID broadcast, and enabled WEP, your next step is to filter by Media Access Control (MAC) address. Filtering by MAC address allows only wireless clients with pre-determined MAC addresses to connect to the access point.
From the initial setup screen, click the Advanced tab. This brings up the advanced settings window. Next, click the Wireless tab to open the advanced wireless settings window, as shown in Figure 20.18.
Figure 20.18. The advanced wireless settings window

Select the Enable radio button next to Station MAC Filter, as shown in Figure 20.19.
Figure 20.19. Enable Station MAC filter

Then, click the Edit MAC Filter Setting button to open the Wireless Group MAC Table window, shown in Figure 20.20.
Figure 20.20. The wireless group MAC table window

Next, enter the MAC addresses of the clients that are allowed to access your wireless network in the MAC Address textboxes and select the Filter checkbox next to each of them, as shown in Figure 20.21.
Figure 20.21. Enter allowed MAC addresses

Finally, click the Apply button on the Wireless Group MAC Table window, the Advanced Wireless Settings window, and the initial setup screen to save your settings.
20.5. Enabling Security Features on a Linksys WRT54G 802.1 lb/g Access Point/Router
The most popular 802.11g device is the Linksys WR.T54G 802.11b/g Access Point/Router. The WRT54G gained popularity in 2003 as 802.11g devices became more common and affordable. 802.11g devices operate on the 2.4 GHz band, like 802.11b, but offer speeds up to 54 megabits per second (Mbps). Additionally, 802.1 lg devices are compatible with 802.1 l b cards. This section details the minimum steps you should take to configure the WRT54G securely. All of the steps outlined in this section should be done from a computer that is connected to your wired network.
20.5.1. Setting a Unique SSID
The first security measure you should enable on the Linksys WRT54G is setting a Unique SSID. When you log in to the WRT54G, by default, there is no username required and the password is admin. This brings up the initial setup screen (see Figure 20.22).
Figure 20.22. The Linksys WRT54G initial setup screen

In the SSID textbox, enter a unique SSID, as shown in Figure 20.23.
Figure 20.23. Setting a unique SSID on the WRT54G

Then, click the Apply button to save your settings.
20.5.2. Disabling SSlD Broadcast
After you have set a unique SSID, disable the SSID broadcast. From the initial setup screen, select Disable from the SSID Broadcast drop-down box, as shown in Figure 20.24.
Figure 20.24. Disable SSID broadcast
Then, click the Apply button to save your settings and disable SSID broadcast.
20.5.3. Enabling WEP
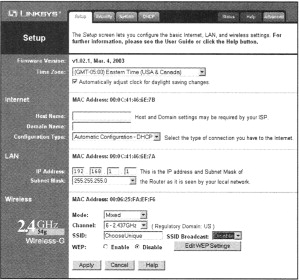
Once you have set a unique SSID and disabled SSID broadcast, you need to require the use of 128-bit WEP encryption. From the initial setup screen, choose the Enable radio button next to WEP to require WEP encryption, as shown in Figure 20.25.
Figure 20.25. Enable WEP on the WRT54G

Next, click the Edit WEP Settings button, opening the WEP Keys window. Select 128 bits 26 hex digits from the WEP Encryption drop-down box to require 128-bit WEE Type a strong passphrase in the Passphrase textbox. This is the passphrase that will be used as the basis for generating WEP keys. Click the Generate button to generate four WEP keys, as shown in Figure 20.26.
Figure 20.26. The WEP keys window

Next, select the key (1–4) that you will initially use by choosing the appropriate radio button next to Default Transmit Key. Finally, click Apply on both the WEP Keys window and the initial setup screen to save your settings.
20.5.4. Filtering by Media Access Control (MAC) Address
After you have set a unique SSID, disabled SSID broadcast, and enabled WEP encryption, you need to filter access to the WRT54G by MAC address.
First, from the initial setup screen click the Advanced tab to display the Advanced Wireless screen (see Figure 20.27).
Figure 20.27. The advanced wireless screen
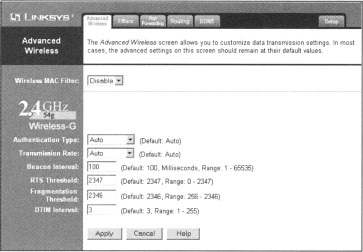
Next, select Enable from the Wireless MAC Filter drop-down box. This will reveal the MAC filter options, as shown in Figure 20.28.
Figure 20.28. The wireless MAC filter options

Choose the Permit Only PCs Listed Below To Access The Wireless Network radio button, and click the Edit MAC Filter List button to display the MAC Address Filter List window (see Figure 20.29).
Figure 20.29. The MAC address filter list window

Enter the MAC addresses of wireless clients that are allowed to access your wireless network in the provided textboxes and then click Apply, as shown in Figure 20.30.
Figure 20.30. Enter allowed MAC addresses
Finally, click Apply in the Advanced Wireless window to save your settings and enable filtering by MAC address.
20.6. Enabling Security Features on a D-Link DI-624 AirPlus 2.4 GHz Xtreme G Wireless Router with 4-Port Switch
Although Linksys has a sizable share of the home access point market, D-Link also has a large market share. D-Link products are also sold at most big computer and electronics stores such as Best Buy and CompUSA. This section details the steps you need to take to enable the security features on the D-Link 624 AirPlus 2.4 GHz Xtreme G Wireless Router with 4-Port Switch. The DI-624 is an 802.11g access point with a built-in router and switch similar in function to the Linksys WRT54G.
20.6.1. Setting a Unique SSID
The first security measure to enable on the D-Link DI-624 is setting a unique SSID.
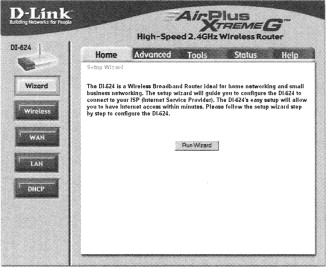
First, you need to log into the access point. Point your browser to 192.168.0.1. Use the username admin with a blank password to access the initial setup screen (see Figure 20.31).
Figure 20.31. The D-Link DI-624 initial setup screen
Next, click the Wireless button on the left side of the screen to bring up the Wireless Settings screen, as shown in Figure 20.32.
Figure 20.32. The wireless settings screen
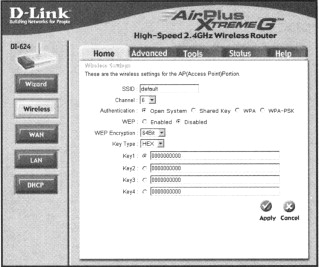
In the SSID textbox, enter a unique SSID, as shown in Figure 20.33, and click Apply to save and enable the new SSID.
Figure 20.33. Set a unique SSID

20.6.2. Enabling Wired Equivalent Privacy
After you have set a unique SSID, you will need to enable 128-bit WEP encryption.
First, choose the Enabled radio button next to WEP, as shown in Figure 20.34.
Figure 20.34. Enable WEP

Next, choose 128Bit from the WEP Encryption drop-down box, as shown in Figure 20.35.
Figure 20.35. Require 128-Bit WEP encryption

Then, you will need to assign a 26-character hexadecimal number to at least Key1 (see Figure 20.36). A 26-digit hexadecimal number can contain the letters A–F and the numbers 0–9.
Figure 20.36. Assign WEP keys

Finally, after you have assigned your WEP keys, click Apply to save your settings. Any wireless clients that connect to the DI-624 must be configured to use this WEP key.
20.6.3. Filtering by Media Access Control (MAC) Address
After you have set a unique SSID and enabled 128-bit WEP encryption, you should filter access to the wireless network by MAC address.
First, click the Advanced tab, as shown in Figure 20.37.
Figure 20.37. The advanced options screen

Next, click the Filters button on the left side of the screen, as shown in Figure 20.38.
Figure 20.38. The advanced filters options

Then choose the MAC Filters radio button. This makes the MAC Filtering options visible, as shown in Figure 20.39.
Figure 20.39. The MAC filtering options

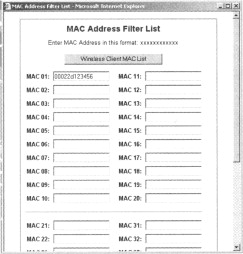
Finally, select the Only Allow Computers With MAC Address Listed Below To Access The Network radio button and enter the MAC address of each client card that is allowed to access the network. You must also enter a descriptive name, of your choice, for each client in the Name textbox (see Figure 20.40). Note that you must click Apply after each MAC address entered.
Figure 20.40. Filter by MAC address

20.6.4. Disabling SSID Broadcast
After you have set a unique SSID, enabled 128-bit WEP, and filtered access by MAC address, you need to disable SSID broadcast.
From the Advanced Features screen, click the Performance button, as shown in Figure 20.41.
Figure 20.41. The advanced performance options
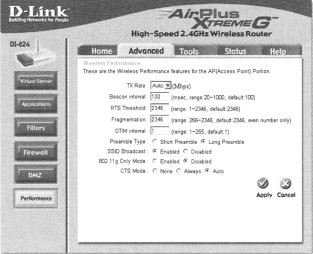
Select the Disabled radio button next to SSID Broadcast and click Apply to save your settings, as shown in Figure 20.42.
Figure 20.42. Disabling SSID broadcast

20.7. Configuring Security Features on Wireless Clients
After you have configured your access points to utilize security features, you will then need to configure each wireless client to work with your access points. This means that each wireless client needs to be configured with the correct SSID and have the appropriate WEP key entered and selected.
20.7.1. Configuring Windows XP Clients
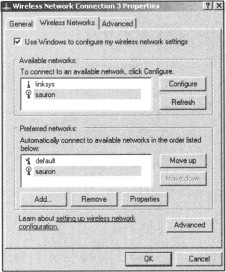
For Windows XP Clients, double-click the Wireless Network Connections icon on the taskbar to bring up the Wireless Network Connection Properties window (see Figure 20.43).
Figure 20.43. The Windows XP wireless network connection properties window
Next, click the Add button to add a new preferred network. Enter the SSID of your network in the SSID textbox, and un-check The Key Is Provided For Me Automatically. Then, enter the WEP key for your wireless network in the Network Key and Confirm Network Key textboxes, as shown in Figure 20.44.
Figure 20.44. Configuring Windows XP clients for use
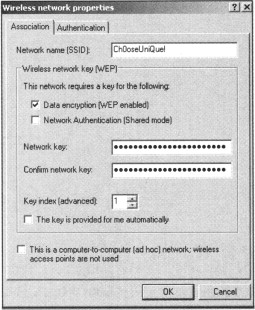
Finally, choose the appropriate key index (1–4) and click OK. If your settings are correct, you will be connected to your access point.
20.7.2. Configuring Windows 2000 Clients
Unlike Windows XP, with Windows 2000 you will need to configure the wireless client software that came with your wireless card. The examples shown in this section are for the ORINOCO client manager. The exact steps for other client managers may differ, but the basic idea is the same.
- Create a wireless profile for your access point.
- Enter the SSID of your access point.
- Enter the WEP key for your wireless network.
To create a wireless profile for your access point, double-click the client manager icon on the taskbar to open the Client Manager. Choose Actions | Add/Edit Configuration Profile to open the Add/Edit Configuration Profile window, as shown in Figure 20.45. Select the radio button next to a blank profile and enter the name of the profile.
Figure 20.45. The configuration profiles

Next, click the Edit Profile button. On the Basic screen, enter the SSID of your access point in the Network Name textbox. Then, click the Encryption tab, as shown in Figure 20.46. Choose the Use Hexadecimal radio button and enter your WEP keys (1–4).
Figure 20.46. Entering the WEP key
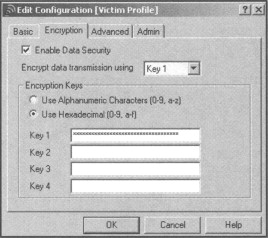
Finally, click OK to save your settings. Your wireless client is now configured for use with your access point.
20.7.3. Configuring Linux Clients
Configuring wireless clients for use with your network after security features have been enabled is a simple two-step process.
- Edit the /etc/pcmcia/wirless.opts.
- Restart PCMCIA services or reboot.
First, you need to edit the /etc/pcmcia/wireless.opts file (see Figure 20.47).
Figure 20.47. Editing the wireless.opts file

Ensure that the four lines starting with the line that reads START SECTION TO REMOVE have been commented out by placing a pound sign (#) in front of each, as shown in Figure 20.48.
Figure 20.48. Commenting lines out of the wireless.opts file

Next, find the appropriate section for your wireless card. Enter the SSID your access point uses in the ESSID section. Then, enter the WEP key for your wireless network in the KEY section, as shown in Figure 20.49, and save your changes.
Figure 20.49. Entering the SSID and WEP key

Before your settings take effect, you need to restart the Personal Computer Memory Card International Association (PCMCIA) services. The method for restarting PCMCIA services varies and depends on the Linux distribution you are using. In Slackware, Linux PCMCIA services are restarted by issuing the following command:
- root@roamer: ~# /etc/rc.d/rc/pcmcia restart
If you are unsure how to restart PCMCIA services on your distribution, you can reboot. When the system restarts, your settings will take effect.
Notes from the Underground…
Enabling Security Features on the Xbox
Many Xbox owners like to take advantage of the Xbox Live feature. Xbox Live allows gamers to connect their Xbox to the Internet and play selected games against online opponents. Since the Xbox is often connected to a TV that isn’t necessarily in the same room with most of the household computer equipment, wireless networking is a natural choice for this connection.
There are several wireless bridges (like the Linksys WET Wireless Ethernet Bridge) available that will connect the Xbox to a home network. These devices must be configured to use the wireless network’s security features.
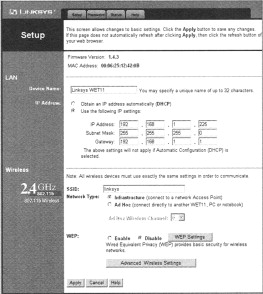
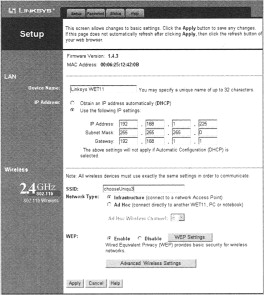
First, log in to the WET 11. By default, the WET 11 is configured to use the IP address 192.168.1.251 (see Figure 20.50).
Figure 20.50. The Linksys WET 11 initial setup screen
Enter the SSID for your wireless network in the SSID textbox, and then select the Enable radio button next to WEP (see Figure 20.51).
Figure 20.51. Set the SSID and enable WEP
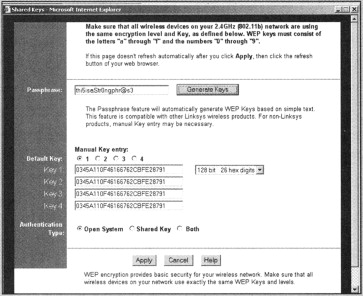
Click WEP Settings button to open the Shared Keys window (see Figure 20.52). Select 128 bit 26 hex digits from the drop-down box and then enter the WEP keys that your wireless network uses. The WEP keys can be entered in either of two ways:
- Generate the keys using the same passphrase used to generate the keys on your access point.
- Manually enter the WEP keys that your access point uses.
Figure 20.52. Enter the WEP keys
Next, click the Apply button on the Shared Keys window and the initial setup to save your settings. Finally, add the MAC address of your WET 11 to your allowed MAC address list on your access point.
20.8. Summary
Regardless of the particular brand or model of access point that you choose for your home network, by default it is set up very insecurely. At a minimum, four basic security measures should be enabled:
- Change the default Service Set Identifier (SSID).
- Disable the SSID broadcast.
- Enable 128-Bit Wired Equivalent Privacy (WEP) encryption.
- Filter by Media Access Control (MAC) address.
These steps are enough in most cases to protect low-traffic wireless networks used at home. It is important to use all four of these measures in order to deploy your wireless network using a layered security approach. While it is true that no network is completely secure, enabling these security measures on your wireless network reduces the risk of becoming an easy target and increases the likelihood that a prospective attacker will move on to a wireless network that does not employ the same precautions.
20.9. Solutions Fast Track
20.9.1. Enabling Security Features on a Linksys WAP11 802.11b AP, Linksys BEFW11SR 802.11b AP/Router, WRT54G 802.11b/g AP/Router, and D-Link DI-624 AirPlus 2.4 GHz Xtreme G Wireless Router with 4-Port Switch
These have been consolidated because they are the recommendations for securing any AP/router and are not specific to a particular hardware.
- Assigning a unique SSID to your wireless network is the first security measure that you should take. Any attacker with a “default” configuration profile is able to associate with an access point that has a default SSID. While assigning a unique SSID in and of itself doesn’t offer much protection, it is one layer in your -wireless defense.
- Many attackers use active wireless scanners to discover target wireless networks. Active scanners rely on the access point beacon to locate it. This beacon broadcasts the SSID to any device that requests it. Disabling SSID broadcast makes your access point “invisible” to active scanners. Because your access point can still be discovered by passive wireless scanners, this step should be used in conjunction with other security measures.
- Wired Equivalent Privacy (WEP) encryption, at a minimum, should be used on your home wireless network. Although there are tools available that make it possible to crack WEP, the amount of traffic that needs to be generated make it unlikely an attacker will take the time to do so on a home, or low-traffic, network. Adequate security for these networks is provided by 128-bit WEP.
- Filtering by Media Access Control (MAC) address allows only wireless cards that you specifically designate to access your wireless network. Again, it is possible to spoof MAC addresses, therefore you shouldn’t rely on MAC address filtering exclusively. It should be part of your overall security posture.
- Each of the four security steps presented in this chapter can be defeated. Fortunately, for most home users they do provide adequate security for a wireless network. By enacting a four-layer security posture on your wireless network, you have made it more difficult for an attacker to gain access to your network. Because the likelihood of a strong “return” on the attacker’s time investment would be low, he is likely to move on to an easier target. Don’t allow your wireless network to be a target of convenience.
20.9.2. Configuring Security Features on Wireless Clients
Windows XP clients are configured using the Wireless Connection Properties and the Windows XP Wireless Client Manager. To associate with your access point once the security features have been enabled, your access point must be added as a Preferred Network. You need to enter the SSID and the WEP key during the configuration process.
Windows 2000 does not have a built-in wireless client manager like Windows XP. You need to enter the SSID and WEP key into a profile in the client manager software that shipped with your wireless card.
Linux users need to configure the /etc/pcmcia/wireless.opts file in order to access a wireless network with the security features enabled. The SSID and WEP key need to be entered in the appropriate section of the /etc/pcmcia/wireless.opts file. Restarting PCMCIA services or rebooting allows these settings to take effect.