Chapter 5: Exploring Popular SEO Plugins
In This Chapter
![]() Using plugins for SEO best practices
Using plugins for SEO best practices
![]() Breaking down your SEO configuration options
Breaking down your SEO configuration options
![]() Generating sitemaps
Generating sitemaps
![]() Using redirect plugins
Using redirect plugins
![]() Adding breadcrumbs and pagination
Adding breadcrumbs and pagination
When you have the concepts of SEO down and the beginnings of your strategy properly mapped out, you can then install the tools you need. In this chapter, I go through some of the most popular SEO-related plugins. All these plugins have a good developer behind them and a good track record.
Several plugins in the WordPress plugin directory assist with SEO, so it’s hard to decide which ones to use. In Book VII, I cover plugins in detail, but in this chapter I provide you with the plugins that are the most common, as well as the ones that I use myself, because they are some of the more solid and reliable plugins available that bring good SEO results.
Exploring Must-Use Plugins for SEO Best Practices
Here are the plugins that this chapter covers:
![]() All in One SEO Pack: Gives you complete control of the search-engine optimization of your blog.
All in One SEO Pack: Gives you complete control of the search-engine optimization of your blog.
![]() Google XML Sitemaps: Generates an XML sitemap that’s sent to Google, Yahoo!, Bing, and Ask.com. When your site has a sitemap, site crawlers can more efficiently crawl your site. One of the added bonuses of the sitemap is that it notifies search engines every time you post.
Google XML Sitemaps: Generates an XML sitemap that’s sent to Google, Yahoo!, Bing, and Ask.com. When your site has a sitemap, site crawlers can more efficiently crawl your site. One of the added bonuses of the sitemap is that it notifies search engines every time you post.
![]() Redirection: Can help when you move from an old site to WordPress or when you want to change the URL structure of an established site. It allows you to manage 301 redirections (when the web address of a page has changed, a 301 redirect tells search engines where they can find the new web address of the page), track any 404 errors (errors that are displayed when you try to load a page that does not exist) that occur on the site, and manage any possible incorrect web address (URL) issues with your website.
Redirection: Can help when you move from an old site to WordPress or when you want to change the URL structure of an established site. It allows you to manage 301 redirections (when the web address of a page has changed, a 301 redirect tells search engines where they can find the new web address of the page), track any 404 errors (errors that are displayed when you try to load a page that does not exist) that occur on the site, and manage any possible incorrect web address (URL) issues with your website.
![]() Yoast Breadcrumbs: This plugin allows you to easily add breadcrumbs (covered in Chapter 4 of this minibook) to your site. On most sites, you just need to add a line of code to your template to make the breadcrumb navigation links display on your site.
Yoast Breadcrumbs: This plugin allows you to easily add breadcrumbs (covered in Chapter 4 of this minibook) to your site. On most sites, you just need to add a line of code to your template to make the breadcrumb navigation links display on your site.
![]() WP-PageNavi: To achieve pagination for your WordPress site, this plugin gives you the ability to display page links at the bottom of each archive page and/or category page.
WP-PageNavi: To achieve pagination for your WordPress site, this plugin gives you the ability to display page links at the bottom of each archive page and/or category page.
![]() Robots Meta: Using the Robots Meta plugin gives you the ability to control how your site is crawled by the search engines, allowing you to hide content that you don’t want to be noticed by search engine robots and to ensure that search engine crawlers see only what you want them to see. It helps eliminate duplicate content by preventing crawlers from indexing category, author, and tag pages so that the crawlers focus only on your main content. Also, this plugin allows you to easily add the verification tools from Yahoo! Site Explorer, Bing’s Webmaster Central, and Google’s Webmaster Tools. If you don’t want to edit your header, you can easily use this tool to add the various code that these search engines request you to use to verify your web page.
Robots Meta: Using the Robots Meta plugin gives you the ability to control how your site is crawled by the search engines, allowing you to hide content that you don’t want to be noticed by search engine robots and to ensure that search engine crawlers see only what you want them to see. It helps eliminate duplicate content by preventing crawlers from indexing category, author, and tag pages so that the crawlers focus only on your main content. Also, this plugin allows you to easily add the verification tools from Yahoo! Site Explorer, Bing’s Webmaster Central, and Google’s Webmaster Tools. If you don’t want to edit your header, you can easily use this tool to add the various code that these search engines request you to use to verify your web page.
All in One SEO Pack
The All in One SEO Pack plugin (http://wordpress.org/extend/plugins/all-in-one-seo-pack) makes everyone's life so much easier because it automates many SEO tasks for you. Out of all the plugins I cover, this one is an absolute must for your site. It gives you so much control over your search engine optimization, and it's very flexible.
This plugin breaks down each option on the configuration page, which allows you to preselect options right off the bat or make some changes to the plugin.
 Hover your mouse pointer over any of the plugin fields to find details on what each field is, along with inline help documentation.
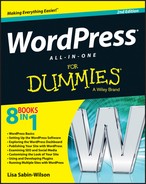
After you install this plugin on the All in One SEO Plugin Options page (check out Book VII, Chapter 2 for information on plugin installation), which you find when you click the All In One SEO link on the Settings menu on your Dashboard, scroll past the rows of advertisements that appear on this page and be sure that the Plugin Status radio button is set to Enabled, as shown in Figure 5-1. Below that radio button are three text boxes that you need to type information into:
![]() Home Title: Type the title of your website in this box. (This will be the same Site Title that you filled out in the General Settings page, as I discuss in Book III, Chapter 2.)
Home Title: Type the title of your website in this box. (This will be the same Site Title that you filled out in the General Settings page, as I discuss in Book III, Chapter 2.)
![]() Home Description: Type a description of your website in this box. (This will probably be the same as the Tagline that you filled out on the General Settings page, as I discuss in Book III, Chapter 2.)
Home Description: Type a description of your website in this box. (This will probably be the same as the Tagline that you filled out on the General Settings page, as I discuss in Book III, Chapter 2.)
![]() Home Keywords (comma separated): Type multiple keywords that describe your site, and separate them each by commas. For example, if my site is about country music, my Home Keywords might look like this: country music, guitar, southern, fiddle, Nashville.
Home Keywords (comma separated): Type multiple keywords that describe your site, and separate them each by commas. For example, if my site is about country music, my Home Keywords might look like this: country music, guitar, southern, fiddle, Nashville.
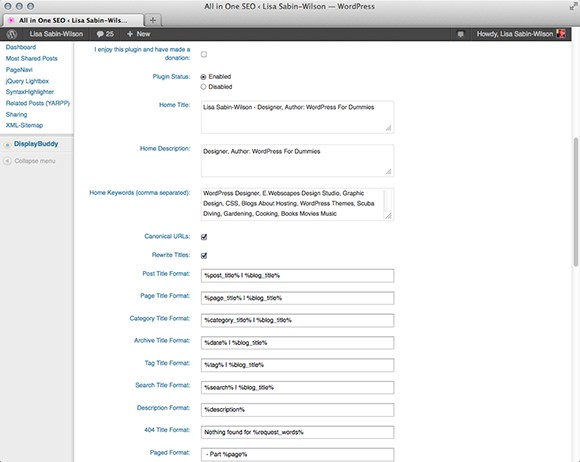
Figure 5-1: The All in One SEO Pack configura-tion page.
The Canonical URLs check box appears below the text boxes. It is selected by default, and you should keep that default setting in place because canonical URLs assist with SEO by giving the search engines a definitive source URL for pages on your website. For example, when Google crawls a web page, it sees the following four URLs:
![]()
www.example.com
![]()
example.com
![]()
www.example.com/index.html
![]()
example.com/home.asp
Although you may think that all these URLs are the same; technically, they’re all different. In the canonicalization process, Google chooses which one of those URLs best represents your site from that group. When selecting to use canonical URLs in the All In One SEO plugin, you’re telling Google which URL you want them to choose.
Most of the remaining options that are selected, by default, should work fine for your site. However, you should select the Use No Index for Archives and Use No Index for Tag Archives check boxes to make sure that the search engines are not indexing your archives pages, which would provide the search engines with duplicate content that they have already indexed.
After you make all your selections, click the Update Options button at the bottom of the page.
You can use the All in One SEO Pack right out of the box, without changing any of the default options that are already set for you: If you aren’t confident in fine-tuning it, you don’t have to do it. But don’t forget to put in the proper information for your home page on the Options page of the plugin; this includes your home page title, description, and keywords.
Google XML Sitemaps for WordPress
You can use XML Sitemaps (http://wordpress.org/extend/plugins/google-sitemap-generator) right out of the box with very little configuration. After you install it, you do need to tell the plugin to create your sitemap for the first time. You can accomplish this easy task by following these steps:
1. Click the XML-Sitemap link on the Settings menu on your Dashboard.
The XML Site Generator for WordPress options page appears in your browser window. (See Figure 5-2.)
2. Locate the top module titled The Sitemap Wasn’t Generated Yet.
3. Click the link labeled Click Here To Tell the Plugin to Build Your Sitemap.
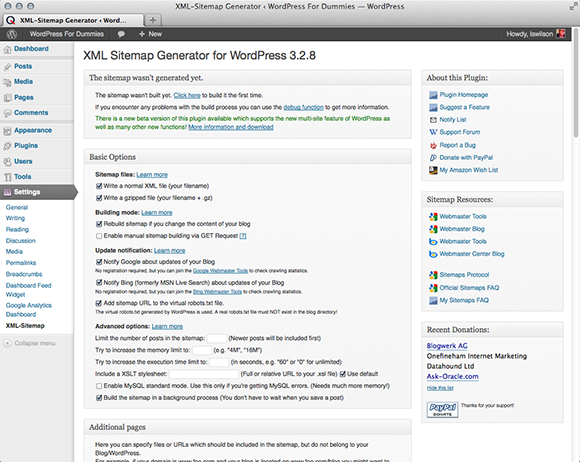
Figure 5-2: XML Sitemap Generator for WordPress settings.
The XML Site Generator for WordPress page refreshes and the This Sitemap Wasn’t Generated Yet module is replaced with the Result of the Last Build Process module, and the date your sitemap was last generated is displayed.
4. (Optional) View your sitemap in your browser.
Click the first sitemap link in the top module, or you can visit the following address: http://yourdomain.com/sitemap.xml (where yourdomain.com is your actual domain).
You never need to visit your sitemap, or maintain it. The XML Sitemap Generator maintains the file for you. Every time you publish a new post or page on your website, the plugin automatically updates your sitemap with the information and notifies major search engines, like Google, Bing, and Ask.com that you have updated your site with new content. Basically, the plugin sends an invitation to the search engines to come to your site and index your new content in their search engines.
Having a Google Webmaster account is also something you can do to further assist Google in finding and indexing new content on your site. If you don't already have one, you can sign up for one at Google.com. (Visit www.google.com, click the Sign In link at the top right, and then click the Create an Account Now link and follow the steps to create a new Google account.) After you sign in to your Google Account, you can set up the Google Webmaster tools and add your sitemap to Google.
In the Basic Options section of the XML Sitemap Generator for WordPress plugin page (see Figure 5-2), select every check box you see there except for the Enable Manual Sitemap Building via GET Request, Enable MySQL Standard Mode, and Use This Only If You're Getting MySQL Errors options. Those options are not necessary unless you're experiencing errors with the plugin — in which case, you should contact the plugin developer and report the problems. (Contact information for the plugin developer is available on the plugin page in the WordPress plugin directory. For this plugin, you can find the page here: http://wordpress.org/extend/plugins/google-sitemap-generator.)
All the other default settings are fine for you to use, so leave those as they are. In the Sitemap Content section, select the following check boxes: Include Homepage, Include Posts, Include Static Pages, Include Categories, and Include the Last Mortification Time. Making these selections allows for your site to get crawled by the search engines the most efficient way.
Redirection
If you're redoing the URL (permalink) structure of your site or moving a site to WordPress from another blogging platform, such as Blogger or TypePad, you really need to use the Redirection plugin (http://wordpress.org/extend/plugins/redirection). Redirection allows you to maintain the links that are currently coming into your site by rerouting (or redirecting) people coming in through search engines and other existing links going to the new permalink. If you change URLs, you need to reroute/redirect old links to maintain the integrity of incoming traffic from websites and search engines that are still using the old page URL.
Using Redirection is a pretty simple process: Put the old URL in the Source URL text box, put the new URL in the Target URL text box, and then click the Add Redirection button. (See Figure 5-3.)

Figure 5-3: The Redirection plugin allows you to redirect traffic from your old URL.
Yoast Breadcrumbs
Yoast Breadcrumbs (http://wordpress.org/extend/plugins/breadcrumbs/) adds navigation breadcrumbs (covered in Chapter 4 of this minibook) to your site. Although you can install and activate the plugin like any other plugin, you need to go through a few extra steps to get the breadcrumbs to show up on your page. For most standard WordPress themes, you need to add the following code into the template where you want the plugin to appear (see Book VI if you need assistance with editing template files):
<?php if ( function_exists('yoast_breadcrumb') ) {
yoast_breadcrumb('<p id="breadcrumbs">','</p>'),
} ?>
WP-PageNavi
To create page navigation links underneath your blog posts and archive listings for sites that have numbered pages, you need to install the WP-PageNavi plugin (http://wordpress.org/extend/plugins/wp-pagenavi). (See the settings in Figure 5-4.) This plugin provides a better user experience for your readers by making it easier for them to navigate through your content, and allowing search engines to easily go through your web page and index your pages and posts. After you install and activate the plugin, you need to insert the following code into your Main Index template (index.php):
<?php wp_pagenavi(); ?>
 The
The wp_pagenavi(); template tag needs to be added on a line directly after The Loop. Go to Book VI, Chapter 3 for extensive discussion of The Loop in the Main Index template file to find out where, exactly, you need to add this line of code.
Installing this code gives you the lower navigation. You can experiment with where you want to place the wp_pagenavi() code in your template file to give you the type and look and feel you want. Additionally, you can control the look of the plugin by providing styling in your CSS (style.css) theme file for the WP-PageNavi plugin display, or you can have the plugin insert its default CSS into your regular CSS by deselecting the Use Pagenavi.css? option.
Figure 5-4: Adjust the WP-PageNavi settings.
Robots Meta
Similar to the All in One SEO Pack plugin (see "All in One SEO Pack," earlier in this chapter), the Robots Meta plugin (http://wordpress.org/extend/plugins/robots-meta) gives you a breakdown of each menu option and the impact that it has on your site. This plugin, however, isn't ready to go out of the box, like many of the other plugins in this chapter. To use it, you need to consider how your SEO works on your site and what content you want the search engines to index. If you want to base your search results on your categories (which is a good approach if you have a lot of content in categories based off popular keywords), make sure that robots don't scroll your subpages.
I can’t offer any recommendations for setting up this plugin — the choices are too specific to you and your site needs. (See Figure 5-5.) Just go through and think about each choice and how it pertains to your blog and configure the settings that you feel work best for your website.
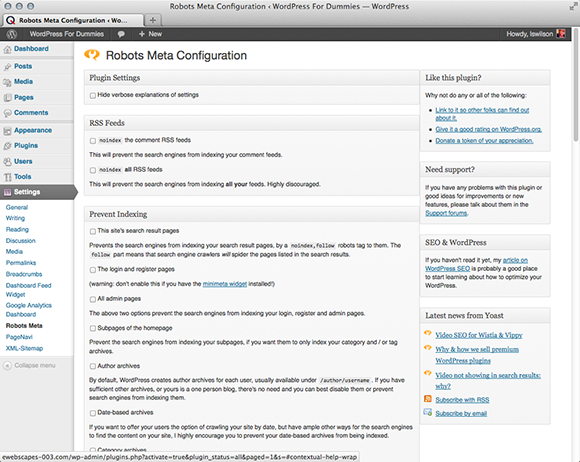
Figure 5-5: Handling the Robots Meta configura-tion.