Chapter 3: Exploring the Anatomy of a Theme
In This Chapter
![]() Examining the theme’s stylesheet
Examining the theme’s stylesheet
![]() Exploring template tags
Exploring template tags
![]() Making widget areas
Making widget areas
![]() Understanding the main template files
Understanding the main template files
This chapter breaks down the parts that make up your WordPress theme. Understanding your theme allows you greater flexibility when you customize it. Many of the problems people encounter with themes, such as not knowing which files edit certain functions of a site, comes from lack of understanding all the pieces.
There are those who like to get their hands dirty (present company included!). If you’re one of them, you need to read this chapter. WordPress users who create their own themes do so in the interest of
![]() Individuality: Having a theme that no one else has. (If you use one of the free themes, you can pretty much count on the fact that at least a dozen other WordPress blogs have the same look as yours.)
Individuality: Having a theme that no one else has. (If you use one of the free themes, you can pretty much count on the fact that at least a dozen other WordPress blogs have the same look as yours.)
![]() Creativity: Displaying your own personal flair and style.
Creativity: Displaying your own personal flair and style.
![]() Control: Having full control of how the blog looks, acts, and delivers your content.
Control: Having full control of how the blog looks, acts, and delivers your content.
Perhaps you aren’t at all interested in creating your own templates for your WordPress blog, however. Sometimes, it’s just easier to leave matters to the professionals and to hire an experienced WordPress theme developer to create a custom look for your WordPress website or to use one of the thousands of free themes provided by WordPress designers. (See Chapter 2 of this minibook.)
Creating themes does require you to step into the code of the templates, which can be a scary place sometimes — especially if you don’t really know what you’re looking at. A good place to start is understanding the structure of a WordPress blog. Separately, the parts won’t do you any good. But when you put them together, the real magic begins! This chapter covers the basics of doing just that, and near the end of the chapter, you find specific steps to put your own theme together.
 You don’t need to know HTML to use WordPress. If you plan to create and design WordPress themes, however, you need some basic knowledge of HTML and Cascading Style Sheets (CSS). For assistance with HTML, check out HTML 5 Quick Reference For Dummies, by Andy Harris, or HTML, XHTML, and CSS Bible, by Steven M. Schafer.
Starting with the Basics
A WordPress theme is a collection of WordPress templates made up of WordPress template tags. When I refer to a WordPress theme, I’m talking about the group of templates that makes up the theme. When I talk about a WordPress template, I’m referring to only one of the template files that contain WordPress template tags. WordPress template tags make all the templates work together as a theme (more about this topic later in the chapter). These files include
![]() The theme's stylesheet: (
The theme's stylesheet: (style.css) The stylesheet provides the theme's name, as well as the CSS rules that apply to the theme. (Later in this chapter, I go into detail about how stylesheets work.)
![]() The main index template: (
The main index template: (index.php) The index file is the first file that will be loaded when a visitor comes to your site. It contains the HTML as well as any PHP code needed on your home page.
![]() An optional functions file: (
An optional functions file: (functions.php) This optional file is a place where you can add additional functionality to your site via PHP functions.
Template and functions files end with the .php extension. PHP is the scripting language used in WordPress, which your web server recognizes and interprets as such. (Book II, Chapter 3 covers additional details on the PHP language that you will find helpful.) These files contain more than just scripts, though. The PHP files also contain HTML, which is the basic markup language of web pages.
Within this set of PHP files is all the information your browser and web server need to make your website. Everything from the color of the background to the layout of the content is contained in this set of files.
 The difference between a template and a theme can cause confusion. Templates are individual files. Each template file provides the structure in which your content will display. A theme is a set of templates. The theme uses the templates to make the whole site.
Understanding where the WordPress theme files are located on your web server gives you the ability to find and edit them, as needed. You can view and edit WordPress theme files, using two different methods, by following these steps:
1. Connect to your web server via FTP, and have a look at the existing WordPress themes on your server.
The correct location is /wp-content/themes/. When you open this folder, you find the /twentytwelve theme folder.
If a theme is uploaded to any folder other than /wp-content/themes, it won't work.
2. Open the folder for the Twenty Twelve theme (/wp-content/themes/twentytwelve) and look at the template files inside.
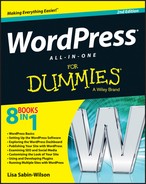
When you open the Twenty Twelve theme folder (see Figure 3-1), you see several files. At minimum, you find these five templates in the default theme:
• Stylesheet (style.css)
• Header template (header.php)
• Main Index (index.php)
• Sidebar template (sidebar.php)
• Footer template (footer.php)
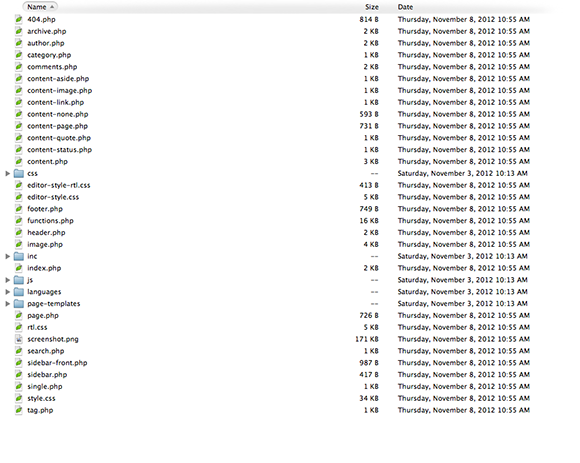
Figure 3-1: WordPress themes in the /wp-content/themes folder on your web server.
These files are the main WordPress template files, and I discuss them in more detail in this chapter. There are several template files, however, and you should try to explore all of them if you can. Take a peek inside and see the different template functions they contain. These filenames are the same in every WordPress theme.
3. Log in to your WordPress Dashboard in your web browser window and click the Editor link on the Appearance menu to look at the template files within a theme.
This page lists the various templates available within the active theme. (Figure 3-2 shows the templates in the default Twenty Twelve theme.) A text box on the left side of the screen displays the contents of each template, and this box is also where you can edit the template file(s). To view and edit a template file, click the template name in the list on the right side of the page.
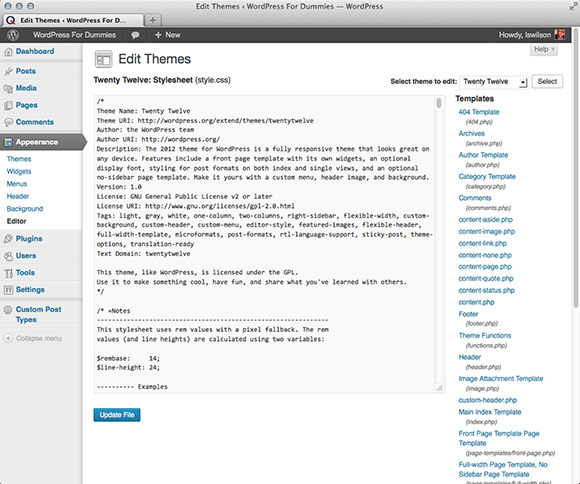
Figure 3-2: A list of templates available in the default Twenty Twelve WordPress theme.
The Edit Themes page also shows the template tags within the template file. These tags make all the magic happen in your blog; they connect all the templates to form a theme. The next section of this chapter discusses these template tags in detail, showing you what they mean and how they function.
When viewing a PHP file, click the Document drop-down list underneath the edit area on the right side of the screen to see all the template tags used in the template you’re currently viewing. This list is helpful when you edit templates, and it gives you some insight into some of the different template tags used to create functions and features within your WordPress theme.
Understanding the Stylesheet
Every WordPress theme includes a style.css file. A browser uses this file, commonly known as the stylesheet, to style the theme. Style can include text colors, background images, and the spacing between elements on the site. The stylesheet targets areas of the site to style by using CSS IDs and classes. CSS IDs and classes are simply means of naming a particular element of the site. IDs are used for elements that appear only once on a page, but classes can be used as many times as you need. Although this file references style, it contains much more information about the theme.
At the very beginning of the style.css file, a comment block known as the stylesheet header passes information about your theme to WordPress. Comments are code statements included only for programmers, developers, and any others who read the code. Computers ignore comment statements entirely, but WordPress uses the stylesheet header to get information about your theme. In CSS, comments always begin with a forward slash (/) followed by a star (*), and end with a star followed by a forward slash (*/). The following code shows an example of the stylesheet header for the Twenty Twelve theme:
/*
Theme Name: Twenty Twelve
Theme URI: http://wordpress.org/extend/themes/twentytwelve
Author: the WordPress team
Author URI: http://wordpress.org/
Description: The 2012 theme for WordPress is a fully responsive theme that looks great on any device. Features include a front page template with its own widgets, an optional display font, styling for post formats on both index and single views, and an optional no-sidebar page template. Make it yours with a custom menu, header image, and background.
Version: 1.0
License: GNU General Public License v2 or later
License URI: http://www.gnu.org/licenses/gpl-2.0.html
Tags: light, gray, white, one-column, two-columns, right-sidebar, flexible-width, custom-background, custom-header, custom-menu, editor-style, featured-images, flexible-header, full-width-template, microformats, post-formats, rtl-language-support, sticky-post, theme-options, translation-ready
Text Domain: twentytwelve
This theme, like WordPress, is licensed under the GPL.
Use it to make something cool, have fun, and share what you've learned with others.
*/
Figure 3-3 shows how the Manage Themes page on the Dashboard looks with the Twenty Twelve theme activated. The title and information are taken directly from the style.css header.
If you make modifications to the stylesheet header, the changes reflect in the WordPress Dashboard on the Themes page located on the Appearance menu.
Figure 3-3:This shows the currently active theme, Twenty Twelve.
 Themes must provide this information in the stylesheet header, and no two themes can have the same information. Two themes with the same name and details would conflict in the theme-selection page. If you create your own theme based on another theme, make sure that you change this information first.
Below the stylesheet header are the CSS styles that drive the formatting and styling of your theme.
Chapter 4 of this minibook goes into detail about CSS, including some examples that you can use to tweak the style of your existing WordPress theme — check it out!
Exploring Template Tags, Values, and Parameters
Some people are intimidated when they look at template tags. Really, they’re just a simple bit of PHP code that you can use inside a template file to display information dynamically. Before starting to play around with template tags in your WordPress templates, it’s important to understand what makes up a template tag and why.
WordPress is based in PHP (a scripting language for creating web pages) and uses PHP commands to pull information from the MySQL database. Every tag begins with the function to start PHP and ends with a function to stop PHP. In the middle of those two commands lives the request to the database that tells WordPress to grab the data and display it.
A typical template tag looks like this:
<?php get_info(); ?>
This example tells WordPress to do three things:
![]() Start PHP (
Start PHP (<?php).
![]() Use PHP to get information from the MySQL database and deliver it to your blog (
Use PHP to get information from the MySQL database and deliver it to your blog (get_info();).
![]() Stop PHP (
Stop PHP (?>).
In this case, get_info is the actual tag function, which grabs information from the database to deliver it to your blog. What information is retrieved depends on what tag function appears between the two PHP commands. As you may notice, there's a lot of starting and stopping of PHP throughout the WordPress templates. The process seems as though it would be resource intensive, if not exhaustive — but it really isn't.
For every PHP command you start, you need a stop command. Every time a command begins with <?php, somewhere later in the code is the closing ?> command. PHP commands that aren't structured properly cause really ugly errors on your site, and they've been known to send programmers, developers, and hosting providers into loud screaming fits.
Understanding the basics
If every piece of content on your site were hard-coded (manually added into the template files), it wouldn't be easy to use and modify. Template tags allow you to add information and content dynamically to your site. One example of adding information by using a template tag is the the_category tag. Instead of typing all the categories and links that each post belongs in, you can use the the_category() tag in your template to automatically display all the categories as links.
Using template tags prevents duplication of effort by automating the process of adding content to your website.
When you use a template tag, you're really telling WordPress to do something or retrieve some information. Often, template tags are used to fetch data from the server and even display it on the front end. More than 100 template tags are built into WordPress, and the tags vary greatly in what they can accomplish. A complete list of template tags can be found in the WordPress Codex (documentation for WordPress) at http://codex.wordpress.org/Template_Tags.
Template tags can be used only inside of PHP blocks. The PHP blocks can be opened and closed as many times as needed in a template file. When opened, the server knows that anything contained in the block is to be translated as PHP. The opening tag (<?php) must be followed, at some point, by the closing tag (?>). All blocks must contain these tags. A template tag is used in the same way that PHP functions are. The tag is always text with no spaces (may be separated by underscores or dashes), opening and closing brackets, and a semicolon. The following line of code shows you how it all looks:
<?php template_tag_name(); ?>
PHP is a fairly advanced coding language and has many built-in functions for you to use. If you aren’t a PHP developer, keep it simple when you’re attempting to add custom PHP. All code must be semantically perfect or it will not work. Always read your code to make sure that you entered it correctly.
Some template tags can be used only inside The Loop, so check the Codex for details. You can find out more about The Loop in the section titled “Examining the Main Index and The Loop,” later in this chapter.
Using parameters
Because a template tag is a PHP function, you can pass parameters to the tag. A parameter is simply a variable that allows you to change or filter the output of a template tag. WordPress has three types of template tags:
![]() Tags without parameters: Some template tags don't require any options, so they don't need any parameters passed to them. For example, the
Tags without parameters: Some template tags don't require any options, so they don't need any parameters passed to them. For example, the is_user_logged_in() tag doesn't accept any parameters because it only returns true or false.
![]() Tags with PHP function–style parameters: Template tags with PHP function–style parameters accept parameters that are passed to them by placing one or more values inside the function's parentheses. For example, if you're using the
Tags with PHP function–style parameters: Template tags with PHP function–style parameters accept parameters that are passed to them by placing one or more values inside the function's parentheses. For example, if you're using the bloginfo() tag, you can filter the output to just the description by using
<?php bloginfo('description'), ?>
If there are multiple parameters, the order in which you list them is very important. Each function sets the necessary order of its variables, so double-check the order of your parameters.
Always place the value in single quotes, and separate multiple parameters by commas.
![]() Tags with query string–style parameters: Template tags with query string–style parameters allow you to change the values of just the parameters you require. This is useful for template tags that have a large number of options. For example, the
Tags with query string–style parameters: Template tags with query string–style parameters allow you to change the values of just the parameters you require. This is useful for template tags that have a large number of options. For example, the wp_list_pages() tag has 18 parameters. Instead of using the PHP function–style parameters, this function allows you to get to the source of what you need and give it a value. For example, if you want to list all your WordPress pages except for page 24, you use
<?php wp_list_pages('exclude=24'), ?>
Query string–style parameters can be the most difficult to work with because they are generally dealing with the template tags that have the most possible parameters.
Table 3-1 helps you understand the three variations of parameters used by WordPress.
Table 3-1 Three Variations of Template Parameters
|
Variation |
Description |
Example |
|
Tags without parameters |
These tags have no additional options available. Tags without parameters have nothing within the parentheses. |
|
|
Tags with PHP function–style parameters |
These tags have a comma-separated list of values placed within the tag parentheses. |
|
|
Tags with query string–style parameters |
These types of tags generally have several available parameters. This tag style enables you to change the value for each parameter without being required to provide values for all available parameters for the tag. |
|
The WordPress Codex, located at http://codex.wordpress.org, has every conceivable template tag and possible parameter known to the WordPress software. The tags and parameters in this chapter are the ones used most often by WordPress users.
Customizing common tags
Because template tags must be used inside the PHP template files, they can easily be customized with HTML. If you're using the PHP tag wp_list_pages(), for example, you could display it in an HTML unordered list so that the pages are easily accessible to the users, like this:
<ul>
<?php wp_list_pages(); ?>
</ul>
This displays all the pages that you created in WordPress as an unordered list. If you had the pages About, Blog, and Content, it would be displayed like this:
![]() About
About
![]() Blog
Blog
![]() Contact
Contact
Another example is titles. For proper search engine optimization, you should always put page titles in H1 HTML tags, like this:
<h1 class="pagetitle">
<?php the_title(); ?>
</h1>
Creating New Widget Areas
Many themes are widget-ready, meaning that you can insert widgets into them easily. Widgets allow you to add functionality to your sidebar without having to use code. Some common widget functionalities include displaying recent posts, displaying recent comments, adding a search box for searching content on a site, and adding static text. Even widget-ready themes have their limitations, however. You may find that the theme you chose doesn’t have widget-ready areas in all the places you want them. However, you can make your own.
Registering your widget
To add a widget-ready area to the WordPress Dashboard Widget interface, you must first register the widget in your theme's functions.php file by adding this code:
register_sidebar( array (
'name' => __( 'Widget Name'),
'id' => 'widget-name',
'description' => __( 'The primary widget area'),
'before_widget' => '<li id="%1$s" class="widget-container %2$s">',
'after_widget' => "</li>",
'before_title' => '<h3 class="widget-title">',
'after_title' => '</h3>',
) );
You can insert this code directly beneath the first opening PHP tag (<?php). It is sometimes helpful to add a few extra lines when you're adding code. The extra empty lines around your code are ignored by the browser but can greatly increase readability of the code.
Within that code, you see seven different arrays. An array is a set of values that tells WordPress how you would like your widgets handled and displayed:
![]()
name: This name is unique to the widget and is displayed on the Widgets page on the Dashboard. It is helpful if you register several different widgetized areas on your site.
![]()
id: This is the unique ID given to the widget.
![]()
description: This is a text description of the widget. The text that gets placed here will display on the Widgets page on the Dashboard.
![]()
before_widget: This is the HTML markup that gets inserted directly before the widget. It is helpful for CSS styling purposes.
![]()
after_widget: This is the HTML markup that gets inserted directly after the widget.
![]()
before_title: This is the HTML markup that gets inserted directly before the widget title.
![]()
after_title: This is the HTML markup that gets inserted directly after the widget title.
Even though you use register_sidebar to register a widget, widgets don't have to appear in a sidebar. Widgets can appear anywhere you want them to. This code snippet registers a widget named Widget Name in the WordPress Dashboard. Additionally, it places the widget's content in an element that has the CSS class of widget, and puts <h4> tags around the widget's title.
Widgets that have been registered on the WordPress Dashboard are ready to be populated with content. On your site’s Dashboard, on the Appearance menu, you can see a link titled Widgets. When you click the Widgets link, you can now see the new widget area you have just registered.
Displaying new widgets on your site
When a widget-ready area is registered with the WordPress Dashboard, you can display the area somewhere on your site. A very common place for widget-ready areas is in the sidebar.
To add a widget-ready area in your sidebar, pick a location within the sidebar and then locate that area in the HTML, which can vary from theme to theme. Many times, theme authors will create their own sidebar.php file, and you can add this code there. After you find the area in the HTML, add the following code to the template:
<?php dynamic_sidebar('Widget Name'), ?>
This code displays the contents of the widget that you previously registered in the admin area.
Simplifying customization with functions
You may find that the simple code doesn't accomplish all the functionality that you need. For example, you may want to style the widget's title separate from the content. One solution is to create a custom PHP function that gives you a few more options. Open functions.php and insert the following code directly below the opening <?php tag to create a function:
function add_new_widget_location( $name ) {
if ( ! function_exists( 'dynamic_sidebar' ) || ! dynamic_sidebar(
$name ) ) : ?>
<div class="widget">
<h4><?php echo $name; ?></h4>
<div class="widget">
<p>This section is widgetized. If you would like to
add content to this section, you may do so by using the Widgets
panel from within your WordPress Admin Dashboard. This Widget
Section is called "<strong><?php echo $name; ?></strong>"</p>
</div>
</div>
<?php endif; ?>
<?php
}
In this function, the first part checks to see whether a widget is assigned to this area. If so, the widget displays. If not, a message with the name of the widget area displays, which allows users to distinguish the widget area they want to add widgets to. Now if you want to display a widget by using this method, you go to the desired template file and insert the following code where you want the widget to appear:
<?php add_new_widget_location('Widget-Name'), ?>
Exploring common problems
A common problem when creating widget areas is forgetting the admin side. Although people successfully create the widget in the PHP template where they want it, they often fail to make it to the functions.php to register the new widget area.
Another common problem is omitting the widget code from the functions.php file. If you're adding widget areas to an existing site, you need to add the widget code to the bottom of the list of widgets in the functions.php file. Failure to do so causes the widget areas to shift their contents. This places your widgets out of order, causing you to have to redo them on the Widgets page on the WordPress Dashboard.
Examining the Main Index and The Loop
Your theme is required to have only two files. The first is style.css. The other is a main index file, known in WordPress as index.php. The index.php file is the first file WordPress tries to load when someone visits your site. Extremely flexible, index.php can be used as a standalone file, or it can include other templates. The Main Index template drags your blog posts out of the MySQL database and inserts them into your blog. This template is to your blog what the dance floor is to a nightclub — it's where all the action happens.
The filename of the Main Index template is index.php. You can find it in the /wp-content/themes/twentytwelve/ folder.
The first template tag in the Main Index template calls in the Header template, meaning that it pulls the information from the Header template into the Main Index template, as follows:
<?php get_header(); ?>
Your theme can work without calling in the Header template, but it will be missing several essential pieces — the CSS and the blog name and tagline, for starters.
The Main Index template in the Twenty Twelve theme calls in three other files in a similar fashion:
![]()
get_template_part( 'content' ); — This function calls in the template file named content.php.
![]()
get_sidebar(); — This function calls in the template file named sidebar.php.
![]()
get_footer(); — This function calls in the template file named footer.php.
I cover each of these three functions and template files in upcoming sections of this chapter.
The concept of calling in a template file by using a function or template tag is exactly what the Main Index template does with the four functions for the header, loop, sidebar, and footer templates explained later in this section.
Generally, one of the important functions of the main index is to contain The Loop. In WordPress, The Loop displays posts and pages on your site. Any PHP or HTML that you include in The Loop will repeat for each of your posts that it displays. The Loop has a starting point and an ending point; anything placed in between is used to display each post, including any HTML, PHP, or CSS tags and codes.
Here’s a look at what the WordPress Codex calls “The World’s Simplest Index”:
<?php
get_header();
if (have_posts()) :
while (have_posts()) :
the_post();
the_content();
endwhile;
endif;
get_sidebar();
get_footer();
?>
Here’s how it works:
1. The template opens the php tag.
2. It includes the header, meaning that it retrieves anything contained in the header.php file and displays it.
3. The Loop begins with the while (have_posts()) : bit.
4. Anything between the while and the endwhile repeats for each post that displays.
The number of posts that displays is determined in the settings section of the WordPress Dashboard.
5. If your blog has posts (and most do, even when you first install it), WordPress proceeds with The Loop, starting with the piece of code that looks like this:
if (have_posts()) :
while (have_posts()) :
This code tells WordPress to grab the posts from the MySQL database and display them on your blog page.
6. The Loop closes with this tag:
endwhile;
endif;
Near the beginning of the Loop template, there is a template tag that looks like this:
if (have_posts()) :
To read that template tag in plain English, it says If [this blog] has posts.
7. If your blog meets that condition (that is, if it has posts), WordPress proceeds with The Loop and displays your blog posts. If it does not meet that condition (that is, it does not have posts), WordPress displays a message that no posts exist.
8. When The Loop ends (at the endwhile), the index template goes on to execute the files for sidebar and footer.
Although it is simple, The Loop is one of the core functions of WordPress.
Misplacement of the while or endwhile statements causes The Loop to break. If you're having trouble with The Loop in an existing template, check your version against the original and see whether the while statements are misplaced.
In your travels as a WordPress user, you may run across plugins or scripts with instructions that say something like this: “This must be placed within The Loop.” That’s The Loop that I discuss in this section, so pay particular attention. Understanding The Loop arms you with the knowledge you need for tackling and understanding your WordPress themes.
The Loop is no different from any other template tag; it must begin with a function to start PHP, and it must end with a function to stop PHP. The Loop begins with PHP and then makes a request: “While there are posts in my blog, display them on this page.” This PHP function tells WordPress to grab the blog post information from the database and return it to the blog page. The end of The Loop is like a traffic cop with a big red stop sign telling WordPress to stop the function completely.
You can set the number of posts displayed per page in the Reading Settings page in the WordPress Dashboard. The Loop abides by this rule and displays only the number of posts per page that you’ve set.
WordPress uses other template files besides the main index, such as the header, sidebar, and footer templates. The next sections give you a closer look at a few of them.
Header template
The Header template for your WordPress themes is the starting point for every WordPress theme because it tells web browsers the following:
![]() The title of your blog
The title of your blog
![]() The location of the CSS
The location of the CSS
![]() The RSS feed URL
The RSS feed URL
![]() The blog URL
The blog URL
![]() The tagline (or description) of the blog
The tagline (or description) of the blog
In many themes, the first elements in the header are a main image and the navigation. These two elements are usually in the header.php because they load on every page and rarely change. The following statement is the built-in WordPress function to call the header template:
<?php get_header(); ?>
Every page on the web has to start with a few pieces of code. In every header.php file in any WordPress theme, you can find these bits of code at the top:
![]() The
The DOCTYPE (which stands for document type declaration) tells the browser which type of XHTML standards you're using. The Twenty Twelve theme uses <!DOCTYPE html>, which is a declaration for W3C standards compliance mode and covers all major browser systems.
![]() The
The <html> tag (HTML stands for Hypertext Markup Language) tells the browser which language you're using to write your web pages.
![]() The
The <head> tag tells the browser that the information contained within the tag shouldn't be displayed on the site; rather, it's information about the document.
In the header template of the Twenty Twelve theme, these bits of code look like this, and you should leave them intact:
<!DOCTYPE html>
<html <?php language_attributes(); ?>>
<head>
On the Edit Themes page, click the Header template link to display the template code in the text box. Look closely and you see that the <!DOCTYPE html> declaration, <html> tag, and <head> tag show up in the template.
The <head> tag needs to be closed at the end of the Header template, which looks like this: </head>. You also need to include a fourth tag, the <body> tag, which tells the browser where the information you want to display begins. Both the <body> and <html> tags need to be closed at the end of the template, like this: </body></html>.
Using bloginfo parameters
The Header template makes much use of one WordPress template tag in particular: bloginfo();.
What differentiates the type of information that a tag pulls in is a parameter. Parameters are placed inside the parentheses of the tag, enclosed in single quotes. For the most part, these parameters pull information from the settings in your WordPress Dashboard. The template tag to get your blog title, for example, looks like this:
<?php bloginfo('name'), ?>
Table 3-2 lists the various parameters you need for the bloginfo(); tag and shows you what the template tag looks like. The parameters in Table 3-2 are listed in the order of their appearance in the Twenty Twelve header.php template file, and pertain to the bloginfo(); template tag only.
Table 3-2 Tag Values for bloginfo();
|
Parameter |
Information |
Tag |
|
|
Character settings set in Settings/General |
|
|
|
Blog title, set in Settings/General |
|
|
|
Tagline for your blog, set in Settings/General |
|
|
|
Your blog’s web address, set in Settings/General |
|
|
|
URL of primary CSS file |
|
|
|
Displays the trackback URL for your blog on single post pages |
|
Creating title tags
Here's a useful tip about your blog's <title> tag: Search engines pick up the site title for inclusion in the search engine directory. Here is the code to include in the header.php file to make sure your site title gets search engine exposure:
<title><?php wp_title( '|', true, 'right' ); ?></title>
It may help if this example is plain English. The way the Twenty Twelve Header template displays the title is based on the type of page that is being displayed — and it shrewdly uses SEO to help you with the browser powers that be. Simply, the wp_title ('|', true, 'right'), tag displays the title of the page you're viewing with a separator bar (|) to the right of the title.
The title bar of the browser window always displays your blog name unless you’re on a single post page. In that case, it displays your blog title plus the title of the post on that page.
Displaying your blog name and tagline
The default Twenty Twelve theme header displays your blog name and tagline on the top of your site on every page.
You can use the bloginfo(); tag plus a little HTML code to display your blog name and tagline. Most blogs have a clickable title, which is a site title that takes you back to the main page when it's clicked. No matter where your visitors are on your site, they can always go back home by clicking the title of your site in the header.
To create a clickable title, use the following code:
<a href="<?php bloginfo('url'), ?>"><?php bloginfo('name'), ?></a>
The bloginfo('url'), tag is your main blog Internet address, and the bloginfo('name'), tag is the name of your blog (refer to Table 3-1). So the code creates a link that looks something like this:
<a href="http://yourdomain.com">Your Blog Name</a>
The tagline generally isn’t linked back home. You can display it by using the following tag:
<?php bloginfo('description'), ?>
This tag pulls the tagline directly from the one that you set up on the General Settings page on your WordPress Dashboard.
This example shows how WordPress is intuitive and user-friendly; you can do things such as changing the blog name and tagline with a few keystrokes on the Dashboard. Changing your options in the Dashboard creates the change on every page of your site — no coding experience required. Beautiful, isn’t it?
In the Twenty Twelve templates, these tags are surrounded by tags that look like these: <h1></h1> or <h4></h4>. These tags are H tags, which define the look and layout of the blog name and tagline in the CSS of your theme. Chapter 4 of this minibook covers CSS.
Sidebar template
The Sidebar template in WordPress has the filename sidebar.php. The sidebar is usually found on the left or right side of the main content area of your WordPress theme. (In the Twenty Twelve theme, the sidebar is displayed to the right of the main content area.) It is a good place to put useful information about your site, such as a site summary, advertisements, or testimonials.
Many themes use widget areas in the sidebar template. This allows you to display content easily on your WordPress pages and posts. The following statement is the built-in WordPress function to call the Sidebar template:
<?php get_sidebar(); ?>
This code calls the Sidebar template and all the information it contains into your blog page.
Footer template
The Footer template in WordPress has the filename footer.php. The footer is generally at the bottom of the page and contains brief reference information about the site. This usually includes copyright information, template design credits, and a mention of WordPress. Similarly to the Header and Sidebar templates, the Footer template gets called into the Main Index template through this bit of code:
<?php get_footer(); ?>
This code calls the Footer template and all the information it contains into your blog page.
The default Twenty Twelve theme shows the site title and a statement that says “Proudly powered by WordPress.” You can use the footer to include all sorts of information about your site; however, you don’t have to restrict it to small bits of information.
Examining Other Template Files
To make your website work properly, WordPress uses all the theme files together. Some, such as the header and footer, are used on every page. Others, such as the comments template (comments.php), are used only at specific times, to pull in specific functions.
When someone visits your site, WordPress uses a series of queries to determine which templates to use.
Many more theme templates can be included in your theme. Here are some of the other template files you might want to use:
![]() Comments template (
Comments template (comments.php): The Comments template is required if you plan to host comments on your blog; it provides all the template tags you need to display those comments. The template tag used to call the comments into the template is <?php comments_template(); ?>.
![]() Single Post template (
Single Post template (single.php): When your visitors click the title or permalink of a post you published to your blog, they're taken to that post's individual page. There, they can read the entire post, and if you have comments enabled, they see the comments form and can leave comments.
![]() Page template (
Page template (page.php): You can use a Page template for static pages in your WordPress site.
![]() Search Results (
Search Results (search.php): You can use this template to create a custom display of search results on your blog. When someone uses the search feature to search your site for specific keywords, this template formats the return of those results.
![]() 404 template (
404 template (404.php): Use this template to create a custom 404 page, which is the page visitors get when the browser can't find the page requested and returns that ugly 404 Page Cannot Be Found error.
The templates in the preceding list are optional. If these templates don't exist in your WordPress themes folder, nothing breaks. The Main Index template handles the display of these items (the single post page, the search results page, and so on). The only exception is the Comments template. If you want to display comments on your site, you must have that template included in your theme.
Customizing Your Blog Posts with Template Tags
This section covers the template tags that you use to display the body of each blog post you publish. The body of a blog post includes information such as the post date and time, title, author name, category, and content. Table 3-3 lists the common template tags you can use for posts, available for you to use in any WordPress theme template. The tags in Table 3-3 work only if you place them within The Loop (covered earlier in the "Examining the Main Index and The Loop" section in this chapter and found in the loop.php template file).
Table 3-3 Template Tags for Blog Posts
|
Tag |
Function |
|
|
Displays the date of the post. |
|
|
Displays the time of the post. |
|
|
Displays the title of the post. |
|
|
Displays the permalink (URL) of the post. |
|
|
Displays the post author’s name. |
|
|
Displays the URL of the post author’s site. |
|
|
Displays the content of the post. (If you use an excerpt [following], the words Read More appear and are linked to the individual post page.) |
|
|
Displays an excerpt (snippet) of the post. |
|
|
Displays the category (or categories) assigned to the post. If the post is assigned to multiple categories, commas separate them. |
|
|
Displays a link to the comments, along with the comment count for the post in parentheses. (If no comments exist, it displays a No Comments message.) |
|
|
Displays the words Previous Entries linked to the previous page of blog entries. |
|
|
Displays the words Next Entries linked to the next page of blog entries. |
The last two tags in Table 3-3 aren't like the others. You don't place these tags in The Loop; instead, you insert them after The Loop but before the if statement ends. Here's an example:
<?php endwhile; ?>
<?php next_posts_link('« Previous Entries') ?>
<?php previous_posts_link('Next Entries »') ?>
<?php endif; ?>
Within some of the WordPress template tags, such as the <title> tag example at the beginning of this section, you may notice some weird characters that look like a foreign language. You may wonder what » is, for example. It isn't part of any PHP function or CSS style. Rather, it's a character entity — a kind of code that enables you to display a special character in your blog. The » character entity displays a double right-angle quotation mark.
Putting It All Together
Template files can’t do a whole lot by themselves. The real power comes when they’re put together.
Connecting the templates
WordPress has built-in functions to include the main template files, such as header.php, sidebar.php, and footer.php, in other templates. An include function is a custom PHP function that is built in to WordPress, allowing you to retrieve the content of another template file and display it along with the content of another template file. Table 3-4 shows the templates and the function to include them.
Table 3-4 Template Files and Include Functions
|
Template Name |
Include Function |
|
|
|
|
|
|
|
|
|
|
|
|
|
|
|
If you want to include a file that doesn't have a built-in include function, you need a different piece of code. For instance, if you want to add a unique sidebar to a certain page template, you could name the sidebar file sidebar-page.php. To include that in another template, you would use the following code:
<?php get_template_part('sidebar', 'page'), ?>
In this statement, the PHP get_template_part function looks through the main theme folder for the sidebar_page.php file and displays the sidebar.
In this section, you put together the guts of a basic Main Index template by using the information on templates and tags from this chapter. There seem to be endless lines of code when you view the loop.php template file in the Twenty Twelve theme, so I've simplified it for you in this section. You'll have a basic understanding of the WordPress Loop and common template tags and functions that you can use to create your own.
You create a new WordPress theme, using some of the basic WordPress templates. You need six templates: Header, Theme Functions, Sidebar, Footer, Stylesheet, and Main Index.
In your favored text editor (such as Notepad for the PC or TextMate for the Mac) create and save the following files with the corresponding code:
![]() Header template: Create the file with the following lines of code then save it with the filename
Header template: Create the file with the following lines of code then save it with the filename header.php:
<!DOCTYPE html PUBLIC "-//W3C//DTD XHTML 1.0 Transitional//EN" "http://www.w3.org/TR/xhtml1/DTD/xhtml1-transitional.dtd">
<html xmlns="http://www.w3.org/1999/xhtml" <?php language_attributes(); ?> />
<head profile="http://gmpg.org/xfn/11">
<meta http-equiv="Content-Type" content="<?php bloginfo('html_type'), ?>;
charset=<?php bloginfo('charset'), ?>" />
<title><?php bloginfo( 'name' ); ?> <?php if ( is_single() ) { ?> » Blog Archive <?php } ?>
<?php wp_title(); ?></title>
<link rel="stylesheet" href="<?php bloginfo( 'stylesheet_url' ); ?>" type="text/css" media="screen" />
<link rel="pingback" href="<?php bloginfo( 'pingback_url' ); ?>" />
<?php if ( is_singular() ) wp_enqueue_script( 'comment-reply' ); ?>
<?php wp_head(); ?>
</head>
<body <?php body_class() ?>>
<div id="page">
<div id="header">
<h1><a href="<?php bloginfo('url'), ?>"><?php bloginfo('name'), ?><?a></h1>
<h2><?php bloginfo('description'), ?></h2>
</div>
<div id="main">
![]() Theme Functions: Create the file with the following lines of code and then save it with the filename
Theme Functions: Create the file with the following lines of code and then save it with the filename functions.php:
<?php
if ( function_exists('register_sidebar') ) register_sidebar(array('name'=>'Sidebar',
));
The Theme Functions file registers the widget area for your site so that you’re able to add widgets to your sidebar by using the available WordPress widgets from the Widget page in the Dashboard.
![]() Sidebar template: Create the file with the following lines of code and then save it with the filename
Sidebar template: Create the file with the following lines of code and then save it with the filename sidebar.php:
<div id="side" class="sidebar">
<ul>
<?php if ( !function_exists('dynamic_sidebar') || !dynamic_sidebar('Sidebar') ) : ?>
<?php endif; ?>
</ul>
</div>
The code here tells WordPress where you want the WordPress widgets to display in your theme; in this case, widgets are displayed in the sidebar of your site.
![]() Footer template: Create the file with the following lines of code and then save it with the filename:
Footer template: Create the file with the following lines of code and then save it with the filename: footer.php:
</div>
<div id="footer">
<p>© Copyright <a href="<?php bloginfo('url'), ?>"><?php bloginfo('name'), ?></a>. All Rights Reserved</p>
</div>
<?php wp_footer(); ?>
</body>
</html>
![]() Stylesheet: Create the file with the following lines of code and then save it with the filename
Stylesheet: Create the file with the following lines of code and then save it with the filename style.css (more CSS is covered in Chapter 4 of this minibook — this example gives you just some very basic styling to create your sample theme):
/*
Theme Name: My Theme
Description: Basic Theme from WordPress All In One For Dummies example
Author: Lisa Sabin-Wilson
Author URI: http://lisasabin-wilson.com
*/
body {
font-family: verdana, arial, helvetica, sans-serif;
font-size: 16px;
color: #555;
background: #eee;
}
#page {
width: 960px;
margin: 0 auto;
background: white;
border: 1px solid silver;
}
#header {
width: 950px;
height: 100px;
background: black;
color: white;
padding: 5px;
}
#header h1 a {
color: white;
font-size: 22px;
font-family: Georgia;
text-decoration: none;
}
#header h2 {
font-size: 16px;
font-family: Georgia;
color: #eee;
}
#main {
width: 600px;
float:left;
}
#side {
width: 220px;
margin: 0 15px;
float:left;
}
#footer {
clear: both;
width: 960px;
height: 50px;
background: black;
color: white;
}
#footer p {
text-align: center;
padding: 15px 0;
}
#footer a {
color: white;
}
Using the tags provided in Table 3-3, along with the information on The Loop and the calls to the Header, Sidebar, and Footer templates provided in earlier sections, you can follow the next steps for a bare-bones example of what the Main Index template looks like when you put the tags together.
When typing templates, be sure to use a text editor such as Notepad or TextEdit. Using a word processing program such as Microsoft Word opens a whole slew of problems in your code. Word processing programs insert hidden characters and format quotation marks in a way that WordPress can’t read.
Now that you have the basic theme foundation, the last template file you need to create is the Main Index template. To create a Main Index template to work with the other templates in your WordPress theme, open a new window in a text-editor program and then follow these steps. (Type the text in each of these steps on its own line. Press the Enter key after typing each line so that each tag starts on a new line.)
1. Type <?php get_header(); ?>.
This template tag pulls the information in the Header template of your WordPress theme.
2. Type <?php if (have_posts()) : ?>.
This template tag is an if statement that asks, "Does this blog have posts?" If the answer is yes, it grabs the post content information from your MySQL database and displays the posts in your blog.
3. Type <?php while (have_posts()) : the_post(); ?>.
This template tag starts The Loop.
4. Type <a href=”<?php the_permalink(); ?>”><?php the_title(); ?></a>.
This tag tells your blog to display the title of a post that’s clickable (linked) to the URL of the post.
5. Type Posted on <?php the_date(); ?> at <?php the_time(); ?>.
This template tag displays the date and time when the post was made. With these template tags, the date and time format are determined by the format you set in the Dashboard.
6. Type Posted in <?php the_category(‘,’); ?>.
This template tag displays a comma-separated list of the categories to which you’ve assigned the post — Posted in: category 1, category 2, for example.
7. Type <?php the_content(‘Read More..’); ?>.
This template tag displays the actual content of the blog post. The 'Read More..' portion of this tag tells WordPress to display the words Read More, which are clickable (hyperlinked) to the post's permalink, where the reader can read the rest of the post in its entirety. This tag applies when you're displaying a post excerpt, as determined by the actual post configuration in the Dashboard.
8. Type Posted by: <?php the_author(); ?>.
This template tag displays the author of the post in this manner: Posted by: Lisa Sabin-Wilson.
9. Type <?php comments_popup_link(‘No Comments’, ‘1 Comment’, ‘% Comments’); ?>.
This template tag displays the link to the comments for this post, along with the number of comments.
10. Type <?php endwhile; ?>.
This template tag ends The Loop and tells WordPress to stop displaying blog posts here. WordPress knows exactly how many times The Loop needs to work, based on the setting in the WordPress Dashboard. That’s exactly how many times WordPress will execute The Loop.
11. Type <?php next_posts_link(‘« Previous Entries’); ?>.
This template tag displays a clickable link to the previous page of blog entries, if any.
12. Type <?php previous posts link(‘» Next Entries’); ?>.
This template tag displays a clickable link to the next page of blog entries, if any.
13. Type <?php else : ?>.
This template tag refers to the if question asked in Step 2. If the answer to that question is no, this step provides the else statement — IF this blog has posts, THEN list them here (Step 2 and Step 3), or ELSE display the following message.
14. Type Not Found. Sorry, but you are looking for something that isn’t here.
This is the message followed by the template tag that is displayed after the else statement from Step 13. You can reword this statement to have it say whatever you want.
15. Type <?php endif; ?>.
This template tag ends the if statement from Step 2.
16. Type <?php get_sidebar(); ?>.
This template tag calls in the Sidebar template and pulls that information into the Main Index template.
17. Type <?php get_footer(); ?>.
This template tag calls in the Footer template and pulls that information into the Main Index template. Note: The code in the footer.php template ends the <body> and the <html> tags that were started in the Header template (header.php).
When you’re done, the display of the Main Index template code looks like this:
<?php get_header(); ?>
<?php if (have_posts()) : ?>
<?php while (have_posts()) : the_post(); ?>
<div <?php post_class() ?> id="post-<?php the_ID(); ?>">
<a href="<?php the_permalink(); ?>"><?php the_title(); ?></a>
Posted on: <?php the_date(); ?> at <?php the_time(); ?>
Posted in: <?php the_category(','), ?>
<?php the_content('Read More..'), ?>
Posted by: <?php the_author(); ?> | <?php comments_popup_link('No Comments', '1 Comment', '% Comments'), ?>
</div>
<?php endwhile; ?>
<?php next_posts_link('« Previous Entries') ?>
<?php previous_posts_link('Next Entries »') ?>
<?php else : ?>
Not Found
Sorry, but you are looking for something that isn't here.
<?php endif; ?>
<?php get_sidebar(); ?>
<?php get_footer(); ?>
18. Save this file as index.php.
In Notepad, you can save it by choosing File⇒Save As. Type the name of the file in the File Name text box and then click Save.
Now that you have all your template files ready, follow these steps to upload your files to your web server:
1. Connect to your web server via FTP, click the wp-content folder, and then click the themes folder.
This folder contains the themes that are currently installed in your WordPress blog. (Go to Book II, Chapter 2 if you need more information on FTP.)
2. Create a new folder, and call it mytheme.
In most FTP programs, you can right-click and choose New Folder. (If you aren’t sure how to create a folder, refer to your FTP program’s help files.)
3. Upload your index.php file to the mytheme folder.
4. Activate the theme in the WordPress Dashboard and view your blog to see your handiwork in action!
This Main Index template code has one template tag that is explained in Chapter 6 of this minibook: <div <?php post_class() ?> id="post-<?php the_ID(); ?>">. This tag helps you create some interesting styles in your template by using CSS, so check out Chapter 6 to find out all about it!
This very simple and basic Main Index template that you just built doesn’t have the standard HTML markup in it, so the visual display of your blog will differ somewhat from the default Twenty Twelve theme. This example gives you the bare-bones basics of the Main Index template and The Loop in action. Chapter 4 of this minibook goes into detail about the use of HTML and CSS to create nice styling and formatting for your posts and pages.
Using additional stylesheets
Often, a theme uses multiple stylesheets for browser compatibility or consistent organization. If you use multiple stylesheets, the process for including them in the template is the same as any other stylesheet.
To add a new stylesheet, create a directory in the root theme folder called css. Next, create a new file called mystyle.css within the css folder. To include the file, you must edit the header.php file. This example shows the code you need to include in the new CSS file:
<link rel="stylesheet" href="<?php bloginfo('stylesheet_directory'),
?>/css/mystyle.css" type="text/css" media="screen" />