
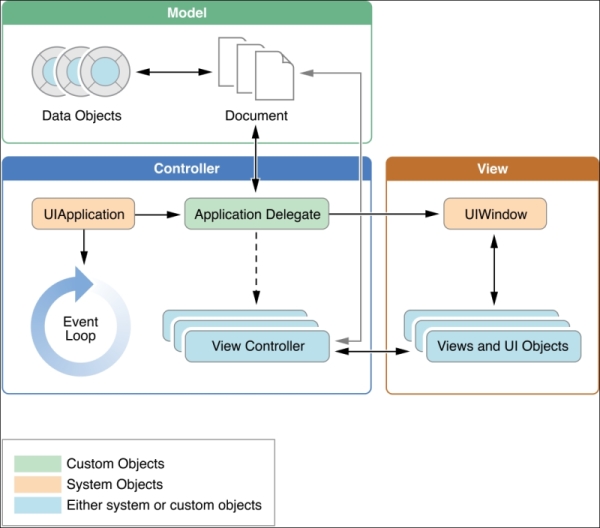
Before we move on to working with storyboards, segues, and the foundation of our game apps, it's best we go over the overall lifecycle of an iOS app as it's important to know the entry points of our code and various objects/structures of our apps.
Insert app lifecycle imagery here before we move on to working with storyboards, segues, and the foundation of our game apps. It's best we go over the overall lifecycle of an iOS app as it's important to know the entry points of our code and various objects/structures of our apps.
Anyone who has worked with C/C++, Java, or other languages will be familiar with the main() function. The main() function is used to designate your program's main entry point. The preceding example is how Apple designates the typical main function for apps. Essentially what this is doing is calling the first class in the typical lifecycle of iOS apps, the AppDelegate class.
Here's the code with the main() function:
#import <UIKit/UIKit.h>
#import "AppDelegate.h"

int main(int argc, char * argv[])
{
    @autoreleasepool {
        return UIApplicationMain(argc, argv, nil, NSStringFromClass([AppDelegate class]));
    }
}
//Objective-C example of the Main() function
Note how the main() function is written in Objective-C. Swift again makes declaring the entry of your application easier.
@UIApplicationMain
class firstClassCalled
{
  //class code
}
While building an iOS app with Swift, the main.m file seen in prior Objective-C projects is no longer needed. Instead, we use an Attribute call, @UIApplicationMain, just before the declaration of the class that is first called.
Note
Swift attributes
Attributes, beginning with the at character, @, are used to add additional information to a declaration or a type. In Swift, they have the following syntax:
@attribute name
@attribute name(attribute arguments)
As in other programming languages, attributes, depending on their functionality, can be used to describe objects, functions, and even entire classes.
For example, the @objc attribute is used to declare code that is readable in Objective-C.
As we'll see while using and linking various objects in the storyboards with our code, the attributes @IBOutlet and @IBAction are used to describe objects and functions representing objects we create in Xcode's Interface Builder.
We will discuss more on Attributes in Chapter 7, Publishing Our iOS 9.0 Game.
UIApplication is the object responsible for controlling an app's event-loop as well as handling other upper-level app processes. Game app or not, this is present in all iOS apps and is what is first called at the main entry point and works together with the AppDelegate class. Though it is possible to subclass UIApplication, it's usually not recommended. Customizations to what your game does during various app states are what we use the AppDelegate class and ViewControllers for, even if storyboards are not utilized (that is if you choose to mostly hardcode your game).
We can think of the AppDelegate class as your app's main hub. It's the top level of general customization for your game. While making an app in Swift (game or not), it's the class that is given the @UIApplicationMain attribute because it's the general first entry of your game's model/code.
Here's the code that Apple provides with almost every iOS app preset in Xcode:
import UIKit

@UIApplicationMain
class AppDelegate: UIResponder, UIApplicationDelegate {

    var window: UIWindow?

    func application(application: UIApplication, didFinishLaunchingWithOptions launchOptions: [NSObject: AnyObject]?) -> Bool {
        // Override point for customization after application launch.
        return true
    }
    func applicationWillResignActive(application: UIApplication) {
        // Sent when the application is about to move from active to inactive state. This can occur for certain types of temporary interruptions (such as an incoming phone call or SMS message) or when the user quits the application and it begins the transition to the background state.
        // Use this method to pause ongoing tasks, disable timers, and throttle down OpenGL ES frame rates. Games should use this method to pause the game.
    }

    func applicationDidEnterBackground(application: UIApplication) {
        // Use this method to release shared resources, save user data, invalidate timers, and store enough application state information to restore your application to its current state in case it is terminated later.
        // If your application supports background execution, this method is called instead of applicationWillTerminate: when the user quits.
    }

    func applicationWillEnterForeground(application: UIApplication) {
        // Called as part of the transition from the background to the inactive state; here you can undo many of the changes made on entering the background.
    }

    func applicationDidBecomeActive(application: UIApplication) {
        // Restart any tasks that were paused (or not yet started) while the application was inactive. If the application was previously in the background, optionally refresh the user interface.
    }

    func applicationWillTerminate(application: UIApplication) {
        // Called when the application is about to terminate. Save data if appropriate. See also applicationDidEnterBackground:.
    }
}
This is the direct code and comments (as of Xcode 6.4) that Apple provides for us when using the iOS 9 game preset. Before we dive into structuring our games with storyboards and the two main frameworks (SpriteKit and SceneKit), it's best to understand what happens in this class. Events that happen to your game app relating to the device, particularly those that are outside of the player's control, such as incoming phone calls, notifications, and the device shutting down due to low battery power, as well as those controlled by the player (that is pausing the game), are handled by this class. As we see, Apple already provides great instructions for what each function of this class does, so be sure to review them. We will come back to these as we create our games and handle those specific situations. Note that the AppDelegate class has an optional variable (meaning it can be nil) named window and is of the type, UIWindow. A UIWindow object is a child of UIView and can allocate various displays/objects that can be put into the view of the user. Technically, we can use objects of UIWindow and UIView in code directly to create the visuals of our game, but Apple provides more robust objects that handle both the user's interaction with the screen and view. These objects are what make up iOS storyboards; the ably named, ViewControllers.
View controllers are probably one of the most vital structures of iOS development and are what storyboards are visually representing when designing them in Xcode's Interface Builder. In terms of their typical entry point order, it's MAIN --> AppDelegate --> RootViewController --> [calls to any additional ViewControllers instance].
When we create a new app project in Xcode, Apple will make a default Root View Controller named ViewController for us. Here's it's code:
import UIKit
class ViewController: UIViewController {
    override func viewDidLoad() {
        super.viewDidLoad()
        // Do any additional setup after loading the view, typically from a nib.
    }
    override func didReceiveMemoryWarning() {
        super.didReceiveMemoryWarning()
        // Dispose of any resources that can be recreated.
    }
}
This is the starter code given to us in Xcode with the default ViewController.swift class. As we see, it's a subclass of UIViewController and thus inherits all of its parent class's functions. One of them shown here is the function viewDidLoad(). In Swift, when we wish to override a function of a parent class, we use the keyword override before the function declaration. We also see that super.viewDidLoad() is called as well. What this does is call the parent's own version of this function before we add our own code/customizations and is recommended when using any of the functions of UIViewController. The UIViewController functions handle various view states; viewDidLoad() handles when the view is first loaded and is called once for the life of the UIViewController object during an app's lifecycle. If we want to call some code every time a view is seen, we can use the viewDidAppear() function of UIViewController instead.
Here's a visual representation of these view states.
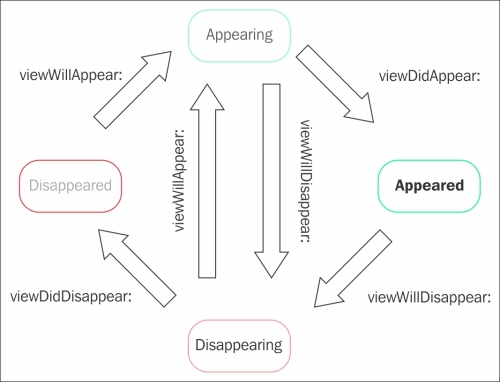
Here storyboards and segues, as we'll see, essentially give us a visual and customizable representation of these very states and the transitions between them without using too much code.
To dive even deeper into the UIViewController methods, check out Apple's documentation on the subject:
https://developer.apple.com/library/ios/documentation/UIKit/Reference/UIViewController_Class/
Note
For anyone familiar with the game development engine Unity (which has scripts written in either C#, JavaScript, or the Python derivative), one way we can imagine the UIViewController functions viewDidLoad() and viewDidAppear() is that they are somewhat similar to the Unity functions Awake() and OnEnabled(), respectively. One function is called when the scene is first loaded and the other just before the first frame that the object is visible/enabled. The UIViewController functions however are on a more upper-level basis for the entirety of the app as opposed to a per gameObject basis.
For more information and graphics on the entire iOS app lifecycle, check out the full documentation here:
View controllers come in a number of types and we can create our own by subclassing them. The two main types are container view controller, which hold other view controllers, and content view controllers, which as we can imagine, are what display the content. Content view controllers include the RootViewController, which is the first view controller accessed after the app's entry point and is also the first view controller seen in the default Main.Storyboard file in a preset Xcode project's inspector. There are also other special types of view controllers, like the UITableViewController, used to display data listed in table cell formats and the NavigationController, which controls the navigation logic/imagery of the app when moving between other view controllers.
For a more in-depth look at the various view controllers available in UIKit, check out the official documentation seen here:
It's actually at this point that we can begin to code our game, albeit entirely programming the MVC model. In the beginning of iOS game development, this was essentially how one would go about developing a game for the original iPhone. We'd programmatically work with the UIWindow and ViewController objects and our game's own custom classes to craft the app. As the family of iOS devices grew, an obvious issue began to arise. Though we can, and sometimes might have to. programmatically change code based on the device, dealing with a growing number of screen sizes and device types made it so that our code would always have to be refactored and produced ever increasing ambiguity whenever a new Apple iOS device was announced. Also, let's not forget that game development is as much of a visual designer / animator's work as it is a programmer's. Editing, positioning, refining, and later updating various visual aspects of a game can be very time consuming if done entirely via code.
Storyboards were made to help alleviate this issue by allowing us to visually design our game in the project itself as oppose to having our own possibly handwritten storyboards that describe just a model-based, code-centric design. With the introduction of Auto Layout in Xcode 5, we can, without using any code, make one project and general view for all varieties of iOS devices. We shall touch on AutoLayout as we now finally move on to working with Storyboards and segues, but for a more in-depth look on Auto Layout, check out the official documentation on Apple's developer portal: https://developer.apple.com/library/ios/documentation/UserExperience/Conceptual/AutolayoutPG.