
When we look at the collectFlower() function from our particle example, we see that there's an SCNNode parameter passed. This node comes from the function physicsWorld. In both SpriteKit and SceneKit, we can create an overall set of physics rules and handle various physics-related interactions, most notably, contacts between two or more nodes. One of the most basic aspects of any game is to do something when game objects hit each other. This could be when the player touches a collectable, when enemies contact the player or the player hits the enemy with an attack. In iOS development and in game engines, we call these boundaries between 2D sprites or 3D objects as bounding boxes. We mentioned these physics objects briefly in our talk of iOS 9 and later debugOptions property. Bounding boxes for SceneKit objects are created automatically based on the simplified version of an object's geometry, but we can edit these shapes with the SCNBoundingVolume class.
More documentation of this class can be found at https://developer.apple.com/library/prerelease/ios/documentation/SceneKit/Reference/SCNBoundingVolume_Protocol/index.html.
Game physics in iOS and game development in general are much larger topics than we can discuss in this chapter. So for now, let's just see how the Fox demo and iOS games in general handle the simple concept of two nodes contacting their bounding boxes.
func physicsWorld(world: SCNPhysicsWorld, didUpdateContact contact: SCNPhysicsContact) {
if (contact.nodeA.physicsBody.categoryBitMask == AAPLBitmaskSuperCollectable) {
        self.collectFlower(contact.nodeA)
    }
if (contact.nodeB.physicsBody.categoryBitMask == AAPLBitmaskSuperCollectable) {
        self.collectFlower(contact.nodeB)
}
Preceding is a Swift pseudo code example of the Fox demo's physicsWorld function. The function takes in two parameters, world of the type SCNPhysicsWorld that represents the entire physics environment of a scene and the object representing the physics contact of the type SCNPhysicsContact. The function here checks the bitmask of the nodes in the contact. If the first or second node of the contact (nodeA or nodeB) are in the flower's specific category, then the collectFlower() function is called and that collectable's node is passed as a parameter.
Bitmasking is when we designate a set of bits for another set of bits that can be combined together using bitwise math. Think of it as using 1s and 0s to not only categorize a range of ones and zeros but also allow us to handle situations where many categories happen in the same context.
For example, we have different categories of objects/events in our game and we fit them in their own slots in a byte (8 bits). In the Fox demo, the game collisions are a bitshift value of 2, thus they represent 00000100 in binary. The category designation of collectables in the Fox demo a bitshift of 3 or 00001000, the enemies are 4, 00010000.
In the demo, we see the following code for AAPLBitmaskSuperCollectable:
// Collision bit masks
typedef NS_OPTIONS(NSUInteger, AAPLBitmask) {
    AAPLBitmaskCollision        = 1UL << 2,
    AAPLBitmaskCollectable      = 1UL << 3,
    AAPLBitmaskEnemy            = 1UL << 4,
    AAPLBitmaskSuperCollectable = 1UL << 5,
    AAPLBitmaskWater            = 1UL << 6
};
When the category bitmask in either nodeA or nodeB of the collision match the flower collectable (if the slot is on per say, or equal to 1, then we know the collectable was involved in the collision).
Swift version 1 didn't really have a similar way to mimic bitmasking as done in Objective-C with NSOptions, but as of Swift 2.0, we can perform bitmasking like the demo in the following way:
struct AAPLBitmask : AAPLBitmaskType {
 let rawValue: Int
 init(rawValue: Int) { self.rawValue = rawValue }

 static var None: AAPLBitmaskType { return AAPLBitmask(rawValue: 0) }
 static var AAPLBitmaskCollision : AAPLBitmask   { return AAPLBitmask(rawValue: 1 << 2) }
 static var AAPLBitmaskCollectable : AAPLBitmask  { return AAPLBitmask(rawValue: 1 << 3) }
 static var AAPLBitmaskEnemy : AAPLBitmask   { return AAPLBitmask(rawValue: 1 << 4) }
static var AAPLBitmaskSuperCollectable : AAPLBitmask   { return AAPLBitmask(rawValue: 1 << 5) }
static var AAPLBitmaskWater : AAPLBitmask   { return AAPLBitmask(rawValue: 1 << 6) }
}
Essentially, it's a struct that returns bitshifted static variables of itself. It's not as elegant as seen in Objective-C and in past C implementation, but if we wish to use bitmasking in boilerplate code in Swift, this should allow you to do so.
One last note about the physicsWorld() function, in order for the function to be called during the collision of two physics bodies, we need to set the physics world delegate. In most cases, that delegate would be the current game scene.
scene.physicsWorld.contactDelegate = self
Xcode will most likely tell you that a physics world delegate wasn't set and if you haven't, this is the code that is usually placed in the viewDidLoad() function of ViewController.
Getting back to the visual aspects of the Fox demo, let's look at the game scene objects created in the project and how we can view the nodes in what's known as the scene graph.
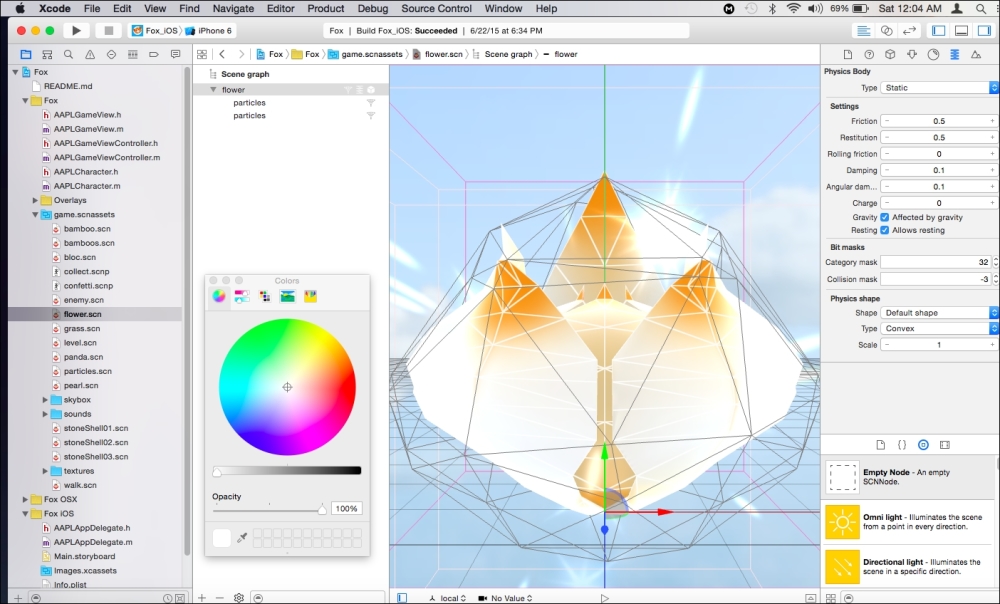
We see that game objects and particle effects in the Fox demo can be visually manipulated in Xcode and together in one view. The preceding image shows the flower collectable and its components that consist of the 3D mesh, lighting, bounding boxes, and the particle effects. In SceneKit, we do this with a SceneKit scene file (SCN).
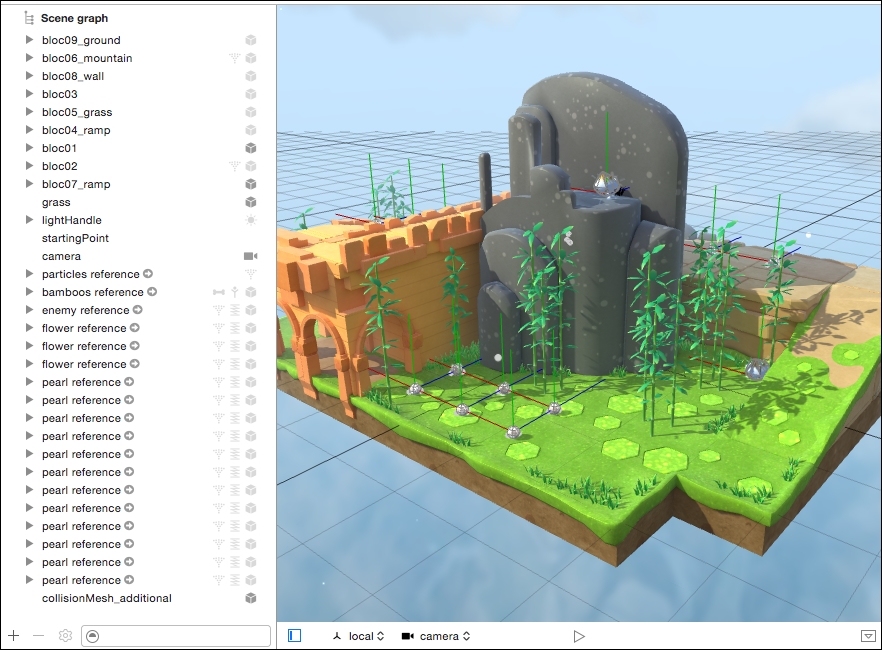
To view the scene's scene graph, click on the side window icon found toward the bottom-left of the Xcode window under the visual editor window of the scene, as seen in the following screenshot:
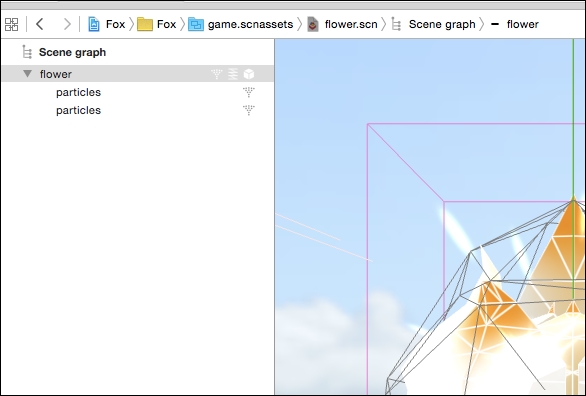
This is a screenshot of the scene graph. Those familiar with the game engines, such as Unity and Unreal Engine, will be quite familiar with this type of component/game scene view. The scene graph shows the dropdown hierarchy of all the objects in the scene including their own internal components. The flower power-up consists of a 3D mesh model named flower that has two child particle effects as well as a physics body. All three are denoted by the three symbols seen on the right-hand side of the graph's objects.
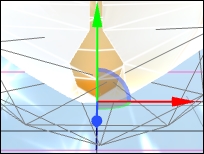
We can move the model around in the scene, using X, Y, and Z markers seen in the preceding image. We can also zoom in, zoom out, rotate the scene, as well as add more objects to the scene.
To add more objects to the scene, follow these:
- Go to the media library found in the library windows at the bottom-right of the screen (seen in the prior image).
- Now search for
grassand simply drag and drop it into the scene. Now the premade grass object is in this scene as a reference.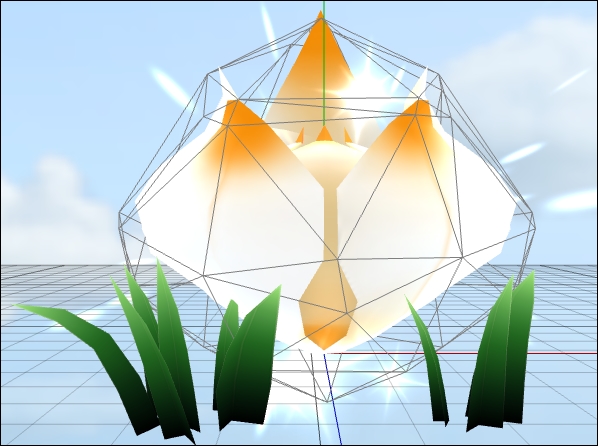
- This is actually how the
level.scnfile was composed. - There's also the option to add primitive objects to the scene and build them up from there, which is again very similar to the design-centric game engines. Simply select from the object library tab right next to the media library icon and search
geometry. There are primitive objects, such as spheres, planes, and boxes.
- The primitive objects lack the lighting, materials and other details that we can see in the grass and other premade objects in the projects. Use the even more detailed inspector windows for these objects to see and edit various details, such as the physics bodies, materials, baking the lighting, and object name identification for any scripting/coding.

- There's also actions that can be added to these objects. Click on the secondary editor icon (the upside down triangle in a square at the button right of the flow scene's view). This will open the secondary editor that shows a
RotateByEuleraction if the flower asset is selected in the scene graph.
- What this action does is rotate the flower once every second. To see this in action, click on the Play button seen just above the secondary editor window timeline. We can see how this object will rotate from this action.
- The action can be shortened or extended by expanding or condensing it in the secondary editor timeline. More details about the action can be edited in the Inspector window, and if we'd like, we can use the library to add more actions to this object or remove the one provided to have it act in a different way.
Test out a few actions, times, and properties yourself. We can see how, without any code, we can set up a scene visually and dynamically control actions of each object in that scene. Many of these visual features and actions work for both SceneKit and SpriteKit scenes.
Look at the level.scn file to see a scene with a fully composed level camera object (as seen in the previous screenshot). Do you want to make a similar level with maybe more obstacles and a different skybox? Copy the level and change those assets and name it level2. This can save a monumental amount of time in the design of games and levels. From Xcode 7 onwards, we have tools directly in the IDE that originally were only for the multiplatform game engines. It really puts the design back into game design.
Much of the manual code we've gone over could get daunting, especially for those of us who may want to get into game design but are still relatively new to coding.
//Objective-C
SCNScene *scene = [SCNScene sceneNamed:@"game.scnassets/level.scn"];
//Swift
let scene = SCNScene(named: "game.scnassets/level.scn")!
This is all we need to reference a scene from the visually designed tools. Add it to the view's root node like we spoke about in the SceneKit basic template and it's ready to go. Use code to add spawning enemies, the player, and the 2D SpriteKit overlay (which can itself have actions and visual designs in its SKS file), and it's a full-fledged game.
For more information on the SceneKit framework as well as the latest updates and additions to its library, see the full documentation link as follows:
https://developer.apple.com/library/ios/documentation/SceneKit/Reference/SceneKit_Framework/