
Creating a great game is hard work. Our goal as game developers is to have an application that can be played by thousands, if not millions of people. We want them to play what we crafted in those long weeks and months. Before the app is released, we'd also probably want to have others test the game to weed out any bugs that might have been missed. Publishing on the iOS platform can allow us to do both.
We can allow others to try out our games before release through the TestFlight service, and of course, we can then submit our game for release on the Apple App Store. After release, we can submit updates. These updates and future versions could be just to patch up some minor bugs we might have missed in the initial releases, add new features, such as levels, achievements, and other Apple services, or we might need to update our app later on to adhere to the eventual updates that will happen with the iOS platform.
In this chapter, we are going to cover a few main topics:
- Setting up our apps for either testing or publishing in iTunes Connect
- Steps to submit our app to be played in the app store
- Summary of the TestFlight service for testing in the prerelease phase
- How to use iTunes Connect to create updates to our app
We won't tell you how to market your game, as that's an entire book/topic on its own that depends on your budget and preferences. However, we will say that if you or your beta testers found playing your game fun, there is a chance that others will too. Submitting to the app store does not warrant instant success.
Even unreleased games that get high accolades at the ever growing list of indie game reward shows or game jams might not have seen that praise reflected in sales and downloads after release. We have to remember that the game development scene, thanks in part to gaming's position in popular culture, is a sea of thousands of developers, both big and small, trying to make the next great game.
Don't let that discourage you though. If your game does well, which it has the ability to with the Apple App Store, then it could be a life-changing experience. No matter the outcome, let the experience of building your own game and learning this development platform humble you and make you want to be an even better developer for your next project. Eventually, that hard work will pay off.
Before we move forward in explaining the steps needed to publish your game, we wanted to note a little fact about this subject. This fact is that the exact steps needed to submit our iOS apps for testing or publication is one that changes rather often. Every couple of months this process might change from how we describe it here.
Over the years, since the start of iOS development, Apple has continually made this process easier and more streamlined. Xcode does much more of the signing/provisioning work for us than it did in the past, and the worries of our app taking forever to appear in the App Store are hardly an issue.
For example, when the Swift game PikiPop was submitted in November, 2014, it only took five business days between the day it was submitted for review to when it appeared in the App Store for the public. This review time will vary for each of us, but as long as there aren't any terrible errors or policy violations in our apps, we can expect our creations to be public for millions to potentially play. To make sure that the publication of your game goes smoothly, it's best to review the App Review Guidelines found here: https://developer.apple.com/app-store/review/guidelines/.
There is one more potential development snag we must warn about before you choose to submit your app to the app store. As of the time of this publication, if you build your app in a beta version of Xcode, that app will be rejected from review.
During the course of this book, we have been building our apps and going over features that currently are in the beta version of Xcode 7. This was because there are a number of new features for iOS 9 / Xcode 7 that weren't there in iOS 8 / Xcode 6, namely, the GameplayKit framework and visual editor tools for SceneKit that make Xcode development as hands on as multiplatform game engines.
When you build your games for releasing to the App Store, make sure to first build them in the current non-beta version of Xcode. Use the beta versions of Xcode to test the newest unreleased features as well as up and coming iOS builds during the prerelease phase.
So you have coded, simulated, and hopefully enjoyed playing a bit of that iOS game you worked so much on. The next step is to bring your app into the beta/prerelease phase. The goal of this phase is to get your game into the hands of a smaller pool of gamers/testers to simulate what the experience could be for the thousands, if not millions of people who could potentially play your game. The very first step to this, if you haven't already, is to sign up for the Apple Developer Program: https://developer.apple.com/programs/.
There is a cost involved and that cost will be based on your development goals. For individual, sole proprietor business accounts, it costs $99 a year to be an iOS developer. If you are working as part of a group of developers, then the Enterprise plan of $299.99 might be a better choice.
Note
In your developer page, you will also have to make sure that your provisioning profile is set up correctly. This step used to be one of the toughest things to complete in being an iOS developer, but Xcode has made this process more automated with each new update. If you've been testing your app in Xcode with an actual device, you've obviously already done this step. If not, here's more information on setting up your provision profile(s): https://developer.apple.com/library/mac/documentation/NetworkingInternet/Conceptual/RemoteNotificationsPG/Chapters/ProvisioningDevelopment.html.
The portal that will be your best friend in the process of publishing your app is iTunes Connect here:
https://itunesconnect.apple.com/
iTunes Connect is where you can see your submitted apps, track various app analytics, assign TestFlight beta testers, and view your app's revenue. We won't be able to give a full rundown of every feature available in iTunes Connect; mainly we'll look at the steps needed to post, publish, and update your game. Feel free to dive into all of the features and settings that iTunes Connect can provide for your app as the features grow with every new iOS update.
Let's get right into the steps needed to submit your app. First, we shall talk about the testing/beta phase of your game.
Here is a summary of the steps needed for the testing/beta phase of your game:
- Create an iTunes Connect app record.
- Update the build string.
- Archive and validate your app.
- Upload your app to iTunes Connect.
- Beta test your game with the TestFlight service.
- Analyze crash reports and solicit feedback from testers.
These are the steps needed to add your App to the iTunes Connect app record:
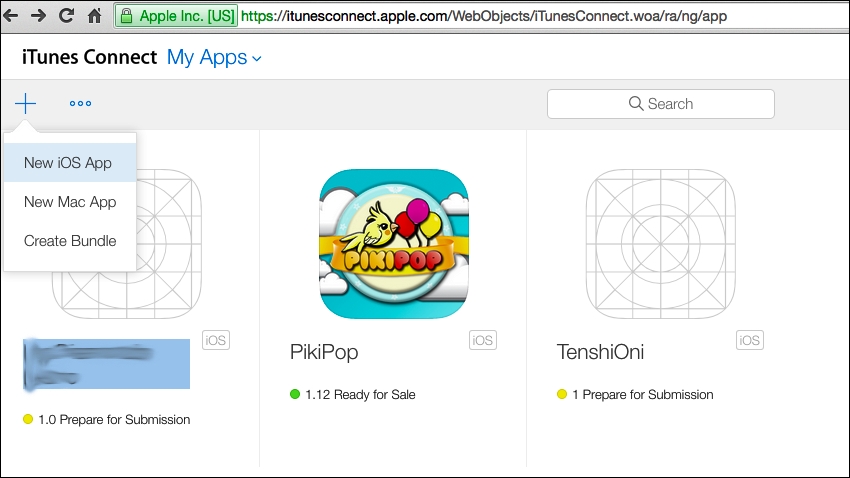
- Log into your account at https://itunesconnect.apple.com/ and go to the My Apps section.
- Now click on the + icon located on the top-left corner of the page and pick New iOS App from the dropdown.
- Fill in the appropriate fields and click on Create if you already know the information for this data. For those unsure what to place here, we review each of these fields in the following screenshot:
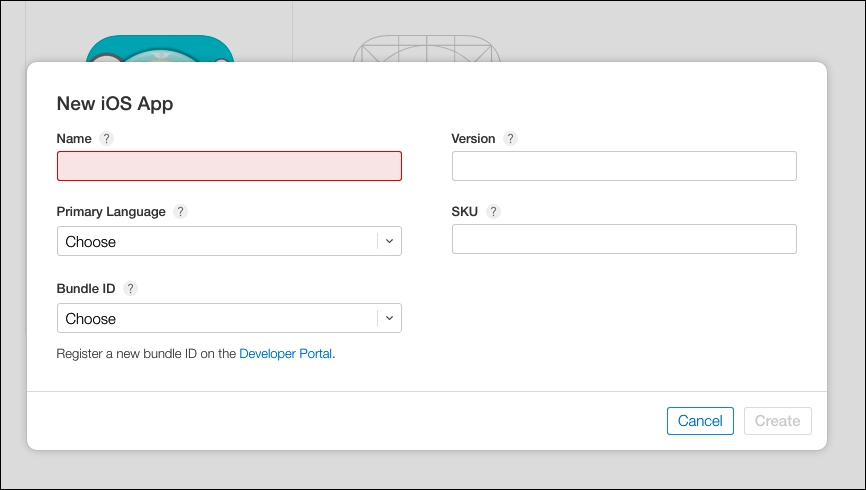
Note the SKU, the Version, and the Bundle ID fields. The SKU must be unique and not in use already as Apple will use this for the identification of your app in the store. The Version and Bundle ID fields must match the build settings you have set in your game's Xcode project. The Bundle ID field is a dropdown that at first might only show the Wildcard App/Bundle ID.
The Wildcard ID is one of two types of Bundle IDs, the other being the Explicit App ID. Here's a link to Apple's documentation/FAQ for which type of ID would be best for your game: https://developer.apple.com/library/ios/qa/qa1713/_index.html. In short, if you are going to use Apple services, such as Notifications and Game Center achievements, you would need an Explicit App ID, if not, then the Wildcard ID is best.
Note
If you wish to use the Explicit Bundle ID, you will have to register your app's Bundle ID in the Apple Developer portal. The IDs that are registered on the Developer portal will populate that dropdown. Here's the link to that page in the developer site: https://developer.apple.com/account/ios/identifiers/bundle/bundleCreate.action.
The Bundle ID Suffix field is found in your project's info.plist file. It's a unique string that is created by your Xcode project, also known as the Bundle Seed ID. We'll show you where to find this and other bundle/build-based information when we go over the Updating the build string step next.
The Name field is what your game's name will be in the App Store. This is what people searching for and hopefully visiting your game's landing page will see. The Primary Language dropdown is what your game's default language will be if the app store can't localize your game's information for that territory.
The build string represents an iteration of your game's bundle. It's a two-period-separated list of positive integers, as in 1.2.3. Basically, the build string is another layer of versioning added for your game. When making an iOS app, as in our case, changing this build information will automatically be seen by iTunes Connect during the upload step. If we don't update this field, even if we change our game's code, iTunes connect will still think that you are trying to upload the same build and will reject your upload.
Here's where you can find this information in your Xcode project:
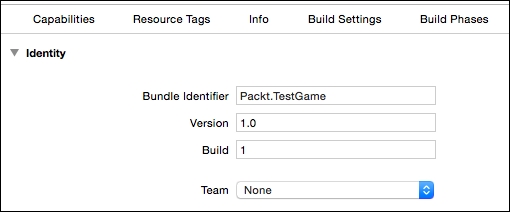
The bundle identifier, build string, version number, and other app identification/global settings are found on the General tab in the Inspector window when we click on the project's main file in the Navigation pane. We can also find this information represented in the info.plist file. Make sure that these fields match your iTunes Connect record.
Now let's move on to uploading our game in Xcode to iTunes Connect.
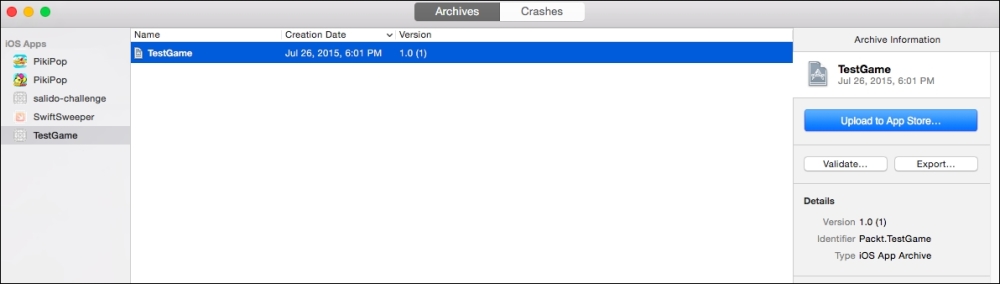
The next step in the app publishing process is to archive your game's project bundle. To do this, go to the top dropdown menus and then navigate to Project | Archive. The archive selection might be inaccessible if your test device is the simulator as to the iOS Device.
Once built, your archived app will be seen in the Archives organizer with other archives you have created from this and other apps. This window will open when you build the archive, but it can be accessed at any time by going to Window | Organizer in the top menu.
The window can be seen in the following screenshot:
Next, we validate your game to make sure that it fits the minimum requirements for submission. To do this, follow these steps:
- Click on the Validate button found on the right side of the preceding Archives organizer window.
- A pop-up window will show where you choose the Development Team that would do the provisioning for this app. (This is assuming your Provisioning profile was set up correctly.) Click on Choose to move to the next step.
- This will open more of the popup showing a summary of your app before performing the actual validation. Information such as your app's Bundle ID along with the Bundle Seed ID mentioned earlier can be seen here as well.
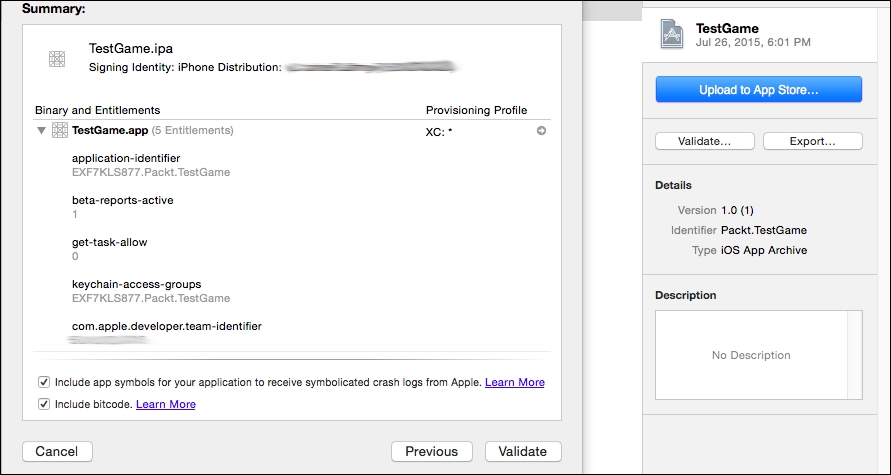
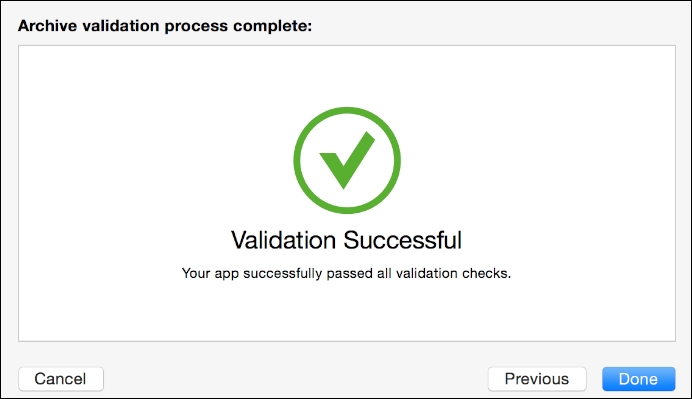
- Click on Validate and if the information in your app project is correctly matching what we set up on iTunes Connect, then your app should be validated and ready for submission to iTunes Connect and eventually the App Store itself.
If your app is not validated, make sure that all of your information in iTunes Connect matches, most importantly the Bundle ID.
More on app validation can be found here:
This step should now be rather simple. Click on the blue Upload To App Store… button, and you should get the same prompts seen from the app validation stage. You'll be asked to choose the Development Team; show your app's details, and you can choose to upload your app by clicking on Submit. If your game validated previously, then it should upload smoothly to iTunes Connect. Now your game should be one step closer to being available for either beta testing or purchase/download on the App Store.
Every app should have at least some form of beta testing before release with video games usually being the type of apps that need it more than others, as games tend to have more variables and chances for crashing than your run-of-the-mill mobile program. Also, the Apple services, such as GameCenter and In-App purchases, can't be tested correctly without moving to this phase.
In the past, the only way to test iOS apps before release was using the ad hoc distribution method, validating individual devices with their UDID, and giving the testers a download with a manifest file that would allow the app to actually work on their device. This is where Apple differs greatly from other platforms such as Android. Apple is very careful in keeping what developers like to call a walled garden with their application distribution.
In the past, this was a bit of a headache and led to a rather convoluted ad hoc setup as compared with Android resulting in app bugs not being noted until after the release. To help keep the integrity of Apple's app distribution and give developers a better way of pretesting their apps easily and to have more people than the original 100 device limit, the TestFlight service was created. The TestFlight icon is seen here:
TestFight is an app that anybody can download from the Apple App store for their iOS device. For you, the developer, it can be a great tool for early distribution of your games. TestFlight testers are segmented into two groups: internal testers and external testers. Internal testers are made up of your own team members, and you can have a maximum of 25 internal testers.
In iTunes Connect, you can set roles for your team in the Users and Roles main section. These roles include Admin, Technical, Marketing, and others. The members that are in the Admin and Technical category are those whom you can assign as internal testers. Making those users internal testers is as easy as turning on the Internal Testers switch next to their name.

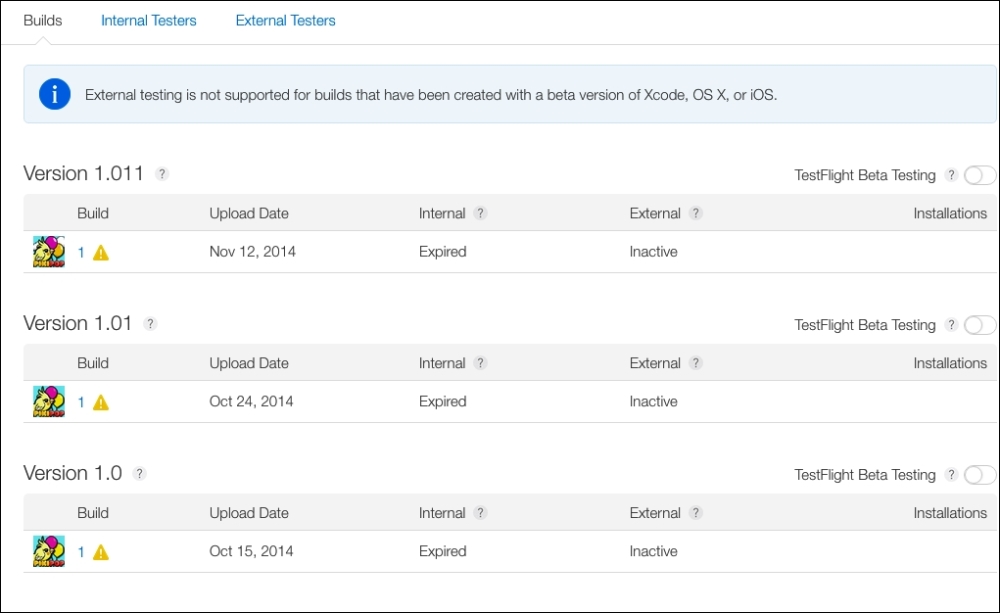
To have these users test your game in TestFlight, locate your game in the My Apps section of iTunes Connect. If your game's build was successfully added to iTunes Connect from the steps provided in the previous section, then you should see it listed in the Prerelease tab.
Note
When you upload your app to iTunes Connect they can be divided into versions, which are then subdivided into their own builds. For example, version 1.0 (1) is version 1.0, build 1 of your game, whereas 1.0(1.2) would be version 1.0 / build 1.2 of your game. Changing the build string in your project and then uploading that new build is how you can divide your app for this page in iTunes Connect. We will discuss more on this while creating a new update to your game, but this is the process for versioning the prerelease builds.
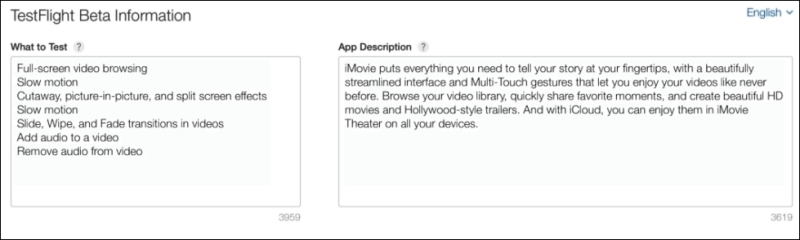
The next step is to click on the build or version, which should open the build's own metadata page. Fill in this information to better help your testers know whom to contact and what to test. This information is what your testers will see when they download your game's beta version.
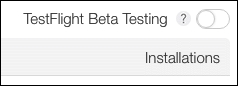
To allow this build/version for TestFlight testing, simply switch on the TestFlight Beta Testing switch found on the upper-right side of the version's listing in the Prerelease tab.
Now to have your testers test this build in their TestFlight app, simply click on the Internal Testers tab next to the Builds tab on in the game's prerelease page, click on the checkmark next to their name and then click on Invite.
They should get an e-mail to accept that invite, and you will see which build they are testing once they installed it in TestFlight.
To get external testers for your game with TestFlight is also a rather simple process with one caveat; your app needs to be submitted for beta review. Doing so is simple though all you need to do is to click on the Submit For Beta App Review link at the right side of your app's build; again in the Builds tab of the Prerelease section.
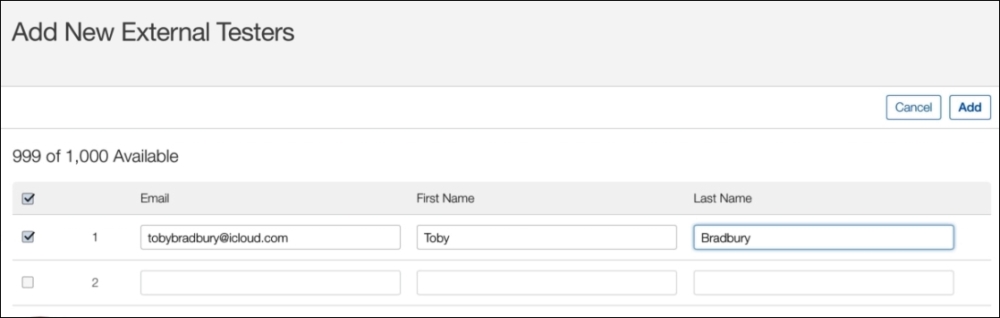
As with the actual App Store submission, it might involve waiting before moving to the next step. The wait is not as long as the full app submission and is a very good sign that all will go well when you do the public release. Unlike internal testers, all of the metadata must be completed but you can have up to 1000 testers! You can start to invite testers once the Submit For Beta App Review link is tapped and your app is waiting for beta test review.
Now go to the External Testers tab in the Prerelease page and then click on the + button to add them with their e-mail address and (optionally) their first and last name. Click on Next to add that person to your invite list. Note that you only have 30 days for external testers to review that build of your game.
Once your app passes beta review, your external testers can test your app just like your internal testers can.
Now that you have people testing your game, take notes from their e-mails on what issues there might be in your game and then go back to your game's project to do the needed fixes. Update the build number in the build string of your Xcode project and reupload the build to easily allow your testers to keep up to date with each new prerelease update.
App crash reports can be viewed in the App Analytics main section of iTunes Connect, as seen in the image from PikiPop's information as follows. However, it seems that these detailed crash analytics are for after release and not during prerelease.

More on TestFlight and even a video explanation can be found on Apple's official page on the subject as follows: