
For the sake of simplicity, MineSweeper won't have many different assets or any sprite textures. It instead uses Swift's Unicode emoticon character capabilities and UIView calls to design the game's graphics in a rather old-fashioned, very MineSweeper-like way.
Not only do we do this to give us a somewhat simplistic starting point, but to show how Swift code and SpriteKit classes can let us create the entire game's logic and flow without the initial need of sprite assets. This way, if developing as a team or by yourself, the game can be made before doing the sometimes grueling process of making wonderful visual assets. Thinking with code and structure first can ensure that you have a working prototype that you can polish later with sprites, music, and atmosphere.
We've so far left SwiftSweeper waiting as just a shell of the SpriteKit game template. It's about time we get to the game's model:
- First, let's add our image assets. For more information, visit https://mega.co.nz/#!XhEgCRgJ!4QqKMl1l1P4opWU7OH2wEN_noVQ86z5mxEyLuyUrcQo.
This is a link to the
Assets.xcassetsfolder ofSwiftSweeper. We can add these individually, but the simplest way is to just replace your project'sAssets.xcassetsfolder directly in your computer where your project's folder is located. You can have Xcode open while you do this, it'll automatically update from the original template files. - Next, let's add the sound files from the following URL:
https://mega.co.nz/#!T5dUnJZb!NUT837QQnKeQbTpI8Jd8ISJMx7TnXvucZSY7Frw5gcY
- Add the sounds by doing the following:
- Right-click on the
SwiftSweeperExamplefolder that holds the Swift files and then go to New | Group from the menu.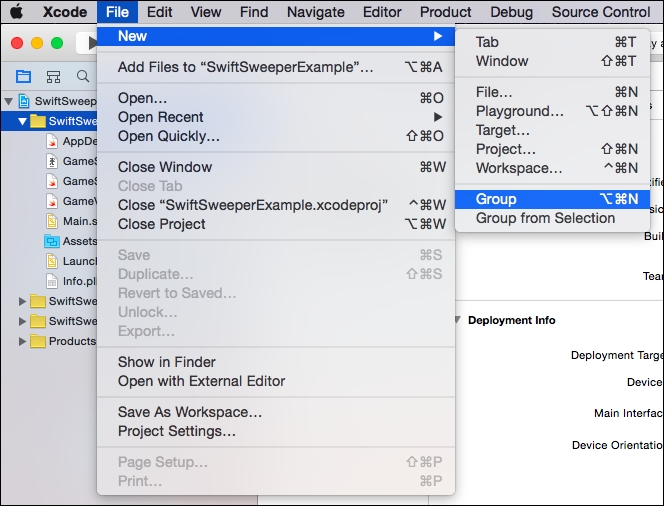
- Name this folder
Soundsand drag it to the bottom of the files within the sameSwiftSweeperExamplefolder.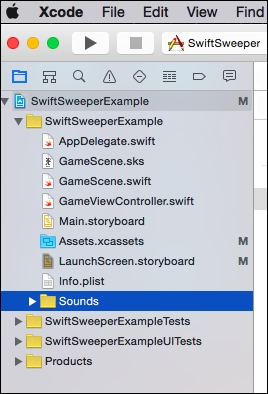
- Right-click the
Soundsfolder and selectAdd Files To "SwiftSweeperExample".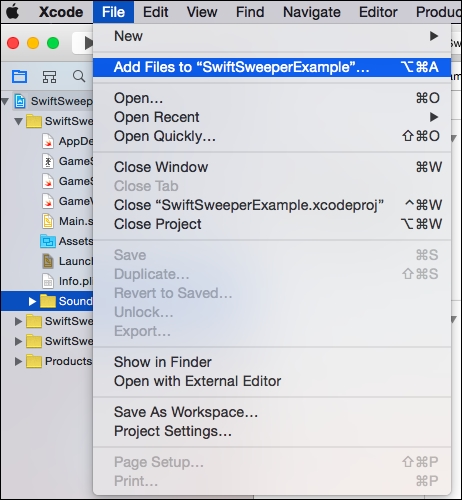
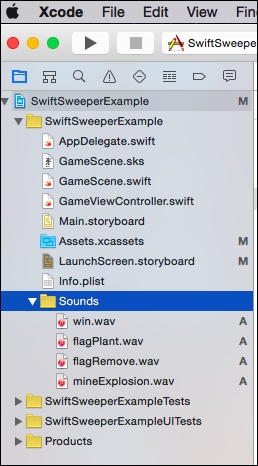
- Add the sounds from the
SwiftSweeperSoundsfolder, and they should now be in your project.
- Right-click on the
All of the assets should be now in the project, so now we can build our game. Let's first start with the actual tiles.
Now create a new Swift file, name it Tile, and paste the following code into the file:
class Tile{
    //Properties
//(1)
    let row : Int
    let column : Int
//(2)
    var isTileDown = false
    var isFlagged = false
    var isAMine = false
//(3)
    //Mines counter
    var nearbyMines:Int = 0
//(4)
    init(row:Int, col: Int){
        self.row = row
        self.column = col
    }
}
Here are some stepwise logic we adhere to while creating tiles:
- While building any code logic, we usually place the properties about this object at the top. We know that each tile in a game of MineSweeper will be part of a row and a column. The number of the row and the column this tile will have during gameplay won't change during the course of a single round, so we make them constants with the keyword
letand set them with the typeIntas we know that you can't have fractions of a row or a column, at least in terms of the tile objects. - A tile can have a few different states. It could be already tapped, it could have a flag placed on it, and if it's a a mine. Since these are true/false properties, we set them with as Boolean variables
isTileDown,isFlagged, andisAMine. We set them tofalseinitially. - Tiles in MineSweeper count how many tiles around them are mines, so we create the integer counter
nearbyMinesto hold that information. - When an instance of a tile object is created, we want the game to set its row and column number placement on the
GameBoard, so we create the default initializer,init, to have two parameter inputs for both the row and column.
That's all we need for the Tile objects, so let's move on to setting the button functionality of these Tile objects with the MineTileButton class.
Create a new Swift file and name it MineTileButton and paste the following code into it:
//(1)
import UIKit
class MineTileButton : UIButton {
//(2)
    var tile:Tile
    let tileSize:CGFloat
//(3)
    init(tileButton:Tile, size:CGFloat) {
        self.tile = tileButton
        self.tileSize = size

        let x = CGFloat(self.tile.column) * tileSize
        let y = CGFloat(self.tile.row) * tileSize
        let tileBoundingFrame = CGRectMake(x, y, tileSize, tileSize)
        super.init(frame: tileBoundingFrame)
    }
//(4)
    required init(coder aDecoder: NSCoder) {
        fatalError("init(coder:) has not been implemented")
    }
//(5)
    //button text;
    //replace button with an SKSprite for better GUI interface?
    func getTileLabelText() -> String {
        if !self.tile.isAMine {
            if self.tile.nearbyMines == 0 {
                return "0"
            }else {
                return "(self.tile.nearbyMines)"
            }
        }
//(6)
        return "💥"
    }
}
Here's the explanation of the code:
- Since we are creating a
UIButtonobject, we import the UIKit framework for this object. - These are the properties of this button object. We need a
Tileobject namedtileto reference, aCGFloatsize namedtileSizeto represent the rectangle this button will occupy. - The initializer for this class takes in a
Tileobject namedtileButtonand aCGFloatnamedsize. We assign the class's own tile totileButtonandtileSizetosizeand then we make a square namedtileBoundingFramewith theCGRectMake()method. This is done just after we set an x and y value ofCGFloatto the square based on thetileSize. TheUIButtonparentinit(frame: )initializer uses thetileBoundingFrameas the parameter viasuper.init(frame: tileBoundingFrame). - Since Xcode 5, the
initfunction is needed mainly to keep the compiler happy while dealing with UI objects. - The function
getTileLabelText()returns a string based on the status of thetileobject. If the tile is not a mine, we know that we have to either place something for there being no tiles; traditionally, this is just a blank space or an empty""string, but for now, we are just placing0there, leaving the logic open for customization. Honestly, we could simply return the nested if-else statement's return(self.tile.nearbyMines), and it'd return the same result. As we see, it's returning the particularTileobject'snearbyMinesproperty. - If the tile is a mine, then we return the collision Unicode emoji character. The
getTileLabelText()function is called when the player taps anunflaggedtile. - Swift's ability to use Unicode character symbols can be a great visual aid in the planning process of your games. The collision Unicode emoji used in line
(6)isU+1F4A5 (128165). If you see only a square box and not the red explosion-like character, it can be seen in the full project download mentioned earlier in the chapter or at the following link.
Note
Find more information on this emoji at http://www.charbase.com/1f4a5-unicode-collision-symbol.
Now that we have our tile object and button logic that will represent each tile object named MineTileButton, we need to create an object representing the collection of these objects, that is, GameBoard.
The full GameBoard.swift code is a bit too large to show here in its entirety, so we will summarize its main features and segments.
We can view the entire code either in the full project link mentioned earlier in the chapter, or directly below in order to copy to your current game project file:
For our GameBoard, we are looking to create a tiled board of 10x10 size that also has three levels of difficulty: easy, medium, and hard. To create the difficulty, we simply use an enumerator named difficulty to store the game's difficulty levels.
The most important properties of GameBoard include boardSize_ (which is set to 10 in this case), a variable that will represent the number of mines that will be placed named mineRandomizer, the number of mines active on the board named mineCount, and the Tile objects that will populate the board named tiles.
Make a note of the syntax used for the tiles property:
var tiles:[[Tile]] = []
In this way, we can create an ordered 2D array (or matrix) in Swift*. The GameBoard object will basically store an array of an array of Tile type objects.
Note
*Swift does have more ways to express matrices, for example, we can use Structs to define our own unique matrices. As at the time of this publication, Swift does not have its own true functionality for fixed length arrays, as we see in various C languages. However, using the nested braces [[]] is fine for what we are trying to accomplish.
The initializer for GameBoard, init(selectedDifficulty:difficulty){}, takes in the player-selected difficulty as it's single parameter then builds the board based on the boardSize property and then uses the following nested for-in loop to populate the entire board with Tile objects:
        for row in 0 ..< boardSize_ {
            var tilesRow:[Tile] = []
            for col in 0 ..< boardSize_ {
                let tile = Tile(row: row, col: col)
                tilesRow.append(tile)
            }
            tiles.append(tilesRow)
        }
Since the tiles object is a 2D array, we first need to perform this nested loop that first creates a 1D array of Tile objects (named tilesRow) for each row and then add a tile for each column in that row with the .append function. The main tiles 2D array is then appended that tilesRow array.
Tip
If you wish to make a GameBoard instance that is a rectangle or of another shape, you'd have to take into account the differing column and row amounts. This would make the nested for-loop have more complexity by needing a separate columnSize and rowSize property. Many puzzle games will make their boards look complex to the player but might still keep their internal structures simple to either squares or rectangles by instead filling in that tile with a nonplayable section or background/transparent tile.
It's a way for a developer to cut corners while at the same time allowing complex functionality and design. It's why we built this game with separate classes representing the Tiles, the tile button functionalities, and the game board layout.
Using inheritance, we can continue to customize what each tile does and thus allow a myriad of features based on a simple foundation.
It's why video games have always been the poster children to make the most out of object-oriented design.
Don't worry if at first it's tough to get a full understanding of this, as nested loops tend to be brain twisters. Just observe how the interior for-loop won't exit until it's done filling in columns based on the boardSize_ property. This kind of loop is made easier with the fact that the rows and columns are all equal at 10.
The initializer then calls the resetBoard() function, which resets the mineCount to 0, and does two more nested for-loops:
for row in 0 ..< boardSize_ {
            for column in 0 ..< boardSize_ {
                self.createRandomMineTiles(tiles[row][column])
                tiles[row][column].isTileDown = false
            }
        }
This board-iterating for-loop randomly sets which tiles are mines using the createRandomMineTiles() function as well as resets the tiles to being untouched with the tiles[row][column].isTileDown = false call. The createRandomMineTiles() function works off the current difficulty level, particularly the mineRandomizer property that is determined in the implementDifficulty() function. The higher the mineRandomizer value, the less of a chance the iterated tile will be made into a mine.
The next nested for-loop in resetBoard() is the following:
for row in 0 ..< boardSize_ {
            for column in 0 ..< boardSize_ {
                self.calculateNearbyMines(tiles[row][column])
            }
        }
This iterates through every tile on the board and sets the number the player will see if tapped. That number of course being the number of mines surrounding a non-mine tile, that is, the nearbyMines property of the Tile class.
This rather complex chain of calculations begins with the calculateNearbyMines() function and runs through the array/tile index calculating functions, getNearbyTiles() and getAdjacentTileLocation(). We provided various detailed comments in each of these functions to get a better understanding on how they work. It's advised that you read the intricate details on how it's done but to not muddy an already complex game logic explanation, take notes on the following line in getNearbyTiles():
let nearbyTileOffsets =
   [(-1,-1), //bottom left corner from selected tile
            (0,-1),  //directly below
            (1,-1),  //bottom right corner
            (-1,0),  //directly left
            (1,0),   //directly right
            (-1,1),  //top left corner
            (0,1),   //directly above
            (1,1)]  //top right corner
If any line in these three complex functions is to be understood, it's this one. The nearbyTileOffset object is an explicitly written array of tuples, which contains every offset that could exist around a single 2D tile. Actually, it's best to think of each member of this array as an (x,y) 2D Vector.
Thus, as commented in the preceding code, the offset of (-1,-1) would be to the bottom left of the tile since x = -1 (left 1) and y = -1 (down 1). Similarly, (1,0) is to the right, (1,1) is the top-right corner.
We also have to take into account that some tiles are on the edge and/or column of the board, thus some of the tile offsets won't return the reference to another tile; they'll instead return nil.
for (rowOffset,columnOffset) in nearbyTileOffsets {

 //optional since tiles in the corners/edges could have less than 8 surrounding tiles and thus could have a nil value
            let ajacentTile:Tile? = getAjacentTileLocation(selectedTile.row+rowOffset, col: selectedTile.column+columnOffset)
            //if validAjacentTile isn't nil, add the Tile object to the nearby Tile array
            if let validAjacentTile = ajacentTile {
                nearbyTiles.append(validAjacentTile)
            }
        }
This for-loop in getNearbyTiles() not only checks the offsets of every tile, but also, using the call to getAjacentTileLocation(), accounts for edge or corner tiles.
Again, these three functions are rather complex, even in a less line-by-line / semi-generic explanation of their functionality. So, don't worry if you don't understand the flow/order at first.
Finally, for resetBoard(), we can't win the game without knowing if the player got every non-mine tile, so we get that information with the line:
numOfTappedTilesToWin_ = totalTiles_ - mineCount
When the player's number of completed moves (counted in the GameScene class) equals numOfTappedTilesToWin, the player wins!
This is all done before the player makes the first move! This is done in order to have the values already predetermined. Yes, we could make some of these calculations during the player's touch, but dealing with boilerplate game logic is usually fast enough to prepare the game at load time so that we can use the game play to focus on effects, sequences, and other visual notifications during the game loop.
This functionality is controlled by the GameScene.swift file, which we will summarize next.
We now have the core of SwiftSweeper's logic set up, but now it's time to present it in our SKScene provided by the game template, GameScene. This scene uses the game/rendering loop functions that we mentioned at the beginning of the chapter.
The SwiftSweeper version of GameScene.swift is rather large at about 800 lines of code, so like GameBoard, we won't be going over it line by line but instead we'll be summarizing some of the important aspects of the scene. As stated previously, every update to Xcode and iOS brings more visual ways of setting up these scenes, so getting to know every line of code in this example isn't necessary, but still recommended if you really wish to dive deep into how to use code to present SpriteKit game scenes.
The full code can be found in the full project link mentioned earlier in the chapter or (if you've been building it from scratch throughout the chapter) at the link mentioned here:
We used various //MARK: comments to section off parts of this code, so you can navigate easier. After copying the code into your project, you could build and run the app. As long as everything was placed into the project correctly, you should have a working version of SwiftSweeper running on your phone or in the phone simulators. Play through it a bit to get an idea what is being done in GameScene to present the game. Sometimes, seeing a game in action lets us see the code behind it better. If any errors pop up, something went wrong and if all else fails, you can download the completed project from https://github.com/princetrunks/SwiftSweeper.
The first visual entry point in GameScene, didMoveToView(), is actually rather small as follows:
override func didMoveToView(view: SKView){
        self.backgroundColor = UIColor.whiteColor()
        stageView_ = view
        loadInstructions()
    }
We simply set the background color to white and load the instructions. Again, we didn't say that this was meant to be a beautiful-looking game.
The loadInstructions() function manually places the instructions sprite on the screen and sets the currentGameState_ enum to .Instructions. A game state or state machine is common game development methodology that instructs characters, the player, and the game itself what state it is in. This could be used to make sure that certain parts of the gameplay don't happen in parts they aren't suppose to. iOS 9 / Xcode 7 introduced the framework; we'll dive into more later chapters named GamePlayKit, which, among other game logic functions, works with state machines that can be modular and independent from a specific scene. Components from the class SKComponents and more modern usage of SKAction, also introduced in iOS 9, work in the same way, independent from OOP inheritance. Think of more dynamic/usable versions of protocols.
The next overall step in the GameScene is the chooseDifficultyMenu() that came with the removeInstructions() function, which was called after the player taps the screen. This tap is checked in the function we mentioned in a few examples prior, touchesBegan(), using the game state as a logic check:
override func touchesBegan(touches: Set<UITouch>, withEvent event: UIEvent?) {
       /* Called when a touch begins */
        for touch in touches {
            //flag button Pressed
            if CGRectContainsPoint(flagButton_.frame, touch.locationInNode(self)) {
                flagButtonPressed()
            }
            //instructions removed when tapped
            if CGRectContainsPoint(instructionsSprite_.frame, touch.locationInNode(self)) && currentGameState_ == .Instructions {
                removeInstructions()
            }
        }
    }
Note how the touchesBegan function is actually rather simple. It only checks if we tapped the flag button or if we tapped on the instructions. What about the tiles? Well, remember that we made these tiles all members of UIButton with the MineTileButton class. Here's the function that controls this:
func tileButtonTapped(sender: MineTileButton) {
        //exit function if not playing the game
        if (currentGameState_ != .MineTap && currentGameState_ != .FlagPlanting){
            return
        }
        //reveals the underlying tile, only if the game is in the main state, aka MineTap
        if (!sender.tile.isTileDown && currentGameState_ == .MineTap) {
            sender.tile.isTileDown = true
            sender.setTitle("(sender.getTileLabelText())", forState: .Normal)
            //sender.backgroundColor = UIColor.lightGrayColor()
            //mine HIT!
            if sender.tile.isAMine {
                //sender.backgroundColor = UIColor.orangeColor()
                self.mineHit()
            }
            //counts the moves; also used in calculating a win
            moves_++
        }
        else if (!sender.tile.isTileDown && currentGameState_ == .FlagPlanting){
            self.flagPlant(sender)
        }
    }
Members of the UIButton class send out a reference of what has been tapped to the scene. In this game, is an object of the type, MineTileButton. Using the game state to check if it's logical to the scene, we either end the round if a mine is hit with the mineHit() function or we increment the moves performed (used to calculate the win by comparing it to numOfTappedTilesToWin_ calculated at the start of the round). If the game state is .FlagPlanting, then we instead deal with the logic behind planting a flag on the tiles. Tiles with flags don't react to .MineTap game state taps and thus, if you put a flag on the wrong tile, you won't get the win until you uncover all of the non-mine tiles.
Through the rest of the code, we'll find a timer, alerts for the player based on the outcome, and even the ability to save times per difficulty levels using the class functions of the NSUserDefaults class.
Again, it's not exactly all that visually elegant, but intricate in code and most importantly a fully functioning game. We advise you to check out more of the code in GameScene.swift, but one major issue to our design one might have caused in the beginning is that this only works with iPhones.
Using visual tools such as autolayout, seen briefly in the previous chapter, will allow easier design changes for the entire family of iOS devices. Since many of the visual assets in SwiftSweeper's GameScene were manually placed in the view (particularly the instructions), we'd have to account for every device type in code. This is possible, but as the family of devices grows, manual code used for screen visuals could be broken rather easily in future iOS updates and device announcements. That's why in our next chapter about SceneKit and later, we will mostly diverge from this code-centric structure and embrace the hands-on tools and newer frameworks such as GamePlaykit from Xcode 7 and later.