
Some of the basic assets in any game, be it SpriteKit or SceneKit built, are the various particle effects we'd add to characters, objects, or an entire scene. Particles can add to the feel of collecting that item, give the player a signal that something is happening to the player, like they are gaining or losing health, or show the presence and power of an incoming boss fight.
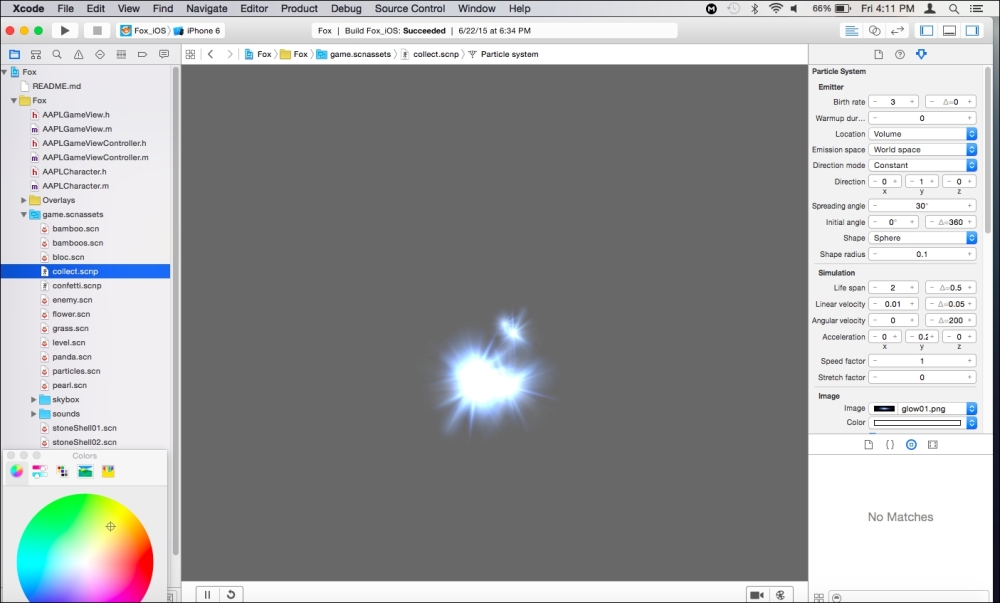
Collectable particle effect from the Fox demo
In the past, the process of making a particle effect would be to manually create sometimes rather complex particle emitter shader objects using OpenGL code. This can still be done if we so choose (using either Apple's fast, low-level API, Metal, or OpenGL), but over time, the process of visually creating and editing particle effects has gotten easier. Not too long ago in the iOS development history, frameworks such as Cocos2D/ Cocos3D allowed us to use third-party particle effects builders to import into our games. With both SpriteKit and SceneKit, Xcode as of about iOS 7/iOS 8, a more visual representation of particles was created in Xcode thus saving us a large amount of time and effort in creating the effects we want and expect to see in our games. The image previously shown displays the Xcode particle systems editor with the Fox demo's collectable sparkle effect.
To create your own particle effect in SceneKit, follow these steps:
- Create a new file as we did in the past by navigating to File | New … or simply the keyboard shortcut command + N.
- We then select the Resource section under iOS and select the SceneKit Particle System template. (If working with SpriteKit, select SpriteKit Particle File.)
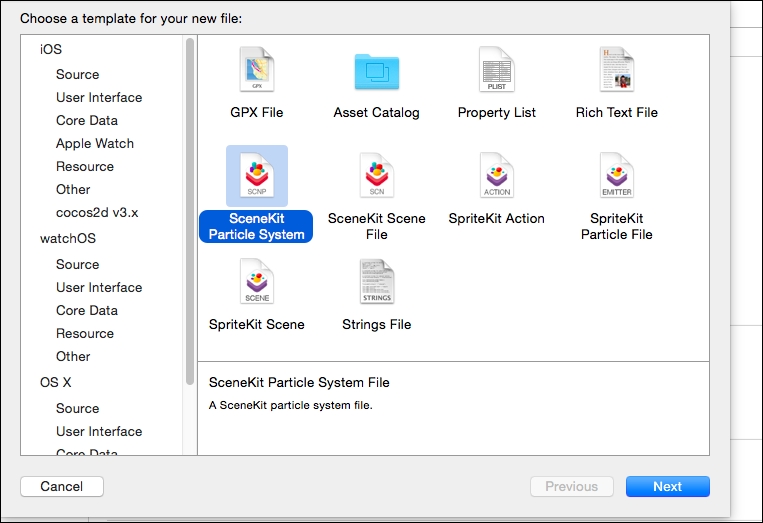
- Both the SpriteKit and SceneKit particle options give us a list of basic particle templates we can start from, such as Reactor, Sparkle, or Bokeh. Select one of your choosing or check out a collectable one here in the demo. For SpriteKit, this creates an SKS file and the image mask for the particles. The SceneKit template creates the 3D particle effect via an SCNP file and the image mask.
Let's take a look back at the particle system we created for the collectable particle in the demo. If not selected already, click on the attributes inspector to view various controls we can edit to customize our particle effects.
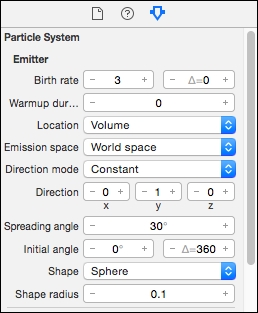
Feel free to test a number of the variables and fields within the inspector. There's the birth rate, which controls how often the particles restart their start and end animation, the image, which can make up the shape and color of the particles, and the various angles that determine the overall direction of the effects. There's also the Looping dropdown, which keeps the particles repeating during the life of the particle system in the scene. Additionally, the affected by gravity toggle is what we use to have the particles fall based on the scene's gravity. The collection particles loop constantly without gravity, and the confetti particles happen once and fall to gravity, as we'd expect confetti to behave. If an object in our scene has a physics field, we can also have the particles react to that.
When we create SpriteKit or SceneKit particles, we can call them in our scene via code in either the SpriteKit or SceneKit:
SpriteKit particles aren't in the Fox demo but to backtrack a bit to our talk on SpriteKit, if we'd wanted to add particles to a 2D SpriteKit game, here's an example of how we'd accomplish that:
//(1)
var path = NSBundle.mainBundle().pathForResource("Spark", ofType: "sks")
//(2)
    var sparkParticle = NSKeyedUnarchiver.unarchiveObjectWithFile(path!) as! SKEmitterNode
//(3)
    sparkParticle.position = CGPointMake(self.size.width/2, self.size.height)
    sparkParticle.name = "sparkParticle"
    sparkParticle.targetNode = self.scene
self.addChild(sparkParticle)- We create a path to our app's bundle with the
NSBundle.mainBundle().pathForResource()function call, and we pass the string of the particle file's name, in this case,Spark, with the file type, SKS. - Next, we create the
sparkParticleobject using theNSKeyedUnarchiver.unarchiveObjectWithFile(path!)call that, as we see, takes the path we created in part(1). It's casted as the particle object for SpriteKit,SKEmitterNode.NSKeyedUnarchiveris a class used to decode named objects from keyed archives, an encoded hierarchy of archives. This class has some support of what is known type coercion. In short, it can decode objects in files, be it whether in a 32-bit or 64-bit architecture. More on this special file decoding class here: https://developer.apple.com/library/mac/documentation/Cocoa/Reference/Foundation/Classes/NSKeyedUnarchiver_Class/ - We then set a position and name for this particle effect and target it to the scene while also adding it to the scene node.
Though this example isn't given in the Fox demo, this is a great example of how we can target specific files in our project's navigation hierarchy.
SceneKit particles are members of the SCNParticleSystem class. We add these particles to our scene with the addParticleSystem function of the SCNNode class. The Fox demo does this in the collectFlower() function with the following Objective-C line:
[self.gameView.scene addParticleSystem:_collectParticles withTransform:particlePosition];
What this code is doing is calling the scene in the designated view and adding the particles, which are declared earlier in the class as _collectParticles to our scene. It then tells the scene at which point in space this effect will appear. In this case, it's the particalPosition variable that when traced back is taken from the SCNNode parameter passed into the collectFlower() function.
Note
Here's how this would be written in Swift:
scene.particleEmitNode.addParticleSystem(_collectable!)
Swift's addParticleSystem API unfortunately doesn't have the withTransform parameter as in Objective-C, so we'd have to add the particle system to the node it will be emitting from, which is denoted by the particleEmitNode variable. This most likely will change in future API changes of Swift 2.x and later.