
A video game, more than any other type of application, bases much of its logic on whether the game or entities in that game are currently in one of a number of different states.
This could be checking whether the game is in the intro scene, running in the main gameplay mode, the player has died, the player is idle, a boss enemy has appeared, the game is over, the stage is over, the boss is low on health, and much more.
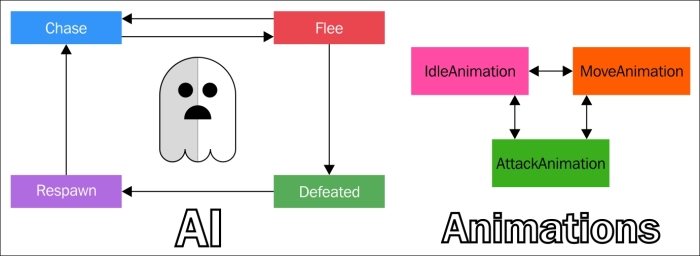
An example of state machines for either AI or character animations
In the past, it has always been common practice for game developers to write their own custom state machine logic from scratch and then use the update/render cycle to check on these various states. Typically this would be done in a custom class or simply in a custom-made enum object that will shift through various states, such as .GameOver, .MainGame, .LowHealth, and so on. These states could also describe the status of an individual entity in our game and dictate which animation cycle to run. For example, the player could be charging their attack and we'd want to use that state of the player to animate the charging animation. Objects in the game scene might check back on such states via switch statements to make sure that they are not doing any action that wouldn't make sense based on the context of the state. It wasn't too long before multiplatform game engines made this a part of the workflow, particularly in the animation handlers. These objects that let us inform the game and entities in the game of the various states are known as state machines. GameplayKit allows us to work with this concept in conjunction with its component/entity functionality. The framework provides the abstract class GKState for us to subclass from for our game's states, and the class GKStateMachine to utilize for placing these state objects into a designated state machine. An object of the type GKStateMachine can only be in one state at a time, so it gives us a better way to use and reuse these states, as opposed to the old boilerplate/switch statement methodology.
The previous diagram is from WWDC15 and uses an example of what a PacMan-like ghost character's, or any other game character's, animation and AI state machines would look like. Also note that not all paths could lead to each other. For example, the ghost can switch back and forth between chasing and fleeing, but can neither be defeated while chasing nor could it respawn unless it was previously in the defeated state. These are known as state transitions or edges in a state machine.
By default, all edges are valid and we override the isValidNextState(_:) function in our GKState objects/components to tell the state machine if we are allowed to move between certain states.
Here's how this is done in the DemoBots sample program's TaskBotAgentControlledState class. DemoBots is the iOS 9 SpriteKit demo mentioned in Chapter 3, SpriteKit and 2D Game Design:
override func isValidNextState(stateClass: AnyClass) -> Bool {
        switch stateClass {
            case is FlyingBotPreAttackState.Type, is GroundBotRotateToAttackState.Type, is TaskBotZappedState.Type:
                return true
            default:
                return false
        }
    }
This tells the state machine that the TaskBotAgentControlledState state can transition to FlyingBotPreAttackState, GroundBotRotateToAttackState, or TaskBotZappedState. This object is another of the GameplayKit component type known as an Agent (which we will go over next), but for now note how we validate which transitions can happen in the isValidNextState() function.
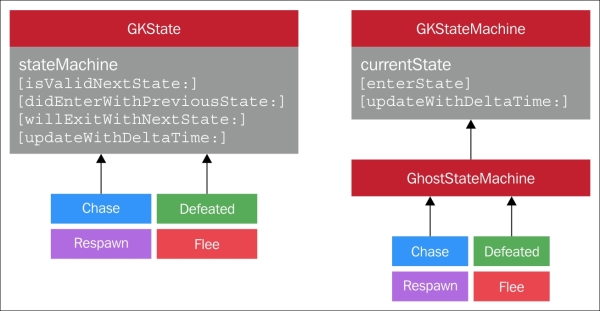
Here we see a visual representation of the GKState and GKStateMachine classes. As stated before, isValidNextState() tells us which state transitions are valid. The didEnterWithPreviousState() function is where we tell our components what to do when the state is entered, and the willExitWithNextState() function is where we tell the component(s) what to do when the state is exiting to the next state. The updateWithDeltaTime() function, as with previously mentioned GameplayKit objects, is where we put our render/game loop cycle updates. Optionally, we can also add more functionality to these classes through inheritance. For example, we can create a previousState property to collect more information about the prior state. We can then potentially use that information for our own helper functions, such as exitState() or execute().
Here's a code snippet showing how to create state machines and how to add GKState objects to them:
/* Make some states - Chase, Flee, Defeated, Respawn */
let chase = ChaseState()
let flee  = FleeState()
let defeated = DefeatedState()
let respawn  = RespawnState()
/* Create a state machine */
let stateMachine = GKStateMachine(states: [chase,flee,defeated,respawn])
/* Enter our initial state - Chase */
stateMachine.enterState(chase.classForCoder)
In the preceding code, we see the states created from the premade classes of GKState (chase, flee, defeated, and respawn). The stateMachine object, at initialization, receives a parameter of an array of GKState objects, as shown in: let stateMachine = GKStateMachine(states: [chase,flee,defeated,respawn]). Then, in this example, we start that state machine at the state chase. This, of course, will be different based on the logic of your own game's components. GKStateMachine objects can also return the currentState() function; thus, we can guide various entities and components in our game based on the current pulse of the game's objects.
Find out more on GKState and GKStateMachine in the following full documentation:
Next we go over agents, goals, and behaviors.
When we make entities in our games, particularly those that are not the player, we want them to perform various actions. These actions are dictated by artificial intelligence (AI) that we give them, and are based on various states of the game, the player, the environment, or the player themselves. We can have a group of enemies follow a certain path, track the player, or automatically move smoothly around obstacles using our game's physical world. The framework allows us to make our game entities be what's known as agents. Agents are entities that can have goals and behaviors attached to them.
Agents in GameplayKit, which utilize the GKAgent class, can have GKComponent objects that automatically set various behaviors and are based on the weight of their goals. The weight of a goal is usually a float from 0 to 1. The higher the goal's weight value is compared with other goals, the greater the chance that the agent will perform those behaviors. For example, if an enemy character is low on health, we'd probably want their Heal goal to have a higher goal weight. The enemy will behave in a fashion that shows the urgency of that current low health situation by healing more often and thus giving the player a more challenging and intelligent opponent. In other words, agents, goals, and behaviors are a stackable and malleable AI system.
Here's an overview of this functionality in GameplayKit:
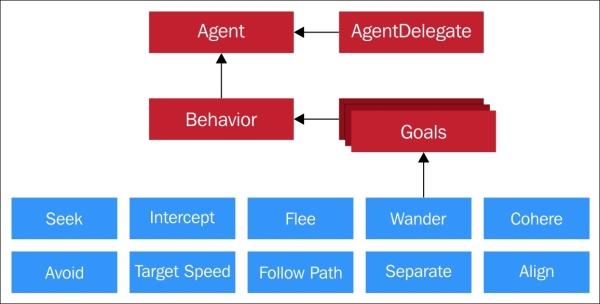
A behavior, via the GKBehavior class, is made of an array of GKGoal objects that are each given a certain weight. For example, we could have a GKBehavior class for an NPC in a racing game named RacingBehavior. That behavior would be a combination of two goals, such as FollowPath and AvoidAgents. Together those goals would make a character in our game that will automatically move away from other NPCs while staying on the current track for the stage we are in.
Here's a visual representation of these classes:
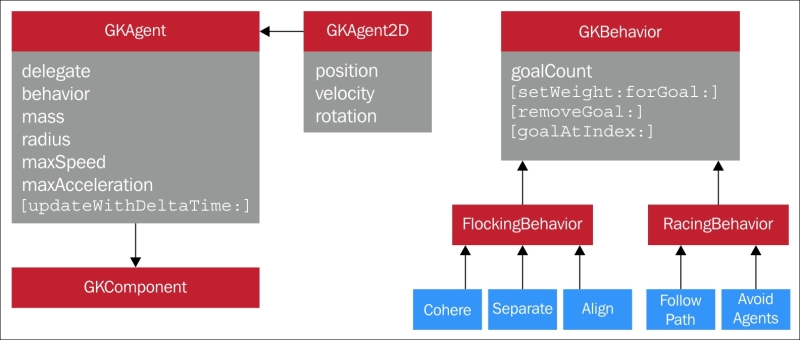
A GKAgent object, as we can see in the preceding image, has a number of physics-based properties, such as mass, radius, maxSpeed, and more. Like other GameplayKit objects, it utilizes the updateWithDeltaTime() function to sync with the render/game loop updates of either GKComponentSystem or GKEntity. Are you starting to see a pattern here with these objects? In a way, we can also think of a GKAgent object being similar to a SpriteKit or a SceneKit node since they work on our game's physics. However, whether we made our game with SpriteKit, SceneKit, or our own custom render components, such as in OpenGL or Metal, we need to link up these classes to what's displayed on the screen with the special GKAgentDelegate class. Here's a diagram of that class and its functions:
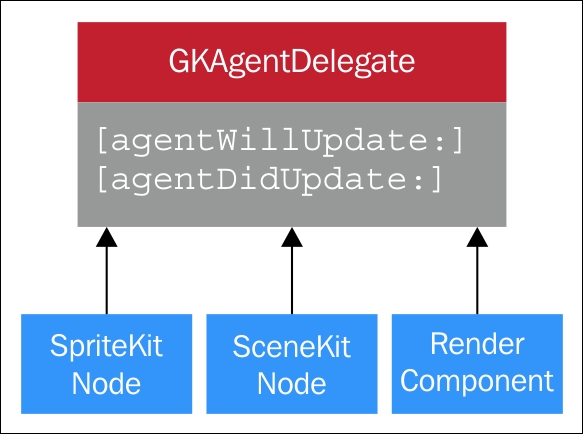
The agentWillUpdate() function is what we use to tell the agent what to do just before the game's update() function, and the agentDidUpdate() function is what we use to tell the agent what to do on screen after the update() function. This can be, in the case of a Follow GKGoal object, having a reference to the player's position on the screen before the update takes place. Here's the example of this from WWDC15, but written in Swift as opposed to the Objective-C example that was given:
func agentWillUpdate(agent:GKAgent)
{
   /* Position the agent to match our sprite */
    agent.position = self.position
    agent.rotation = self.zRotation
}
func agentDidUpdate(agent:GKAgent)
{
   /* Position the sprite to match our agent */
    self.position = agent.position
    self.zRotation = agent.zRotation
}
Let's look at an example to see what a GKGoal/GKAgent interaction looks like. Here's a code snippet found in the DemoBot project's TaskBotBehavior.swift class, which is a child of GKBehavior:
//(1)
let separationGoal = GKGoal(toSeparateFromAgents: agentsToFlockWith, maxDistance:
GameplayConfiguration.Flocking.separationRadius, maxAngle: GameplayConfiguration.Flocking.separationAngle)
//(2)
behavior.setWeight(GameplayConfiguration.Flocking.separationWeight, forGoal: separationGoal)
In line (1), the toSeparateFromAgents parameter of GKGoal lets us pass a reference for the GKAgent objects we wish to keep a certain distance from.
In line (2), the behavior.setWeight() function passes the predetermined float GameplayConfiguration.Flocking.separationWeight as the weight for this very goal. The higher the weight, the more priority is put on that goal.
You'll notice from the full documentation of GKGoal linked to later that much of the GKGoal class deals with the attraction or repulsion agents have to each other. Combining different characteristics of this basic functionality lets us create unique goals that GKAgent parameters get, as shown here: https://developer.apple.com/library/prerelease/ios/documentation/GameplayKit/Reference/GKGoal_Class/index.html.
To backtrack a bit, here is a more basic way we can create these objects, as shown at the conference both in Objective-C and Swift.
//Objective-C
/* Make some goals, we want to seek the enemy, avoid obstacles, target speed */
GKGoal *seek = [GKGoal goalToSeekAgent:enemyAgent];
GKGoal *avoid = [GKGoal goalToAvoidObstacles:obstacles];
GKGoal *targetSpeed = [GKGoal goalToReachTargetSpeed:50.0f];
/* Combine goals into behavior */
GKBehavior *behavior = [GKBehavior behaviorWithGoals:@[seek,avoid,targetSpeed]
  andWeights:@[@1.0,@5.0,@0.5]];
/* Make an agent - add the behavior to it */
GKAgent2D *agent = [[GKAgent2D* alloc] init];
agent.behavior = behavior;

//Swift
/* Make some goals, we want to seek the enemy, avoid obstacles, target speed */
let seek  = GKGoal(toSeekAgent: enemyAgent)
let avoid = GKGoal(toAvoidObstacles: obstacles, maxPredictionTime: 0.5)
let targetSpeed = GKGoal(toReachTargetSpeed: 50.0)
/* Combine goals into behavior */
let behavior = GKBehavior(goals: [seek, avoid, targetSpeed], andWeights: [1.0, 5.0, 0.5])
/* Make an agent - add the behavior to it */
let agent = GKAgent2D()
agent.behavior = behavior
We see in the preceding code that when we create goals we assign agents to them that we are either seeking or avoiding. Goals on agents can have a target speed, as seen with the toReachTargetSpeed: parameter, and these can all be bundled up into the current behavior with set weights given to them.
Here's more documentation on GKGoal, GKAgent, GKAgentDelegate, and GKBehavior:
One other thing to note is that the obstacles array reference passed here is part of the GKObstacle class. This class references objects on the scene that we tell agents to usually avoid when moving across the screen, and are part of our next topic, Pathfinding.
Navigation is an integral part of most games. We could have an overworld scene in our game showing the various levels traversed or yet to be visited, with branching pathways to each point, or we could have a 3D action platformer with a spell that points out a logical path to our next quest or battle location. We can also see pathfinding in top-down isometric games. For instance, the player could be fighting off a hoard of enemies all locked on the player's location on the screen. Good pathfinding AI would not only tell the enemies to move toward their goal, but to dynamically avoid any impassable objects in their way and detour to a better route automatically . In our talk on agents, goals, and behaviors, we somewhat covered that. Behaviors, which GKAgent objects adhere to, sync with various game physics and thus create smooth AI movements to change with other agents/objects in the scene. However, it would be great to also be able to inform these components where they can and can't traverse in a scene, and that's where pathfinding comes in.
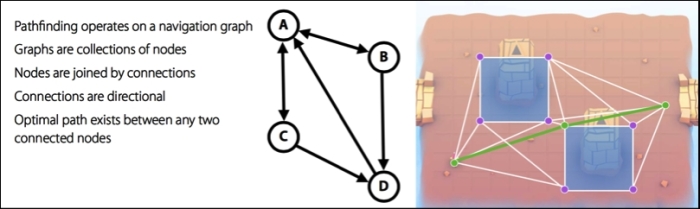
The preceding diagram shows what Pathfinding is and is an in-game visual given to us by Apple during the WWDC15 conference. It can be broken down as follows:
- Pathfinding involves nodes with transversal paths to and from those nodes in what's known as a navigation graph.
- These nodes can be single directional or bidirectional and, most importantly, there can be a path calculated with this graph that represents the best path a
GKAgentcan take. - The squares shown in the earlier scene represent
GKObstacleobjects that are placed in the scene (be it by code or visually in the Xcode editor's tools).
Here's the full documentation for the GKObstacle class:
Like other GameplayKit features, we use various abstract classes to child from for setting up the navigation graph and overall Pathfinding functionality; those classes are GKGraph, GKGridGraph, GKGridGraphNode, and GKObstacleGraph.
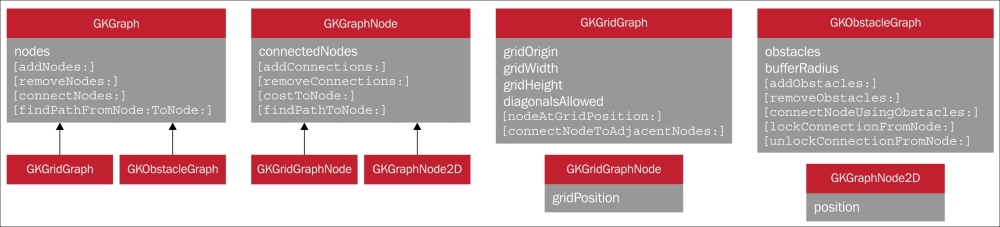
It's not too foreboding when we see the preceding diagram of classes and go through them one by one. The main, and most common, class used id the GKGraph class. This is where we can attach to it one of two different graph specification types: GKGridGraph or GKObstacleGraph. GKGraph lets us add and remove nodes, connect them, and find the optimal path between nodes. Of the two specification types, GKGridGraph has a simpler functionality that is meant for easy, 2D-based navigation graph creation, whereas GKObstacleGraph lets us set up a navigation graph using GKObstacle objects. Nodes are automatically created around those obstacles based on their shape, and these classes do much of the footwork needed to calculate the paths our agents need to take from the start to the finish of their set path(s). If we want to add even more functionality to our nodes, say if we want customized movement based on terrain type in addition to shape, then we could use the nodes of GridGraphNode.
The costToNode() function, for example, can be used to indicate that though this path would be the optimal path on a flat, even and similar type plane, it would cost more to traverse. For example, if there's quicksand in our game, the player could traverse it, so it wouldn't make sense to make an impassable GKObstacle object over the quicksand. Instead we would say that the path across that terrain between the two nodes costs more. This will make our game's navigation smarter and will handle such custom parameters.
Note
The costToNode() function is actually an example of best practice. We can choose to not use it, but, if we are not careful, our game's pathfinding AI could end up rather unintuitive. This would not only make a poor experience for the player, but end up adding more time from debugging faulty AI actions later on.
Let's look at some code samples to get a better understanding of these classes and how to work with them. Do note that the code as of WWDC15 is in Objective-C.
/* Make an obstacle - a simple square */
vector_float2 points[] = {{400,400}, {500,400}, {500,500}, {400,500}};
GKPolygonObstacle *obstacle = [[GKPolygonObstacle alloc] initWithPoints:points count:4];
/* Make an obstacle graph */
GKObstacleGraph *graph = [GKObstacleGraph graphWithObstacles:@[obstacle] bufferRadius:10.0f];
/* Make nodes for hero position and destination */
GKGraphNode2D *startNode = [GKGraphNode2D nodeWithPoint:hero.position];
GKGraphNode2D *endNode = [GKGraphNode2D nodeWithPoint:goalPosition];
/* Connect start and end node to graph */
[graph connectNodeUsingObstacles:startNode];
[graph connectNodeUsingObstacles:endNode];
/* Find path from start to end */
NSArray *path = [graph findPathFromNode:startNode toNode:endNode];
This code snippet uses the functionality of GKObstacleGraph by first manually creating 2D vector points in the points array and initializing the GKObstacleGraph object and graph with those points. Next, the two GKGraphNode2D objects are created to represent the start and end nodes for a hero character in the game. Then, finally, the optimal path for that hero character is created and stored into the array automatically; that is, a path using the graph's findpathFromNode: and toNode: parameters using the startNode and endNode objects, respectively. This path object can then be used in our hero's movement component or may be a map visual component to move to or indicate to the player the correct path needed to traverse the game stage's obstacles.
The following code sample is how the DemoBots project worked with the navigation in Swift, using what's known as a lazy stored property.
More information on the Swift keyword, lazy, can be found here:
Swift example from DemoBots:
lazy var graph: GKObstacleGraph = GKObstacleGraph(obstacles: self.polygonObstacles, bufferRadius: GameplayConfiguration.TaskBot.pathfindingGraphBufferRadius)

lazy var obstacleSpriteNodes: [SKSpriteNode] = self["world/obstacles/*"] as! [SKSpriteNode]
/*the above line casts the obstacles in our project's "world/obstacles/" folder path as an implicitly unwrapped array of SKSpriteNodes
*/

lazy var polygonObstacles: [GKPolygonObstacle] = SKNode.obstaclesFromNodePhysicsBodies(self.obstacleSpriteNodes)
In short, lazy variables are quick array initializations in which their values are not known at first and are controlled by outside sources. In the case of DemoBots, these are obstacles that are created automatically from the bounds of SpriteKit nodes, which is done by the SpriteKit node function obstaclesFromNodePhysicsBodies(). This example, just shows how much time can be saved when using the provided frameworks. In the first example and more so in past game development, much of this logic would have to be manually done via terribly complex boilerplate code logic.
For more information on Pathfinding with GameplayKit, check out the examples and documentation found here:
So far, we've created AI that's great for the components and objects that are active in a scene with their movement, behaviors, and navigation, but what about AI that can understand the game's rules like the player? A good example of this is a game of chess or various other board/tile-like games. It'd be great to control how much the computer can make progress in the game with various levels of difficulty for the player. We can also want to let the game decide for us what the next best move is. Something like this is common in three-match type games, such as Bejeweled® or CandyCrush®, in which you are looking at grid and the game gives you a hint. This type of logic is where MinMaxAI comes in.
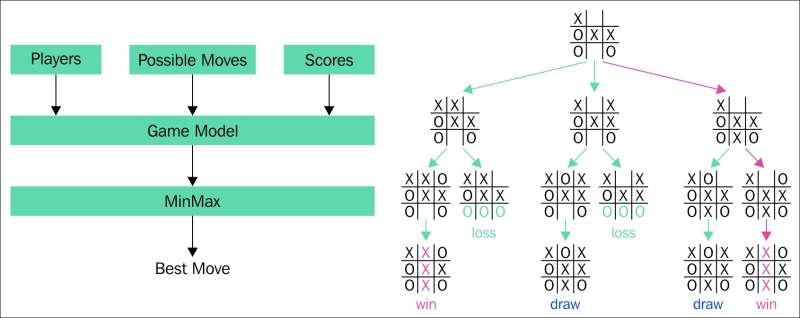
MinMaxAI works by taking an inventory of all of the available moves for our game and placing them into a decision tree. Based on the parameters we give the AI, we can tell it how to choose these decision branches, typically in terms of game difficulty. This is done by taking in the players, a list of all their possible moves as well as their scores, and plugging them into a Game Model protocol that then uses MinMaxAl to determine the best move. The Tic-Tac-Toe example from WWDC15 is shown in the preceding diagram. Note how some branches would lead to more losses than draws or wins for the computer AI. A harder difficulty level would make the computer player choose the paths that more likely lead to a win for it, or, in the case of those three-match games, give the player a suggestion for the next best move.
Of course, as one might have guessed, this type of logic is best for turn-based or tile-based games. MinMaxAI can work in any game, but that game, or at least the implementation of MinMaxAI, will only work if there's a set base of moves and future moves for it to take into its Game Model protocol. An action platformer, unless given some choice of features, wouldn't be able to use MinMaxAI, for example. What's great about this functionality in GameplayKit is that it doesn't need to know the details of your game's rules; it just needs the ability to look into future possible moves.
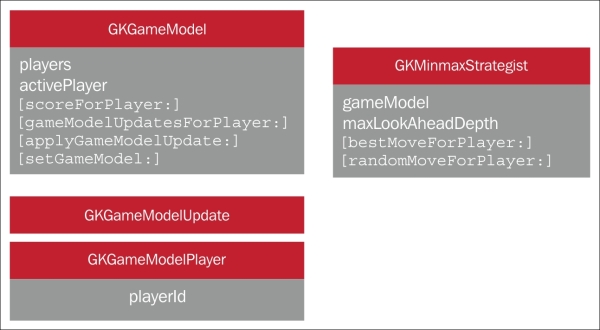
The class diagram shows the classes and functions used when dealing with MinMaxAI. We see GKGameModel, which is actually a protocol for a game state. The GKState objects that adhere to this protocol need to provide a list of players, the active player, the player's score, and the player's list of moves, the latter via the gameModelUpdatesForPlayer() function. We then tell the GKGameModel object what to do as it moves on to the next game move with the applyGameModelUpdate() function. GKGameModelUpdate is essentially an abstract of a game's move and is used by the GKMinMaxStrategist class to build a decision tree, which is thus applied to GKGameModel to change that state in the setGameModel() function.
The GKGameModelPlayer class is a protocol for a player of the game who makes a move, as stated previously, with GKGameModelUpdate. The playerId property is a unique number you can set, which is used to differentiate the players in our game's logic and deal with their own set of moves. This allows the flexibility to have both a hinting structure for the player (or players in a multiplayer game) in addition to also having the computer player have an AI for its own moves. The playerID property is required to adhere to this protocol as we wouldn't know the player we are referencing without it.
The GKMinMaxStrategist class is the actual AI itself that is tied to the gameModel property we created with the prior protocols. The maxLookAheadDepth property is how many moves ahead the AI will look, the more the better and then it returns the best move via the bestMoveForPlayer() function. We can use the randomMoveForPlayer() function to add a bit of randomness to the next move choices; this could be used particularly for the computer's own AI to maybe purposely cause it to make mistakes by choosing a less optimal move.
A quick Objective-C snippet showing how to do this in code is given in the following code. Don't worry about the syntax if you are only familiar with the Swift language we've provided in this book; just get an idea on the basics for setting up these objects.
/* ChessGameModel implements GKGameModel */
ChessGameModel *chessGameModel = [ChessGameModel new];
GKMinmaxStrategist *minmax = [GKMinmaxStrategist new];
minmax.gameModel = chessGameModel;
minmax.maxLookAheadDepth = 6;
/* Find the best move for the active player */
ChessGameUpdate *chessGameUpdate =
            [minmax bestMoveForPlayer:chessGameModel.activePlayer];
/* Apply update to the game model */
[chessGameModel applyGameModelUpdate:chessGameUpdate];
This is also, like many of the code snippets in this chapter, taken from the WWDC15 conference. It uses a chess game as an example. The intricate details of setting up a chess game model are a bit complex, so simply take note of how in this code a ChessGameModel object (which is a child of the abstract GKGameModel class) is first created. Then, we create an object of the GKMinMaxStrategist class named minmax, set its game model, set its maxLookAheadDepth property to 6, and pass the game's move and the current active player to the minMax object. Finally, we update the game's model with the applyGameModelUpdate() function. It's also done in Objective-C at the time of this publication, but check out the FourInaRow demo found here: https://developer.apple.com/library/prerelease/ios/samplecode/FourInARow/Introduction/Intro.html.
This project will let us see a more complete implementation of this AI.
For even more on MinMaxAI, check out the following documentation link:
Next we will talk about adding controlled randomness to our games with GameplayKit's random sources.
Randomness in games has been a staple of AI, player moves, level design, and game replayability since the early days of game development. The rand() function in various programming languages, in addition to a range of numbers to scale that randomness, has typically been used to give our applications some less predictable outcomes. However, games sometimes need to have what we like to call controlled randomness. When debugging a game, we don't want to ever run into a problem where a shipped product has an untested state. Sometimes, when using past conventions of randomness, we can run into a situation where the only time some rare events happen may be after a game is out and in the hands of thousands, if not millions, of players who add to the testing pool that we didn't have in the developing phase. Therefore, we may want to control the distribution of randomness. In a typical random selection of outcomes, we get a bell curve of results where the average or middle-ranged outcomes will occur more often than fringe outcomes. This is fine in some games, but rather undesirable in others. Another bit about the rand() function is that its randomness can vary based on other factors, such as the system it's on, the current date and time, and other uncontrollable factors. What we need, then, is platform-independent determinism and customizable distribution. With GameplayKit's random sources, we can accomplish that.
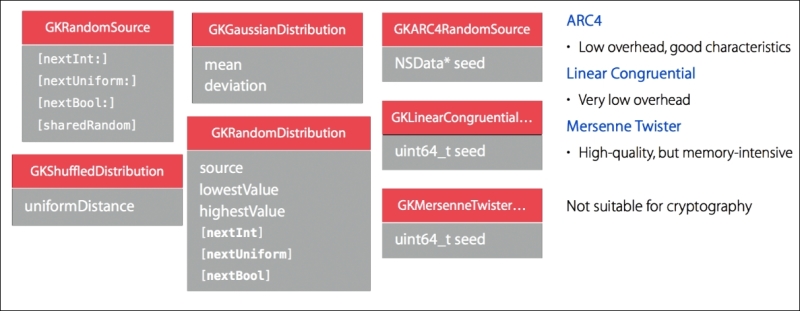
We see a number of the different classes we can use in the preceding image. The base class is GKRandomSource, which actually uses the ARC4 type algorithm by default (via its GKARC4RandomSource subclass). ARC4 is a quick/low overhead and has the typical randomness that we use in many instances. It's different from the arc4Random() C call in which instances of GKARC4RandomSource are independent from each other. GKRandomSource can also become a subclass to either the Linear Congruential or the Mersenne Twister algorithms. Their benefits and disadvantages are shown in the diagram.
It's not recommended that these objects are used for cryptography, so it's best to use other the encryption / hashing frameworks that Apple recommends (https://developer.apple.com/library/ios/documentation/Security/Conceptual/cryptoservices/GeneralPurposeCrypto/GeneralPurposeCrypto.html).
The remaining classes give us control of the random number/outcome distribution methodologies. The GKRandDistribution objects let us use helper methods that, for example, give us the ability to create x-sided die pieces in addition to letting us set its lowest and highest range values. The GKGaussianDistribution and GKShuffledDistribution classes also let us use those helper functions, but GKGaussianDistribution is used when we want to have a bell-curve type randomization where the middle values happen more often than the fringe values. Its mean and deviation properties give us controls on that bell curve and if we maybe want more occurrences of fringe values. GKShuffledDistribution, as we can tell from its name, is great for creating an even and complete range distribution, for shuffling decks of cards, or making sure that every value occurs evenly. This class's uniformDistance property is a float between the values of 0.0 and 1.0. At 0.0, all shuffling is completely random; at 1.0, the distribution of all values is even.
Adding random sources to our games is very simple. Here's some code examples using these classes:
/* Create a six-sided die with its own random source */
let d6 = GKRandomDistribution.d6()
/* Get die value between 1 and 6 */
let choice = d6.nextInt()
/* Create a custom 256-sided die with its own random source */
let d256 = GKRandomDistribution.die(lowest:1, highest:256)
/* Get die value between 1 and 256 */
let choice = d256.nextInt()
/* Create a twenty-sided die with a bell curve bias */
let d20 = GKGaussianDistribution.d20()
/* Get die value between 1 and 20 that is most likely to be around 11 */
let choice = d20.nextInt()
/* Create a twenty-sided die with no clustered values — fair random */
let d20 = GKShuffledDistribution.d20()
/* Get die value between 1 and 20 */
let choice = d20.nextInt()
/* Get another die value that is not the same as 'choice' */
let secondChoice = d20.nextInt()

/* Make a deck of cards */
var deck = [Ace, King, Queen, Jack, Ten]
/* Shuffle them */
deck = GKRandomSource.sharedRandom().shuffle(deck)
/* possible result - [Jack, King, Ten, Queen, Ace] */
/* Get a random card from the deck */
let card = deck[0]
As we can see, these are very quick, simple lines of code that all use the various random source classes. Most are simple property calls, so that when we create our objects in Swift, as seen in the preceding code, it just needs one or two lines of code to utilize these class types and their various randomization functionalities. Combining this to the goal weight of, say, a wander or track AI behavior, and we get some diverse and moderately controlled randomness for the objects and characters in our games.
To read up more on random sources/randomization in this framework, see the documentation link here:
Last, but not least, we come to GameplayKit's rule systems. This aspect of the framework uses what's known as fuzzy logic or approximations, mainly in the context of transitions between game states. This isn't something all too new to game development. Anyone familiar with linear interpolation will be right at home as this is practically the same concept. Unlike the typical use of linear interpolation, which tends to revolve around transitions between physical actions, GameplayKit's rule systems perform these approximate transitions between various game states. Think of the objects/entities in our games as nouns, the components and actions as verbs, and these rules as the interactions between these verbs and nouns. As we've seen throughout this chapter, this would very much describe game states. So why add an extra layer to this logic? Well, let's look at this example from the GameplayKit announcement. This is where transitions between game states and/or entity-component actions could use this fuzzy logic:
if (car.distance < 5) {
  car.slowDown()
}
else if (car.distance >= 5) {
  car.speedUp()
}
This pseudo code could represent a car NPC in our game. Maybe a city building game, where there are various car GKAgent objects that have this code as part of their behavior. This seems sound until we get to values at or near 5. What we might notice in our game are a bunch of NPC cars accelerating and braking in a jerky motion. To solve this, we make the transitions between braking and accelerating not be so finite, but instead transition in approximation.
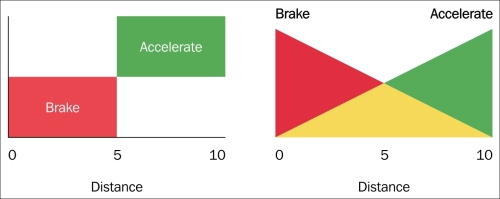
The preceding image is a better illustration of this, with the original logic on the left and fuzzy logic on the right. This creates a smooth transition between actions or states where rule systems come into play; here are the classes we use to implement this type of logic:
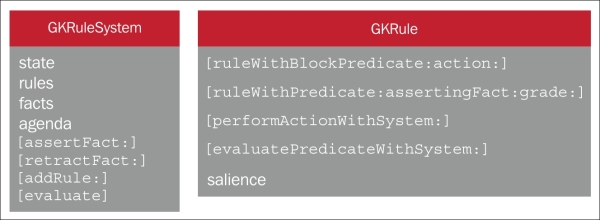
We use the GKRuleSystem and GKRule class instances to utilize rule systems. GKRule represents a specific decision to be made based on an external state, and GKRuleSystem evaluates a set of rules against state data to determine a set of facts. We can assert facts or retract them, and we can grade the fuzziness factor between these rules.
Let's take a look at this in code to get a better feel for it:
/* Make a rule system */
GKRuleSystem* sys = [[GKRuleSystem alloc] init];
/* Getting distance and asserting facts */
float distance = sys.state[@"distance"];
[sys assertFact:@"close" grade:1.0f - distance / kBrakingDistance];
[sys assertFact:@"far" grade:distance / kBrakingDistance];
/* Grade our facts - farness and closeness */
float farness = [sys gradeForFact@"far"];
float closeness = [sys gradeForFact@"close"];
/* Derive Fuzzy acceleration */
float fuzzyAcceleration = farness - closeness;
[car applyAcceleration:fuzzyAcceleration withDeltaTime:seconds];
First, the sys object of GKRuleSystem is created, and we grab the distance state value and save that to the distance variable. We then assert/add a rule named close that happens if 1.0f - distance / kBrakingDistance. The next finite rule we add is far, which is defined as distance / kBrakingDistance, or basically any distance greater than 1 - distance / kBrakingDistance. We create new fuzzy values of close and far, named farness and closeness, that are based on the gradeForFact property of GKRuleSystem. Then, from this, we get our fuzzyAcceleration value from the difference between farness and closeness and apply that acceleration to our car. This is checked during the update render cycle automatically and keeps the logic transitions smooth, removing jerky movements between the different states.
This simple example code from WWDC15 is in Objective-C, but we can see more examples (some in Swift) in the full documentation page as follows:
We can also see some of this implemented in the demo projects we linked to previously.
With these classes, we can create a number of complex rule systems that transition in a more fluid fashion.