
For this chapter, we will be going over the iOS framework used for 3D game development known as SceneKit. SceneKit first became available in iOS 7 but originally was just used for MacOS development. Previously, developers had to code 3D games using OpenGL or third-party frameworks and engines, such as Cocos3D, Unreal Engine, Havok, and Unity. As the graphical power in the iOS family of devices improved, so did the need for an immersive, hands-on first-party 3D game design engine. SceneKit shortly became available for iOS giving developers an Xcode built-in solution to make 3D games.
In the previous chapter, we approached iOS game development in a more code-based methodology. We'll still be working in some code, but since the introduction of Xcode 5 and Xcode 6, Apple has provided some great demos that show how the IDE can be just as visually dynamic of a game engine as multiplatform game engines are. The benefit of using Xcode and the SpriteKit/SceneKit frameworks over those engines is that you have a dedicated design environment for a specific platform. In our case, that platform is iOS and the Apple family of devices. As iOS frequently updates and continues to give new features, Xcode and these frameworks will update with it. Updates to the multiplatform engines usually occur at a later date with sometimes the additional need to install plugins to ensure that your app runs smoothly in future updates.
In addition to the very dynamic and tool-rich DemoBots SpriteKit demo, the June 2015 World Wide Developer's Conference also introduced a wonderful SceneKit demo named Fox. The Fox demo also makes use of features introduced in iOS 9 that we can use for either SpriteKit or SceneKit, such as reusable actions, components, and state machines.
In this chapter, we will go over the basics of SceneKit and we will make a simple SceneKit scene (known as SCNScene) using both code and the visual design tools Xcode provides. We will then add physics, lights, and particles to our SceneKit objects and scene. We will then wrap up with a look into the WWDC15 Fox Demo and some of the features/APIs it uses, which became available in iOS 8 and iOS 9.
Note
In the previous chapter, we left out much of these asset creation features in our discussion on SpriteKit. With SpriteKit scene files, (.sks), we can also create game assets, such as lights, physics fields, bounding boxes/physics constraints, normal maps, textures, entire levels, and characters in the same fashion that SceneKit scene files (.scn) work. We will at times show the SpriteKit method to similar features.
Since SpriteKit and SceneKit scene assets work similarly and can be together in the same scene (thanks to their inherit node/tree functionality), we thought that it was best to save the visual and asset tool discussion for this chapter. The previous chapter's talk on the game/render loop and much of the scene code functionality will work in SceneKit much like it did previously in SpriteKit.
So in other words, we are already set up to dive right into SceneKit.
Like SpriteKit, SceneKit is based on the concept of nodes. SpriteKit objects are children of the SKNode class, while SceneKit objects are children of the SCNNode class.
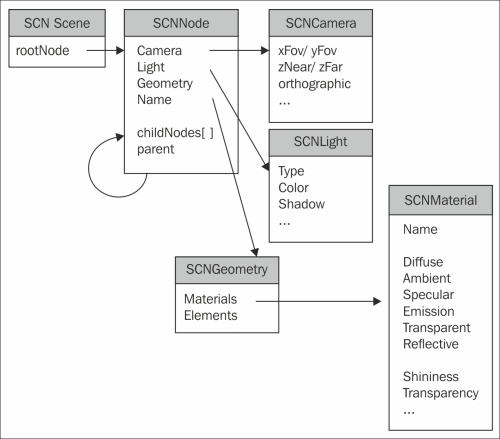
The preceding image is the SceneGraph hierarchy from Apple's SceneKit introduction. As we see, SceneKit has various nodes that branch off from the SCNScene class. These include the generic SCNNode for lights, geometry, and the camera.
Nodes are a tree data structure that can have other nodes added to them and have information of other nodes in the structure. As seen in the preceding graph, it's shown with the childNode[] array and parent properties. Spatial information, such as position, scale, and orientation, can be received from these properties. This is what makes nodes unique to other parent-child structuring in object-oriented design (OOD).
In SpriteKit, we'd typically add a node to our scene or to another node within our scene via the addChild() function. In SceneKit, the same functionality is done with addChildNode(). For example, the main root node in a SceneKit scene is the SCNScene node that is placed in the SCNView node, that is, the framework's unique version of the UIView class. To add a basic sphere object to our scene, we'd do the following:
let sphereGeometry = SCNSphere(radius: 1.0)
let sphereNode = SCNNode(geometry: sphereGeometry)
self.rootNode.addChildNode(sphereNode)
As stated with SpriteKit, working with nodes in SpriteKit can allow us to group various members of our game scene together into their own parent nodes and make actions on them in one call also iterating through for loops or other iteration calls.