
Now that we know the goal of our game, here's how we go about building it in SpriteKit:
- First, open Xcode and create a new project.
- Now select the Game template and click on Next.
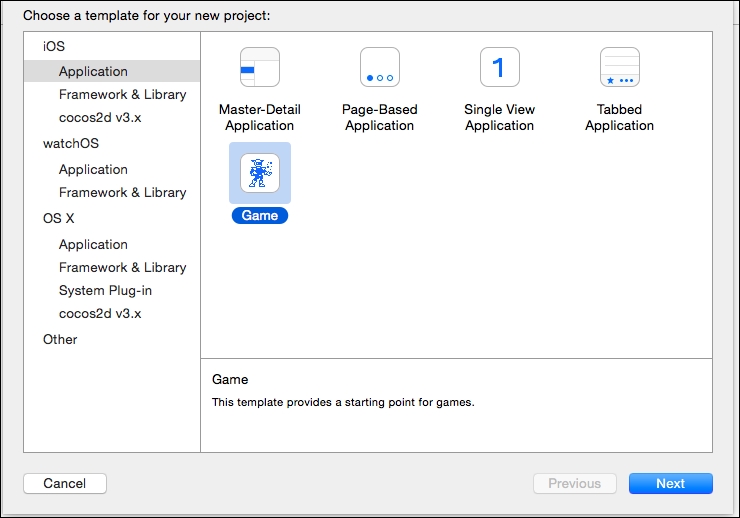
- Next, fill in the product name. We will name this project
SwiftSweeperExampleand make sure that the language is Swift with SpriteKit selected as the game technology as well as the devices set to iPhone.
- Then, click on Next, and we now have a brand new SpriteKit game project with a number of files already written up for us to get us started.
- Now click on the project's main file in the navigation pane and deselect all but the Portrait selection in the Device Orientation field.
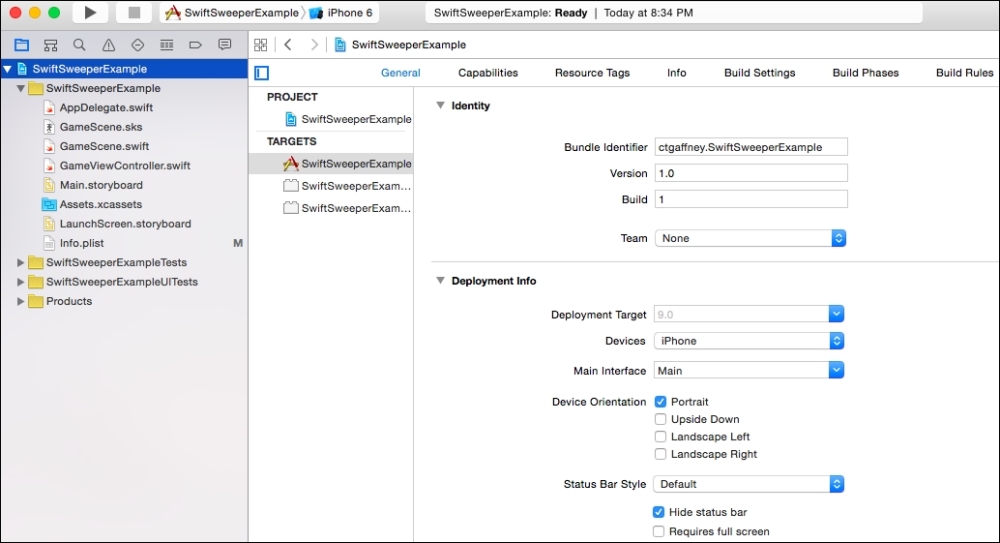
- Since we are going to work mostly with code, we can also either ignore or delete the
GameScene.sksfile for now. These files are Xcode's option for you to visually design your game scene. We will know more on these files later when we work with our more visually designed SpriteKit game example. - Build and run the app to see Apple's default SpriteKit project, which has
Hello Worldwritten in Chalkduster font and a rotating spaceship appears where you click or tap on the screen.
Before we add our code, let's use this template to get an idea on how SpriteKit's basic objects, functions, and flow work.
As we stated in the previous chapter, AppDelegate.swift is the main entry point. The code then moves to GameViewController.swift, which is a child of the UIViewController class that imports the SpriteKit framework. The following code is written in the viewDidLoad() function of GameViewController:
override func viewDidLoad() {
        super.viewDidLoad()
        if let scene = GameScene(fileNamed:"GameScene") {
            // Configure the view.
            let skView = self.view as! SKView
            skView.showsFPS = true
            skView.showsNodeCount = true
            /* Sprite Kit applies additional optimizations to improve rendering performance */
            skView.ignoresSiblingOrder = true
            /* Set the scale mode to scale to fit the window */
            scene.scaleMode = .AspectFill
            skView.presentScene(scene)
        }
    }
Tip
Downloading the example code
You can download the example code files from your account at http://www.packtpub.com for all the Packt Publishing books you have purchased. If you purchased this book elsewhere, you can visit http://www.packtpub.com/support and register to have the files e-mailed directly to you.
Using the keyword override, this version of viewDidLoad() can now either add to or well override the parent class's functionality. super.viewDidLoad() calls the parent class's original functionality and then it works its own custom functionality. This is how Swift handles the OOP concept of inheritance.
Next, we see how a game scene is first created with GameViewController. A major aspect of SpriteKit is that it works in scenes that are members of the SKScene class, which are themselves children of the SKNode class. The SKNode classes are the main building blocks of nearly every object in SpriteKit. Be it sprites, lights, videos, effects, physics fields, audio files (SKAudioNodes), cameras (SKCameraNodes), or labels/UI objects, they are SKNode classes. These objects all hold important information, most importantly coordinate information of object's node family. For games, this allows the developer to create custom classes, such as Enemies, GameLights, Tiles, and so on, that all have screen and other information on both parent and child nodes. For example, we can hit every enemy on the screen with an attack by the player by calling an inherited function in a parent Enemy class. We don't need to check for each individual type of enemy but instead enumerate through the parent nodes in the various game loop functions of SKScene:
enumerateChildNodesWithName("player", usingBlock: block)Do you remember the block/closure call in PikiPop? To actually use it in the didSimulatePhysics() function of SKScene, we call the enumerateChildNodesWithName function of SKNode to target only those nodes in the scene and have that block of code run for each member in the scene with that name.
playerNode.name = "player"
The name is simply a string that can be set using the SKNode.name property. Have every custom node initiate with a given name (or change during game play), and you have a whole group of objects you can single out in the scene.
You can find more on SKNode in Apple's official documentation at https://developer.apple.com/library/ios/documentation/SpriteKit/Reference/SKNode_Ref/.
The GameScene.swift class in our project inherits from SKScene, and it is there that the game loop / rendering functions we mentioned earlier occur. SpriteKit runs on scenes, and scenes can be transitioned and segued to and from it.
In the previous chapter, we showed how to structure a game using storyboards and segues. SKScene makes it where you don't even have to use storyboards but just straight code to transition. We can use storyboards, and we can also visually design each individual scene using .sks files or a combination of all three methods. With code, SKScene can transition with the SKTransition objects and functions. Actually, as we'll see with SwiftSweeper, we can just use code to manually refresh assets in the scene to do transitions. This method is rather old fashioned and not as elegant as SKTransition storyboards and SKS files, so let's take a quick look at how to transition scenes in code with SKTransition, storyboards, and briefly into SKS files via code. Later, and in the next chapter, we will focus much more on the visual SKS files since every update to iOS and Xcode continues to put the focus on these visual tools to shorten the coding time and workflow.
The following code changes the game's scene:
  override func touchesBegan(touches: Set<UITouch>, withEvent event: UIEvent?) {
    super.touchesBegan(touches, withEvent: event)
    if let location = touches.first?.locationInNode(self) {
        let touchedNode = self.nodeAtPoint(location)
        if touchedNode.name == "SceneChangeButton" {
            let transition = SKTransition.revealWithDirection(SKTransitionDirection.Up, duration: 1.0)

            let scene = AnotherGameScene(size: self.scene!.size)
            scene.scaleMode = SKSceneScaleMode.AspectFill
            self.scene!.view!.presentScene(scene, transition: transition)
        }
    }
}
The SKTransition classes are really just types of segues. As in the preceding code, the transition is a directional switch to the next scene with the SKTransitionDirection.Up enumerator type. As we saw in GameViewController, the new scene is created with the similar functions that control the scene's view size and aspect ratio and then presents that scene to the unwrapped view with self.scene!.view!.presentScene(scene, transition: transition).
Also note that this takes place in the same function as we see in our current project's GameScene.swift class, override func touchesBegan(touches: Set<UITouch>, withEvent event: UIEvent?){}. This is the function that handles touch gestures from the player and checks whether the name of the node touched matches the SceneChangeButton string.
More on SKTransition and other neat transition effects you can give your games can be found here in the official documentation:
Here's the code for a SKScene/storyboard example:
@IBAction func buttonPressed(button:UIButton)
{
    // Remove button from the view
    button.removeFromSuperview()
    if let scene = GameScene.unarchiveFromFile("GameScene") as? GameScene {
        // Configure the view.
        let skView = self.view as SKView
        skView.showsFPS = false
        skView.showsNodeCount = false

        //used for optimization of SKView
        skView.ignoresSiblingOrder = true

        scene.scaleMode = .AspectFill
        skView.presentScene(scene)
    }
}
As we saw in the previous chapter, using the visual help of storyboard files can give us great visual road maps to our apps, both game and non-game. The preceding code uses a link to an @IBAction linkage on a storyboard file to set a new scene.
Storyboards in games can be great for the prototyping phase when we know just the general structure of our game, and can be perfect for the game's menu navigations or even for all individual game scenes*.
The button itself is removed before the transition via the button.removeFromSuperview() call to prevent a memory leak caused by the new scene being drawn over what could have been an unseen menu button—unseen to the player but not to the game's memory stack.
Tip
*It's usually the best practice to only use storyboards for overall navigation menus and not for each individual level/scene. The SKScene and SKNode functionality can let us reuse similar scene structures and save much of the coding for similarly structured levels. Games with many levels could turn our storyboards into a web of confusing structures and thus undo their initial purpose. Scenes with the actual gameplay could just be in their own single view controller in the storyboard, and we'd have the pause, share, and other menus be controlled by storyboard segues.
A .sks file is a special SpriteKit scene file that can allow the creation of a scene as well as the placement of the player, particles, enemies, and level assets in a visual, drag and drop way. Transitioning to a visually designed .sks file in Swift is the same as our initial SKTransition example.
override func touchesBegan(touches: Set<NSObject>, withEvent event: UIEvent) {
    /* Called when a touch begins */
    let introNode = childNodeWithName("introNode")

    if (introNode != nil) {
        let fadeAway = SKAction.fadeOutWithDuration(1.0)

        introNode?.runAction(fadeAway, completion: {
            let doors = SKTransition.doorwayWithDuration(1.0)
            let gameScene = GameScene(fileNamed: "GameScene")
            self.view?.presentScene(gameScene, transition: doors)
        })
    }
}
The creation of the gameScene constant with the SKScene initializer fileNamed and then presenting that scene to the view works the same with either the .swift file or .sks file. This gives us the flexibility to both code and/or visually design our game scenes. In the case of SwiftSweeper, we will do the more code-centric methodology, but feel free to build on this game on your own if you wish with either more code, Storyboards, and/or with visually designed SpriteKitScene (.sks) files.
As of Xcode 7, game assets are placed in the Assets.xcassets folder. Previous versions of Xcode might have had an Images.xcassets folder for the game's icons and sprites, but this has changed and might continue to change with each new iOS release.
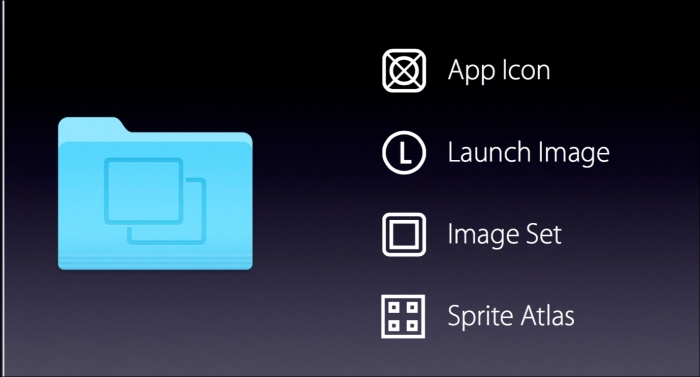
An image from Apple's WWDC15 conference
Starting with iOS 9 and Xcode 7, the assets folder was given even more flexibility with the ability to handle the various app icon sizes, the launch image, sets of images, and sprite atlases. This also allows us to develop with various memory saving capabilities introduced in iOS 9 like app slicing / app thinning and on-demand resources. The app slicing/thinning feature makes sure that only the assets relevant to the device are downloaded, which saves space on the player's iPhone or iPad. On-demand resources let us tag assets that are available in the device's memory only during certain parts of our games. This way, we can create even larger games for our players to experience without taxing the sometimes-limited space in the Apple family of devices.
You can find more on app slicing/thinning at https://developer.apple.com/library/prerelease/ios/documentation/IDEs/Conceptual/AppDistributionGuide/AppThinning/AppThinning.html.
When setting up your game for on-demand services, something that could be great to know in the initial planning of your games, can be found in the official documentation at https://developer.apple.com/library/prerelease/ios/documentation/FileManagement/Conceptual/On_Demand_Resources_Guide/.
SwiftSweeper actually doesn't use animating sprites; as we'll see, it simply uses Unicode emoticon characters to animate the screen. Yet, we can't discuss SpriteKit and 2D game development without mentioning sprites, animating and optimizing them with texture atlases/sprite sheets, could we? A sprite atlas is a collection of images bundled into a single image, also known as a sprite sheet or texture atlas. While developing 2D games, it is highly recommended to use texture atlases as opposed to various image sets because to the renderer, texture atlases will equate to far fewer draw calls and thus can make sure that your game runs at that needed 60 fps. The Collectables.atlas folder in Assets.xcassets could hold all of your game's collectables and with the SKTextureAtlas class, efficiently draw those collectables to the screen. When storing the images to say the player's idle, walking, and jumping animations, we use texture atlases to store them.
Creating a texture atlas is very simple and is presented as follows:
- Simply click on your
Assests.xcassetsfolder and right-click on an empty part of the folder's hierarchy.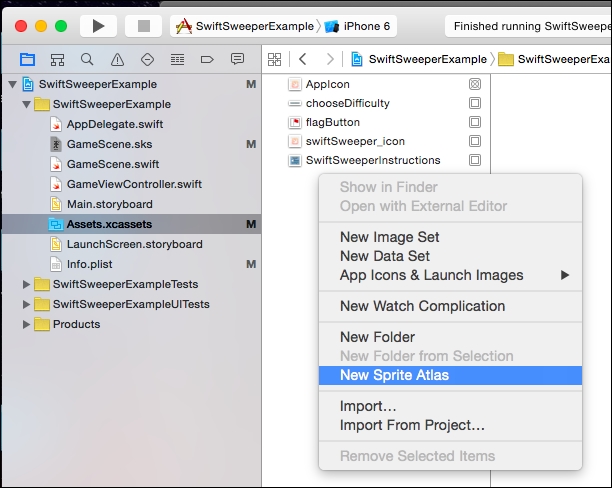
- Click on New Sprite Atlas and just like this, we have a folder where we can store various sprites for our game.

- Make sure to name the folder based on how you wish to categorize the groups of sprites. You'd need this name when referencing them in code.
To create a reference to this atlas in code and animate the sprites, we use SKTextureAtlas as follows:
let PlayerAtlas = SKTextureAtlas(named:"Player.atlas")

let textures = map(1...4) { number in
            PlayerAtlas.textureNamed("player_sprite_normal_(number)")
            }
            let anim = SKAction.animateWithTextures(textures, timePerFrame: self.animationRefreshRate_)
            let idleAnimation = SKAction.repeatActionForever(anim)
            self.runAction(idleAnimation)
First, this code creates an SKTextureAtlas reference to the player's sprite atlas using the initializer SKTextureAtlas(named:"Player.atlas"). Then, we create an array of textures using one of Swift's orders block map(NSRange){…}. This is a closure block that iterates through the textures in the sprite atlas based on the range specified in the map call. The number object is a simple index object we can use to represent the index of the mapping.
This is done because our player has these sprite names for the normal/idle animation:
"player_sprite_normal_1", "player_sprite_normal_2", "player_sprite_normal_3", "player_sprite_normal_4"
Since we know that the sprite animations are named with an indexed naming structure, it's better to use Swift's functional programming tools, such as map(), here to simplify the code. 2D Sprites with many frame-by-frame animations (games such as Metal Slug) could be iterated through in such a fashion.
SKTextureAtlas also has a class function named preloadTextureAtlases we can use to preload an array of texture atlases:
SKTextureAtlas.preloadTextureAtlases([PIKIATLAS,BGATLAS,COLLECTABLESATLAS,HUDATLAS, OBSTACLESATLAS])
{
  //perform other tasks while loading TextureAtlases
}
This is great to make sure that a stage's sprites are loaded before entering the stage.