Day 23. OSPFv3 Modification
CCNA 200-101 ICND2 Exam Topics
![]() Configure and verify OSPF (single-area)
Configure and verify OSPF (single-area)
Key Topics
Today’s review focuses specifically on OSPFv3 advanced configurations that mirror what you reviewed yesterday for OSPFv2.
OSPFv3 Configuration Review
Today’s review of the OSPF configuration commands uses the topology in Figure 23-1 and the addressing scheme in Table 23-1.
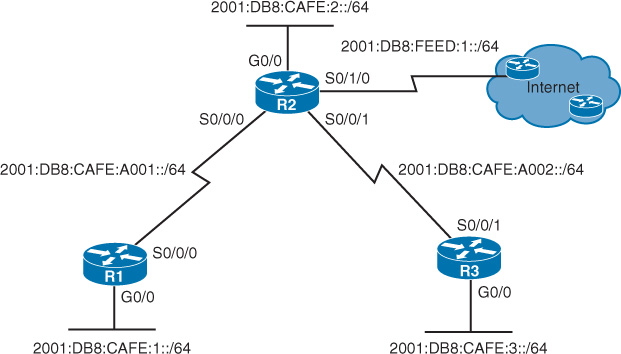
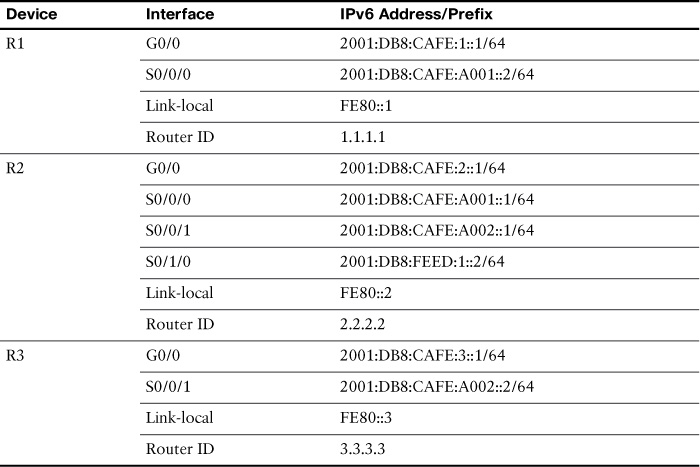
Example 23-1 shows the configuration commands for R2 to enable IPv6 and OSPFv3 on all interfaces. The commands are the same for R1 and R3.
Example 23-1 Enabling IPv6 and OSPFv3 on R2
R2(config)# ipv6 unicast-routing
R2(config)# ipv6 router ospf 10
R2(config-rtr)# router-id 2.2.2.2
R2(config-rtr)# auto-cost reference-bandwidth 1000
R2(config-rtr)# interface g0/0
R2(config-if)# ipv6 add 2001:db8:cafe:2::1/64
R2(config-if)# ipv6 add fe80::1 l
R2(config-if)# ipv6 ospf 10 area 0
R2(config-if)# interface s0/0/0
R2(config-if)# ipv6 add 2001:db8:cafe:a001::1/64
R2(config-if)# ipv6 add fe80::2 link-local
R2(config-if)# ipv6 ospf 10 area 0
R2(config-if)# interface s0/0/1
R2(config-if)# ipv6 add 2001:db8:cafe:a002::1/64
R2(config-if)# ipv6 add fe80::2 link-local
R2(config-if)# ipv6 ospf 10 area 0
R2(config-if)# interface s0/1/0
R2(config-if)# ipv6 add 2001:db8:feed:1::2/64
R2(config-if)# ipv6 add fe80::2 link-local
R2(config-if)# end
R2# show ipv6 ospf neighbor
Neighbor ID Pri State Dead Time Interface ID Interface
3.3.3.3 0 FULL/ - 00:00:38 4 Serial0/0/1
1.1.1.1 0 FULL/ - 00:00:33 3 Serial0/0/0
R2# show ipv6 route ospf
IPv6 Routing Table - 11 entries
Codes: C - Connected, L - Local, S - Static, R - RIP, B - BGP
U - Per-user Static route, M - MIPv6
I1 - ISIS L1, I2 - ISIS L2, IA - ISIS interarea, IS - ISIS summary
O - OSPF intra, OI - OSPF inter, OE1 - OSPF ext 1, OE2 - OSPF ext 2
ON1 - OSPF NSSA ext 1, ON2 - OSPF NSSA ext 2
D - EIGRP, EX - EIGRP external
O 2001:DB8:CAFE:1::/64 [110/65]
via FE80::1, Serial0/0/0
O 2001:DB8:CAFE:3::/64 [110/65]
via FE80::3, Serial0/0/1
R2#
The two commands show ipv6 ospf neighbors and show ipv6 route ospf verify that R2 has established adjacencies with R1 and R3 and learned the necessary routes. You configure the link to the Internet in the next section.
Modifying the OSPFv3 Configuration
As with OSPFv2, you can configure OSPFv3 to propagate a default route, fine-tune the interfaces, and enable multiple areas.
Propagating a Default Route
The process to propagate a default route in OSPFv3 is the same as for OSPFv2. As shown in the configuration for R2 in Example 23-2, configure the default route and then use the command default-information originate in router configuration mode to propagate the route to OSPF neighbors.
Example 23-2 Propagating a Default Route in OSPFv3
R2(config)# ipv6 route ::/0 serial 0/1/0
R2(config)# ipv6 router ospf 10
R2(config-rtr)# default-information originate
R2(config-rtr)# end
R2#
As shown in Example 23-3, R1 and R3 both have a default route indicated by the OE2 in the routing table.
Example 23-3 Default Route Propagated to R1 and R3
R1# show ipv6 route ospf | begin OE2 :
OE2 ::/0 [110/1], tag 1
via FE80::2, Serial0/0/0
O 2001:DB8:CAFE:2::/64 [110/65]
via FE80::2, Serial0/0/0
O 2001:DB8:CAFE:3::/64 [110/129]
via FE80::2, Serial0/0/0
O 2001:DB8:CAFE:A002::/64 [110/128]
via FE80::2, Serial0/0/0
R1#
R3# show ipv6 route ospf | begin OE2 :
OE2 ::/0 [110/1], tag 1
via FE80::2, Serial0/0/1
O 2001:DB8:CAFE:1::/64 [110/129]
via FE80::2, Serial0/0/1
O 2001:DB8:CAFE:2::/64 [110/65]
via FE80::2, Serial0/0/1
O 2001:DB8:CAFE:A001::/64 [110/128]
via FE80::2, Serial0/0/1
R3#
Modifying the Timers
To modify the OSPFv3 timers, use the same commands used for OSPFv2, but change ip to ipv6, as shown in Example 23-4.
Example 23-4 Configuring Hello and Dead Intervals in OSPFv3
R2(config)# interface s0/0/0
R2(config-if)# ipv6 ospf hello-interval 5
R2(config-if)# ipv6 ospf dead-interval 20
R2(config-if)# end
R2#
%OSPF-5-ADJCHG: Process 10, Nbr 1.1.1.1 on Serial0/0/0 from FULL to DOWN, Neighbor
Down: Dead timer expired
%OSPFv3-5-ADJCHG: Process 10, Nbr 1.1.1.1 on Serial0/0/0 from FULL to DOWN, Neighbor
Down: Interface down or detached
R2 loses adjacency with R1. To restore adjacency, you must configure R1 with the same timers, as shown in Example 23-5.
Example 23-5 Configuring the Timers on R1 to Match R2
R1(config)# interface s0/0/0
R1(config-if)# ipv6 ospf hello-interval 5
R1(config-if)# ipv6 ospf dead-interval 20
R1(config-if)# end
%OSPFv3-5-ADJCHG: Process 10, Nbr 2.2.2.2 on Serial0/0/0 from LOADING to FULL,
Loading Done
R1#
Configuring Multi-Area OSPFv3
Multi-area OSPFv3 is most likely not covered on the CCNA exam; however, the configuration is simple enough to include here. Figure 23-2 shows the same topology used for multi-area OSPFv2 yesterday, but now it is addressed for IPv6.
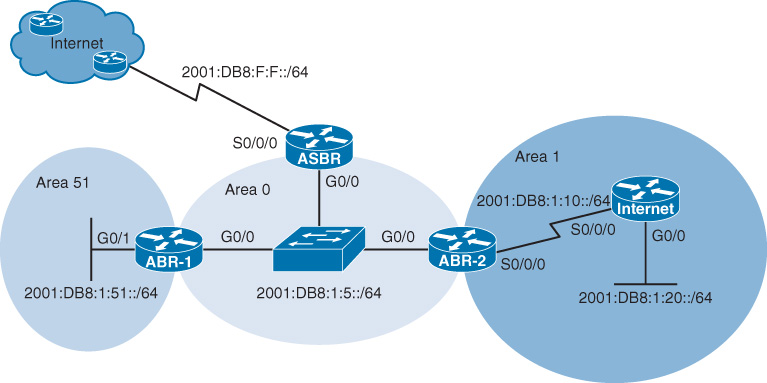
Example 23-6 shows the configuration for the routers. The only difference between single-area and multi-area is the area ID in the ipv6 ospf process-id area area-id interface configuration command.
Example 23-6 Multi-Area OSPFv3 Configurations
ABR-1(config)# ipv6 router ospf 10
ABR-1(config-rtr)# router-id 1.1.1.1
ABR-1(config-rtr)# auto-cost reference-bandwidth 1000
ABR-1(config-rtr)# interface g0/0
ABR-1(config-if)# ipv6 ospf 10 area 0
ABR-1(config-if)# interface g0/1
ABR-1(config-if)# ipv6 ospf 10 area 51
ABR-1(config-if)# end
ABR-1#
ABR-2(config)# ipv6 router ospf 10
ABR-2(config-rtr)# router-id 2.2.2.2
ABR-2(config-rtr)# auto-cost reference-bandwidth 1000
ABR-2(config-rtr)# interface g0/0
ABR-2(config-if)# ipv6 ospf 10 area 0
ABR-2(config-if)# interface s0/0/0
ABR-2(config-if)# ipv6 ospf 10 area 1
ABR-2(config-if)# end
ABR-2#
ASBR(config)# ipv6 route ::/0 serial 0/0/0
ASBR(config)# ipv6 router ospf 10
ASBR(config-rtr)# router-id 3.3.3.3
ASBR(config-rtr)# auto-cost reference-bandwidth 1000
ASBR(config-rtr)# default-information originate
ASBR(config-rtr)# interface g0/0
ASBR(config-if)# ipv6 ospf 10 area 0
ASBR(config-if)# end
ASBR#
Internal(config)# ipv6 router ospf 10
Internal(config-rtr)# router-id 4.4.4.4
Internal(config-rtr)# auto-cost reference-bandwidth 1000
Internal(config-rtr)# interface g0/0
Internal(config-if)# ipv6 ospf 10 area 1
Internal(config-if)# interface serial0/0/0
Internal(config-if)# ipv6 ospf 10 area 1
Internal(config-if)# end
Internal#
Example 23-7 shows the OSPF routes installed in the routing table for ABR-2.
Example 23-7 Multi-Area OSPFv3 Routes in the ABR-2 Routing Table
ABR-2# show ipv6 route ospf
IPv6 Routing Table - 8 entries
Codes: C - Connected, L - Local, S - Static, R - RIP, B - BGP
U - Per-user Static route, M - MIPv6
I1 - ISIS L1, I2 - ISIS L2, IA - ISIS interarea, IS - ISIS summary
O - OSPF intra, OI - OSPF inter, OE1 - OSPF ext 1, OE2 - OSPF ext 2
ON1 - OSPF NSSA ext 1, ON2 - OSPF NSSA ext 2
D - EIGRP, EX - EIGRP external
OE2 ::/0 [110/1], tag 1
via FE80::3, GigabitEthernet0/0
O 2001:DB8:1:20::/64 [110/65]
via FE80::4, Serial0/0/0
OI 2001:DB8:1:51::/64 [110/2]
via FE80::1, GigabitEthernet0/0
ABR-2#
Similar to the codes in OSPFv2, the OI code indicates an interarea route, and the OE2 code indicates an external route (in this case, a default route).
Study Resources
For today’s exam topics, refer to the following resources for more study.
