Getting started in Flash CS3
Accessing learning and reference resources
Getting to know the fundamental Flash interface: What's new in Flash CS3
Saving and loading custom Workspace Layouts
Creating custom keyboard shortcut sets
Using the Tools panel and shortcut keys
Adding or moving tools
This chapter gives you a tour of the Flash workspace and the various methods for organizing and navigating your documents. We define fundamental features of the authoring environment, but in some cases, defer the explanation of more-complex functionality to later chapters. This chapter orients new users to the program and introduces experienced users to some of the new Flash CS3 features.
Tip
The confusion caused by splitting Flash into two different versions (Basic and Professional) is now a thing of the past. With an upgrade to Flash CS3 you gain all the features and tools that were previously available in Flash 8 Professional along with improvements and updates brought to you by Adobe. Everyone using Flash CS3 will be on the same playing field.
When you walk into a studio, the first thing you need to know is where to find your tools. Although you might have an idea of where to start looking based on experience, nothing improves your workflow more than being able to reach for something without hesitation. This kind of familiarity and comfort in a workspace is a prerequisite for the mastery of any craft.
Fortunately, many of the features of the Flash CS3 interface will look familiar to you if you've worked in other graphics applications. However, there are some unique features that you need to understand before you can tackle your Flash projects with the ease of an expert. We begin by introducing the Flash interface and pointing out the tools available for managing and customizing your Flash "studio." We've done our best to keep new terminology consistent with the interface. Where inconsistencies occur, we've tried to choose terms most consistent with other Adobe products and documentation.
Note
In an effort to maintain consistent terms and UI names across the various programs in the Adobe Creative Suite, Adobe has changed some familiar terms and added some new ones. In some cases, changes to a UI term may not be implemented consistently in all menus, dialog boxes, and Help documents — we hope the context of the term will give you enough clues to sort out what it refers to. Rest assured that you're not imagining things: Like most software, Flash just has a few growing pains with each new version.
You'll soon notice that there is often more than one way to access an option. As we describe the steps for carrying out a task, we include shortcut keys or menu paths in parentheses. You should feel comfortable and ready to get to work in no time.
Whether you've been using Flash since the early days of version 2, or you've just opened the program for the first time, you can quickly see that the Flash interface has finally matured — enough to remain recognizable from one release to another! As Flash has grown and evolved, the interface has been through a number of variations, but Flash CS3 continues to build upon the streamlined panel system that was introduced with Flash MX. One of the most obvious UI changes in CS3 is the implementation of a true tabbed panel system consistent with other Adobe applications. Some small but significant modifications have also been made to the look and function of common tools, menus, and panels. We cover them as we discuss workflows for specific tasks throughout the book.
In Flash 8, Macromedia focused on expressiveness as much as on efficiency, and as a result, Flash helps users at all levels to be creatively inspired. With Flash CS3, Adobe maintains the creative features of the previous version while fine-tuning performance and taking ActionScript to the next level (AS3), making this the most balanced and powerful release yet. Some of the most significant changes in Flash CS3 are hinted at in the interface, but we give you a peek under the hood in this chapter.
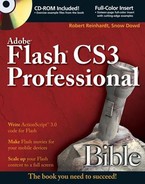
The Start Page (shown in Figure 4.1) gives you quick access to tutorials and other help features and provides a handy way to choose the file you want to open or create.
Note
Flash content for mobile phones and other devices is increasingly popular, and Adobe supports developers with templates designed specifically for popular handheld devices in different markets.
By default, the Start Page should appear when you first launch Flash and any time you close all Document windows while the program is running. After you have opened or created a new file, the Start Page automatically closes to make room on your desktop. If you prefer not to use the Start Page, select the Don't show again check box at the bottom of the panel, or change the settings for On launch in General Flash Preferences (Edit
The links at the bottom of the Start Page connect you to the built-in Help system in Flash as well as to online content available through the Adobe Web site. These links are worth investigating if you want to get a quick introduction to Flash.
Note
You don't need to have Flash installed to view the Adobe presentations. If you want to introduce other friends or coworkers to the new features of Flash CS3, you can direct them to the presentation online at www.adobe.com/software/flash/cs3/productinfo/features/.
One of the most useful links in the Start Page is to Macromedia Flash Exchange (under the Extend title). If you are connected to the Internet, you can browse the Flash Exchange for helpful tools and add-ons that Flash developers have made available through Adobe's site.
Note
You do need to be connected to the Internet to access Macromedia's support site: www.adobe.com/support/documentation/(language)/flash, but once you get there you have the option of downloading most of the reference manuals in PDF format for future reference.
The options listed under the Create New title in the Start Page have changed since Flash 8. The options for creating a Flash Document, Flash Slide Presentation, or Flash Form Application have been replaced with options for three different types of Flash file. Each type targets a different version of ActionScript:
Flash File (ActionScript 3.0): ActionScript 3.0 can only be used with Flash Player 9 and should only be specified if you plan to use advanced code that requires AS 3.0 capabilities.
Flash File (ActionScript 2.0): ActionScript 2.0 files created in Flash CS3 target Flash Player 9 by default but these files can also be published to be backwards-compatible with older versions of the Flash Player (as far back as Flash Player 6).
Tip
ActionScript 2.0 files are appropriate for most Web content that will use techniques described in this book.
Flash File (Mobile): This option will launch Adobe Device Central, which is a specialized authoring environment designed to support the development of Flash content for mobile devices. These files target the Flash Lite Player rather than the full Flash Player and are limited to a more simplified set of ActionScript (1.0 or 2.0, depending on the version of Flash Lite that is running on the target device).
Note
To learn more about Adobe Device Central and authoring content for Flash Lite, refer to Chapter 21, "Publishing Flash Movies".
If you select more or any of the other options listed under Create from Template in the Start Page (or use the application menu to select File
Tip
The New Document or New From Template lists available in the secondary dialog box are also a good way to browse the various file types because a preview and a description of each are available before you actually create and load a specific file.
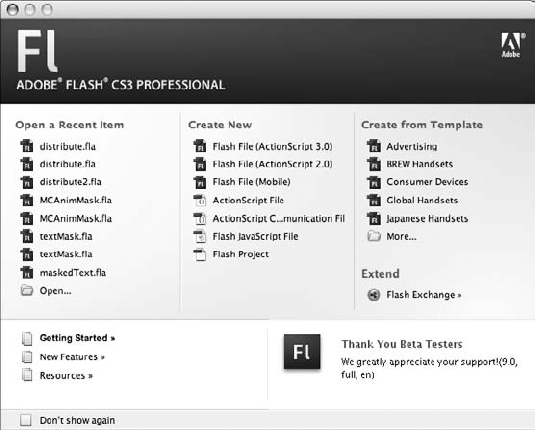
The Flash Help menu is your gateway to local versions of the documentation and examples on Adobe's support site. You can browse or search a listing of available Help topics and use the drop-down menu to choose the "books," or categories of Help content you want to view. An accordion divider separates the main reference content from the table of contents (or book listings) that will expand or collapse to show sublistings as you use the control icons at the top of the panel. You can also navigate books and subcategories using the expand and collapse arrows on the left edge of the book list. To adjust the division of the book list and the content area (shown in Figure 4.2), simply hover over the dividing line until you see a dual arrow cursor; then drag the divider until you're happy with the panel split.
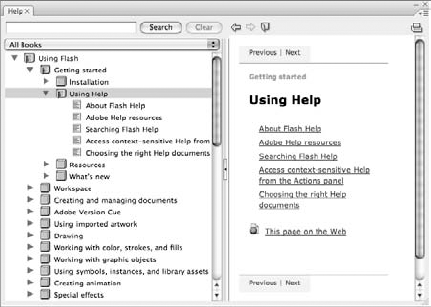
Figure 4.2. The Flash Help panel includes a drop-down menu to help you sort a list of reference categories or "books" and a search field to find content on specific topics.
If you don't want to muddle around in the Help panel, the Flash application Help menu offers quick shortcuts to commonly used reference content. Unless you've removed the help files from your Flash installation, you can access a number of offline resources directly from the Help menu. These resource topics will launch the Help panel and load the offline HTML content you have requested. First, have a look at the What's New in Flash CS3 link to get an overview of the new features. Next, if you're a new user, you may want to browse the video tutorial content for Flash (along with other Creative Suite 3 products) in the Adobe Video Workshop that is available on the CD provided with your Flash product package or online at www.adobe.com/designcenter/video_workshop/about.html
Tip
Although they are not available in the application Help menu, the ActionScript 3.0 Language and Components Reference and the ActionScript 2.0 Language Reference are both included in the Help panel in the main book list. These guides include a series of documents with detailed information on various aspects of the ActionScript language with notes on syntax changes in the latest version and information you need to know if you want to update old Flash files to work with Flash Player 9.
Adobe has also included guided entry points to a vast array of online resources. The Flash Exchange is an online resource created to support use and development of Flash extensions. It is a great place to look for new tools, components, and effects that you can download and add to your Flash toolkit. The Flash Support Center is Adobe's primary vehicle for the distribution of up-to-date information about Flash and Flash-related topics. It is a searchable area with current (and archived) articles on many Flash topics. You can also find links to downloads, documentation, forums, and many other invaluable Flash-related resources and updates. Use Help
Tip
The Help panel can be docked with other panels in your workspace, but it is much easier to read or search for help content if you undock the panel and drag the size box horizontally to make it wider. Use the keyboard shortcut (F1) to show or hide the Help panel whenever you need to.
Before discussing the various Flash menu items, panels, and miscellaneous dialog boxes that you can use to control and customize your workspace, we begin with a look at the interface with its default array of toolbars and panels as they appear on Macintosh and Windows. Use the application menu to select Window
Thanks to some Adobe magic, the Flash UI finally works in the same fluid way as other programs in the CS3 Suite. The old Macromedia UI has been polished into a flexible system of panels that can be docked individually or easily arranged into tabbed groups that can be expanded or collapsed as needed. The implementation of panels is consistent across both Mac and Windows. Throughout the book, we discuss each panel in context with the tools and tasks where it is used. As you'll quickly find, there are many ways to arrange these panels for a customized workflow. Your preferred panel layouts for different tasks can be saved as custom Workspace layouts and recalled from the Workspace menu.
Figure 4.3 shows how the default layout (Window
Tip
The default Workspace includes two tabbed panel groups that support commonly used features and reduce clutter: a Property inspector with tabs for Properties, Parameters, and Filters and a Color panel group that puts the Mixer panel and the Swatches panel into a handy tabbed layout. The expanded Library panel also includes a drop-down menu for loading Library content from different documents without having to manage multiple floating panels.
Along with the default Workspace layout, Flash CS3 ships with two space-saving presets that load the main panels as a condensed docked group with cool new graphic icons, shown in Figure 4.4.
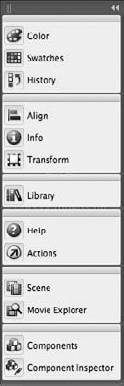
Figure 4.4. The new graphic panel UI that loads when you select Window
Note
Although there are some minor differences between Macintosh and Windows interfaces for Flash CS3, these are due to differences in the operating systems that are apparent in any application. For the most part, however, we use Macintosh OS X and Windows XP illustrations interchangeably, pointing out differences only when they directly affect workflow.
The Mac version now has the same docking functionality as Windows. Note that the Tools panel docks only to the sides of the screen, while most other panels can dock to any edge of the screen or with other panels. To prevent docking while you are moving panels, press the Control key while dragging.
For clarity, we have capitalized terms that refer to specific Flash interface features such as Document window, Stage, Timeline, Tools panel, and Options area. You may see these words lowercase in other parts of the text, where they are used as general terms rather than as labels for specific parts of the Flash interface.
We describe the actual uses and options for most of these various interface elements in the context of where the elements are applied. To get started with Flash, we introduce the Property inspector, Tools panel, Document window, Scene panel, Timeline, and Controller, along with the related menu items. We discuss the remainder of the panels and windows, and how they are used, in chapters on drawing, animation, interactivity, and other specific production topics.
Note
The Main toolbar is an optional feature only available on the Windows version of Flash. This toolbar gives you quick access to commonly used tool and panel options and it should not be confused with the Tools panel. The Controller and the Edit bar options found in the Toolbars menu have the same function on Windows and Mac versions. The Controller is used to control the position of the Playhead in the Timeline, and the Edit bar (which docks to the top of the Document window) includes controls for navigating Scenes, editing symbols, and changing View settings.
The Property inspector is a centralized place to access most common options for various authoring items. You can select or modify many options directly in the Property inspector, but for some items, buttons appear that you can use to launch additional menus or dialog boxes. Generally, you will only need to access separate panels for a few specialized editing tasks. Figure 4.5 shows how the Property inspector changes to display options relevant to the currently selected item.
The top figure shows the Property inspector (collapsed), as it appears when the PolyStar tool is active (selected in the Tools panel) — displaying Stroke and Fill colors and options, buttons for launching Settings dialog boxes for line styles and tool options, and the icon for launching the Help panel. The bottom figure shows the Property inspector (expanded), as it appears when a Button symbol instance is selected on the Stage — displaying instance properties and options. The launcher icon for the Help panel is still available, and icons for launching the Actions panel and the Accessibility panel are also visible when the Property inspector is expanded.
Notice the tabs at the top of the Property inspector for switching between Properties, Filters, and component parameters. We explain the applied uses of these tabs in later chapters where we introduce Filters and components in more detail. For now, all you need to know is that you can use the Filters tab to apply and sort Filter effects and use the Parameters tab to access component parameters in the Property inspector.
Depending on what is currently selected, the Property inspector will display relevant attributes for a document, frame, symbol instance, component instance, shape, or text box. Pop-up menus and editable value fields make it quick and easy to make changes without hunting through panel sets or the application menu. As shown in Figure 4.5, when an element is selected that can have code attached to it, a gray arrow appears on the right edge of the Property inspector. Clicking this icon launches the Actions panel for editing code on individual frames or symbol instances.
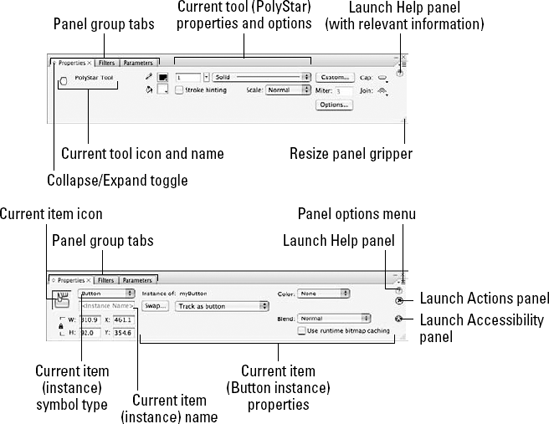
Figure 4.5. The Property inspector, as it appears when the PolyStar tool is active (top), and when a Button symbol instance is selected (bottom)
Because the Property inspector and the Tools panel provide access to all tool options (with the exception of some drawing and text attributes that are adjusted in the Preferences window), there are only four panels that you might need to open separately for additional options while drawing and editing graphics on the Stage. They are Color, for adding alpha, gradients, and custom colors; Align, for accurately arranging elements in relation to each other or to the Stage; Transform, for quickly making exact size or rotation adjustments; and History, for tracking or changing your edits. You can optimize this simple setup even further by sorting panels into custom stacked or tabbed groups, as we describe in the next section.
Tip
The Property inspector is wider than most other panel groups, but you can make use of all the horizontal space by adding other commonly used panels for quick tabbed access.
Most interface elements have built-in display controls (see Figure 4.6 for the tabbed panel controls that you will see on both Mac and Windows versions), but you can also manage what appears in your workspace with the main application menu. Rather than go through a laundry list of all the application menu options, we will note the various features that apply to individual windows and panels as we describe their uses.
Tip
To make the interface easier to use, Adobe kindly made the top area of the panels active so that you can expand or collapse a panel by double-clicking anywhere in the top gray bar, not only on the Expand/Collapse toggle.
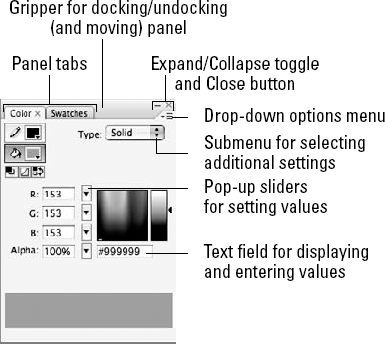
Figure 4.6. The controls we note here on the tabbed Mac Color panel group are consistent with the control icons you will see on other panels for both Mac and Windows.
As in many other programs, you will find Flash contextual menus pop up in response to a right-click on a selected item in the Timeline, Library panel, or on the Stage. (Control+click for the Mac if you don't have a two-button mouse.) Contextual menus duplicate most functions and commands that are accessible either through the application menu or through the various panels and dialog boxes, which we discuss in this chapter. Because contextual menus show you only those options relevant to the element you have selected, they provide a handy authoring shortcut that can also help you get familiar with Flash.
The awkward group and ungroup workflow that was introduced in Flash 8 has been replaced with a clean and intuitive panel system that is consistent with other Adobe Creative Suite programs. You can drag and drop individual panels to create vertical stacks or horizontal tabbed groups that will maximize your workspace while keeping options handy. Figure 4.7 shows a tabbed panel group, a panel stack, and a free-floating panel.
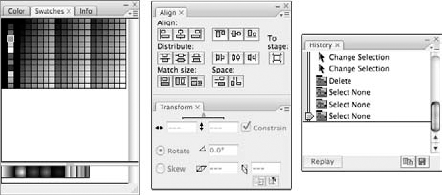
Figure 4.7. Tabbed panel groups (left) are more space efficient than stacked (center) or individual floating panels (right).
Grouping panels for tabbed access is more space efficient than just docking panels to the sides of your work space or stacking panels vertically, but you will probably still want to stack some panels or panel groups to keep your workspace orderly. To group, dock or stack panels, follow these steps:
Grab the panel (or panel group) by clicking on the top gray bar of the panel.
Warning
Do not release the mouse until the panel is ready to dock!
Drag the panel until it overlaps another open panel or panel group or until it is close to a side or to the bottom of your screen.
When Flash recognizes the panel overlap, a blue docking highlight appears at the top or bottom of the panel that you want to dock to or along the side of your screen. Dragging your panel on top of another panel adds it as tabbed group, and dragging your panel toward the bottom of another panel will stack it vertically. Dragging a panel to the side or bottom of your screen makes it "stick" there, so you'll have fewer floating panels cluttering your work space.
Release the mouse and the panel should remain docked or stacked.
Unstacking or undocking panels is easy: Just click the top gray area and drag to pull any panel away from the other panels in a stack and make it free-floating.
Prior to Flash 4, only one area of the application required users to pay attention to focus — when they were selecting colors for either the stroke or fill — because it was easy to confuse the two. As the interface has grown to include more panels and windows that can be active at different times within the Flash environment, focus has become an important aspect of the program. What is focus? Focus is a term used to describe which part of the application is active, or has priority, at a given time. For example, all panels, such as the Actions panel, do not automatically "have focus" — this means that you have to click within the panel to begin working there. Similarly, to return to the Document window or Stage to edit an element, you must click there to return focus to that aspect of the application. The Property inspector can actually remind you what area or element is active because it displays the attributes of the currently active item. Otherwise, if a panel or dialog box doesn't seem to respond, just remember to focus on what you're doing.
Whether you have chosen a layout from the Window menu (Window
To save your current panel layout as a custom set that can be accessed from the Workspace menu the next time you open Flash, follow these simple steps:
Open and arrange (by grouping or stacking) any panels that you want to include in your custom layout.
Go to Window

You are prompted by a dialog box to name your layout. Enter a name that will help you remember why you made that panel set, such as animation or scripting.
Your custom layout now appears in the list of available Workspaces (Window
Deleting or renaming Workspaces is easy. Select Window
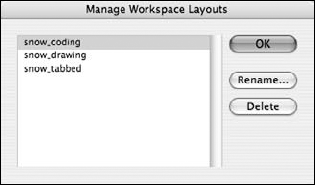
Figure 4.8. The dialog box for managing saved Workspace layouts makes it easy to delete or rename your custom layouts.
Do you really love your custom layout? You can save Workspace layouts just as you would project files in order to share them with other people or take them with you when you upgrade to a newer version of Flash (or move to another machine). When you want to add them to your current version of Flash, just place the files in the Workspace Layouts folder and they'll appear in the menu, ready for you to use. The only limitation is that Workspace Layout files cannot be shared between the Mac and Windows versions of Flash.
Workspace layouts are stored in a folder on your hard drive. Once you find the Workspace folder you can either add or delete any of these files and the Workspace menu in Flash will update to show only the files that you currently have saved there.
The standard directory path on Windows is:
C:Documents and Settings(username)Local SettingsApplication
   DataAdobeFlash CS3(language)ConfigurationWorkspace
The standard directory path on Mac is:
HDUsers: (username)Library: Application SupportAdobeFlash
   CS3(language)ConfigurationWorkspace
Keyboard shortcuts enable you to work more quickly because you avoid the hassle of clicking through a menu to activate a feature with your mouse. This is a workflow trick that many people use even when working in text-editing applications. Instead of browsing to the Edit menu to find the Copy command, you can just press the key combination Ctrl+C (or
A default set of keyboard shortcuts is available without having to change any settings, and these shortcuts are listed after most commands in the various application menus. However, if you would like to use different shortcut keys for certain tasks or add a new shortcut key for a custom Panel group or tool, you can make changes to the default settings in the Keyboard Shortcuts dialog box shown in Figure 4.9 (Edit
Tip
By default, Flash CS3 uses the Adobe Standard set of built-in keyboard shortcuts, which is designed to be consistent on most applications in the Creative Suite. You can also select a built-in keyboard shortcut set from legacy versions of popular applications, including Flash 5, Illustrator 10, and Photoshop 6. Instead of manually changing a duplicate of the Adobe Standard set to match your favorite program, simply switch the Current Set using the menu list.
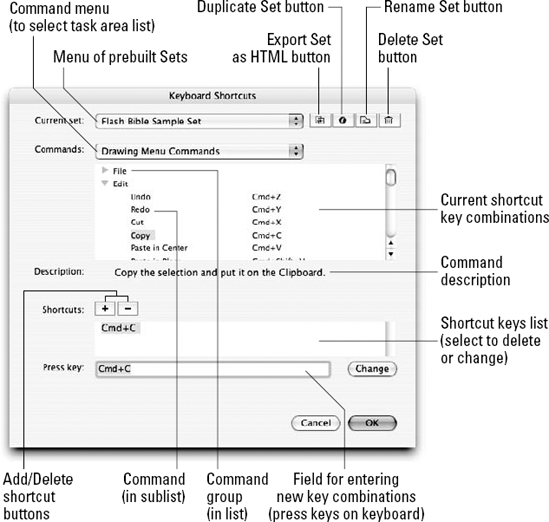
Figure 4.9. The Keyboard Shortcuts dialog box as displayed on Mac OS X. The appearance is slightly different on Windows, but the options available are the same.
As shown in Figure 4.9, the Keyboard Shortcuts dialog box enables you to customize your Flash keyboard shortcuts to maintain consistency with other applications or to suit a personalized workflow. Not only can you choose keyboard shortcuts developed from other applications, but you can also save your modifications and custom settings. A full explanation of this dialog box follows.
You can find the Keyboard Shortcuts dialog box in the application menu (Edit
Select a shortcut set from the Current set submenu. This is now the active set.
Duplicate the active set by clicking the Duplicate Set button. The Duplicate dialog box appears. Enter a new name for this set in the Duplicate name field and click OK.
A similar procedure is employed to rename a shortcut set. Simply click the Rename Set button and enter the new name in the ensuing dialog box. (Note that you can rename all the built-in sets that ship with the program, with the exception of the Adobe Standard set.)
Select a commands list (Mobile menu, Drawing menu, Tools panel, Test Movie menu, Script edit, Timeline, Workspace Accessibility, or Actions panel) from the Commands pop-up menu either to add to a command list or to modify it.
Next, in the commands list, choose either a grouping or a command from one of the previously chosen commands lists. Note that some lists have sublists. Click the plus sign (or small arrow on the Mac) to expand a particular category.
Now choose a command that you want to add (or subtract) — a description of the selected command appears in the Description area.
To delete the existing shortcut, click the minus (−) shortcut button.
To add a shortcut for this command, click the plus (+) shortcut button; then enter the shortcut key combination in the Press Key entry box. Simply press keys on the keyboard, rather than type the key names. Click Change and then OK to close the dialog box.
Or, to change an existing command, select the command and click the Change button.
To delete a shortcut set, click the Delete Set button, and then select the set to be deleted from the Delete Set dialog box and click the Delete button. (Because you cannot delete the built-in sets that ship with the program, they do not appear in the Delete Set dialog box.)
Tip
The Export Set as HTML button in the Keyboard Shortcuts dialog box (shown in Figure 4-9) is a fantastic way to create a formatted table of shortcut keys that you can post near your desk or share with other people. This option enables you to name the file and choose a location to save it. Drag the saved HTML file into a browser window to see a nicely formatted reference table that you can read onscreen or print out.
Note
Like Workspace layout files, Keyboard Shortcut sets are stored on your hard drive. You can find them in the Keyboard Shortcuts folder in the same Configuration folder that we listed in the previous section for Workspace layouts. You can navigate to this location on your hard drive and copy, back up, restore, delete, or otherwise manipulate any of these files from this folder. Keyboard shortcuts are transferable between machines, although we have had no success transferring them across platforms.
The vertical bar that appears by default docked on the left side of the interface is referred to as the Tools panel. If you haven't just installed Flash, or if someone else has changed the defaults in Flash, you may not see the Tools panel on your screen. You can find it in the main Window menu (Window
The Tools panel cannot be scaled or minimized like other panels, but it can be set to display as one vertical stack of icons (long view) or as a double-wide stack (short view) by clicking the small arrow toggle at the very top left of the panel. It can also be hidden (and unhidden) along with other panels by choosing Window
Note
If you're using a Windows machine, don't confuse Tools with the menu item for Toolbars, which refers to a set of optional menus we describe in the section "The Flash CS3 interface on Macintosh and Windows" earlier in this chapter.
Tip
To drag the Tools panel to the edge of the program window, yet prevent it from docking, press the Ctrl key while dragging.
If you would rather not see the tooltips that display when tool icons are pointed to in the Tools panel, you can turn them off in your General Preferences. (In OS X, go to Flash
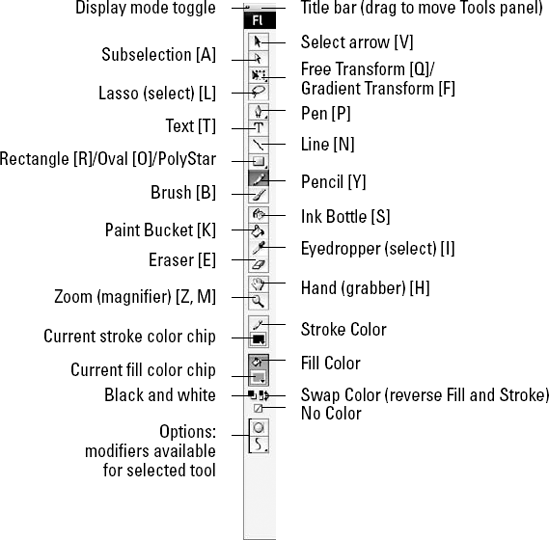
The Tools panel contains all 17 Flash tools (see Figure 4.10 for tool icons and shortcut keys), as follows from left to right and top to bottom: Selection (arrow), Subselection, Free Transform (with Gradient Transform in the submenu), Lasso, Pen, Text, Line, Rectangle (with other shape tools in the submenu), Pencil, Brush, Ink Bottle, Paint Bucket, Eyedropper, and Eraser. The Flash View tools: the Hand and Zoom are below the drawing tools. Beneath the View tools is the Color area, with swatches for assigning Stroke color and Fill color, and buttons for Black and White, No Color, and Swap Color (to reverse stroke and fill colors). The last section of the Tools panel is the Options area, where some of the available tool modifiers appear for any active tool.
Note
We explain the application of individual tools and options in the Tools panel in the chapters related to specific production topics that make up the remainder of Part II, "Mastering the Flash Environment."
Depending on the tool selected, the Options area may display some of the options, or properties, that control the functionality of that particular tool, while other controls may appear in the Property inspector or in a panel that launches separately. Of the options located in the Options area, some appear as submenus with multiple options, while others are simple buttons that toggle a property on or off. (For example, if the Lasso tool is selected, the Magic Wand option can be turned on or off by clicking a toggle button in the Options area.) If an option has more than two settings, these are generally available in a submenu.
Many of the options that appear within the Options area of the Tools panel can also be accessed from the Property inspector, from the application menu, or with keyboard shortcuts.
All the tools accessed from the Tools panel have keyboard equivalents, or shortcuts, that are single keystrokes. For example, to access the Selection tool — which is the tool with the black arrow icon, located in the upper-left corner of the Tools panel — you can simply press the V key when the Stage or Timeline is in focus. Thus, the V key is the keyboard shortcut for the Selection tool on both Mac and Windows. This is faster than moving the mouse up to the Tools panel to click the Selection tool, and it saves mouse miles on repeated tasks. To help you learn and remember shortcuts, throughout this book when we mention a new tool, the keyboard shortcut for that tool follows in parentheses, like this: Selection tool (V).
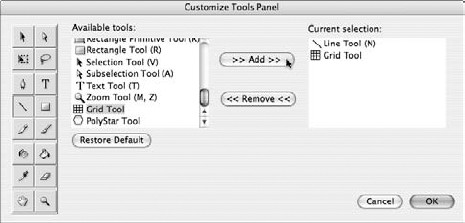
Because the Tools panel is the most convenient place to store and access drawing tools, Adobe has provided a user-friendly interface that makes it possible to add, delete, or rearrange the tools (and icons) that appear in the Tools panel. Open the dialog box shown in Figure 4.11 by choosing Edit
The PolyStar tool is a good example of how you can store new tools that you want to use in Flash. The PolyStar tool was added to Flash MX 2004, and unlike the original Flash Oval tool and Rectangle tool, it did not get its own square in the Tools panel. The PolyStar tool had to move in and share a square with the Rectangle tool. The PolyStar icon is only visible in the Tools panel when the tool has been selected from the drop-down menu triggered by clicking and holding the Rectangle tool icon. Any tool square that has more than one tool stored in it will display a small black arrow below the currently active tool to indicate that a drop-down menu is available. By default, the tool icons will appear in the drop-down list in the order that they are added to the Current selection list in the Customize Tools Panel dialog box. The first tool added to the list will show up in its assigned square in the Tools panel unless one of the other tools in the same square is selected from the drop-down menu. The most recently selected tool in any square will be visible until Flash is restarted or another tool is selected from the same square.

Figure 4.11. Use the Customize Tools Panel dialog box to add or rearrange the tools available in the Tools panel.
All assigned tool shortcut keys remain mapped to individual tools and can be used to activate a specific tool regardless of which square the tool is stored in. If all of the tools are removed from a square, that space on the Tools panel is left blank. Thanks to the Restore Default button in the Customize Tools Panel dialog box, you can have fun moving, grouping, or even deleting tools from different tool squares with the knowledge that you can always go back to the original layout. To illustrate the steps for adding a new Flash tool and storing it in the Tools panel, we have included a brief tutorial on a custom Grid tool developed by Joey Lott.
Adding New Tools to Flash, by Joey Lott
Authors' Note: Although it is beyond the scope of this book to describe the steps involved in actually scripting your own custom tools for Flash, we can tell you how to use custom tools that other developers have made. Joey Lott has generously agreed to let us include the code for one of his Flash tools on the CD-ROM. This brief tutorial is adapted from Joey's notes on how to install and use his "Grid" tool. We hope you will be able to follow these same steps to use other custom tools available from Adobe or from generous developers in the Flash community.
The first step to using a custom tool is to find the files that Flash needs to make the tool work in the authoring environment and the icon that will be visible in the Tools panel. Unless you happen to know some brainy coders, the best place to look for new custom tools is in the Flash Exchange area of Adobe's site (www.adobe.com/exhange).
The three files you will want to find and download are as follows:
An XML file that describes the functionality of the tool and controls any "settings" that can be used to modify the final result
A JavaScript-Flash file (.jsfl) that implements required methods for manipulating the Flash authoring tool based on parameters specified by the XML file
A .png file that will appear in the Tools panel as the icon for the custom tool
Note
We have included Grid.xml, Grid.jsfl, and Grid.png on the CD-ROM in the CustomTool subfolder of the ch04 folder.
You have to save these files in your Flash CS3 Tools folder so that the tool can be applied in the authoring environment.
The standard directory path on Windows is:
C:Documents and Settings(username)Local SettingsApplication DataAdobeFlash CS3(language)ConfigurationTools
The standard directory path on Mac is:
HDUsers: (username)LibraryApplication SupportAdobe
Flash CS3(language)ConfigurationTools
After the three files for the Grid tool are saved to the Tools folder, the Grid tool is added to the list of available tools in the Customize Tools Panel dialog box.
The steps for adding the Grid tool icon to a square on the Tools panel are the same as those used to assign any other tool to a specific location in the panel:
Open the Customize Tools Panel dialog box (Edit
Select a location square on the Tools panel preview on the left side of the dialog box, select the Grid Tool from the list of Available tools, and click the Add button. (As shown in Figure 4.12, we chose to add the Grid Tool to the Line Tool square.)
Click OK to apply your changes and close the dialog box.
Now that the Grid tool icon has been added to the Tools panel, you will be able to select it from the square that you chose to store it in. As with the PolyStar tool, you will notice that when the Grid tool is active, an Options button appears in the Property inspector. Use this button to launch the Tool Settings dialog box (shown in Figure 4.13) where it is possible to control the number of rows and columns that you want to draw with the Grid tool.
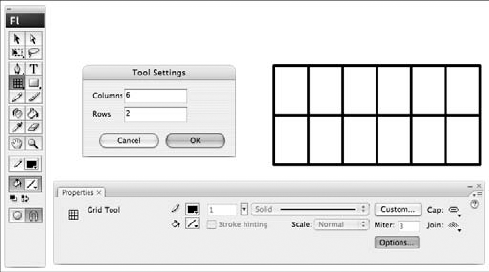
Figure 4.13. After they have been added to the Tools panel, custom tools and options can be used as easily as other standard Flash tools.
After you choose settings for the grid and click OK to close the dialog box, you can draw a grid as easily as you would draw a rectangle with the Rectangle tool: Click the Stage and drag horizontally to create width and vertically to create height — the live preview lets you see how the grid looks before you release the mouse. You can select individual lines in the final vector grid, modify them with other drawing tools, group the lines, or convert them into a reusable symbol. This is a simple tool, but it creates perfect grids every time and saves you time and mouse miles, too!
Let's hope there will be many more useful and creative tools available that will open new possibilities for your Flash designs. You can continue to save other custom tool files to your Tools folder, and they will be added to the Available tools list in the Customize Tools Panel dialog box.
Warning
Obviously, it would be a big mistake to save a custom tool file to your Tools folder if it had the same name as an existing tool. Unless you want to overwrite existing Flash tools, make sure you're using unique names for any custom tools that you add. If you'd rather not change the name of a tool, simply add a unique number to the tool name to avoid overwriting other files with the same name.
You can remove tool icons from the Tools panel at any time without actually deleting the files stored in the Tools folder, but if you decide you don't need a tool anymore, or if your available tool list gets too cluttered, simply remove the relevant .xml, .jsfl, and .png files from the Tools folder (save them somewhere else if you liked the tool, trash them if you didn't).
The Document window is the work table of your Flash project. This window tells you what document (.fla) is currently active and shows you where you are working in the project. When you open or create a new Flash file, a new Document window appears on the screen. You can have multiple files open simultaneously — click to move from one Document window to another. You have the option of choosing a document type from the Start Page (discussed earlier in this chapter; shown in Figure 4.1) or from the New Document dialog box invoked by the New File command: File
Tip
If you prefer to bypass the New Document dialog box, you can create and open a basic Flash document in one step (by default this will be set to use ActionScript 2.0), by using the shortcut command Alt+Ctrl+N (or Option+
Figure 4.14 shows the New Document dialog box for Flash CS3. The dialog box includes a General tab for opening Flash documents and a Templates tab for opening Flash documents with prebuilt elements that you can use as guides for designing specific kinds of presentations.
In addition to the basic Flash File (.fla) types targeting different versions of the Flash Player, the General tab includes several specialized file types which give developers more options for application development and script editing.
Note
Advanced authoring with Flash JavaScript and Flash Form applications is beyond the scope of this book, but if you want to take your Flash development to the next level, the Flash ActionScript Bible (Wiley, 2007) provides more information on these topics.
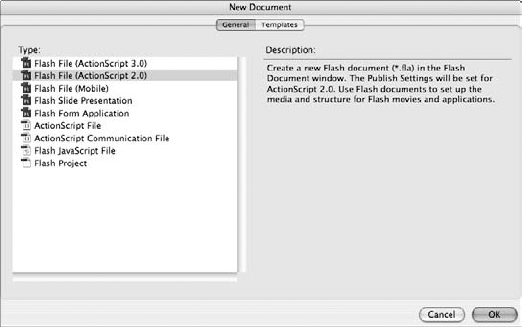
Figure 4.14. Use the New Document dialog box in Flash CS3 to create new documents or open template files.
Even when you choose to hide all panels (F4), the Document window remains visible — closing the window will close your Flash project. On Macintosh, the Document window is always free-floating and can be moved anywhere onscreen by grabbing the top of the panel with your mouse, or scaled by dragging the size box in the lower-right corner. By default, on Windows, the Document window is maximized to fill the workspace and it cannot be scaled or moved independently, unless you first click the document Restore Down button (between the Minimize button and the Close button) in the top-right corner of the window (below the larger buttons that control the application). This will "free" the Document window from other panels in the program window so that you can move it around and scale it.
Flash CS3 optimizes screen real estate and makes it easier to work with multiple documents by automatically grouping open Document windows into the same tabbed format used for panels. As you create new documents or open existing documents during a session in Flash, they will be added as sequential tabs along the top of the Document window. Click any tab to switch to a specific document, click and drag a tab to move it to a new position in the tab order, and click the small "x" icon to close a Document.
Note
If you prefer not to work with tabbed Document windows, you can turn off this default setting by deselecting the first check box in the Preferences panel under the General category.
Tip
If you need to see two tabbed Document windows side by side (to facilitate dragging items from one file to another or to compare two files), use the Duplicate Window command (Window
The main reason you may want to alter the default placement of the Document window is to organize your panel layouts to suit a dual-monitor workstation. Although you can drastically change the size and location of the Document window, generally you will want it centered in your workspace and scaled to allow you to comfortably work with objects on the Stage. Figure 4.15 shows the Document window on Macintosh as it appears with default settings and with the Document Properties dialog box open.
Note
The Document Properties dialog box includes two fields for entering metadata for your published Flash files. Title and description information entered in Document Properties will be embedded in the published .swf file as metadata that will help search engines to find and catalog your Flash content. Unfortunately, this information is not automatically carried over to the .html file published from Flash.

The default document settings of Flash will automatically create new documents with a size of 550 × 400 pixels, a white background color, and a frame rate of 12. All of these attributes are displayed in the Property inspector and can be changed at any time. Clicking the Size button in the Property inspector launches the Document Properties dialog box where you can enter a custom size or use the Match options to automatically create a document that fits your current printer page settings (Printer), include all the elements you have placed into your document (Contents), or restore the default size setting (Default).
Tip
If you wish to change the default settings for all new documents, invoke the Document Properties panel by clicking the Size button on the Property inspector or choosing Modify
The white Stage area is the central part of the Document window that becomes the visible area or "screen" of a published Flash movie (.swf). As we noted earlier, you can change the color and size of this "background" at any time, but it is best to establish these settings before you begin creating other elements.
The light gray Work area (also called the Pasteboard) that frames the Stage enables you to place elements into your project while keeping them out of the visible area. This feature is useful if you want to show only part of an element or animate it as it moves onto the Stage. A good example of the utility of the Pasteboard feature can be seen in some cartoons in which very large background artwork hangs off the Stage (or View area) until it's called upon or tweened through to create the effect of a camera pan. The Stage and the Pasteboard are always available in the Document window. The default panel layout also includes the Timeline docked at the top of the Pasteboard, because this is generally the most convenient place to use it.
Tip
You can strip the Timeline panel out of the Document window and leave it free-floating, or you can redock it to the top or bottom of the Pasteboard. You can also dock the Timeline to either side of the Pasteboard, but this is usually an awkward view.
The narrow bar located above the Stage and Pasteboard is referred to as the Edit bar (shown in context in Figure 4.15). This bar contains icons and a value box that help you navigate within a document.
Tip
When the Timeline is docked at the top of the Document window, the Edit bar appears below the Timeline by default. To move the Edit bar above the Timeline hold down Shift+Ctrl (or Shift+
Although the scale value box is at the end of the bar, we discuss it first because it can be useful even when you first begin putting artwork on the Stage. This value box, called the Stage View control, shows you the current scale of the Stage area and enables you to type new percentages or select a preset value from a submenu.
Note
The view percentages are based on the pixel dimensions of your project, as defined in Document properties, and your screen resolution. For example, if your project size is 500 × 400 pixels and your screen resolution is 1024 × 768, then the Stage area would occupy almost 50 percent of your screen if view scale was set to 100 percent (Ctrl+1 or
The first three settings in the View submenu list are Fit in Window, Show Frame (Ctrl+2 or
Fit in Window scales the Stage view to fill the current Document window without cropping the visible area.
Show Frame sets the Stage view to a scale that fits the content of a frame in the Document window; if there is nothing on the current frame, the Stage view is set at a scale that shows the entire Stage area within the current Document window size.
Show All sets the Stage view to a scale that includes any elements you have placed on the Pasteboard outside the Stage. You can find these same view options from the application menu (View
There are two additional tools available in the Tools panel (see Figure 4.10), which will also control your view of the Stage and Pasteboard within the Document window:
The Hand tool (H) allows you to move the Stage area within the Document window by "grabbing" it (clicking and dragging). Double-clicking the Hand icon in the Tools panel quickly gives you the same Stage view as choosing the menu item Show Frame.
Tip
To toggle the Hand tool on while using any other tool, without interrupting your selection, hold down the spacebar.
The Zoom tool, or magnifier (Z, M), does just what the name implies — adjusts the scale of your Stage view. The available magnification range is between 8 percent and 2,000 percent. However, you can apply this handy tool in a few ways. With the Zoom tool active, clicking consecutively on the Stage will pull in closer to artwork with the Enlarge option (Ctrl+[+] or
Now back to the other icons on the Edit bar. The location label on the top-left edge of the window (immediately to the right of the Timeline view/hide toggle) shows you the current scene and what part of the project you are editing. The sequence of labels that displays in this area are sometimes referred to as breadcrumbs because these labels show the steps, or the path, leading back to the Main Timeline from the location you're editing. When in Edit mode, you can use these sequential labels to step your way back to the Main Timeline of the current scene, or click the arrow in front of the labels to return to the Main Timeline of the first scene in your project. To the right is the Edit Scene icon, and at the far right is the Edit Symbols icon. Click these icons to access menus of scenes or symbols in the current document that can be opened and edited within the Document window.
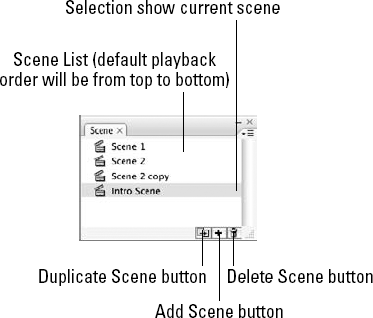
The Scene panel (Shift+F2 or Window
Dividing logical project parts into separate documents also facilitates efficiency in team environments, where developers can be working on different pieces of a project simultaneously. Scenes can still be useful for organizing certain types of projects, such as simple presentations without a lot of graphics, or for animators who prefer to organize a cartoon in one file before handing it off for integration into a larger site structure.
Adding named anchor keyframes is another useful option for linear Flash presentations. These enable Forward and Back buttons in a Web browser to jump from frame to frame or scene to scene to navigate a Flash movie.
Tip
You turn the option of making the first keyframe in a new Scene a named anchor keyframe on or off in the Timeline section of the General Preferences panel (Ctrl+U or
Warning
Named anchors work well on Windows browsers but almost always fail on Mac browsers, so this is not a reliable option for Web navigation within a Flash movie if you expect some visitors to your site to be using Mac systems.
Note
For more on how to set and publish named anchor keyframes, refer to Chapter 20, "Making Your First Flash Project."
To navigate and modify scenes from within the Document window:
Click the Edit Scene button on the Edit bar and then choose the desired scene from the submenu.
Navigate to a specific scene from the application menu with the View
To add a new scene, either use the Scene panel's Add button — indicated by the plus sign — or, from the Insert menu, use Insert
Use the Duplicate button on the Scene panel to make a copy of a scene, including all content on the scene's Timeline.
To delete a scene, use the Scene panel's Delete button — indicated by the trashcan icon. (To bypass the alert asking if you want to delete the scene, use Ctrl+click or

To rename a scene, simply double-click the scene name within the Scene panel and type a new name. Using numbers in scene names will not affect playback order; the scenes will play from the top to the bottom of the list.
To rearrange scene order, simply click and drag a scene to alter its position in the Scene panel list. You can use actions to direct the movie to access scenes outside the default linear order. For more about actions, refer to Chapter 18, "Understanding Actions and Event Handlers."
Warning
Although scenes give you the visual impression of having a whole new timeline to work on, they are really continuations of the Main Timeline that begins in the first scene of your document. If you're using any actions to control your movie playback, it's important to avoid duplicate naming on frame labels or named anchors. Thus, even if it seems logical, it isn't a good idea to label the beginning of each new scene "intro," because you won't be able to differentiate these labels as easily for targeting with ActionScript.
There are several options available from the application menu that control display or editing in the Document window. These can be helpful when you're creating or placing elements on the Stage. All of these can be accessed from View on the application menu (notice the shortcut key combinations listed after most commands). The basic functions of these various commands are as follows:
Goto: Leads to a submenu of scenes in the current movie, including four handy shortcuts to the First, Previous, Next, and Last scenes. This menu is also available from the Edit scene icon on the Edit bar in the Document window.
Zoom In: Increases the scale of the Stage view by 50 percent.
Zoom Out: Decreases the scale of the Stage view by 50 percent.
Magnification: Leads to the same view options that are available in the Stage View Control on the top right of the Document window. Note that three of these options also have corresponding keyboard shortcuts.
Preview Mode: Leads to a menu of various settings for rendering and displaying content in the authoring environment:
Outlines: Simplifies the view of elements on the Stage by showing all shapes as outlines, and all lines as thin lines. This option is helpful when reshaping graphic elements. It also speeds up the display of complex scenes and can assist in getting the general timing and sense of a movie. It is a global equivalent of the outline options available in the Timeline window for layers and frames.
Fast: Turns off both antialiasing and dithering to speed up the display. The default is off, to create the most accurate screen image, and it is only recommended that you turn this option on if you need to reduce demand on your processor.
Antialias: Dithers the edges of shapes and lines so that they look smoother onscreen. It can also slow the display, but this is only an issue with older video cards. This is actually a toggle in opposition with the Fast command: Turn this On and Fast goes Off.
Antialias Text: As with Antialias, this is also a toggle in opposition to the Fast command. It smoothes the edges of text only and is most noticeable on large font sizes. You can only have one Antialias option on at a time, so you can make a choice between smoothing text or smoothing shapes, depending on what content you're working with.
Full: Use this option for the most "finished" or high-definition preview. If you are working on intensive animation, it may slow down rendering of the display in the authoring environment.
Pasteboard: Makes the light gray area that surrounds the Stage available for use. When the Pasteboard is visible, your Stage area displays centered in the Document window when you apply Show Frame or Show All. If the Pasteboard has been turned off in the View menu, then the Stage will align to the top-left of the Document window.
Warning
Items that are selected and offstage when View
Rulers: Toggles the reference Rulers (which display at the top and left edges of the Work area) on or off — use Modify
Grid: Toggles visibility of the background Stage grid on or off. This grid does not export with the final Flash movie (.swf), but it does serve as an authoring reference. You can control the appearance of the Grid and the precision of grid snapping by adjusting the settings in the dialog box invoked with the Edit Grid command. When the Snap to grid option is active, it works even if the Grid is not visible. Edited Grid settings can be saved as the default by clicking the Save Default button, which enables you to have these setting as presets for all subsequent Flash movies.
Note
The default Grid size of 18 pixels is equal to 0.25 inch. Grid units can be changed by entering the appropriate abbreviation for other units of measurement (for example: 25 pt, 0.5″, 0.5 in, 2 cm, and so on) in the Grid Spacing entry boxes. Although the specified units will be applied to the grid, they will be translated into the current unit of measurement for the Ruler. Thus, if the Ruler is set to pixels, and the Grid units are changed to 0.5 in, then, on reopening the Grid dialog box, the Grid units will be displayed as 36 pix (because pixels are allocated at 72 pix = 1''). Changing Ruler units via Modify
Guides: When Rulers are turned on, you can drag horizontal or vertical Guides onto the Stage from respective rulers. These four commands control the parameters of these Guides:
Show Guides: This is a simple toggle to either show or hide Guides that you have dragged out from the rulers.
Lock Guides: This is a toggle that either locks or unlocks all current Guides. This is useful to prevent Guides from accidentally being moved after you have placed them.
Edit Guides: This command invokes the Guides dialog box, where Guide Color and Guide-specific snap accuracy can be adjusted. Also included are check boxes for the other three Guide commands: Show Guides, Snap to Guides, and Lock Guides. This enables you to establish Guide settings and then click the Save Default button to have these settings as presets for all subsequent Flash movies. To delete all Guides from the Stage, press the Clear All button.
Clear All: The Clear All command gets rid of all visible guides in the current document. It does the same thing as the Clear All button in the Edit Guides dialog box.
Snapping: Leads to a menu of various options for controlling snapping behavior in the authoring environment.
Note
When Snap to Pixels is turned on, a 1-pixel grid appears when the Stage view is magnified to 400 percent or higher. This grid is independent of the Show Grid command.
Hide Edges: Hides selection patterns so that you can edit items without the visual noise of the selection pixel "highlight." This only applies to currently selected items and allows a clean view without having to lose your selection. Most useful for seeing colors or fine lines that may appear visually distorted by the selection pattern.
Show Shape Hints: This toggles Shape Hints to make them visible or invisible. It does not disable shape hinting. Shape Hints are used when tweening shapes.
Note
For more about Shape tweens (or Shape Morphing) refer to Chapter 11, "Timeline Animation."
Show Tab Order: This is a toggle to turn on or off numbers that will mark the tab order set in the Accessibility panel for elements in the authoring environment.
The library of predefined Flash documents available in the Templates tab of the New Document dialog box (or in the Create from Template list of the Start Page) is a good starting point for standard Flash presentations. (See Figure 4.17.)
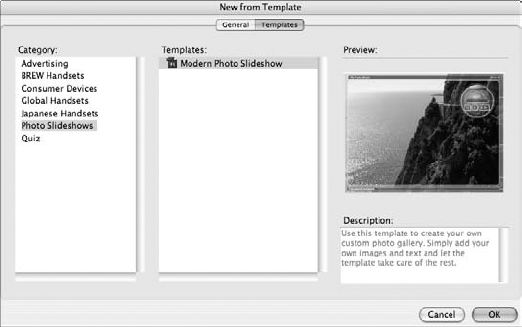
Figure 4.17. The prebuilt templates that ship with Flash provide a good starting point for authoring simple Flash presentations.
To work with a Flash template, open it as you would any other Flash document. You can then add your own content to the Stage or modify the Timeline following the guides in the template and save the finished document with a new name.
You can also create your own reusable template from any Flash document by choosing File
Tip
Although each template type has a different file structure and may contain different content, the preview for any template will include only the visible content in the Stage area on the first frame of the template file. Changing the content in the first frame of a template file will also change the preview for that template.
Tip
The standard directory path for the Templates folder on Windows is:
C:Program FilesAdobeFlash CS3(language)ConfigurationTemplates
The standard directory path on Mac is:
HD/Applications/Adobe Flash CS3/Configuration/Templates
Note
If you are interested in creating custom template previews, visit www.flashsupport.com/archive to find Bill Perry's tutorial and example files from the Flash MX 2004 Bible.
The Timeline is like nothing you will find in your analog studio, unless you have a time machine that enables you to move forward and backward in time and up and down between dimensions. This may seem like a rather far-fetched analogy, but understanding the behavior and purpose of a timeline is often the most foreign new concept to grasp if you have not worked in other time-based applications (such as Macromedia Director). A clear understanding of timelines is critical to production in Flash. Even if you know how to use all your other tools, not knowing the Timeline makes working in Flash like trying to work in a studio with no light.
Note
Flash MX Professional 2004 introduced an alternative to the Timeline authoring structure with form-based templates for application authoring. For more information on this feature, search in the Help panel Features booklet or under Using Flash for "Slide screens and form screens."
The Timeline window is really composed of two parts: the Layer section, where content is "stacked" in depth; and the Timeline/Frames section, where content is planned out in frames along the duration of your movie, like on a strip of motion picture film. In the Layer section, you can label or organize your "stacks" of frame rows. You can also lock or hide individual layers or just convert their display to colored outlines on the Stage while you are editing. In the Timeline section you can control where and for how long content is visible and how it changes over time to animate when the movie plays back. You can also add actions to control how the Playhead moves through the Timeline, making it start and stop or jump to a specific frame.
Note
You can find more on controlling the timeline for specific animation techniques in Chapter 11, "Timeline Animation." Actions are introduced in Part V, "Adding Basic Interactivity to Flash Movies."
On both Macintosh and Windows, the default position for the Timeline is docked at the top of the Document window, which is often the most logical place to put it. If you don't see the Timeline when you open Flash, go to Window
Tip
The Filmstrip icon on the top left of the Timeline window is a toggle button that serves the same purpose as the minimize/maximize triangle icon in most other panels. Clicking the Timeline toggle expands or collapses it faster than using the application menu to open and close it completely. This feature also makes it easy to collapse the Timeline window so that it doesn't take up screen space, while still leaving it available to expand again when you need it.
You can always adjust the position, size, and shape of the Timeline to suit your workflow. You can dock the Timeline to any edge of the Document window, but you cannot group it with other panels. You can, however, move it anywhere as a floating window, even exile it to a second monitor — leaving the Document window all for the Stage and Pasteboard.
Move the Timeline by clicking and dragging the title bar at the top of the window. If the Timeline is docked, click anywhere in the gray area above the layer stack and drag to undock the Timeline and reposition it.
If it's undocked, resize the Timeline by dragging any edge (Windows), or the gripper/size box in the lower-right corner (Mac). If it's docked, drag the bar at the bottom of the Timeline that separates the layers from the Stage area, either up or down.
To resize the layer area for name and icon controls (to accommodate longer layer names or to apportion more of the view to frames), click and drag the bar that separates the layer name and icon controls from the Timeline frame area.
Note
If you prefer to use menu commands rather than dragging to change the position of the Timeline panel, you can use the new Placement options available from the Frame View options menu. As shown in Figure 4.21, these options set the position of the Timeline panel to Above, Below, Left, or Right of the Document window.
The Controller (Window
Warning
Playback speed within the document (.fla) is not as accurate as it is in the movie file (.swf), so the Controller is not intended as a replacement for the Test Movie command (Control
As you can see in Figure 4.18, the buttons on the Controller will be familiar to anyone who has used a remote control. The only special function to note is that the Play button toggles to start and stop; you don't have to use the Stop button.
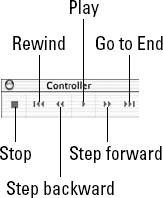
Figure 4.18. The Controller showing callouts for the buttons as they are used to control movement of the Playhead
Tip
Using shortcut keys is often the preferred way to move along the Timeline. On both Windows and Mac, pressing the Enter/Return key will work as a toggle to start and stop the Playhead. If you prefer to move along the Timeline frame by frame, pressing the period key (.) moves forward one frame and pressing the comma (,) moves back one frame. A more intuitive way to remember these keys is to look for the less than (<) and greater than (>) symbols.
The Timeline graphically orders Flash content across two dimensions — time and depth — and provides you with some options for how this content is displayed on the Stage and within frames on the Timeline.
The order of time is displayed by the sequence of frames arranged horizontally, from left to right, as they appear within the duration of your project. Thus, if your movie is set to 20 frames per second, frame 40 occurs at the 2-second point of your animation.
Note
Although they say that time and space are without limits, the Flash authoring environment supports about 32,000 frames, and the .swf format only officially supports around 16,000, which is actually so long that you might never find your way from one end of the Timeline to the other. Organizing your work with scenes and Movie Clips, or even in multiple documents, should save you from ever having to use a Timeline even a tenth of this length.
Note
For more details on the limits of Flash, refer to the Adobe Tech Note Index:
www.adobe.com/cfusion/knowledgebase/index.cfm?id=tn_14437.
You can insert, delete, copy, paste, and reorder frames as well as convert them to various specific frame types that control how elements will animate. Current frame settings display in the Property inspector when a frame is selected, and you can also add/change a frame name or tween type here. The main controls for editing frames are found in the contextual menu (right-click on Windows or Control+click on Mac) or from the Timeline submenus under Edit, Insert, and Modify in the application menu.
Tip
As you work with frames, you'll find shortcut keys invaluable. These shortcut keys are listed in the application menu following most commands.
The Timeline layers enable you to separate content onto individual "transparent" work surfaces within the Document window. This enables you to animate or edit elements individually even if they occupy the same Timeline (or frame) space as other elements in the document. These layers are arranged vertically, holding content that stacks in the Document window from bottom to top. They enable you to organize content, actions, comments, labels, and sounds so that you will be able to quickly find the parts of the project that you want to edit.
Tip
Layer folders are a huge help to organizing multilayered documents. With layers moved inside a folder, they can be opened up for editing or hidden away (collapsed) to reduce the number of layers you have to navigate.
You can insert, delete, move, or rename layers and folders, as well as adjust how content is displayed in the editing environment. Items placed on layers higher in the layer stack can visually obscure other items in layers beneath them, without otherwise affecting each other. With the layer control icons shown at the top of the layer stack, you can set layer visibility (the Eye icon), editability (the Lock icon), and the display mode (the Square icon) to regular or outline only. Note, however, that these settings are visible within the editing environment only and do not affect the appearance of the final movie (.swf).
Figure 4.19 shows the Timeline window, as it appears when it is undocked or floating. The various controls of the window interface are labeled here, but we defer detailed explanations of some of these controls to the drawing and animation chapters where we show you how they are applied.
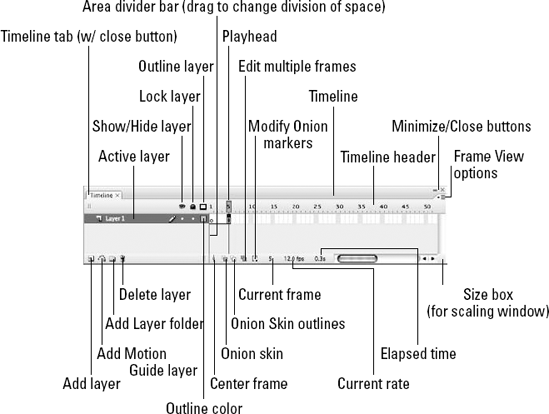
Figure 4.19. The floating Timeline window with callouts showing the principal features and control elements
As shown in Figure 4.19, the principal features and controls of the Timeline are:
Timeline (panel): More than one Timeline tab can be opened and displayed in the Timeline panel at the same time. Individual Timeline tabs can be closed by using the "x" icon on the tabs or the entire Timeline window can be minimized or closed using the controls on the top-right corner of the Timeline panel.
Timeline header: The Timeline Header is the ruler that shows frame numbers and measures the time of the Timeline — each tick is one frame.
Playhead or Current frame indicator: The red rectangle with a line extending down through all layers is the Playhead. The Playhead indicates the current frame. Drag it left or right along the Timeline to move from one area of the Timeline to another. Push it beyond the visible area to force-scroll the Timeline. You can also drag the Playhead at a consistent rate for a preview of your animation; this is called "scrubbing the Timeline."
Tip
On Windows, if you have a mouse with a scroll wheel, you can scroll up and down through the layers, or by holding down the Shift key while you scroll, you can move the Playhead forward and backward along the Timeline. If all of your layers (or layer folders) are already visible in the Timeline window, then the scroll wheel will just scroll you forward and backward along the Timeline without moving the Playhead.
Active layer icon: To make a layer active, either click the layer's name, or select a frame or group of frames. Then the pencil icon appears, indicating that the layer is now active. That's in addition to this more obvious clue: The Layer bar of the active layer is a darker gray than that of inactive Layer bars. Although you can select multiple layers or content on multiple layers, only one layer will be marked as active at a time. For more about frame selection and editing behaviors, please see the section "Editing frames and layers," which follows this one.
Show/Hide layer toggle: Click the dot beneath the eye icon to hide the contents of a layer from view on the Stage. When the layer is hidden, a red X appears over the dot. To return the layer to visibility, click the X. To hide or show all layers at once, simply click on the eye icon directly.
Warning
Hidden layers do export, and any content on the Stage within a hidden layer will become visible upon export. Even if the content is offstage and not visible, it may add considerably to the file size when a Flash movie (.swf) is published, so you should save your document (.fla) and then delete these layers or convert them to Guide layers before your final export.
Lock/Unlock layer toggle: This toggle locks or unlocks the layer to either prevent or enable further editing. When the layer is locked, a padlock icon appears over the dot. To lock/unlock all layers at once, click directly on the lock icon.
Outline Layer toggle: This toggles the colored layer outlines on or off. When on, the filled square icon changes into an outline, and all elements in that layer appear as colored outlines in the Document window. The outline color for the layer can be changed with the Outline Color control of the Layer Properties dialog box, which can be accessed by double-clicking the square Outline color icons in the layer stack or by choosing Modify
Frame View options: This button, at the far-right end of the Timeline, accesses the Frame View options menu, which affords many options for the manner in which both the Timeline header and the frames are displayed.
Add layer: Simply click this button to add a new layer above the currently active layer. By default, layers are given sequential numeric names. Double-click the layer name in the Layer bar to change the name. Click and drag any part of the Layer bar to move it to a new position in the stack, or drag it on top of a folder layer to place it inside the folder.
Add Motion Guide layer: Motion guide layers are used to move elements along a path. This button adds a Motion guide layer directly above (and linked to) the currently active layer. To learn about using Motion guide layers, refer to Chapter 13, "Applying Layer Types."
Add Layer folder: This button enables you to create folders for storing groups of layers. New folders will automatically be placed above the currently selected layer and labeled in the same number sequence as layers. They can be renamed or moved in the same way as other layers.
Delete layer: This button deletes the currently active layer, regardless of whether it is locked. Flash always retains one layer in the Timeline, so if you only have one layer in your document, you can't delete it unless you add another layer to the Timeline.
Tip
Because using the Delete key on your keyboard does not remove an active layer or folder, but rather removes all of the content from those frames, it can be helpful to get in the habit of right-clicking (Windows) or Control+clicking (Mac) a layer that you want to remove, and choosing Delete from the contextual menu. You can always click the trash icon to dump a selected layer or folder, but sometimes the contextual-menu click is a work habit that can be easily applied.
Center frame: Click this button to shift the Timeline so that the current frame is centered in the visible area of the Timeline.
Onion skin: This enables you to see several frames of animation simultaneously.
Onion Skin outlines: This enables you to see the outlines of several frames of animation simultaneously.
Edit Multiple frames: In general, Onion skinning permits you to edit the current frame only. Click this button to make each frame between the Onion Skin markers editable.
Modify Onion markers: Click this button to evoke the Modify Onion Markers pop-up. In addition to making manual adjustments, you can use the options to control the behavior and range of Onion skinning.
Note
Onion skinning is further described in Chapter 11, "Timeline Animation."
Current frame: This indicates the number of the current frame.
Current rate: This indicates the frame rate of the movie, measured in frames, or frames per second (fps). The program default of 12 fps is usually a good starting point. Ideally, you should do some testing in the final playback environment before deciding on an optimal frame rate. You can double-click the Frame Rate Indicator to invoke the Document Properties dialog box (Modify
Note
The fps setting is not a constant or absolute — it really means "maximum frame rate." The actual frame rate is dependent upon a number of variables, including download speed, processor speed, and machine resources; these are variables over which you have no control. However, another factor, over which you do have control, is the intensity of the animation: Complex movement with multiple elements or many layers of transparency is more processor intensive than simple movement. Previewing real-world playback speed at different frame rates — on various machines — early on in your development process is very important.
Elapsed time: This indicates the total movie time, measured in seconds (or tenths of a second), which will elapse from frame 1 to the current frame — provided that the movie is played back at the optimal speed.
After you learn to recognize the visual conventions of the Timeline and how it displays different types of frames, you will be able to learn a lot about what is happening in an animation just by reading the Timeline. Figure 4.20 illustrates the Flash conventions for frame and layer display.
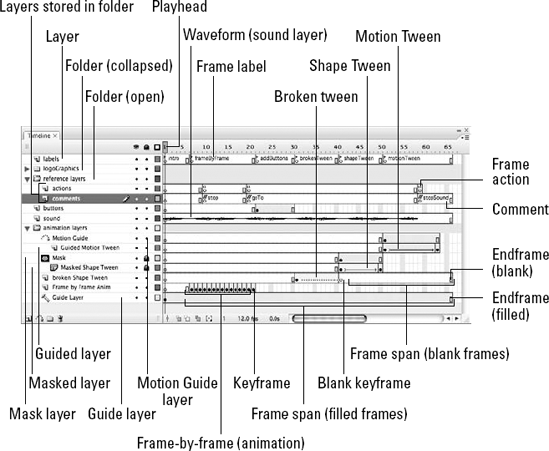
The Timeline features noted in Figure 4.20 are defined as follows:
Keyframe: A keyframe is any frame in which the contents of the frame may differ from the contents of either the previous or subsequent frames. Filled (black) circles on the Timeline mark keyframes with content.
Blank keyframe: A keyframe that does not contain any content has the same behavior as any keyframe, but it is marked by an empty (white) circle on the Timeline.
Frame span: Frame spans are the sections from a keyframe to an endframe (up to, but not including, the next keyframe to the right). Note that these spans can be selected by double-clicking, and dragged as a whole to a different location.
Filled frame(s): The intermediate frames in a span, following to the right of a keyframe (with content), are shaded gray.
Empty frame(s): The intermediate frames in a span, following to the right of a blank keyframe, are white. A black line also outlines the entire span.
Endframe: The final frame of a span, marked with a small white rectangle and a vertical line to the right of the rectangle.
Frame-by-Frame animation: Frame-by-frame animation is animation composed entirely of keyframes. In a frame-by-frame animation, the content on every frame is changed manually (rather than tweened).
Tweened animation: Tweened animation is movement or change in an element interpolated by Flash over a range of frames that extend between two keyframes. An arrow stretching across a colored frame span designates a tween, of which there are two varieties:
Motion tweens: Motion tweens are indicated by a blue tint and can be applied only to groups or symbols.
Shape tweens: Shape tweens are indicated by a green tint and can be applied only to primitive (nongrouped) shapes.
Note
A dashed line replaces the normal tween arrow if a tween is broken or missing an element required for the tween to render properly. The best fix for this is to remove the tween, check the contents of the beginning and ending keyframe to ensure that they are ready to tween, then reapply the tween to the beginning keyframe.
Note
For more coverage on making frame-by-frame animation and using tweens and Timeline Effects, refer to Chapter 11, "Timeline Animation."
Layer folder: These folders are used to organize other layers, and they can be named and repositioned in the layer stack the same way as layers. Layer folders do not have individual frame settings and thus show up in the Timeline display as a continuous gray bar. To expand (open) or collapse (close) folders, click the arrow toggle at the left of the folder name or use the contextual menu. Note that dragging a folder inside another folder creates subfolders.
Motion Guide layer: A Motion Guide layer is used to guide an animated item along a vector path. For more about Motion Guide layers, refer to Chapter 13, "Applying Layer Types."
Mask layer: A Mask layer is a layer that is used to selectively obscure the layers beneath it. For more about Mask layers, refer to Chapter 13, "Applying Layer Types."
Label: Labels are used to give frames meaningful names, rather than using frame numbers. The advantage of this is that named keyframes can be moved without breaking ActionScript calls assigned to them. Upon export, labels are included as part of the .swf. Use the field in the Property inspector to add a label to a selected frame. Press Enter/Return after typing a frame label or comment to ensure that the label takes.
Comment: Comments are special labels, preceded by a double-slash (//). Comments do not export, so you can be as descriptive as you need to be without adding to the .swf size. However, you won't be able to read long comments unless you leave a lot of space between keyframes. Add comments in the Property inspector the same way as you add labels; just be sure your text is preceded by two forward-slash characters.
Note
The Property inspector includes a menu for selecting a frame text Type. After you type into the Frame text field, you can select from three options in the Type menu: Name, Comment, or Anchor. Note: A frame "name" is generally referred to as a label.
Waveform: This squiggly blue line in the sound layer is the waveform of a placed sound. This visual reference for your sound makes it easier to synchronize animated elements to a soundtrack.
Frame actions: The small as in frames 10, 20, and 58 of the actions layer designate the presence of frame actions.
Note
If you want to see how the various layer and frame types look in the authoring environment and what happens when you publish the file, open framesAndLayers.fla (the Timeline shown in Figure 4.20) from the ch04 folder on the CD-ROM.
The Timeline might look a bit chaotic or confusing at first but there are a lot of cues to help you keep track of the content of your file. Empty keyframes are marked with an empty circle (white dot), the last frame of a span is marked with the empty bar icon, and keyframes with content are marked with a filled circle (black dot).
Flash MX 2004 introduced the option of using either Flash 4 or Flash 5 frame-selection behavior. In Flash 4, individual frames could be selected just by clicking them, even if they were part of a span (a series of frames following a keyframe). With Flash 5, Span-based selection was introduced as the default behavior — all the frames in a span would be selected just by clicking one frame. Since Flash MX, the default has gone back to Flash 4 selection style, but double-clicking a frame selects a span. For the option of going back to the Flash 5 selection style, go to Edit
Tip
Although double-clicking a frame in the default selection style will select a span of frames, if the span is moved, it will automatically extend along the Timeline until it meets another keyframe. This can be helpful or annoying depending on what you are trying to accomplish. With Span-based selection behavior enabled, when you relocate a span, it does not auto-extend and the original span length is preserved.
So that you can better understand the various frame-editing options available, we have listed them here with notes on the ways you can accomplish your intended result. Some of the methods differ depending on whether you have enabled Span-based selection as we described previously. For users of previous versions of Flash, this may take a little getting used to. For new users, deciding on a preference will be a matter of testing out both selection style options. The default methods are listed here first, followed by the methods that differ when Span-based selection is turned on.
The default Flash CS3 selection methods are as follows:
Selecting frames: The methods for selecting single frames and spans of frames have not changed since Flash 8.
Frame spans: To select a span of frames extending between two keyframes, double-click anywhere between the keyframes.
Single frames: To select a single frame within a span, or a keyframe outside of a span, simply click to select it.
Multiple frames or spans: To select multiple frames along the Timeline (within a span or independent of a span), click and drag in any direction until you have selected all the frames you want to include in the selection. You can also use Shift+click to add to a selection of frames.
Note
The difference between selecting a frame by dragging over it, and moving a frame by selecting it and then dragging can be hard to differentiate. At first, you may find yourself moving frames that you only wanted to select. The trick is to be sure that you don't release the mouse after you click a frame before you drag to select other frames. Conversely, if your intention is to move a frame or a series of frames, you have to click and release the mouse to select them first and then click again and drag to move them.
Moving frames: Select the frame(s) that need to be moved and then drag them to the new location.
Extending the duration of a span: There are two ways to change the duration of a span, which is the same result as inserting frames (F5) or removing frames (Shift+F5) after a keyframe. To change where a span begins, select the keyframe and then drag the keyframe to the position where you want the span to begin. To change where a span ends, Ctrl+click or
Note
If you click and drag any nonkeyframe (frame or endframe) without pressing the Ctrl key (or the
Copying frames: Select the frame(s) that you want to copy. Choose Edit
Pasting frames: Select the frame where you want the copied or cut frames to be inserted (Flash automatically adds frames or layers below and to the right of the selected frame to accommodate the pasted content), and choose Edit
Warning
Edit
Inserting frames: Select the point at which you would like to insert a new frame, and select Insert Frame (F5) from the contextual menu or from the application menu (Insert
Inserting keyframes: Select the point at which you would like to insert a new keyframe, and select Insert Keyframe (F6) from the contextual menu or from the application menu (Insert
Inserting blank keyframes: Select the point at which you would like to insert a new blank keyframe, and select Insert Blank Keyframe (F7) from the contextual menu or from the application menu (Insert
Note
If you already have content in the current layer and you insert a keyframe, a new keyframe will be created that duplicates the content of the endframe immediately prior. But if you insert a blank keyframe, the content of the prior endframe will cease and the blank keyframe will, as its name implies, be void of content.
Note
For a hands-on example of frame-based Timeline editing, refer to the file
frames_example.flain thech04folder of the CD-ROM that accompanies this book.Removing frames (to shorten a span): Select the frame(s) that you want to remove, and then choose Remove Frames (Shift+F5) from the contextual menu or from the application menu (Edit
Clearing a keyframe: To remove a keyframe and its contents, select the keyframe and choose Clear Keyframe (Shift+F6) from the contextual menu or from the application menu (Modify
Cutting frames (leaves blank frames or keyframes): To replace selected frames in a span with blank frames, while keeping content in the remainder of the span intact, select the frame(s) you want to "blank" and then choose Cut Frames (Alt+Ctrl+X on Windows or Option+
Warning
Selecting a frame or keyframe and using the Delete key will remove the content from the entire span, but will not remove the keyframe itself, or change the length of the span. You can delete content from multiple layers this way, but it will leave all the empty frames and keyframes on the Timeline.
Tip
Flash MX 2004 introduced a command called Clear Frames (Alt+Delete or Option+Delete). This is a flexible command that will eliminate the content on a selected frame, keyframe, or span of frames without changing the number of frames in a span. If you select a keyframe and apply Clear Frames, the keyframe will be cleared and the content of the keyframe will be removed. If you select a normal frame and apply Clear Frames, the selected frame will be converted into a blank keyframe to eliminate the content in that frame while preserving the content in other frames within the same span. This command is also listed in the contextual menu and in the application menu under Edit
Editing the contents of a keyframe: Select the keyframe where you want to edit content. This moves the Playhead to the selected frame so that its content is visible in the Document window, where it can be edited. Note that if you edit content on a keyframe or frame within a span, the changes will apply to the current frame and the span it is part of.
Note
We detail numerous techniques for editing content in later chapters of this book that address specific types of content. For the most relevant information, look for chapters that describe the types of content you are working with — vector art, bitmaps, sound, video, and so on.
The Span-based selection methods are as follows:
Frame spans: To select a span of frames extending between two keyframes, simply click anywhere between the keyframes.
Single frames within a span: To select a single frame within a span, press the Ctrl key (on Windows) or the
Single frames not within a span: To select a single frame that is not implicated with a span, simply click to select it.
Multiple frames or spans: To select multiple frames along the Timeline (within a span or independent of a span), use Shift+click to add to a selection of the frames.
Figure 4.21 shows a Timeline that illustrates some editing points. The top layer shows the Original layer, with content starting on a keyframe on frame 1, followed by a span of 19 frames, putting the endframe on frame 20. This layer was copied into all three lower layers, with the result that the initial content of all four layers was the same. When a frame was inserted at frame 10 of the Insert frame layer, the content was extended, pushing the endframe of the span to frame 21. When a keyframe was inserted at frame 10 of the Insert keyframe layer, the content was maintained in the new keyframe, but the span was not extended, as indicated by the gray filled frames in the span from frame 10 to frame 20. When a blank keyframe was inserted at frame 10 of the Insert blank keyframe layer, the content was cleared following the new blank keyframe, as indicated by the white frames extending from frame 10 to frame 20.
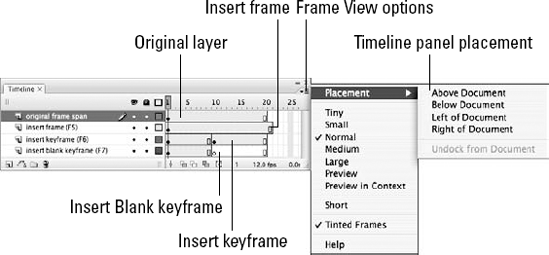
Note
For more information about how frames are used to author and control animation, refer to Chapter 11, "Timeline Animation."
Knowing how to work with layers makes all the difference between a well-ordered project and a chaotic mess of elements that you may never be able to sort out if you have to come back to edit later on. The necessity of a logical folder structure and consistent naming conventions is even more crucial in a team environment, where someone else may have to try to find her way around in your document. Like most good production habits, this may seem like extra work at first, but over time it pays off. As your projects get more complex and your archive of Flash documents grows, the few additional steps you take early on will be invaluable down the road.
Being organized doesn't mean you have to always put every layer into a folder, but rather that you just try to find the most efficient way of keeping track of where you've placed different elements. To make it easier to remember what content is on different layers, it's a good habit to give your layers meaningful names. It can also be helpful to use consistent abbreviations that help you to recognize what type of content is described by the name (such as "MC" for Movie Clip or "Anim" for animation). To edit a layer name, simply double-click the layer's name on the Layer bar and type into the text field.
With all Flash projects in our studio, we begin the layer structure by creating three layers titled "actions," "labels," and "functions" — these are always kept at the top of the layer stack. On projects that we want to document very carefully, we also add a "comments" layer where the type of action or function added on the other layers can be noted. Although these layers don't hold content that is visible on the Stage, they make it easy to quickly find any actions placed on the Timeline and to see labels and comments that give an indication of how the movie is structured.
For detailed methods and suggestions on organizing Flash documents, see Chapter 3, "Planning Flash Projects," Chapter 20, "Making Your First Flash Project," and Chapter 36, "Building an Image Gallery Component."
By default, new layers are stacked on top of the currently active layer. To rearrange layers, click in the area between the layer name and the layer toggle icons, and drag the Layer bar to the desired position in the layer stack and release. To move layers into a folder, click and drag the Layer bar onto any layer with a folder icon. To move a layer back out of a folder, drag it to a position above the folder name bar or below all the other layers contained in the folder.
Because many of the controls for layer options are built into the Timeline window, layer properties are one of the few attributes that are not displayed in the Property inspector (frame properties are visible when any layer is selected). The contextual menu (right-click on Windows or Control+click on Mac) provides convenient access to most of the commands you will need when editing layers — including commands otherwise found in the Layer Properties dialog box or in the application menu:
Show All: Shows all layers. If some layers have had their visibility turned off, this makes them all visible.
Lock Others: Unlocks the active layer and locks all other layers.
Hide Others: Makes the currently active layer visible if it is not visible, and hides all others.
Insert Layer: Inserts a new layer above the currently active layer with an auto-numbered name that continues the number sequence of existing layers and folders.
Delete Layer: Deletes the active layer and all content stored on that layer.
Guide: Transforms the current layer into a Guide layer — a reference layer that will only be visible in the authoring environment (.fla).
Add Motion Guide: Inserts a new Motion guide layer directly above the current layer and automatically converts the current layer into a guided layer.
A Guide layer differs from a Motion guide layer. A Motion guide layer is linked to a guided layer, which usually contains a tweened animation that follows a path drawn on the Motion guide layer. A Guide layer is not linked to a guided layer and is most often used for placing a bitmap design composition, or other items used for design reference that should not be visible in the final movie (.swf). Neither Guide layers nor Motion guide layers export with the project when the file is tested or published.
Mask: Transforms the current layer into a Mask layer.
Show Masking: Use this command on either the Mask or the masked layer to activate the masking effect. Essentially, this command locks both layers simultaneously, which makes the masking effect visible.
Insert Folder: Inserts a new folder above the currently active layer or folder with an auto-numbered name that continues the number sequence of existing layers and folders.
Delete Folder: Deletes the currently active folder, along with all the layers stored in that folder.
Expand Folder: Opens the current folder to make any layers stored inside visible in the layer stack and on the Timeline.
Collapse Folder: Closes the current folder to hide any layers stored in the folder. The elements existing on these stored layers will still be visible in the Document window and in the movie (.swf), but the keyframe rows will not show up along the Timeline.
Expand All Folders: Opens all folders to show any stored layers visible in the layer stack and on the Timeline.
Collapse All Folders: Closes all folders to hide any layers that have been placed in folders. The elements existing on these stored layers will still be visible in the Document window and in the movie (.swf), but the keyframe rows will not show up along the Timeline.
Properties: Invokes the Layer Properties dialog box for the currently active layer. The Layer Properties dialog box can also be invoked directly by double-clicking the "page" icon or the colored square icon on any layer, and is always available in the application menu (Modify
Note
For in-depth coverage of using layer types, refer to Chapter 13, "Applying Layer Types."
The main place to find options for controlling the appearance of the Timeline within the window is in the submenu available from the Frame View options button, shown in Figure 4.21.
As noted previously, the Frame View options menu is used to customize the size, color, and style of frames displayed within the Timeline. These features can prove very helpful when you're working with cartoon animation and want to see each frame previewed. Or, if you're working on an extremely long project with a huge Timeline, it can be helpful to tweak the size of the individual frames, so that you can see more of the Timeline in the Timeline window.
When you use the Frame View option in conjunction with the Layer Height option of the Layer Properties dialog box, you can customize your Timeline display in several ways to better suit your particular project. Your options include
Tiny, Small, Normal, Medium, Large: These options afford a range of sizes for the width of individual frames. When working on extremely long animations, narrower frames facilitate some operations. Wider frames can make it easier to select individual frames and to read frame labels or comments.
Short: This option makes the frames shorter in height, permitting more layers to be visible in the same amount of space. When working with many layers or folders, short layers help speed the process of scrolling through the stack.
Tinted Frames: This option toggles tinted frames on or off. With Tinted Frames on, the tints are as follows:
White: Empty or unused frames (for any layer). This is the default. The white color of empty or unused frames is unaffected regardless of whether Tinted Frames is on or off.
Gray: There are two kinds of gray frames: (a) The evenly spaced gray stripes in the default (empty) Timeline are a quick visual reference that indicates every fifth frame, like the tick marks on a ruler. These stripes appear regardless of whether Tinted Frames are enabled. (b) The solid gray color with a black outline, which appears when Tinted Frames are enabled, indicates that a frame contains content, even if it isn't visible on the Stage.
Blue: Indicates a Motion tween span.
Green: Indicates a Shape tween span.
Note
Regardless of whether Tinted Frames is enabled, Flash displays tween arrows (and keyframe dots) across a tween. However, with Tinted Frames disabled, tweened spans are indicated by colored arrows, instead of colored fills, that show the type of tween.
A red arrow: Indicates a Motion tween, when Tinted Frames are off.
A green arrow: Indicates a Shape tween, when Tinted Frames are off.
Preview: As shown in composite Figure 4.22, the preview option displays tiny thumbnails that maximize the element in each frame. Thus, the scale of elements is not consistent from frame to frame.
Preview in Context: As shown in the lower frame preview of composite Figure 4.22, when previewed in context, the same animation is seen with accurate scale from frame to frame (because elements are not maximized for each frame).
Note
The preview in frames option only shows content in keyframes. Thus, if you use this option to view a tweened animation, you will only see images displayed on the Timeline for the first and last frames of the animation.
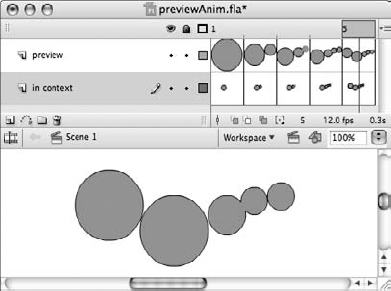
Although Flash is considered a Web and animation program, it fully supports printed output. The functionality and specific dialog boxes vary slightly from the Mac to the PC — while other variations are subject to which printers and printer drivers are installed on your machine. The File
The options available in the Layout area of the Page Setup dialog box on Windows or in the Print Margins dialog box on Mac (File
Print Margins (Mac only): Note the Disable PostScript check box. When you're printing single large areas of color surrounded by complex borders, problems may occur on PostScript printers. If you encounter such problems, try using the Disable PostScript check box in the Mac Print Margins dialog box (Edit
Frames: Use this drop-down menu to choose to print either All Frames of the animation or the ecological default, which is to print the First Frame Only.
Layout: There are three basic options:
Actual Size: This prints the frame at full size, subject to the accompanying Scale setting: At what scale do you want to print your frames? You enter a percentage.
Fit on One Page: This automatically reduces or enlarges the frame so that it fills the maximum printable area, without distortion.
Storyboard: This enables you to print several thumbnails per page in the following arrangements: Boxes, Grid, or Blank. There are accompanying settings for Frames Across, Frame Margin, and Label Frames. This is a great tool for circulating comps and promotional materials.
Tip
When printing Storyboard layouts, use File
The remaining options in the main menu differ on Mac and Windows machines but the key tasks and locations are as follows:
Print: Just print it! (The Mac option for Preview is found in the dialog box that opens from this command.)
Print Preview: On Windows, use the Print Preview command to see an on-screen preview of how the printed output looks, based upon the options you've chosen in the Page Setup dialog box. On Macintosh, the Preview button is found in the Print dialog box (File
Send (PC only): This command invokes the default e-mail client so that you can readily send the Flash file as an attachment.
It is important to note that the Document background color (or Stage color) will not be included on printed output. If you want the background color to appear in your printed output, you must create a filled rectangle of the color that you want in the background and place it on a layer behind the other elements. The printer will then recognize this as artwork and include it in the output.
Note
We'd like to know what you think about this chapter. Visit www.flashsupport.com/feedback to fill out an online survey with your comments.
Flash CS3 offers a few new tools and workspace options in a more polished interface that is consistent with other applications in the Adobe Creative Suite.
The true panel functionality introduced with Flash CS3 is more intuitive and will be familiar to anyone who has worked with Adobe programs like Illustrator or Photoshop.
The Start Page and robust Help features get you started quickly, while the options for saving custom Workspace layouts and custom keyboard shortcut sets make it easy to optimize your workspace for specific production needs.
New templates for mobile devices and the guided file set-up workflow supported by Adobe Device Central gives developers a jump-start on Flash projects that target specific mobile environments.
Tabbed panels make it easy to optimize screen space and customize the editing environment to suit your monitor configuration and work style.
Layer folders and frame-editing options make it easy to organize and navigate your document structure.
Although Flash is mainly used to produce Web content, it fully supports printed output.
If you need a quick reminder on any of the fundamental interface elements, this chapter will be your reference.