Creating a Flash projector
Controlling a stand-alone with
fscommand()actionsToggling the screen mode with a behavior
Distributing the Flash Player
Third-party utilities for Flash stand-alones
This chapter, the last in Part VI, explores alternative means of distributing your Flash movies as self-contained executable applications for CD/DVD-ROMs or other removable storage devices. We also look at the broad support available for the Flash Player plug-in for Web browsers.
The stand-alone Flash Player and projector enable you to take your Flash right off the Web and onto the desktop without having to worry whether users have the plug-in. In fact, you don't even need to worry about them having browsers! Stand-alone players and projectors have similar properties and limitations, although they're slightly different.
Stand-alone player: This is an executable player that comes with Flash CS3. You can open any .swf file in this player. The stand-alone player can be found in the
Adobe/Flash CS3/Players/Releasefolder (Windows) or theAdobe Flash CS3:Players:Releasefolder (Mac) on the volume where you installed Flash CS3.Projector: A projector is an executable copy of your movie that doesn't need an additional player or plug-in to be viewed. It's essentially a movie contained within the stand-alone player. The projector is ideal for distribution of Flash applications on CD-ROMs or DVD-ROMs. Figure 23.1 shows a Flash movie played as a Projector on Windows.

For the sake of simplicity, we refer to both projectors and movies played in the stand-alone Flash Player as stand-alones in this discussion. Because both the projector and stand-alone player have similar properties and limitations, you can apply everything discussed here to either one you choose to use.
Note
Due to the differences in operating systems, Flash stand-alones on the Mac have the application menu listed in the system bar at the top of the Mac desktop area. On Windows, the application menu bar is part of the stand-alone window, as shown in Figure 23.1.
When you have finished producing a Flash movie, it's fairly simple to turn it into a projector. You have two ways to create a stand-alone projector. Turning your Flash movies into Flash Player 9 stand-alone projectors typically adds 2.3MB (Windows projectors) or 9.7MB (Mac projectors) to the final file size.
Note
As each new version of Flash is released, the projector size will likely increase. Flash 4 projectors added 280KB (316KB Mac) to a movie's file size, Flash 5 added 368KB (500KB Mac) to the file size, Flash MX added 800K (1 MB Mac) to a Flash movie's file size, Flash MX 2004 added 973KB (1.3MB Mac) to the movie's size, and Flash 8 added 1.47MB (2MB Mac). As the Flash Player's features are expanded, we'll likely see the size of the player continue to increase with each release of Flash.
The simplest way to make a Flash projector file is to use the Publish feature of Flash CS3. In three short steps, you can have a stand-alone Flash movie presentation.
Choose File

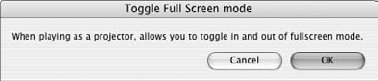
When the Publish Settings dialog box opens, select the Formats tab and check the projector formats. Publish both Windows and Mac projectors using this method. Figure 23.2 shows the Publish Settings dialog box with the appropriate formats selected. Be sure to select the Flash tab to control how your Flash movie is compiled (Flash Player version, ActionScript version, and so on).
Click the Publish button in the Publish Settings dialog box, and your Flash movie will be published in all of the formats (for example, .swf, .gif, .jpg, and projector formats) specified with Publish Settings.

You can also create a Flash projector file using the stand-alone Flash Player executable file that ships with Flash CS3. You can find the stand-alone Flash Player in the Players/Release folder of the Flash CS3 application folder.
Note
If you use this method to create a projector, you can make a projector for the current platform only. Thus, if you are using the Windows version of the stand-alone Flash Player, you can create a Windows projector only.
Export your Flash movie as an .swf file using File
Open the exported Flash movie file (.swf) in the stand-alone Flash Player.
Choose File
When the Save As dialog box opens, name the Projector and save it.

Tip
If your movie is set to play at full screen (see fscommand coverage later in this chapter), press the Esc key to make the stand-alone player menu bar appear. If the Flash movie is set to play without the application menu, you should use the Publish method to create a projector.
Distribution of stand-alone projectors or the Flash Player is free; you don't have to buy a license to distribute either the stand-alone Flash Player or projector. However, according to Adobe, you need to follow specific guidelines for distributed Flash Players and projectors. You can download the runtime license agreement and Adobe logos from the Adobe Web site. For more information, check out www.adobe.com/support/shockwave/info/licensing/.
The Flash platform has become increasingly popular for use on multimedia CD-ROMs or DVD-ROMs, especially as embedded .swf files in larger Adobe Director projectors. Stand-alones can be used as front-ends for installations, splash screens for other programs, or even as complete applications. When you combine the good looks of a Flash interface with a few fscommand actions (see the next section for more information) and put them together on a CD-ROM (or DVD-ROM) that's programmed to start automatically on insertion, you have a first-class product.
Warning
As a general rule, don't try to send projector files (.exe files) as attachments to e-mail messages. Most current e-mail clients, such as Microsoft Outlook, will not allow you to open an e-mail containing an executable file, protecting you against computer-virus infections.
The fscommand actions can be used to provide greater functionality to your stand-alones. These actions can turn a simple Flash movie into something spectacular! When they're combined with additional scripting and executables, you can make fully functional applications. Table 23.1 lists fscommand actions for stand-alones.
Warning
You should use these actions for ActionScript 2.0 or 1.0 code. If you're using ActionScript 3.0, refer to the flash.system.fscommand() entry in the Flash Help panel.
Table 23.1. fscommand Actions for Stand-Alones
fscommand | Arguments | Function |
|---|---|---|
|
| Expands or contracts the view of the projector. The argument |
|
| Allows for scaling of the movie. The argument |
|
| Toggles the menu bar and the right-click/Control+click menu. The argument |
|
| Captures all key presses, including those that would normally control the player. If you have turned off the menu with the |
| Path to executable (BAT, COM, EXE, and so on) | Opens an executable from within the stand-alone player. The application opens in front of the projector. |
| No argument | Closes the stand-alone. |
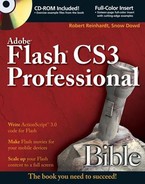
When an fscommand action is added in the Actions panel, you can access stand-alone-specific commands from Script Assist mode, as shown in Figure 23.4. Refer to Chapter 18, "Understanding Actions and Event Handlers," for more information on adding actions to Flash frames or buttons.
Note
Flash 5 offered an undocumented save command for use in fscommand actions. This command enabled a Windows projector to save variables from the Flash movie to a text (.txt) file on the end-user's system. Although Flash MX, Flash MX 2004, Flash 8, and Flash CS3 no longer offer this feature, you can combine Flash movies with Director projectors and the FileIO Xtra to write text files on either Mac or Windows systems. Even better, Flash ActionScript has a SharedObject class that enables local storage of information from Flash movies. We demonstrate the use of the SharedObject class in Chapter 32, "Creating a Game in Flash."
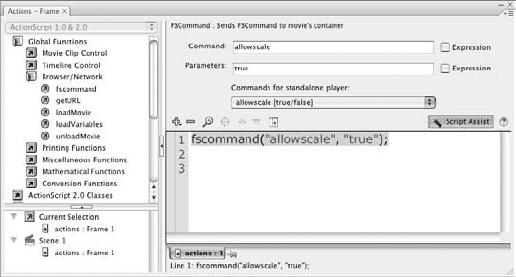
Figure 23.4. If you turn on Script Assist for an fscommand() action, you can choose from a list of commands.
Warning
Make sure you list the commands and arguments for fscommand actions as strings, not as expressions (unless you purposely want to refer to an ActionScript variable). If you do not encapsulate the command and argument in quotes, as in fscommand("allowscale","true");, it may not be interpreted by the stand-alone. Also, in order to use Script Assist with an fscommand() action, you must provide two arguments with the function, such as fscommand("allowscale", "true");. Otherwise, Script Assist mode returns an error.
You can also open HTML documents (even ones stored on a distributed CD-ROM) in the system's default Web browser by using the getURL() action. The following getURL() action opens a file named start.html that's in the same location as the stand-alone movie:
getURL("start.html");Or, alternatively, you can display remote content in the Web browser by specifying absolute URLs, such as:
getURL("http://www.theMakers.com/index.html");Although fscommand actions are relatively simple to use, Flash ActionScript has a Stage object that enables you to control many of the same features of the Flash Player. Refer to the coverage of the Stage object in the Flash ActionScript Bible series (Wiley).
One of the behaviors included with Flash CS3 is the Toggle Full Screen mode behavior, to be used for Flash stand-alone projectors. When you run a Flash projector, you can have the projector take over the user's desktop, getting rid of the application window and menus. This mode is similar to a presentation mode for a PowerPoint file or a QuickTime or Windows Media movie. In the following steps, you learn how to quickly apply this behavior to a Button component.
In Flash CS3, create a new Flash file (ActionScript 2.0).
Rename Layer 1 to button.
Open the Buttons library by choosing Window
Select the new instance on the Stage. In the Property inspector, name the instance toggleBtn. In the Parameters tab of the inspector, type Toggle Screen in the Label field and select the auto-width check box above the field, as shown in Figure 23.5.
With the instance selected on the Stage, open the Behaviors panel (Shift+F3). Click the Add Behavior (+) button in the panel, and choose Projector
Save your Flash document as
projector_behavior.fla.Choose File
On your desktop, browse to the location where you saved the Flash document in Step 6. Double-click the projector file that corresponds to the operating system you are using. For example, if you're using Windows, double-click the
projector_behavior.exefile. If you're on a Mac, double-click theprojector_behaviorapplication file.When the projector starts, the Flash movie should be running in a normal application window. Click the Toggle Screen button to make the movie run in full-screen mode. When you click the button again, the movie should revert to the application window mode.

When you create a stand-alone, the task may not be as simple as taking your Flash document and exporting it as a projector. In this section, we briefly discuss issues that may affect the performance of your projector.
When you distribute your Flash movies as stand-alones, you may think that you won't have to worry about streaming and download. As a consequence, stand-alones are often made considerably larger than a typical Flash movie—which can be a mistake! Very large movies (5MB or more) may not play well on slower computers with Pentium III (or PowerMac G4) or older processors. Remember that Flash movies require the computer processor to compute all of those vector calculations, especially for rich animation. When you try to give a slower computer a large Flash movie to load, it may not be able to handle it.
Note
One way to get around this limitation is to break your movies into several smaller movies. You can use the loadMovie/unloadMovie actions to open and close other movies within the original movie. You should use these actions in your stand-alones.
You should also test your movies on a variety of computers, especially if you plan to put a lot of development time and money into distributing them on CD-ROM. Some processors handle the movies better than others, and you often have to decide which processor you want to target as the lowest common denominator.
If you use the "exec" parameter with an fscommand() action to run an application from the projector, you need to make sure that the application file that Flash is targeting is located within a folder named fscommand. This folder should be contained in the same folder as the stand-alone projector file. In the sample included on this book's CD-ROM, the stand-alone projector named start.exe is allowed to open any application in the fscommand folder.
Note
You can find a sample projector structure and file setup in the ch23/exec folder of this book's CD-ROM. Note that the exec parameter does not work on the Mac platform. This is a known bug.
Adobe implemented this security feature with Flash Player 6 stand-alones, and continues to implement the policy with Flash Player 9 stand-alones. By restricting access to executables (that is, application files), users can trust that a Flash movie or projector won't be able to run system-level applications that could potentially corrupt their computer or install a virus.
Warning
As a Web user, you should always be careful of running any type of application file, especially if you receive it in an e-mail or download it from an unknown company's Web site. A malicious user could easily disguise a virus within any executable. Make sure you run applications only, including projectors, from trusted sources.
Flash movies can be played only in Web browsers that have the Flash Player plug-in or ActiveX control installed. Macromedia has made huge strides in making the plug-in prepackaged with newer Web browsers and operating system installation programs, eliminating the need for users to manually download and install the plug-in themselves. Unfortunately, the Flash Player 9 version of the plug-in will likely only be included in future releases of Web browsers and operating systems. Remember that earlier versions of the plug-in can try to play Flash movies published for Flash Player 9; however, new features in Flash Player 9-based movies (such as ActionScript 3.0, full-screen movie sizes, and so on) will not be available.
Note
For up-to-date information on the Flash Player plug-in, see Adobe's download page at www.adobe.com/shockwave/download/alternates.
Since Flash 3, Adobe has greatly expanded its platform support for the Flash Player plug-in. At the time of this writing, you can download Flash Players for Windows 95/98/ME/NT/2000/XP/Vista and for Power PC and Intel Macs. By the time this book is published, version 9 players should be available for Linux x86. At conferences worldwide, Adobe has demonstrated that Flash graphics can be ported to a variety of GUIs (graphical user interfaces) and operating systems. We've also seen Flash graphics showing up in add-on applications for entertainment consoles such as the Sony PlayStation and set-top boxes from Motorola.
The Flash Player plug-in works best with Mozilla-compatible and Internet Explorer browsers. Any browser compliant with Netscape Navigator 2.0's plug-in specification or Internet Explorer's ActiveX technology can support the Flash Player plug-in or ActiveX control, respectively. Note that Mac versions of Internet Explorer or Apple Safari use a Netscape plug-in emulator to use the Flash Player plug-in rather than an ActiveX control.
For AOL subscribers, any version of AOL's 3.0 through 9.0 browsers (except for the earliest 3.0 release that used a non-Microsoft Internet Explorer shell) will support Adobe plug-ins.
Warning
The Flash action fscommand, when used to communicate with JavaScript, works only with certain browser versions. Currently, no versions of Internet Explorer on the Mac (up to version 5.1) or Apple Safari support the fscommand action. Netscape 3.01 through 4.x (on both Mac and Windows) or Internet Explorer 3.0 or greater for Windows 95/98/NT/2000/XP is necessary for fscommand implementation. Netscape 6.0 and 6.1 do not support fscommand interactivity with JavaScript. If you're developing Flash movies targeted to Flash Player 8 or higher, you should use the new ExternalInterface API introduced with Flash 8. We discuss this new feature set in Chapter 22, "Integrating Flash Content with Web Pages."
For a comprehensive list of supported browsers (and Flash compatibility), please see the Adobe tech note at www.adobe.com/support/flash/ts/documents/browser_support_matrix.htm.
Anyone can download the Flash Player plug-in for free from the Adobe Web site. You can direct visitors at your Web sites to Adobe's Flash Player download page, www.adobe.com/go/getflashplayer. In fact, according to Adobe's licensing agreement, if you're publishing Flash movies on your Web site, you need to display the "Get Shockwave Player" logo or "Get Flash Player" logo on your Web site. This logo should link to Adobe's download page, which we just listed. However, you can't distribute the plug-in installer yourself—you need to license the right to distribute any plug-in installer from Adobe. For more details on licensing, see www.adobe.com/licensing/.
You can find the official Adobe button graphics at:
www.adobe.com/macromedia/style_guide/buttons/
In Chapter 21 we discuss the Publish feature of Flash CS3 and the use of preformatted HTML templates to deliver your Flash movies to your Web site. The template and/or handwritten HTML that you use for your Flash-enabled Web pages will determine the degree of difficulty your visitors will have upon loading a Flash movie.
Adobe has also officially named the auto-update experience of the Flash Player plug-in as Express Install. This feature refers to the nearly pain-free process of upgrading from Flash Player 6 or higher to the latest version of the Flash Player. Flash Player 7 was released with an auto-update feature, enabling new versions of the plug-in to download without the hassle of installing an updated ActiveX control or downloading a plug-in installer application.
Note
You can change the auto-update preferences of your Flash Player installation by visiting the following Adobe Web page:
www.adobe.com/support/documentation/en/flashplayer/help/settings_manager05.html
By default, the Flash Player will check for an updated version of the plug-in every 30 days. You can change the time interval to as little as 7 days.
Flash Player 6 introduced the Settings option from the Flash Player's contextual menu, which can be accessed by right-clicking (or Control+clicking on the Mac) a Flash movie. When you choose the Settings option, the Macromedia Flash Player Settings dialog box opens. This dialog box has four tabs, which we discuss in the following sections.
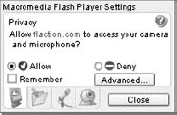
This tab, shown in Figure 23.8, controls the access of the current Flash movie to your Webcam and microphone. Whenever a Flash movie tries to access your Webcam or microphone, the Flash Player opens this tab to ask you for permission. You can choose Allow, which gives the Flash movie access to your camera and microphone, or Deny, which stops the Flash movie from gaining access to these devices. You can also select the Remember check box so that the Flash Player remembers the choice you made, preventing the dialog box from opening during subsequent visits to the same Flash movie (or Web site hosting the Flash movie). If you click the Advanced button in the Privacy tab, a new Web browser opens and loads the help page for the Settings options on Macromedia's site.
Note
Flash movies can stream live audio and video to Flash Media Server applications by using the Camera, Microphone, and NetStream objects.
The Privacy option applies to any and all Flash movies hosted on the domain listed in the Privacy tab.
Note
For the most up-to-date information on the Privacy tab, refer to the following page on Macromedia's site:
www.adobe.com/support/flashplayer/help/privacy/
You can also access the Global Settings manager on Adobe's site, which enables you to control the privacy settings for all sites you have visited. Go to the following URL:
www.adobe.com/support/flashplayer/help/settings/global_privacy.html
As shown in Figure 23.9, the Local Storage tab controls how much information can be stored on your computer from the Flash Player. Since Flash Player 6, Flash movies can be engineered to store data on the user's machine, with the use of local Shared Objects. The SharedObject class in ActionScript enables you to store customized information on a user's machine, just like cookies can store information from a Web application.

By default, a Web site and Flash movies hosted on that site can allocate as much as 100KB of data on a user's machine. If a Flash movie hosted from a Web site requests more than this amount, the Flash Player automatically opens this tab asking for the user's permission to store more data. You can click the Never Ask Again option to prevent the Flash Player from automatically opening this tab when a site requests to store more data than its allotted amount.
Note
You can find the latest information about the Local Storage tab at www.adobe.com/support/flashplayer/help/localinfo/.
The Microphone tab, shown in Figure 23.10, controls the source of audio input to a Flash movie. Depending on your computer system, you may have several audio capture devices listed in this tab's menu. If you don't have an audio capture device on your system, then you may not see any options available in this panel. You can use this tab to control the sensitivity of the microphone (or capture device) by adjusting the slider position. The tab provides real-time audio monitoring with a bar graph. You can click the Reduce Echo check box to minimize the echo or feedback from a speaker that is located near your microphone.

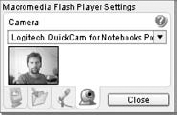
The Camera tab, shown in Figures 23.11 and 23.12, controls the camera source used by the Flash Player. If your computer does not have a camera (or digital video capture card, which includes FireWire, or IEEE 1394, cards), then you may not see a camera source listed in this tab. If you have multiple video capture sources, you can use this tab to control which source is used for live streams going out of the Flash movie into a Flash Media Server application.
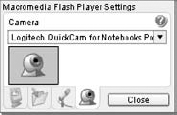
You can click the camera icon in the Camera tab to see live video from your chosen capture source, as shown in Figure 23.12. If you do not see any picture in this area after you click the camera icon, you may have a problem with your capture driver or the Flash Player may be incompatible with the driver.
Note
For more information on the Camera tab and its settings, see the following page on Macromedia's site: www.adobe.com/support/flashplayer/help/camera.
Adobe has teamed up with RealSystems and Apple to enable Flash content in the RealOne Player and the QuickTime Player, respectively. By enabling Flash content in other players, Macromedia is promoting the acceptance of Flash as the de facto vector standard for Web graphics. Moreover, with so many alternatives for Flash playback, it is more likely that your Web visitors can see your Flash content.
With a little effort, you can repackage your Flash movies as RealFlash presentations over the Web. Web visitors can use the RealPlayer G2, RealPlayer 8, or the new RealOne Player to play Flash, RealAudio, or RealVideo (among a long list of RealMedia types) content. RealMedia movies stream from a RealServer (special server software running concurrently with Web server software) into the RealPlayer plug-in (Netscape) or ActiveX control (Internet Explorer).
Note
Since Flash MX, you can no longer publish Flash movies tuned for RealPlayer. You can find more information about Flash and RealPlayer at service.real.com/help/library/guides/realone/ProductionGuide/HTML/realpgd.htm?page=htmfiles/flash.htm.
Apple introduced playback support for Flash movies with QuickTime 4. Better yet, Adobe has included QuickTime Flash export options with Flash 4, 5, MX, MX 2004, 8, and CS3. A QuickTime Flash movie file (.mov) is essentially a Flash movie file (.swf) packaged as a QuickTime media type.
Note
The QuickTime architecture and QuickTime Flash format are discussed at length in the archived chapter, "Working with QuickTime," available on the book's support site at www.flashsupport.com/archive.
You can use the QuickTime HTML template in Publish Settings to create an instant Web page that uses the QuickTime Player plug-in. It uses the <object> and <embed> tags to prescribe the name, width, height, and plug-in download location.
QuickTime 4 can support only Flash 3 graphics and actions; QuickTime 5 can support Flash 4 SWF format features, including loadVariables actions; and QuickTime 6 and higher can support Flash Player 5-based features and ActionScript. Flash movies can act as a timeline navigator for other QuickTime media, such as video or audio. For interactive Flash content, you should limit yourself to Flash 4- or 5-compatible actions.
Since Director 6.5, you can include Flash movie files (.swf) in your Director movies, either as stand-alone Director projectors or as part of Shockwave movie files (.dcr) on the Web. The Flash Asset Xtra is automatically included as part of the default Shockwave plug-in installation process. Among other benefits, Shockwave movies enable you to integrate Flash movies with dynamic 3-D models and graphics and use Flash assets with third-party Xtra capabilities.
Note
For more information on Director and Flash interactivity, please read our archived chapter, "Working with Director," at www.flashsupport.com/archive.
You can also reformat and modify stand-alones for both Windows and Mac. A few software companies create applications specifically designed to modify Flash movies and stand-alones. Here is a list of Web site URLs for those companies:
www.flashjester.comwww.multidmedia.comwww.northcode.comwww.screentime.comwww.alienzone.com/screensaver_features.htmwww.goldshell.com
Some of these companies offer more than just one utility for Flash movie development, such as the JTools of FlashJester. For updates to this list, check out this book's Web site, listed in the Preface of this book.
Tip
You can find directories of Flash utilities at www.flashmagazine.com and graphicssoft.about.com/cs/flashtools.
One of our favorite utilities is Versiown, created by Goldshell Digital Media. This handy utility allows you to modify the properties of a Flash (or Director) projector file, specifically .exe versions for Windows. With Versiown, you can
Add or modify the version information that shows up in the Properties dialog box, accessible by right-clicking the .exe file and choosing Properties.
Add a custom icon for the .exe file of the projector. Together with an icon utility such as IconBuilder from Iconfactory (which is a filter plug-in for Adobe Photoshop), you can make custom .ico files to be used as icons for your Flash projectors.
You can download trial versions of Versiown at www.goldshell.com/versiown. A trial of IconBuilder is available at www.iconfactory.com/ib_home.asp.
Note
You can use the Get Info dialog box (Mac OS X) on Mac files to easily replace the icon image for Flash projector files on the Mac. Open the .ico file made from IconBuilder in an image editor such as Adobe Photoshop, use Edit
Note
We'd like to know what you think about this chapter. Visit www.flashsupport.com/feedback to send us your comments.
Flash movies can be viewed in Web pages with the Flash Player plug-in or ActiveX control. You can also play Flash movie files (.swf) with the stand-alone Flash Player included with the Flash CS3 application, or you can publish a Mac or Windows projector that packages the stand-alone Flash Player and .swf file into one executable file.
You can freely distribute a Flash movie projector or stand-alone Flash Player as long as you adhere to the guidelines outlined at Adobe's Web site.
Flash movies can be distributed with other multimedia presentations such as Macromedia Director projectors. Your Flash movies can be distributed on a CD-ROM or DVD-ROM.
The
fscommand()action enables you to control the stand-alone player environment, including its viewing area.Flash movies can be viewed best with the Adobe Flash Player plug-in or ActiveX control. However, you can also view Flash movies with third-party products, such as the RealOne Player or the Apple QuickTime Player.
You can enhance your Flash movies with third-party tools such as FlashJester's JTools for Flash.