Working with Movie Clips
Using targets and paths
Exploring absolute and relative paths
Using dot syntax
Controlling animated sequences with ActionScript
Using behaviors across timelines
Unlike most multimedia authoring applications, Flash has the capability to use multiple simultaneous timelines in its movies. So far, most of the examples in this book have only one timeline or have used only one scene. You've seen how to add basic actions to your movies to make them interactive. Now you begin exploring the world of multiple movie timelines using the Movie Clip symbol.
A powerful piece to the Flash movie format is the Movie Clip symbol, introduced in Flash Player 3. Movie Clips enabled Flash developers to create complex behaviors by nesting self-contained sequences of animation or interactivity inside each other. These sequences could then be placed as discrete, self-playing modules on the Main Timeline (that is, Scene 1). Initially, the key to the power of Movie Clips was their capability to communicate with and control each other via the tellTarget action.
In Flash 4, the role of Movie Clips was expanded — they could be used with ActionScript. That capability put Movie Clips at the foundation of advanced interactivity in Flash. In Flash 5, when ActionScript matured into a full-blown scripting language that mirrored JavaScript, Movie Clips became the central object of programming. In Flash MX, Movie Clips could utilize more compiler directives, which enabled them to become full-blown user-interface components. In Flash MX 2004, Movie Clips and components continued to evolve and play a vital role in the organization of a Flash movie's content and interactivity. In Flash 8, Movie Clips gained new filter effects, blend modes, and bitmap-caching optimizations. Now, in Flash CS3, Movie Clips remain a vital element in Flash Player 8 projects. In this chapter, you look at several key features of the Movie Clip symbol.
Note
If you're planning on building projects written in ActionScript 3.0, the role of the MovieClip class has changed dramatically. MovieClip instances should only be used for multiple frame timeline-based animations. In ActionScript 3.0, several new classes, including the Sprite class, have been introduced to take over most of the functionality that was previously assigned to the MovieClip class. Regardless of which version of ActionScript you plan to use, you should understand the fundamentals of the MovieClip instances discussed in this chapter and throughout the book. For more comprehensive coverage of ActionScript 3.0, refer to the Flash ActionScript 3.0 Bible (Wiley).
Previous chapters dealt with Flash movies as a single sequence of frames arranged along a single timeline. Whether the playback along that timeline was linear (traditional animation) or nonlinear (where the Playhead jumps arbitrarily to any frame), our example movies have normally comprised only the frames of a single timeline. Ostensibly, a single timeline may seem to provide everything you'd need to create any Flash behavior, but as you get more inventive or ambitious, you'll soon find yourself conceiving ideas for animated and interactive segments that are thwarted by the limits of a single timeline.
Suppose that you want to create a looping animation of a dog with its tail wagging. You decide that the tail should wag every 5 seconds and the dog should bark every 15 seconds. On a single timeline, you'd need a loop of 180 frames to accommodate the timing of the bark (assuming a frame rate of 12 frames per second), and repeating keyframes for the wagging tail artwork every 60 frames. Although animating a dog in that manner would be a bit cumbersome, it wouldn't be impossible — until your dog had to move around the screen as an integrated whole. Making the bark and the wagging tail loop while the whole dog moved around complex paths for extended periods of time would quickly become impractical, especially if the dog was only one part of a larger environment.
Now imagine that you could make the dog by creating two whole separate movies, one for the tail and one for the barking mouth and sound. Could you then place those movies as self-contained, animated objects on the Main Timeline, just like a graphic or a button? Well, you can — that's what Movie Clips are all about. Movie Clips are independent sequences of frames (timelines) that can be defined outside the context of the Main Timeline and then placed onto it as objects on a single frame. You create Movie Clips the same way you create a Graphic symbol in Edit mode. Unlike a Graphic symbol, a Movie Clip (as the name somewhat implies) acts in most cases just like a fully functional movie or .swf file, meaning, for instance, that frame actions in Movie Clip timelines are functional. After you have created a Movie Clip as a symbol, you drop instances of it into any keyframe of the Main Timeline or any other Movie Clip timeline. The following are some general Movie Clip principles:
During playback as a Flash .swf file, a Movie Clip instance placed on a timeline begins to play as soon as the frame on which it occurs is reached, whether or not the Main Timeline (or the clip's parent timeline) is playing.
A Movie Clip plays back autonomously, meaning that as long as it is present on the Stage it is not governed by the playing or stopping of the Main Timeline.
Movie Clips can play when the Main Timeline is stopped, or stay halted when the Main Timeline plays.
Like a Graphic or a Button symbol, Movie Clips can be manipulated on the Stage — you can size them, skew them, rotate them, place effects such as alpha blending on them, or tween them, all while the frames within them continue to play.
Tip
Movie Clip instances can use filter effects and blend modes. You create these effects in real time and set them in the Property inspector or with ActionScript code.
All timelines play at the frame rate specified by the Document Properties dialog box (Modify

In our dog wagging and barking example, the tail and head of the dog could be looping Movie Clips, and then those Movie Clips could be nested inside another Movie Clip symbol (representing the entire dog). This "whole" dog clip could then be tweened around the Stage on the Main Timeline to make the dog move. You could use the same principle to move a Movie Clip of a butterfly with flapping wings along a motion path.
Because a Flash movie can have more than one timeline existing in the same space and time, there must be a way to organize Movie Clips within the Main Timeline (Scene 1) of your Flash document. Just as artwork can be placed inside any symbol, symbol instances can be nested within other symbols. If you change the contents of the nested symbol, the parent symbol (the symbol containing the other symbol) will be updated as well. Although this may not seem special, it's of extreme importance to Movie Clips and Flash interactivity. Because the playback of each Movie Clip timeline is independent from any other timeline, you need to know how to tell Flash which Movie Clip you want to control.
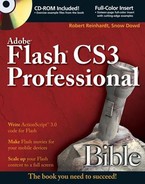
The Flash movie diagram in Figure 19.1 illustrates multiple timelines. This Flash movie has two layers on the Main Timeline: Layer 1 and Layer 2. Layer 1 has a Movie Clip (instance "A") that exists for 19 frames on the Main Timeline. Layer 2 has a Movie Clip (instance "B") that exists for 10 frames on the Main Timeline, but it also contains a nested Movie Clip (instance "C").
In Figure 19.1, if the Main Timeline has a stop action on the first frame, all three Movie Clips will continue to play unless there are stop actions on their first frames or they are told to stop by actions targeted to them. If the Main Timeline plays to frame 20, instance "A" will no longer be on the Stage, regardless of how many frames it may have on its timeline. Figure 19-2 shows a more practical diagram of a timeline hierarchy.

Figure 19.2. Flash movies can be flow-charted in this fashion. This diagram is similar to the Movie Explorer's method of displaying Flash movie information.
In Figure 19.2, you can see three Movie Clips. Two of them, ballAnim and dog, occupy space on the Main Timeline. The other one, dogTailAnim, is nested within the dog Movie Clip. Each Movie Clip instance on any given timeline must have a unique name — you can't have two or more Movie Clip instances on the same timeline using the same instance name. The instance name is specified in the Property inspector, shown in Figure 19.3. To see the settings for a particular instance, you must have the instance selected on the Stage before referencing the Property inspector.

Figure 19.3. Among other things, the Property inspector enables you to name each Movie Clip instance that appears on the Stage.
Tip
The suffix Anim is the naming convention we use to designate a symbol name (in the Library) containing an animation. As you can see in Figure 19.3 we name the instance dog, without any naming convention for the data type. If you use ActionScript 1.0, you may want to use the _mc suffix with instance names; this suffix allows the Actions panel to show code hints specifically for Movie Clip instances. If you use ActionScript 2.0, you can derive your own naming convention as long as you type all MovieClip instance variables. You'll learn more about these concepts later in the chapter.
Now that you understand how multiple timelines can exist within a Flash movie, let's see how you can make Movie Clips communicate with one another.
If you already studied Movie Clips in Chapter 6, "Symbols, Instances, and the Library," you probably know that they provide the solution to our animated dog problem. However, you might not have guessed that Movie Clips can also add logic to animation and Flash interfaces. Let's take our animated dog example a little further: When dogs bark, their tails may stop wagging. Our hypothetical dog may look strange if it is barking and wagging at the same time. Suppose we wanted to stop the tail wagging during every bark. We'd have to have some way for the barking head Movie Clip to control the tail Movie Clip so that we could tell the tail to stop wagging when the dog barks, and then tell the tail to return to its wagging loop again when the bark is over.
Well, you have a few ways to control the tail Movie Clip from the barking head Movie Clip. In Flash 3 and 4, the tellTarget action was used to let actions on any timeline (including Movie Clip timelines and the Main Timeline) control what happens on any other timeline. How? tellTarget simply provided a mechanism for extending basic actions such as play and stop, enabling them to specify (or target) the timeline upon which they should be executed. Targets are any Movie Clip instances that are available at the current "state" of a Flash movie — you can't target a Movie Clip that isn't displayed (or existing) on the Stage. For example, suppose you had two Movie Clips, one on frame 1 and another on frame 10 of the Main Timeline. If the Main Timeline was stopped on frame 1, you couldn't target the Movie Clip on frame 10 because the instance is not on the current frame.
Since Flash 5, developers have been able to direct actions to specific timelines by attaching the same actions as methods to a MovieClip object (we define methods in the following sidebar). As such, the tellTarget action is a deprecated action; it's still supported in current Flash Players, but it's been replaced with more versatile actions and syntax that makes its use outdated. For an overview of deprecated actions, see the sidebar on deprecated actions in the preceding chapter. In this chapter, you work exclusively with the preferred ActionScript dot syntax to control Movie Clip instances. First, however, you need to understand how targeting works in Flash movies.
Note
If you're new to scripting, please read the "What is dot syntax?" sidebar.
Tip
If you're building Flash movies for Flash Lite 1.0/1.1, you need to use the tellTarget action to control Movie Clip instances. Flash Lite 1.0/1.1 is based on the Flash Player 4 specification.
Earlier in this chapter, you found out how multiple Movie Clip timelines appear on the Stage. It's entirely possible to nest several Movie Clips within another Movie Clip. To understand how Movie Clips communicate with one other by using actions, you need to have a firm grasp on Movie Clip paths. A path is simply that — the route to a destination, an address per se. If you have a Movie Clip instance named mcTailAnim inside a mcDog Movie Clip instance, how is Flash supposed to know? What if there was more than one mcTailAnim in the entire movie, with others nested in other Movie Clips besides the mcDog instance? You can specify a Movie Clip's path in an absolute or a relative mode.
An absolute path is the full location information, or target, for a given Movie Clip instance from any other location (or target). Just like your postal address has a street name and number and a ZIP code so that people can find you on a map, all Movie Clips have a point of origin: the Main Timeline (that is, Scene 1). Flash CS3 only displays dot notation with absolute and relative paths.
Tip
Since Flash MX 2004, the Insert Target Path dialog box no longer shows you dot and slash notations. See the sidebar "Paths in Flash 4 or earlier movies" for an explanation of slash notation.
Note
Dot notation and dot syntax are synonymous terms and are used interchangeably throughout this book.
Dot notation follows the ActionScript language conventions. With dot notation, the Main Timeline becomes
_root
A Movie Clip instance named dog on the Main Timeline (or _root) would have an absolute path of
_root.dog
Notice that a period, or dot, separates the term _root from dog. The dot denotes a parent-child relationship; the dog instance is a "child" of its parent, _root. And, following suit, a Movie Clip instance named tailAnim that is nested within the dog Movie Clip would have the absolute path of
_root.dog.tailAnim
A relative path is a contextual path to one timeline from another. From a conceptual point of view, think of a relative path as the relationship between the location of your pillow and the rest of your bed. Unless you have an odd sleeping habit, the pillow is located at the head of the bed. You may change the location of the bed within your room or the rooms of a house, but the relationship between the pillow and the bed remains the same. Another example that can illustrate the difference between absolute and relative references is the postal address example we used earlier. An absolute reference to your residence would use your full street address, city, state, and ZIP code. However, if you're giving directions to a friend of yours who lives nearby, you're more likely to tell your friend, "From your house, walk two blocks down A street, and turn right on B street. I'm five houses down on the left side of the street."
With Flash, relative Movie Clip paths are useful within Movie Clips that contain several nested Movie Clips. That way, you can move the container (or parent) Movie Clip from one timeline to another and expect the inner targeting of the nested Movie Clips to work. To refer to a timeline that is above the current timeline in dot notation, use
this._parent
Here, the term this refers to the current timeline from where the action is being called, and _parent refers to the current timeline's parent timeline. You can use relative dot notation to refer up and down the hierarchy at the same time. For example, if you have two nested Movie Clips, such as tailAnim and barkingAnim, within a larger Movie Clip named dog, you may want to target tailAnim from barkingAnim. The relative dot path for this task is
this._parent.tailAnim
This path tells Flash to go up one timeline from the current timeline, mcBarkingAnim, to its parent timeline (the mcDog timeline), and then look for the instance named mcTailAnim from there.
You can also use successive _parent references to travel up in the timeline hierarchy multiple times, such as
this._parent._parent
Using the dog instance example again, if you wanted to control the Main Timeline (which is the parent timeline of the dog instance) from the tailAnim instance, you could use _parent._parent in the target path of an action executed from the tailAnim timeline.
Note
You can directly control the Main Timeline using the reference _root. However, as you'll see later in Chapter 28, you may load an entire .swf file into a Movie Clip instance, thereby changing the reference to _root. Flash Player 7 and higher supports a property of MovieClip objects named _lockroot, which can help you avoid path problems when loading external .swf files.
Note
Flash designers and developers learning to use ActionScript often encounter scope problems with their code. Scope refers to the code objects that can be "seen" within a given code block, such as a function. You can use the Delegate class to help you deal with issues of scope. Robert wrote a free tutorial on CommunityMX.com titled, "Better Practices for Flash Designers - Part 1: Coding Buttons." You can find a link to this article at www.flashsupport.com/cmx. This tutorial walks you through the use of the Delegate class with Flash buttons. The Delegate class can help you avoid using long chains of _parent references in your code.
As with absolute paths, we recommend that you become familiar with using the dot notation for relative paths.
Okay, that's enough theory. Now, you're going to practice nesting Movie Clips inside of other Movie Clips, as well as target actions at specific instances using dot notation.
In this section, you'll see how to make Movie Clips interact with one another by using dot notation and ActionScript. Specifically, you're going to create the barking and wagging dog example we discuss at the beginning of this chapter. You begin this exercise with a starter Flash document file (.fla) located on the book's CD-ROM.
With the starter file open in Flash CS3, test the movie using Control
bark.wav: This is the sound file used for Stella's bark. You will find this sound on the bark layer of the barkAnimClip Timeline.barkAnimClip: This Movie Clip symbol contains the animation for Stella's barking head. If you double-click this symbol in the Library panel, you'll see that the timeline has two layers, one for the sound and another for the head animation. This symbol is used in the stellaClip Movie Clip symbol.
bodyGraphic: This Graphic symbol is artwork of Stella's body and legs. There is no animation on its timeline. The bodyGraphic symbol is used in the stellaClip Movie Clip symbol.
headGraphic: This Graphic symbol is artwork of Stella's head. You'll find a couple of instances of this symbol in the barkAnimClip symbol.
stellaClip: This Movie Clip timeline contains instances of the barkAnimClip, bodyGraphic, and tailAnimClip symbols.
tailAnimClip: This Movie Clip symbol contains two instances of the tailGraphic symbol. Each instance is rotated differently to create the wagging effect.
tailGraphic: This Graphic symbol contains the artwork for Stella's tail.
Tip
As you can see by the names of the symbols, you can adopt naming conventions for your symbol types in the Library panel. All Movie Clip symbols use a "Clip" suffix, and Graphic symbols use a "Graphic" suffix. A naming convention can help you quickly identify the type of asset just by looking at its name.
Now, you're going to add some behaviors to the movie. First, you'll need to name the instances in the movie. ActionScript can find a Movie Clip instance only by its instance name. Using the Property inspector, you'll add instance names to all of the Movie Clip instances.
After the instances are named, you can then target the instances with ActionScript. In this example, you'll target the tailAnim instance from the barkAnim instance. When the keyframe containing the barking mouth inside of barkAnim is reached, the movie will tell tailAnim to go to and stop on a specific frame. When the barking is over, tailAnim will be told to continue playing.
With
stella_starter.flaopen in Flash CS3, resave the document asstella_absolute.fla. In this tutorial, you use absolute paths with your targets.Select the instance of the stellaClip symbol on the Stage, on the Main Timeline. Open the Property inspector, and name the instance
dogin the <Instance Name> field, as shown in Figure 19.4.Double-click the
doginstance on the Stage to edit the stellaClip symbol in the Library. Select the barkAnimClip symbol instance, and again, using the Property inspector, name this instancebarkAnimin the <Instance Name> field.Select the tailAnimClip symbol instance located on the tailAnim layer. Name the instance in the Property inspector, using the name
tailAnim.With all of the Movie Clip instances named, you can now target actions to specific timelines. Your first goal is to stop the wagging tail while Stella barks. Double-click the
barkAniminstance to edit the barkAnimClip symbol's timeline.On the barkAnimClip timeline, create a new layer and rename it actions. Place this layer at the top of the layer stack. On frame 14 of this new layer, insert an empty keyframe (F7). Frame 14 is the frame just before the Stream sound on the bark layer begins. On frame 14, you want to tell the
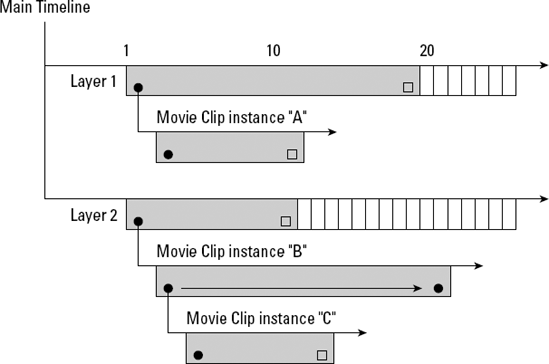
tailAniminstance to stop playing. So, let's give this keyframe a frame comment that indicates this behavior. With the keyframe selected, open the Property inspector and, in the <Frame Label> field, type //stop wagging, as shown in Figure 19.5.After you have assigned a comment on the frame, you're ready to write the ActionScript to perform the described behavior. With frame 14 selected on the actions layer, open the Actions panel (F9, or Option+F9 on Mac). Make sure you are not working in Script Assist mode. Click the Target Path selector icon (see Figure 18-5 in the last chapter for its location). The Insert Target Path dialog box will open. Click the plus icon (+) on Windows or the twirl-down arrow on the Mac next to the
doginstance to reveal the nested instances,barkAnimandtailAnim, as shown in Figure 19.6. Select thetailAniminstance because it contains the wagging animation that you want to stop. Finally, make sure the Absolute option is selected in the Mode setting. Click OK.In the Script pane of the Actions panel, you now see the path to the instance
_root.dog.tailAnim. After this name, type.stop();. As you learned in the last chapter, thestop()action will halt a playing timeline. When you are finished, the Script pane should contain the following code:_root.dog.tailAnim.stop();
Tip
If you use the
_mcsuffix naming convention with your Movie Clip instances, the Actions panel displays a code hint menu when you type the period (.) after the_mcsuffix. You can also see these same code hints if you use ActionScript 2.0 strong data-typing with a variable name, which we discuss in Chapter 24. To try this technique, delete the line of code from Step 8, and type the following code:var mc:MovieClip = _root.dog.tailAnim;
After you've declared a variable and its data type, the Actions panel can display code hints for that data type. On line 2, type:
mc.
As soon as you type the period (
.) after the variable namemc, the Actions panel displays all of the properties and methods of theMovieClipclass. You can click the entry you want to use, and the Actions panel adds it to the existing line of code. If there are other parameters for the new code, the Actions panel display code hints for those parameters as well.Use this same technique to tell the
tailAniminstance to start playing again once the bark has ended. In the barkAnimClip symbol timeline, create yet another actions layer. You can make more than one to prevent overlap of your frame comments. Place this new actions layer beneath the original actions layer. On frame 20 of this second actions layer, insert an empty keyframe (F7). Assign a frame comment of //start wagging in the <Frame Label> field of the Property inspector for this keyframe.Repeat Steps 7 and 8 for the action on this keyframe. This time, however, type a
.play();action from the code hints menu in the Actions panel. When you are finished, the following code should be on frame 20 of the actions layer:_root.dog.tailAnim.play();
Now you're ready to test your movie. Save the Flash document, and use Control


Note
This example has shown you how to target Movie Clip instances using absolute paths built with the Insert Target Path dialog box in the Actions panel. However, you can also try using relative paths to target the instances. In the ch19/stella folder of the book's CD-ROM, open the stella_relative.fla file to see an example of relative path addressing. Note that this example also uses a gotoAndStop(2) action on the //stop wagging keyframe to make sure Stella's tail is pointed down during the bark. You can also find a completed example file for the exercise you just completed, stella_absolute.fla.
In this section, you learn how to include the same interactivity of the previous exercise using Flash CS3's behaviors feature. Behaviors, as we discussed in the last chapter, are self-contained blocks of ActionScript code that you can easily apply to elements in your Flash movie. In the following steps, you use behaviors instead of hand-coded actions to stop Stella's tail from wagging during the bark cycle.
Note
As the starter file for this exercise, use the stella_absolute.fla document in the ch19/stella folder of this book's CD-ROM.
Open the
stella_absolute.fladocument, and double-click thedoginstance on the Stage.On the stellaClip timeline, double-click the
barkAniminstance (that is, Stella's head).On the barkAnimClip timeline, select frame 14 on the topmost actions layer. Open the Actions panel (F9, or Option+F9), select the existing ActionScript code in the Script pane, and press the Delete or Backspace key to erase the code. Close the Actions panel when you're finished.
Rename the topmost actions layer to behaviors. Re-select frame 14 of this layer, and open the Behaviors panel (Shift+F3). Click the Add Behavior (+) button and choose Movieclip
Select frame 20 of the lower actions layer, and erase the existing ActionScript code on this keyframe, as you did in Step 3.
Rename the lower actions layer behaviors. With frame 20 of the lower behaviors layer selected, click the Add Behavior (+) button in the Behaviors panel, and choose Movieclip
Tip
You can review the ActionScript code that the behavior uses by selecting its keyframe in the Timeline window and opening the Actions panel. Do not edit this code, however, or the behavior will not likely function properly.
Save your document as
stella_behaviors.fla, and choose Control


Chapter 15, "Adding Sound," discusses the ins and outs of sound import and use in Flash documents. In this chapter, we show you how to create a sound library using Flash CS3's Behaviors panel. Once the set of sounds is created, you learn how to stop the sounds from keyframes in another Movie Clip timeline.
Note
You'll find sound files (WAV and AIF formats) in the ch19/pianoKeys/sounds folder of this book's CD-ROM. Make a copy of the pianoKeys_starter.fla file for this exercise. This file is located in the ch19/pianoKeys folder.
Open the pianoKeys_starter.fla file. A keys Movie Clip instance is already on the Stage of the Main Timeline. Double-click the keys instance to enter Edit mode, as shown in Figure 19.9. Note that the Timeline window is docked to the left side of the Document window.
The timeline for the keysClip symbol has several layers for individual Button instances and labels. If you test this movie using Control
on (press, keyPress "a") {
   gotoAndStop ("key_1");
}
on (rollOver) {
   gotoAndStop ("keys_full");
}
These actions don't use any dot notation — they are simple navigation actions that you learned in the last chapter. When the keyButton_1 instance is clicked with the mouse, the Playhead moves to the key_1 label on the current timeline, which is the keysClip timeline.

When the timeline goes to the key_1 frame label, a new PNG bitmap of a "pressed" piano key (key_01.png on the keys layer) appears on top of the keys_full.png bitmap that is placed on the bottom keysFull layer. Note that the keys_full.png bitmap is present throughout the entire keysClip timeline. Each Button instance in the keysClip Movie Clip sends the Playhead to the appropriate piano key frame label.
Now that you have an understanding of what's happening in this Movie Clip, let's create some sounds with the Behaviors panel. These sounds will be targeted within the mcKeys instance later in this chapter.
Before you start making sound instances, you need to establish a naming convention for your sounds. A naming convention is simply a way of consistently identifying components in any project, in or out of Flash. To a member of a Web production team, the importance of naming conventions cannot be overemphasized — everyone involved with the project should know how to give names to images, sounds, symbol names, instance names, and so on. Even if you work by yourself, a naming convention provides a system of integrating elements from project to project and enables you to identify elements much more easily when you open old files.
Resave the starter file as pianoKeys_sounds.fla.
For each key on the piano, you'll make a unique sound. Each sound will be on its own timeline where it can be targeted to play. Because there are seven keys on this odd piano, you need to import seven sounds into the Flash document. Using File
Link each sound in the library, so that the sounds can be referenced by ActionScript (and behaviors). Open the Library panel (Ctrl+L or

Repeat Step 3 for each sound file in the Library panel, matching the number of the linkage identifier name to the number used in the filename. For example, you should link the
key_2.wav(orkey_2.aif) file tokey_2. When you are finished, expand the width of your Library panel to reveal the Linkage column. Your sound files should have identifiers displayed, as shown in Figure 19.11.Now you're ready to use behaviors to create ActionScript-ready references to the sounds in the Library. Make sure you are on the Main Timeline (Scene 1) of the
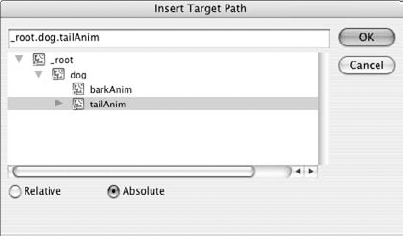
pianoKeys_sounds.fladocument. On this timeline, you should see akeyslayer. Create another layer and rename it behaviors.Select the first frame of this new layer, and open the Behaviors panel (Shift+F3). Click the Add Behavior (+) button in the top-left corner of the panel, and choose Sound
Repeat Step 6 for each sound in the Library, matching the instance name's number to the number used in the linkage identifier. For example, the Load Sound from Library behavior for the
key_2.wav(orkey_2.aif) file should specifykey_2for the top field andsndKey_2for the lower field. When you are finished completing this task for every sound in the Library, you should have seven behaviors listed in the Behaviors panel. You can double-click the Action name of each behavior to review that behavior's settings.Save your Flash document as
pianoKeys_sounds.fla. Test the movie (Ctrl+Enter or


Note
You can refer to the pianoKeys_sounds.fla file located in the ch19/pianoKeys folder of this book's CD-ROM. This file has the seven sound files in the Library panel, sorted in the keySounds folder.
Now that you have behaviors set up for the sounds, you're ready to begin controlling the sounds with additional behaviors attached to keyframes in the keysClip timeline. This section of the exercise shows you how to add behaviors to the keysClip timeline that will target the sound instances.
Note
There will be more than one actions layer in this timeline. The actions layer in Step 1 is a new layer in addition to the existing actions layer (with the //stop comment).
Enter Edit mode by double-clicking the
keysinstance on the Main Timeline (Scene 1). On the keysClip Timeline, add a new layer and name it behaviors. Move this new actions layer underneath the layer that contains the key_1 frame label, as shown in Figure 19.13.On frame 3 of the new behaviors layer, you need to add a behavior that will play the first Sound instance,
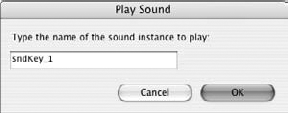
sndKey_1. Remember that the Button instances on the keysClip timeline already move the Playhead to each key's label. Insert a blank keyframe (F7) on frame 3.With the new keyframe selected, open the Behaviors panel (Shift+F3). Click the Add Behavior (+) button, and choose Sound
Now, open the Property inspector. With frame 3 of the second actions layer selected, type //play sound into the <Frame Label> field. Your Timeline window should resemble Figure 19.15.
At this point, you want to test your movie to see if the behavior is finding the target and playing the sound. Save your document as
pianoKeys_behaviors.fla, and use ControlNow, you need to enable all the other sound instances created by your earlier Load Sound from Library behaviors. Create a new layer and name it behaviors. Place the new layer underneath the label layer that contains the
key_2frame label. Copy the//play soundkeyframe from the previous actions layer, by selecting the keyframe and choosing EditTip
You can also copy and paste frames by selecting the frame(s), right-clicking (or Ctrl-clicking on Mac) the frame(s), and choosing Copy Frames or Paste Frames from the contextual menu. Frames are copied to a separate Clipboard than other elements in a Flash document that you use with the standard Edit
Select the new
//play soundkeyframe in the behaviors layer underneath the key_2 frame label layer. Open the Behaviors panel (Shift+F3). You need to change the copied Play Sound behavior to point to thesndKey_2instance. Double-click the Play Sound item in the Action column of the panel. In the Play Sound dialog box, change the target tosndKey_2, as shown in Figure 19.16.Repeat Steps 5 and 6 for each key and sound. Each
key_frame label should have its own behaviors layer with a//play soundkeyframe. Test your movie each time you add a new keyframe with ActionScript. If a particular key doesn't work, check the target's name in the Play Sound settings.When you've finished adding a behavior for every key, save the document and test it. After all's been said and done, you should have a functional Flash piano (well, at least seven keys' worth!) that plays a sound whenever you click a piano key. If you want to change the sounds, you can either update the sound file in the Library or import new ones.


Note
You can refer to the complete exercise file, pianoKeys_behaviors.fla, located in the ch19/pianoKeys folder of the book's CD-ROM.
Note
We'd like to know what you think about this chapter. Visit www.flashsupport.com/feedback to send us your comments.
Movie Clips are the key to Flash interactivity for ActionScript 2.0 and 1.0 projects. Each Movie Clip has its own independent timeline and playback.
Each Movie Clip instance needs a unique name on any given timeline. You cannot reuse the same name on other Movie Clips on a timeline. You can, however, use the same instance name on different timelines.
There are two types of target paths for Movie Clips: absolute and relative. Absolute paths start from the Main Timeline and end with the targeted instance name. Relative paths start from the timeline that's issuing the action(s) and end with the targeted instance name.
The slash and dot notations are formats for writing either absolute or relative paths. The Slash notation is considered deprecated, and should be avoided unless you are authoring for Flash Player 4 or earlier. The dot notation was introduced in Flash 5 and has a more complete syntax for programming in ActionScript.
The Insert Target Path dialog box can help you build the path to a Movie Clip instance, to use with another action.
Behaviors can be used across timelines. For example, an instance of a sound created by a behavior on the Main Timeline can be accessed by another behavior located within another Movie Clip instance.