Understanding the
MovieClipobjectWorking with properties of the
MovieClipobjectCreating Mouse Drag behaviors
Event models explained
Making sliders that dynamically change properties
In Chapter 19, "Building Timelines and Interactions," we established the key role that Movie Clips have within the Flash movie structure. By having a timeline that plays separately from other timelines, Movie Clips enable multiple events to occur—independently or as part of an interaction with other Movie Clips. In this chapter, we explore how to manipulate Movie Clips beyond navigation actions such as gotoAndPlay() or stop().
Note
In ActionScript 3.0, much of the functionality assigned to MovieClip instances in ActionScript 2.0 has shifted to other classes, the Sprite class, for example. In AS3, the MovieClip class should be used for elements that specifically need a timeline, such as an animation. In AS1 or AS2, the MovieClip class still remains a central element of production.
Since Flash 5, the implementation of ActionScript has resembled that of true object-oriented programming languages. Much like JavaScript, each element in a Flash movie has a data type. A data type is simply a category to which an element belongs. In the current version of ActionScript (including ActionScript 2.0), there are several data types available—boolean, number, string, object, function, and movieclip, among others.
Tip
If you want to see a list of all data types in ActionScript, open the Actions panel (make sure code hints are turned on), and type var a:. After you type the colon ( : ), you'll see a list of supported data types.
For our purposes, a Movie Clip instance is an object, and we'll refer to it as such throughout Part VII of this book. An object is any element in Flash that has changeable and accessible characteristics through ActionScript. Objects can be user-defined (you create and name them) or predefined by the programming language. The MovieClip class is a predefined class, meaning that all of its characteristics are already described in the ActionScript language.
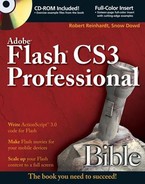
A MovieClip object is the same Movie Clip instance you've seen in previous chapters. Any instance of a Movie Clip is a unique object in ActionScript. However, you haven't treated it like an object in your scripting. Before we can proceed with a discussion of Movie Clips as Flash movie assets, you need to understand what predefined characteristics are available in a MovieClip object. See Figure 25.1 for more information.
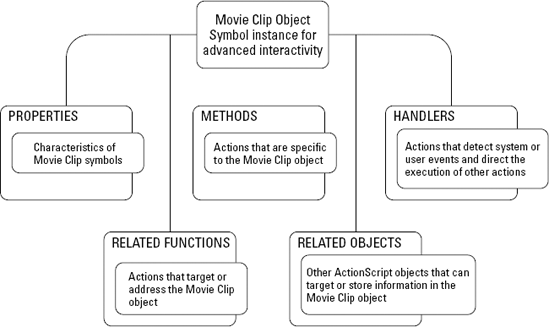
Each Movie Clip instance has definable properties, or attributes, that control its appearance, size, and position. For example, you can move a Movie Clip instance to a new position on the stage by changing the value of its X or Y coordinate. This property in ActionScript is denoted as _x or _y, respectively. Some properties have read-only values, meaning these values can't be altered. One read-only property is _url, the value of which indicates the download location of the Movie Clip (or .swf file) such as http://www.yourserver.com/swf/background.swf. Figure 25.2 is a summary of the properties of the MovieClip object. For more information on each property, please refer to Table 25.1, "Flash Movie and Movie Clip Properties."
All properties are preceded by the underscore ( _ ) character. In Table 25.1, each property has an "R" (as in "read") and/or "W" (as in "write") designation. All properties can be read, which means that you can retrieve that property's current value. The values of some properties can also be changed through ActionScript. The table represents these properties with the "W" designation.
Note
In Flash Player 4 ActionScript, these properties were retrieved using the getProperty() action. Properties are altered using the setProperty() action. For Flash Player 5 or higher movies, you should avoid using these actions. Many free online Flash tutorials or samples at sites such as FlashKit.com will often be riddled with these deprecated actions.
Note
We don't review the more advanced properties of the MovieClip object in this chapter. For the most comprehensive coverage, refer to the MovieClip class coverage in the Flash 8 ActionScript Bible (Wiley).
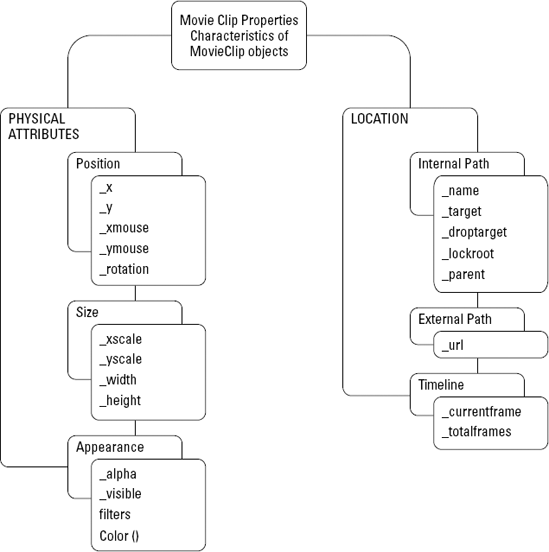
Table 25.1. Flash Movie and Movie Clip Properties
Property | Timeline | Flash 4 | Flash 5+ | Flash 8 | Definition | |
|---|---|---|---|---|---|---|
MC = Movie Clip; R = Read property (cannot be modified); W = Write property (can be modified) | ||||||
Position |
| MC | RW | RW | RW | The horizontal distance between a Movie Clip's center point and the top-left corner of the stage upon which it resides. It increases as the clip moves to the right, and is measured in pixels. |
Movie | RW | RW | RW | |||
| MC | RW | RW | RW | The vertical distance between a Movie Clip's center point and the top-left corner of the stage upon which it resides. It increases as the clip moves downward, and is measured in pixels. | |
Movie | RW | RW | RW | |||
| MC | N/A | R | R | The horizontal distance (in pixels) between the zero point of a Movie Clip (or the Movie) and the current position of the mouse pointer. | |
Movie | R | R | ||||
| MC | N/A | R | R | The vertical distance (in pixels) between the zero point of a Movie Clip (or the Movie) and the current position of the mouse pointer. | |
Movie | R | R | ||||
| MC | RW | RW | RW | The amount (in degrees) that a Movie Clip is rotated off plumb. It returns values set both by the Transform panel (or Transform tool) and by ActionScript. | |
Movie | RW | RW | RW | |||
| MC | RW | RW | RW | The width of a Movie Clip instance (or Movie) as a percentage of the parent symbol's actual size. | |
Movie | RW | RW | RW | |||
Size |
| MC | RW | RW | RW | The height of a Movie Clip instance (or Movie) as a percentage of the parent symbol's actual size. |
Movie | RW | RW | RW | |||
MC | R | RW | RW | The width (in pixels) of a Movie Clip or the main Movie Stage. It is determined not by the width of the canvas but by the width of the space occupied by elements on the Stage (meaning it can be less than or greater than the canvas width set in Movie Properties). | ||
Movie | R | R | R | |||
| MC | R | RW | RW | The height (in pixels) of a movie clip or the main movie. It is determined not by the height of the canvas but by the height of the space occupied by elements on the Stage. | |
Movie | R | R | R | |||
Appearance |
| MC | RW | RW | RW | The amount of transparency of a Movie Clip or Movie. It is measured as a percentage: 100 percent is completely opaque; 0 percent is completely transparent. |
Movie | RW | RW | RW | |||
| MC | RW | RW | RW | A Boolean value that indicates whether a Movie Clip instance is shown or hidden. It is set to 1 (or | |
Movie | RW | RW | RW | |||
| MC | N/A | N/A | RW | This property in Flash Player 8 or higher enables you to add visual effects to | |
Movie | N/A | N/A | RW | |||
| MC | N/A | RW | RW | This property in Flash Player 8 or higher enables you to control physical characteristics of a MovieClip object via transformation object. In Chapter 27, "Interacting with Movie Clips," we discuss the | |
Movie | N/A | N/A | RW | |||
| MC | RW | RW | RW | This property returns or reassigns the Movie Clip instance's name (as listed in the Property inspector). | |
Movie | R | R | R | |||
| MC | R | R | R | This property returns the exact string in Slash notation that you'd use to refer to the Movie Clip instance. To retrieve the dot syntax path, use | |
Movie | R | R | R | |||
| MC | R | R | R | This property returns the name (in Slash notation) of the last Movie Clip upon which a draggable Movie Clip was dropped. To retrieve the dots syntax path, use | |
Movie | R | R | R | |||
| MC | RW | RW | RW | This property, only available to Flash Player 7 or higher -compatible movies, enables you to control how a | |
Movie | RW | RW | RW | |||
| MC | N/A | R | R | This property returns a reference to the parent timeline of the current | |
N/A | R | R | * | |||
External Path |
| MC | R | R | R | This property returns the complete path to the Flash movie (.swf) in which the action is executed, including the name of the Flash movie file (.swf) itself. It can be used to prevent a movie from being viewed if it is not on a particular server. |
Movie | R | R | R | |||
Timeline |
| MC | R | R | R | This property returns the number of the current frame (for example, the frame on which the Playhead currently resides) of the Movie or a Movie Clip instance. |
Movie | R | R | R | |||
| MC | R | R | R | This property returns the number of total frames in a Movie or Movie Clip instance's timeline. | |
Movie | R | R | R | |||
| MC | R | R | R | This property returns the number of frames that have downloaded over the network. | |
Movie | R | R | R | |||
Global |
| Movie | N/A | RW | RW | The visual quality of the movie. The value is a string equal to: |
| Movie | RW | RW | RW | A Boolean value that indicates whether a yellow rectangle is shown around buttons when accessed via the Tab key. The default is to show. When set to 0, the Up state of the button is shown instead of the yellow rectangle. | |
| Movie | RW | RW | RW | The number of seconds a sound should preload before it begins playing. The default is five seconds. | |
Although the name might sound intimidating, don't be scared. Methods are simply actions that are attached to objects. As you now know, Movie Clips qualify as objects in ActionScript. A method looks like a regular action, except it doesn't (and, in most cases, can't) operate without a dot syntax reference to a target or an object:
Action: gotoAndPlay("start"); |
becomes
Method: myMovieClip.gotoAndPlay("start"); |
As actions, interactive commands are executed from the timeline on which they are written. As methods, interactive commands are tied to specific (or dynamic) targets. Figure 25.3 lists many of the methods and Table 25.2 reviews them in more detail. Some methods can be used with MovieClip instances and with the entire Flash movie (_root, _level0, and so on), while others can only be used with MovieClip instances. The "Flash 4" column in Table 25.2 indicates if the method (when used as an action) is compatible in Flash Player 4. Some commands need to be written in dot syntax, as a method (designated as "M" in the table) of a timeline or MovieClip object. Other commands can be used as actions (designated as "A" in the table), meaning that the MovieClip object name need not precede the command.
Note
Figure 25.3 and Table 25.2 do not contain all methods of the MovieClip class. For comprehensive descriptions and usage of the methods, refer to the Flash 8 ActionScript Bible (Wiley).
Table 25.2. Common Movie and Movie Clip Methods
Method | Flash 4 | Definition | Usage | |
|---|---|---|---|---|
M = Method; A = Action | ||||
Position |
| No | Determines if a | timeline.hitTest(MovieClip object); OR timeline.hitTest(x coordinate, y coordinate, shapeFlag); |
M |
| |||
| ||||
| Yes | Enables the user to move a Movie Clip instance on the Stage. The Movie Clip moves (or drags) in tandem with the movements of the mouse. You can specify whether the mouse pointer locks to the center of the Movie Clip instance and if the drag area is constrained to a range of X and Y coordinates (in the parent symbol or timeline space). Constraining the drag area is useful for slider controls. | timeline.startDrag(lock, min X, min Y, max X, max Y); | |
M, A |
| |||
| Yes | Stops any | timeline.stopDrag(); | |
M, A |
| |||
Playback |
| Yes | Starts playback from the current position of the Playhead on a specified timeline. | timeline.play(); |
M, A |
| |||
| ||||
Yes | Stops playback on a specified timeline. | timeline.stop(); | ||
M, A |
| |||
| ||||
| Yes | Jumps the Playhead of a specified timeline to a label, frame number, or expression, and starts playing from there. | timeline.gotoAndPlay(position); | |
M, A |
| |||
| ||||
| Yes | Jumps the Playhead of a specified timeline to a label, frame number, or expression, and stops playback. | timeline.gotoAndStop(position); | |
M, A |
| |||
| ||||
| Yes | Moves the Playhead of the specified timeline to the next frame. | timeline.nextFrame(); | |
M, A |
| |||
| Yes | Moves the Playhead of the specified timeline to the previous frame. | timeline.prevFrame(); | |
M, A |
| |||
Internal Assets |
| No | Makes a blank (empty) Movie Clip instance on the Stage (or nested in another Movie Clip instance). The new instance is placed directly above the parent instance, at a specified depth. Higher depth numbers appear above lower depth numbers (for example, a Movie Clip at depth 2 is stacked above a Movie Clip at depth 1). | |
This method works in Flash Player 6 or higher. | timeline.createEmptyMovieClip(new name*, depth); | |||
M | ||||
| ||||
*You should only specify an instance name for the new | ||||
| Yes | Makes a copy of an existing Movie Clip instance on the Stage (or nested in another Movie Clip). The new copy is placed directly above the parent instance, at a specified depth. Higher depth numbers appear above lower depth numbers (for example, a Movie Clip at depth 2 is stacked above a Movie Clip at depth 1). | timeline.duplicateMovieClip(new name*, depth); | |
M, A |
| |||
| ||||
*See note for the | ||||
| Yes | Deletes a previously duplicated Movie Clip instance. When used as a method, you do not need to specify a target. You cannot remove a Movie Clip instance that is manually inserted on any timeline frame from the Library. | timeline.removeMovieClip(); | |
M, A |
| |||
| No | Places an instance of a Movie Clip symbol from the Library into the specified timeline. Each attached instance requires a unique name and depth. Attached Movie Clip instances can be deleted with | timeline.attachMovie(ID*, new name, depth); | |
M |
| |||
*You need to specify a unique identifier to linked Movie Clip symbols in the Library, using the Linkage Properties. | ||||
No | Returns the current depth of a duplicated (or attached) | |||
This method only works in Flash 6 movies played in Flash Player 6. | timeline.getDepth(); | |||
M |
| |||
| ||||
*If you attempt to retrieve the depth of a Movie Clip instance that you manually placed on the Stage, then ActionScript will return −16383 as the value of | ||||
| No | Switches the depth placement of two duplicated or attached Movie Clips. This method is useful for placing one Movie Clip instance in front of (or behind) another instance. | timeline.swapDepths(depth); | |
M | timeline.swapDepths(target); | |||
| ||||
| ||||
| No | Determines if any objects currently exist within depth slots of the current | ||
This method works only when issued from a Flash Player 7 or higher movie. | timeline.getNextHighestDepth(); | |||
M |
| |||
No | Returns the name of an object occupying the specified depth slot. If no object exists at the slot, | |||
This method works only when issued from a Flash Player 7 or higher movie. | timeline.getInstanceAtDepth(depthSlot); | |||
M |
| |||
| No | Adds a new | ||
This method works only when issued from a Flash Player 6 or higher movie. | timeline.createTextField(name, depth, x position, y position, width, height); | |||
M |
| |||
| No | Assigns a | ||
This method works only when issued from a Flash Player 6 or higher movie. | timeline.setMask(instanceName); | |||
M |
| |||
External Assets |
| Yes | Loads an external movie file (.swf) or image file into the main movie. As one of the most powerful features of Flash, this method enables you to break up your Flash movie into several smaller components, and load them as needed. This method can load movie files (.swf) or standard JPEG image files (.jpg) into Flash Player 6 or higher movies. Flash Player 8 or higher movies can also load GIF, PNG, and progressive JPEG images into Movie Clip targets. | timeline.loadMovie(path, send variables*); |
| ||||
OR | ||||
| ||||
*You can also send Flash variables to the newly loaded .swf file with an optional | ||||
| Yes | Removes an externally loaded movie file (.swf) or image file from the main movie. This method enables you to dump movie assets when they are no longer needed. Use this method for assets loaded into Movie Clip targets. | timeline.unloadMovie(); | |
M, A |
| |||
| Yes | Loads external text-based data into the movie. This method enables you to access data (in the form of variable name/value pairs) from server-side scripts or text files, and place it in a Movie Clip target. | timeline.loadVariables(path, send variables*); | |
M, A |
| |||
*See note in loadMovie. We discuss | ||||
No | Returns the number of bytes that have streamed into the Flash Player for a specified Movie Clip (or movie). | timeline.getBytesLoaded(); | ||
M |
| |||
| No | Returns the total file size (in bytes) for a loading movie or Movie Clip. Combined with | timeline.getBytesTotal(); | |
M |
| |||
| ||||
| ||||
| No | Returns the version of the Flash movie as a number. For example, if you create a Flash movie (.swf) to be Flash Player 4–compatible, you can check the version number of that .swf from a Flash Player 7–compatible movie file (.swf). | ||
This method can only be invoked from Flash movies created for Flash Player 7 or higher. | timeline.getSWFVersion(); | |||
M |
| |||
In Flash Player 5, the onClipEvent handler was added to the ActionScript language. In Flash Player 4 or earlier, the only event handlers were keyframes and Button instances. In Flash Player 5 or higher movies, you can add actions to the wrapper of a Movie Clip instance—meaning that these actions are not added to keyframes on the Movie Clip's timeline. Nine events can be used with the onClipEvent handler. Refer to Table 25.3 for a summary of these events.
Here's how you create a simple example of onClipEvent() in action:
Create a new Flash file (ActionScript 2.0), using File

Draw any artwork you wish, and make the artwork a Movie Clip symbol.
Select the Movie Clip instance on the Stage. In the Property inspector, name the instance
tracker.With the
trackerinstance selected on the Stage, open the Actions panel (F9, or Option+F9). Type the following code into the Script pane:onClipEvent (mouseMove){ this._x = _root._xmouse; this._y = _root._ymouse; updateAfterEvent(); }This code uses
onClipEvent()to track the position of the user's mouse, and apply that position to theMovieClipobject—effectively moving theMovieClipobject with the mouse pointer. The code is executed every time the user's mouse moves. TheupdateAfterEvent()action will tell the Flash Player to refresh the video display each time a mouse move is detected, resulting in a smoother movement of the object.Save your Flash document as
tracker_oce.fla, and test it (Ctrl+Enter or
Note
You can find a completed version of the file tracker_oce.fla in the ch25 folder of this book's CD-ROM.
In Flash Player 6 and higher, event handlers for MovieClip objects can be written and executed from any other event handler. This means that you can code the same event handlers used for onClipEvent() in keyframe or Button instance actions. While this may not seem like a monumental leap forward, this new event model enables you to create event handlers that are not directly attached to physical instances of a Movie Clip in the authoring environment. For a summary of common event methods, see Table 25.3.
Note
It is beyond the scope of this book to discuss all of the event methods available in ActionScript 1.0 and 2.0. Please refer to the Flash 8 ActionScript Bible (Wiley) for more information.
To get a better idea of how this event model works, create this simple example:
Create a new Flash file (ActionScript 2.0).
Draw some artwork, and make it a Movie Clip symbol.
Select the new instance on the Stage. Name the instance
trackerin the Property inspector.Create a new layer on the Main Timeline (that is, Scene 1). Name the layer actions.
Select frame 1 of the actions layer, and open the Actions panel (F9, or Option+F9 on Mac). Type the following code into the Script pane:
var tracker:MovieClip;
   tracker.onMouseMove = function (){
   this._x = _root._xmouse;
   this._y = _root._ymouse;
   updateAfterEvent();
};
This code adds an
onMouseMove()method to thetrackerinstance. Each time the user's mouse moves, the function written for the method will execute. We discuss functions in the next chapter.Save your Flash document as
tracker_eventmodel.fla, and test it (Ctrl+Enter or
Note
You can find the completed document, tracker_eventmodel.fla, in the ch25 folder of this book's CD-ROM. You will also find another document, tracker_eventmodel_adv.fla, which uses multiple event handlers.
You can continue to add more event methods to the tracker instance, in order for the instance to respond to mouse clicks, time elapsing, and so on.
Warning
This event model for Flash movies works in Flash Player 6 or higher. If you need to use events with Movie Clips that are compatible with Flash Player 5, then use onClipEvent() handlers.
Table 25.3. Common Flash Player 5 and Higher Event Handlers
onClipEvent (FP5+) | Event Handler (FP6+) | Definition | Usage | |
|---|---|---|---|---|
Playback |
|
| This event is triggered when (A) a Movie Clip instance first appears on the Stage; (B) a new instance is added with Note: The | onClipEvent(load){
trace( _name + " has
loaded.");
}
OR MovieClip.prototype.
onLoad = function(){
trace("A movie or Movie
Clip has loaded.");
}; |
|
| This event occurs when (A) a Movie Clip instance exits the Stage (just after the last frame has played on the Main Timeline), or (B) an external Flash movie file (.swf) is unloaded from a Movie Clip target. Actions within this handler type will be executed before any actions in the keyframe immediately after the Movie Clip's departure keyframe. | onClipEvent(unload){
trace( _name + " has
unloaded.");
}
OR mcHolder.onUnload =
function(){
trace(this._name + " has
unloaded.");
}; | |
| This event executes when each frame on a Movie Clip instance's timeline is played. The actions within this event handler will be processed after any actions that exist on the keyframes of the Movie Clip Timeline. Note that | onClipEvent(enterFrame){
trace( _name + " is
playing.");
}
OR mcHolder.onEnterFrame =
function(){
trace(_name + " is
playing.");
}; | ||
User Input |
|
| This event is triggered each time the mouse moves anywhere on the Stage. All Movie Clip instances with this event handler defined receive this event. Combined with the | onClipEvent(mouseMove){
var myX = _root._xmouse;
var myY = _root._ymouse;
if(this.hitTest(myX, myY,
true) == true){
trace("Mouse move over
MC.");
}
}
OR mcHolder.onMouseMove =
function(){
var myX:Number =
_root._xmouse;
var myY:Number=
_root._ymouse;
if(this.hitTest(myX, myY,
true)){
trace("Mouse move over " +
this._name);
}
updateAfterEvent();
}; |
| This event occurs each time the left mouse button is pressed (or down) anywhere on the Stage. All Movie Clip instances with this event handler receive this event. | onClipEvent(mouseDown){
myX = _root._xmouse;
myY = _root._ymouse;
if(this.hitTest(myX, myY,
true)){
trace("Mouse press on
MC.");
}
}
OR mcHolder.onMouseDown =
function(){
var myX:Number =
_root._xmouse;
var myY:Number =
_root._ymouse;
if(this.hitTest(myX, myY,
true)){
trace("Mouse press on " +
this._name);
}
}; | ||
|
| This event is triggered each time the left mouse button is released (when the user lets up on the mouse button). All Movie Clip instances with this handler receive this event. | onClipEvent(mouseUp){
myX = _root._xmouse;
myY = _root._ymouse;
if(this.hitTest(myX, myY,
true)){
trace("Mouse release on
MC.");
}
}
OR mcHolder.onMouseUp=
function(){
var myX:Number =
_root._xmouse;
var myY:Number =
_root._ymouse;
if(this.hitTest(myX, myY,
true)){
trace("Mouse release on "
+ this._name);
}
}; | |
| This event occurs when the user presses a key. Combined with the Note: It's better to use | onClipEvent(keyDown){
newKey = Key.getCode();
myKey = Key.UP;
if(newKey == myKey){
trace("UP arrow is
pressed.");
}
} | ||
|
| This event happens when the user releases a key (when the finger leaves the key). It provides the same functionality as the Note: It's preferable to use | onClipEvent(keyUp){
newKey = Key.getCode();
myKey = Key.LEFT;
if(newKey == myKey){
trace("LEFT arrow
released.");
}
} | |
|
| This event is triggered when (A) the Note: If you're building Flash Player 6 or higher movies, use the | onClipEvent(data){
trace("New data
received.");
}
OR mcHolder.onData =
function(){
trace("New data
received.");
} |
You can use Movie Clips with other ActionScript classes to control appearances and sounds, and to manipulate data.
This class can control the color effects of the targeted Movie Clip.
Tip
Flash Player 8 introduced a new MovieClip class property, transform. The transform property controls color transformations applied to a MovieClip instance. For more information about this new feature, read Chapter 27, "Interacting with Movie Clips."
With this class, you can create virtual sound instances on a MovieClip instance and target them for later use.
This class controls the appearance of the mouse pointer within the Flash movie. After the Mouse object is hidden, you can attach a MovieClip object to the X and Y coordinates of the mouse pointer.
Flash MX 2004 and Flash Player 7 introduced the ActionScript class, PrintJob. PrintJob objects enable you to send MovieClip instances—as pages to a user's printer. The PrintJob class offers you more control over printing than previous versions of the Flash Player. You learn more about the PrintJob API in Chapter 27, "Interacting with Movie Clips."
Note
You can still use the print() function for Flash Player 6 or earlier movies. This function prints a frame (or series of frames) in the targeted timeline. Each frame prints to one piece of paper. Use this function to print high-quality artwork. Note that alpha and color effects applied to MovieClip objects do not print reliably with this method—use the printAsBitmap() function instead.
This action enables you to avoid needless replication of object references and paths. By specifying a target for the with() action, you can omit the path from nested actions. We demonstrate the with() action in the next section.
This Flash Player 4–compatible action can direct actions to a specific Movie Clip Timeline. To be compatible with Flash Player 4, you need to use slash syntax for the target path. We strongly discourage you from using tellTarget() actions if you are designing Flash Player 5 or higher movies.
Now that you have a sense of what a Movie Clip can do (or be told to do), it's time for you to get some practical experience with the Movie Clip properties. In this section, we show you how to access Movie Clip appearance properties that control position, scale, and rotation.
Note
The following exercises use Button symbols from the prebuilt Common Libraries that ship with Flash CS3. To access buttons from the Common Libraries, use Window
You can change the location of MovieClip instances on the fly with position properties such as _x and _y. How is this useful? If you want to create multiple MovieClip instances that move randomly (or predictably) across the Stage, you can save yourself the trouble of manually tweening them by writing a few lines of ActionScript code on the object instance. Here are the steps to take:
Create a new Flash file (ActionScript 2.0) by choosing File
Rename Layer 1 to circle.
On frame 1 of the circle layer, draw a simple shape such as a circle. Select the shape and press the F8 key to convert it into a symbol. Choose the Movie Clip behavior in the Convert to Symbol dialog box, and give the new Movie Clip symbol a unique name such as circleClip.
Select the instance on the stage of the Main Timeline, and in the Property inspector, name the instance
circle.Create a new layer on the Main Timeline (that is, Scene 1), and name the layer actions.
Select frame 1 of the actions layer, and open the Actions panel (F9, or Option+F9 on Mac). Type the following code into the Script pane:
var circle:MovieClip;

circle.onEnterFrame = function(){
     this._x += 5;
};
Save your document as
movieclip_x.fla, and test the movie (Ctrl+Enter or
Note
You can find the movieclip_x.fla in the ch25 folder of this book's CD-ROM.
How does this code work? In Step 4, you specified that the onEnterFrame() event method should be assigned to the Movie Clip instance circle. Regardless of the number of frames on any playing timeline, the enterFrame event is triggered continuously. Therefore, any actions nested within the handler will be executed repeatedly.
Your nest contains one action: this._x += 5. On the left side of the action, this refers to the object instance to which this handler and code has been applied. In your case, this refers to your circle Movie Clip instance. Immediately after this is the property for the X position, _x. By adding the property _x to the object this, Flash knows that you want to change the value of this property.
On the right side of the action are the operators += and the value 5. By combining the + and = operators, you've created a shortcut to adding the value of 5 to the current X position of the circle Movie Clip instance. Each time the enterFrame event occurs, the circle object moves 5 pixels to the right.
To show how quickly you can replicate this action on multiple Movie Clips, select the circle instance on the Stage, and duplicate it (Ctrl+D or
circle_2.onEnterFrame = function():Void{
     this._x += 10;
};
circle_3.onEnterFrame = circle_2.onEnterFrame;
When you test your movie, each instance moves independently across the Stage. Notice that the onEnterFrame() handler for the circle_3 instance borrows the onEnterFrame() handler from circle_2. Once a method has been defined for one object, you can reuse it with other objects' methods.
Tip
To move the instance diagonally across the Stage, add the action this._y += 5 to the onEnterFrame() handler. This moves the instance down 5 pixels each time the handler is processed. Also, we'll show you how to consolidate duplicated actions in Chapter 26, "Using Functions and Arrays."
In the last example, you learned how to access the _x and _y properties of the MovieClip object. The next example shows you how to use a Button symbol to enlarge or reduce the size of a Movie Clip on the Stage:
Create a new Flash file (ActionScript 2.0).
Draw a shape (or multiple shapes), select the shape(s), and press the F8 key to convert the artwork into a symbol. Give the Movie Clip symbol a distinct name to identify it in the Library.
Select the instance of the Movie Clip on the Stage, and open the Property inspector. Give the Movie Clip a unique name. In this example, we've named the instance
circle.From the Button library, drag an instance of a button onto the Stage. Name the instance incrButton (short for increase button) in the Property inspector.
Now create the ActionScript code that will enlarge the
circleMovie Clip instance. Create a new layer named actions. Select frame 1 on this layer, and open the Actions panel. Type the following code into the Script pane:var incrButton:Button; var circle:MovieClip; incrButton.onRelease = function():Void{ with (circle){ _xscale += 10; _yscale += 10; } };This code uses the
with()action to target thecircleinstance with a nested group of actions. In this case, you've increased the values of the_xscaleand_yscaleproperties by 10 percent. With each release event on the Button symbol instance, the scale properties of thecircleinstance will be changed.Save your document as
movieclip_scale.fla, and test the movie (Ctrl+Enter orDuplicate the
Buttoninstance (Ctrl+D orvar decrButton:Button; decrButton.onRelease = function():Void { with (circle){ _xscale -= 10; _yscale -= 10; } };By changing the
+=operator to-=, each click on this Button instance reduces (shrinks) thecircleinstance by 10 percent.Resave your Flash file and test the movie again. Make sure that each Button instance behaves appropriately. If one doesn't work (or works in an unexpected manner), go back to the Flash document and check the code on both Button instances.
Note
You can find the movieclip_scale.fla document in the ch25 folder of this book's CD-ROM.
Warning
In this simple exercise, we haven't placed any limits on the how much the Movie Clip can be reduced or enlarged. If you click the reduce button enough times, the Movie Clip instance will actually flip vertically and start enlarging again. We look at creating conditions and logic for Movie Clips in Chapter 27, "Interacting with Movie Clips."
Let's move along to the rotation property, _rotation, which is used to control the angle at which your Movie Clip is shown. In this sample, you'll use the same Flash document that you created in the previous section.
Note
If you drew a perfect circle in past exercises for the MovieClip object, then you will want to edit your Movie Clip symbol to include some additional artwork that provides an indication of orientation and rotation. If you try to rotate a perfect circle, you won't see any visual difference on the Stage. Because the value of the _rotation property is determined from the center point of the Movie Clip, you can also move the contents of the Movie Clip (in Edit mode) off-center to see updates in the _rotation value.
Select frame 1 of the actions layer, and open the Actions panel. Change the
incrButtoninstance's ActionScript code to:incrButton.onRelease = function():Void { circle._rotation += 10; };Now, change the
decrButtoninstance's ActionScript code in the Actions panel to:decrButton.onRelease = function():Void { circle._rotation -= 10; };Save your document as
movieclip_rotation.fla, and test the movie. Each button should rotate thecircleMovie Clip instance accordingly.
At this point, you should have a general knowledge of how to access a Movie Clip's properties. Repeat these examples using other properties that can be modified, such as _width and _height. Try combining all the properties into one Button instance handler, or one event method or onClipEvent() handler.
Flash Player 4 introduced the drag-and-drop feature, which enables the user to pick up objects with the mouse pointer and move them around the movie Stage. Flash Player 5 added some other ways to use drag-and-drop with the onClipEvent() Movie Clip handler. As we briefly discussed, Flash Player 6 and higher ActionScript can use a different event model for MovieClip objects. Drag-and-drop in Flash is based entirely on Movie Clips. The only objects that can be moved with the mouse are Movie Clip instances. So, if you want a drawing of a triangle to be moveable by the user, you have to first put that triangle into a Movie Clip, and then place a named instance of that clip onto the Stage. Flash's drag-and-drop support is fairly broad, but more-complex drag-and-drop behaviors require some ActionScript knowledge.
In mouse-based computer interfaces, the most common form of drag-and-drop goes like this: A user points to an element with the mouse pointer, clicks the element to begin moving it, and then releases the mouse button to stop moving it. One method of adding drag-and-drop functionality is the use of a button handler with a MovieClip instance. A startDrag() action is added to an onPress() handler for that MovieClip instance. Let's try out this technique.
Start a new Flash file (ActionScript 2.0). Rename Layer 1 to dragger.
Create a circle with the Oval tool. Select the artwork and press F8. In the Convert to Symbol dialog box, select the MovieClip type. Name the symbol dragClip. Make sure the registration point is set to the center of the clip.
With the new Movie Clip instance selected, open the Property inspector. Give the instance the name
dragger.On the Main Timeline (that is, Scene 1), create a new layer named actions and place this layer at the top of the layer stack. Select the first frame of the actions layer, and open the Actions panel (F9, or Option+F9 on Mac). Type the following code into the Script pane:
var dragger:MovieClip;
dragger.onPress = function():Void {
  this.startDrag();
};
Even though this
startDrag()method will be applied to the same Movie Clip (this), astartDrag()method can target any Movie Clip from any button, or from any keyframe.At this point, your
MovieClipinstance button, when clicked, causes the instance to start following the mouse pointer. Now you have to tell the Movie Clip to stop following the pointer when the mouse button is released. After the last curly brace (}) highlighted in the actions list of the Script pane, type the following code:dragger.onRelease = dragger.onReleaseOutside = function():Void{ this.stopDrag(); };Save your Flash document as
movieclip_button_drag.fla. Test your movie with Control
Note
You can find the movieclip_button_drag.fla document in the ch25 folder of this book's CD-ROM.
Did it work? Great! Now we can tell you about the other basic settings for the startDrag() action. Next, you'll look at additional features of the startDrag() action. You may want to select an existing startDrag() action in the Script pane of the Actions panel and click the Reference icon in the panel's toolbar to more clearly see these options.
This setting, which is the first option specified in the parentheses of the startDrag() method, controls how the Movie Clip instance will position itself relative to the position of the mouse pointer. There are two values for this option: true or false. When set to true, this option makes the dragged Movie Clip instance center itself under the mouse pointer for the duration of the drag movement. If the dragged Movie Clip instance is not already under the mouse pointer when the startDrag() action occurs, the instance will automatically be moved under the pointer, providing that the pointer is not outside the region defined by Constrain to Rectangle (discussed in the next section). The following code will "snap" the center of the Movie Clip instance dragger to the mouse pointer:
dragger.startDrag(true);
When this option is set to false, the Movie Clip instance moves with the mouse pointer from the point at which it was clicked. For example, if you click the draggable object on its left edge, then that's where the object will "snap" the mouse pointer:
dragger.startDrag(false);
In order to specify the limits of the rectangular region within which a draggable Movie Clip instance can be dragged, you can add parameters to the startDrag() method. First, determine the pixel locations of the four corners of the rectangle. The pixel coordinates are set relative to the top-left corner of the Stage upon which the draggable Movie Clip instance resides. For example, the following code would constrain the draggable Movie Clip instance named dragger to a 300-pixel square region in the top-left corner of the Main Timeline's Stage:
dragger.startDrag(false, 0, 0, 300, 300);
Note
If the draggable Movie Clip instance is located outside of the defined drag region when the startDrag() action occurs, the instance is automatically moved into the closest portion of the drag region.
In the "Drag-and-drop basics" section, we showed you how to make Movie Clip instances that the user can move around. But what if you want to force the user to move a Movie Clip object into a certain location before you let her drop it? For instance, consider a child's shape-matching game in which a small circle, square, and triangle should be dragged onto corresponding larger shapes. If the child drops the small circle onto the large square or large triangle, the circle returns to its original location. If, on the other hand, the child drops the small circle onto the large circle, the small circle should stay where it is dropped, and the child should receive a "Correct!" message. That kind of game is quite possible in Flash, but it requires some understanding of Movie Clip properties. Here's how it works—you'll use the circle as an example.
Create a new Flash file (ActionScript 2.0), and save it as movieclip_droptarget.fla.
Rename Layer 1 to circle.
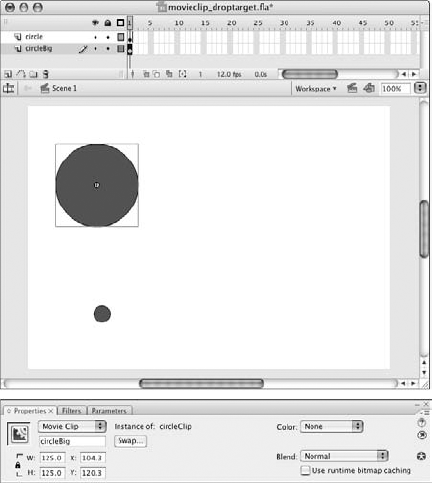
On frame 1 of the circle layer, use the Oval tool to draw a circle that is 100 × 100 pixels. Convert the artwork to a Movie Clip symbol named circleClip, and name the instance
circle. Scale the artwork to 25 percent in the Transform panel. Position this instance along the bottom left of the Stage, as shown in Figure 25.4.Copy the
circleinstance by selecting it on the Stage and choosing EditCreate a new layer, and name the layer circleBig. Place the layer below the circle layer.
On frame 1 of the circleBig layer, choose Edit
Create a new Movie Clip symbol from scratch by choosing Insert
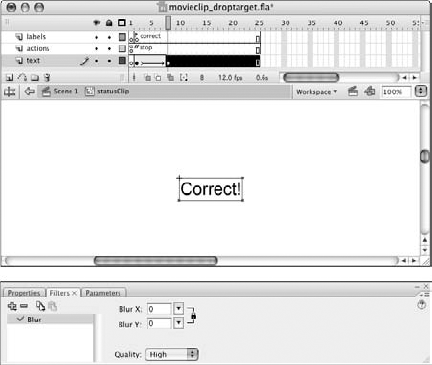
Go back to the Main Timeline (that is, Scene 1), and place an instance of statusClip along the bottom of the Stage, centered. With the instance selected, open the Property inspector and name the instance
statusMsg.Now, you will make the
circleinstance draggable by adding some frame actions. On the Main Timeline, create a new layer named actions and place this layer above the other layers. Select frame 1 of the actions layer, and in the Actions panel type the following code into the Script pane:var circle:MovieClip; var circleBig:MovieClip; var statusMsg:MovieClip; circle.onPress = function(){ this.startDrag(); };Here, the
onPress()method of theMovieClipobject is used to assign a button press behavior to the instance. In this code, you tell thecircleinstance to start dragging when it is clicked on the Stage. Note that as soon as a Movie Clip instance has a button event assigned to it, the mouse pointer will switch to a finger icon when it rolls over the area of theMovieClipobject.Next, you need to tell the
circleinstance to stop dragging when the mouse button releases. Underneath the last line of the code from Step 9, type the following code:circle.onRelease = circle.onReleaseOutside = function(){ this.stopDrag(); if ( eval(this._droptarget) == circleBig ) { statusMsg.gotoAndPlay ("correct"); } else { this._x = 112; this._y = 316; } };This code uses the
onRelease()method. The code for this method will be executed when the mouse button is released after a mouse click on thecircleinstance. The instance is told to stop dragging, and then ActionScript evaluates if the current instance (this) is dropped on top ofcircleBig. When the user drops any Movie Clip instance, the instance's_droptargetproperty is updated. The_droptargetproperty specifies the name of the Movie Clip instance upon which the dragged Movie Clip instance was last dropped. If no instance is underneath the dragged instance,_droptargetreturns nothing (that is, an empty string). If the_droptargetis the large circle, then the dragged instance stays where it was dropped and thestatusMsginstance plays its "Correct!" animation. Otherwise, the dragged instance (circle) returns to the X and Y coordinates of its starting point (112, 316).Note
The
eval()function is used to convert the slash syntax returned by_droptargetinto a "real" object reference. On its own,_droptargetreturns Flash Player 4-compatible syntax. In order to use it with current ActionScript routines, use theeval()function to return a proper object reference.Save your Flash document as
movieclip_droptarget.fla, and test it (Ctrl+Enter or

You can continue this example with other shapes, using the same methodology. Create a separate onPress() and onRelease() method for each new drag interaction.
Note
For further study, we've included this basic drag-and-drop game as a sample document called movieclip_droptarget.fla in the ch25 folder of this book's CD-ROM. A more advanced example named movieclip_droptarget_adv.fla uses three different shapes, and assigns the handlers to each draggable clip with a for() loop and an array.
A compelling use of a draggable Movie Clip is a slider that can alter the properties of another object. By checking the position of a Movie Clip, you can use the position's X or Y coordinate value to alter the value of another Movie Clip. In this section, we show you how to create two sliders (one for alpha and another for scale) that will dynamically change the transparency and size of a Movie Clip instance on the Stage. Many thanks to Sandro Corsaro (http://sandrocorsaro.com) for supplying the artwork of our dog Stella and the park sign.
Note
You need to copy the slider_basic_starter.fla file from the ch25 folder of this book's CD-ROM. You'll use premade artwork to understand the functionality of startDrag, stopDrag, and duplicateMovieClip.
In this section, you set up the basic composition of the Stage, using elements from the slider_basic_starter.fla Library. You will add artwork of a dog and a park sign to the movie. The dog artwork will be duplicated using the duplicateMovieClip() method, and the duplicate instance will be manipulated by the sliders that you create in the next section. The park sign will be used to remove the duplicate instance using the _droptarget property and the removeMovieClip() method.
Open your copy of the
slider_basic_starter.fla. Resave this document asslider_basic_100.fla.Rename Layer 1 to dog_1.
Access the document's Library by pressing Ctrl+L or
With the
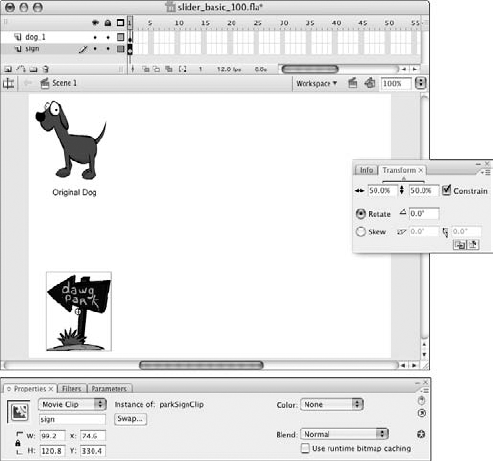
dogClipinstance selected, open the Property inspector. In the <Instance Name> field, typedog_1, as shown in Figure 25.7.Using the Text tool, add the words Original Dog under the
dog_1instance. You don't need to make a new layer for this artwork.Create a new layer and name it sign. Move this layer below the
dog_1layer. Drag the parkSignClip symbol, located in theparkSignElementsfolder in the Library, to the lower-left corner of the Stage. In the Property inspector, assign the instance the namesign. In the Transform panel, reduce the size of thesigninstance to 50%, as shown in Figure 25.8.Create a new layer called actions, and place it above all the other layers. Select the first keyframe of this layer. In the Actions panel, add the following actions:
var dog_1:MovieClip;
   var dog_2:MovieClip = dog_1.duplicateMovieClip(
                                 "dog_2",
                                 1,
                                 {_x: 350,_y: 175 }
                               );
Tip
You can insert line returns between arguments of a method, as demonstrated in this code sample. This practice makes the arguments easier to read on review.
This line of code duplicates the instance
dog_1, names the new instancedog_2, and places it on the first depth layer of the current timeline (_root). However, Flash Player 6 (or higher) ActionScript enables you to do a little more with theduplicateMovieClip()method. You can assign aninitObjectparameter that is passed to the duplicated instance. In this example, you create an object with_xand_yproperties that are passed to the This argument positions thedog_2instance at the X coordinate of 350 (350 pixels from the left corner of the Main Timeline Stage) and the Y coordinate of 175 (175 pixels down from the left corner).Save the Flash document, and test the movie (Ctrl+Enter or


Now that you have some artwork on the Stage, you can manipulate the duplicated Movie Clip with a pair of dynamic sliders.
In this section, you'll create two sliders: one for scale, and one for transparency. You'll need to make only one slider Movie Clip symbol and use a new instance for each slider. The basic "problems" of a dynamic slider are to (a) retrieve the position value of an object on the slider (you'll call this the slider bar), and (b) set the value of another object equal to (or some factor of) the position value of the slider bar. Finding the position of a slider bar is relatively straightforward. The difficulty lies in creating the value scale for the slider.
Because you have already determined the properties that will be altered (scale and transparency), you need to establish a range of values that each property can use. Luckily, both scale (as _xscale and _yscale in ActionScript) and transparency (as _alpha) use percentage units. However, scale can be any value that's greater than 0 percent and less than 3,200 percent. Alpha has a range of 0 to 100 percent. If you want to use the same parent slider for each property slider, you need to manipulate the position values of the slider bar differently for each property. Let's start with building the basic slider.
Note
Resume using the same file you finished in the previous section. Otherwise, you can open a copy of slider_basic_100.fla, located in the ch25 folder of this book's CD-ROM.
Resave the
slider_basic_100.flafile asslider_basic_101.fla.Create a new Movie Clip symbol (Ctrl+F8 or
With the sliderRule graphic selected, open the Info panel. On the right side of the Info panel (on the diagram of the square bounding box), make sure that the registration point is set to the top-left corner of the selection's bounding box. Then enter the values −28 for the X coordinate and −12 for the Y coordinate, as shown in Figure 25.10.
Create another layer for the sliderClip symbol and name it pos. Drag an instance of the sliderBar Movie Clip (located in the
sliderBarElementsfolder of the Library) to the sliderClip Movie Clip Stage.With the sliderBar instance selected, open the Transform panel. Type 90 in the Rotate field, and press Enter. In the Info panel, enter 100 for the X coordinate and 0 for the Y coordinate.
To control the position of the sliderBar instance with ActionScript, you need to assign a unique instance name. Select the sliderBar instance and type
posin the <Instance Name> field of the Property inspector, as shown in Figure 25.11.Now you need to make the
posMovie Clip instance draggable. In this example, you're going to make a button-free draggable Movie Clip instance, using the neweronPress()andonRelease()methods forMovieClipobjects—just as you did in the earlier exercise. Create a new layer in the sliderClip symbol, name it actions, and move it above the pos layer. Open the Actions panel (F9). Type the following code in the Script pane:var pos:MovieClip; pos.onPress = function():Void{ this.startDrag(true, 0, 0, 200, 0); };To make the position instance draggable, you need to detect a mouse press event on the
posinstance. When a mouse click occurs on the instance, the actions nested within theonPress()function are executed.The second line of code enables the dragging behavior of the
posinstance by using thestartDrag()method onthis. Because it's used as a method and not as an action, you don't need to specify a target instance in the arguments. The arguments prescribed here lock the mouse to the center of the object and constrain the draggable region to a bounding box defined by 0, 0 and 200, 0. This effectively keeps theposinstance confined to the line of the sliderRule graphic.Next, you need to be able to stop dragging the
posobject when the mouse button is released. You'll use theonRelease()handler to define your actions. Open the Actions panel for frame 1 of the actions layer. Type the following code after the last curly brace of theonPress()function:pos.onRelease = pos.onReleaseOutside = function():Void { this.stopDrag(); };This block of code performs in the same manner that your code in Step 7 did. Once a mouse release event (the act of releasing the left mouse button) is detected (line 1), you stop the dragging of the
posinstance initiated in Step 7 (line 3).In the following step, you'll create two instances of the sliderClip symbol on the Main Timeline Stage: one for scale, and one for alpha.
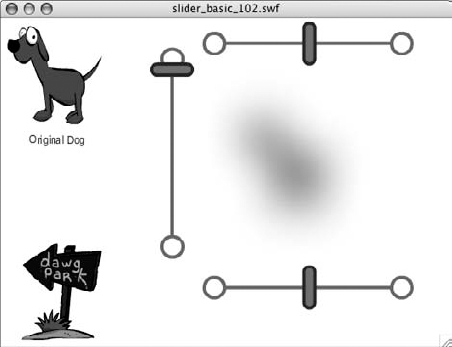
Exit Edit mode, and return to the Scene 1 Timeline (the Main Timeline). Create a new layer called scaleSlider. Open the Library and drag an instance of the sliderClip to the Stage. Name this instance
scaleSliderin the Property inspector.Move the
scaleSliderinstance to the lower right of the Stage.Create another layer called alphaSlider. Drag another instance of the sliderClip symbol onto the Stage, and name the instance
alphaSlider. Rotate this instance −90 degrees. Place the instance just left of center of the Stage, as shown in Figure 25.12.Save your Flash document, and test it. You should be able to drag the position bars on both sliders.


Once you have a slider bar that is draggable, you need to access the new values of the pos instance and apply the values to the properties of the To do this, you need to have an event handler whose sole job is to check the X coordinate of the pos instance. In this section, you'll learn how to make an onEnterFrame() handler on the Main Timeline.
Note
Resume using the Flash document that you created in the last section. If you didn't complete that section, make a copy of the slider_basic_101.fla file located in the ch25 folder of this book's CD-ROM.
Save the
slider_basic_101.flafile asslider_basic_102.fla.Select frame 1 of the actions layer in the Main Timeline (that is, Scene 1). Open the Actions panel. In the Script pane, after the
duplicateMovieClip()action, type the following code:var scaleSlider:MovieClip; var alphaSlider:MovieClip; this.onEnterFrame = function():Void { var scaleVal:Number = scaleSlider.pos._x; var alphaVal:Number = alphaSlider.pos._x; with (dog_2) { _xscale = scaleVal; _yscale = scaleVal; _alpha = alphaVal; } };Because the event method
onEnterFrame()is specified for the Main Timeline (this), this block of code will execute continuously in your Flash movie. Why? Any timeline will continuously enter a frame for playback, even if astop()action is applied to all timelines. The speed at which theenterFrameevent occurs is determined by the frame rate of the Flash movie (as defined by the ModifyWhat happens on each execution of the
onEnterFrame()handler? The second and third lines of code create variables that reference the X positions of theposinstances with your two sliders. The fourth line of code uses thewith()action to target thedog_2object with the remaining nested actions. The fifth and sixth lines of code set the X and Y scale properties of thedog_2instance to the value returned by the current X coordinate of theposinstance (relative to the coordinates within the sliderClip symbol) nested within thescaleSliderinstance. The seventh line sets the_alphaproperty of thedog_2instance equal to the X coordinate of theposinstance within thealphaSliderinstance.Save your Flash document, and test it. When you drag the bar on the bottom scale slider, notice how the size of the
dog_2instance increases as you drag it to the right. When you drag the bar down on the left alpha slider, you'll see that the opacity of thedog_2instance decreases.Note
You may be wondering why the X coordinate of the
posinstance is used for thealphaSliderinstance, instead of the Y coordinate. Indeed, you do drag the bar on a vertical axis instead of a horizontal one. However, theposinstance exists within the space of the sliderClip symbol, which has a horizontal orientation in the Edit mode. The X coordinate is derived from the Stage of the Edit mode, regardless of the instance's orientation.Okay, you have the sliders changing the size and opacity of the However, nothing happens as you drag the bar on the
alphaSliderinstance toward its upper limit. Because the X coordinate of theposinstance starts at 100, you won't see any visual effect to the_alphaproperty as it increases beyond 100 percent. Therefore, it would be better to have thealphaSliderslider convert the X coordinate of theposinstance to a true 0 to 100 range of values.To do this, you need to develop an equation that will do the work of automatically remapping values to a 0–100 scale. We know that the lowest X coordinate of the
posinstance is 10, and that the highest X coordinate is 200. If you want the highest position of the bar to provide 100 percent opacity, then you need to divide 200 by a number that will give you 100. Dividing 200 by 2 returns 100. How does that work for the low end? If the X coordinate returns the lowest value of 10, then your lowest opacity value will be 5.With frame 1 of the actions layer of the Main Timeline selected, open the Actions panel (F9, or Option+F9 on Mac), and modify the seventh line of the
onEnterFrame()handler function to read:_alpha = alphaVal/2;
Save your Flash document and test it. Now, as you drag up with the bar for the
alphaSliderinstance, the opacity increases. As you drag down, it decreases.So far, so good. However, it would be useful if the
alphaSlider's posinstance started with an X coordinate of 200. This would initialize thedog_2instance with an opacity of 100 percent. You could physically move theposinstance within the sliderClip symbol to an X coordinate of 200, but that would increase the scale of thedog_2instance to 200 percent at the start. To change only theposinstance ofalphaSliderat the start of the movie, you'll add another line of code to frame 1 of the actions layer on the Main Timeline.Select frame 1 of the actions layer, and open the Actions panel. Add the following code to the Script pane, after all of the existing code:
alphaSlider.pos._x = 200;
This block of code will execute once, when the
posinstance (a Movie Clip object) first appears (or loads) on the Stage.Save the Flash document and test it. This time, the
alphaSlider's bar (itsposinstance) will immediately start at the upper limit.Now, let's take advantage of the new filter effects available in Flash Player 8. Create a new layer on your Main Timeline (that is, Scene 1), and name it blurSlider. Make a copy of the
scaleSliderinstance and paste it on frame 1 of the blurSlider layer.Name the new copied instance blurSlider in the Property inspector, and position the instance near the top of the
alphaSliderinstance, parallel to thescaleSliderinstance.To enable a blur effect with this slider, you need to modify the code in the
onEnterFrame()handler on frame 1 of the actions layer. Select this frame, and open the Actions panel. Modify theonEnterFrame()handler with the bold code shown below. Do not type the
var blurSlider:MovieClip;this.onEnterFrame = function():Void { var scaleVal:Number = scaleSlider.pos._x; var alphaVal:Number = alphaSlider.pos._x;var blurVal:Number = blurSlider.pos._x;var bf:flash.filters.BlurFilter = newflash.filters.BlurFilter();bf.blurX = blurVal/2;bf.blurY = blurVal/2;bf.quality = 3;with (dog_2) { _xscale = scaleVal; _yscale = scaleVal; _alpha = alphaVal/2;filters = [bf];} };This code creates a new
BlurFilterinstance namedbf. The same calculation used for the alpha value is used for the blur quantities,blurXandblurY. Thebffilter is applied to thedog_2instance'sfilterproperty at the end of thewith()statement.Save the Flash document, and test the movie. The
dog_2instance should now initialize with a blurred look, as shown in Figure 25.13.In order to keep a clear visual of the
dog_2instance when the movie first loads, add this line of code to the end of the script on frame 1 of the actions layer:blurSlider.pos._x = 0;
Save the Flash document, and test it. Now, the
blurSliderinstance initializes ablurXandblurYvalue of 0.
At this point in the chapter, you have three sliders that dynamically control the scale and alpha of the dog_2 Movie Clip instance on the Stage. What if you wanted to get rid of the dog_2 instance? How would you delete it? The only way to remove a duplicated Movie Clip instance is to use the removeMovieClip() method or action. In this section, we show you how to use the _droptarget property and the removeMovieClip() method of the MovieClip object.
Note
Resume using the same document, slider_basic_102.fla, that you created in the last section. Alternatively, you can open the slider_basic_102.fla file located in the ch25 folder of this book's CD-ROM.
Select frame 1 of the actions layer on the Main Timeline, and open the Actions panel. Type the following code after the last line of ActionScript currently in the Script pane:
dog_2.onPress = function():Void{
  this.startDrag (true, 0, 0, 550, 400);
};
dog_2.onRelease = dog_2.onReleaseOutside = function():Void{
  this.stopDrag ();
  if(eval(this._droptarget) == sign){
    this._parent.onEnterFrame = null;
    this.removeMovieClip();
  }
};
Most of this code is already familiar to you. Here you want to make only your duplicate dog instance (
dog_2) draggable.When a mouse press event is detected on the
dog_2instance, the function declared within theonPress()method fordog_2will execute. ThestartDrag()method of the current dog instance (this) will be enabled and constrained to the dimensions of the Flash movie Stage.When a mouse release event is detected over the
dog_2instance, then thestopDrag()method will be executed. The lastifstatement checks whether the_droptargetproperty of the current dog instance is equal to the target path of thesigninstance. If thedog_2instance is over thesigninstance on the Stage when the dragging stops, then the current dog instance is removed.Finally, if the
dog_2instance is removed, you must reset theonEnterFrame()method assigned to the Main Timeline, the parent of thedog_2instance—otherwise, theonEnterFrame()method will generate errors in the Output window. By assigning a value ofnullto the Main Timeline'sonEnterFrame()handler, the function established earlier will be deleted.Note
We use the
eval()action on the_droptargetproperty because_droptargetreturns the path of the target in Slash notation (for Flash Player 4 compatibility). If we useeval()on the_droptargetproperty, Flash returns the target path in dot syntax, as a true object reference.Save your Flash document as
slider_basic_103.fla, and test it. When you drag thedog_2instance over thesigninstance, thedog_2instance disappears.
Note
You can find a completed version of slider_basic_103.fla in the ch25 folder of this book's CD-ROM. Another version, slider_basic_104.fla, has a button handler to re-duplicate the dog_2 instance and re-organize the actions within a function.
In the next chapter, you expand your knowledge of ActionScript code by using functions and arrays. These code devices enable you to organize code and data much more efficiently with ActionScript.
Note
We'd like to know what you think about this chapter. Visit www.flashsupport.com/feedback to send us your comments.
The
MovieClipclass has unique properties, methods, and handlers. Using dot syntax, you can access these characteristics of aMovieClipobject.You can change a
MovieClipinstance's position, scale, and rotation using ActionScript. Most physical attributes are accessed by specifying the Movie Clip's path followed by the property name, as ininstance._rotation.You can create draggable Movie Clips in ActionScript without using any Button instances, by using the
onPress()andonRelease()methods of theMovieClipobject.The
_droptargetproperty of Movie Clip instance (instance A) indicates the path of the Movie Clip instance (instance B) upon which a Movie Clip instance (instance A) is dropped.As the sliders example demonstrated, you can use the values of one
MovieClipinstance's properties to change the property values of anotherMovieClipinstance.