Using the Bandwidth Profiler
Generating a size report
Understanding Flash movie publish options
Creating profiles in Publish Settings
Using HTML templates with your Flash movies
Creating bitmap image alternates for your Flash movie
If you have read Parts I through V of the book, you're probably more than ready to get your Flash movies uploaded to your Web server to share with your visitors. This chapter shows you how to create Flash movies (.swf files) from Flash CS3 so that your Flash movies can be played with the Flash Player plug-in or ActiveX Control for Web browsers. We'll show you how to test your Flash movies, prepare Flash movie options, and adjust other output formats from Flash CS3, such as HTML documents and image formats.
Tip
In this chapter, you also learn how to take advantage of Flash CS3's Flash Player detection option. This feature adds the necessary JavaScript code to your HTML document in order to check the Flash Player plug-in version installed in a user's browser.
You have four ways to test your Flash movies: in the authoring environment using the Control
Flash documents files (.fla) have much larger file sizes than their Flash movie file (.swf) counterparts. To accurately foretell the network bandwidth that a Flash movie requires, you need to know how large the final Flash movie will be. If the download demand is too overwhelming for your desired Internet connection speed (for example, a 56K modem), you can go back and optimize your Flash document.
The Control

Movie Clip animations and actions targeting Movie Clip instances cannot be previewed using the standard Control
Tip
You can temporarily preview Movie Clip symbol instances within the Flash authoring environment (for example, the Timeline window) by changing the Symbol instance behavior to Graphic instead of Movie Clip. Do this by selecting the instance, opening the Property inspector, choosing Graphic in the Behavior drop-down menu, and setting the playback menu to Play Once or Loop. However, if you switch the behavior back to Movie Clip, you will have lost the original instance name of the Movie Clip.
Most scripting done with Flash actions, such as
loadMovie(), loadVariables(), andstartDrag(), cannot be previewed with the Play command. Enabling Simple Frame Actions or Simple Buttons in the Control menu has no effect with newer scripting actions. You need to use Test Movie to try out most interactive functions in a Flash movie.Tip
Any actions that require the use of remote server-side scripts, Flash Remoting, or Adobe Flash Media Server connections to load variables, movies, or XML data will work in the Test Movie environment. You do not need to view your .swf files in a browser to test these actions, unless your server-side functionality has IP address restrictions that would prohibit playback from your local machine.
Accurate frame rates cannot be previewed with the Play command (Control
You can test your Flash movies directly within the Flash CS3 interface by using the Control
Warning
If your movie is currently titled Untitled-1, Untitled-2, and so on in the application title bar, it usually indicates that the document has not yet been saved. Make sure you save your Flash movie with a distinct name before testing it.
Tip
Flash CS3 opens all tested movies in a separate nontabbed window. On the Windows version of Flash CS3, the Test Movie window hosts the playback and debugging commands. On the Mac version of Flash CS3, the application menu bar changes depending on which type of tab or window was focused (authoring document versus movie file).
Before you use the Test Scene or Test Movie command, you can specify the settings of the resulting Flash .swf file. The Test Scene or Movie command uses the specifications outlined in the Publish Settings dialog box to generate .swf files. We discuss the Publish Settings dialog box later in this chapter. For the time being, you can use the Flash CS3 default settings to explore the Test Scene and Movie commands.
When you choose Control
Tip
You can publish multiple .fla files at the same time by using the Project panel. To learn more about the Project panel, read Chapter 3, "Planning Flash Projects."
If you are working on a lengthy Flash document with multiple scenes, you may want to test your scenes individually. You can do this by using Control
Tip
You can use the Test Scene command while in Edit mode to export an .swf file that contains the current symbol timeline. The movie won't contain anything else from your Flash document. Note that the symbol's center point will become the top-left corner of the playback stage.
Do you want to know how long it will take for a 28.8 kilobits per second (Kbps) modem to download your Flash movie or scene? How about a 36.6 Kbps modem? Or a 56 Kbps modem? Or a cable modem? The Bandwidth Profiler enables you to simulate any download speed.
Note
See the ch21 folder of this book's CD-ROM for a Flash document named bandwidth.fla. We use that Flash document for this section.
To use the Bandwidth Profiler, you first need to create a movie or scene to test. When you create a Flash movie with the Control
The Test Movie or Test Scene viewing environment opens your Flash movie in a dedicated window with its own View and Control menus.
Note
On the Mac, the View and Control menus appear in the application menu bar, not in the Test Movie window.
The first three commands in the View menu are the same as those of the Flash Player plug-in viewing controls, while the others are specific to the testing environment:
Zoom In: Selecting this option enlarges the Flash movie. The shortcut key for this command is Ctrl+= or

Zoom Out: Selecting this option shrinks the Flash movie. The shortcut key for this command is Ctrl+-or
Magnification: This submenu enables you to change the zoom factor of the movie. The Flash movie is displayed at the original pixel size specified in the Modify
Note
In the Test Movie environment, only the 100% and Show All options are enabled in the View menu. The other magnification options are enabled in the authoring environment.
Bandwidth Profiler: To view the Bandwidth Profiler in this new window, use View
The left side of the profiler displays three sections: Movie, Settings, and State. Movie indicates the dimensions, frame rate, size (in KB and bytes), duration, and preload (in number of frames and seconds). The Settings area displays the current selected connection speed (which is set in the View
The larger right section of the profiler shows the timeline header and graph. The lower red line beneath the timeline header indicates whether a given frame streams in real time with the current modem speed specified in the Control menu. For a 28.8 Kbps modem, any frame above 200 bytes may cause delays in streaming for a 12 frames per second (fps) movie. Note that the byte limit for each frame is dependent on frame rate. For example, a 24 fps movie has a limit of 120 bytes per frame for a 28.8 Kbps modem connection.
When the Bandwidth Profiler is enabled, two other commands are available in the View menu: Streaming Graph (Ctrl+G or
Streaming Graph: By default, Flash opens the Bandwidth Profiler in Streaming Graph mode. This mode indicates how the Flash movie streams into a browser (see Figure 21.1). Alternating light and dark gray blocks represent each frame. The size of each block indicates its relative byte size. For our
bandwidth.swfexample, all the frames will have loaded by the time our Playhead reaches frame 13 when the movie is played over a 56 Kbps connection. The shortcut key for Streaming Graph is Ctrl+G orFrame By Frame Graph: This second mode available to the Bandwidth Profiler lays each frame side by side under the timeline header (see Figure 21.2). Although the Streaming Graph enables you to see the real-time performance of a Flash movie, the Frame By Frame Graph enables you to more easily detect which frames are contributing to streaming delays. If any frame block goes beyond the red line of the graph (for a given connection speed), then the Flash Player halts playback until the entire frame downloads. In the
bandwidth.swfexample, frame 1, weighing in at 420 bytes, is the only frame that may cause a very slight delay in streaming when the movie is played over a 28.8 Kbps connection. The remaining frames are right around 200 bytes each—right at the threshold of 200 bytes per frame for a 28.8 Kbps modem connection playing a 12 fps Flash movie. The shortcut key for Frame By Frame Graph is Ctrl+F orNote
If you use Flash CS3's document title and description fields in the Document Properties dialog box (Modify
Simulate Download: When the Simulate Download option is enabled, the Bandwidth Profiler emulates the chosen modem speed (in the View
Tip
The Simulate Download command also applies to loaded runtime assets, such as SWF, JPEG, and MP3 files. For example, when a
loadMovie()action begins to load another file, the left side of the Bandwidth Profiler shows the progressive download at the simulated download speed. This feature only applies to assets that are loaded locally, from your system, and not over an Internet connection.Download Settings: The View menu also features a submenu of connection speeds, which work in tandem with the Streaming and Frame By Frame Graphs:
14.4, 28.8, 56K, DSL, T1: These settings determine what speed the Bandwidth Profiler uses to calculate estimated download times and frame byte limitations. Notice that these settings use more practical expectations of these modem speeds. For example, a 28.8 modem can theoretically download 3.5 kilobytes per second (KB/s), but a more realistic download rate for this modem speed is 2.3 KB/s.
User Settings 6, 7, and 8: These are user-definable speed settings. By default, they are all 2.3 KB/s.
Customize: To change the settings for any of the modem speeds listed previously, use the Customize command to input the new value(s).
Quality: The Quality submenu controls the visual appearance of graphics within the Flash movie. By default, all graphics are displayed at High quality. You can choose from Low, Medium, or High quality in this menu.
Show Redraw Regions: This option enables you to see which areas of the Flash movie are being updated on the screen. For example, if you have a Graphic symbol animation playing in the movie, a red outline frame appears around that portion of the Stage. Any and all redraw regions are bounded by such a red frame. You can use this feature to determine how much work the Flash Player is doing to redraw the Stage —many performance and playback issues are the direct result of too much screen redrawing.


Use the Control menu to play (Enter key) or rewind (Ctrl+Alt+R or
You can use the Disable Keyboard Shortcuts command to turn off the shortcut keys for all of the commands available in Test Movie mode. This is especially useful if you have enabled interactive key presses within ActionScript for your movie. For example, if you enable the Return or Enter key for a button, it will conflict with the Play command (Control
The Debug menu contains List Objects and List Variables commands. List Objects can be used to show the names of Movie Clip instances or ActionScript Objects in the Output window, while the List Variables command displays the names and values of any currently loaded variables, ActionScript objects, and XML data.
Note
We discuss how these features can be used in Chapter 33, "Managing and Troubleshooting Flash Movies."
Flash also lets you view a text file summary of movie elements, frames, and fonts called a size report. In addition to viewing Frame By Frame Graphs of a Flash movie with the Bandwidth Profiler, you can inspect this size report for other "hidden" byte additions such as font character outlines. You can enable the size report to be created by accessing the Publish Settings dialog box (File
A word about the Export Movie command
Even though Flash streamlines the process of creating Flash movies with the Publish commands (discussed in the next section), it is worth mentioning that the File
After you publish, publish preview, or export a Flash movie, go to the folder where the .swf file was created. In that folder, you'll find a text file accompanying the Flash movie. This file is named after your Flash movie's name, followed by "Report" and the .txt file extension, as in
bandwidth Report.txt.When you test your Flash movie using the Control
Note
A sample size report, called bandwidth Report.txt, is included in the ch21 folder of this book's CD-ROM.
After you've made a dazzling Flash movie complete with Motion tweens, 3-D simulations, and ActionScripted interactivity, you need to make the Flash movie usable for the intended delivery medium—the Web, a CD- or DVD-ROM, or a QuickTime Flash movie, to name a few. As we mentioned in the introduction to this book, you need the Flash CS3 application to open .fla files. Because the Flash Player plug-in uses .swf files, you need to export or publish your .fla file in a format that your audience can use. More importantly, Flash documents are authoring documents, while Flash movies are optimized for the shortest delivery times and maximum playback performance.
You can convert your Flash document files (.fla) to Flash movies files (.swf) by using either the File
Three commands are available with the Publish feature: Publish Settings, Publish Preview, and Publish. We discuss each of these commands in the following sections.
The Publish Settings command (File
Tip
The Publish Settings dialog box has many features that were introduced in Flash MX 2004, with some updates in Flash CS3. You should be aware that the default ActionScript language version is AS2 or AS3 for new Flash documents in Flash CS3. You learn more about ActionScript and the implications of ActionScript versions in Part VII, "Approaching ActionScript."
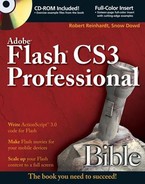
Choose File
If you click the Use Default Names button, all of the File fields fill in with the name of your Flash document, followed by the file format's suffix. For example, if your movie is named sample.fla and you click the Use Default Names button, this is the base from which the names are generated in publishing. Thus, sample.swf, sample.html, sample.gif, and so on would result.
Tip
You can enter nonversion-specific filenames for Flash documents that you incrementally save as you work. For example, if you have a Flash document named main_100.fla, set the Flash movie filename to main.swf, and then every new Flash document version you save (for example, main_101.fla, main_102.fla, and so on) will still produce a main.swf file. This way, you can consistently refer to one Flash movie file (.swf) in your HTML code and incrementally save your Flash documents. However, if you work on large Flash projects with a team of Flash designers and developers, you should consider using version control software, such as SVN (Subversion), CVS (Concurrent Versioning System), or Microsoft SourceSafe. With version control software, you don't need to resave files with new names; rather, you check in your changes to the version control system, which keeps track of each file version. We briefly discuss version control in Chapter 3, "Planning Flash Projects."
Tip
You can specify which folder a publish document is created and stored in. All of the file formats have a folder icon to the right of the File field. If you click the folder icon, you can browse to a specific location where your published file will be created. You can use relative or absolute paths with the filenames in the Formats tab.
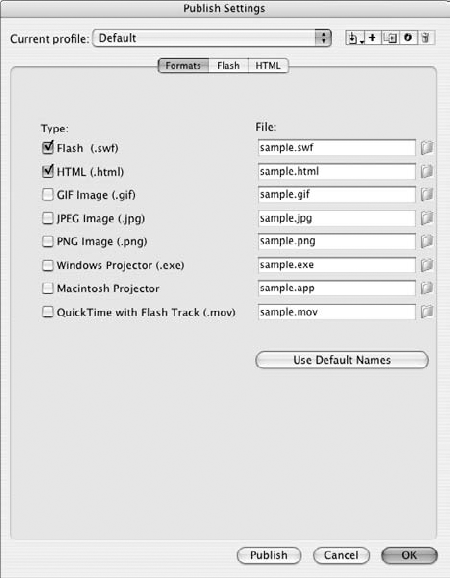
The primary and default publishing format of Flash CS3 documents is the Flash movie .swf format. Only Flash movies retain full support for Flash actions and animations. To control the settings for the Flash movie, choose the Flash tab of the Publish Settings dialog box, as shown in Figure 21.4.
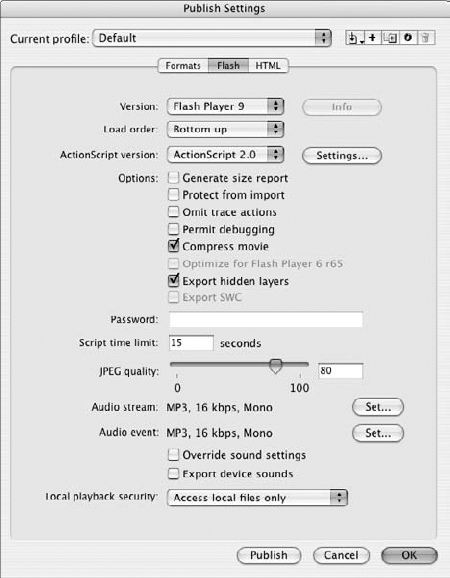
Figure 21.4. The Flash tab of the Publish Settings dialog box controls the settings for a movie published in the Flash format.
Here are your options in the Flash tab:
Version: This drop-down menu provides the option to publish movies in any of the Flash movie formats. To ensure complete compatibility with all of the new Flash CS3 features, select Flash Player 9. Flash Player 1 and 2 support only basic animation and interactive functions. Flash Player 3 supports just about all animation and artwork created in Flash CS3, but it doesn't recognize any actions introduced with either Flash 4 or 5, editable text fields (such as form elements), or MP3 audio. If in doubt, you should test your choice of version in that version's Flash Player.
Tip
Flash CS3 has Flash Lite options in the Version menu. Flash Lite 1.0/1.1 is the most common Flash Player shipping with some mobile phones, such as DoCoMo phones in Japan. Newer phones may have Flash Lite 2.0 or 2.1 installed. If one of these options is selected, make sure you are using a Stage size that is compatible with the screen size of the mobile handset on which the movie will be deployed. There are several templates available for devices in the Global Phones, Japanese Phones, and PDA categories of the Template tab of the File
Load order: This option determines how the Flash Player will draw the first frame of the Flash movie as it is downloaded to the plug-in or player. When Bottom up (the default) is chosen, the layers load in ascending order: The lowest layer displays first, then the second lowest, and so on, until all of the layers for the first frame have been displayed. When Top down is selected, the layers load in descending order: The topmost layer displays first, then the layer underneath it, and so on. Again, this option affects the display of only the first frame of a Flash movie. If the content of the first frame is downloaded or streamed quickly, you probably won't notice the Load Order's effect.
Note
Load Order does not affect the order of actions spread across layers for the same frame. ActionScript will always execute in a top-down fashion; the actions on the topmost layers will execute before actions on lower layers.
ActionScript version: This option introduced in Flash MX 2004 controls how ActionScript is compiled in a Flash movie file (.swf). You can choose ActionScript 1.0, ActionScript 2.0, or ActionScript 3.0. By default, ActionScript 2.0 is selected if you created your Flash document with the Flash file (ActionScript 2.0) option. ActionScript 3.0 is selected if you chose Flash file (ActionScript 3.0). Only use ActionScript 2.0 or 3.0 if you use the ActionScript 2.0 or 3.0 coding features, or if you use components that ship with Flash CS3, such as the FLVPlayback component or the UI components. If you code ActionScript the same way that you did in Flash MX or Flash 5, then choose ActionScript 1.0.
Tip
Flash CS3 can compile ActionScript 2.0 code so that it is compatible with Flash Player 6. If you choose ActionScript 2.0 and set the Version menu to Flash Player 6, Flash CS3 automatically compiles ActionScript 2.0 in a format that Flash Player 6 understands.
Also, keep in mind that ActionScript 1.0 or 2.0 code is case-sensitive if it is published for Flash Player 7 or higher. In Flash Player 7 or higher movies, variables, instance names, and other terms in ActionScript are case-sensitive. For example, if you accidentally refer to a variable named myName as myname, Flash Player 7–compiled movies will not be as forgiving as Flash Player 6-compiled movies.
Generate size report: As we discussed earlier in this chapter, the size report for a Flash movie can be very useful in pinpointing problematic bandwidth-intensive elements, such as font characters. When this option is checked, the Publish command exports a text (.txt) file. You can view this document separately in a text-editor application such as Notepad or TextEdit.
Protect from import: This option safeguards your Flash movies on the Internet. When enabled, the .swf file cannot be imported into the Flash CS3 authoring environment or altered.
Warning
The Protect from import option will not prevent a Web browser from caching your .swf files. Also, Macromedia Director can import and use protected Flash movies. Flash utilities such as SWF Decompiler from
www.sothink.comcan break into any .swf file and extract artwork, symbols, video clips, and sounds. There's even an application called ActionScript Viewer fromwww.buraks.com/asvthat can extract ActionScript from your .swf files! For this reason, you should always use server-side scripts to verify sensitive data such as password entries in Flash movies, rather than internal ActionScripted password checking withif/elseconditions. Don't store sensitive information such as passwords in your source files!Omit trace actions: If this option is selected, Flash CS3 removes any
trace()actions used in your Flash document's ActionScript code.trace()actions will open the Output panel in Test Movie mode for debugging purposes. In general, if you usedtrace()actions, you will want to omit them from the final Flash movie—they can't be viewed from the standard version of the Flash Player anyway.trace()actions add to the final Flash movie (.swf) file size. For final production and live deployment, you should enable the Omit trace actions option to reduce the overall file size.Permit debugging: If this option is selected, you can access the Debugger panel from within the Debug Movie environment, or from a Web browser that is using the Flash Debug Player plug-in or ActiveX control. To install the Flash Debug Player plug-in or ActiveX control, go to the Players folder in your Adobe Flash CS3 application folder. There, you find a Debug folder. With your browser applications closed, run one (or more) of the following files:
Install Flash Player 9 ActiveX.msi to install the ActiveX control for Internet Explorer on Windows 98/ME/2000/XP/Vista.
Install Flash Player 9 Plugin.msi to install the plug-in for Mozilla-compatible browsers such as Firefox or Netscape on Windows 95/98/ME/NT/2000/XP/Vista.
Install Flash Player 9 UB to install the plug-in for Mozilla-compatible browsers such as Apple Safari or Mozilla Firefox on Macs running OS × 10.1 or greater.
Compress movie: This option compresses Flash Player 6 or higher movies only. When enabled, this compression feature will greatly reduce the size of text or ActionScript-heavy Flash movies. However, you may see little or no size difference on other Flash elements, such as artwork and sounds. Compression cannot be used on Flash Player 5 or earlier movies.
Optimize for Flash Player 6 r65: If you decide to publish your Flash movie for Flash Player 6, you can select this check box to further optimize the .swf file. The r65 release of Flash Player 6 introduced enhancements for Flash movie playback that were not available in prior releases of Flash Player 6.
Note
If you select the Optimize for Flash Player 6 r65 option, Flash CS3 prompts you with a warning dialog box when you publish the Flash movie. If you use this option, you should use the updated version detection features in the Publish Settings' HTML tab to ensure that visitors trying to view the movie will be redirected to the proper plug-in download page if they are using an earlier version of the player. Specifically, you should enter 6.0.65 in the Version fields of the Publish Settings' HTML tab.
Export hidden layers: This new feature in Flash CS3 enables you to prevent hidden layers from being exported with your SWF file. For example, if you hide a layer in a MovieClip symbol, that layer will not export with the SWF file if this option is unchecked in the Flash tab. By default, hidden layers export with the SWF file.
Export SWC: If you've built a document class file for your Flash document, you can export the class as a precompiled component, or SWC file. This option is only available if you use Flash Player 9 and ActionScript 3.0.
Password: If you selected the Permit debugging option, you can enter a password to access the Debugger panel. Because you can debug movies over a live Internet connection, you should always enter a password here if you intend to debug a remote Flash movie. If you leave this field empty and check the Permit debugging option, Flash CS3 will still prompt you for a password when you attempt to access the Debugger panel remotely. Simply press the Enter key when this prompt appears if you left this field blank.
Script time limit: This new feature in Flash CS3 enables you specify a time out value for script execution. For example, if you create complex ActionScript code that temporarily bogs down the Flash Player, you can specify a longer time out value in this box. If a script executes longer than the time limit, the Flash Player presents a "script running slowly" dialog box to the user, enabling the user to abort the script.
JPEG quality: This slider and text-field option specifies the level of Joint Photographic Experts Group (JPEG) compression applied to bitmapped artwork in the Flash movie. The value can be any value between (and including) 0 to 100. Higher values apply less compression and preserve more information of the original bitmap, whereas lower values apply more compression and keep less information. The value entered here applies to all bitmaps that enable the Use document default quality option, found in the Bitmap Properties dialog box for each bitmap in the document's Library panel. Unlike the audio settings discussed in a moment, no "override" option exists to disregard settings in the Library.
Audio stream: This option displays the current audio compression scheme for Stream audio. By clicking the Set button (see Figure 21.4), you can control the compression applied to any sounds that use the Stream Sync setting in the Sound area of the Property inspector (when a sound keyframe has focus). Like the JPEG quality option discussed previously, this compression value is applied to any Stream sounds that use the Default compression in the Export Settings section of each audio file's Sound Properties dialog box in the document's Library. See Chapter 15, "Adding Sound," for more information on using Stream sounds and audio compression schemes.
Audio event: This setting behaves exactly the same as the Audio Stream option, except that this compression setting applies to Default compression-enabled Event sounds. See Chapter 15, "Adding Sound," for more information on Event sounds.
Tip
Flash CS3 supports imported MP3 audio that uses Variable Bit Rate (VBR) compression. However, Flash cannot compress native sounds in VBR. If you use any imported MP3 audio for Stream Sync audio, Flash will recompress the MP3 audio on export.
Override sound settings: If you want the settings for Audio stream and Audio event to apply to all Stream and Event sounds, respectively, and to disregard any unique compression schemes specified in the document's Library, check this option. This is useful for creating multiple .swf file versions of the Flash movie (hi-fi, lo-fi, and so on) and enabling the Web visitor to decide which one to download.
Export device sounds: In Flash CS3, you have the option of exporting device sounds with your Flash movie. You use this option only if you are using one of the Flash Lite options in the Version menu. To learn more about the use of this feature, use the search phrase "device sound" in the Help panel (Help
Local playback security: This feature in Flash CS3 enables you to control the access to local or networked assets from the published Flash movie. In older releases of the Flash Player, a Flash movie file (.swf) could potentially access local files, representing a security hole. A Flash movie, for example, had the capability to load text files on the local computer and transmit the contents of that file to a remote server. Now, local Flash files are able to accept data from both local and network sources. However, if you choose to send data to a network source, you are only able to receive from a network source, with no data available locally. For more information on this feature, search the Help panel in Flash CS3 with the term "local playback security." Note that a Flash projector can potentially read local files and transmit information to other networks.
When you are finished entering the settings for the Flash movie, you can proceed to other file type settings in the Publish Settings dialog box. Or you can click OK to return to the authoring environment of Flash CS3 so that you can use the newly entered settings in the Test Movie or Scene environment. You can also export a Flash movie (and other file formats currently selected in Publish Settings) by clicking the Publish button in the Publish Settings dialog box.
HTML is the language in which most Web pages are written. The HTML tab of the Publish Settings dialog box (see Figure 21.5) has a number of settings that control the way in which Flash CS3 publishes a movie into a complete Web page with HTML tags specifying the Flash Player.
Figure 21.5. The HTML tab controls flexible Flash movie options—you can change these options without permanently affecting the Flash movie.
The settings available in the HTML tab include
Template: Perhaps the most important (and versatile) feature of all Publish Settings, the Template setting enables you to select a predefined set of HTML tags to display your Flash movies. To view the description of each template, click the Info button to the right of the drop-down list (shown in Figure 21.5). All templates use the same options listed in the HTML tab—the template simply places the values of those settings into HTML tags scripted in the template. You can also create your own custom templates for your own unique implementation of Flash movies.
You can view the "source" of each template in the HTML folder found inside the
en/FirstRun/HTMLfolder (Windows) or theFirst Run/HTMLfolder (Mac) of the Flash CS3 application folder. These template files have .html extensions, and you can use Adobe Dreamweaver, Notepad (Windows), TextEdit (Mac), or any text editor to view and edit the files. All of the preinstalled templates include HTML tags to create an entire Web page, complete with<head>, <title>, and<body>tags. The following templates are available in the HTML tab:Flash For Pocket PC 2003: With this template, Flash creates an HTML document that can display the Flash movie within the Pocket IE application running on a Pocket PC. This template also creates the necessary tags to display the same Flash movie in the regular desktop versions of Internet Explorer and Netscape. At the time of this writing, Flash Player 7 was the latest public release available for the Pocket PC.
Note
If you are designing Flash movies for the Pocket PC, be sure to check out the PDA document templates. Choose File
Flash HTTPS: This template looks nearly identical to the Flash Only template (discussed next). The only difference with this template is that the download locations for the ActiveX control and plug-in page use
https://instead ofhttp://. If you are loading your Flash movie file (.swf) from a secure URL and page, it's recommended that any and all URLs used within that document use secure URLs as well. A secure URL always starts withhttps://.Flash Only: This default template inserts the
<object>and<embed>tags for a Flash movie. It does not perform any browser or plug-in detection. If the user does not have the Flash Player plug-in or ActiveX control, the browser may produce an error message, a missing plug-in icon, or a prompt to download the latest plug-in or ActiveX control, depending on the browser configuration. The HTML produced by this template may allow an earlier Flash Player (such as Flash Player 4) to attempt playback of your newer Flash movie. Keep in mind that any version of the Flash Player will try to render any Flash movie file. However, you may get unpredictable results when a newer-version Flash movie loads into an older player.Note
The Flash Only template now includes JavaScript code to create the
<object>and<embed>tags. This code is stored in a separate JavaScript file named AC_RunActiveContent.js, which Flash CS3 creates in the same folder as the rest of your published files. This .js file must be uploaded along with the HTML and SWF files to your Web server in order for the script to run properly. This script removes the Internet Explorer for Windows "Click to activate and use this control" focus window around Flash content.Flash Only - Allow Full Screen: This template behaves like the Flash Only template but also inserts the necessary tag attributes to enable full-screen playback of Flash movies in Flash Player 9 r28 or higher. This new feature allows Flash movies to "take over" the entire screen and play outside of the browser window.
Flash with AICC Tracking: Use this template if you are creating Flash movies that incorporate components from the Learning Interactions Library (Window
Flash with FSCommand: Use this template if you are using the
fscommand()action in your Flash movies to communicate with JavaScript in the HTML page. Thefscommand()is discussed in Chapter 22, "Integrating Flash Content with Web Pages." The necessary<object>and<embed>tags from the Flash Only (Default) template are also included.Flash with Named Anchors: If you are using named anchors in the Main Timeline of your Flash document, you will want to use this template for your published HTML document. This template creates the necessary JavaScript to enable the Back button on your Web browser with named anchors within your Flash movie. Named anchors allow you to designate specific keyframes (and scenes) that register in the browser's history when played.
Flash with SCORM 1.2 Tracking: This template creates the HTML and JavaScript/VBScript functions to enable communication between Flash movies that use the components from the Learning Interactions Library and the HTML page. SCORM, which stands for Shareable Content Object Reference Model, is a set of guidelines for learning systems created by the U.S. Department of Defense Advanced Distributed Learning (ADL) Initiative. Both SCORM and AICC guidelines aim to promote interoperability among learning and training systems. Note that this template will only function in Web browsers that support the
fscommand()from Flash movies.Flash with SCORM 2004 Tracking: This template has the same functionality as the last template, except that the codebase has been updated to support SCORM 2004 features.
Image Map: This template does not use or display any Flash movie. Instead, it uses a GIF, JPEG, or PNG image (as specified in the Publish Settings' Format tab) as a client-side image map, via an
<img>tag with aUSEMAPattribute. Use a frame label of#mapin the Flash document file (.fla) to designate which frame is used as the map image. See the section "Using the GIF settings" later in this chapter for more details.QuickTime: This template creates both the
<object>and<embed>tags to display QuickTime Flash movies. You need to enable the QuickTime file type in the Publish Settings' Format tab. A QuickTime Flash movie is a special type of QuickTime movie, playable with QuickTime 4 or higher. QuickTime 4 can recognize Flash 3 features only, QuickTime 5 can play Flash 4, and QuickTime 6 can play Flash 5 movies. Be careful to only use ActionScript features that are compatible with each respective version. You must choose Flash Player 3, Flash Player 4, or Flash Player 5 as the Version option in the Flash tab. Depending on the options selected in the QuickTime tab of Publish Settings, the Flash movie may or may not be stored within the QuickTime movie file—it's possible to create a reference .mov file that links to an .swf file, or you can create a .mov file that embeds the .swf file.Note
The "Working with QuickTime" chapter, found in previous editions of the Flash Bible, has been moved to an online-only location. You can download the .pdf file at
www.flashsupport.com/archive.
Detect Flash Version: This updated feature of Flash CS3 enables you to add version detection to your Flash content. For the most basic use, simply select this check box and leave the default versions. The version displayed in the HTML tab reflects the version of the Flash Player you selected in the Flash tab of the Publish Settings. For more advanced use, you can specify major and minor versions of the currently selected Flash Player version. The Detect Flash Version feature creates all of the necessary JavaScript to detect the Flash Player on modern browsers. The options for this feature include two fields:
Minor Revision: This text field controls the minor version revision number you want to require. Note that, to date, there have been no minor revisions to any publicly released Flash Players—Adobe has only released incremental revisions.
Incremental Revision: This text field displays the incremental revision number of the Flash Player you want to require. You can edit this value directly in the dialog box. For example, if you chose the Optimize for Flash Player 6 r65 option in the Flash tab, you could enter the number 65 in this field. The detection script would then check for r65 or higher.
Tip
The Detect Flash Version feature does not create an alternate content page, as it did in Flash MX 2004. With Flash CS3, the alternate content HTML is specified in the JavaScript. To include your own custom alternate content, you can edit the JavaScript in Adobe Dreamweaver or your preferred text editor. Also, we highly recommend using Geoff Stearn's SWFObject JavaScript library as a preferred Flash Player detection script. You learn more about SWFObject in Chapter 22.
Dimensions: This setting controls the
widthandheightvalues of the<object>and<embed>tags. The dimension settings here do not change the original Flash movie; they simply create the area through which your Flash movie is viewed on the Web page. The way that the Flash movie "fits" into this viewing area is determined with the Scale option (discussed later). Three input areas exist: a drop-down menu and two text fields for width and height. The options here areMatch Movie: If you want to keep the same width and height that you specified in the Document Properties dialog box (Modify
Pixels: You can change the viewing size (in pixel units) of the Flash movie window by selecting this option and entering new values in the Width and Height text fields.
Percent: This option scales the movie to the size of the browser window—or a portion of it. Using a value of 100 on both Width and Height expands the Flash movie to fit the entire browser window. If Percent is used with the proper Scale setting (see the description of the Scale setting later in this chapter), the aspect ratio of your Flash movie will not be distorted.
Tip
The ActionScript
Stageclass and its supporting methods enable you to disable or override automatic scaling of the Flash movie. For example, the following action added to frame 1 of your Flash movie will disable scaling:Stage.scaleMode = "noScale";. If you want to center your Flash movie's stage in a browser window, you can set the size to Percent in the HTML tab, and the Scale setting to No scale.Width and Height: Enter the values for the Flash movie width and height here. If Match Movie is selected, you shouldn't be able to enter any values. The unit of measurement is determined by selecting either Pixels or Percent from the drop-down menu.
Playback: These options control how the Flash movie plays when it is downloaded to the browser. Each of these options has
<object>and<embed>attributes if you want to control them outside of Publish Settings. Note that these attributes are not viewable within the Publish Settings dialog box—you need to load the published HTML document into a text editor to see the attributes.Paused at start: This is equivalent to adding a
stop()action on the first frame of the first scene in the Flash movie. By default, this option is off—movies play as soon as they stream into the player. A button with aplay()action can start the movie, or the Play command can be executed from the Flash Player shortcut menu (by right-clicking or Control+clicking the movie). Attribute:play="true"or"false". Ifplay="true", the movie will play as soon as it is loaded.Loop: This option causes the Flash movie to repeat an infinite number of times. By default, this option is on. If it is not checked, the Flash movie stops on the last frame unless some other ActionScripted event is initiated on the last frame. Attribute:
loop="true"or"false".Display menu: This option controls whether the person viewing the Flash movie in the Flash Player environment can access the shortcut menu via a right-click (Windows) or Control+click (Mac) anywhere within the movie area. If this option is selected, the visitor can select Zoom In/Out, 100 percent, Show All, High Quality, Play, Loop, Rewind, Forward, and Back from the menu. If this option is not selected, the visitor can only select About Flash Player from the menu. Attribute:
menu="true"or"false".Device font: This option applies to Flash movies played only in the Windows version of the Flash Player. When enabled, this option replaces fonts that are not installed on the Player's system with antialiased system fonts. Attribute:
devicefont="true"or"false".
Quality: This menu determines how the Flash artwork in a movie will render. While it would be ideal to play all Flash movies at high quality, slower processors may not be able to redraw antialiased artwork and keep up with the frame rate. The options for this setting include the following:
Low: This setting forces the Flash Player to turn off antialiasing (smooth edges) completely. On slower processors, this may improve playback performance. Attribute:
quality="low".Auto Low: This setting starts in Low quality mode (no antialiasing) but will switch to High quality if the computer's processor can handle the playback speed. Attribute:
quality="autolow".Auto High: This setting is the opposite of Auto Low. The Flash Player starts playing the movie in High quality mode, but if the processor cannot handle the playback demands, it switches to Low quality mode. For most Web sites, this is the optimal setting to use because it favors higher quality first. Attribute:
quality="autohigh".Medium: This quality produces antialiased vector graphics on a 2 × 2 grid (in other words, it will smooth edges over a 4-pixel square area), but it does not smooth bitmap images. Artwork will appear slightly better than the Low quality, but not as smooth as the High setting. Attribute:
quality="medium". This quality setting will only work with the Flash Player 5 or higher.High: When this setting is used, the Flash Player dedicates more of the computer's processor to rendering graphics (instead of playback). All vector artwork is antialiased on a 4 × 4 grid (16-pixel square area). Bitmaps are smoothed unless they are contained within an animation sequence such as a Motion tween. By default, this setting is selected in the HTML tab of the Publish Settings dialog box. Attribute:
quality="high".Best: This mode does everything that High quality does, with the addition of smoothing all bitmaps—regardless of whether they are in Motion tweens. This mode is the most processor-intensive. Attribute:
quality="best".
Window Mode: The Window Mode setting works only with any version of the Flash ActiveX control on Internet Explorer for Windows 95/98/ME/NT/2000/XP or with Flash Player 6 r65 and higher for Mozilla-compatible browsers on Windows or Mac OS X. If you intend to deliver to one of these browsers and/or this version of the Flash Player, you can animate Flash content on top of DHTML content. One of the following values can be selected from this menu:
Window: This is the "standard" player interface, in which the Flash movie plays as it would normally, in its own rectangular window on a Web page. Attribute:
wmode="window".Opaque Windowless: Use this option if you want the Flash movie to have an opaque (that is, nontransparent) background and have DHTML or HTML elements behind the Flash movie. Attribute:
wmode="opaque".Transparent Windowless: This option "knocks out" the Flash background color so that other HTML and DHTML elements can show through. You have likely seen this type of Flash movie and effect used on several commercial Web sites, where Flash ads animate across the screen on top of the HTML document. Note that the Flash movie's frame rate and performance may suffer on slower machines when this mode is used because the Flash movie needs to composite itself over other non-Flash material. Attribute:
wmode="transparent".
HTML alignment: This setting works much like the
ALIGNattribute of<img>tags in HTML documents, but it's used with theALIGNattribute of the<OBJECT>and<embed>tags for the Flash movie. Note that these settings may not have any effect when used within a table cell (<td>tag) or a DHTML layer (<div>or<layer>tag). The options for this setting include the following:Default: This option left-justifies the Flash movie in the browser window. If the browser window is smaller than a Flash movie that uses a Pixel or Match Movie dimensions setting (see the Dimensions setting earlier in this section), the Flash movie will be cropped.
Left, Right, Top, and Bottom: These options align the Flash movie along the left, right, top, or bottom edge of the browser window, respectively.
Scale: This setting works in tandem with the Dimensions setting discussed earlier in this section, and it determines how the Flash movie displays on the HTML page. Just as big-screen movies must be cropped to fit the aspect ratio of a TV screen, Flash movies may need to be modified to fit the area prescribed by the Dimensions setting. The settings for the Scale option include the following:
Default (Show all): This option fits the entire Flash movie into the area defined by the Dimensions setting without distorting the original aspect ratio of the Flash movie. However, borders may appear on two sides of the Flash movie. For example, if a 300-×−300-pixel window is specified in Dimensions and the Flash movie has an aspect ratio of 1.33:1 (for example, 400 × 300 pixels), then a border fills the remaining areas on top of and below the Flash movie. This is similar to the "letterbox" effect on widescreen video rentals. Attribute:
scale="showall".No border: This option forces the Flash movie to fill the area defined by the Dimensions setting without leaving borders. The Flash movie's aspect ratio is not distorted or stretched. However, this may crop two sides of the Flash movie. Using the same example from Show All, the left and right sides of the Flash movie are cropped when No Border is selected. Attribute:
scale="noborder".Exact fit: This option stretches a Flash movie to fill the entire area defined by the Dimensions setting. Using the same example from Show All, the 400 × 300 Flash movie is scrunched to fit a 300 × 300 window. If the original movie showed a perfect circle, it now appears as an oval. Attribute:
scale="exactfit".No scale: This option prevents the Flash movie from scaling beyond its original size as defined in the Document Properties dialog box (Modify
Flash alignment: This setting adjusts the
salignattribute of the<object>and<embed>tags for the Flash movie. In contrast to the HTML Alignment setting, Flash alignment works in conjunction with the Scale and Dimensions settings, and determines how a Flash movie is aligned within the Player window. This setting has the following options:Horizontal: These options—Left, Center, and Right—determine whether the Flash movie is horizontally aligned to the left, center, or right of the Dimensions area, respectively. Using the same example from the Scale setting, a 400-×−300-pixel Flash movie (fit into a 300 × 300 Dimension window with
scale="noborder") with a Flash Horizontal Alignment setting of Left crops only the right side of the Flash movie.Vertical: These options—Top, Center, and Bottom—determine whether the Flash movie is vertically aligned to the top, center, or bottom of the Dimensions area, respectively. If the preceding example used a Show All Scale setting and had a Flash Vertical Alignment setting of Top, the border would occur only below the bottom edge of the Flash movie.
Show warning messages: This useful feature alerts you to errors during the actual Publish process. For example, if you selected the Image Map template and didn't specify a static GIF, JPEG, or PNG file in the Formats tab, Flash returns an error. By default, this option is enabled. If it is disabled, Flash suppresses any warnings during the Publish process.
The Graphics Interchange File (GIF) format, developed by CompuServe, defined the first generation of Web graphics and is still quite popular today, despite its 256-color limitation. In the context of the Publish Settings of Flash CS3, the GIF format is used to export a static or animated image that can be used in place of the Flash movie if the Flash Player or plug-in is not installed. Although the Flash and HTML tabs are specific to Flash movie display and playback, the settings of the GIF tab (see Figure 21.6) control the characteristics of a GIF animation (or still image) that Flash CS3 will publish.
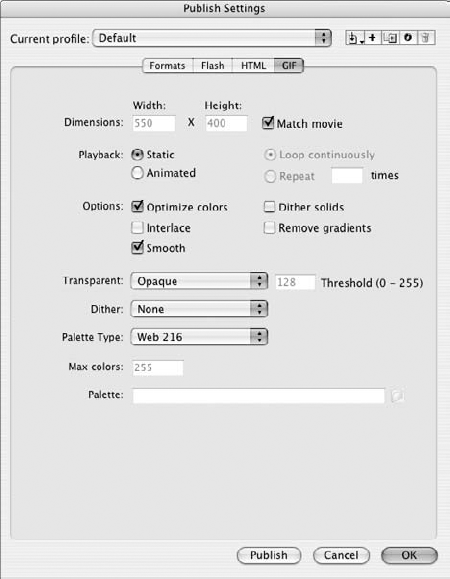
Figure 21.6. You can finesse every subtle aspect of a GIF animation or still image with these settings of the GIF tab of the Publish Settings dialog box.
The settings in the GIF tab include the following:
Dimensions: This setting has three options: Width, Height, and Match movie. As you might have guessed, Width and Height control the dimensions of the GIF image. These fields are enabled only when the Match movie check box is unchecked. With Match movie checked, the dimensions of the GIF match those of the Flash Movie that is being published.
Playback: These radio buttons control what type of GIF image is created and how it plays (if Animated is chosen):
Static: If this button is selected, then Flash exports the first frame of the Flash movie as a single still image in the GIF format. If you want to use a frame other than the first frame, use a frame label of
#Staticon the desired frame. Alternatively, you could use the FileAnimated: If this button is selected, Flash exports the entire Flash movie as an animated GIF file (in the GIF89a format). If you don't want to export the entire movie as an animated GIF (indeed, a GIF file for a Flash movie with more than 100 frames would most likely be too large to download easily over the Web), you can designate a range of frames to export. Use a frame label of
#Firston the beginning frame of a given range of frames. Next, add a frame label of#Lastto the ending frame of the desired sequence of frames. Flash actually is pretty good at optimizing animated GIFs by saving only areas that change over time in each frame—instead of the entire frame.Loop continuously: When the Animated radio button is selected, you can specify that the animated GIF repeats an infinite number of times by selecting the Loop continuously radio button.
Repeat _ times: This option can be used to set up an animated GIF that repeats a given number of times. If you don't want the animated GIF to repeat continuously, enter the number of repetitions here.
Options: The options in the Options settings control the creation of the GIF's color table and how the browser displays the GIF:
Optimize colors: When you are using any palette type other than Adaptive, this option removes any colors pre-existing in the Web 216 or custom palettes that are not used by the GIF image. Enabling this option can only save you precious bytes used in file overhead—it has no effect on the actual quality of the image. Most images do not use all 216 colors of the Web palette. For example, a black-and-white picture can use only between 3 and 10 colors from the 216-color palette.
Interlace: This option makes the GIF image download in incrementing resolutions. As the image downloads, the image becomes sharper with each successive "scan." Using this option is typically a personal preference. Some people like to use it for image maps that can provide basic navigation information before the entire image downloads.
Smooth: This option antialiases the Flash artwork as it exports to the GIF image. Text may look better when it is antialiased, but you may want to test this option for your particular use. If you need to make a transparent GIF, smoothing may produce unsightly edges.
Dither solids: This option determines whether solid areas of color (such as fills) are dithered. In this context, this type of dithering would create a two-color pattern to mimic a solid color that doesn't occur in the GIF's color palette. See the discussion of dithering later in this section.
Remove gradients: Flash gradients do not translate or display very well in 256 or fewer colors. Use this option to convert all Flash gradients to solid colors. The solid color is determined by the first color prescribed in the gradient. Unless you developed your gradients with this effect in mind, this option may produce undesirable results.
Transparent: This setting controls the appearance of the Flash movie background, as well as any Flash artwork that uses alpha settings. Because GIF images support only one level of transparency (that is, the transparent area cannot be antialiased), exercise caution when using this setting. The Threshold option is available only if Alpha is selected. The options for this setting include the following:
Opaque: This option produces a GIF image with a solid background. The image has a rectangular shape.
Transparent: This option makes the Flash movie background appear transparent. If the Smooth option in the Options setting is enabled, Flash artwork may display halos over the background HTML color.
Alpha and Threshold: When the Alpha option is selected in the drop-down menu, you can control at what alpha-level Flash artwork becomes transparent by entering a value in the Threshold text field. For example, if you enter 128, all alphas at 50 percent become completely transparent. If you are considering an animated GIF that has Flash artwork fading in or out, you probably want to use the Opaque transparent option. If Alpha and Threshold were used, the fade effect would be lost.
Dither: Dithering is the process of emulating a color by juxtaposing two colors in a pattern arrangement. Because GIF images are limited to 256 colors (or fewer), dithering can often produce better-looking images for continuous tone artwork such as gradients. However, Flash's dithering seems to work best with the Web 216 palette. Dithering can increase the file size of a GIF image.
None: This option does not apply any dithering to the GIF image.
Ordered: This option applies an intermediate level of dithering with minimal file size overhead.
Diffusion: This option applies the best level of dithering to the GIF image, but with larger file size overhead. Diffusion dithering only has a noticeable effect when the Web 216 palette is chosen in Palette Type.
Palette Type: As we mentioned earlier in this section, GIF images are limited to 256 or fewer colors. However, this grouping of 256 is arbitrary: Any set of 256 (or fewer) colors can be used for a given GIF image. This setting enables you to select predefined sets of colors to use on the GIF image. See Chapter 7, "Applying Color," for more information on the Web color palette. The options for this setting include
Web 216: When this option is selected, the GIF image uses colors only from the limited 216 Web color palette. For most Flash artwork, this should produce acceptable results. However, it may not render Flash gradients or photographic bitmaps very well.
Adaptive: With this option selected, Flash creates a unique set of 256 colors (or fewer, if specified in the Max colors setting) for the GIF image. However, these adapted colors fall outside of the Web safe color palette. File sizes for adaptive GIFs are larger than Web 216 GIFs, unless few colors are chosen in the Max colors setting. Adaptive GIFs look much better than Web 216 GIFs, but they may not display very well with 8-bit video cards and monitors.
Web Snap Adaptive: This option tries to give the GIF image the best of both worlds. Flash converts any colors close to the 216 Web palette to Web safe colors and uses adaptive colors for the rest. This palette produces better results than the Adaptive palette for older display systems that use 8-bit video cards.
Custom: When this option is selected, you can specify a palette that uses the ACT file format to be used as the GIF image's palette. Macromedia Fireworks and Adobe Photoshop can export color palettes (or color look-up tables) as ACT files.
Max colors: With this setting, you can specify exactly how many colors are in the GIF's color table. This numeric entry field is enabled only when Adaptive or Web Snap Adaptive is selected in the Palette Type drop-down menu.
Palette: This text field and the folder browse button are enabled only when Custom is selected in the Palette Type drop-down menu. When enabled, this dialog box is used to locate and load a palette file from the hard drive.
The Joint Photographic Experts Group (JPEG) format is just as popular as the GIF format on the Web. Unlike GIF images, however, JPEG images can use much more than 256 colors. In fact, JPEG files must be 24-bit color (or full-color RGB) images. Although GIF files use lossless compression (within the actual file itself), JPEG images use lossy compression, which means that color information is discarded in order to save file space. However, JPEG compression is very good. Even at its lowest-quality settings, JPEG images can preserve quite a bit of detail in photographic images.
Another significant difference between GIF and JPEG is that GIF images do not require nearly as much memory (for equivalent image dimensions) as JPEG images do. You need to remember that JPEG images "uncompress" when they are downloaded to your computer. While the file sizes may be small initially, they still open as full-color images in the computer's memory. For example, even though you may get the file size of a 400-×−300-pixel JPEG image down to 10KB, it still requires nearly 352KB in memory when it is opened or displayed.
Flash publishes the first frame of the Flash movie as the JPEG image, unless a #Static frame label is given to another frame in the Flash movie. The limited settings of the JPEG tab of the Publish Settings dialog box (see Figure 21.7) control the few variables of this still photo-quality image format:
Dimensions: This setting behaves the same as the GIF Dimensions setting. Width and Height control the dimensions of the movie. But these fields are enabled only when the Match movie check box is unchecked. With Match movie checked, the dimensions of the JPEG match those of the Flash Movie.
Quality: This slider and text field work exactly the same way as the JPEG Quality setting in the Flash tab of Publish Settings. Higher values apply less compression and result in better quality, but they create images with larger file sizes.
Progressive: This option is similar to the Interlaced option for GIF images. When enabled, the JPEG image loads in successive scans, becoming sharper with each pass.

The Portable Network Graphic (PNG) format is another still-image format. The PNG specification was developed in 1996 by the W3C (World Wide Web Consortium), and the format is an improvement over both the GIF and JPEG formats in several ways. Much like JPEG, it is excellent for transmission of photographic quality images. The primary advantages of PNG are variable bit-depths (images can be 256 colors or millions of colors), multilevel transparency, and lossless compression. However, some browsers do not offer full support for all PNG options without some kind of additional plug-in. When in doubt, test your PNG images in your preferred browser.
The settings of the PNG tab (see Figure 21.8) control the characteristics of the PNG image that Flash will publish.

Figure 21.8. The settings found on the PNG tab closely resemble those on the GIF tab. The PNG was engineered to have many of the advantages of both the GIF and JPEG formats.
The PNG tab options are
Dimensions: This setting works just like the GIF and JPEG equivalents. When Match movie is checked, you cannot alter the Width and Height of the PNG image.
Bit depth: This setting controls how many colors are created in the PNG image:
8-bit: In this mode, the PNG image has a maximum color palette of 256 colors, similar to the palette function of GIF images. When this option is selected, the Options, Dither, Palette Type, Max Colors, and Palette settings can be altered.
24-bit: When this option is selected, the PNG image can display any of the 16.7 million RGB colors. This option produces larger files than 8-bit PNG images, but it renders the Flash artwork most faithfully.
24-bit with Alpha: This option adds another 8-bit channel to the 24-bit PNG image for multilevel transparency support. This means that Flash will treat the Flash movie background as a transparent area, so that information behind the PNG image (such as HTML background colors) shows through. Note that, with proper browser support, PNG can render antialiased edges on top of other elements, such as HTML background images!
Options: These options behave the same as the equivalent GIF Publish Settings.
Dither, Palette Type, Max colors, and Palette: These settings work the same as the equivalent GIF Publish Settings. Because PNG images can be either 8- or 24-bit, these options apply only to 8-bit PNG images. If anything other than 8-bit is selected in the Bit depth setting, these options are disabled. Please refer to the previous section for more information.
Filter options: This drop-down menu controls what type of compression sampling or algorithm the PNG image uses. Note that this does not apply an art or graphic "filter effect" as the filters in Adobe Photoshop do, nor does it throw away any image information—all filters are lossless. It simply enables you to be the judge of what kind of compression to use on the image. You need to experiment with each of these filters on your Flash movie image to find the best filter-to-file-size combination. Technically, the filters do not actually look at the pixel data. Rather, they look at the byte data of each pixel. Results vary depending on the image content, but here are some guidelines to keep in mind:
None: When this option is selected, no filtering is applied to the image. When no filter is applied, you usually have unnecessarily large file sizes.
Sub: This filter works best on images that have repeated information along the horizontal axis. For example, the stripes of a horizontal American flag filter nicely with the sub filter.
Up: The opposite of the sub filter, this filter works by looking for repeated information along the vertical axis. The stripes of a vertical American flag filter well with the up filter.
Average: Use this option when a mixture of vertical and horizontal information exists. When in doubt, try this filter first.
Path: This filter works like an advanced average filter. When in doubt, try this filter after you have experimented with the average filter.
Adaptive: This filter provides the most thorough analysis of the image's color and creates the most accurate color palette for the image. However, it usually provides the largest file sizes for the PNG format.
To export a Mac stand-alone projector, check the Macintosh Projector option in the Formats tab. To publish a Windows stand-alone projector, check the Windows Projector option in the Formats tab.
Note
The Mac Projector published by Flash CS3 is designed for playback on Mac OS X (10.1) and higher. If you want to publish a projector compatible with Mac OS 9.x or earlier, you'll need to use Flash MX 2004 or earlier.
Apple QuickTime 4 or higher includes built-in support for Flash tracks and .swf files. As such, you may want to publish QuickTime movie files (.mov) in addition to your Flash movies. If you want to enable QuickTime movie output via the Publish command, make sure that it is selected in the Formats tab of the Publish Settings dialog box.
Note
The QuickTime Publish Settings are discussed at length in an online PDF, "Working with QuickTime." This content, found in previous editions of the Flash Bible, has been moved to an online-only location. You can download the PDF file at www.flashsupport.com/archive.
After you have entered the file format types and specifications for each in the Publish Settings dialog box, you can proceed to preview and publish the file types you selected.
Flash CS3 includes a profiling feature to the Publish Settings. You can save the settings from all of the enabled format tabs in Publish Settings to a custom profile. You can create as many profiles as you need. The profiles that you create are document-specific. They are saved with the Flash document file (.fla), and by design, you cannot access the profiles of one document directly from another. However, you can export a profile from a Flash document and import it into another.
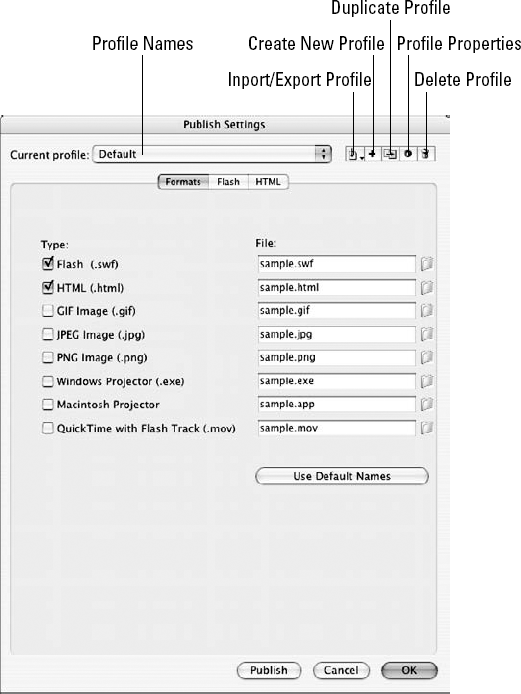
To choose, create, modify, or delete profiles, open the Publish Settings dialog box (File
Profile Name: This drop-down menu displays the currently active profile. Every new Flash CS3 document has a Default profile. If you open a Flash document from an earlier version of Flash (that is, Flash MX, Flash MX 2004, or Flash 8) in Flash CS3 and resave it as a Flash CS3 document, the original document Publish Settings are stored in a Flash MX, Flash MX 2004, or Flash 8 Settings profile.
Import/Export Profile: If you click this button, you can choose Import or Export from this option's menu. If you want to use one document's Publish Settings in another document, you need to first export the current profile. Profiles are exported as XML documents. In the other document, you can then import the XML profile document.
Create New Profile: This button adds a new profile name to the Profile Name menu, using the current profile's settings as a starting point. If you click this button, the Create New Profile dialog box appears, prompting you to enter a new profile name.
Duplicate Profile: This button makes a copy of the currently active profile. If you click this button, the Duplicate Profile dialog box appears, prompting you to enter a new profile name for the copy.
Profile Properties: This button opens a dialog box wherein you can change the name of the currently active profile. No other properties are associated with a profile.
Delete Profile: Clicking this button removes the currently active profile from the document.
Changes to profiles do not need to be saved. When you choose a profile from the Profile Name menu, any settings that you change, enable, and so on are automatically saved to the current profile as long as you click OK to close the Publish Settings dialog box. If you click the Cancel button, any changes you make will not be saved to the current profile.
To minimize your wait during publishing or testing Flash movies, you may want to use MP3 files for all of your Event Sync sounds.
Test your Flash movies and scenes within the Flash authoring environment. The Bandwidth Profiler can provide vital information about frame byte requirements and can help you find problematic streaming areas of the Flash movie.
The size report that can be generated from the Export Movie or Publish commands for Flash movies lists detailed information related to individual elements, such as audio, fonts, and frame byte size.
The Publish Settings dialog box enables you to pick any number of file formats to export at one time. You can control just about every setting imaginable for each file type and use HTML templates to automate the insertion of Flash movies into your Web pages.
Flash movies published from Flash CS3 can have specific local playback security options, preventing unscrupulous Flash content creators from accessing private information on another person's computer.
Flash CS3 offers a Flash Player version detection feature in the Publish Settings dialog box. With this feature, you can create an HTML page that detects which version of the Flash Player a user has and direct her to appropriate content on your site.
The profiles feature in Flash CS3 enables you to quickly load publish presets that you can apply to one or more Flash documents.