
Planning and scoping a component
Using filter effects with components
Storing image information as BitmapData
Integrating the Tween class
Scripting XML data with PHP
In the first two chapters of Part IX, you learned how to use many of the user interface and data components of Flash CS3. Now that you're familiar with common production tasks associated with components, you can start to learn how to create your own custom components. In this chapter, you learn how to build a Gallery component. By the end of this chapter, you will know the steps and procedures required to build a fully functional component.
In this chapter, you learn how to build a Flash movie that can dynamically load a list of JPEG files that the user can browse as a series of thumbnails. When the user clicks one of the thumbnails, a larger version of the image loads into the Flash movie. To see the final project, open your Web browser and go to:
www.flashsupport.com/fb/as2/gallery
Note
Make sure you have Flash Player 8 or higher installed to view the completed project.
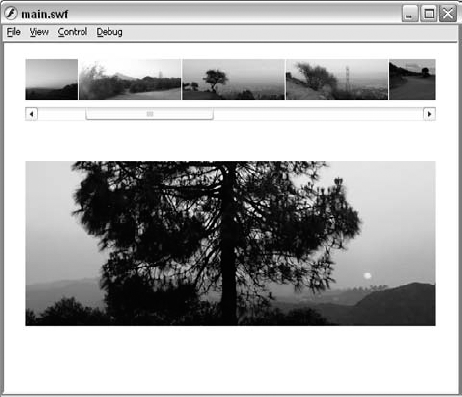
At this location, you see the interface shown in Figure 36.1. When you click an image thumbnail, the original JPEG loads into the area below the thumbnail bar. The active selection within the bar is highlighted with a bevel filter. When you click another thumbnail, the previously selected thumbnail transitions to a muted grayscale version.

Before you can start to build the Gallery component, you need to plan the scope of the project. Just what will the component do? We distill the planning process by telling you the component's features, but in the real world, you will need to brainstorm your ideas and formulate directives for a workable production schedule, accountable to your client's budget and your time.
Note
Read Chapter 3, "Planning Flash Projects," for more information on production guidelines for Flash projects.
It might sound too simple to state, but you have to have a plan before you can build anything— even a Flash movie. And more often than not, the lack of proper planning before you start to build a Flash project only results in bigger problems later— the kind that keep you up late at night days before the final delivery date. One of the most common problems that arise early in a Flash project is the desire to overbuild, or add more features to a project than are necessary to satisfy the goals of the project.
The goals we're aiming to fulfill with the Gallery component include:
Quick updates to images on the server: Many of your business clients love the capability to just upload some images to a Web server, and voila— the images are automatically loading into a Flash user interface you designed for them. One of the goals of this project, therefore, is to use server-side scripting (in this case, using PHP as the server-side language) to dynamically read the filenames in a given Web folder and deliver that data to the Flash movie. Whenever a new JPEG file is uploaded to that Web folder, the PHP script automatically includes the file in the XML feed it sends to the Flash movie.
Unique yet usable interface for browsing images: At the end of the day, if your Flash movie's user interface is too confusing for a Web visitor to understand, the project has lost the potential that Flash offers over standard HTML-based sites. The Gallery component should indicate the state of image browsing clearly, with rollover and rollout states for thumbnail buttons. The thumbnails should also remember if they've been clicked previously or not.
Downloadable images: If a user likes an image, she should be able to download the image to the desktop. In this component, you learn how to use the new
FileReferenceAPI to download files directly from a Flash Player 8 or higher movie. You use this new feature with theContextMenuclass to enable the user to right-click the large image area to download the JPEG file currently displayed.Tip
In ActionScript 2.0, you can also use the
FileReferenceAPI to upload files from the user's computer to your Web server.Utilizing JPEG metadata: If you've used a digital camera, you know that JPEG images can store a lot of useful data related to the exposure, camera model, flash settings, and so on. You can also use an application like Adobe Photoshop to add more metadata, such as a caption and an author byline. If the JPEG image displayed in the Gallery component has a caption, the component should display the caption below the image.
Dynamic resizing of original JPEG files for thumbnails: With the power of server-side scripting, you can create dynamically resized JPEG images on the fly— without ever having to manually create a thumbnail version yourself in a program like Adobe Photoshop. The Gallery component will feature a property that specifies the URL to a resizing script.
As we mentioned in the previous section, our Gallery component requires the power of server-side scripting to work its magic. We picked PHP as the server-side language to use for this project, although you could adapt the same functionality with any server-side language, including Macromedia ColdFusion, Microsoft .NET/ASP, Perl, and so on. One of the reasons we use PHP for this project is that PHP is available on practically every Web account that you purchase from an Internet Service Provider (ISP) or Internet Presence Provider (IPP). The following list provides the server-side requirements for this project.
Note
You can upload the info.php document to your Web server account to discover more details about your server's PHP installation. You can find this file in the ch36/finished files/prod/wwwroot folder of this book's CD-ROM.
PHP5: We recommend that you use PHP5 for this project, but you should be able to use PHP4 as well.
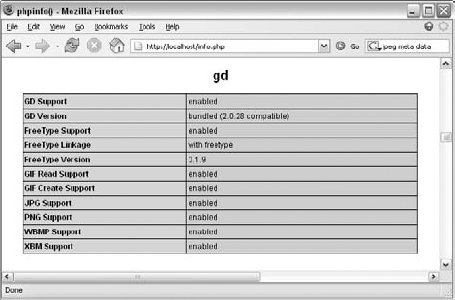
GD library: This library enables your PHP scripts to manipulate image data, including the capability to resize JPEG images. Without this library, you won't be able to create the thumbnail images for the Gallery component. If you run the
info.phpscript on your Web server, search for the term "gd" to see if the GD library is installed, as shown in Figure 36.2.
After you've determined that your server has met the core requirements, you're ready to use the three PHP scripts we've included in the ch36/finished files/prod/wwwroot folder on this book's CD-ROM.
Tip
You can quickly determine if your Web server has PHP installed and enabled. Upload the info.php script to a publicly accessible folder on your Web server, and access the info.php script in a Web browser. If the browser asks you to download the info.php file, your Web server most likely does not have PHP enabled.
Note
It's beyond the scope of this chapter to discuss the PHP scripting used in each script file. We provide a basic overview of the each file's functionality in the following sections. We encourage you to open the PHP files in your preferred text editor to review the syntax. For the PHP experts out there, note that the $doc_root variable (found in both the files.php and resize.php scripts) uses a nonstandard way — for portability reasons— to determine the document root of the Web server. The syntax we use enables the scripts to function properly in both Windows IIS server and Apache Web server environments. Feel free to modify any of the scripts to suit your particular needs.
This script dynamically reads a specified Web folder to search for JPEG files and displays the found JPEG files in an XML document. You must pass a directory name, either relative or from the server root, as a variable named dir. For example, if you specify
files.php?dir=images/
the script looks for a folder named images in the same folder where the files.php script resides. You can also specify a directory with the syntax:
files.php?dir=/gallery/images/
which tells the script to look for a folder named gallery at the server root, and then looks for a folder named images within that gallery folder.
To see a sample XML document created by this script, type the following URL into a Web browser:
www.flashsupport.com/f8b/gallery/files.php?dir=images/
When this page loads, you should see the XML data shown in Listing 36.1. Note that the
Note
In order for the files.php script to function properly, the JPEG-Meta.php script must be located in the same Web folder as the files.php file. We discuss the JPEG-Meta.php script later in this section.
The XML data provided by the files.php script is loaded into the Flash movie, which turns the XML data into an array to pass as a data provider to the Gallery component.
Example 36.1. The XML Data for the JPEG Files
<?xml version="1.0" encoding="utf-8"?> <gallery> <img width="500" height="200" src="images/darkPine.jpg" caption="Darkpine and setting sun, Griffith Park, CA" filename="darkPine.jpg" /> <img width="500" height="200" src="images/dustHalo.jpg" caption="Dusthalo on small tree, Griffith Park, CA" filename="dustHalo.jpg" /> <img width="500" height="200" src="images/dustyClearing.jpg"caption="Dusty clearing with slanting sun, Runyon Canyon Park, CA"filename="dustyClearing.jpg" /> <img width="500" height="200" src="images/japaneseTree.jpg"caption="Japanese tree in fog, Runyon Canyon Park, CA"filename="japaneseTree.jpg" /> <img width="500" height="200" src="images/rainbowTower.jpg"caption="Rainbow sky and metal tower, Hollywood Hills, CA"filename="rainbowTower.jpg" /> <img width="500" height="200" src="images/roadNorth.jpg"caption="Road north to Mulholland Drive, Runyon Canyon, CA"filename="roadNorth.jpg" /> <img width="500" height="200" src="images/scrolledRoot.jpg"caption="Scrolled root at dusk, San Fernando Valley, CA"filename="scrolledRoot.jpg" /> <img width="500" height="200" src="images/skyPools.jpg"caption="Rain pools under cloudy sky, Runyon Canyon Park, CA"filename="skyPools.jpg" /> <img width="500" height="200" src="images/valleyOverlook.jpg"caption="Overlook, San Fernando Valley, CA"filename="valleyOverlook.jpg" /> <img width="500" height="200" src="images/weepingTree.jpg"caption="Weeping dark tree, Mulholland Drive, CA"filename="weepingTree.jpg" /> <img width="500" height="200" src="images/wiredCity.jpg"caption="Phone poles and palms, Hollywood, CA" filename="wiredCity.jpg" /> <img width="500" height="200" src="images/wiredHill.jpg"caption="Dark hills and paths under wires, Los Angeles, CA"filename="wiredHill.jpg" /> </gallery>
This PHP script performs the task of resizing a copy of the original JPEG image to fit a specific height. In this project, the Gallery component's thumbnails should be 50 pixels tall. The resize.php script requires two parameters: height and img. The height parameter should be an integer value, while the img parameter specifies the path and name of the JPEG file to resize. For example, if you type the following URL into a Web browser, you should see a picture of a beach on Prince Edward Island, Canada, resized to a height of 50 pixels:
www.flashsupport.com/fb/as2/gallery/resize.php?height=50&img=/images/beach.jpg
With the Gallery component, you can specify the resize.php script as the value of the thumbScript property.
Tip
You can quickly determine if you have the GD library installed (and/or enabled) on your Web server by uploading the resize.php script to a publicly accessible folder and accessing the script in the Web browser as we demonstrated with the beach picture. Specify an img path that points to a JPEG you've uploaded to another folder on the server.
This amazing script, provided to us by Rob Williams at CommunityMX.com, enables the files.php script to retrieve the metadata, if any exists, of each JPEG file in the specified folder. This script must be uploaded to the same Web folder as the files.php script. Without this file, the files.php script does not function.
Note
For more information about using Rob William's PHP script, read his tutorial at CommunityMX.com. You can find a link to this tutorial in the PHP Utilities section of the www.flashsupport.com/links page.
Note
You also need to upload the JPEG images to your Web server, into a folder whose path you specify with the files.php script from the Flash movie.
On this book's CD-ROM, in the ch36 folder, you can find two folders: starter files and finished files. Each folder has the same structure, featuring dev and prod folders. The dev folder contains all of the source files, such as .fla files and ActionScript files, while the prod folder contains all of the Web-ready files that should be uploaded to the Web server for final deployment.
Note
You can learn more about our dev and prod folder structures in Chapter 3, "Planning Flash Projects."
The starter files and finished files folders also have their own version of the gallery.flp file, which is a Flash Project file. In Flash CS3, you can open these .flp files to see the dev and prod folder structures. The gallery.flp file from the starter files folder is shown in Figure 36.3.

Let's review the files that have already been built in the starter files folder. You can access each of these files from the gallery.flp file in the Project panel.
This ActionScript 2.0 class file, found in the dev/flash/ascb/utils folder, enables a class named Proxy, which has a create() method. This class is very similar to the Delegate class we have used with several ActionScript 2.0 examples in previous chapters of the books. The advantage of using the Proxy.create() method over the Delegate.create() method is that the Proxy.create() method enables you to pass additional parameters to the proxied (or delegated) function. For example, with the Delegate class, you can only specify a scope and a handler
import mx.utils.Delegate;

var myButton:MovieClip;

myButton.onRelease = Delegate.create(this, onButtonClick);

function onButtonClick():Void {
   trace("onButtonClick >");
}
which instructs the onRelease() handler of the MovieClip instance named myButton to invoke the onButtonClick() function whenever the myButton instance is clicked. However, with the Proxy class, you can pass one or more parameters to the proxied function. In the following example, the onButtonClick() function receives a reference to the myButton instance:
import ascb.util.Proxy;

var myButton:MovieClip;

myButton.onRelease = Proxy.create(this, onButtonClick, myButton);

function onButtonClick(mc:MovieClip):Void {
   trace("onButtonClick >");
   trace("	clicked instance: " + mc);
}
For the Gallery component, you use the Proxy class to delegate events for several handlers, including the User Interface components and the thumbnail image buttons.
Note
Many thanks to Joey Lott, co-author of the Flash ActionScript Bible series (Wiley), for providing us with his Proxy.as class. You can find more information about Joey and his books at www.person13.com.
This class file, which can be found in the dev/flash/com/themakers/Effects folder, contains one method named saturate. This method can create a ColorMatrixFilter instance. This filter is the ActionScript class responsible for enabling the new Adjust Color filter available for MovieClip and TextField instances in the Filters tab of the Property inspector. For the Gallery component, you use the EasyFilter.saturate() method to easily control the saturation color values of thumbnail images. The saturate() method accepts values from −100 to 100, just like the Saturation slider in the Adjust Color filter of the Filters tab of the Property inspector. The following code sample illustrates a typical use of the method:
import com.themakers.Effects.EasyFilter;

var myButton:MovieClip;
myButton.filters = [EasyFilter.saturate(−50)];
Note
Many thanks to Joey Lott and Guy Watson for their help with creating the ActionScript code within the saturate() method. It's beyond the scope of this book to discuss the intricacies of using matrix values with the ColorMatrixFilter class— look to the Flash 8 ActionScript Bible by Joey Lott (Wiley, 2006) for more information.
This Flash document contains the basic layout for the Gallery component and can be found in the ch36/starter files/dev/flash/main_starter.fla folder. If you open this file, you can see that the Main Timeline of the movie has three layers:
_captionField: This layer has a
TextFieldinstance of the same name. The instance is located near the bottom of the Stage. This field displays the caption text for the JPEG image. This field also embeds most of the Basic Latin characters for the Arial font, and the field uses the new Anti-alias for readability setting in the Property inspector. Note that not all JPEG images have caption metadata— we specifically added caption data to each sample JPEG image in the project, using Adobe Photoshop's File
_scrollPane: This layer has a ScrollPane component of the same name. The instance is located at the top of the Stage. The ScrollPane instance stores
MovieClipholders for each of the loaded JPEG thumbnail images._loader: This layer has a Loader component of the same name. The instance is located below the ScrollPane instance. When a user clicks a thumbnail image in the ScrollPane instance, the full-size JPEG image loads and scales within the width and height of the
Loaderinstance.
The Publish Settings for the main_starter.fla file have already been set up to publish the .swf and .html files for the document to the prod/wwwroot folder. The .swf file is named main.swf, and the .html file is named main.html. Both of these files have already been added to the gallery.flp file.
Before you start to modify the starter files, create a copy of the starter files folder on your computer. In the following steps, you learn how to create a Gallery class file for the Gallery component. Then, you associate the class with a new Gallery clip in the Library panel.
Note
Make a copy of the ch36/starter files folder on your computer.
Browse to the
dev/flash/com/themakersfolder in thestarter filesfolder you copied.Create a new folder named Portfolio. This folder is used to store the
Gallery.asfile you create in the next steps. This folder could also be used to store other class files related to a Portfolio set of components, such as a gallery chooser.In Flash CS3, open the
gallery.flpfile in thestarter filesfolder you copied.Create a new ActionScript document by choosing File
In the
Gallery.asscript file, add the code shown in Listing 36.2. This code imports all of the necessary classes that theGalleryclass requires and creates the constructor for the class. We discuss many of the imported classes as we add further portions of code to the class. For now, you declare three private variables representing the three elements currently on the Stage of themain_starter.fladocument. The constructor invokes theinit()function, which contains atrace()action to indicate that the class has instantiated.Example 36.2. The Gallery Class Constructor
import ascb.util.Proxy;
import flash.display.BitmapData;
import flash.filters.*;
import flash.net.FileReference;
import mx.transitions.Tween;
import com.themakers.Effects.EasyFilter;

class com.themakers.Portfolio.Gallery extends MovieClip {

   private var _scrollPane:mx.containers.ScrollPane;
   private var _loader:mx.controls.Loader;
   private var _captionField:TextField;

   function Gallery(){
      init();
   }
   private function init():Void {
      trace("Gallery.init >");
   }

}
Save the
Gallery.asfile.In the Project panel, double-click the
main_starter.flafile.In the Timeline window, select all the frames, from top to bottom, across the three layers. Right-click (or Control+click on Mac) the frame selection, and choose Copy Frames from the contextual menu.
Choose Insert
Tip
Alternatively, you can assign global class paths in the Flash tab of the Publish Settings dialog box— click the Settings button next to the ActionScript Version menu.
In the new timeline of the Gallery symbol, select frame 1 of Layer 1. Right-click (or Control+click on Mac) the frame, and choose Paste Frames. The elements from the Main Timeline should now be pasted into the Gallery symbol timeline. Note that the layer names are automatically copied as well.
With all of the elements selected on the Stage, open the Property inspector. The elements are not aligned to the top-left corner of the symbol's registration point. In general, it's considered best practice to align elements within components to the top-left corner. In the Property inspector, change the X position to 0 and the Y position to 0. When you deselect the elements on the Stage, the registration point should be at the top-left corner of the ScrollPane component.
Believe it or not, that's all you need to do on the timeline of the Gallery symbol. Everything else happens within the
Gallery.asfile. Remember, because you attached theGalleryclass in the AS 2.0 Class field for the Gallery clip, all of the code within the class file is automatically associated with the symbol.Tip
If you want to change the embedded font used for caption text, select the
_captionFieldinstance on the Stage of the Gallery clip and change the font name in the Property inspector.Go back to the Main Timeline (Edit
Open the Library panel (Ctrl+L or

To make sure the
Gallery.asclass file is attaching correctly to the Gallery symbol, save the Flash document, and test it (Ctrl+Enter or
Note
You can find this version of the main_starter.fla file as main_100.fla in the ch36/in_process folder. The Listing36-1.as file located in the ch36 folder can be renamed to Gallery.as and inserted into your Portfolio folder.
In this section, you learn how to modify the Gallery.as and main_starter.fla files to load JPEG thumbnails from your PHP server.
Before you can continue to modify the Flash documents for this project, you need to upload the files in the starter files/prod/wwwroot folder to a publicly accessible location on your PHP-enabled Web server. If possible, try uploading the files to the document root of the Web server. For example, if your site's domain is www.mydomain.com, try putting the PHP script files at the document root where you can load them by typing the following URL into a Web browser:
http://www.mydomain.com/info.php
Also, if you have directory browsing enabled on your Web server, you should be able to access the images folder (and browse the image files within) by typing:
http://www.mydomain.com/images
After you've completed the project, you can move your script files and images to other folders and modify the script parameters in the Flash movie as needed.
Tip
You can also configure a local Web server on your computer for testing purposes. During the writing of this chapter, we used PHP5 with Microsoft IIS on Windows XP. If you test locally, make sure that http://localhost/info.php loads properly before continuing.
Once you have uploaded the wwwroot files to your own Web server, you're ready to go back to Flash production tasks. In this section, you add several data properties to the component, enabling the component to access the resize.php script and to store the JPEG file information for the Gallery.
Go back to the
Gallery.asfile you created in Phase 1. Add the bold code shown in Listing 36.3. This new code creates the following properties. Each property has an associated private variable listed at the top of the class.items: This property saves an array of JPEG filenames in the_dataprivate variable. The items property is accessed later in this chapter when the thumbnails are built. Whenever information related to the active thumbnail or JPEG image displayed in the Loader component is needed, the items property can be utilized.rootURL: This property stores a root path to the Web server with the PHP scripts and images. This value is appended to image URLs used throughout the class. The private variable_rootURLstores the String data associated with this property.thumbScript: This property stores the name of the script file to call for dynamic resizing of the JPEG images as thumbnails. The default value is set toresize.php, the script file you've already put on your Web server.thumbURL: This read-only property formats thethumbScriptvalue with therootURLvalue, thethumbHeightvalue for theheight=variable for theresize.phpscript, and theimg=variable required by theresize.phpscript. The actual image name is appended tothumbURLin a later function. The String value for this property is stored in the private variable_thumbScript.thumbHeight: This property stores the height, in pixels, that should be passed to theresize.phpscript for the creation of the thumbnail images. The private variable_thumbHeightstores the value for this property.
Note
Any property that is preceded by an
[Inspectable]tag will be available in the Parameters tab of the Property inspector for the Gallery component. You won't see such properties appear unless you specify the AS 2.0 class name in the Component Definition dialog box, which we discuss later in this chapter.Also, while the use of the underscore (
_) for private variable names used within a class is a common practice, you can name your private variables with your own custom naming convention.Example 36.3. The Data Properties of the Gallery Class
import ascb.util.Proxy; import flash.display.BitmapData; import flash.filters.*; import flash.net.FileReference; import mx.transitions.Tween; import com.themakers.Effects.EasyFilter; class com.themakers.Portfolio.Gallery extends MovieClip { private var _scrollPane:mx.containers.ScrollPane; private var _loader:mx.controls.Loader; private var _captionField:TextField;private var _data:Array;private var _rootURL:String;private var _thumbScript:String;private var _thumbHeight:Number;function Gallery(){ init(); } private function init():Void { trace("Gallery.init >"); }public function set items(val:Array):Void {_data = val;}public function get items():Array {return _data;}[Inspectable(defaultValue="",name="Server Host")]public function set rootURL(path:String):Void {_rootURL = path;}public function get rootURL():String {return _rootURL != undefined ? _rootURL : "";}[Inspectable(defaultValue="resize.php")]public function set thumbScript(path:String):Void {_thumbScript = path;}public function get thumbScript():String {return _thumbScript;}public function get thumbURL():String {return rootURL +thumbScript + "?height=" + thumbHeight + "&img=";}[Inspectable(defaultValue=50)]public function set thumbHeight(val:Number):Void {_thumbHeight = val;}public function get thumbHeight():Number {return _thumbHeight;}
After you've created the data properties for the Gallery class, you're ready to add the code that makes new MovieClip holders within the nested ScrollPane instance, _scrollPane, of the Gallery symbol.
In the
Gallery.asfile, add the bold code shown in Listing 36.4. Note that the
init: Theinit()function now sets a private variable named_thumbSpacing. This variable stores the number of pixels to insert between thumbnail images. You can change this number to increase or decrease the horizontal gap between thumbnails.onLoad: Because we have placed author-time instances of the User Interface components on the Stage of the Gallery symbol, we need to use theMovieClip.onLoad()handler to properly initialize any parameters with the ScrollPane (_csp) or Loader (_clo) components. Here, thestylePane()function is invoked to format theScrollPaneinstance.Note
Because the
Galleryclass extends theMovieClipclass (see theclassstatement at the top of the file), theonLoadfunction automatically invokes when theGalleryinstance appears within the Flash movie at runtime. You don't explicitly call theonLoad()function anywhere within the class.stylePane: This function sets the background color and border style of theScrollPaneinstance. More importantly, thecontentPathproperty of theScrollPaneinstance is set to paneHolder. As you see in thebuildHolders()function, you need to create newMovieClipinstances within the ScrollPane instance— you can't add content within the ScrollPane instance without building an empty MovieClip symbol in the movie's Library that is attached to theScrollPaneinstance. You build the paneHolder symbol later in this section.buildHolders: This function goes through theitemsproperty (which contains a list of all the JPEG file information) and builds nestedMovieClipinstances within the ScrollPane instance's content clip. EachMovieClipinstance for a thumbnail (themcinstance) is created within aMovieClipnamed_imgColl(short for image collection), which is also a private variable for theGalleryclass. This variable is accessed later for finding thumbnails and controlling their states. Eachmcinstance has a nestedMovieClipinstance namedimg, which is targeted with aMovieClipLoaderinstance named_mcl, which is also a private variable name. Each object in theitemsarray contains asrcproperty (mapped from the XML generated by thefiles.phpscript), which is used as theimgvariable value to format the URL for theresize.phpscript.calcThumbW: This function is used within thebuildHolders()function to determine how wide a thumbnail image should be based on the aspect ratio of the original image. Thewidthandheightproperties of the JPEG file are retrieved from nested objects within theitemsarray.Note
You haven't actually loaded any data into the
Galleryinstance back in themain_starter.flafile. In the next few steps, you learn how to load the XML data and format it as a data provider for the items property.load: This public function initiates the thumbnail creation and loading process. This is the only method that needs to be called outside of the class.
Note
The properties added in Listing 36.4 are not displayed in the printed listing, but the complete code is available in the
Listing36-4.asfile in thech36folder of this book's CD-ROM.Example 36.4. The Thumbnail Creation Process
import ascb.util.Proxy; import flash.display.BitmapData; import flash.filters.*; import flash.net.FileReference; import mx.transitions.Tween; import com.themakers.Effects.EasyFilter; class com.themakers.Portfolio.Gallery extends MovieClip { private var _scrollPane:mx.containers.ScrollPane; private var _loader:mx.controls.Loader; private var _captionField:TextField; private var _data:Array; private var _rootURL:String; private var _thumbScript:String; private var _thumbSpacing:Number;private var _thumbSpacing:Number;private var _mcl:MovieClipLoader;private var _imgColl:MovieClip;function Gallery(){init(); } private function init():Void { trace("Gallery.init >");_thumbSpacing = 1;}private function onLoad():Void {stylePane();}private function stylePane():Void {_scrollPane.setStyle("backgroundColor", 0xFFFFFF);_scrollPane.setStyle("borderStyle", "none");_scrollPane.contentPath = "paneHolder";}private function buildHolders():Void {var holder:MovieClip = _scrollPane.content;_mcl = new MovieClipLoader();_mcl.addListener(this);var files:Array = items;var w:Number = 0;var coll:MovieClip = _imgColl = holder.createEmptyMovieClip("_imgColl",1);for(var i:Number = 0; i < files.length; i++){var item:Object = files[i];var mc:MovieClip = coll.createEmptyMovieClip("image_" + i,i+1);mc._x = (i == 0) ? 0 : coll["image_" + (i-1)]._x + ;calcThumbW(files[i-1]) + _thumbSpacing;var disp:MovieClip = mc.createEmptyMovieClip("disp", 1);var imgH:MovieClip = disp.createEmptyMovieClip("imgH", 1);var img:MovieClip = imgH.createEmptyMovieClip("img", 1);mc.idx = i;var path:String = thumbURL + escape(item.src);_mcl.loadClip(path, img);}}private function calcThumbW(file:Object):Number {var w:Number = file.width;var h:Number = file.height;var factor:Number = thumbHeight/h;return w*factor;}public function load():Void {buildHolders();}[Public properties omitted from this listing...]}Switch over to the
main_starter.fladocument. As we mentioned earlier in this section, you need to create an empty Movie Clip symbol named paneHolder, to use as a holder within the ScrollPane component. Choose InsertOnce you're inside the paneHolder timeline, choose Edit
Create a new layer named actions, and place it at the top of the layer stack. Select frame 1 of the actions layer, and open the Actions panel (F9, or Option+F9 on Mac). Add the code shown in Listing 36.5.
This code creates a new
XMLinstance namedxmlData. Thegalleryinstance (already placed on the Stage) is typed as aGalleryclass member. Thehostvariable should be set to the domain name of your Web server. Do not use thelocalhostvalue unless you are testing against a Web server running on your computer.Note
When you're ready to deploy the final version of the Flash movie, you can set
hostto an empty string, or the folder path leading to the PHP script files. Also, if you have difficulties testing against your own PHP server, you can usehttp://www.flashsupport.com/fb/as2/gallery/as the value for thehostvariable to test your Flash movie.The
init()function uses theProxy.create()method to delegate theonLoad()handler of thexmlDatainstance to theonFileData()function. When the XML data has loaded from the PHP script, theonFileData()function invokes. Thehostvalue is appended to thefiles.php?dir=images/string in theload()method of thexmlDatainstance.The
onFileData()function cycles through the returned XML data, which resembles that shown in Listing 36.1. Thefor()loop goes through each<img>node (xn) and maps each attribute to a property of the same name on an object (item) that is passed to theitemsarray. After each<img>node has been processed, theitemsarray is used for theitemsproperty of theGalleryinstance,gallery.The
rootURL, thumbScript, andthumbHeightproperties of theGalleryinstance are also set in theonFileData()function. Once these properties have been set, theload()function is invoked, starting the process of loading the thumbnail images.Example 36.5. Loading the XML Data
import ascb.util.Proxy;

var xmlData:XML = new XML();
var gallery:com.themakers.Portfolio.Gallery;
var host:String = "http://localhost/";

init();

function init():Void {
   xmlData.ignoreWhite = true;
   xmlData.onLoad = Proxy.create(this, onFileData);
   xmlData.load(host + "files.php?dir=images/");
}

function onFileData(success:Boolean):Void {
   trace("onFileData > " + success);
   var files:Array = xmlData.firstChild.childNodes;
   var items:Array = new Array();
   for(var i:Number = 0; i < files.length; i++){
      var xn:XMLNode = files[i];
var item:Object = { src: xn.attributes.src, width: Number(xn.attributes.width), height: Number(xn.attributes.height), caption: xn.attributes.caption, filename: xn.attributes.filename }; items.push(item); } gallery.items = items; gallery.rootURL = host; gallery.thumbScript = "resize.php"; gallery.thumbHeight = 50; gallery.load(); }Save the
main_starter.fladocument, and test the movie (Ctrl+Enter or


Note
You can find this version of the main_starter.fla file as main_101.fla in the ch36/in_process folder on this book's CD-ROM.
Because the XML data provided by the files.php script completely describes each JPEG image in the chosen Web folder, your work with the main_starter.fla document is finished. You complete the remaining changes within the Gallery class file.
After you have the thumbnail JPEG images loading from the resize.php script, you're ready to add more functionality to each MovieClip instance containing a JPEG thumbnail. The mc instance created in the for() loop of the buildHolders() function is the primary instance to target for adding button behaviors.
You also need to track which thumbnail is currently selected. Just as the List component has a selectedIndex property indicating which entry in the list is active, the Gallery component needs a selectedIndex property to indicate which thumbnail has been clicked by the user.
Go back to the
Gallery.asfile, and add the bold code shown in Listing 36.5. This code has the following changes:buildHolders: This function now creates anonRelease()handler for eachmcinstance holding a JPEG thumbnail image. TheonRelease()handler is delegated to theonThumbClick()function of theGalleryclass. A reference to themcinstance is passed to theProxy.create()method in order for theonThumbClick()handler to identify which thumbnail image has been clicked. Also, the firstmcinstance to be created in thefor()loop is set as the value of a new private variable named_thumb. This variable can be referenced in later functions to also identify whichmcinstance was clicked last.onThumbClick: This function is invoked whenever the user clicks a thumbnail image in theScrollPaneinstance. When a thumbnail is clicked, the_thumbvariable is set to the passedmcreference of the function. Then, theselectedIndexproperty is set to that clip'sidxvalue. Remember, thefor()loop of thebuildHolder()function assigns anidxvalue to each thumbnailmcinstance. Theidxvalue matches the index of the corresponding JPEG data in theitemsarray.loadImage: This function does the work of changing thecontentPathproperty of theLoaderinstance,_clo, to the full-size JPEG image URL. TheselectedIndexvalue is used to look up the JPEG file data from theitemsarray. Thesrcproperty, as built by the script in Listing 36.6, contains the URL to the JPEG image. This value is appended to therootURLvalue and then set as the newcontentPathproperty value. TheloadImage()function, by design, is only invoked by theselectedIndexsetter function.selectedIndex: This pair of setter/getter functions creates a new property namedselectedIndex. This property tracks which index of theitemsarray is currently selected. Whenever the user clicks a thumbnail button, theselectedIndexvalue is updated and theloadImage()function is invoked.
Example 36.6. Tracking the Active Thumbnail
import ascb.util.Proxy;
import flash.display.BitmapData;
import flash.filters.*;
import flash.net.FileReference;
import mx.transitions.Tween; import com.themakers.Effects.EasyFilter; class com.themakers.Portfolio.Gallery extends MovieClip { private var _csp:mx.containers.ScrollPane; private var _clo:mx.controls.Loader; private var _tCaption:TextField; private var _data:Array; private var _rootURL:String; private var _thumbScript:String; private var _thumbHeight:Number; private var _thumbSpacing:Number; private var _mcl:MovieClipLoader; private var _imgColl:MovieClip;private var _thumb:MovieClip;private var _selectedIndex:Number;function Gallery(){ init(); } private function init():Void {[No changes to this function]} private function onLoad():Void {[No changes to this function]} private function stylePane():Void {[No changes to this function]} private function buildHolders():Void { var holder:MovieClip = _scrollPane.content; _mcl = new MovieClipLoader(); _mcl.addListener(this); var files:Array = items; var w:Number = 0; var coll:MovieClip = _imgColl = holder.createEmptyMovieClip( "_imgColl", 1 ); for(var i:Number = 0; i < files.length; i++){ var item:Object = files[i]; var mc:MovieClip = coll.createEmptyMovieClip( "image_" + i, i+1 ); mc._x = (i == 0) ? 0 : coll["image_" + (i-1)]._x +calcThumbW(files[i-1]) + _thumbSpacing;var disp:MovieClip = mc.createEmptyMovieClip("disp", 1); var imgH:MovieClip = disp.createEmptyMovieClip("imgH", 1); var img:MovieClip = imgH.createEmptyMovieClip("img", 1);if(i == 0) _thumb = mc;mc.idx = i;mc.onRelease = Proxy.create(this, onThumbClick, mc);var path:String = thumbURL + escape(item.src); _mcl.loadClip(path, img); } } private function calcThumbW(oFile:Object):Number {[No changes to this function]}private function onThumbClick(mc:MovieClip):Void {_thumb = mc;selectedIndex = mc.idx;}private function loadImage():Void {var idx:Number = selectedIndex;var item:Object = items[idx];_loader.contentPath = rootURL + item.src;}public function load():Void {[No changes to this function]}public function set selectedIndex(idx:Number):Void {if(_selectedIndex != idx){_selectedIndex = idx;loadImage();}public function get selectedIndex():Number {return _selectedIndex;}[Other public properties have been omitted from this listing]}Go back to the
main_starter.fladocument, and test it (Ctrl+Enter or

As Figures 36.6 and 36.7 illustrate, the scroll bar of the nested ScrollPane instance (_scrollPane) is not visible as more thumbnails load into the instance. The ScrollPane instance needs to be told when to redraw its UI elements— the ScrollPane component does not automatically detect when more content has been added beyond its visible frame.
Go to the
Gallery.asfile, and add the functions shown in Listing 36.7. Place these functions after the last private function,loadImage, and before the public functions. This code contains two new functions:onLoadInit: This function is an event listener for theMovieClipLoaderinstance,_mcl, created in thebuildHolders()function. Whenever a thumbnail image has finished loading, theonLoadInit()function is automatically invoked by the_mclinstance. A reference to theMovieClipholder for the image is passed to the function, where theidxvalue assigned to the outermcholder for the nested thumbnail holder is accessed. When the first thumbnail in theScrollPaneinstance loads, theselectedIndexproperty is set to0, which invokes all of the code in thepublic function set selectedIndex()area of the class file. This process sets the loading of the first full-size JPEG image into action. If the very last thumbnail is loaded into theScrollPaneinstance, theupdateScroller()function is invoked.Tip
You can place the
updateScroller()action in theonLoadInit()handler outside of theif/elsestatement to force the ScrollPane instance to update after every thumbnail load. If you have several images in your Web folder, you might wait a long time before the last thumbnail loads.updateScroller: This function fires one action:_scrollPane.redraw(true);. This action forces theScrollPaneinstance to re-examine its contents and determine if a vertical and/or horizontal scroll bar is necessary.Note
The
Listing36-7.asfile in thech36folder of this book's CD-ROM shows the new code within the entireGalleryclass file.Example 36.7. The onLoadInit() and updateScroller() Functions
private function onLoadInit(mc:MovieClip):Void {
   var idx:Number = mc._parent._parent._parent.idx;
   if(idx == 0){
      selectedIndex = 0;
   } else if(idx == items.length - 1){
      updateScroller();
   }
}

private function updateScroller():Void {
   _scrollPane.redraw(true);
}
Go back to the
main_starter.fladocument and test it (Ctrl+Enter or
Right now, you have a Gallery component that can load clickable thumbnails that load full-size JPEG images. While this functionality is critical to the success of the Gallery component, the same functionality could be accomplished in a regular HTML page with less effort. Let's add some features that are truly within the domain of Flash technology.
In this section, you learn how to add a bevel filter to the selected thumbnail image.
Go back to the
Gallery.asfile. Add the code shown in Listing 36.8. Note that thepublic function set selectedIndexshould already be defined in your code— add the new code shown in bold. This code adds two new functions, and extends the functionality of theselectedIndexsetter function:frameThumb: This function creates a newBevelFilterinstance namedbffor the selected thumbnail, which is retrieved from the_imgCollholder within theScrollPaneinstance. (_imgCollis set in thebuildHolders()function.) The bf instance is assigned to thefiltersarray of the selected thumbnail, and the alpha of the clip is set to 100%.dimThumb: This function retrieves the previously selected thumbnail, removes any filters, and sets the alpha of the previous thumbnail to 75%.selectedIndex: The setter function for theselectedIndexproperty now invokes thedimThumb()function with the existing_selectedIndexvalue before a new_selectedIndexvalue is assigned. After a new value has been assigned, theframeThumb()function is invoked. Remember, theselectedIndexproperty is the heart of theGalleryclass— any change to theselectedIndexvalue propagates to other functions within the class.
Note
The
Listing36-8.asfile in thech36folder of this book's CD-ROM shows the new code within the entireGalleryclass file.Example 36.8. Framing the Selected Thumbnail
private function frameThumb():Void {var mc:MovieClip = _imgColl["image_" + selectedIndex];var bf:BevelFilter = new BevelFilter();mc.filters = [bf];mc._alpha = 100;}private function dimThumb(idx:Number):Void {var mc:MovieClip = _imgColl["image_" + idx];mc.filters = [];mc._alpha = 75;}public function set selectedIndex(idx:Number):Void { if(_selectedIndex != idx){if(_selectedIndex != undefined) dimThumb(_selectedIndex);_selectedIndex = idx;frameThumb();loadImage(); } }Go back to the
main_starter.fladocument, and test it (Ctrl+Enter or

Let's continue the fun with Flash filters! In this section, you learn how to use the BitmapData class to make a copy of the thumbnail image over the Loader component area. The thumbnail, of course, is not as large as the full-size JPEG image. As such, the thumbnail image is stretched and pixilated when it's set to the same width and height of the full-size image. You use the BlurFilter class to smooth the thumbnail's pixilation. The filter's strength is inversely proportional to the loaded percent of the full-size JPEG image. As the full-size JPEG image loads into the Loader component, the intensity of the BlurFilter instance is gradually diminished.
Go back to the
Gallery.asfile and add the bold code shown in Listing 36.9. This code modifies existing functions and adds a few new ones:init: This function uses two new private variables:_blurStrengthindicates the maximum blur applied to the copied thumbnail when the copy is made, and_overlayis a newMovieClipinstance that holds the copied thumbnail in theoverlayThumb()function. The position of the_overlayinstance is set to the same X and Y position as the_cloinstance.onLoad: This handler is modified to add two event listeners to the Loader component,_loader. The"progress"event is broadcasted from the Loader component as new bytes of a loaded full-size JPEG image arrive into the Flash movie. This event is captured by theonImgProgress()function. The"complete"event is broadcasted by the Loader component when the full-size JPEG image has fully loaded into the Flash movie. This event is captured by theonImgComplete()function.overlayThumb: This function creates a bitmap copy of the selected thumbnail, scales the copy to fit within the dimensions of the Loader component, and sets the initial blur of the scaled copy to a maximum intensity. TheoverlayThumb()function is invoked by theselectedIndexproperty when a new thumbnail is clicked. Here, the newBitmapDataclass is used to create the copy of the loaded thumbnail JPEG image. The new bitmap is attached to a newMovieClipholder named_bitmapwithin the_overlayinstance. The_overlayinstance is then resized using the same procedure that the Loader component uses to fit loaded images within its display area.blurOverlay: This function creates theBlurFilterinstance responsible for blurring the copied thumbnail image. The function requires one parameter: the percent loaded of the full-size JPEG image. If the loading process has just started, the percent loaded is equal to 0. This value is remapped to a blur intensity value (blurVal), as indicated by the_blurStrengthvariable set in theinit()function. As more bytes of the JPEG image load into the movie, theblurValamount is reduced. TheBlurFilterinstance is applied to thefiltersarray of the_overlayinstance.onImgProgress: This handler is invoked whenever the Loader component broadcasts a"progress"event. When this event occurs, the loaded percent of the JPEG is retrieved with thepercentLoadedproperty of the Loader component and passed to theblurOverlay()function.onImgComplete: When the Loader component broadcasts the"complete"event, theonImgComplete()function is invoked. The"complete"event signals that the full-size JPEG image has loaded completely into the Flash movie. At this point, the_bitmapinstance within the_overlayinstance can be removed to reveal the full-size JPEG below it.selectedIndex: TheoverlayThumb()function is added to the setter function for theselectedIndexproperty. Whenever the user clicks a new thumbnail image, the process of copying, scaling, and blurring the thumbnail is started.
Note
The
Listing36-9.asfile in thech36folder of this book's CD-ROM shows the new code within the entireGalleryclass file.Example 36.9. Copying and Blurring the Thumbnail Image
private var _blurStrength:Number;private var _overlay:MovieClip;private function init():Void { _thumbSpacing = 1;_blurStrength = 20;_overlay = createEmptyMovieClip("_overlay", 10);_overlay._x = _loader._x;_overlay._y = _loader._y;} private function onLoad():Void { stylePane();_loader.addEventListener("progress", Proxy.create(this,;onImgProgress));_loader.addEventListener("complete", Proxy.create(this,;onImgComplete));}private function overlayThumb():Void {var mc:MovieClip = _thumb;var w:Number = mc._width;var h:Number = mc._height;var bmd:BitmapData = new BitmapData(w, h);bmd.draw(mc);var holder:MovieClip = _overlay.createEmptyMovieClip("_bitmap", 1);holder.attachBitmap(bmd, 1);var lw:Number = _loader.width;var lh:Number = _loader.height;var factor:Number = h >= w ? lh/h : lw/w;_overlay._xscale = _overlay._yscale = factor*100;_overlay._x = _loader._x + ((_loader.width - _overlay._width)/2);_overlay._y = _loader._y + ((_loader.height - _overlay._height)/2);blurOverlay(0);}private function blurOverlay(pl:Number):Void {var n:Number = (pl*(_blurStrength/10))/10;var blurVal:Number = _blurStrength - n;var bf:BlurFilter = new BlurFilter(blurVal, blurVal, 3);_overlay.filters = [bf];}private function onImgProgress(e:Object):Void {var loader:mx.controls.Loader = e.target;blurOverlay(loader.percentLoaded);}private function onImgComplete(e:Object):Void {_overlay._bitmap.removeMovieClip();}public function set selectedIndex(nIdx:Number):Void { if(_selectedIndex != nIdx){ if(_selectedIndex != undefined) dimThumb(_selectedIndex); _selectedIndex = nIdx;overlayThumb();frameThumb(); loadImage(); } }Go back to the
main_starter.fladocument, and test it (Ctrl+Enter, or

The thumbnails in the ScrollPane component can also use a scripted tween to fade to a desaturated state as the user views each full-size image. In this section, you see how the Tween class can programmatically update the thumbnail images. You can create a Tween instance by using the following syntax:
import mx.transitions.Tween; var mc:MovieClip; var tw:Tween = new Tween(mc, "_x", mx.transitions.easing.Regular.easeOut,mc._x, mc._x + 100, 5, true);
The Tween constructor accepts seven arguments, in the following order:
target: The first argument specifies the object whose property will be manipulated by the
Tweeninstance. You can pass any object reference you want, including aTextField, MovieClip, orObjectreference.property name: The second argument indicates which property of the target object will be updated by the
Tweeninstance. This argument should be aStringvalue. For example, to control aMovieClipinstance's X position, pass a value of"_x"as the second argument.easing class: The third argument specifies the type of tween you'd like to use. You can use a variety of easing classes. If you do not require any special type of easing with the tween, you can specify a
nullvalue.starting value: The fourth argument indicates the starting value that the
Tweeninstance should use. You can use any numeric value, such as the current X position or alpha value of aMovieClipinstance.ending value: The fifth argument specifies the finish value for the
Tweeninstance. You can use any numeric value. When theTweeninstance reaches this value, theonMotionFinishedhandler for any listener assigned to theTweeninstance is invoked.duration: The sixth argument indicates how long the tween should last. This numeric value can be specified as seconds or frames.
time unit: The seventh and final argument determines the unit of measure for the duration argument, as a Boolean value. If you pass
trueas the last argument, the unit of measure is seconds. If you passfalse, the unit of measure is frames.
Go back to the
Gallery.asfile and add the code shown in Listing 36.10. This code replaces the existingdimThumb()function with a new set of actions to utilize theTweenclass.dimThumb: This function is invoked from theselectedIndexproperty, just as it was in earlier sections of this project. Two newTweeninstances are created for the thumbnail instance. The firstTweeninstance namedtwSaturationis responsible for modifying the saturation value of the thumbnail instance. TheRegular.easeOutstatic class is specified as the easing class for bothTweeninstances. The starting value for the saturation tween is 0 (no change) and the ending value is −100 (color removed, desaturated). The duration of both tweens is one second. ThetwAlphainstance animates the current alpha of the thumbnail instance to the muted 75% used earlier. The thumbnail instance is added as a listener to bothTweeninstances; therefore, theonMotionFinished()handler of the thumbnail instance is fired when the tweens finish. TheonTweenFinish()function of theGalleryclass is delegated for this handler. Because saturation values are not a directly accessible value to use with theTweenclass, a new property namedthumbSaturationis created for the thumbnail instance. Thewatch()method can detect any changes to this property on the instance, and theProxy.create()method is specified as the event handler for thewatch()method.onThumbSaturation: This function is invoked whenever the saturation tween (twSaturation) updates thethumbSaturationproperty of the thumbnail instance. Here, the new value created by the tween is passed to theEasyFilter.saturate()method to create a newColorMatrixFilterinstance. We discuss theEasyFilter.saturate()method in greater detail at the start of this chapter.onTweenFinish: This handler is invoked by eachTweeninstance when the respective tween has completed. Each tween is removed from atweensarray stored within the thumbnail instance.controlTweens, clearTweens: These functions manage the playback of theTweeninstances. You add more functions later in this chapter that take advantage of these functions.
Note
The
Listing36-10.asfile in thech36folder of this book's CD-ROM shows the new code within the entireGalleryclass file.Example 36.10. Tweening the Thumbnail States
private function dimThumb(idx:Number):Void { var mc:MovieClip = _imgColl["image_" + idx]; if(mc.tweens != undefined) clearTweens(mc); var twSaturation:Tween = new Tween(mc, "thumbSaturation",mx.transitions.easing.Regular.easeOut, 0, −100, 1, true); var twAlpha:Tween = new Tween(mc, "_alpha",mx.transitions.easing.Regular.easeOut, mc._alpha, 75, 1, true); twSaturation.addListener(mc); twAlpha.addListener(mc); mc.tweens = [twSaturation, twAlpha]; mc.watch("thumbSaturation", Proxy.create(this, onThumbSaturation), mc ); mc.onMotionFinished = Proxy.create(this, onTweenFinish, mc); } private function onThumbSaturation(prop:String, oldVal:Number,newVal:Number, mc:MovieClip):Void { mc.filters = [EasyFilter.saturate(newVal)]; updateAfterEvent(); } private function onTweenFinish(tw:Tween, mc:MovieClip):Void { for(var i:Number = 0; i < mc.tweens.length; i++){ if(mc.tweens[i] == tw) mc.tweens.splice(i, 1); } if(mc.tweens.length < 1) delete mc.tweens; } private function controlTweens(mc:MovieClip, action:String):Void { for(var i:Number = 0; i < mc.tweens.length; i++){ mc.tweens[i][action](); }} private function clearTweens(mc:MovieClip):Void { controlTweens(mc, "stop"); delete mc.tweens; }Go back to the
main_starter.fladocument, and test it (Ctrl+Enter or
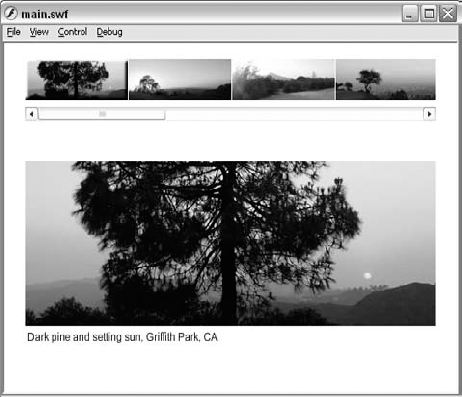
After you have the full-size JPEG image loading into the Loader component, you're ready to populate the _captionField TextField instance, which you copied into the Gallery symbol earlier in this chapter. The JPEG files provided in the starter files and finished files folders have had metadata added to them. The caption metadata is read by the JPEG-Meta.php script on the server and inserted into the XML data sent to the Flash movie with the files.php script.
Go back to the
Gallery.asfile and add the bold code shown in Listing 36.11. Add the new private variable to the list of existing private variables at the top of the class file, modify the existinginit()andloadImage()functions, and add the newdisplayCaption()function below the last private function in the class file.init: The new_captionSpacingvariable stores the gap, in pixels, that should buffer the top of the_captionFieldinstance and the bottom of the full-size JPEG image.loadImage: After the full-size JPEG image starts to load into the Loader component, thedisplayCaption()function is invoked to show the image's caption. The caption text is stored in thecaptionproperty of the current object within theitemsarray, as described by the XML document delivered by thefiles.phpscript.displayCaption: This function populates the_captionFieldinstance with the new caption text and positions the field below the lower-left corner of the image.
Note
The
Listing36-11.asfile in thech36folder of this book's CD-ROM shows the new code within the entireGalleryclass file.Example 36.11. The displayCaption() Function
private var _captionSpacing:Number;private function init():Void { _thumbSpacing = 1; _blurStrength = 20;_captionSpacing = 5;_overlay = createEmptyMovieClip("_overlay", 10); _overlay._x = _clo._x; _overlay._y = _clo._y; } private function loadImage():Void { var idx:Number = selectedIndex; var item:Object = items[idx]; _loader.contentPath = rootURL + item.src;displayCaption(item.caption);}private function displayCaption(val:String):Void {_captionField.text = val;_captionField._x = _overlay._x;_captionField._y = _overlay._y + _overlay._height + _captionSpacing;}Return to the
main_starter.fladocument, and test it (Ctrl+Enter or
The thumbnail functionality is nearly complete. In its current state, the thumbnail images, once clicked, remain muted— even when the user rolls over a previously selected thumbnail. In this section, you add onRollOver and onRollOut handlers to each thumbnail instance.
Go back to the
Gallery.asfile, and add the bold code shown in Listing 36.12.buildHolders: This function, which creates the original thumbnail holders, is modified to assignonRollOverandonRollOuthandlers to each thumbnail instance (mc). TheProxy.create()method delegates these handlers to theonThumbOverandonThumbOutfunctions of theGalleryclass.onThumbOver: This handler checks to see if any tweens are active on the thumbnail when the rollover event occurs. If there are any active tweens, they are paused. Any active filters applied to the instance are stored in a new property namedexistingProps. This property is used inonThumbOutto restore the last state of the button. Any filters on the thumbnail instance are removed, and the alpha is set to 100%. Note that these actions are only applied to a thumbnail instance if it is not the active thumbnail.onThumbOut: This handler resumes any active tweens that may have been in progress when the user rolled over the thumbnail instance. Any filters that were applied to the instance before the rollover event occurred are also reapplied to the clip.selectedIndex: When a thumbnail is initially selected with theselectedIndexproperty, theexistingPropsproperty is initialized with the filters that are applied to the selected thumbnail.
Example 36.12. The onRollOver() and onRollOut() Thumbnail Handlers
private function buildHolders():Void { var holder:MovieClip = _scrollPane.content; _mcl = new MovieClipLoader(); _mcl.addListener(this); var files:Array = items; var w:Number = 0; var coll:MovieClip = _imgColl = holder.createEmptyMovieClip( "_imgColl", 1 ); for(var i:Number = 0; i < files.length; i++){ var item:Object = files[i]; var mc:MovieClip = coll.createEmptyMovieClip( "image_" + i, i+1 ); mc._x = (i == 0) ? 0 : coll["image_" + (i-1)]._x +calcThumbW(files[i-1]) + _thumbSpacing; var disp:MovieClip = mc.createEmptyMovieClip("disp", 1); var imgH:MovieClip = disp.createEmptyMovieClip("imgH", 1); var img:MovieClip = imgH.createEmptyMovieClip("img", 1); if(i == 0) _thumb = mc;mc.idx = i; mc.onRelease = Proxy.create(this, onThumbClick, mc);mc.onRollOver = Proxy.create(this, onThumbOver, mc);mc.onRollOut = Proxy.create(this, onThumbOut, mc);var path:String = thumbURL + escape(item.src); _mcl.loadClip(path, img); } }private function onThumbOver(mc:MovieClip):Void {if(mc != _thumb){if(mc.tweens.length > 0) controlTweens(mc, "stop");var existingFilters:Array = new Array();for(var i:Number = 0; i < mc.filters.length; i++){existingFilters.push(mc.filters[i]);}mc.existingProps = { filters: existingFilters, alpha: mc._alpha};mc.filters = [];mc._alpha = 100;}}private function onThumbOut(mc:MovieClip):Void {if(mc.tweens.length > 0 && _thumb != mc){controlTweens(mc, "resume");} else {mc.filters = mc.existingProps.filters;mc._alpha = mc.existingProps.alpha;}}public function set selectedIndex(nIdx:Number):Void { if(_selectedIndex != nIdx){ if(_selectedIndex != undefined) dimThumb(_selectedIndex); _selectedIndex = nIdx; overlayThumb(); frameThumb(); loadImage();_thumb.existingProps = {filters: _thumb.filters,alpha: _thumb._alpha};} }Return to the
main_starter.flafile, and test it (Ctrl+Enter or
To enable the user to download the full-size JPEG image, you use the ContextMenu class to add a new menu item to the Flash Player's contextual menu that appears when the user right-clicks (or Control+clicks on Mac) the Loader component display area.
Go back to the
Gallery.asfile, and add the bold code shown in Listing 35.13. This code creates or modifies the following functions:onLoad: This handler, which is invoked automatically when theGalleryinstance loads in the Flash movie, now invokes theaddContextMenu()function.addContextMenu: This function creates a new instance of theContextMenuclass. The built-in items of the Flash Player contextual menu (such as Zoom In, Zoom Out, and so on) are disabled for this new menu. A new custom menu item is created, named "Download this image." When the user selects this menu item, thedownloadImage()function is invoked. The new menu is then assigned to the Loader component,_clo.downloadImage: This function uses the new Flash Player 8FileReferenceAPI to enable the user to download a file from the Web server. The current JPEG file URL and JPEG filename values are retrieved from theitemsarray, and passed to thedownload()method of thefileRefinstance.
Example 36.13. Utilizing the FileReference API
private function onLoad():Void { stylePane();addContextMenu();_loader.addEventListener("progress", Proxy.create(this,onImgProgress)); _loader.addEventListener("complete", Proxy.create(this,onImgComplete)); }private function addContextMenu():Void {var cm:ContextMenu = new ContextMenu();cm.hideBuiltInItems();cm.customItems.push(new ContextMenuItem("Download this image",Proxy.create(this, downloadImage)));_loader.menu = cm;}private function downloadImage():Void {var fileRef:FileReference = new FileReference();var item:Object = items[selectedIndex];var path:String = rootURL + item.src;if(!fileRef.download(path, item.filename)) {trace("dialog box failed to open.");}}Go back to the
main_starter.fladocument, and test it (Ctrl+Enter or

You've completed all of the scripting for the Gallery component— Congratulations! You can now deploy Flash movies with the Gallery component. In this last section, you learn how to enable inspectable properties of the Gallery class to display in the Parameters tab of the Property inspector (or Component Inspector panel).
If you open the Library panel of the main_starter.fla document, you can see that the symbol type of the Gallery symbol is a Movie Clip. In order to convert the component to a full-fledged component (complete with component icon!), you need to specify the Gallery class in the Component Definition dialog box.
With the
main_starter.fladocument active, open the Library panel (Ctrl+L orRight-click (or Control+click on Mac) the Gallery clip, and choose Component Definition.
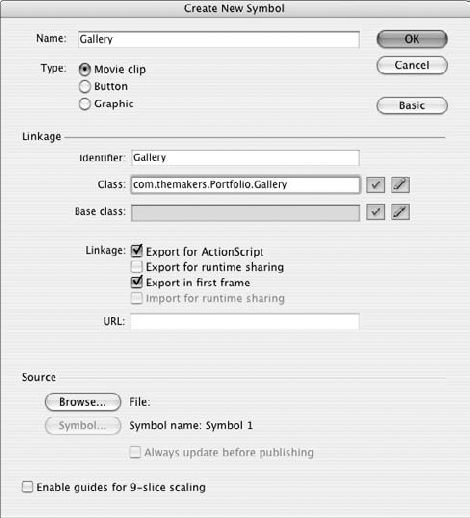
In the Component Definition dialog box, type com.themakers.Portfolio.Gallery in the AS 2.0 Class field, as shown in Figure 36.13. Select the Require minimum player version check box, and choose Flash Player 8. Click OK. Select the Require minimum ActionScript version, and choose ActionScript 2.0.
To see the inspectable parameters, you can repeat Step 2 to see the parameters automatically created for you by Flash CS3, as shown in Figure 36.14.
To see the new parameters, select the
galleryinstance of the Gallery component on the Stage and open the Property inspector. When you select the Parameters tab, you should see the new inspectable parameters as shown in Figure 36.15.


Now, you can change the thumbnail height, server host, and thumbnail script values directly in the Property inspector.
Note
You still need to specify an items value for the Gallery instance in ActionScript code, and invoke the load() handler to initiate the thumbnail loading process.
When you're ready to deploy a Flash movie featuring the Gallery component, keep in mind that you may very likely need to change to the values used in the frame 1 script to initiate loading of the XML data from the files.php script. Make sure you specify a valid Web folder name (or path) as the dir value appended to the files.php filename in the XML.load() handler. You may also need to update the name and path to the resize.php script in the onFileData() handler written within the frame 1 script.
Note
We'd like to know what you think about this chapter. Visit www.flashsupport.com/feedback to send us your comments.
The process for planning a Flash component can require ample time to properly spec the functionality you want to build.
The Gallery component can load thumbnail versions of JPEG images on your Web server and display the full-size JPEG image when the thumbnail is clicked.
Server-side scripting can enable a wide range of functionality within your Flash movies. For the Gallery component, the PHP script files provide XML data and dynamically resized JPEG images to the Flash movie.
The
JPEG-Meta.phpscript written by Rob Williams can retrieve JPEG metadata within your own PHP scripts.The
Proxyclass written by Joey Lott can delegate events and additional parameters within your ActionScript 2.0 classes.The
BitmapDataclass can create a copy of aMovieClipsurface. You can use this class to replicate graphics within your Flash movies.The Flash Player 8 filters can add more visual effects to interactive button states.
You can use the
FileReferenceAPI to download and upload files, without relying on the browser to intervene.