Knowing your workflow
Managing Flash content production
Creating a functional specification document
Using the Project panel in Flash CS3
One of the most important steps — if not the most important step — to producing great Flash content is knowing what steps you'll have to take to move from the concept or idea of the Flash movie to the finished product. This chapter explores the basics of Flash production and how to use the Project panel in Flash CS3 to organize your files. Whether you're a freelance Web consultant (or designer) or a member of a large creative or programming department, knowing how to manage the Flash content production will save you plenty of headaches, time, and money.
No matter what the size or scope, every project in which you choose to participate should follow some type of planned workflow. Whether it's for print, film, video, or Web delivery (or all four!), you should establish a process to guide the production of your presentation.
Before we can explore the way in which Flash fits into a Web production workflow, we need to define a holistic approach to Web production in general. Figure 3.1 shows a typical example of the Web production process within an Internet production company.
Note
The phases of production have been coined differently by various project managers and companies. Some interactive agencies refer to preproduction as an "architecture phase" or a "planning phase." Preproduction may also involve a "discovery phase" which is a span of time before the architecture phase wherein the requirements for a project are determined.
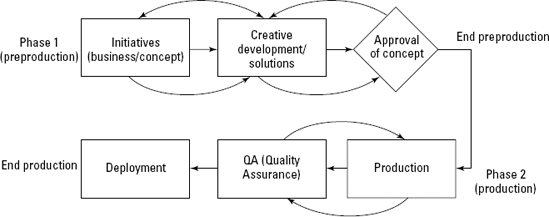
Figure 3.1. Two of the most common phases when generating Web content are preproduction and the actual production phase.
As a Web developer or member of a creative team, you will be approached by companies (or representatives for other departments) to help solve problems with projects. A problem may or may not be well defined by the parties coming to you. The goal of Phase I is to thoroughly define the problem, offer solutions for the problem, and approve one or more solutions for final production.
Before you can help someone solve a problem, you need to determine what the problem is and whether there is more than one problem. When we say problem, we don't mean something that's necessarily troublesome or irritating. Think of it more as a math problem, where you know what you want — you're just not sure how to get there. When you're attempting to define a client's problem, start by asking them the following questions:
What's the message you want to deliver? Is it a product that you want to feature on an existing Web site?
Who's your current audience?
Who's your ideal audience? (Don't let them say, "Everyone!")
What branding materials (logos, colors, and identity) do you already have in place?
Who are your competitors? What do you know about your competitors?
The next to last question points to a bigger picture, one in which the client may already have several emotive keywords that define their brand. Try to define the emotional heart and feeling of their message — get them to be descriptive. Don't leave the meeting with the words edgy or sexy as the only descriptive terms for the message.
Tip
Never go into a meeting or a planning session without a white board or a big pad of paper. Documenting everyone's ideas and letting the group see the discussion in a visual format is always a good idea. If all participants are willing, it's often useful to record the meeting with a digital voice recorder or video camera, so that it can be reviewed outside of the meeting. There are also new products on the market that enable you to record every detail of a meeting, such as Adobe Acrobat Connect, which enables you to conduct live meetings, as well as record them, over the Internet. Robert often uses his Tablet PC with Microsoft OneNote to record live audio that's synchronized with his notes from the meeting. You can find more information about Adobe Acrobat Connect at www.adobe.com/acrobatconnect.
You can also start to ask the following technical questions at this point:
What type of browser support do you want to have?
Do you have an idea of a Web technology (Shockwave; Flash; Dynamic HyperText Markup Language, or DHTML; Scalable Vector Graphics, or SVG) that you want to use?
Does the message need to be delivered in a Web browser? Can it be in a downloadable application such as a stand-alone player? A CD-ROM? A DVD?
What type of computer processing speed should be supported? What other types of hardware concerns might exist (for example, hi-fi audio)?
Of course, many clients and company reps look to you for the technical answers. If this is the case, the most important questions are
Your audience determines, in many ways, what type of technology to choose for the presentation. If the client says that Ma and Pa from a country farm should be able to view the Web site with no hassle, then you may need to consider using an older version of the Flash Player (such as Flash Player 6 or 7) or building a non-Flash presentation (such as HTML and CSS). If the client wants the text on the Web site well-indexed by search engines, you may also need to consider building a non-Flash version of the content. However, if they say that their ideal audience is someone who has a 56K modem and likes to watch cartoons, then you're getting closer to a Flash-based presentation. If the client has any demographic information for their user base, ask for it up front. Putting on a show for a crowd is difficult if you don't know who's in the crowd.
The client or company reps come to you for a reason — they want to walk away with a completed and successful project. As you initially discuss the message and audience for the presentation, you also need to get a clear picture of what the client expects to get from you.
Will you be producing just one piece of a larger production?
Do they need you to host the Web site? Or do they already have a Web server and a staff to support it?
Do they expect you to market the presentation? If not, what resources are in place to advertise the message?
When does the client expect you to deliver proposals, concepts, and the finished piece? These important dates are often referred to as milestones. The payment schedule for a project is often linked to production milestones.
Will they expect to receive copies of all the files you produce, including your source .fla files?
What are the costs associated with developing a proposal? Will you do work on speculation of a potential project? Or will you be paid for your time to develop a concept pitch? (You should determine this before you walk into your initial meeting with the client.) Of course, if you're working with a production team in a company, you're already being paid a salary to provide a role within the company.
At this point, you'll want to plan the next meeting with your client or company reps. Give them a realistic time frame for coming back to them with your ideas. This amount of time will vary from project to project and will depend on your level of expertise with the materials involved with the presentation.
After you leave the meeting, you'll go back to your design studio and start cranking out materials, right? Yes and no. Give yourself plenty of time to work with the client's materials (what you gathered from the initial meeting). If your client sells shoes, read up on the shoe business. See what the client's competitors are doing to promote their message — visit their Web sites, go to stores and compare the products, and read any consumer reports that you can find about your client's products or services. You should have a clear understanding of your client's market and a clear picture of how your client distinguishes their company or their product from their competitors'.
After you (and other members of your creative team) have completed a round of research, sit down and discuss the findings. Start defining the project in terms of mood, response, and time. Is this a serious message? Do you want the viewer to laugh? How quickly should this presentation happen? Sketch out any ideas you and any other member of the team may have. Create a chart that lists the emotional keywords for your presentation.
At a certain point, you need to start developing some visual material that articulates the message to the audience. Of course, your initial audience will be the client. You are preparing materials for them, not the consumer audience. We assume here that you are creating a Flash-based Web site for your client. For any interactive presentation, you need to prepare the following:
Tip
You can use tools such as Microsoft Visio (http://office.microsoft.com/) or Omni Group's OmniGraffle for Mac (www.omnigroup.com/applications/omnigraffle). For more information on the Visio 2007 Bible, published by Wiley, go to www.flashsupport.com/books/visio.
An organizational flowchart is a simple document that describes the scope of a site or presentation. Other names for this type of chart are site chart, navigation flowchart, and layout flowchart. It includes the major sections of the presentation. For example, if you're creating a Flash movie for a portfolio site, you might have a main menu and four content areas: About, Portfolio, Resumé, and Contact. In an organizational flowchart, this would look like Figure 3.2.
A process flowchart constructs the interactive experience of the presentation and shows the decision-making process involved for each area of the site. There are a few types of process charts. A basic process flowchart displays the decisions an end-user will make. For example, what type of options does a user have on any given page of the site? Another type of flowchart shows the programming logic involved for the end-user process chart. For example, will certain conditions need to exist before a user can enter a certain area of the site? Does he have to pass a test, finish a section of a game, or enter a username and password? Refer to Figure 3.3 for a preliminary flowchart for a section of our portfolio Web site. We discuss the actual symbols of the flowchart later in this chapter.
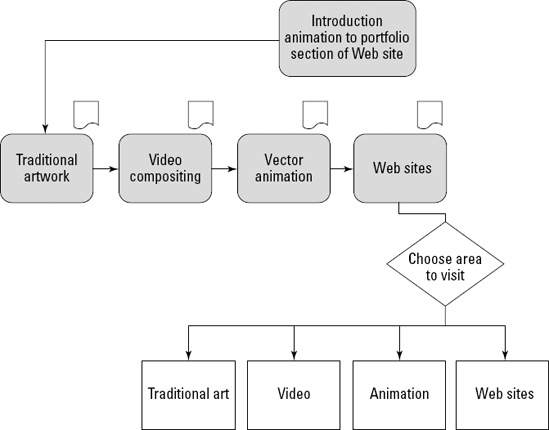
Figure 3.3. The user watches an intro animation and is led through several short subsequent animations detailing each area of the portfolio. The user can then go to an area of his choice after this animation is complete.
A functional specification (see Figure 3.4) is a document that breaks down the elements for each step in the organizational and/or process flowchart. This is by far the most important piece of documentation that you can create for yourself and your team. Each page of a functional specification (functional spec, for short) lists all the assets used on a page (or Flash keyframe, Movie Clip) and indicates the following information for each asset:
Item ID: This is part of the naming convention for your files and assets. It should be part of the filename, or Flash symbol and instance name. It should also be used in organizational and process flowcharts.
Type: This part of the spec defines the name you're assigning to the asset, in more natural language, such as Home Button.
Purpose: You should be able to clearly explain why this element is part of the presentation. If you can't, then you should consider omitting it from the project.
Format: This column indicates what technology (or what component of the technology) will be utilized to accomplish the needs of the asset. In an all-Flash presentation, list the symbol type or timeline element (frames, scene, nested Movie Clips) necessary to accomplish the goals of the asset.
Note
Functional specs come in all shapes and sizes. Each company usually has their own template or approach to constructing a functional spec. The client should always approve the functional spec, so that you and your client have an agreement about the scope of the project.
Finally, after you have a plan for your project, you'll want to start creating some graphics to provide an atmosphere for the client presentation. Gather placement graphics (company logos, typefaces, photographs) or appropriate "temporary" resources for purposes of illustration. Construct one composition, or comp, that represents each major section or theme of the site. In our portfolio content site example, you might create a comp for the main page and a comp for one of the portfolio work sections, such as "Animation." Don't create a comp for each page of the portfolio section. You simply want to establish the feel for the content you will create for the client. We recommend that you use the tool(s) with which you feel most comfortable creating content. If you're better at using Illustrator or Photoshop to create layouts, then use that application. If you're comfortable with Flash for assembling content, then use it.
Warning
Do not use copyrighted material for final production use, unless you have secured the appropriate rights to use the material. However, while you're exploring creative concepts, use whatever materials you feel best illustrate your ideas. When you get approval for your concept, improve upon the materials that inspired you.
Then you want to determine the time and human resources required for the entire project or concept. What role will you play in the production? Will you need to hire outside contractors to work on the presentation (for example, character animators, programmers, and so on)? Make sure you provide ample time to produce and thoroughly test the presentation. When you've determined the time and resources necessary, you'll determine the costs involved. If this is an internal project for your company, then you won't be concerned about cost so much as the time involved — your company reps will want to know what it will cost the company to produce the piece. For large client projects, your client will probably expect a project rate — not an hourly or weekly rate. Outline a time schedule with milestone dates, at which point you'll present the client with updates on the progress of the project.
Exploring the details of the workflow process any further is beyond the scope of this book. However, there are many excellent resources for project planning. One of the best books available for learning the process of planning interactive presentations is Nicholas Iuppa's Designing Interactive Digital Media (Butterworth-Heinemann, 1998). We strongly recommend that you consult the Graphic Artists Guild Handbook of Pricing & Ethical Guidelines (Graphic Artists Guild, 2003) and the AIGA Professional Practices in Graphic Design: American Institute of Graphic Arts (Allworth Press, 1998), edited by Tad Crawford, for information on professional rates for design services.
After you have prepared your design documents for the client, it's time to have another meeting with the client or company rep. Display your visual materials (color laser prints, inkjet mockups, and so on), and walk through the charts you've produced. In some situations, you may want to prepare more than one design concept. Always reinforce how the presentation addresses the client's message and audience.
When all is said and done, discuss the options that you've presented with the client. Gather feedback. Hopefully, the client prefers one concept (and its budget) and gives you the approval to proceed. It's important that you leave this meeting knowing one of two things:
The client has signed off on the entire project or presentation.
The client wants to see more exploration before committing to a final piece.
In either case, you shouldn't walk away not knowing how you'll proceed. If the client wants more time or more material before a commitment, negotiate the terms of your fees that are associated with further conceptual development.
When your client or company executives have signed off on a presentation concept, it's time to rock and roll! You're ready to gather your materials, assemble the crew, and meet an insane production schedule. This section provides a brief overview of the steps you need to take to produce material that's ready to go live on your Web site.
The first step is to gather (or start production of) the individual assets required for the Flash presentation. Depending on the resources you included in your functional spec and budget, you may need to hire a photographer, illustrator, animator, or music composer (or all four!) to start work on the production. Or, if you perform any of these roles, then you'll start creating rough drafts for the elements within the production. At this stage, you'll also gather high-quality images from the client for their logos, proprietary material, and so on.
Of course, we're assuming that you're creating a Flash-based production. All the resources that you've gathered (or are working to create) in Phase 1 will be assembled into the Flash movie(s) for the production. For large presentations or sites, you'll likely make one master Flash movie that provides a skeleton architecture for the presentation, and use ActionScript to bring in material for the appropriate sections of the site.
Before you begin Flash movie production, you should determine two important factors: frame size and frame rate. You don't want to change either of these settings midway through your project. Any reductions in frame size will crop elements that weren't located near the top-left portion of the Stage — you'll need to recompose most of the elements on the Stage if you used the entire Stage. Any changes in your frame rate will change the timing of any linear animation and/or sound synchronization that you've already produced.
As soon as you start to author the Flash movies, you'll create a local version of the presentation (or entire site) on your computer, or a networked drive that everyone on your team can access. The file and folder structure (including the naming conventions) will be consistent with the structure of the files and folders on the Web server. As you build each component of the site, you should begin to test the presentation with the target browsers (and Flash Player plug-in versions) for your audience.
Even if you're creating an all-Flash Web site, you need a few basic HTML documents, including:
Plug-in detection with JavaScript that directs visitors without the Flash Player plug-in to the Macromedia site to download the plug-in.
HTML page(s) to display any non-Flash material in the site within the browser.
You will want to construct basic HTML documents to hold the main Flash movie as you develop the Flash architecture of the site.
Before you can make your Flash content public, you need to set up a Web server that is publicly accessible (preferably with login and password protection) so that you can test the site functionality over a non-LAN connection. This also enables your client to preview the site remotely. After quality assurance (QA) testing is complete (the next step that follows), you'll move the files from the staging server to the live Web server.
We've noticed problems with larger .swf files that weren't detected until we tested them from a staging server. Why? When you test your files locally, they're loaded instantly into the browser. When you test your files from a server — even over a fast DSL (digital subscriber line) or cable modem connection, you have to wait for the .swf files to load over slower network conditions. Especially with preloaders or loading sequences, timing glitches may be revealed during tests on the staging server that were not apparent when you tested locally.
Tip
You should use the Simulate Download feature of the Bandwidth Profiler in the Test Movie environment of Flash 8 to estimate how your Flash movies will load over a real Internet connection. See Chapter 21, "Publishing Flash Movies," for more discussion of this feature.
In larger corporate environments, you'll find a team of individuals whose sole responsibility is to thoroughly test the quality of a nearly finished production (or product). If you're responsible for QA, then you should have an intimate knowledge of the process chart for the site. That way, you know how the site should function. If a feature or function fails in the production, QA reports it to the creative and/or programming teams. QA teams test the production with the same hardware and conditions as the target audience, accounting for variations in:
Computer type (Windows versus Mac)
Computer speed (top-of-the-line processing speed versus minimal supported speeds, as determined by the target audience)
Internet connection speeds (as determined by the target audience)
Flash Player plug-in versions (and any other plug-ins required by the production)
Browser application and version (as determined by the target audience)
Note
It's worthwhile to use an online reporting tool to post bugs during QA. Many companies use the open source (freeware) tool called Mantis, a PHP/MySQL solution. You can find more information about Mantis at www.mantisbt.org/. Another popular bug reporting tool is Bugzilla (www.bugzilla.org).
After QA has finished rugged testing of the production, pending approval by the client (or company executives), the material is ready to go live on the site.
After you've celebrated the finished production, your job isn't over yet. If you were contracted to build the site or presentation for a third party, you may be expected to maintain and address usability issues provided by follow-ups with the client and any support staff they might have. Be sure to account for periodic maintenance and updates for the project in your initial budget proposal. If you don't want to be responsible for updates, make sure you advise your clients ahead of time to avoid any potential conflicts after the production has finished.
You should have a thorough staging and testing environment for any updates you make to an all-Flash site, especially if you're changing major assets or master architecture files. Repeat the same process of staging and testing with the QA team that you employed during original production.
Note
You can find an online archived PDF version of Eric Jordan's tutorial, "Interface Design," on the book's Web site at www.flashsupport.com/archive. This tutorial was featured in the Flash MX Bible (Wiley, 2002).
In this final section of the chapter, we show you how to use the Project panel in Flash CS3 using some sample files we provide on this book's CD-ROM. You jump right into the Project panel, so you may want to review some of the content in the Help panel of Flash CS3 before proceeding. The Using Flash
Before you start using the Project panel, consider a scenario in which you would want to use the feature. The Project panel lets you organize and group all of the files related to a Flash production. You can include any file type you want in the Project panel. All of the asset names and locations are stored in a Flash Project file, which uses an .flp file extension. This file is essentially an .xml file that describes the files you want to manage.
After you've created a Flash Project file, you can quickly open any document directly in Flash CS3 or another application. You can publish one or more Flash documents in the project. But more important, you can use the Project panel to directly upload content to your FTP server, an Adobe Version Cue Server, or a local network server. The Project panel can check in and check out files, so that other members on your team know that you're working on them.
Note
It's beyond the scope of this book to explore the various use cases of Adobe Version Cue. For more information on this product, visit www.adobe.com.
The Project file is linked to a site definition in the Project panel. The site definition is exactly the same site you may have created in Adobe Dreamweaver. If you've made a site in Dreamweaver, it's automatically available in Flash CS3 as well.
One important factor to keep in mind when you use the Project panel is that you should only open a local copy of the project's files on your computer. In this way, everyone working on the project has his or her own copy of the files. One member of the team can be editing, implementing, and testing changes while other members are doing the same with their copies. When a member is done editing a file, she can check the file back into the server.
Warning
Unless you're implementing a version control system with your project files, you should not edit the same file that another person is using. Version control systems can merge changes to the same document. For example, if two people edit the same ActionScript document (.as file), the version control system merges the changes into one file and even flags potential conflicts during the process. The Project panel cannot perform this type of merge without the assistance of a separate software product such as Visual SourceSafe, which is only available with the Windows version of Flash CS3. Also, it's important to note that version control software cannot merge changes in two Flash documents (.fla files) because such files are binary, not ASCII (or Unicode). Usually, version control systems can only merge text documents.
Here's a quick review of the procedures you follow:
Establish a site definition in Flash CS3. This definition describes where you'll store your local copy of the project files, and where to upload the master copies of the project.
Add the files to the Flash Project file in the Project panel of Flash CS3.
Open, edit, and test one of the sample files.
Publish an entire project.
The headings that follow elaborate on these five steps, and include the step numbers for easy reference.
Before you can start making or editing documents in Flash CS3 for a project, you need to define a site that the Project panel can use. In this section, you learn how to define a site and establish a local mirror copy of your site's files on your machine.
On your computer, choose a location that you can use to store all of the files with a project. For example, if you're on Windows, you can create a folder named
sitesat the root of your C drive. If you're on a Mac, you can create a folder namedsitesat the root of your startup drive, such as Macintosh HD.Inside of the
sitesfolder, copy therobertreinhardt.comfolder from thech03/starter_filesfolder located on this book's CD-ROM. As shown in Figure 3.5, therobertreinhardt.comfolder has two subfolders,devandprod.Tip
In Mac OS X, you can turn on Personal Web Sharing in the Sharing preferences (Apple menu

The
devfolder, short for development, will contain any source files, specifications, planning documents, raw assets (images, video, and sound), and so on. Theflafolder inside of thedevfolder holds all Flash documents (.fla files) for the project.The
prodfolder, short for production, will contain any and all files that will be part of the final application, as a publicly accessible Web site or application. Theprodfolder has only one nested folder,wwwroot, for this example. Thewwwrootfolder holds the files that will be uploaded to the public root folder of your Web server. These files are also called runtime files, as they will run in the Flash Player and Web browser from the live Web site. All of the Flash movies (.swf files), runtime assets (JPEGs, MP3s, FLVs, and so on), and HTML documents will be kept here. The copy ofwwwrootfrom the CD-ROM includes several subfolders to store external assets necessary for the Flash movie (.swf file) at runtime.Tip
The
prodfolder can also contain other folders, such as a Flash Media Server applications folder or a database folder, which holds other assets related to services available on your Web server.Now you're ready to create a Flash Project file to put into the project folder you created in the last step. Open Flash Professional CS3. Choose Window

Click the Create a new project link in the Project panel (shown in Figure 3.6).
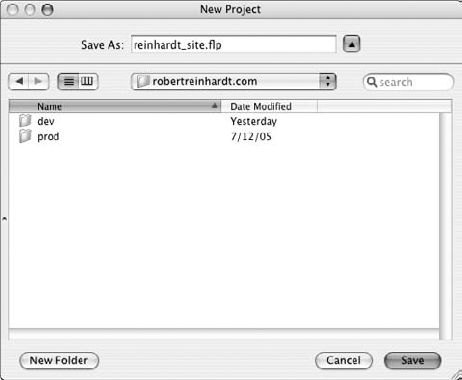
In the New Project dialog box, browse to the
robertreinhardt.comfolder on your computer. Save a new project file namedreinhardt_site.flpin this location, as shown in Figure 3.7.With a project file created, you're ready to define a site in Flash CS3. In the Project panel, click the Version Control button, which features an icon of two arrows pointing in opposite directions. In this menu, choose the Edit Sites option, as shown in Figure 3.8.
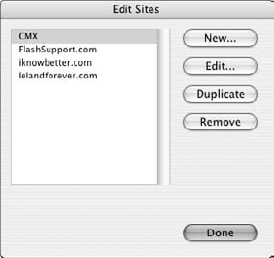
In the Edit Sites dialog box, you may see other sites already defined (as shown in Figure 3.9). If you use Adobe Dreamweaver, you can use these sites, or create a new site for the project. For this example, create a new site by clicking the New button.
In the Site Definition dialog box, specify a name for the site such as
robertreinhardt.com. Most important, specify the path to therobertreinhardt.com/prod/wwwrootfolder in the Local Root field, as shown in Figure 3.10. For the Email and Check Out Name fields, type your own information. In the Connection parameters, you must decide how you will connect to the testing (or live) server that will host the "master" copy of all project documents. You can use a location that's accessible via FTP, the local network, or a SourceSafe database. This location also stores the lock files (.lck files) necessary for members in your team to check in and check out documents. When you're finished specifying the connection details, you may want to click the Test button to make sure that Flash Pro 8 can connect to the location. Click OK to close the dialog box, and click the Done button in the Edit Sites dialog box.Note
The Connection parameters shown in Figure 3.10 are for demonstration purposes only. These parameters will not connect to an actual FTP site. If you use an FTP connection, make sure that the FTP Directory field specifies the path to the public HTML or Web folder for the site. The public Web folder of your server will vary depending on your server's operating system and Web server software. Also, with the
devandprodfolder setup for this example, only the files in thewwwrootfolder can be checked in and out. If you want to be able to check in and out files in thedevfolder, you need to make sure that your local and remote folders have identical folder hierarchies.Now, you'll link the newly defined site to your
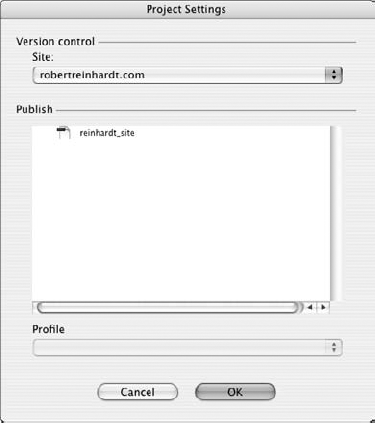
reinhardt_site.flpproject file. Right-click (or Control+click on Mac) thereinhardt_sitefile in the Project panel, and choose Settings. In the Project Settings dialog box, chooserobertreinhardt.comin the Site menu. Refer to Figure 3.11. Click OK to close the dialog box.
After you've created a Flash Project file and defined a site for the project, you're ready to start adding files to the project.
Begin the process of re-creating the folder structure of the local site folders in the
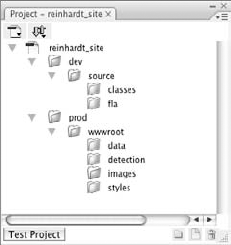
reinhardt_site.flpproject file. In the Project panel, click the Add Folder icon at the lower-right corner of the panel. Name the first folderdev. Repeat this process until you have created all the folder names you had in the localrobertreinhardt.comfolder, including the subfolders. When you are finished, you should have the same folder structure shown in Figure 3.12.Warning
Unlike Adobe Dreamweaver, the Flash Project panel cannot automatically create a folder structure for the defined site. You must create each folder in the Project panel, and add individual files.
Also, changes to a Flash Project file are automatically saved. As such, be careful whenever you modify the project contents.
Select the
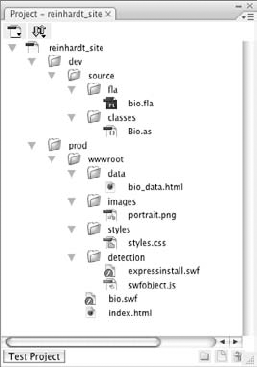
flafolder you created in the last step, and click the Add File button in the lower-right corner of the Project panel. Browse to the Sites
Tip
Notice that we don't include the
Bio.asfile with the runtime files located within thewwwrootfolder. Many beginner Flash designers and developers mistakenly think that .as files should be uploaded to a live Web server with the other runtime files of a Flash project. Any .as file you use with a Flash document is automatically compiled and included in the .swf file that references it.It's highly likely that you'll have more than one Flash document (.fla file) in a project. As such, you should define the default document for the project. This file should be the master file, the one "most in charge" per se. This could be the Flash document that controls the loading of other runtime assets or the document that contains the most code. In the
devfolder of the Project panel, right-click (or Control+click on the Mac) thebio.fladocument and choose Make Default Document in the contextual menu. The icon of the document should change to a downward-pointing green arrow.
After you have added files to your project, you should commit the files to your testing server. In this section, you learn how to commit project files and how to open and edit documents from the Project panel.
When you are finished creating folders and adding files to your Flash Project file, you should check in the runtime files to your remote testing server. You can do this procedure only if you have defined a site for the project file. Choose the
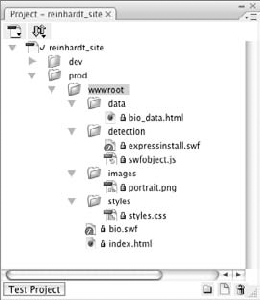
wwwrootfolder in the Project panel. Right-click (or Ctrl+click on the Mac) the folder, and choose Check In. Flash CS3 then connects to your remote server and checks in the nested files and folders within thewwwrootfolder. When the files and folders have been successfully checked in, a lock appears next to them (see Figure 3.14).When you're ready to edit a specific file in Flash CS3, right-click (or Control+click on the Mac) the file in the Project panel and choose Check Out in the contextual menu. Try this step with the bio.swf document. Once you have checked out this file, double-click its corresponding .fla file,
bio.fla, to edit it in the Flash authoring environment.Note
When you have checked out a file, you'll see a green check mark next to the file icon. Other members of your team subscribed to the same project will see a lock next to the same file in their Project panels. If you don't check out the .swf file associated with a .fla file, you will not be able to publish or test the Flash movie (.swf file).
With
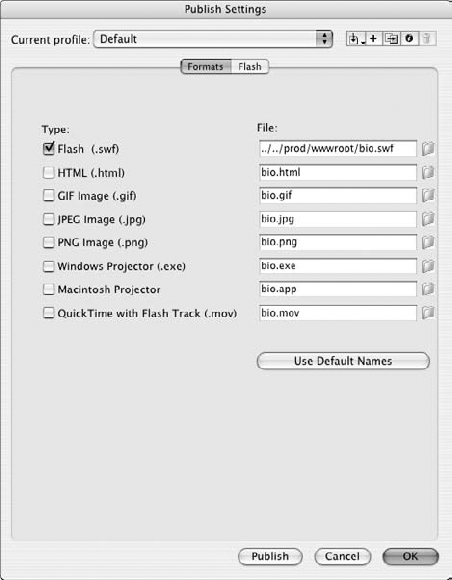
bio.flaopen, take a look at how thebio.swffile (located in thewwwrootfolder) is published. Choose File
In this final section, you'll learn how to test an entire project, and upload the updated runtime files to your testing server.
Before you can publish or test the project, you'll need to unlock the file that will be published by Flash:
bio.swf. Check out this files in thewwwrootfolder of the Project panel.Click the Test Project button in the lower-left corner of the Project panel. You can also use the keyboard shortcut Ctrl+Alt+P, or Command+Option+P on Mac. Flash CS3 will publish all of the Flash documents (.fla files) in the project file. In our example, there's only one .fla file,
bio.fla. The newly publishedbio.swffile, located in thewwwrootfolder, then opens in the Test Movie environment.If everything is working correctly, check in the
bio.swfdocument. If there was an error during testing, double-check the code added in the last section for syntax errors. The Output panel will likely provide clues about any errors associated with improper URLs for runtime assets.
Note
You can find the final site files in the ch03/final_files folder of the Flash CS3 Bible CD-ROM. If you try to open the reinhardt_site.flp document from the CD-ROM (or a copy of it), you'll likely need to relink the documents to the locations of the copies on your system.
Note
We'd like to know what you think about this chapter. Visit www.flashsupport.com/feedback to send us your comments.
Your clients rely on you to understand and guide the production process involved with Flash content creation.
Careful planning helps you to create Flash solutions that best meet the goals of your project. The technical issues, such as usability, target audience, and delivery platform, should be balanced with the aesthetic aspects of experience design.
To structure the development of Flash projects, many Web developers use a two-phase production model that involves six milestones: Business Initiative, Creative Solutions, Approval, Production, QA, and Delivery.
During the production period, it is helpful to keep six key concepts in mind: asset assembly, a master Flash architecture, a local test environment, HTML page layout, a server staging environment, and proper QA testing. After production is finished, you also need to devise a strategy for systematic maintenance.
You can use the Project panel in Flash CS3 to manage all of the Flash documents for a site or application.
