Interactivity in a Flash movie can broadly be thought of as the elements that react and respond to a user's activity or input. A user has many ways to give input to a Flash movie, and Flash has even more ways to react. But how does interactivity actually work? It all starts with actions and event handlers.
Even the most complex interactivity in Flash is fundamentally composed of two basic parts: the behavior (what happens), and the cause of the behavior (what makes it happen). Here's a simple example: Suppose you have a looping soundtrack in a movie and a button that, when clicked, turns the soundtrack off. The behavior is the sound turning off, and the cause of the behavior is the mouse clicking the button. Another example is stopping an animation when it reaches a certain frame on its timeline. When the last keyframe of the animation is played (the cause), an action on that keyframe stops the animation (the behavior). In Flash, the building blocks of behaviors are referred to as actions.
Note
Flash CS3 features an interactive authoring tool called the Behaviors panel. Our usage of the term behaviors in the preceding description should not be confused with this feature. The Behaviors panel, which you'll learn about later in this chapter, enables you to quickly add an action or a series of actions to a Flash object or keyframe.
The first step in learning how to make interactive movies is becoming familiar with the list of possible actions. However, actions can't act without being told to act by something. That something is often the mouse pointer coming in contact with a button, but it can also be a keystroke, or simply a command issued from a keyframe. We refer to any occurrence that can cause an action to happen (such as the button click in the preceding example) as an event. The mechanism you use to tell Flash what action to perform when an event occurs is known as an event handler. This cause-and-effect relationship seems obvious, but it is an extremely important concept. For the purposes of creating basic interactivity, the difference between an action and the cause of an action is merely a practical detail. As the set of Flash actions, collectively know as ActionScript, continues to grow with each release of the Flash authoring tool (and, therefore, the interactive capabilities that they provide), understanding the relationship between actions and the things that cause them can be the key to adding more sophisticated behavior to your movies with traditional programming techniques. Every interactive framework, whether it is Adobe Flash or Director or Apple DVD Studio Pro, has unique handlers for specific events. Table 18.1 relates interactive events with Flash handlers.
Note
Any ActionScript covered in this chapter refers to ActionScript 1.0 or 2.0. For any examples in this chapter, make sure you choose Flash file (ActionScript 2.0) when you create a new file.
Table 18.1. Events and Flash Handlers
Event | Type | Event handler | Example |
|---|---|---|---|
Playback | Time-based | Keyframes | Timeline plays until it reaches a certain frame; a |
Mouse | User input |
|
|
Key press | User input |
| A user presses the Enter key to submit a form; an alert appears if the Caps Lock key is enabled. |
Window resize | User input |
| A user clicks the maximize button on a Flash projector or Web browser window and Flash elements respond accordingly. |
Microphone or Webcam activity | Audio/video input |
| When a user stops talking into a microphone, a graphic turns red; a stream starts to record audio and video when the movement is detected in front of a Webcam. |
Data | System-based |
| Search results display in the Flash movie when the results have fully loaded. |
While the breadth and depth of ActionScript involved with the interactions described in Table 18.1 may seem overwhelming, don't worry — we're taking it one step at a time. First, you'll learn about what the new Behaviors panel can do. Then you'll learn how to set up the Actions panel, whose look and feel has changed from previous versions of Flash. Later, we'll look at actions that control movie playback. Later, you'll also learn how to call these actions in various ways with three kinds of event handlers: button manipulation, keyframes, and keystrokes.
Flash CS3 includes a Behaviors panel, which was introduced in Flash MX 2004. This panel is designed to help a novice who is just starting to use Flash for design and development. You can open the Behaviors panel, shown in Figure 18.1, by choosing Window
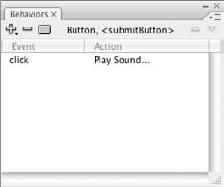
If you create a new Flash document (ActionScript 2.0) and select the first frame of Layer 1, you can click the Add Behavior (+) button at the top-left corner of the Behaviors panel to see a list of categories (see Figure 18.2).
These categories represent a variety of objects you can control with one or more behaviors. So what do behaviors do? In the simplest sense, a behavior is automated scripting. When you add a behavior to an event handler, Flash CS3 generates the necessary ActionScript code to make that behavior happen. Let's take a quick look at a Web behavior.
Create a new Flash document by choosing File

Rename Layer 1 to button.
Open the Components panel (Ctrl+F7 or

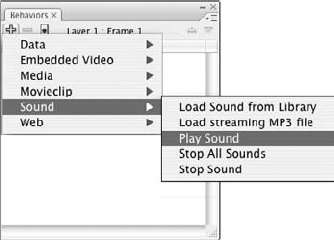
Select the Button component instance on the Stage, and open the Property inspector. In the <Instance Name> field, type siteButton. Click the Parameters tab, and in the label field, type web site (see Figure 18.3).
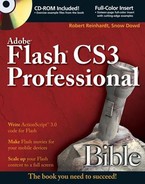
With the Button instance selected on the Stage, open the Behaviors panel. Click the Add Behavior (+) button, and choose Web
Now look at the code that Flash CS3 created for the behavior. Select the
siteButtoninstance, and choose Windowon (click) { //Goto Webpage Behavior getURL("http://www.flashsupport.com","_blank"); //End Behavior }The heart of this code is the event handler,
on(), and thegetURL()action. When the user clicks the Button component instance, theon()handler detects the click and executes (or invokes) thegetURL()action. You'll learn more about these actions later in this chapter.Note
The
clickevent is available in Flash Player 7 and higher and is specific to the UI components. This event is not used for standard mouse events on Button symbol instances.Save your Flash document (File
Note
You can find the completed file, button_behavior.fla, in the ch18 folder of this book's CD-ROM.
We won't discuss any other behaviors in this chapter, as you can find specific categories of behaviors explained in other parts of the book:
MovieClipbehaviors, Chapter 19, "Building Timelines and Interactions"Projector behavior, Chapter 23, "Using the Flash Player and Projector"
Sound behaviors, Chapter 15, "Adding Sound"
Behaviors enable you to learn by example — you can add a behavior to an object and look at the code used to describe the interaction.
Note
Experienced Flash developers and programmers will be the first to tell you that it's not a good idea to put a lot of code on objects that are on the Stage. Most scripts are placed on one or more keyframes, or the code is stored in a separate .as file. You learn more about programming practices in Part VII, "Approaching ActionScript."
Every interactive authoring system uses a language (or code) that enables elements within the system to communicate. Just as there are several languages that people use to speak to one another around the globe, there are hundreds of programming languages in use today. In an effort to make Flash more usable to computer programmers, Flash's scripting language, called ActionScript, changed much of its formatting in Flash 5 to mirror JavaScript, a fundamental element for adding advanced interactivity to HTML Web pages. Right now, we focus on using the most basic Flash ActionScript.
Note
In Flash MX 2004, ActionScript matured to a whole new version, dubbed ActionScript 2.0, or AS2. ActionScript 2.0 is a different — and more complex — style of coding than what was used in Flash MX and earlier. The ActionScript style used in Flash MX and earlier is now known as ActionScript 1.0, or AS1. It's still perfectly valid to code in either style. Starting with Flash CS3, you can use a completely revamped version of ActionScript 2.0, called ActionScript 3.0. The new version is much more complex, and should only be used by experienced developers and programmers. ActionScript 3.0 will feel more familiar to developers who have used other object-oriented programming languages such as C++ or Java.
Note
If you're interested in learning the fundamental building blocks of ActionScript programming, check out our advanced coverage of ActionScript in Chapters 24 through 36. The three chapters of Part V are intended to provide a starting point for Flash designers and developers who are new to Flash actions and interactive concepts. Some chapters in Parts VII and IX of this book cover specific aspects of ActionScript 3.0. For more expanded coverage of ActionScript 3.0, refer to the Adobe Flash ActionScript 3.0 Bible (Wiley).
Flash CS3 has a specific interface element that enables you to add interactive commands to Flash movies — the Actions panel. Unlike behaviors and the Behaviors panel, you don't use menus to add interactive functionality — you type the ActionScript code describing the interactivity in (or out of) of the Actions panel. You can open the Actions panel in a number of ways:
Go to Windows
Press the F9 key (or Option+F9 on the Mac)
Click the Actions icon button in the Property inspector
Alt+double-click (or Option+double-click) a keyframe in the Timeline window
If you have a keyframe selected in the Timeline window, the Actions panel will be titled Actions - Frame (see Figure 18.5). If you have a Movie Clip symbol instance selected on the Stage, you'll see the name Actions - Movie Clip. If you have a Button symbol instance selected on the Stage, the Actions panel will be titled Actions – Button. If you have a component selected, the Actions panel will read Actions – Component. Don't be confused — there is only one Actions panel. Flash CS3 simply lets you know the object to which you are assigning actions.
Tip
The Actions panel in Flash CS3 features an updated Script Assist mode. Script Assist enables you to code ActionScript by selecting actions and filling in parameters, instead of writing out all the code by hand. If you used Normal mode in Flash MX or earlier, you'll be happy to know that Normal mode is essentially reintegrated as Script Assist in Flash CS3.
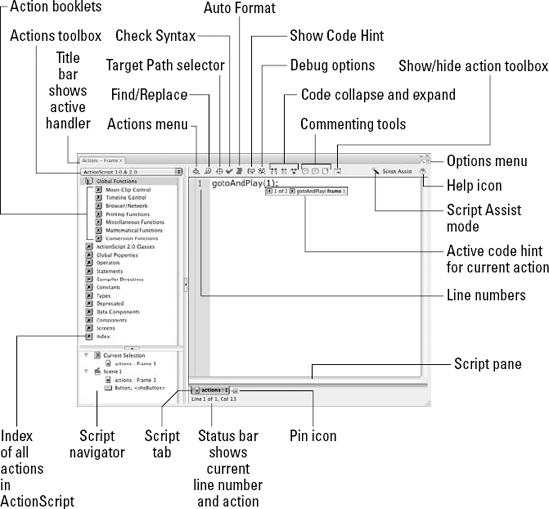
As shown in Figure 18.5, the Actions panel in Flash CS3 has three distinct areas (counter-clockwise from the left): the Actions toolbox, the Script navigator, and the Script pane. The new Script Assist area is available within the Script pane. There are two auto-snap dividers, one dividing the Actions toolbox and Script navigator from the Script pane, and another subdividing the Actions toolbox and Script navigator. You may want to practice opening and closing these dividers, as well as dragging each to your preferred width and height, respectively. Figures 18.5 and 18.6 show a breakdown of the Actions panel in Flash CS3. The following list details the three areas:
The Actions toolbox contains several nested booklets of ActionScript commands. You can select actions to add to the Script pane.
Tip
The Actions toolbox has a booklet selection drop-down menu. The default set of booklets displayed in the toolbox pertain to ActionScript 1.0, 2.0, and 3.0, but you can switch to other sets of booklets, including various versions of Flash Lite. Each Flash Lite booklet only displays actions compatible with the Flash Lite players that ship on mobile devices and phones.
The Script navigator can jump to any script within your Flash document. When you select a keyframe or object in this pane, any code attached to the item is displayed in the Script pane.
Tip
The Script navigator shows the actions for the entire document, not just for the current timeline.
The Script pane displays the current code for an item selected on the Stage, a keyframe selected in the Timeline window, or an item selected in the Script navigator. You can type, copy, cut, and paste code into the Script pane, as long as you are not working in Script Assist mode. An options bar is located at the top of the Script pane as well. The options bar contains several buttons to modify, search, debug, or format your code in the Script pane. You can also find most of these options in the panel's options menu, located in the top-right corner of the panel.
Tip
You can click the pin icon at the bottom tab of the script in the Script pane. You can pin multiple scripts in the Script pane, and quickly tab between them.
The Script Assist area within the Script pane enables you to visualize your code with contextual parameters, as fill-in text fields or drop-down menus, as shown in Figure 18.6. The Script Assist mode is most useful for beginners learning ActionScript for the first time. To enter Script Assist mode, click the Script Assist button on the options bar of the Script pane. Not all actions have the same ease of use within Script Assist; more complex ActionScript code is not well-suited for Script Assist mode. When Script Assist mode is enabled, you cannot edit code manually within the Script pane, and you cannot switch the active booklet set.
Tip
When the Actions panel is in focus, a highlighted bar shows up on the left side of the Script pane. This highlighted color enables you to know if you can start typing in the Script pane.
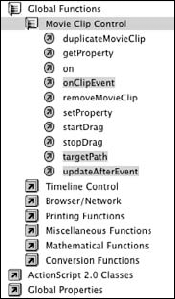
For this chapter, you'll work primarily within the Timeline Control booklet, located within the Global Functions booklet in the Actions toolbox.
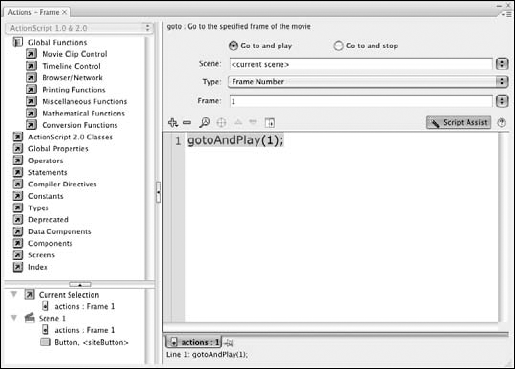
Figure 18.6. The Script Assist mode displays a more user-friendly interface for controlling action parameters.
You can add actions to the Script pane in one of three ways:
Drag an action from the Actions toolbox to the Script pane.
Select an action from the Actions menu, accessed by clicking the plus (+) icon.
Double-click an action in the Actions pane.
To delete actions, select the action line(s) in the Script pane, and press the Delete or Backspace key on the keyboard.
After you have added an action to the Script pane, you can specify parameters (or arguments) for the action. Depending on the action, you may or may not need to type such parameters. By default, Flash CS3 provides code hints as you type actions into the Script pane. The Show Code Hint button enables you to see the parameters for an action, as shown in the gotoAndPlay action in Figure 18.5.
More importantly, the Script Assist mode makes it much easier for you to add and adjust settings for basic actions, especially those you find in the Timeline Control booklet. You use the Script Assist mode throughout this chapter to learn the basic control actions.
You should get in the habit of clicking the Check Syntax button (the blue check mark) to make sure you didn't mistype an action. If you have an error, the Output panel displays some information related to the error, indicating the line number where the syntax error occurs.
Note
In Chapter 24, "Knowing the Nuts and Bolts of Code," you can also learn about referencing actions in the Help panel of Flash CS3.
For now, look at two booklets in the Actions toolbox's Global Functions booklet: Timeline Control and Browser/Network. The Timeline Control actions are listed in alphabetical order. The first eight actions in this booklet, including gotoAndPlay, gotoAndStop, play, and stop, control the playback of the movie. The last action, stopAllSounds, is a global command to handle sound playback.
Note
If you're in Script Assist mode, the actions listed in the action booklets may change. The actions in the Timeline Control booklet are reduced to goto, play, stop, and stopAllSounds. The Script Assist mode enables the missing actions in one of the other actions. For example, the gotoAndPlay and gotoAndStop actions are both available in the parameters of the goto action in Script Assist mode. The Browser/Network actions are also truncated in a similar fashion.
The Browser/Network actions — fscommand, getURL, loadMovie/loadMovieNum, loadVariables/loadVariablesNum, and unloadMovie/unloadMovieNum — enable movies to load external files and communicate with the browser, a Web server, or the stand-alone player. In this chapter, we get you up and running with the getURL action, which enables you to link to other Web resources outside of the Flash movie (such as Web pages and file downloads).
Note
Throughout this book, most actions are specified with () characters at the end of the action's name. For example, the gotoAndPlay action is really a method, and in code it appears as gotoAndPlay(). In Part VII of this book, we provide more detailed information about code terms and practices.
The remaining Action booklets primarily offer extended ActionScript programming capabilities. We discuss many of these actions in later chapters.
Some of the most difficult concepts for beginners to understand with code writing are white space, parentheses ( ( ) ), semicolons ( ; ), and curly braces ( {} ). In the following paragraphs, you learn how each of these affects your ActionScript code.
White space is a collective term referring to any blank areas between lines of code. It includes spaces inserted by the spacebar, indentations inserted with the Tab key, and line returns inserted with the Enter or Return key. When Flash CS3 compiles your ActionScript code into the Flash movie, the white space between your lines of code usually will not generate any errors. For example, the following code works exactly the same:
on(release){
   getURL("mypage.html");
}
or
on(release){
getURL("mypage.html");
}or
on      (             release ){
getURL("mypage.html");
}
However, white space is an issue when it separates the key terms in the action, such as:
get URL("mypage.html");The space between get and URL will cause an error when Flash CS3 tries to create the Flash movie.
Tip
To check if your syntax is correct, click the Check Syntax button in the Actions panel. If you do have any white space errors, the Output panel will display information related to the error. Also, if you code has errors, you are prevented from entering the Script Assist mode.
Deprecated and incompatible actions: What are they?
As the ActionScript language of Flash continues to expand and encompass new functionality, older actions coexist with newer and better actions (or methods, properties, event handlers, and functions, which we'll discuss later). Although Flash Player 9 will continue to support ActionScript 2.0 and earlier actions, it's better not to use older actions if the newest version of the Flash Player has a new way of accomplishing the same task. Older actions that have been replaced with a new action (or new way to perform the same task) are called deprecated actions. The Actions panel in Flash CS3 houses all deprecated actions in the Deprecated booklet of the Actions pane. Why shouldn't you use these actions? As you'll see in more advanced scripting, ActionScript 2.0 and 3.0 have specific syntax to target Movie Clips and determine whether certain frames have loaded, among other features of the ActionScript "dot syntax" language. The following figure shows the actions within the Deprecated
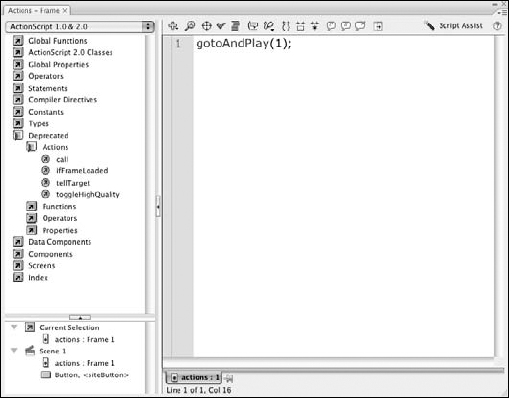
Although you should avoid actions that are highlighted in the Deprecated booklet if possible, Flash Player 9 continues to support them.
Flash CS3 also lets you know if certain actions are not supported with the Player version that is selected in the Flash format tab of the Publish Settings (File
Flash Player 4 (or earlier) and Flash Lite 1.0/1.1 will not support the onClipEvent or updateAfterEvent actions (among others), as these actions were introduced in Flash Player 5.
Many, but not all, actions require parentheses after the action term, such as on(), getURL(), or even play(). A general rule to remember is that if the action requires a parameter, such as on (release), then parentheses are required as well.
Note
Parameters are also referred to as arguments.
However, many actions, such as play() and stop(), still require parentheses, even though they do not use any arguments. Another rule for parentheses is that any open parenthesis ( ( ) must eventually be followed by a closing parenthesis ( ) ). A habit we like to encourage is counting the number of opening parentheses in a script and then counting the number of closing parentheses. If the numbers don't match, you need to review your code to find the place where you forgot to include a parenthesis.
You've probably already noticed that most actions include a semicolon ( ; ) at the end of the code line. In practice, many coders forget to include semicolons. Usually, Flash is very forgiving if you omit semicolons, but by no means should you be encouraged to omit them. The general rule for semicolons and curly braces is mutually inclusive: If your action doesn't end with an opening curly brace ( { ), it should end with a semicolon. As with parentheses, all opening curly braces must eventually be followed by a closing curly brace ( } ). Curly braces are commonly used with actions beginning with on, such as on() and onClipEvent(), as well as if and function declarations.
Note
You'll learn more about if statements and functions in Part VII, "Approaching ActionScript."
Now that you have a general picture of what actions do, let's look at five common actions in detail. At this point, we're describing only the functionality of each action, not how to add an action to your movie. We provide information on adding an action in the next section, "Making Actions Happen with Event Handlers."
Note
You will find coverage of further actions (and full-blown ActionScript) in later chapters.
Actions in the Flash interface appear alphabetically sorted from top to bottom. In the following sections, complementary actions are grouped together.
These "go to" actions change the current frame of the movie to the target frame specified as the action's parameter. There are two variations:
gotoAndPlay: Changes the current frame to the frame specified, and then executes aplayaction.gotoAndPlayprovides the capability to show animated sequences as preludes to individual content areas.gotoAndPlayalso gets frequent use in choose-your-own-adventure style animations, in which the user guides an animated character through different paths in a narrative.Note
If you use a
gotoAndPlay()action to go to a frame that has astop()action, the timeline will stop at the new frame.gotoAndStop: Changes the current frame to the frame specified and then halts playback on that frame.gotoAndStopis often used to produce toolbar-style interfaces where the user clicks buttons to view different areas of content in a movie.
Both actions enable you to jump to certain areas of the Flash movie. The parameters of these actions start with the largest time unit, the scene, and end with the smallest one, the frame.
You can specify frames in other scenes as the target of goto actions with the scene parameter. As shown in the following code, you type the name of the scene first, with double quotes around the name, and then the frame number (without quotes) or frame label. In this example, "Scene 2" is the name of the scene and "animate_in" is the frame label in that scene to jump to.
gotoAndPlay("Scene 2", "animate_in");However, if you only specify one parameter in a gotoAndPlay or gotoAndStop action, the parameter is interpreted as a frame label. For example, the following code tells the current timeline to jump to its "menu" frame label:
gotoAndStop("menu");Warning
Although we haven't looked at actions specifically for use in Movie Clip instances, make a note that you can't use a goto action specifying a scene within a Movie Clip instance. In this case, you should target the Main Timeline to go to and stop (or play) the keyframe label in the desired scene, omitting the Scene's name. For example, _root.gotoAndStop("products"); executed from a Movie Clip Timeline would tell the Main Timeline to go to and stop on the frame label products, which would be located in a different scene.
There are three methods of specifying the frame to which the movie should go when it receives a goto action. The methods for specifying the frame are
number: Specifies the target frame as a number. Frame 1 is the beginning of the movie or scene. Frame numbers span scenes, so if you have a movie with two scenes, each containing 25 frames, and you add a
gotoaction with Frame Number set to 50, your action advances the movie to the 25th frame of the second scene. Frame numbers should not use surrounding quotes, as frame labels do. The following action tells the current timeline to jump to frame 10 and start playing:gotoAndPlay(10);
Warning
Using frame numbers to specify the targets of
gotoactions can lead to serious scalability problems in Flash movies. Adding frames at the beginning or in the middle of a movie's Timeline causes the subsequent frames to be renumbered. When those frames are renumbered, allgotoactions that use frame numbers must be revised to point to the correct new number of their target frames.In the vast majority of cases,
gotoactions that use a frame label to specify target frames are preferable togotoactions that use a frame number to specify target frames. Unlike numbered frame targets,gotoactions with labeled frame targets continue to function properly, even if the targeted frame changes position on the timeline.label: Individual keyframes can be given names via the Label field in the Property inspector. Once a frame is labeled, a
gotoaction can target it by name. To specify a label as the target of agotoaction, type the name of the frame as the action's parameter. The following example tells the Flash movie to go to the frame labeled"products"and stop at that frame.gotoAndStop("products");ActionScript expression: Specifies the target frame as an interpreted ActionScript code segment. You use expressions to dynamically assign targets of
gotoactions. Here's a quick example of a string variable being used as a frame label in ActionScript 1.0 style:var targetLabel = "products"; gotoAndPlay(targetLabel);
Notice that the term
targetLabeldoes not use quotes, because it is not the actual frame label name. When the Flash Player interprets this action, it looks up the value of targetLabel, which is"products", and inserts that value into thegotoAndPlayaction. In ActionScript 2.0, the same action looks like this:var targetLabel:String = "products"; gotoAndPlay(targetLabel);
Note
Expressions are covered in Chapter 24, "Knowing the Nuts and Bolts of Code."
The nextFrame and prevFrame actions act like a gotoAndStop action, in that they both transport the timeline to a new position and stop.
nextFrame: This action tells the current timeline to move forward one frame and stop playback.nextFramecan be used in conjunction withprevFrameto quickly set up a slide-show-style walkthrough of content, where each of a series of contiguous keyframes contains the content of one "slide." This action does not use any parameters. The following code moves the timeline to the next frame:nextFrame();
prevFrame: This action moves the current timeline backward one frame and stops playback. For example, if the timeline is on frame 20, and the movie runs aprevFrame()action, the timeline moves to frame 19. As with thenextFrameaction,prevFramedoes not use any parameters:prevFrame();
These actions advance the Flash movie to a new scene. Here's how they work:
nextScene: This action tells the current timeline to move to the first frame of the next scene. You can usenextScenefor more elaborate slide shows or demonstration movies, where each scene contains animated content with a stop action on the last frame. The last frame of the scene then contains a button using thenextSceneaction. This action does not use any parameters. The following code tells the movie to jump to the next scene:nextScene();
prevScene: This action jumps the movie to the previous scene. For example, if the playhead is in Scene 2, the timeline moves to the first frame of Scene 1. As with thenextScene()action,prevScene()does not use any parameters:prevFrame();
Note
The nextScene and prevScene actions do not automatically recycle the scenes when the last or first scene is reached, respectively. For example, if you have three scenes and use a nextScene action while the movie is on the last scene, the movie will not jump back to the first scene.
Tip
Although you may find it simpler to segment your Flash content across several scenes as you begin to learn Flash, most seasoned Flash designers and developers only use one scene, and separate content across several Movie Clip symbols placed on one or more frames of Scene 1. Scenes are not compatible with standard targeting syntax, as you'll learn in the next chapter.
Note
You can find an example of nextScene and prevScene usage in the document named nextScene.fla in the ch18 folder of this book's CD-ROM.
These simple actions are the true foundations of Flash timeline control. play sets a movie or a Movie Clip instance in motion. When a play action is executed, Flash starts the sequential display of each frame's contents along the current timeline.
The rate at which the frames are displayed is measured as frames per second, or fps. The fps rate can be set from 0.01 to 120 (meaning that the play action can cause the display of as little as 1 frame every 100 seconds to as many as 120 frames in 1 second, subject to the limitations of the computer's processing speed). The default fps is 12.
After play has started, frames continue to be displayed one after the other, until another action interrupts the flow, or the end of the movie or Movie Clip's timeline is reached. If the end of a movie's timeline is reached, the movie either loops (begins playing again at frame 1, Scene 1) or stops on the last frame.
After the end of the Movie Clip's timeline is reached, playback loops back to the beginning of the clip, and the clip continues playing. To prevent looping, add a stop action to the last frame of your Movie Clip.
Note
A single play action affects only a single timeline, whether that timeline is the main movie timeline or the timeline of a Movie Clip instance. For example, a play action executed inside a Movie Clip does not cause the Main Timeline to begin playing. Likewise, any goto action on the Main Timeline doesn't migrate to the Movie Clips that reside there. A timeline must be specifically targeted to control playback along that timeline. If there is no specified target, the action is referring to its own timeline. However, this is not the case for animations within Graphic symbol instances. An animation in a Graphic symbol is controlled by actions on the timeline in which the symbol instance is present — Flash ignores actions on a Graphic symbol's timeline.
stop, as you may have guessed, halts the progression of a movie or Movie Clip that is in a play state. stop is often used with buttons for user-controlled playback of a movie, or on frames to end an animated sequence.
Tip
Movie Clip instances placed on any timeline begin to play automatically. Remember to add a stop action on the first frame of a Movie Clip if you don't want it to play right away.
A simple but powerful action that mutes any sounds playing in the movie at the time the action is executed, stopAllSounds does not disable sounds permanently — it simply cancels any sounds that happen to be currently playing. It is sometimes used as a quick-and-dirty method for making buttons that shut off background looping soundtracks. stopAllSounds is not appropriate for controlling whether individual (or specific) sounds are played or muted.
Want to link to a Web page from a Flash movie? No problem. That's what getURL is for. You can find the getURL action in the Global Functions
getURL has three parameters that are familiar to Web builders (the first one, url, is required for this action to work):
url: This is the network address of the page, file, script, or resource to which you are linking. Any value is permitted (including ActionScript expressions), but the linked item can be displayed only if the reference to it is correct. url is directly analogous to the HREF attribute of an HTML anchor tag. You can use a relative or absolute URL as well. Examples:
http://www.yoursite.com/
ftp://ftp.yoursite.com/pub/documents.zip
menu.html
/cgi-bin/processform.cgi
   /script/form.cfm
Since Flash Player 4,
getURLcan be used to link to documents on the Web from the stand-alone Flash Player. Execution of agetURLaction in the stand-alone player causes the default Web browser to launch and load the requested URL.Tip
You can specify secure domain URLs by using the
httpsprotocol for SSL (Secure Socket Layer) connections.window: This is the name of the frame or window in which you wish to load the resource specified in the url setting. The window parameter is directly analogous to the
targetattribute of an HTML anchor tag. In addition to enabling the entry of custom frame and window names, the window parameter can use the following browser-standard target names:"_self": Loads the URL into the same frame or window as the current movie. If you do not specify a window parameter in thegetURLaction, this behavior will be the default."_blank": Creates a new browser window and loads the URL into it."_parent": Removes the current frameset and loads the URL in its place. Use this option if you have multiple nested framesets, and you want your linked URL to replace only the frameset in which your movie resides."_top": Loads the URL into the current browser and removes all framesets in the process. Use this option if your movie is in a frame, but you want your linked URL to be loaded normally into the browser, outside the confines of any frames.
Note
Frame windows and/or JavaScript windows can be assigned names. You can target these names by manually typing the name in the Window field. For example, if you had a frame defined as
<frame name="main". . .>, you could load specific URLs into a frame namedmainfrom a Flash movie.method: This parameter enables
getURLto function similarly to an HTML form submission. For normal links, the method parameter should be omitted. But in order to submit values to a server-side script, one of the submission methods,"GET"or"POST", should be specified. For a complete discussion on submitting data to a server from a Flash movie (using the newLoadVarsobject), see Chapter 30, "Sending Data In and Out of Flash."
Tip
getURL functions in the Test Movie environment. Both the Flash stand-alone player and the Test Movie command give you access to external and/or local URLs.
Here are some examples of how you can write a getURL action. The following code tells the browser to load the URL, www.wiley.com, into the current browser window:
getURL("http://www.wiley.com");Alternatively, you can specify a unique target for the loaded URL. The following example loads an HTML document named menu.html into a frame named menu_frame:
getURL("menu.html", "menu_frame");A more advanced usage of the getURL action sends variables from the Flash movie to a Web server's script, which is set up to receive the variables. The following code looks up the version of the Flash Player playing the movie and sends to a script that logs the information:
var playerVersion = getVersion();
getURL("http://www.mysite.com/scripts/log.cfm", "_self", "GET");
As we mention with the goto actions, you can also use expressions with getURL actions. Expressions can be used as parameters of any ActionScript action. The following example uses a string variable to specify the URL used by a getURL action:
var siteURL = "http://www.flashsupport.com";
getURL(siteURL);
You should start familiarizing yourself with the ActionScript notation that Flash uses for each action (see Table 18.2). As you use Flash for more advanced interactivity, you'll need to have a firm grasp of code notation. Part VII, "Approaching ActionScript," teaches you how to start building more advanced code.
Table 18.2. Common Actions and ActionScript Notation
Arguments | ||
|---|---|---|
|
| Scene Name (Frame Label, Number, or Expression) |
|
| Scene Name (Frame Label, Number, or Expression) |
|
| None |
|
| None |
|
| None |
|
| None |
|
| None |
|
| None |
|
| None |
|
| url, target frame or window, method for form submission |
The ten common actions we discuss in the previous sections provide many of the behaviors that you need to make an interesting interactive Flash movie. But those actions can't make your movies interactive on their own. They need to be told when to happen. To tell a Flash movie when an action should occur, you need event handlers. Event handlers specify the condition(s) under which an action can be made to happen. For example, you might want to mouse-click a button to initiate a play() action, or you might want a movie to stop when a certain keyframe in the timeline is reached. Creating interactivity in your movies is simply a matter of deciding what event you want to detect (mouse click, keystroke, and so on), adding the appropriate event handler to detect it, and specifying the action(s) that should be performed when it happens.
Before we describe each event handler in detail, in the next section we show you an example of exactly how an event handler merges with an action to form a functioning interactive button.
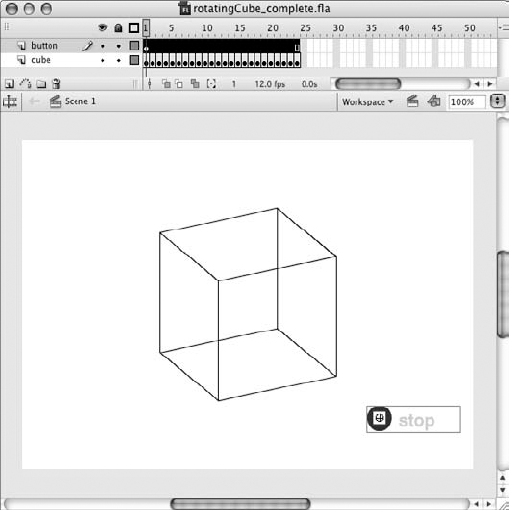
Imagine that you have a short, endlessly looping movie in which a wire-frame cube rotates. Now imagine that you want to add a button to your movie that, when clicked, stops the cube from rotating by stopping the playback of the looping movie. Here's what you need to do:
Note
For this exercise, you can use the rotatingCube.fla file located in the ch18 folder on this book's CD-ROM. The finished file is named rotatingCube_complete.fla.
Open the starter Flash document,
rotatingCube.fla. Save this document as rotatingCube_complete.fla on your local hard drive.Make a new layer called button.
Place a button on the button layer. You can use Flash CS3's sample Stop button found in the classic buttons
Tip
Selecting buttons and editing button properties sometimes can be tricky if buttons are enabled in the Flash authoring environment. For easier button manipulation, disable buttons by unchecking Enable Simple Buttons under the Control menu.
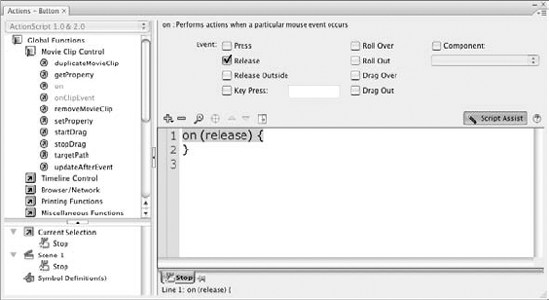
With the Stop Button instance selected, open the Actions panel (F9, or Option+F9 on Mac). Click the Script Assist button, and open the Global Functions
Double-click the
onevent handler in the Movie Clip Control booklet, or drag it to the Script pane. A list of mouse events foronappears in the Script Assist area of the Script pane (shown in Figure 18.8). Notice that thereleaseevent is automatically checked for you. Thereleaseevent is one of several mouse-click events (another frequently used event ispress; we describe both later in this chapter in the section titled "The Flash event handlers"). Notice that the event is specified between the parentheses of theonhandler in the Script pane. You've now told Flash that you want something to happen when the mouse clicks the button. All that's left is to tell it what should happen. In other words, you need to nest another action within theon (release){}code.Now you'll try another method for adding an action to the Script pane. While in Script Assist mode, make sure line 1 in the Script pane is highlighted. Then click the plus (+) button in the toolbar of the Actions panel. From the menu, choose Global Functions
A
stopaction will be placed between the curly braces ({}) of theonhandler. The Script Assist mode automatically formats the code cleanly. The Script pane should now read as follows:on (release){ stop(); }The
stopaction, represented by the codestop();, is contained by the curly braces{and}that mark the beginning and end of the list of actions that are executed when thereleaseevent occurs (there could be any number of actions in this list). Each action line (handlers excluded) must end with the semicolon (;) character.You now have a button in your Flash movie that stops the movie's playback when it is clicked. Save your Flash document (.fla), and test the movie by choosing Control

To make any interactivity in your movies, you simply have to apply the basic principles you used to make the stop button: Decide which action (or actions) you want to happen, and indicate when you want that action to happen with an event handler. Let's look now at more event handlers you can use to make those actions happen.
Three primary event handlers exist in Flash: those that detect mouse activity on Button instances (button manipulation), those that recognize when a key is pressed on the keyboard (key presses), and those that respond to the progression of the timeline (keyframes).
Event handlers that occur based on the user's interaction with a button rely entirely on the location and movement of the mouse pointer. If the mouse pointer comes in contact with a Button symbol's Hit area, it changes from an arrow icon to a finger pointer icon. At that time the mouse is described as "over" the button. If the mouse pointer is not over a button, it is said to be out or outside of the button. General movement of the mouse without the mouse button depressed is referred to as rolling. General movement of the mouse with the mouse button pressed is referred to as dragging.
Note
If you don't know how to make a Button symbol and its various states, read Chapter 6, "Symbols, Instances, and the Library."
Warning
Event handlers and actions for buttons must be placed only on Button instances, not on the four frames in the timeline of the original Button symbol. One of the features in Flash CS3 is that it will not enable you to place any actions in a Button symbol timeline.
It's worth mentioning that you can assign one or more mouse events to a Button instance's on handler. For example, the following code will be invoked when the user releases the mouse button over or outside of the Hit area of the Flash button:
on (release, releaseOutside){
   stop();
}
As this code demonstrates, multiple events are separated by a comma ( , ). You can specify as many events as you need within the parentheses of the on handler.
Here are the mouse-based events for Flash buttons.
A single mouse click can actually be divided into two separate components: the downstroke (the press) and the upstroke (the release). A press event occurs when the mouse pointer is over the Hit area of a button and the downstroke of a mouse click is detected. Press is best used for control panel-style buttons, especially toggle switches.
Warning
Typically, developers should program reversible decisions for primary navigation so that users can abort their clicks by rolling the cursor away from the Hit area before releasing the mouse. For example, a user might click a button for more information and decide she would rather not get that information. We do not recommend using the press event for important user moves such as these because it does not give users an opportunity to abort their moves.
A release event occurs when the mouse pointer is over the Hit area of a button and both the downstroke and the upstroke of a mouse click are detected. The release event is the standard button click event.
Tip
If you use the Track as Menu Item behavior for a Button instance in the Property inspector, a button will respond to a release event over its Hit state even if the mouse was pressed outside of the button's Hit area.
A releaseOutside event occurs in response to the following series of mouse movements:
The mouse pointer moves over a button's Hit area.
The mouse button is pressed.
The mouse pointer is moved off the button's Hit area.
The mouse button is released.
The releaseOutside event can be used to react to an aborted button click.
A rollOver event occurs when the mouse pointer moves onto the Hit area of a button without the mouse button depressed.
Note
To perform standard rollover button effects, such as graphic art changes or sound events, you can insert graphics and sound on to the Over state of the Button symbol timeline. It's common practice, however, to create Movie Clip instances that use mouse event handlers for specialized rollover effects. You learn more about this advanced usage of Movie Clips in Chapter 25, "Controlling Movie Clips." You can also find a bonus file demonstrating Movie Clip-based rollovers at www.flashsupport.com/bonus/button_transition/button_anim.html.
A rollOut event occurs when the mouse pointer moves off of the Hit area of a button without the mouse button depressed. This event is commonly used for switching an advanced button's graphic state back to its original state when the user rolls off the button.
A dragOver event occurs in response to the following series of mouse movements:
The mouse button is pressed when the mouse pointer is outside the Hit area of a Flash button.
The mouse pointer moves over the Hit area while the mouse button is still depressed.
The dragOver event is rather obscure, but you could use it for special cases of interactivity such as revealing a hidden item in a game. For example, when the mouse button is held down and mouse movement occurs over a specific area, ActionScript can detect the coordinates of the mouse movement and reveal a Movie Clip instance that is otherwise invisible on the Stage.
A dragOut event occurs in response to the following series of mouse movements:
The mouse button is pressed when the mouse pointer is over the Hit area of a Flash button.
The mouse pointer moves outside the Hit area of the Flash button, and the mouse button is still depressed.
As with dragOver, you'll likely encounter very few situations where the dragOut event is necessary. Most of the more complicated mouse events are only useful for Flash games and experimental user interfaces.
You can also use event handlers to detect events that occur on the user's keyboard. You can enable your Flash movies to "capture" a key press (also known as a keystroke) initiated by the user. One way in which ActionScript can detect a keystroke is by using the keyPress event. This event lets you execute an action (or series of actions) when the user presses a key on the keyboard. The implementation method for a keyPress event handler may be confusing, but it's the least code-intensive (and most designer-friendly) route: To add a keyPress event handler, you must first place a button onstage at the frame where you want the keyboard to be active. You then assign the keyPress event to the Button instance's on handler. Keep in mind, though, that the button's Hit area has no effect on the keyPress event detection. As such, even though the keyPress event is defined on a button, any key press that occurs in the Flash movie can be captured by the button, regardless of the user's mouse position.
Tip
If you are using the button only as a container for your keystroke event handler and you do not want the button to appear on Stage, you should make sure that (in Edit mode for the symbol) all the frames of the Button symbol timeline are blank.
For example, if you have a Button instance on the Stage of your Flash document, you can select the Button instance, open the Actions panel, and add the following code to capture an Enter keystroke:
on (keyPress "<Enter>"){
   trace("The Enter key was pressed.");
}
Note
A trace action sends a message to the Output panel in the Test Movie environment. You'll learn more about trace actions in Part VII, "Approaching ActionScript."
As you can see in this example, you specify the key's name between a set of double quotes, after the keyPress term. Some keys, such as Enter and Escape, require less than ( < ) and greater than ( > ) characters as well. You can use the keyPress event in conjunction with other mouse events. The following example detects when the user clicks the mouse button over the Hit state of the Flash button or presses the spacebar anywhere within the Flash movie:
on (release, keyPress "<Space>"){
   stop();
}
The keyPress event, which was introduced with Flash Player 4, and the newer Key class, introduced with Flash Player 6, open up many possibilities for Flash. Movies can have keyboard-based navigation, buttons can have keyboard shortcuts for convenience and accessibility, and games can have keyboard-controlled objects (such as ships and animated characters). But watch out for some potential "gotchas" to keyboard usage, specifically with on handlers and keyPress events. If you're planning ambitious keyboard-based projects, you may want to check the following list of potential issues first:
Multiple key combinations are not supported. This scenario rules out diagonals as two-key combinations in the classic four-key game control setup. It also means shortcuts such as Ctrl+S are not available. You can, however, use the Shift key in combination with another key to specify an uppercase letter or symbol. (See the case-sensitive note later in this list.)
If presented in a browser, the Flash movie must have "focus" before keystrokes can be recognized. To "focus" the movie, the user must click anywhere in the space it occupies within the browser window. Keyboard-based movies should include instructions that prompt the user to perform this initial mouse click.
Tip
You can use the JavaScript
focus()method in HTML documents to automatically draw attention to a Flash movie contained within the page. You can use theonLoadevent to initiate a JavaScript function that includes thefocus()method to enable this behavior as soon as the page loads into the browser.Because the Escape (Esc), Enter, less than (<), and greater than (>) keys are used as authoring shortcuts in the Test Movie environment, you may want to avoid using them as control keys in your movies. If you need to use those keys in your movies, make sure that you test the movies in a browser, or use the Control
keyPressevents are case-sensitive. For example, an uppercase letter "S" and a lowercase letter "s" can trigger two different actions. No case-insensitive keystroke event (that is, one that would enable both cases of a letter to trigger the same action) exists for Button instances and theonhandler. Achieving case-insensitivity would require two separateonhandlers (and their contained actions), one for each case of the letter, on the same Button instance. For example, the following code would stop the current timeline when either the s key or Shift+s key (or the s key with Caps Lock enabled) is pressed:on (keyPress "s"){ stop(); } on (keyPress "S"){ stop(); }
The keyframe event handler depends on the playback of the movie itself, not on the user. Just about any action (except the on() and onClipEvent() handlers) can be attached to any keyframe on the timeline. An action attached to a keyframe is executed when the Playhead enters the keyframe, whether it enters naturally during the linear playback of the movie or as the result of a goto action. So, for instance, you may place a stop action on a keyframe to pause the movie at the end of an animation sequence.
In some multimedia applications, keyframe event handlers can differentiate between the Playhead entering a keyframe and exiting a keyframe. Flash has only one kind of keyframe event handler (essentially, on enter). Hence, as a developer, you do not need to add keyframe event handlers explicitly — they are a presumed element of any action placed on a keyframe. As we mentioned in an earlier note, ActionScript 2.0 (as well as ActionScript 3.0) can employ a more advanced event model. You learn about different event models in Chapter 25, "Controlling Movie Clips."
Tip
Complex movies can have dozens, or hundreds (or even thousands!), of actions attached to keyframes. To prevent conflicts between uses of keyframes for animation and uses of keyframes as action containers, it is highly advisable to create an entire layer solely for action keyframes. Name the layer actions and keep it on top of all your layers for easy access. Remember not to place any symbol instances, text, or artwork on your actions layer. You can also create a labels layer to hold — you guessed it — frame labels.
The process for adding an action to a keyframe is as follows:
Create a keyframe on a timeline. This keyframe can exist in the Main Timeline (that is, Scene 1) or a Movie Clip symbol timeline.
Select the keyframe in the Timeline window, and open the Actions panel. The Actions panel title should read Actions - Frame.
Type your desired actions in the Script pane.
In the next section, you get a little more hands-on experience adding actions to both buttons and keyframes.
In this section, you learn how to create an "invisible button" and practice the use of getURL actions. An invisible button is essentially a Button symbol that has only a Hit state defined, with empty Up, Over, and Down states. After you have created an invisible button, you can use it to convert any type of Flash element into a button. By dragging an instance of the invisible button on top of another piece of artwork or symbol instance on the Stage, you can add interactivity to that element.
Note
Make a copy of the themakers_ad_starter.fla file, located in the ch18 folder of the book's CD-ROM. This file contains a sample layout of graphics and text for a mock Flash ad, sized for display on a Microsoft Windows Mobile 5 device screen. This document uses a Flash Player 6 version setting in the Publish Settings, which is why some actions in the Actions toolbox's booklets are highlighted in yellow.
With the starter Flash document (.fla) open in Flash CS3, quickly familiarize yourself with the existing content. There are four layers on the Main Timeline (Scene 1). The comments layer indicates what the Flash document is, the border layer contains a black outlined box with no fill, the graphics layer contains a Graphic symbol of branding artwork, and the animText layer contains a Movie Clip instance featuring a tweened animation. Go ahead and test this movie (Control
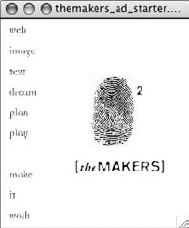
In this exercise, you're going to add two invisible buttons to this movie. One is an oval-shaped button that fits over the thumbprint graphic, and another is a rectangular-shaped button that fits over the company's name. The thumbprint button, when clicked, opens the e-mail client to send an e-mail to the company. When the user clicks the name button, a new browser window opens displaying the company's Web page.
In the starter Flash document, create a new layer named actions. Place this layer just underneath the comments layer.
Save the starter document as makers_ad.fla.
Select the first frame of this layer and open the Actions panel (F9, or Option+F9 on Mac). In the plus (+) menu, choose Global Functions
With this first frame of the actions layer still selected, open the Property inspector and in the <Frame Label> field, type //stop. This will add a frame comment of //stop to the layer in the Timeline window. This comment provides a quick visual cue about the behavior of this keyframe.
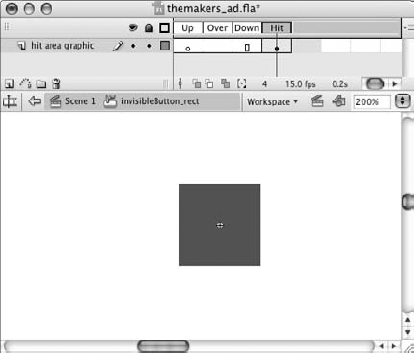
Now you're going to make your first invisible button. Choose Insert
Rename Layer 1 to hit area graphic. On this layer of the Button symbol's Timeline, create a keyframe for the Hit state. Move the Playhead in the Timeline window to this new keyframe.
Select the Rectangle tool, and draw a uniform square on the symbol's Stage. The square can be any color, although we prefer red for invisible buttons. If you drew the shape with a stroke, delete the stroke. Select the square, and in the Property inspector, give the square a width and height of 50 pixels. Then, using the Align panel, center the square on the Stage. Your Button symbol and Timeline should now resemble Figure 18.11.
Now, go back to Scene 1 (the Main Timeline), and create a new layer. Rename this layer linkButton, and place it above the graphics layer.
Open the Library panel (Ctrl+L or
Using the Free Transform tool, size the instance to fit the size of the text, without overlapping other elements on the Stage. You'll notice that your Button instance has a transparent aqua blue tint that overlays the underlying elements (as shown in Figure 18.12). This is Flash's way of enabling you to select and manipulate an invisible button. You will not see this color effect for the button when the document is published or tested as a Flash movie file (.swf).
With the Selection tool, select the Button instance on the Stage, and open the Actions panel (F9, or Option+F9 on Mac). Your Action panel title bar should read Actions – Button. Using the booklets in the Actions toolbox, add an
onhandler from the Global Functionson (release){ }Tip
Try coding these actions without using the Script Assist mode. At any point, you can click the Script Assist button in the Actions panel to help you write your code.
In the Script pane, click the mouse pointer just before the closing curly brace (
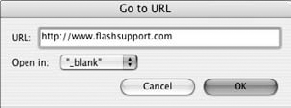
}) on line 2. Now add agetURLaction from the Global Functionson (release){ getURL("http://www.theMakers.com", "_blank"); }For this example, we used the URL
http://www.theMakers.com. When you're linking to domain names, make sure you specify the transfer protocol (such ashttp://, ftp://, and so on). If you are linking to relative URLs, specify the name of the HTML document (or other resource) that you want to access. Thison()handler with thegetURL()action will direct a button click on this instance to [theMAKERS] Web site, in a new browser window.Save your Flash document, and test it using Publish Preview
Now, go back to the Flash document and add another invisible button. You'll use a different procedure this time. On the Scene 1 timeline, create a new layer and name it emailButton. Place this layer above the linkButton layer.
On the first frame of the emailButton layer, select the Oval tool, and draw a perfect circle anywhere on the Stage. Again, you can use any fill color you wish. If the circle has a stroke, delete the stroke. With this circle selected, open the Property inspector and give the circle a width and height of 50 pixels.
With the circle selected, choose Modify
Now, edit the new symbol, either by double-clicking the instance on the Stage, or by double-clicking its listing in the Library panel. On this symbol's timeline, rename Layer 1 to hit area graphic. Now, select the keyframe for the Up state, and drag it to the Hit state. Note that you may need to click, then click and drag the keyframe for this method to work properly. When you are finished, your circle shape should be on only the Hit area of the button's timeline.
Go back to the Scene 1 timeline, and you'll notice that your circle button is now an invisible button, just as our rectangular one is. Move the circular invisible button over the thumbprint graphic, and use the Free Transform tool to shape the circle as an oval that closely matches the shape of the thumbprint, as shown in Figure 18.13. Also, name the instance emailButton in the Property inspector.
With the oval invisible button selected, open the Actions panel. Repeat Steps 11 and 12 of this exercise. This time, however, we'll use a
mailto:URL, as in "mailto:[email protected]". Type this value as the first parameter of agetURLaction for this Button instance. For thisgetURLaction, however, you do not need to specify a window parameter.Tip
You can specify subject lines and body text in
mailto:URLs as well, just as you can with HTML documents. For example, the following code will open a new e-mail message window addressed to [email protected], with a subject line of "Web Feedback" and body text of "Here are my comments." The following code should be typed as one line of code. Do not type the
getURL("mailto:[email protected]?subject=Web%20Feedback&body=Here%20are%20my%20comments%3A");Save your Flash document once again, and preview it in a browser. When you click the active area over the thumbprint graphic, the default e-mail client on your system should open, displaying a new message window with the To: field predefined to the URL you typed in Step 19.


Tip
You can also change the title and description metadata published with the .swf file by choosing Modify
Now you know how to make invisible buttons and add getURL actions to them. In your own work, you may come to realize the true benefit of invisible buttons: You can quickly drag several instances of either invisible button shape (oval or rectangle) to the Stage to create active areas. This offers two benefits: First, you don't have to make Button symbols from regular graphics that don't need four button states, and second, you can make "hidden" areas in interactive puzzles or games.
Tip
As you become more agile with ActionScript, you can start to use Movie Clip instances as button handlers. You learn more about this usage of Movie Clips in Chapter 25, "Controlling Movie Clips."
Note
We'd like to know what you think about this chapter. Visit www.flashsupport.com/feedback to send us your comments.
ActionScript is Flash's interactive language. It is a set of actions that enables Flash to communicate with internal elements (timelines, symbols, sounds, and so on) and external Web pages and scripts.
The Behaviors panel enables the novice user to quickly add interactive commands to Flash movie elements.
Flash CS3 includes a scripting mode called Script Assist, which enables you to see your code in a more user-friendly layout.
Flash interactivity is based on a relatively simple structure: An event handler waits for something to happen (a playback point being reached or the user providing input), and when that something does happen, it executes one or more actions (which alter the movie's playback, behavior, or properties; load a file; or execute a script).
The Timeline Control booklet contains the fundamental actions for navigating Flash playback through multiple scenes and keyframes, as well as controlling soundtracks. The Browser/Network booklet contains the
getURLaction, which can direct the browser window to external Web resources such as HTML pages and FTP downloads.All actions need an event handler to activate them. Event handlers include keyframes on a timeline, button clicks, mouse movements, and key presses. More advanced event handlers are discussed in later chapters.
Invisible buttons enable you to create interactive areas on top of other Flash artwork or symbols.