In this chapter, we show you how to control text field formatting and focus using internal HTML tags and ActionScript. Flash gives you an incredible amount of control over text field formatting when you use the TextFormat object with TextField objects (that is, Input and Dynamic text fields). We will also show you how to highlight text within text fields by using the Selection class.
Tip
Because Flash Player 8 and higher support PNG, GIF, and progressive JPEG image support, you can load these file types into HTML-enabled Flash text fields as well. Flash Player 8 and higher movies can also use the FlashType text rendering engine, which improves the readability of text at small point sizes.
As you have been using Flash CS3, you may have noticed the HTML button in the Property inspector for text fields. Even though one of the primary advantages of using Flash movies is that you can avoid the fuss of HTML page layout, you can use HTML formatting tags within Input and Dynamic text fields. You can use <font> tags to specify multiple typefaces, colors, styles, and sizes within one text field. You can also use <a href> tags to link to internal ActionScript functions or external URLs!
Warning
In Flash Player 4 movies, you cannot specify more than one set of formatting specifications for any text field. For example, if you create a text field that uses black Verdana text at 18 points in faux bold, you can't insert any other typeface, color, or size in that text field.
You can use the following HTML tags to format your Flash text fields. You can insert these tags into ActionScript variable values, or you can apply them (without knowing or writing the syntax) using the Property inspector. As you already know, text fields in ActionScript are real objects with instance names. As such, you need to address specific properties of the TextField object to insert HTML text. In previous chapters, you've used the following syntax to assign text to a text field instance:
var lastNameField:TextField;
   lastNameField.text = "Enter your last name here";
You cannot assign HTML tags in the text property of a TextField object. You must use the htmlText property to assign HTML formatted text, such as:
var lastNameField:TextField;
   lastNameField.html = true;
   lastNameField.htmlText = "Enter your <b>last<b> name here.";
Here, the <b>tag is used to bold the text "last" in the text field instance. In a moment, you will create your own examples that use the htmlText property. You also need to set the html property of the TextField instance to true, to let the Flash Player know that it should parse the HTML text you specify for the htmlText property. Let's review the HTML tags that are available in ActionScript.
The basic <font> and physical "faux" styles for text (bold, italic, and underline) can be applied to Flash text.
<b>: Placing<b> </b>tags around Flash text in string values for text field variables applies bold formatting to the enclosed text.<i>Placing<i></i>tags around Flash string values italicizes the enclosed text.<u>: The<u> </u>tags underline the enclosed text.<p>: The<p>tag inserts a paragraph break between lines of text. You can use thealignattribute to specifyleft, right, center, orjustify, applying the respective justifications to the Flash text.Tip
The
justifyvalue for the align attribute is supported in Flash Player 8 or higher for HTML text.<br/>: The<br/>tag inserts a carriage return at the point of insertion. This is equivalent to thenewlineoperator in ActionScript.<font color='#hex code'>: The<font>tag with thecolorattribute can change the color of your Flash text. This color is specified in hexadecimal values, just as with regular HTML. For example,"<font color='#FF0000> This is red text. </font>" uses full red for the text color.<font face>: The<font>tag with thefaceattribute enables you to specify a specific typeface to the enclosed text. You can specify Flash device fonts for thefacevalue, such as<font face='_sans'>to use the Sans Serif device font.<font size>: Thesizeattribute of the<font>tag enables you to specify the point size of Flash text. You can use absolute values (in point sizes), such as<font size='18'>, or relative values, such as<font size='+1'>, to change the size of text.<font letterSpacing>: TheletterSpacingattribute of the<font>tag enables you to uniformly add horizontal space around each character. You can use positive or negative integers, such as<font letterSpacing='18'>. This attribute is only supported in Flash Player 8.<font kerning>: Thekerningattribute of the<font>tag enables you to turn kerning on (1) or off (0). Kerning is the space between characters of a specific font, and is not available for some fonts such as Courier New.<textformat>: This tag is a Flash-specific formatting tag that you won't find in traditional HTML.<textformat>has four attributes,indent, leading, leftmargin, andrightmargin, that control the margin and line spacing of text within the text field. Each of these attributes uses pixels as the unit of measurement. To get a feel for how these attributes work, create a Static text with a paragraph of text, click the Format button in the Property inspector for the selected text field, and change the settings in the Format Options dialog box.Tip
You can only use the
<textformat>tag within text fields for Flash Player 6 or higher movies. Make sure the Version menu in the Flash tab of the Publish Settings (File
<span>: As with its real HTML counterpart,<span>enables you to apply a style from a style sheet to the encompassed range of text. This tag has only one supported attribute,class. This attribute can be set to the name of the style class declared in the style sheet. For example,<span class="heading">applies the style namedheadingto the enclosed text.<img>:A potentially exciting tag supported in Flash HTML is the<img>tag, short for image. As you may have guessed, this tag enables you to insert images inline with other text in a text field. This tag supports the following attributes:src, id, width, height, align, hspace, andvspace. Thesrcattribute can be set to one of the following: the linkage identifier of a symbol in the library, the external URL to an .swf file, or the external URL to an image file. The JPEG, progressive JPEG, GIF, and PNG formats are supported in Flash Player 8 or higher. Flash Player 7 only supports standard JPEG files with the<img>tag.
You can use the anchor, or <a>, tag with the href attribute to apply URL links within Flash text fields. For example, you can insert the following HTML into a string value for the htmlText property of a text field instance, to link the text [the MAKERS] Web site to the appropriate URL:
<a href='http://www.theMakers.com'>the Makers Web site</a>
You can also specify a target attribute for the <a> tag. The target attribute determines which browser window or frame displays the URL link in the href attribute. As with regular HTML, you can use the default _top, _parent, _self, or _blank values, as described for the getURL() action. Later in this section, you also learn how to execute internal ActionScript functions from <a href> tags.
Warning
You cannot type HTML tags directly into any text block or field — the actual tags show up in the text field as the Flash movie runs in the Flash Player. The formatting tags are specified in ActionScript code or are "hidden" in Static text. (The Property inspector applies the formatting.)
You don't necessarily need to write out HTML tags to apply them to your Flash text. You can use the Property inspector to assign HTML formatting to all Text types (that is, Static, Input, and Dynamic). For Input and Dynamic text fields, you need to enable HTML formatting by pressing the Render text as HTML button in the Property inspector. In this section, we demonstrate the use of HTML formatting within Static and Dynamic text fields.
Create a new Flash file (ActionScript 2.0). If the background color of your document is a nonwhite color, then set the background color to white in the Document Properties dialog box (Ctrl+J or

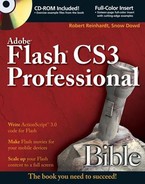
Select the Text tool and open the Property inspector. Make sure the Text type menu (in the top-left corner of the inspector) is set to Static Text. Click once on the Stage and type the following text (with carriage returns) in the text block, using Verdana at 18 points:
Flash CS3 Bible
by Robert Reinhardt & Snow Dowd
With the text block still active, select the Flash CS3 Bible text and, in the Property inspector, change the point size to 24 and click the B (for bold) option, as shown in Figure 31.1. Enter the following URL in the URL field of the Property inspector and choose _blank in the Target menu:
http://www.flashsupport.comWith the text block still active, select the Robert Reinhardt text, and, in the Property inspector, enter the following text for the URL field:
mailto:[email protected]
Now, select the Snow Dowd text and enter the following text in the URL field of the Property inspector:
mailto:[email protected]
See Figure 31.2 for an example of how the URL-linked text will appear.
Save the Flash document, and test the Flash movie file (.swf) in your Web browser by choosing File
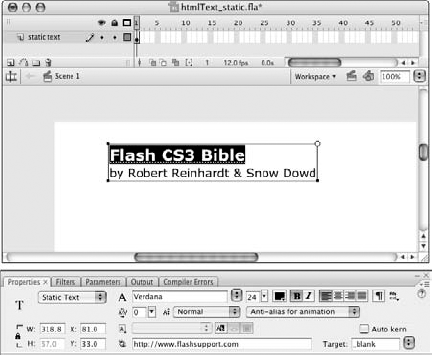
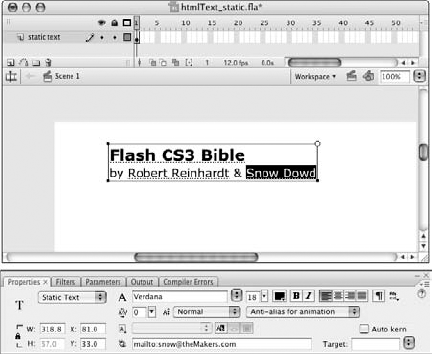
Figure 31.2. URL-linked text appears with dashed underlines. You will not see this dashed underline in the actual Flash movie file (.swf).
Note
You will find the completed htmlText_static.fla document in the ch31 folder of this book's CD-ROM.
Try making another example with your own text and URL links. You can even add javascript: commands to URL links.
In this section, we continue with the previous example that you created in the last section. You convert the Static text block into a Dynamic text field and manipulate the formatting with ActionScript.
Resave your Flash document from the last section as
htmlText_dynamic.fla. You will convert this Static text into a Dynamic text field, so you'll want to keep your original Static text example for future reference.Select the text block and open the Property inspector. Change the text type to Dynamic Text and make sure the HTML option is enabled. In the
<Instance Name>field, type the namebookField. Now, this text field can be updated with ActionScript directed at thebookFieldinstance. You can also disable the Show Border option if you don't want to see a bounding box around your text.Note
If switching the text type removes the formatting you applied in the previous section's exercise, reapply the formatting, including the
mailto:links.Create a new layer named actions. Select frame 1 of the actions layer, and open the Actions panel (F9, or Option+F9 on the Mac). Add the following code to the Script pane. This code displays the
htmlTextvalue of thebookFieldfield in the Output window when you test the movie.var bookField:TextField; trace("htmlText: " + bookField.htmlText);Save the Flash document and test it (Ctrl+Enter or
htmlText: <TEXTFORMAT LEADING="2"><P ALIGN="LEFT"><FONT FACE="verdana" SIZE="24" COLOR="#000000" LETTERSPACING="0" KERNING="0"><A HREF="http://www.flashsupport.com" TARGET="_blank"><B>Flash CS3 Bible</B></A></FONT></P> </TEXTFORMAT><TEXTFORMAT LEADING="2"><P ALIGN="LEFT"><FONT FACE="verdana" SIZE="18" COLOR="#000000" LETTERSPACING="0" KERNING="0">by <A HREF="mailto:[email protected]" TARGET="">Robert Reinhardt</A> & <A HREF="mailto:snow@ theMakers.com" TARGET="">Snow Dowd</A></FONT></P></TEXTFORMAT>
You can observe the requisite ActionScript syntax for HTML formatting in the Output panel.
Note
HTML tag names are not case-sensitive in Flash. We prefer to use XHTML-compliant code; as such, you'll see our examples use all lowercase characters in HTML tag and attribute names. The values of attributes, such as file URLs in
hreforsrc, require attention to case-sensitivity.Close the Test Movie window and go back to the Main Timeline of your Flash document. Create a new Dynamic text field, and in the Property inspector, enable the HTML option. In the
<Instance Name>field, type the namebookField2.Select the first frame of the actions layer and open the Actions panel (F9, Option+F9 on the Mac). In the Script pane, specify an HTML-formatted string value for the
htmlTextproperty of thebookField2instance, such as the following code. Comment out thetrace()action you inserted earlier as well. Note that the character is required before additional quotes within a String value. The
var bookField:TextField; var bookField2:TextField; //trace("htmlText: " + bookField.htmlText); bookField2.htmlText = "<font face="Verdana" size="24"color="#0000FF"><ahref="http://www.communitymx.com">CommunityMX</a></font>";Note
The last line of code should appear as one line number in the Script pane of the Actions panel.
Save the Flash document and test it. The
bookField2text field displays the HTML-formatted value that you specified in the actions layer.
You can also use variables in expressions for HTML-formatted text fields, such as the following (note that the bookURL variable and value should appear on one line of code):
var bookURL:String = "http://www.flashsupport.com";
var bookTitle:String = "Flash CS3 Bible";
bookField.htmlText = "<a href="" + bookURL + "">" + bookTitle + "</a>";
By using other ActionScript variables and methods, you can apply specific text formatting to external data sources that have been loaded into the Flash movie, such as database records or lists. In the next section, you learn how to format text within text fields using the TextFormat object in ActionScript.
Note
You can find the completed htmlText_dynamic.fla document in the ch31 folder of this book's CD-ROM.
ActionScript offers a wide range of options for the TextField object. Many properties of the MovieClip object, such as _x and _y, can be controlled with TextField objects, too. One interesting method of the TextField object is the setTextFormat() method. This method enables you to control the formatting of text within a TextField object without relying on HTML tags. The setTextFormat() method works much like the setTransform() method of the Sound class that we cover in Chapter 27, "Interacting with Movie Clips." Like setTransform(), setTextFormat() requires another object— a TextFormat object — that contains individual properties and values in order to adjust the targeted instance's text contents.
Tip
ActionScript in Flash Player 6 and higher movies can also create text fields on the fly using the createTextField() method of the MovieClip object.
In this section, you create a Flash movie that makes a dynamic text field on the fly and applies formatting to the field with the TextFormat object. You also use the TextFormat object to determine the dimensions of the TextField instance.
Create a new Flash file (ActionScript 2.0). Save the document as
textFormat_100.fla.Rename Layer 1 to actions. ActionScript creates the entire contents of this movie. You will not use any tools from the Tools panel to create the text.
Select frame 1 of the actions layer and open the Actions panel. Type the following code into the Script pane:
var titleFormat:TextFormat = new TextFormat();
with(titleFormat){
   font = "Verdana";
   bold = true;
   color = 0x0000FF;
   url = "http://www.flashsupport.com/";
   target = "_blank";
}
This code creates a new
TextFormatobject namedtitleFormat(line 1). This formatting is used for site links displayed in the Flash movie. Within this object, properties of the site link text are specified. Lines 2 through 8 assign thefont, bold, color, url, andtargetproperties of the style. In later steps, you apply this style to aTextFieldinstance.Within the same actions list shown in Step 3, add the following code:
var name_1:String = "FlashSupport.com";
var sizer:Object = titleFormat.getTextExtent(name_1);
This code declares a
name_1variable, which contains the text of the site link that the movie displays.sizeris an object created by thegetTextExtent()method of theTextFormatobject. This method enables you to determine the pixel dimensions of text with formatting applied to it before you actually create theTextFieldobject displaying the text.sizercontains two properties (among others):textFieldWidthandtextFieldHeight. You access these properties in the next step.Tip
The
TextFormat.getTextExtent()method has been greatly improved for Flash Player 7 and higher movies. The following properties are returned by the method:descent, ascent, textFieldHeight, textFieldWidth, height, andwidth. Refer to the Flash CS3 Help panel for more information on these properties or read the coverage in the Flash ActionScript Bible series (Wiley). In our tests, thegetTextExtent()method works reliably within Flash Player 8 or higher movies.After the last line of code listed in Step 4, add the following code. Note that the
var sitesField:TextField = createTextField("sitesField", 1,10, 10, sizer.textFieldWidth, sizer.textFieldHeight); with(sitesField){ html = true; text = name_1; setTextFormat(titleFormat); }The first line of code uses the
createTextField()method of theMovieClipobject to make a new Dynamic text field namedsitesFieldat a depth of 1 on the current timeline. The field is positioned at the X and Y coordinates of 10, 10, with a width and height specified by thesizerobject created earlier.The second line begins a
with()statement, to apply all of the nested code to the newsitesFieldobject.The third line enables the
htmlproperty of thesitesFieldfield, so that any URL values within theTextFormatobject can be recognized.The fourth line fills the text field with the value of the
name_1variable, which has a value of "FlashSupport.com".The fifth line applies the
titleFormatobject to the entire contents of thesitesFieldinstance.Note
In ActionScript 2.0, make sure you use the
setTextFormat()method if you want to apply formatting to existing text in aTextFieldinstance. If you want to apply formatting before you populate a field with text, then use thesetNewTextFormat()method.Save the Flash document as
textFormat_100.flaand test it (Ctrl+Enter or
Note
You can find the completed textFormat_100.fla file in the ch31 folder of this book's CD-ROM.
You can continue to develop this Flash document, adding more sites to the sitesField text field. You don't necessarily need to make more text fields— create more name variables (for example, name_2, name_3, and so on) and add their expressions together as the contents of the sitesField instance.
In this section, you learn how to load an external style sheet, as a Cascading Style Sheet (CSS) file, and apply its styles to text in a Flash movie. This capability is available in Flash Player 7 and higher movies.
Before you can apply an external style sheet to Flash text, you need to create the CSS file describing the styles. In the following steps, use any text editor such as Notepad or TextEdit, or a full-featured CSS editor, such as Adobe Dreamweaver CS3.
Warning
If you use Dreamweaver to create a new CSS file, remove the @charset "UTF-8"; line of code from the top of the CSS document. This line of code can interfere with the Flash Player's ability to parse the CSS file.
Define two custom styles, h1 and h2. These styles should use bold 14- and 12-pixel type, respectively. The font face should be Verdana for both. Refer to Listing 31.1.
Now, define a p style. This style will be used for regular text in paragraphs. This style will use Arial at 10 px. The color of this text will be dark gray, using the hexadecimal value
#666666. Refer to Listing 31.1.Save your text file as
styles.css.
After you have a CSS file ready, you can create the ActionScript required to load the style sheet into a Flash movie. In the following steps, you'll do just that.
Create a new Flash file (ActionScript 2.0).
Rename Layer 1 to actions.
Select frame 1 of the actions layer, and open the Actions panel (F9, or Option+F9 on Mac). Type the code shown in Listing 31.2 into the Script pane.
In line 1 of this code, you create a new
StyleSheetobject, which is actually a subclass of theTextFieldclass. TheStyleSheetobject is namedmovieStyles.In line 2, you define the
onLoad()method of this object. TheonLoad()handler is invoked when the external CSS file has finished loading into the movie. If the loading was successful, lines 3 through 5 are invoked, sending atrace()message to the Output panel and invoking another function namedshowText(). You define theshowText()function in the next section.If the CSS style cannot be loaded (that is, if the URL or filename is incorrect, or if the style sheet cannot be parsed by the Flash Player), lines 6 through 8 are invoked in the
onLoad()handler. Line 7 sends a message indicating the result to the Output panel.Line 10 invokes the
load()method of themovieStylesobject. This line of code tells the Flash Player to get thestyles.cssfile and attempt to load it.Tip
It's always a good idea to define the
onLoad()handler of an object before you initiate theload()method. There's a slight chance that theonLoad()handler won't be invoked if you declare it after theload()method.Example 31.2. The movieStyles Object
1.  var movieStyles:TextField.StyleSheet = new TextField.StyleSheet();
2.  movieStyles.onLoad = function(success:Boolean):Void {
3.     if(success){
4.        trace("loaded external CSS file");
5.        showText();
6.     } else {
7.        trace("CSS file did not load.");
8.     }
9.  };
10. movieStyles.load("styles.css");
Save your Flash document as
css_styles_100.fla, in the same location where you saved yourstyles.cssfile from the previous section. Test the movie (Ctrl+Enter orloaded external CSS file
After you have the external style sheet loaded into a Flash movie, you're ready to apply the defined styles to text used in dynamic or input text fields. In the remaining steps, you learn how to apply each of the styles to text displayed in a dynamic text field.
In the Flash document that you created in the previous section, go back to frame 1 of the actions layer. Open the Actions panel (F9, or Option+F9 on Mac), and add the code shown in Listing 31.3 after the existing code. Note that the
Line 1 establishes a variable named
displayField. This variable will be used as aTextFieldinstance later in theshowText()function.Line 3 declares the function's name,
showText. Remember that in Listing 31.2, theshowText()function is invoked in themovieStyles.onLoad()handler.Lines 4 through 7 create a long string of text that will be inserted into the
displayFieldfield. Here, you can see that each of the styles is used, defined in theclassattributes of various<span>tags. Since you defined a style for theptag in the style sheet, that style is automatically applied to any text enclosed by<p></p>tags in HTML text. In line 14, thehtmlTextproperty of thetDisplayinstance is set to the value of thesTextvariable.Line 8 creates a text field named
displayField. Line 10 sets thestyleSheetproperty of thedisplayFieldinstance tomovieStyles. Lines 11 through 13 set up basic properties of thedisplayFieldinstance, enabling it to display HTML text (line 11), and display wrapping text over multiple lines (lines 12 and 13).Example 31.3. The showText() function
1. var displayField:TextField; 2. 3. function showText():Void { 4. var fieldText:String = "<span class='h1'>Flash Player StyleSupport</span><br/>"; 5. fieldText += "<p>You can use style sheets in your FlashPlayer 7 or higher movies.</p><br/>"; 6. fieldText += "<span class='h2'>Supported styles</span><br/>"; 7. fieldText += "<p>More text here...</p>"; 8. displayField = createTextField("displayField",1,10,10,400,400); 9. with(displayField){ 10. styleSheet = movieStyles; 11. html = true; 12. multiline = true; 13. wordWrap = true; 14. htmlText =fieldText; 15. } 16. }Save your Flash document, and test it. You should see nicely formatted text, specified by the details of the style sheet, as shown in Figure 31.3.

Note
You can find the completed files, styles.css and css_styles_100.fla, in the ch31 folder of this book's CD-ROM.
You can also use other nonsystem fonts in style sheets, but you'll need to make sure that you have created linked Font symbols in your movie's library or that you have created empty text fields that include the embedded fonts.
In this section, you learn how to load a JPEG image into a TextField object. Continue using the same Flash document you created in the last section.
Note
Open the css_styles_100.fla document from the ch31 folder of this book's CD-ROM if you didn't complete the previous section.
In the
css_styles_100.fladocument, select frame 1 of the actions layer, and open the Actions panel (F9, or Option+F9). Change the script to the code shown in Listing 31.4. Remember that you shouldn't include theThis code uses the same structure of the
showText()function from the last section. However, in line 1, you include thebio.asfile, which you can find in thech31folder of this book's CD-ROM. A copy of this file should exist in the same location as your .fla file. Thebio.asfile declares a string variable namedbioText, containing a sample biography.Tip
For a final production version of this Flash movie, you may want to load the data stored in the
bio.asinto the Flash movie at runtime. For example, the biography text could be stored in an XML document and loaded with anXMLobject, or it could be loaded from a server-side script. For more information on data loading, read Chapter 30, "Sending Data In and Out of Flash."Within the
showText()function, you use the<img>tag to include a JPEG image,portrait.jpg, in thedisplayFieldinstance. You can find this JPEG file in thech31folder of this book's CD-ROM, and it's also located at the URL shown in the function.Example 31.4. The Modified showText() Function
#include "bio.as"var movieStyles:TextField.StyleSheet = new TextField.StyleSheet(); movieStyles.onLoad = function(success:Boolean):Void { if(success){ trace("loaded external CSS file"); showText(); } else { trace("CSS file did not load."); } }; movieStyles.load("styles.css"); var displayField:TextField; function showText():Void {var fieldText:String = "<imgsrc='http://www.flashsupport.com/bio/portrait.jpg'id='portrait' width='200' height='200' vspace='4' hspace='8'align='left'>";fieldText += "<span class='h1'>Robert Reinhardt</span><br/>";fieldText += bioText;displayField = createTextField("displayField", 1, 10, 10, 400, 400); with(displayField){ styleSheet = movieStyles; html = true; multiline = true; wordWrap = true; htmlText =fieldText; } }Save your Flash document as
img_insert_100.fla, and test it. When the movie loads, you should see the header and biography text wrap around the JPEG image, as shown in Figure 31.4.

Note
You can find the completed document, img_insert_100.fla, in the ch31 folder of this book's CD-ROM. Another version of this document, img_insert_101.fla, features a drawBorder() function, which dynamically draws a border around the JPEG image. The checkLoad() function within this file is similar to the functions you created in Chapter 29, "Sharing and Loading Assets."
You can also use symbol linkage identifier names as the value of the src attribute of the <img> tag. However, you may find that if you use several <img> tags in a text field, not all of the images load and/or display. In some of our experiments, we noticed that text realigned itself when text with URLs was rolled over. Be sure to test your Flash movies with the latest Flash Player revisions, as Adobe releases them.
Not only can you use HTML formatting in Flash text but you can also execute Flash actions from your text fields using the <a> tag and a href attribute value of asfunction: function, argument. For example, if you wanted to link text to a function that loads a new Flash movie file (.swf) into a Movie Clip target, you can create a custom function that uses the loadMovie() action and reference that action from your <a href> tag for a text field. See the following code (note that the
var holder:MovieClip; var displayField:TextField; displayField.htmlText = "<a href="asfunction:getSWF,movie.swf">Click to load movie</a>"; function getSWF(path:String):Void{ holder.loadMovie(path); }
In this code example, the text within the <a></a> tags executes the getSWF() function, passing the string movie.swf as the path argument.
Tip
The asfunction can only pass one string value. You do not need to enclose the argument in quotes. If you need to pass another ActionScript variable for the value, use the + operator to add it to the HTML text string.
If you need to pass more than one argument, you will need to send all the values as one string separated by a comma (or preferred character). Then you would use the String.split() method as follows (note that the
var holder:MovieClip; var displayField:TextField; var htmlParams:String = "holder,movie.swf"; displayField.htmlText = "<a href="asfunction:getSWF," +htmlParams + "">Click to load movie</a>"; function getSWF(args:String):Void{ var params:Array = args.split(","); var mc:MovieClip = eval(params[0]); var path:String = params[1]; mc.loadMovie(path); }
In this example, the getSWF() function takes the args paramter and creates an array with the split() method. This array's name is params. The elements of the params array are the two string values separated by a comma in the htmlParams variable.
Note
You can see examples of HTML-formatted Flash text and the asfunction in the ch30/asfunction folder of this book's CD-ROM.
Input and Dynamic text fields have several properties that are accessible with ActionScript 1.0 and 2.0. In this section, you learn how to control the scrolling and font rendering properties of the TextField class.
Two of the TextField class properties, scroll and maxscroll, control the viewable area of a text field that has more lines of text than the text field can show.
scroll: This property can retrieve the current line number (from the top of the field), and it can also move to a new line number in a text field.maxscroll: This property returns the maximum value of the scroll property for a given text field. You can only retrieve this value— you cannot set it.
Note
The scroll property advances text line by line in the viewable area of the TextField instance. To learn more about pixel-level scrolling, see the coverage later in this chapter.
To understand how these properties work, you need to see how lines are enumerated in a text field. Suppose you had ten lines of text as a string value for a variable called myText. If you want to use this text in a Dynamic text field named articleField, which only has a viewable area of five lines, then the remaining five lines of the myText variable will not be seen in the text field. To make the text field "scroll" to the next line of text by showing lines 2 to 6 (instead of lines 1 to 5), you can create a Button instance, such as a down-arrow button, with ActionScript to advance the lines:
var downButton:Button;
var articleField:Text;
downButton.onRelease = function():Void {
  articleField.scroll = articleField.scroll + 1;
};
or
var downButton:Button;
var articleField:Text;
downButton.onRelease = function():Void {
  articleField.scroll += 1;
};
The maxscroll property returns the maximum value for the top line number in a text field. In our previous 10-line text value example, the maxscroll property would equal 6. If you had 20 lines of text in the articleField instance, then the .maxscroll property would return a value of 16.
Tip
Flash CS3 has a TextArea component that automatically creates a text field and scroll bar. You can find more information on User Interface components in Chapter 34, "Using Components."
Note
In the ch31/scroll folder of this book's CD-ROM, you will find a Flash document named scrollProp_simple.fla. This movie demonstrates the use of the scroll property to view the entire Gettysburg Address within a text field. A more advanced scrolling mechanism can be found in the scrollProp_advanced.fla file, which features a draggable scroll bar.
Flash Player 8 and higher adds incredible text rendering advancements to your Flash text. The anti-aliasing engine for text is dubbed FlashType, and collectively refers to the properties of text fields that enable you to control the readability of text. In this section, you learn about the following TextField properties:
antiAliasType:String: This property controls whether or not theTextFieldinstance uses the new FlashType rendering engine. If you set aTextFieldinstance'santiAliasTypeproperty to"normal", the instance renders text just as it did in Flash Player 7 or earlier. If you set the property to"advanced", the text in the field is displayed with the new FlashType engine.thickness:Number: This property controls the thickness of the glyph edges in theTextFieldinstance and is only applied if theantiAliasTypemode is set to"advanced". The value for this property can be in the range of −200 (less thick) to 200 (more thick).Note
A glyph refers to any individual character in the font face. The letter "a," for example, is a glyph.
sharpness:Number: This property controls the sharpness (or softness) of glyph edges in theTextFieldinstance. Acceptable values are in the range of −400 (softer) to 400 (sharp). This property only affects text rendered with the"advanced"value of theantiAliasTypeproperty.Tip
In general, we have found that you don't need to tweak thickness and sharpness values of
TextFieldinstances. However, you may find a particular font that requires some finessing to get the level of readability you desire.gridFitType:String: This property controls how the pixels of text are rendered when theantiAliasTypeproperty is set to"advanced". There are three acceptable values:"none": This value specifies that there is no special grid fitting applied to the text rendering."pixel": This value forces the text to be rendered against actual pixels of the computer monitor, rather than across multiple pixels (which would blur the text). If theTextFieldinstance is set to use"advanced"forantiAliasType, the"pixel"value is the default value ofgridFitType. This value is best used for left-aligned text fields."subpixel": This value forces the text to be rendered on a subpixel grid, which is best for right-aligned or justified text fields. This value can only be used withTextFieldinstances that have theantiAliasTypeproperty set to"advanced".
Warning
You must build Flash Player 8 and higher movies in order to use these new TextField properties. Also, these new settings only apply to text that uses embedded fonts. If you are using device fonts with text, then you will not see any changes applied to your text.
In this section, you learn how to apply the new antialiasing features to TextField instances that you place on the Stage at author-time.
Create a new Flash file (ActionScript 2.0), and save it as
flashtype_100.fla.Rename Layer 1 to fields.
Using the Text tool, add a Dynamic text field on the Stage. In the Property inspector, name the instance displayField_1. Make sure you choose Antialias for animation and Multiline (see Figure 31.5). You can use any font face you prefer, but use a small text size such as 10 point.
Note
Choosing the Anti-alias for animation setting in the Property inspector is the equivalent of setting the
antiAliasTypeproperty to"normal"in ActionScript.In the Property inspector, click the Embed button and select the ranges shown in Figure 31.6. Remember, you can't use the new antialiasing features unless you have embedded the font used by the
TextFieldinstance.Duplicate the
displayField_1field by selecting the instance on the Stage and choosing EditNote
Choosing the Anti-alias for readability setting is the same as setting the
antiAliasTypeproperty to"advanced"in ActionScript.To add some text to the fields, you will set the text property of the fields in ActionScript. Create a new layer named actions. Select frame 1 of the actions layer, and open the Actions panel. Add the following code to the Script pane. The
var displayField_1:TextField;
var displayField_2:TextField;
var bodyText:String = "The quick brown fox jumps over
  the lazy dog.";
displayField_1.text = displayField_2.text = bodyText;
Tip
You can use more than one assignment operator (
=) in an ActionScript expression. In this example, you first set thetextproperty of thedisplayField_2to the value ofbodyText. Then, the text property of thedisplayField_1is set from the same value.Save the document, and test it (Ctrl+Enter or


Note
You can find the completed file, flashtype_100.fla, in the ch31 folder of this book's CD-ROM.
In this section, you learn how to use ActionScript to create TextField instances and set their antialiasing properties.
Continue using the
flashtype_100.flafile you created in the last section, or make a copy of the same file from this book's CD-ROM. Resave this file asflashtype_101.fla.Delete the fields layer. You will re-create these fields in ActionScript.
Even though you will use ActionScript to create
TextFieldinstances at runtime, you still need to embed the font you want to use with yourTextFieldinstances. Create a new layer named embedded fonts. Using the Text tool, add a Dynamic text field to the document, preferably offstage above the Stage area, as shown in Figure 31.9. Type the text abc into this field. In the Property inspector, make sure the text field type is Dynamic Text, and name this instanceembedField_1. Choose your preferred font face for the field; for this example, we used Verdana. Enable the HTML button (< >) for this instance as well. Click the Embed button and select the same ranges shown earlier in Figure 31.6.Note
Some Flash designers and developers prefer to embed fonts by creating Font symbols in the document's Library panel. Font symbols are useful if you need every character (including a wide range of foreign language characters and ASCII art symbols) in your Flash movie, but they greatly increase your .swf file size. Adding the entire Verdana font face as a Font symbol, for example, adds 20 KB to your Flash movie file (.swf) size! But if you only need the character ranges shown in Figure 31.6, using a Dynamic text instance on the Stage only adds 12KB to your Flash movie file (.swf) size.
Because the HTML option is enabled on the
embedField_1instance, you can control the formatting of the abc characters you typed into the field. Select the b character, and bold it in the Property inspector. Select the c character and italicize it in the Property inspector. When you are finished, your field should resemble the one shown in Figure 31.10.Tip
By adding the bold and italic styles to the
tEmbed1field, you are effectively embedding Verdana Bold and Verdana Italic font faces in the .swf file for this example. As such, you can use bold and italic formatting inTextFieldinstances, with appliedTextFormatinstances or HTML text. You'll use HTML text later in this exercise. However, embedding these additional styles adds more weight to the SWF's file size. If you prefer to use Font symbols, you can add a new Font symbol for each font face style you want to embed.Now you're ready to modify the ActionScript on frame 1 of the actions layer. The new script, shown in Listing 31.5, creates two
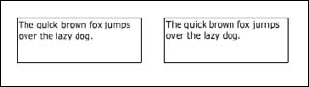
TextFieldinstances using the same instance names used in the previous section's example. Near the end of the init() function, notice thatdisplayField_1uses the"normal"value for theantiAliasTypeproperty, whiledisplayField_2uses the"advanced"value. Note that theTip
This script also creates an inline style sheet,
movieStyles. The local variablestylesin theinit()function shows the inline style, which is exactly the same text you would insert into a CSS file. You can use theparseCSS()method of theStyleSheetclass to convert aStringvalue into a full-fledged style sheet.Example 31.5. Applying AntiAliasing to TextField Instances
var displayField_1:TextField;
var displayField_2:TextField;
var movieStyles:TextField.StyleSheet;
var fieldText:String = "<p class='heading'><b>Typing Lessons 101</b>
  </p><p>The <i>quick</i> brown fox jumps over the lazy dog.</p>";

init();

function init():Void {
   movieStyles = new TextField.StyleSheet();
   var styles:String = "p { font-family: Verdana; font-size: 10; }";
   styles += ".heading { font-family: Verdana; font-size: 14; }";
movieStyles.parseCSS(styles); displayField_1 = createTextField("displayField_1",1,25,25,200,100); displayField_2 = createTextField("displayField_2",2,250,25,200, 100); var fields:Array = [displayField_1, displayField_2]; for(var i:Number = 0; i < fields.length; i++){ var t:TextField = fields[i]; with(t){ html = true; border = true; multiline = true; wordWrap = true; selectable = true; embedFonts = true; styleSheet = movieStyles; } }displayField_1.antiAliasType = "normal";displayField_2.antiAliasType = "advanced";displayField_1.htmlText = displayField_2.htmlText = fieldText; }Save the Flash document, and test it (Ctrl+Enter or


Figure 31.11. The two text fields with "normal" antialiasing (left) and "advanced" antialiasing (right).
Note
You can find the completed file, flashtype_101.fla, in the ch31 folder of this book's CD-ROM.
To help demonstrate the new sharpness and thickness properties of the TextField class, open the flashtype_200.fla file located in the ch31 folder of this book's CD-ROM. On the Stage of this document, you'll see an instance of the displayClip symbol, named display. If you test the Flash movie (Ctrl+Enter or
Note
You can run the flashtype_200.swf file directly in the stand-alone Flash Player or in a Web browser window. You can find this file in the ch31 folder of this book's CD-ROM. You can add more instances of the displayClip symbol on to the Stage of the Flash document (flashtype_200.fla) to have side-by-side comparisons of text and antialiasing values.
Flash Player 8 introduced a new property for the MovieClip class: scrollRect. This property controls the viewable area of a MovieClip instance on the Stage and can only be set with ActionScript (that is, you won't find a scrollRect setting in the Property inspector for Movie Clip symbols). You can think of the scrollRect property as a built-in mask that selectively shows content within the MovieClip object.
Tip
In ActionScript 2, you need to use the Rectangle class in Flash Player 8 or higher to create the rectangle shape that will be used by a MovieClip object's scrollRect property. You learn how to create a Rectangle object in this section's example.
You can use the scrollRect property to show and hide any type of content within a MovieClip object. In this section, you learn how to use the scrollRect property to create a scrollable area with text content within a MovieClip object. You learn how to control the _y property of a TextField instance with the UIScrollBar component. Typically, the UIScrollBar component is used to update the scroll property of a TextField instance, not the TextField instance's _y property.
Note
To get a sense of these two different types of scrolling, open the scroll_comparison.html document in the ch31/scroll folder of this book's CD-ROM. This page shows a Flash movie comparing text scrolling with the scroll property versus the _y property of a TextField instance.
In the following steps, you learn how to build a Flash movie that pixel scrolls a TextField instance with the UIScrollBar component.
Make a copy of the
fp8_pixelscroll_starter.flafile from thech31/scrollfolder of this book's CD-ROM. Open the file in Flash CS3, and resave it asfp8_pixelscroll_100.fla. This starter file has aTextFieldinstance nameddisplayFieldon the Stage. This field is set to embed the same range of Verdana font characters just like our previous examples in this chapter and already contains the text from the Gettysburg Address.Nest the
displayFieldinstance into a new Movie Clip symbol. Select thedisplayFieldinstance on the Stage, and choose ModifySelect the new holderClip symbol instance on the Main Timeline (that is, Scene 1) Stage. In the Property inspector, name this instance
holder. Also, rename the displayField layer to holder.Now you're ready to create a
Rectangleobject to use as thescrollRectvalue for theholderinstance. As you can see, thedisplayFieldinstance nested within theholderinstance continues off stage. ThescrollRectfor theholderwill be 300 × 300 pixels.Create a new layer named actions. Select frame 1 of the actions layer, and open the Actions panel (F9, or Option+F9 on the Mac). Add the code shown in Listing 31.6.
The first line imports the new
Rectangleclass, which is part of theflash.geomclass. The next three lines of code create variables for theRectangle, MovieClip, andTextFieldinstances that will be used within theinit()function.The
init()function creates theRectangleinstance and uses the instance for thescrollRectproperty of theholderinstance. Thewandhvariables establish the width and height, respectively, of the viewable area of theMovieClipinstance. TheRectangleconstructor uses four arguments: the starting X position, the starting Y position, the width, and the height of the rectangle shape. Once the shape is created, it is set to be the value of thescrollRectproperty of theholderinstance. ThedisplayFieldvariable is also set to equal thedisplayFieldinstance inside of theholderinstance, to create a shorter reference name for theTextFieldinstance.Before the
init()function is defined, the function is invoked so that theRectangleinstance is bound to theholderinstance when the Flash movie starts.Note
Due to rendering oddities of the FlashType engine, you buffer the width of the
Rectangleinstance (win) by 5 pixels. This buffer will make sure that any text bleeding outside of theTextFieldinstance will still be viewable.Example 31.6. Creating a Rectangle Object
import flash.geom.Rectangle;

var win:Rectangle;
var holder:MovieClip;
var displayField:TextField;

init();

function init():Void {
   var w:Number = 300;
   var h:Number = 300;
   win = new Rectangle(0, 0, w+5, h);
   holder.scrollRect = win;
   displayField = holder.displayField;
}
Save the document, and test it (Ctrl+Enter or
After the field is masked, you can add a scroll bar to enable the user to view the entirety of the text. Open the Components panel (Ctrl+F7 or
Select frame 1 of the actions layer, and open the Actions panel. Add the bold code shown in Listing 31.7 to the existing script. Note that the
The
init()function adds four new lines of code, which create a new instance of the UIScrollBar component. The new instance is namedsband is positioned to the right of theholderinstance. More importantly, the minimum and maximum values that the scroll bar should return for itsscrollPositionproperty are defined. The height of the Rectangle object is subtracted from the total height of thedisplayFieldinstance, because you don't want to scroll theTextFieldinstance off the Stage. The size of the UIScrollBar instance is also sized to the height of theRectangleinstance. The last line of code within theinit()function adds the new handler,onScroll, as a listener to the"scroll"event broadcasted from the UIScrollBar component.The last block of code defines the
onScroll()function, which is invoked whenever the user interacts with theUIScrollBarinstance,sb. ThescrollPositionproperty returned by thesbis used to set the_yposition of thedisplayFieldinstance. Note that the value is inverted, so that the top of theTextFieldinstance moves up. (You can come back to this code and remove the – sign to see what happens if it's not there.)Example 31.7. Attaching a UIScrollBar Component
import flash.geom.Rectangle;
import mx.utils.Delegate;import mx.controls.UIScrollBar;var win:Rectangle;var sb:UIScrollBar;var holder:MovieClip; var displayField:TextField; init(); function init():Void { var w:Number = 300; var h:Number = 300; win = new Rectangle(0, 0, w+5, h); holder.scrollRect = win; displayField = holder.displayField;sb = createClassObject(UIScrollBar, "sb", 1, {_x: holder._x +holder._width + 5, _y: holder._y});sb.setScrollProperties(h, 0, displayField._height - h);sb.setSize(sb.width, h);sb.addEventListener("scroll", Delegate.create(this, onScroll));}function onScroll(e:Object):Void {displayField._y = -sb.scrollPosition;}Save the document, and test it (Ctrl+Enter or


Note
You can find the completed file, fp8_pixelscroll_100.fla, in the ch31/scroll folder of this book's CD-ROM. You can see a more advanced example, fp8_pixelscroll_101.fla, in the same location. That version dynamically creates the MovieClip instance (holder) and the displayField instance, and populates the field with text from the gettysburg.as file.
The last text feature that we discuss in this chapter is the Selection class in ActionScript 2.0. The Selection class is similar to the Mouse class — you don't create instances of the Selection class as there can only be one active highlighted item at any given time.
Several object classes can use the Selection class, including TextField objects. The Selection class can use a string reference to the text field's variable (Var) name or its instance name to perform its methods. We discuss the methods of the Selection class in the following sections.
Note
In Flash Player 4 movies, there is no way of checking which text field was active. You can turn off a focus rectangle for Flash Player 4 text fields and Button instances, but you can't control tab order or automatically set a text field to active.
This method detects and returns the starting position of a highlighted selection in a text field. The method returns −1 if there is no active text field and/or there is no selection inside the text field. As with the Array object, selection indexes start position values at 0. You do not need to specify a target path for this method— only one text field can have a selection at any given point. Therefore, as a variable nIdx, the getBeginIndex() method would look like:
this.onMouseMove = function():Void {
var idx:Number = Selection.getBeginIndex();
trace("idx: " + idx);
};
In the Output panel, the trace() action would reveal idx = −1 until you made a selection within a text field in the movie, as shown in Figure 31.15.
Note
In the ch31/selection folder of this book's CD-ROM, review the getBeginIndex_trace.fla file to see how the getBeginIndex() method returns values for a text field. Each of the following sections also has a Flash document to demonstrate its respective method.
Similar to the getBeginIndex() method, this method returns a number indicating the index position at the end of a highlighted selection in a text field, as shown in Figure 31.16. If there is no active selection, then a value of-1 is returned.
This method of the Selection class returns the current cursor position (as an index value) within an active text field, as shown in Figure 31.17. As with the two previous methods, if you use the getCaretIndex() method when there is no active cursor in a text field, it returns a −1.
This method returns the current active text field's Var or instance name as an absolute path; that is, if you have selected or inserted the cursor position inside a text field instance named outputField on the Main Timeline, then Selection.getFocus() returns _level0.outputField. If there is no active text field, then this method returns null.
Note
If a text field does not have an instance name but does have a Var name, the Var name and path will be returned. A text field's instance name, when available, will be returned by this method.
Perhaps the best enhancement to controlled text field activity is the setFocus() method. This method enables you to make a text field active automatically — the user doesn't need to click the mouse cursor inside the text field to start typing. To use this method, simply indicate the setFocus() method of the Selection class and the path to the text field as its argument:
Selection.setFocus(inputField);
This code sets the current focus to a TextField instance named inputField. If any text exists in the text field, it will be highlighted as a selection. You can only use string data types as the setFocus() argument for Flash Player 5 compatability, but you can use instance names for Flash Player 6 or higher.
Another method available for the Selection class is setSelection(). This method enables you to make a specific selection within an active text field. The method takes two arguments: a start index and an end index. Use the same index numbering as getBeginIndex() and getEndIndex(). Note that this method will not work unless a text field is already active. The following code creates a selection span from index 5 to 9 of an instance named inputField:
Selection.setFocus(inputField);
Selection.setSelection(5,9);
Warning
You may find that the setSelection() method does not show any results in the Test Movie environment. Always test your Flash movies in a Web browser or the stand-alone player to analyze your results.
Note
We'd like to know what you think about this chapter. Visit www.flashsupport.com/feedback to send us your comments.
You can use HTML text formatting within Flash text fields. Only basic HTML text formatting is allowed.
You can insert HTML tags into the values of ActionScript variables that refer to Input or Dynamic text fields. Any quotes used with HTML attributes should be preceded by a backward slash,
.You can now apply style sheets to text within Flash movies that are compatible with Flash Player 7 or higher movies. The
TextFieldclass can also display inline artwork with the HTML<img>tag.The
asfunctionparameter for theHREFattribute of the<A>tag enables you to execute ActionScript functions from text fields. You can pass one argument to the specified function.The
scrollproperty of Input and Dynamic text fields enables you to control the portion of a text field value that is displayed within the text field.maxscrollreturns the highest line number for a given set of text in a text field.The FlashType rendering engine of Flash Player 8 and higher enable you to create Flash movies with small text that is more legible than in older versions of the Flash Player.