Defining rasters and vectors
Knowing the file formats for import to Flash
Preparing bitmaps
Importing and copying bitmaps
Importing sequences
Setting bitmap properties
Converting rasters to vectors
Using external vector graphics
Importing and copying vector artwork
Optimizing complex vector artwork
Although Flash gives you powerful options for creating and modifying a variety of graphics, you don't have to limit yourself to the Flash authoring environment. That's because Flash also has the capability of importing artwork from a wide range of sources. You can import both vector and raster graphics, and you can use both formats in a variety of ways.
In this chapter, we discuss the differences between vector graphics and raster or bitmap images. We also show you how to import external artwork so that you can use it in a Flash movie, as well as tell you about the Flash features that you can use to handle imported bitmap images and vector graphics.
Note
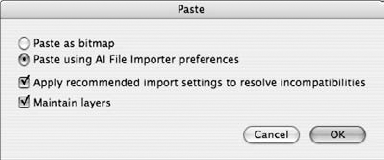
The import dialog boxes for bringing Illustrator and Photoshop files into Flash have been expanded to make it easier to control how the artwork will be transferred. You can select individual layers and apply specific import settings to different types of content.
We define all the formats that Flash supports and go over some of the issues to consider when preparing artwork for import from various programs. We also introduce some Flash features that are helpful for managing imported assets and give some insight into optimizing your final file size.
In addition to various sound and video formats, Flash supports two types of image formats: vector and bitmap. Vector graphic files consist of an equation that describes the placement of points and the qualities of the lines between those points. Using this basic logic, vector graphics tell the computer how to display the lines and shapes, as well as what colors to use, where to put them on the Stage, and at what scale.
Flash is a vector program. Thus, anything that you create with the Flash drawing tools will be described in vector format. Vector graphics have some important benefits: They're small in file size and they scale accurately without distortion.
However, they also have a couple of drawbacks: Highly complex vector graphics may result in very large file sizes, and vectors aren't really suitable for creating continuous tones, photographs, or artistic brushwork.
Bitmap (also referred to as raster) files are described by an arrangement of individual pixels, which are mapped in a grid — like a piece of graph paper with tiny squares. Each square represents a single pixel, and each of these pixels has specific color values assigned to it. So, as the name implies, a bitmap image maps out the placement and color of each pixel on the screen. A line is "drawn" by filling each unique pixel, rather than simply using a mathematical formula to connect two points as is done with vectors.
Note
Do not be confused by the name bitmap. You might already be familiar with the bitmap format used by Windows, which has the file extension .bmp. Although bitmap may refer to that particular image format, it's frequently applied to raster images in general, such as GIF, JPEG, PICT, and TIFF files, as well as many others.
Although bitmap images aren't created in Flash, they can be used within Flash projects. To do this, you need to use an external bitmap-editing application and then import the bitmaps into Flash. Figure 16.1 shows a vector image and a bitmap image of the same logo, scaled at 100 percent.

Figure 16.1. A vector image drawn in Flash (left) and the same image imported as a bitmapped GIF graphic (right)
Although these vector and bitmap images are of similar quality at their original size, their differences become more apparent when the same images are scaled to a larger size. Unlike vector graphics, bitmap images become more pixilated as they are scaled larger because there is a finite amount of information in the image and Flash has to spread this information over more pixels. As we explain later in this chapter, Flash is able to interpolate the pixel information by using Smoothing to reduce the jagged appearance of the scaled pixel pattern, but this can also cause the image to look blurred. Figure 16.2 shows the difference between vector and bitmap graphics when scaled in Flash with Smoothing turned off.
Simple bitmap images are often larger in file size than simple vector graphics, but very complex bitmap images (for example, a photograph) can be smaller and display better quality than vector graphics of equal complexity. Figure 16.3 shows a bitmap image compared to a vector image of equal complexity (created by tracing the bitmap). The original bitmap is a smaller file and better suited for reproducing the photographic image.
The rule of thumb is to use scalable, bandwidth-efficient vector graphics as much as possible within Flash projects, except for situations in which photographs — or photographic-quality, continuous-tone images — are necessary for special content.
Tip
Most 8-bit raster images are GIFs, and they are most frequently used for images with large areas of solid color, such as logos and text. Rather than use this image type in Flash, consider re-creating or tracing this artwork with Flash drawing tools. The final Flash movie (.swf) will not only be smaller; it will also look cleaner and be scalable.


You can import a variety of assets (in compatible formats) directly into your Flash project Library, or you can import or copy and paste from another application into the Flash Document window. Assets can also be dragged from one Flash Document window or library to another. Files must be a minimum size of 2 pixels by 2 pixels for import into Flash.
Warning
Copying and pasting bitmap images into Flash from other applications does not always transfer transparency settings, so it may not be the best workflow for some assets. Using the Import dialog box and specifying that the artwork be imported as an editable object will preserve transparency settings from Fireworks .png files.
The import menu (Ctrl+R or
Note
For a full discussion of importing and handling sound assets, refer to Chapter 15, "Adding Sound." Flash-compatible video formats are documented in Appendix D, "Digital Video Basics."
For now, let's focus on a brief summary of the image formats for Flash import, as shown in Table 16.1.
Note
The QuickTime warning dialog box that would pop up when bitmap images requiring QuickTime support were imported to older versions of Flash no longer appears. Although QuickTime support is still needed for some file types, the warning has been retired to make the process more seamless.
Table 16.1. Image Formats for Flash Import
File type | Extension | Description | Platform |
|---|---|---|---|
Adobe Illustrator (CS3 files are most compatible) | .ai | Adobe Illustrator files are imported into Flash as vector graphics (unless they contain bitmap images). The importer plug-in is required to import files from Adobe Illustrator 8 and earlier. To import EPS or PDF files to Flash CS3, you must first open them in Illustrator and resave in AI format. | Windows Macintosh |
AutoCAD DXF | .dxf | Drawing eXchange format is the original inter-program format for AutoCAD drafting software. Because this format does not support fills, it is mainly used for drafting plans or schematic drawings. This format is used by most CAD, 3-D, and modeling programs for transferring drawings to other programs. | Windows Macintosh |
(Windows) Bitmap | .bmp, .dib | Although Bitmap is a Windows format for bitmap images, don't be confused by the format name — not all bitmap images are Windows Bitmaps. Bitmap can be used with all Win and some Mac applications. It allows variable bit depths and compression settings with support of alpha channels and supports lossless compression. It is ideal for high-quality graphics work. | Windows Macintosh |
Enhanced Metafile | .emf | Enhanced Metafile is a proprietary Windows format that supports vectors and bitmaps internally. This format is occasionally used to import vector graphics, but for most professional graphics work, this is not a recommended format. | Windows |
Flash Movie | .swf, .spl | Flash Player files are exported Flash movies. The movie is flattened into a single layer and scene, and all animation is converted to frame-by-frame animation. | Windows Macintosh |
FreeHand | .fh | This is the vector-based format of FreeHand (v.7 or later). | Windows Macintosh |
GIF image or animated GIF | .gif | Graphic Interchange Format (GIF) was developed by CompuServe as a bitmap image type that uses lossless compression. It is limited to a 256-color (or less) palette and is not recommended as a high-quality Flash export format, even for Web use. | Windows Macintosh |
.jpg | Joint Photographic Experts Group (JPEG) images are a bitmap type that uses lossy compression. Supports 24-bit RGB color. Recommended for Web-friendly compression of photographic images. Because of small file size, JPEG is often the native format for digital still cameras. No support for alpha channels. | Windows Macintosh | |
MacPaint image | .pntg | This is a legacy format for the old MacPaint program. | Windows Macintosh |
PICT image | .pct, .pict | PICT image is compatible with many Win and all Mac applications. It enables variable bit depths and compression settings with support of alpha channels (when saved with no compression at 32 bits), supports lossless compression, and can contain vector or raster graphics. PICT image is ideal for high-quality graphics work. | Windows Macintosh |
PNG image | .png | The Portable Network Graphic (PNG) format is another type of bitmap image that supports variable bit depth (PNG-8 and PNG-24) and compression settings with alpha channels. PNG files imported to Flash from Fireworks or Photoshop as editable objects (unflattened) will preserve artwork in vector format. Lossless compression schemes make it ideal for high-quality graphics work. It is the recommended media type for imported images with alpha channels or filter effects. | Windows Macintosh |
Photoshop image (2.5 or higher) | .psd | This is the native layered format for most versions of Photoshop. | Windows Macintosh |
QuickTime image | .qtif | This is the static raster image format created by QuickTime. It is not commonly used. | Windows Macintosh |
Silicon Graphics image | .sgi | This is an image format specific to SGI machines. | Windows Macintosh |
TGA image | .tga | The TGA, or Targa, format is a 32-bit format that includes an 8-bit alpha channel. It was developed to overlay computer graphics and live video. | Windows (with QT4) Macintosh |
TIFF image | .tif or .tiff | TIFF is a lossless, cross-platform image type used widely for high-resolution photography and printing. | Windows Macintosh |
Windows Metafile | .wmf | Windows Metafile is a proprietary Windows format that supports vectors and bitmaps internally. This format is generally used to import vector graphics. | Windows |
Toon Boom Studio file | .tbp | This is the vector format for files created with Toon Boom Technologies proprietary animation software. It preserves layers, scenes, sound, and so on and is imported with support from the Toon Boom Studio Importer plug-in (TBSi) shipped with Flash MX 2004. | Macintosh (with TBSi) Windows (with TBSi) |
Tip
Although you can export to the GIF format from Flash, this should be considered an option for raw-information transfer only, not as a means for creating final GIF art. For optimal quality and control, GIFs exported from Flash should be brought into Fireworks for fine-tuning and optimization. A preferable workflow is to export a PNG sequence from Flash that can be brought into Fireworks for fine-tuning and final GIF output.
Flash is a vector-based application, but that shouldn't stop you from using bitmaps when you need them. There are many situations in which either the designs or the nature of the content require that photographic images be included in a Flash project. You can import a wide variety of bitmap image types, including JPEG, GIF, BMP, and PICT using the methods we describe in the next section.
Considering that it's a vector-based program, Flash supports bitmap graphics extraordinarily well. However, because the most common use of Flash movies is for Web presentations, you always need to keep file size in mind. Here's what you can do to limit the impact of bitmap images on Flash playback performance:
Limit the number of bitmaps used in any one frame of a Flash movie.
Remember that, regardless of how many times the bitmap is placed on the Stage, the actual bitmap (or its compressed version in the .swf file) is downloaded before the first occurrence of the bitmap (or its symbol instance).
Try spreading out bitmap usage, or hide a symbol instance of the bitmap in an earlier frame before it is actually visible, so that it will be loaded when you need it.
Tip
If you need to include several high-resolution bitmap images in your Flash movie, consider using an ActionScript preloader or try breaking up the project into several linked Flash movies.
When you want to bring raster images into Flash documents, you should know what portion of the Flash Stage the image will occupy. Let's assume that you're working with the default Flash document size of 550 × 400 pixels. If you want to use a bitmap as a background image, it won't need to be any larger than 550 × 400 (as long as your movie will not be scalable). So, assuming that you're starting with a high-resolution image, you would downscale the image to the largest size at which it will appear in the Flash movie before you import it into Flash; for our example, that would be 550 × 400.
Tip
Use an image-editing program such as Fireworks or Adobe Photoshop to downsize the pixel width and height of your source image if necessary.
If you mask bitmaps with a Mask layer in the Flash Timeline, the entire bitmap is still exported. Consequently, before import you should closely crop all images that will be masked in Flash. For example, if all you need to show is a face, crop the image so that it shows the face with as little extraneous background information as possible.
Be aware that Flash doesn't resize (or resample) an image to its viewed or placed size when the Flash movie (.swf) is created. To illustrate how the size of an imported bitmap can impact the size of a final Flash movie (.swf), we compared two different image resolutions used in identical layouts. Using the same source image, we sized the JPEG at two different pixel dimensions, and then placed it in two identical Flash documents (.fla). The first source version of the image had a 400 × 600 pixel dimension, while the second source version had a 200 × 300 pixel dimension — exactly half the size of the first. In both Flash documents, the final image was displayed at 200 × 300 pixels.
In the first Flash document (we'll call it Movie A), we imported the larger JPEG and resized it by 50 percent (using the Info panel) to match the smaller image. In the second Flash document (Movie B), we imported the smaller JPEG and placed it at its original size, occupying the same portion of the Flash Stage as the image in Movie A. Although both Flash movies exported a bitmap of the same display size on the Flash Stage, the resulting .swf files (using the same level of JPEG compression on export) had drastically different file sizes. Movie A was 44.1KB, whereas Movie B was 14.8KB! Movie A is nearly three times larger than Movie B. The difference in image resolution could be seen when a view magnification greater than 100 percent was used within the Flash Player; the larger JPEG in Movie A was much less pixilated than the smaller JPEG in Movie B.
When you choose to use bitmap images, remember that they won't scale as well as vector drawings in the authoring environment. Furthermore, bitmaps will become degraded if the viewer scales your final movie so that the bitmap is displayed larger than its original size. Here are a few points to consider that will help you maintain the quality of your presentation when using bitmaps:
Know your audience, and design for the largest screen (at the highest resolution) that your audience may have. Or, if you deviate from this, remember that audience members with optimal equipment will see a low-quality version of your work. If you're using ActionScript to load image assets, consider having low-res and high-res versions of the images available.
Measure your largest hypothetical image dimensions in pixels. One way to determine these dimensions is to use the Flash Info panel to read the size of a placed image or a placeholder shape. Another way is to take a screen capture of your mock-up, and then measure the intended image area in Photoshop.
Create or resize your bitmap image to the maximum hypothetical dimensions. If there are any rotations or skews required, you may have to do a test to see if the final result is cleaner when the transformation is done in your image-editing program or in the Flash authoring environment.
Import images into Flash at the maximum required size, and then scale them down to fit into your layout.
The advantage of using this approach is that the movie can be scaled for larger monitors without causing the bitmap image to degrade. The disadvantage is that it requires sending the same large bitmap to all users. A more sophisticated solution is to use JavaScript to detect browser dimensions and then send the appropriately scaled bitmaps to each user. Other workaround solutions that may help preserve the quality of your final presentation without adding file size include the following:
Restrict scaling capability of your published movie. You can do this by using HTML options in the Publish Settings or using ActionScript.
Set the bitmap's compression to Lossless (GIF/PNG) if it is already optimized in GIF format or if you want to preserve an alpha channel or editable filter effects in a .png or a .psd file.
Trace the bitmap to convert it to a vector graphic (covered later in this chapter).
Never apply double JPEG compression to your images. If you have compressed and saved images in JPEG format outside of Flash, be certain to select the Use imported JPEG data check box when importing the images to Flash.
Before sizing and importing bitmaps, you need to consider how you will set the dimensions for the Flash movie (.swf) in the HTML tab of the Publish Settings dialog box. You also need to know whether the bitmap is to be scaled in a Motion tween. If the Flash movie scales beyond its original pixel width and height (or if the bitmap is scaled larger in a tween), then bitmap images will appear at a lower resolution with a consequent degradation of image quality.
If you're uncertain of the final size that you need for a bitmap in Flash, it may be best to import a temporary low-resolution version of the image — being careful to store your original high-resolution version where you can find it later. Whenever you need to place the bitmap, drag an instance of the symbol onto the Flash Stage. Then, during final production and testing, after you've determined the required pixel size for the maximum scale of the final bitmap, create and swap-in a higher-resolution image, as follows:
Double-click the icon of the original low-resolution bitmap in the Flash Library to access the bitmap's properties.
In the Bitmap Properties dialog box, click the Import button and select the new, higher-resolution version of the bitmap.
After import of the high-res image, all instances of the bitmap will update automatically, with the scaling, animation, and placement of the image maintained.
Flash has the option to import bitmaps directly to the document Library, in addition to the standard option of importing to the document Stage. When a bitmap file is imported to the Stage, it will be added to the Library as well. To import a bitmap into Flash, follow these steps:
If you want to import an item to the Stage, make sure that there's an active, unlocked layer.
If no layer is available for placement of the imported item, the Import to Stage command is dimmed and you will only be able to use the Import to Library option.
Choose File

Navigate to the file that you'd like to import, select it, and click the Import or Import to Library button.
The important difference between Import and Import to Library is that the latter option places the asset directly into the document Library without placing an instance on the Stage.

Figure 16.4. The Import dialog box as it appears on Mac OS X. You can import multiple files in the same batch by selecting them from the file list before clicking Import.
Because Flash offers full support for the PNG image format (including lossless compression and multilevel transparency and some Fireworks filters), PNG is an ideal format for images that you intend to import into Flash. The PNG format has two types: PNG-8 and PNG-24. Generally, only PNG-24 images support 24-bit color and an alpha channel, but the file sizes can often be prohibitive. Fireworks makes it possible to create PNG-8 files with transparency for import to Flash.
Warning
When you are using bitmap images with transparent areas, display problems can occasionally occur with certain color settings and file types. For troubleshooting assistance, refer to the Adobe TechNote on "Transparency support in Flash" at: www.adobe.com/support/flash/ts/documents/transparent_bitmaps.htm.
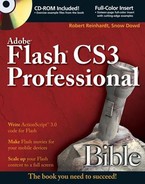
When using the Import to Stage option, if you select an image from a series of images in the same storage location that include sequential numbers at the end of their filenames, Flash prompts you to import the files as a sequence. If that's what you want to do, click Yes in the dialog box (shown in Figure 16.5) to have Flash import all the files and place them in numeric sequence on successive keyframes of the current Timeline. Otherwise, click No, and only the single file that you've selected will be placed on the Stage.
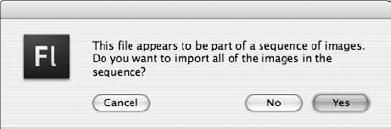
Figure 16.5. You can import images in a numbered sequence and place them on successive keyframes automatically using the Import to Stage option.
If you are importing a series of stills to be used sequentially to create animation (stills from a video sequence, for example), this feature can save a lot of the time you would spend placing and ordering images manually. The most efficient workflow is to create a Movie Clip symbol before importing the images, so that the sequence can be placed directly on the Movie Clip Timeline. This method creates an animated element that can easily be placed anywhere in your Flash project. If you have already imported a sequence to the Main Timeline and decide that it would be more easily managed as a symbol, simply create a Movie Clip, and then cut the images from the Main Timeline and paste them into the Movie Clip Timeline.
Note
For more coverage on how to create bitmap sequences from QuickTime video, go to the archived Flash MX Bible (Wiley, 2002) Chapter 41, available online at www.flashsupport.com/archive.
Although sequential import is not an option when using Import to Library, it is possible to manually select multiple images for import while using either of the Import dialog boxes. In order to bring more than one file into Flash in the same batch, Shift+click to select multiple items in sequence or use Ctrl+click (or
If you are working with graphic files that go beyond simple, single-layer bitmap images, finding the best way to translate those files to Flash may require some trial-and-error. Both Fireworks files (PNG) and Photoshop files (PSD) can contain bitmap and vector artwork, as well as text and masks or filters on multiple layers. Fireworks files may also contain frames and guides. You can always opt to flatten elements into a single bitmap file to preserve the exact appearance of the image or you can choose to preserve editable paths and layers for more flexibility in the Flash authoring environment.
Each layered file imported from Photoshop or Fireworks with editable objects preserved will be nested in a new folder in the Flash library that will automatically have the same name as the imported file. You can change the default name of these folders and reorganize your Flash library as needed to keep the structure clean. You may find it helpful to create a folder for imported elements and nest all the folders that Flash creates for you so that your Library does not get too cluttered.
Tip
Keep in mind that Movie Clip symbols created by Flash to preserve editable files imported from Photoshop or Fireworks will be stored along with any bitmaps or other assets in the folders that Flash auto-creates for each file. If you are using a Movie Clip symbol more than once, you may want to rename and move it to a location that is easier to access — such as into the main file list in the Flash Library — rather than leaving it in the nested folder.
Note
Flash can support some effects and blends created in Fireworks or Photoshop. If an effect is supported in Flash, it will be preserved as an editable Flash filter. If an effect is too complex for Flash to preserve, the image can be rasterized to preserve the appearance of the image, but the effect will not be editable in the Flash authoring environment.
Luckily, Flash CS3 offers a new and improved import dialog box for layered Photoshop files (shown in Figure 16.6) that makes it easier to control elements of the file to be flattened (as bitmaps) or imported as editable objects.
Warning
Although layered Photoshop files can be saved in TIFF or PNG format, these files will be flattened on import to Flash, and you will not have the same control over the conversion of specific elements as you will with PSD files. PSD is the only Photoshop file format that can be brought into Flash with the option to keep layers and editable elements intact.
When importing images from Photoshop into Flash, you will be prompted by the Photoshop Import Settings dialog box to select each layer in the file and make choices for the following import options:
Import this image layer as:
Bitmap image with editable layer styles: This setting will automatically create a Flash Movie Clip and place the elements onto the Movie Clip Timeline while preserving the image, masks, and other effects (supported by Flash) as editable.
Flattened bitmap image: This setting will flatten the image into a single layer in the main Flash Timeline and will preserve the appearance of any masks or filters, but they will not be editable in Flash.
Import this text layer as:
Editable text: Brings the text in as an editable Flash text box, may require font substitution if you do not have the same font available in Flash. The text will be placed on a layer in the Main Timeline or on a Movie Clip Timeline (depending on the other settings you choose).
Vector outlines: Converts the text to individual letter outlines to preserve the appearance of the characters and the layout. You can modify the text using Flash drawing tools, but you will not be able to edit using Flash text tools.
Flattened bitmap image: Converts the text into a single image to preserve appearance but limits editing options to those that can be applied to bitmaps.
Create Movie Clip for this layer: If you have selected this option (or it has been auto-selected to preserve editable elements), you have the option of assigning an instance name and modifying the registration point.
Instance name: You only need to assign an instance name if you plan to target the Movie Clip with ActionScript.
Registration: In most cases, you won't need to worry about changing the default registration point since the convention is to work with the top-left corner as a reference for position and scale.
Publish Settings: You have three options:
You may opt to import the image without any additional compression (Lossless).
You may set a custom compression setting for each layer or image as you import it (Lossy: Custom).
Tip
Use the Calculate Bitmap Size button to preview the effect of different Custom compression settings before you decide on the final level to apply to your imported image.
Or, you may opt for the default setting, which will apply the level of compression you have set globally for your Flash movie in Publish Settings (Lossy: Use publish setting).
Convert layers to:
Flash layers: Puts the contents of each image layer onto a new layer in the selected Flash Timeline (either on the Main Timeline or on a Movie Clip Timeline).
Keyframes: Puts the contents of each image layer into a new keyframe on a single layer in the selected Flash timeline (either on the Main Timeline or on a Movie Clip Timeline).
Along with the layer-specific settings listed above, there are two handy check boxes at the bottom of the dialog box that enable you to apply two additional (optional) settings for all layers in the file:
Place layers at original position: This setting ensures that the placement of the imported elements will be consistent with the original file, relative to the top-left corner of the Stage. If you do not select this check box, the imported elements will just be placed in the center of the visible area of the Document window (including the Pasteboard) — which usually turns out to be a somewhat random location unless you have been very precise with your zoom setting and your scroll bars to position the Stage within the viewable area of the Document window.
Set stage size to same size as Photoshop canvas: This is very helpful if you are importing an image to a new Flash file and you want to match the sizes, but it may disrupt your layout if you already have other elements placed in the Flash file you are importing to.
If all these options seem like more than you need, you can simplify things by leaving the default settings for each layer as-is, or you can select some (or all) of the layers (using Shift+Select or Ctrl+Select) to apply a more limited set of options to all the layers at once.
Tip
While you have more than one layer selected in the Import dialog box, you may also choose to use the Merge button to flatten the layers into a single bitmap to streamline your file — this will preserve the appearance of the layered image but limits your editing options in Flash to those available for simple nonlayered bitmaps.
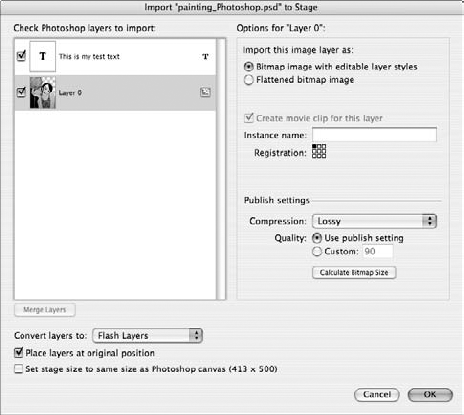
If you want to fine-tune your import settings without having to make selections each time you see the Photoshop Import dialog box, you can choose your own default settings in the Flash Preferences panel (File
The import dialog box for Fireworks files has been modified since Flash 8, but it still supports the import of layered, editable files (as shown in Figure 16.8).

Figure 16.8. Use this special import dialog box to choose conversion settings for Fireworks PNG files.
Warning
Although Photoshop files saved in PNG format will show up in the file list when you browse for PNG files, they will not invoke an import dialog box with options but will be flattened into a single-layer bitmap on import. Only PNG files saved from Fireworks will enable you to preserve layers and editable shape or text elements on import to Flash.
When importing PNG images from Fireworks into Flash, you will be prompted by the Fireworks PNG Import Settings dialog box to make selections for the following import options:
Import as a single flattened bitmap: Select this check box to import the PNG as one rasterized image to the current layer on the Main Timeline or to the Library. When this option is selected, all other options will be unavailable. If you choose this option, you may want to apply Flash JPEG compression to the bitmap image either in Bitmap Properties or in Publish Settings. To edit a flattened image, you can launch Fireworks from inside Flash and edit the original PNG file (including any vector data or text).
To import more complex files, use these options to control the import structure:
Import: Page or Layer or Frames — select the option that best describes the location and structure of the Fireworks content you want to bring into Flash.
Into: Current frame as a movie clip to import the PNG file to a new Flash Movie Clip Timeline with all frames and layers intact, or New Layer to import the PNG file into a single new layer in the current Flash document at the top of the stacking order. All Fireworks layers will be flattened, but not rasterized unless specified, and any frames in the Fireworks file will be included on the new layer.
Use these settings to control whether content is rasterized or kept editable:
Objects: Select either Import as bitmaps to maintain appearance to rasterize Fireworks fills, strokes, and effects in Flash as part of a flattened bitmap image, or select Keep all paths editable to preserve vector paths in Flash. Some Fireworks fills, strokes, and effects may be lost on import.
Text: You can select the same options as those listed for Objects.
As with most files created in external applications, you will find that rasterized and flattened Fireworks artwork and text will import more consistently to Flash, but you also lose all the benefits of having editable vector art and text fields. Although the option for launching Fireworks at any time to edit the original PNG file does make rasterized Fireworks images less limiting than other bitmaps, it is usually worth the little extra time you might need to spend simplifying your artwork to get it to import to Flash with vectors and editable text intact. Any special fills or textures that have been applied to your text in Fireworks will be lost if you choose to preserve editable text on import to Flash.
Note
Although gradients imported from FreeHand are converted to raw Flash shapes with gradient fills, gradients imported from Fireworks are converted to Movie Clip symbols that will appear in the Library in a folder labeled Fireworks Objects — it is still possible to edit the gradient fill just by opening the symbol in Edit mode (or double-clicking the symbol instance).
Warning
If you import a Fireworks PNG file by cutting and pasting into Flash, all vector elements will be rasterized into a flattened bitmap image.
Here's how to use the Clipboard to import a bitmap into Flash:
Copy the bitmap from your image-editing application to your Clipboard.
Most programs support the Ctrl+C or

Return to Flash and make sure that you have an active, unlocked layer that you can paste the bitmap into; this can be on the Main Timeline or on any symbol Timeline.
Paste the bitmap onto the Stage by choosing Edit
Warning
When you are pasting a selected area from Photoshop, any transparency (alpha channel) is ignored or will render with unpredictable patterns that you'll have to mask out in Flash. The bitmap name will also be replaced with a default numbered asset name. In most cases, results will be much more consistent if you import the image file rather than copying and pasting it into Flash.
A bitmap has some of the same advantages as the native Flash symbol types: It is automatically added to the Library when you import it, and instances can be dragged onto the Stage and even used in Motion tweens. However, Filters can't be applied to raw bitmaps and the Color (and Alpha) Effects are not available in the Property inspector when you select a bitmap instance. If you wish to change the alpha settings or color tint of an imported image or apply any of the Flash Filters, you have two easy options:
Convert the bitmap into a Flash symbol type (F8) — use Movie Clip or Button symbol behavior if you want to use Flash Filters. You can use the same name for the symbol instance as the original bitmap image. Filters will be available in the Filters tab, and Color Effect settings will be available in the Properties tab of the Property inspector when you select the new (converted) symbol instance. Unfortunately, if you have placed other instances of the raw bitmap in your Flash file before nesting the bitmap in a symbol, not all of the instances of the bitmap will be automatically linked to the symbol you create, and you cannot use the Swap button to insert a Flash symbol instance in place of a bitmap instance.
Tip
Library folders are very helpful for managing large sequences of images that need to be converted into symbols. We usually create a "Bitmap source" folder and an "Image symbol" folder to make it easy to keep track of where all the assets are. Keep in mind that edits to the bitmap will be visible in the Flash symbol, but changes to the Flash symbol will not change the original bitmap.
You can use Timeline Effects to add alpha or color changes to a bitmap instance. Flash still converts the image into a Graphic symbol before the Effect is applied, but you don't have to worry about doing it as a separate step.
Of course, using an external image-editing program is always an option, too. The features we describe in the next section can assist you if you plan to edit images outside of Flash.
The Bitmap Properties dialog box, shown in Figure 16.9, has several options that are used to control the quality of your imported bitmaps. Settings in the Bitmap Properties dialog box will override the default JPEG compression setting for the document that is controlled in the Flash tab of the Publish Settings dialog box (File
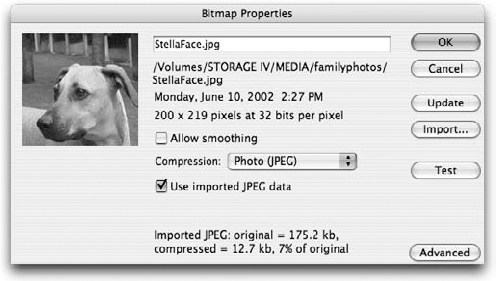
Figure 16.9. The Bitmap Properties dialog box controls the compression settings applied to bitmaps imported into Flash.
Tip
The Advanced button expands the Bitmap Properties dialog box to show Linkage properties. In addition to importing or exporting for runtime sharing, bitmaps can be set to export for ActionScript. If you decide to enter or modify Linkage properties for a bitmap after it has been imported, you can access these same options by selecting the symbol in the Library and choosing Linkage from the contextual menu or from the Options menu.
Follow these steps to use the Bitmap Properties dialog box:
Open the Library panel by choosing Window
Double-click one of the bitmap's icons, or use the contextual menu for a selected image to open the Bitmap Properties dialog box.
You can also select Properties from the Library Options menu, or, with the bitmap highlighted, click the Properties button at the bottom of the Library panel.
Now, set the properties of your bitmap as needed:
Preview window: This displays the bitmap according to the current settings.
Tip
Although the preview window in the Bitmap Properties dialog box may show only a small portion of your image, you can move the picture around within the preview window by clicking and dragging the image to view different areas.
Name: This is the name of the bitmap, as indicated in the Library. To rename the bitmap, highlight the name and enter a new one.
Image Path, Date, Dimensions: Beneath the filename, Flash lists the local path, dimensions, and date information for the source of the imported image (not available if you pasted the image from the Clipboard).
Update: This feature enables you to reimport a bitmap if it's been altered outside of Flash. Flash tracks the original location of the imported bitmap and will look for the original file in that location when the Update button is clicked.
Import: This opens the Import Bitmap dialog box. When using this button, the new imported bitmap will replace the current bitmap (and all instances, if any), while retaining the original bitmap's name and all modifications that have been applied to the image in Flash.
Test: This button updates the file compression information, which appears at the bottom of the Bitmap Properties dialog box and the image in the Preview window. Use this information to compare the compressed file size to the original file size after you have selected new settings.
Compression type drop-down: The compression setting enables you to set the bitmap's compression to either Photo (JPEG) or Lossless (PNG/GIF). Photo is good for very complex bitmap images (photographs for example); Lossless is better for graphic bitmap images with simple shapes and fewer colors. Play around with these settings to see which works best to give you a balance between file size and image fidelity for each particular image. Figure 16.10 shows a comparison of these two settings applied to an imported GIF image (top) and applied to an imported JPEG image (bottom). The GIF with default lossless compression is only 4.7KB. Applying a reduced JPEG Quality compression of 50 results in a larger file size (7KB) for a poorer-looking image. Conversely, the JPEG with a Quality of 50 is only 9KB, while the JPEG forced to lossless compression is 145.6KB, without a huge difference in display quality.
Use imported JPEG data/Use Document default quality: If the imported image is a JPEG, the first option will appear — select this check box to avoid double JPEG compression. If the image is not a JPEG, the second option will appear — select this check box to apply the global JPEG Quality setting defined in the Publish Settings dialog box for your current document. To select a new compression setting for an image, clear the check box beside Use imported JPEG data or Use Document default quality, and enter a new setting between 1 and 100 in the Quality value field. This is not recommended for imported JPEGs because it will result in double JPEG compression. On uncompressed source files, higher Quality settings produce better quality images but also larger file sizes. Figure 16.11 includes a JPEG published with imported data and a JPEG published with a reduced Quality setting (double JPEG compression).
Note
The Quality settings applied in the Bitmap Properties dialog box are not visible in the authoring environment. The quality for images displayed on the Stage appears the same regardless of the Flash JPEG settings. You will see a difference in the image (and the file size) only when you publish the movie (.swf). You can see smoothing in the authoring environment, making it easier to decide which images look better with smoothing applied.
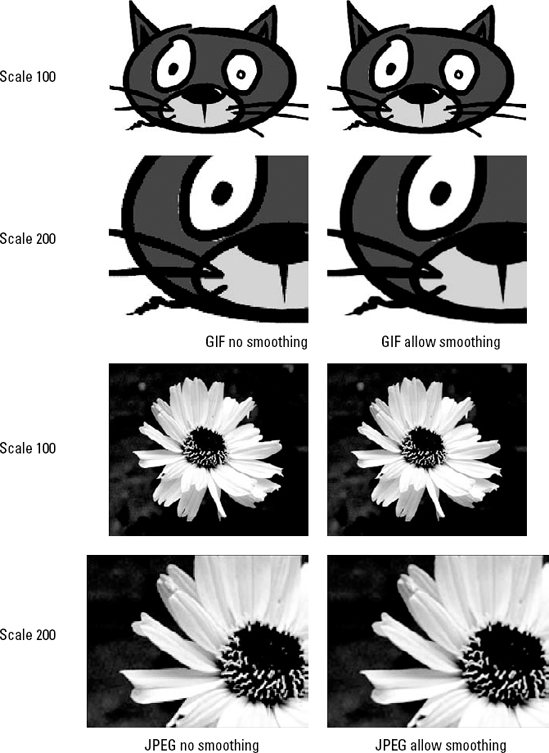
Allow Smoothing (anti-aliasing): Select this check box to enable Flash to antialias, or smooth, the edges of an image. Results may vary according to the image. Generally, this is not recommended for nonscaled graphics because it can soften the image. However, smoothing can be beneficial for reducing jagged edges on low-res images scaled in an animation. Figure 16.12 shows the effect of smoothing applied to a GIF image (top), and smoothing applied to a JPEG image (bottom).
Click OK.
All copies of this bitmap used in Flash are updated to the new settings.
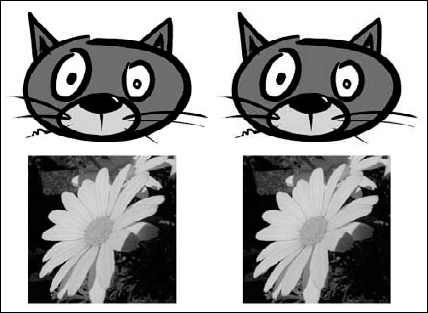
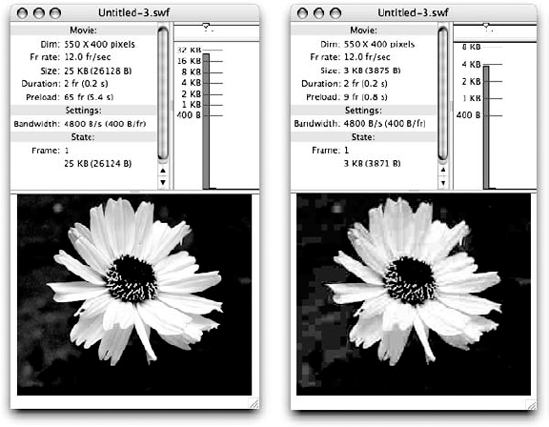
Figure 16.11. The same bitmap image as it displays in the published Flash movie (.swf) using imported JPEG data (left) and using a reduced Quality setting of 10 (right)
Note
For specific bitmap compression recommendations for different types of source files, please refer to the "Making Sense of Bitmap Compression" section, later in this chapter.
Flash retains existing JPEG compression levels on any imported JPEG image, but, if specified in the Bitmap Properties dialog box, it applies additional JPEG compression (set in the Quality field) when the movie is published or exported. Recompressing an image that has already been compressed usually leads to serious image degradation, due to the introduction of further compression artifacts. When importing JPEGs, you'll note that the Use imported JPEG data check box is selected by default in the Bitmap Properties dialog box. This is the preferred setting because recompressing a JPEG is generally detrimental to image quality.
Tip
If you import JPEG images, make sure that you either test the results of further JPEG compression or select the Use imported JPEG data check box in the Bitmap Properties dialog box, which is accessible from the Flash Library.
You can apply compression settings to each individual bitmap in the Library with the Flash Bitmap Properties dialog box to determine the quality that you need before you use the general JPEG settings in the Export Movie or Publish Settings dialog box. Any Quality defined in the Bitmap Properties dialog box will override the JPEG Quality in Publish Settings. To apply the Publish Settings compression to an image, you must select the Use document default check box in the Bitmap Properties dialog box.
Note
We discuss JPEG export settings for Flash movies (.swf) in greater detail in Chapter 21.
We've received more than a few queries about image formats and Flash's capability to transcend issues of browser inconsistency, so here's the answer. Many image formats, such as PNG, are not supported across all browsers. When you import such an image format into Flash and publish or export to the SWF format, you have accomplished browser independence — because the Flash movie (.swf) is browser independent and the image has been encapsulated within the SWF format. (The image is not being sent to the browser in the imported format and then magically empowered to display.) Conversely, if you export any Flash document (.fla) to PNG or to any other format that's subject to cross-browser inconsistency, browser independence is lost.
When a bitmap is selected in the Document window, the Property inspector displays the bitmap's name, symbol type, current size, and X, Y location. In addition to these basic bitmap properties, the Property inspector offers two useful options — the Swap button and the Edit button.
The Swap button invokes the Swap Bitmap dialog box (shown in Figure 16.13), allowing you to specify a different bitmap from the current project Library to replace the bitmap selected in the Document window. This can be considered a localized equivalent of the Import option of the Bitmap Properties dialog box. Rather than replacing the original bitmap symbol in the Library and all instances of the image, the Swap button will simply replace the currently selected bitmap instance without altering the symbols in the Library or any of the other instances of the bitmap that may occur in your project. (This feature is also available from the application menu under Modify

The Edit button of the Property inspector will open the selected bitmap for editing outside of Flash, either in your default image editing application or the application that was used to save the bitmap file, if it is installed on your system. After you edit the image and choose Save, it will automatically be updated in the Flash document. If you prefer to select a specific application for editing a bitmap, select the bitmap in the Library before choosing Edit With from the options menu or the contextual menu. The Edit With menu item launches the Select External Editor dialog box that enables you to browse or search for a specific application installed on your system (or network). When you have selected the application of your choice, it will be launched and the bitmap is opened for editing.
Note
Bitmaps imported from Fireworks (as .png) or Photoshop (as .psd) with individual layers specified as editable objects cannot be edited with an external image editor, so the Edit button will not be visible in the Property inspector when these items are selected in the Flash authoring environment.
Although we did some sample testing to try to show you all the possible image-compression combinations and the final results, the truth is that the optimal settings are entirely dependent on the quality of the original image and the final appearance needed in the context of your design. The main goal when testing various compression strategies should always be to find a balance between image quality and file size. The ideal balance will vary depending on the purpose the image serves in your presentation. For example, when using bitmap images in animation sequences, you may find that you can get away with using higher compression settings because the detail in the image may not be as important as it would be if you used the image in a catalog or some other presentation where the detail and color would be more critical.
The following compression workflows are intended to serve only as general guidelines. You will have to experiment with the specific value settings in each case to find the best results for your particular content and project needs.
If you have 24-bit (or 32-bit including an alpha channel), high-resolution source images saved without compression in PNG, PICT, PSD, or TIFF format, you have two workflow options:
Set JPEG compression in the Bitmap Properties dialog box: If you want to control the compression applied to each imported image individually, clear the Use document default quality check box in the Bitmap Properties dialog box and choose a JPEG compression (Quality) setting that achieves the best balance of image quality and file size for each imported image in your Library. This approach gives you the option of applying more compression to some images than to others.
Set JPEG compression in the Publish Settings dialog box: If your source images have similar color and content, as well as consistent resolution, you may find it more efficient to use the compression settings in the Publish Settings dialog box to apply the same JPEG compression to all of your images. This makes it faster to test different compression settings on all the images in your project at once. If this is the workflow that you choose, make sure that the Use document default quality check box is selected in the Bitmap Properties dialog box for each imported image — this ensures that the Quality settings in the Publish Settings dialog box will be applied when the Flash movie (.swf) is published.
Note
If you want to test and set different compression settings for individual layers in an imported Photoshop file you can now do this in the Publish settings section of the Import dialog box. Choose Lossy compression and select the Custom button, then enter a value between 0 and 100 in the Quality field. Use the Calculate bitmap size button to apply the compression and check the file size of the image (or layer). This new feature for layered Photoshop files enables you to apply different levels of compression to individual layers within a single image.
The main benefit to importing uncompressed source files is that you will not be tied to a specific resolution and thus will maintain the option of changing compression settings at any time in the development process. The main drawback is that your project files (.fla) will be much larger, and each time you test your movie (.swf), you will have to wait for Flash to apply JPEG compression on the images. This might not seem important at first, but the cumulative time loss over the course of developing a project does add up.
Tip
As we mentioned previously, it can be helpful to work with lower resolution placeholder images as you develop a project. You can use the Import option in the Bitmap Properties dialog box to load your high-resolution images in the final stages of the project.
The image formats PNG-24, PSD, PICT, and TIFF also support alpha channels when they're saved with 32-bit color. Alpha channels enable the import of complex masks that might otherwise be difficult to create in Flash. You may be surprised to see that even after you apply Flash JPEG compression to an imported PNG, PSD, PICT, or TIFF image, the transparency is maintained.
Warning
Although Fireworks files are saved with the .png file extension, the options for importing Fireworks PNG files are different from those for importing PNG files saved from Photoshop. For more information about importing Fireworks PNG files, refer to the section "Importing Vector Artwork" later in this chapter.
Source files in 8-bit formats are restricted to 256 (or fewer) colors and are optimized to a file size that is Web-friendly. These files are usually saved in GIF or PNG-8 format and are best suited for graphics that have simple shapes and limited colors, such as logos or line drawings. PNG-8 and GIF files can still support an alpha channel, but unlike 24-bit images, you will not want to apply any JPEG compression to these files when they're brought into Flash.
Warning
To avoid display problems, when exporting GIF files with transparency for use in Flash, the index color and the transparency color should be set to the same RGB values. If these settings are not correct, transparent areas in the imported GIF may display as solid colors in Flash. For more information on this issue, refer to the Adobe TechNote on Transparency support in Flash at www.adobe.com/support/flash/ts/documents/transparent_bitmaps.htm.
Applying JPEG compression to 8-bit files generally results in larger files and degraded image quality (refer to Figure 16.7). To preserve the clean graphic quality of 8-bit images, follow these steps:
In the Import dialog box or in the Bitmap Properties dialog box, make sure that Lossless (PNG/GIF) compression is selected.
This is the default for imported 8-bit images, but it never hurts to double-check to ensure that it hasn't been changed by mistake.
Decide whether to leave the default setting for Allow smoothing in Bitmap Properties.
The image will have sharper edges if this option is unchecked, so it is best to make a decision on this setting depending on whether you prefer smoothed edges when the image is scaled larger.
Remember that the JPEG Quality specified in Publish Settings will not apply to imported images that have been set to Lossless compression in the Bitmap Properties dialog box.
Although JPEG is the native bitmap compression format in Flash, you may want to use an alternative application for optimal JPEG compression on images. In our experience, JPEG compression from Fireworks often produces smaller file sizes and more consistent image quality than JPEG compression applied in Flash. If you have created an optimized Web-ready JPEG using your preferred lossy compression method or a client has delivered source files in JPEG format, you will want to avoid adding additional compression to these images when importing to Flash.
If you find that a JPEG file size is not reduced enough to fit the parameters of a particular project, it is better to go back to the uncompressed source file to redo the JPEG compression than it is to apply additional compression in Flash. As in all media production, double JPEGing images in Flash produces diminishing returns — by the time you get the file down to a size that you want, it has so many compression artifacts that it is generally unusable. By going back to the uncompressed source file and adjusting your compression settings to produce a new JPEG file, you end up with a cleaner image and a smaller file size than you would by compounding the JPEG compression in Flash.
For optimal results when importing JPEG images to Flash projects, the main settings to consider are the Use imported JPEG data and the Allow Smoothing check boxes in the Bitmap Properties dialog box.
To maintain the original JPEG compression of your imported image, simply select the check box to Use imported JPEG data from the Bitmap Properties dialog box. When this check box is selected, the original compression will be preserved and the JPEG Quality specified in Publish Settings will not be added to your imported JPEG image.
Smoothing is only advised if you will be scaling the JPEG image in Flash and you want to minimize the jagged edges with antialiasing. The compromise of Smoothing is that the image will also appear slightly blurred — this may or may not be desirable depending on the detail in the original image.
Although you can clear the Use imported JPEG data check box and choose a setting in the Quality field, remember that this compression will be added to the compression on the original image and will cause inferior results.
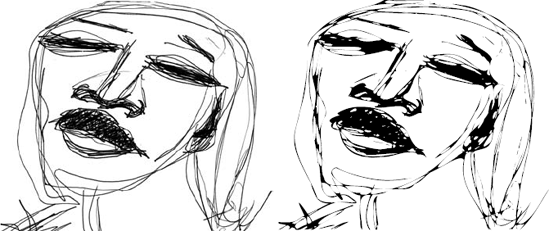
Have you ever wanted to take a scan of a "real" pen-and-ink drawing that you made and turn it into a vector graphic? It's not hard to do, and the results are usually pretty close to the original (see Figure 16.14). You can also turn continuous tone or photographic images into vector art, but the converted version will not likely bear much resemblance to the original. However, this can be useful for aesthetic effects.
As we described in Chapter 9, "Modifying Graphics," bitmap images can be traced in Flash to convert them to vector shapes. Figure 16.3 illustrated why this is not recommended for complex photographic images — the file size will be huge and the image quality will not be as satisfactory as the original bitmap. However, converting rasters to vectors allows you to create some unique visual effects in Flash. After an image has been traced, you can use any of the Flash tools available for shapes, including the Distort and Envelop options of the Free Transform tool. You can also select parts of the image individually to modify colors, or even add custom gradient or bitmap fills.
The Trace bitmap command is different from using the Break apart command on a bitmap. When an image is broken apart, it is perceived by Flash as areas of color that can be modified or sampled for use as a fill in other shapes. Break apart actually duplicates the automatic conversion handled by the Color panel to show bitmaps from the Library in the bitmap fill menu. Although you can modify images that are broken apart with the drawing and painting tools, you cannot select individual parts of the image with the Selection tool or apply the Optimization command, Smooth/Straighten options, or Distort and Envelop modifiers as you can with a traced vector image.
To apply Trace bitmap, select a bitmap image (such as a scanned drawing) that has been imported to Flash (ideally with lossless compression and no Smoothing) and placed on the Stage; then choose Modify

Figure 16.15. Use the Trace Bitmap dialog box to select settings for converting a raster image into vector shapes.
We detail the settings for the Trace bitmap command in Chapter 9, but the default settings can be a good place to start. Higher Color Threshold and Minimum Area values reduce the complexity of the resulting Flash artwork, which means smaller file sizes. This process is most effective when applied to simple images with strong contrast. In these cases, tracing a bitmap graphic can actually reduce the file size and improve the appearance of the scaled image. The settings shown in Figure 16.15 were used to trace the GIF image shown in Figure 16.16. When viewed at a scale of 200 percent, the pixilation along the edges of the bitmap image (on the left) can clearly be seen, and this will be exaggerated the more the image is scaled. The traced vector image (on the right) will scale seamlessly without any loss of quality.
Tip
The vector lines and fills created by tracing an imported bitmap are not always exact, but you can use the Smooth and Straighten modifiers or any of the other drawing tools to "touch up" the artwork.

Figure 16.16. Images with simple shapes and limited colors will be more scalable when converted from bitmap (left) to vector art (right) using the Trace bitmap command.
In order to get the best results from using Trace bitmap, we advise reducing the number of colors in the original image before importing it to Flash. Figure 16.17 shows an imported image that was converted to indexed color and reduced to ten colors in Photoshop before saving as a GIF image for import to Flash. After the image is traced, you can simplify the shapes further by applying the Optimize command (Modify

All artwork drawn in Flash is vector-based; however, not all vector graphics created in other applications will import seamlessly to Flash. As shown in Table 16.1, Flash offers robust support for external vector formats, including FreeHand and Adobe Illustrator. Some vector graphics may be simple objects and fills, whereas others may include complex blending or paths that add significant weight to a Flash movie. Although most vector graphics are by nature much smaller than raster graphic equivalents, don't assume that they're optimized for Flash use.
Importing vector graphics from other applications is fairly simple and straightforward. However, because most vector graphics applications are geared for print production (for example, publishing documents intended for press), you need to keep some principles in mind when creating artwork for Flash in external graphics applications:
Limit or reduce the number of points describing complex paths.
Limit the number of embedded typefaces (or fonts). Multiple fonts add to the final movie's (.swf) file size. As we describe later in this chapter, converting fonts to outlines is one way to avoid adding extra fonts to your Flash file.
To ensure color consistency between applications, use only RGB colors (and color pickers) for artwork. Flash can only use RGB color values and automatically converts any CMYK colors to RGB colors when artwork is imported. Color conversions can produce unwanted color shifts.
Note
When Flash imports a vector file with any placed grayscale images, the images will be converted to RGB color, which will also increase the file size.
Unless you're using FreeHand or Fireworks, you may need to replace externally created gradients with Flash gradients, or accept the file size addition to the Flash movie. Gradients created in other drawing applications are not converted to editable Flash gradients when the file is imported; instead they will be rendered as complex banded graphics with clipping paths or as rasterized, bitmap images.
Preserve layers where possible to help keep imported artwork organized. Some vector formats use layers, and Flash can recognize these layers if the graphic file format is correctly specified. Layers keep graphic elements separate from one another and can make it easier to organize items for use in animation.
If the artwork you are importing includes large areas of solid color, such as a plain background, consider excluding those parts of the graphic from import. They can easily be replaced in Flash after the more complex parts of the artwork are brought in.
The good news with Flash CS3 is that the new import dialog boxes for Adobe Illustrator files (in .ai format) and Photoshop files (in .psd format) enable more precise control of how the file will be translated to Flash — including unique settings for each layer, if needed. The bad news is that the PDF and EPS workflows that were supported in the previous two versions of Flash are no longer an option. However, vector graphics from other applications can still be imported into Flash with relative ease using the Import to Stage or Import to Library command. Browse for files using the All Files setting or specify Adobe Illustrator, Photoshop, FreeHand, or PNG (Fireworks) file in the Import dialog box. Layered files and files with bitmap and vector elements will invoke an Import Options dialog box with relevant settings. Use these settings to control how your file will be handled in the Flash authoring environment. As long as you do not choose to import as bitmap, vector graphics are generally imported as editable groups either on the Main Timeline or in a Movie Clip Timeline.
Tip
Unlike the last two versions of Flash, Flash CS3 does not support the import of PDF and EPS files created with Adobe Illustrator. In order to import editable graphics from these file formats to Flash CS3, they must be opened in Illustrator and resaved in AI format.
Note
Simple bitmap files such as single-layer TIFF, GIF, or JPEG files will not require any custom settings and will import directly (without invoking an Options dialog box), after you browse for the file and choose Import.
Vector artwork will only be saved in the Library on import if it includes clipping paths or gradients that cannot be converted to editable Flash fills. In these cases, Flash automatically adds a folder of nested Graphic symbols with masks or bitmap symbols to the Library to preserve the appearance of elements that cannot be converted to Drawing Objects or simple grouped shapes.
You can also copy and paste or even drag and drop artwork from external applications, but this gives you less control over how the vector information will be translated in Flash — for example, transparency or special fill types may be lost and any layers will be flattened into the currently selected Flash layer.
Because generic numbered layer names, such as Layer 1, may be redundant with layers already present in your Flash document, it is helpful to give layers meaningful names in the original file before importing to Flash. To avoid unexpected color shifts, it is recommended that you convert your color space to RGB in any external application before saving files that will be imported to Flash.
Warning
You must specify Illustrator 7 or higher in the Adobe Illustrator document options when saving AI files to ensure color consistency for artwork imported to Flash. If you choose Illustrator 6 or lower format, then RGB values will not be saved and color shifts may result. When saving EPS files from Illustrator for import to Flash, be sure to deselect the CMYK PostScript option to avoid color shifts when the file is converted to RGB on import to Flash.
To import a vector file to Flash, simply follow these steps:
To import a file to the Stage of your Flash document, make sure that you have an empty, unlocked layer selected, and choose File
In the Import dialog box, choose a file format to browse using the Files of Type (Win) or Show (Mac) menu.
Find the vector file that you want to import and select it from the file list. Then choose Import.
If the application you are importing from includes options for how the artwork will be placed in Flash, you will be prompted to make choices from an Import Options dialog box.
Depending on your options, the artwork will be imported to a single layer or to multiple layers or keyframes in your main Flash Timeline or to a Movie Clip symbol Timeline after you click OK.
Note
If you choose to rasterize the vector artwork into a bitmap image when importing to Flash, remember to apply JPEG compression using the Quality setting in the Bitmap Properties dialog box, or if the Use document default quality check box is selected, set JPEG Quality in the Publish Settings dialog box before exporting your Flash movie (.swf).
To edit the imported graphic with Flash shape tools, ungroup the elements (Shift+Ctrl+G or Shift+
Tip
Double-clicking a grouped item or Drawing Object takes you into Edit in place mode, but if the item is in a compound group, you may have to continue double-clicking through the nested elements until you are able to isolate the stroke and fill of one part of the group for modification.
To store elements in the Library so that they are reusable, convert them to Graphic symbols or Movie Clip symbols.
Tip
If you have imported a layered sequence into multiple Flash keyframes on the main Timeline, consider cutting and pasting the frames into a new Movie Clip symbol to keep the main Timeline uncluttered.
Although you can scale, move, or rotate the grouped elements, to modify individual parts of the graphic you must either ungroup the elements or go into Edit mode until you are able to select the strokes and fills of a particular element.
Note
Where possible, imported graphics are interpolated as Flash Drawing Objects. This makes it easier to edit stroke and fill properties without having to ungroup or click into Edit mode.
Any small inconsistencies in fill style are easy to fix once the elements are ungrouped in Flash. Remember that you can delete fills, add strokes, scale, or otherwise modify the imported artwork with any of the Flash tools.
To make the artwork efficient to reuse and update, it is best to convert the whole graphic into a symbol. If you intend to animate parts of the graphic individually, then convert these into discrete symbols and place them on separate layers.
Note
For more information on working with Drawing Objects and grouped artwork in Flash, refer to Chapter 9, "Modifying Graphics." For more information on using symbols, refer to Chapter 6, "Symbols, Instances, and the Library."
Tip
If you use a program such as FreeHand that enables you to define Flash-compatible symbols and layers in your graphic files, you can save some time when the file is imported to Flash.
Here's how to use the Clipboard to import a vector image into Flash:
Select all vector elements that you wish to include.
Copy the selected items from your vector drawing application to the Clipboard.
Most programs support Ctrl+C or
Return to Flash and make sure that you have an active, unlocked layer that you can paste the vectors into. This can be on the Main Timeline or on any symbol Timeline.
Paste the graphics onto the Stage by choosing Edit
You may want to ungroup, regroup, or move parts of the pasted graphic onto new layers in your Flash document for better organization and for animation.
Illustrator is one of the most commonly used applications for transferring vector artwork into Flash. When importing Illustrator files, you can preserve editable vector paths, text fields,, and most gradient and pattern fills in addition to named layers and Illustrator symbols. Flash CS3 includes a new Import dialog box with comprehensive controls to support the workflow between Illustrator and Flash. Figure 16.19 shows the options available from the Illustrator Import dialog box, which is invoked when importing files with the Illustrator extension (.ai) into Flash.

Figure 16.19. The Illustrator Import dialog box is used to specify how the graphics and file structure of an Illustrator (.ai) file will be handled when brought into Flash.
Although Illustrator can export a variety of file formats, including SWF and EPS, the native AI format will give you the most editing options for files imported to Flash. As with the Photoshop importer, the default options for the Illustrator importer can be modified in Flash preferences (shown in Figure 16.20), and relevant settings can also be adjusted uniquely on the fly for each file that you import.

Figure 16.20. Preferences for the Illustrator Import dialog box can be modified in Flash to establish default settings that best match your workflow.
Remember to convert your Illustrator file to RGB color mode. If the file is in CMYK, you will be warned with an incompatibility note in the import dialog box. If you proceed to import the file with changing the color settings in Illustrator, the file will be converted automatically from CMYK to RGB on import to Flash, and this may cause unexpected color shifts. To ensure seamless translation of Illustrator elements imported into Flash, observe the following guidelines:
Any placed grayscale elements in Illustrator will be converted to RGB color when imported to Flash, which may increase file size.
EPS files placed in Illustrator will not be viewable when imported to Flash. All content must be resaved in native Illustrator format (.ai) before import.
Be cautious with compound shapes: When importing overlapping elements that you want to keep intact in Flash, place them on separate layers in Illustrator and import the layers into Flash. If items on a single layer are overlapping when imported, they may be divided or merged at intersection points in the same way as ungrouped shapes created in Flash. Graphics on separate layers will be converted into Drawing Objects on import to Flash and will not accidentally merge unless you break them apart into raw shapes.
Flash supports up to 15 colors in an imported gradient fill. If a gradient created in Illustrator contains more than 15 colors or special styles (such as contour), Flash uses clipping paths to interpret the gradient. Clipping paths increase file size. To work around this issue, use gradients that contain 15 or fewer colors and use standard gradient styles in Illustrator or replace the imported gradient with a Flash gradient fill as described later in this chapter.
As shown in Figure 16.21, Flash recognizes text and simple gradient or pattern fills imported from Illustrator, making it easy to edit these elements directly in the Flash authoring environment. Effects supported in Flash will also be imported and editable. Effects that are not yet available in the Flash authoring environment can either be imported as rasterized bitmaps to preserve their appearance or they can be sacrificed to preserve the editable content in the file.
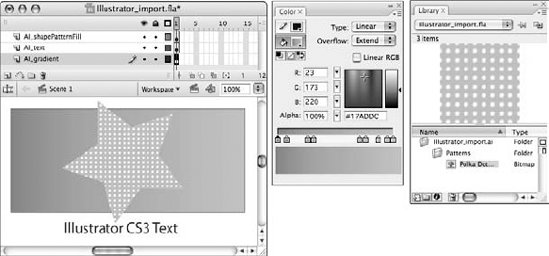
Figure 16.21. You can edit Illustrator files directly in Flash, but you still need to convert shapes and text elements into symbols to store in the Library for reuse. Layer and symbol names from the Illustrator file can also be transferred to the Flash file on import.
Note
Imported Illustrator symbols will be preserved as editable elements, and they will automatically be stored in the Library in a folder that Flash creates.
Tip
Remember that gradients created in Adobe Illustrator can be directly exported to SWF format as Flash gradients. However, if the gradient contains more than 16 colors or uses special alignment (such as contour gradients), Flash adds clipping paths when it is imported. Also, remember that FreeHand blends will always be interpreted by Flash as a series of paths, which can increase file size and sometimes add banding to the blend.
A handy feature of many popular illustration programs is support for layers. Just like layers in a Flash document (.fla), layers in illustration programs enable you to keep individual groups of graphics separate from one another. A simple technique with animating vector graphic files is to animate or tween each layer separately in the Flash authoring environment.
An example of an easily converted illustration movie is a logo. If you have created artwork in Illustrator and have kept the elements separated by layers, then you can quickly create an interactive Flash graphic.
Note
For this exercise, you can use the sample logo, daisyLogo.ai, in the ch16 folder of the CD-ROM. If you use the example file, start at Step 4.
Create a layered graphic in Illustrator.
Before each part of the element is created, make a new named layer for it.
If you use extensive text controls (such as kerning, leading, tracking, and so on), then convert the text to outlines (or paths).
Save the layout. Flash supports direct import of Adobe Illustrator files in .ai format.
Warning
CMYK colors shift when imported into the RGB color space of Flash. Moreover, some masking and cropping information (for bleeds) may not be interpreted correctly by Flash. To see the color difference between CMYK import and RGB import for the logo used in this example, refer to the color insert.
Import the file into Flash, being certain to select the option to preserve your artwork in layers with editable vector paths.
You may want to opt to create a new Movie Clip symbol to contain the imported graphic(s). Otherwise, the layers from the imported file will be stacked with your current layers (as shown in Figure 16.22).
Note
The roughly grouped artwork and preserved layers of the original logo file imported to Flash (shown in Figure 16.22) can be viewed by opening
daisy_AI_import.fla, located in thech16folder of the CD-ROM.You may convert the layered elements into symbols for reuse or easier modification later.
You will need to make button symbols for any element that you want to use interactively (such as the flower animation triggered by the mouse). Repeat this step for every layer.
Now add any Flash tweens or actions to the groups or symbols in each layer.
At this point, you could continue creating a full Flash project with other components, or export a Flash movie (.swf). The project Timeline for the finished animated example on the CD-ROM is shown in Figure 16.23.


As you can see, in just a few straightforward steps, you can create an animated logo and turn many other translations of vector graphics into interactive presentations that can be included in other projects or in e-mail. Whenever you're developing complicated layered work in an application such as Photoshop or Illustrator, you can take advantage of those layers in Flash.
Note
Check out the completed interactive logo, daisyAnim.fla or daisyAnim.swf, located in the ch16 folder of the CD-ROM.
All vector graphics are made up of paths in one shape or another. A path can be as simple as a straight line with two points, a curved line with two points, or 500 or more points along an irregular shape or fill. For this reason, vector graphics are best suited for graphic images such as logos, architectural drawings, and clip art that do not include continuous tones. Fonts are also made up of paths. As you've seen with Flash-drawn graphics, you can scale them to any size without any loss of resolution, unlike raster (bitmap) artwork, which cannot scale larger than its original size without loss of resolution.
Note
Vector graphics are eventually rasterized, so to speak. The vector formatting for drawn shapes and text is more of a simplified storage structure that contains a mathematical description (that is, smaller than a bit-for-bit description) of an object or set of objects. When the vector graphic is displayed, especially with antialiasing, the video card needs to render the edges in pixels. Likewise, the PostScript RIP (Raster Image Processor) of a laser printer needs to convert the vector information, or an EPS (Encapsulated PostScript) file, into printer "dots."
When you use imported vector graphics in Flash movies, you should minimize the number of points describing curved lines or intricate outlined graphics (for example, "traced" raster images). The problem with creating cool graphics in vector-based applications such as Illustrator, FreeHand, and 3D Studio Max is the large number of points used to describe lines. When these graphics are imported into Flash, animations are slower and harder to redraw (or refresh) on the computer screen. In addition, the file size of the Flash movie grows considerably. Most vector applications include features that will enable you to optimize or simplify artwork before importing it to Flash.
There are also a number of ways that you can simplify artwork after it has been imported to Flash. We have discussed many of these Flash features in previous chapters, but we will briefly summarize them here.
Many graphics programs, such as Discreet 3D Studio Max and Adobe Dimensions, can create some astonishing vector-based graphics. However, when you import vector versions of those graphics into Flash, they either fall apart (display horribly) or add unrealistic byte chunks to your Flash movie. But this doesn't mean that you can't use these intricate graphics in your Flash movies. You can try several different procedures with intricate vector artwork, including smoothing, as described previously, to make complex graphics more Flash-friendly.
Depending on the specific use of the artwork, you may also be able to output small raster equivalents that won't consume nearly as much space as highly detailed vector graphics. However, in some instances, the best solution is a bit more labor-intensive. To get just the right "translation" of a complex vector graphic in your Flash movie, you may need to try redrawing the artwork in Flash. Sound crazy and time-consuming? Well, it's a bit of both, but some Flash designers spend hour after hour getting incredibly small file sizes from "hand-tracing" vector designs in Flash.
For example, if you made a highly detailed technical drawing of a light bulb, and wanted to bring it into Flash, you could import the original version of the drawing into Flash, place it on a locked Guide layer, and use Flash drawing tools to re-create a stylized sketch version of the object (see Figure 16.24).
Note
Many other Flash SWF tools can help to speed up the work of optimizing vector artwork — for example, Electric Rain's Swift 3D can simplify 3-D models and output .swf files. Visit their site to learn more about software that can help you with your 3-D Flash work: www.erain.com
Another aspect of vector graphics that you need to keep in mind — especially when working with other designers — is font linking and embedding. With most vector file formats, such as Illustrator, FreeHand, or EPS, you can link to fonts that are located on your system. However, if you give those files to someone who doesn't have those fonts installed, then he won't be able to see or use the fonts. Some formats enable you to embed fonts into the document file, which circumvents this problem. However, whether the fonts are linked or embedded, you may be unnecessarily bloating the size of the vector graphic.
You can break apart imported text in Flash by using the Modify

Figure 16.24. Compare the original imported vector artwork of the light bulb (left) with the stylized version drawn in Flash (right).
You can also convert any text into outlines (or paths) in most drawing or illustration programs (see Figure 16.25). In FreeHand, select the text as a text block (with the Selection tool, not the Text tool) and choose Text
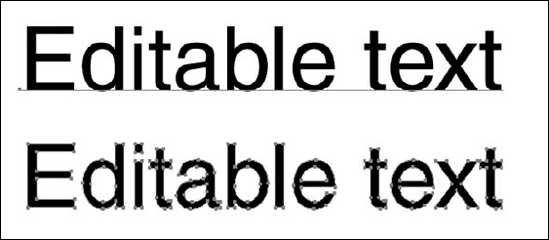
Figure 16.25. Make sure that you have finished editing your text before converting it into outlines. The text at the top can be edited, whereas the text at the bottom can only be modified as individual shapes.
If you have a lot of body text in the graphic, you may want to copy the text directly into a Flash text box and use a _sans, _serif, or other device font. These fonts do not require additional file information (as embedded fonts do) when used in a Flash movie.
You can also reduce the complexity of paths within Flash by using the Modify
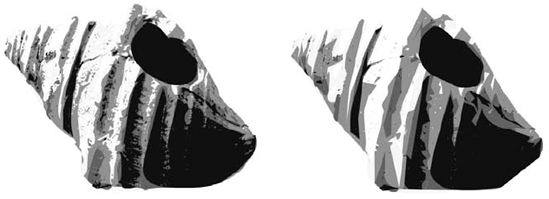
Note
For a more detailed description of the Optimize curves options, refer to Chapter 5"Drawing in Flash."
Flash 8 introduced bitmap caching, a feature designed to improve rendering performance of animation that uses complex vector graphics. This option appears as a small check box in the Property inspector when a Movie Clip instance is selected in the Flash authoring environment (as shown in Figure 16.27). If bitmap caching is enabled, Flash will convert the vector graphic into a bitmap image at run time. The advantage of using this technique is only evident as you start to build more complex files that require Flash to redraw elements in an animation. If your vector artwork is optimized and uses very few points, converting from vector to bitmap will not offer any performance improvements. However, if you have created a highly detailed vector background that you will use to layer with other animated elements, Flash will be able to dedicate more resources to rendering smooth animation if the background is converted into a cached bitmap. Because the bitmap graphic is only rendered once, the speed and smoothness of your animation will not be hindered by Flash having to constantly redraw the points and lines that make up your vector background. These same principles apply if you are using a very complex vector graphic that is motionless but modified with Filter effects. Bitmap caching makes it possible for Flash to convert the complex vectors into a simpler pixel surface while it dedicates resources to rendering the Filter transformations.
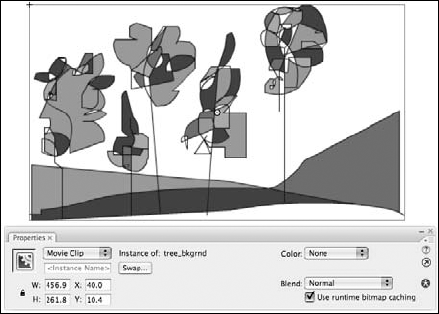
Figure 16.27. Bitmap caching can be enabled in the Property inspector when a Movie Clip or Button symbol is selected in the authoring environment.
There are a few limitations to bitmap caching that you should keep in mind:
Bitmap caching uses significantly more memory than rendering vectors. Use bitmap caching only when it will noticeably improve the performance (smoothness) of your animation.
If your animation requires a zoom on vector content, it will look pixilated if the cache as bitmap option is enabled for that item.
Bitmap caching will fail if it is applied to a symbol that is larger than 2,880 pixels tall or wide.
If the graphic with bitmap caching enabled is nested inside of another symbol that is rotated or scrolled, bitmap caching will be ignored for the nested graphic.
If the Flash Player runs out of memory (producing an error), bitmap caching will be canceled.
Note
Bitmap caching can also improve performance on applications with scrolling text fields or overlapping windows. For an example of using bitmap caching with a scrollable text field, refer to Chapter 30, "Applying HTML and Text Field Formatting."
Note
We'd like to know what you think about this chapter. Visit www.flashsupport.com/feedback to send us your comments.
Flash can use a variety of external media, which enables you to select the most effective format for various types of content.
Bitmap smoothing has improved with newer versions of Flash. Even rotated or scaled bitmaps will look less jagged on the edges than they would in early versions of Flash.
Bitmaps are best suited for photographic images or images that contain detailed shading and/or complex color blends.
Bitmaps can be converted to vector artwork in a variety of ways. This process works best on simplified bitmap images or when it is used to create special image effects.
Vector graphics are most often used for logos, line drawings, and other artwork that does not include complex patterns and blends.
Flash supports the import of layers, editable text, and gradients from some graphics applications, including Photoshop, Fireworks, and Adobe Illustrator. You will need to put some care into preparing files to get the best results, but being able to reuse your file structure and editable elements created in other applications can save you a lot of time.
Flash CS3 includes preferences for the new Illustrator and Photoshop importers that enable you to control how layered files from these applications are translated into Flash.
Flash has fairly robust support for imported gradients and will preserve many Fireworks effects as editable filters in the Flash authoring environment.
The bitmap caching feature in Flash can greatly improve playback performance in movies that use complex vector graphics as background elements or scrolling content.
Most graphics applications include their own options for reducing the complexity of vector art. However, using Flash's various tools for optimizing vector artwork can also be an effective way to reduce your final file size.