Working with audio formats
Understanding the Speech codec
Importing sounds into Flash
Adding sounds to buttons and frames
Using sound behaviors
Understanding Sync options
Using compression in the Publish Settings
Customizing compression in the Library panel
Working with VBR MP3
One of the more neglected — or perhaps understated — aspects of multimedia development is sound. Because the majority of people who use Flash or create multimedia come from graphic arts backgrounds, it's no surprise that sound is often applied as the last effect to an otherwise visually stunning presentation — there may be little or no consideration for the soundtrack in early stages of development. Moreover, it's the one element that is usually taken from a stock source, rather than being original work by the Flash designer. (Exceptions exist, of course, as Flash designers have demonstrated time and time again.)
Note
It goes without saying that as Web projects or applications grow in scope, production teams tend to include specific members responsible for unique tasks, from graphic design to user interface design to sound design.
You can use sound in Flash movies to enhance interactive design with navigation elements, such as buttons, to layer the visitor's experience with a background soundtrack, to add narration, or for more experimental uses. In this chapter, we focus on the fundamentals of importing and integrating sound files into your Flash project. We also discuss the intricacies of controlling audio output, with particular attention to MP3 bit rates. You'll learn how to use the Publish Settings dialog box and compare it with the enhanced control that is available for customizing compression from within the Sound Properties dialog box of the Library. This chapter guides you through using audio within a Flash document and suggests tips for getting the most bang per byte in the final Flash movie file (.swf).
Note
You can read more about sound in Appendix C, "Digital Audio Basics," which is included as a PDF file on this book's CD-ROM. To learn how to load external MP3 files into a Flash movie at run time, read Chapter 29, "Sharing and Loading Assets."
Flash CS3 can work with a wide variety of sound file formats. In this section, you learn which sound file types you can bring into a Flash document file (.fla) and how Flash can compress audio in a variety of formats in the final Flash movie file (.swf).
You can import most sound file formats in either the Windows or Macintosh version of Flash. All major sound file types, such as MP3 and WAV, are compatible on both versions. After you import a sound file into a Flash document, you can edit the resulting .fla file on either platform.
Flash CS3 can import the following sound file formats:
MP3 (MPEG-1 Audio Layer 3): Among the many advantages of MP3 sound files for Flash users, the most obvious is that they are cross-platform. Flash CS3 can import MP3 files with either Windows or Mac versions of the tool. This single advantage improves Flash workflow in cross-platform environments. Other advantages are the efficiency of MP3 compression, the increasing availability of MP3 files, as well as the ease of creating MP3 files with common players such as Windows Media Player or Apple iTunes. For more information about MP3s, see the "MP3s Demystified" sidebar at the end of the section.
WAV (Windows Wave): Until the relatively recent support for MP3, WAV files reigned for nearly a decade as the standard for digital audio on Windows PCs. Still, the WAV format remains the primary acquisition sound format, the format in which you record sound from a microphone or other sound source on your computer. Flash can import WAV files created in sound applications and editors such as SoundForge or ACID. The imported WAV files can be either stereo or mono and can support varying bit depths and frequency rates. You can import WAV files directly into Flash CS3 on a Mac.
AIFF or AIF (Audio Interchange File format): Much like WAV on the PC, the AIF format is the one of the most commonly used digital audio formats for sound acquisition on the Mac. Flash can import AIFF sounds created in sound applications and editors such as Peak, Deck II, or SoundEdit. Like WAV, AIFF supports stereo and mono, in addition to variable bit depths and frequency rates. Unassisted, the Windows version of Flash CS3 cannot import this file format. But when QuickTime 4 or later is installed, you can import AIFF files into Flash CS3 on Windows. The Windows version of Flash CS3 recognizes, properly opens, and can edit Flash documents created on the Mac that contain AIFF sounds.
Sun AU: This sound format file (.au) was developed by Sun Microsystems and Next, and it is the native sound format on many Solaris and UNIX systems, just as WAV and AIF are native to Windows and the Mac, respectively. The Sun AU format is frequently used with sound-enabled Java applets on Web pages.
QuickTime: You can import QuickTime audio files (.qta or .mov) directly into Flash CS3, provided that you have QuickTime 4 or later installed. Once you import a QuickTime audio file into a Flash document, the sound file appears in the Library just as any other sound would.
Sound Designer II: This proprietary audio file format created by Digidesign is used with its signature professional audio suite, Pro Tools. You can import sounds that you save in this file format into the Macintosh version of Flash CS3. If you need to use a Sound Designer II file (.sd2 file extension) with the Windows version of Flash CS3, you can import the file directly if you have QuickTime 4 or later installed.
Note
With Flash CS3, you can link proxy sound files to Musical Instrument Digital Interface (MIDI) and Melody For i-mode (MFI) files that can be played back on mobile devices with Flash Lite. You'll learn more about this feature later in this section.
Tip
Don't rely upon the imported sound that's embedded in the Flash document file (.fla) as your master or backup sound file. Always retain your original master sound file as a backup or for reuse in other multimedia projects.
These sound file types are structural or "architecture" based, meaning that they simply indicate the wrapper used to encode digital audio. Each of them can use a variety of compression techniques or a variety of audio codecs. A codec is a compression and decompression module for digital media. Sound and video is encoded (compressed) with a specific technique by an application or device. After it is encoded, it can be played back (decompressed) by a media player that has access to the codec module. In order for a sound file to play on your computer, you must have the audio codec used in that file installed on your system. MP3 files, for example, can be compressed in a variety of bit rates and frequencies, as can WAV and AIF files. Once Flash imports a sound file, the wrapper type (AIF, WAV, AU, and so on) is stripped. Flash simply stores the sound file as generic PCM (Pulse Code Modulation) digital audio. Moreover, Flash converts any imported 8-bit sound file into a 16-bit sound file. For this reason, it's best not to use any precompression or low bit depths on your sound files before you bring them into Flash CS3.
Note
You can adjust individual MP3 sound files in the Flash document's Library to retain their original compression. This is the sole exception to the rule we just mentioned in the preceding paragraph. As you'll see later in this chapter, however, Flash CS3 may need to recompress all sound files in a Flash movie, depending on their use in the movie's timeline.
You can decide which sound encoding to use for audio when publishing Flash document files to Flash movie files (.swf). Although the default Publish Settings in Flash CS3 is to export all audio with the MP3 format, you can export sound in several other audio formats. We note the benefits and drawbacks of each format in the list that follows.
Note
Flash CS3 enables you to export device sounds in a Flash movie, for playback on mobile devices that use file formats such as MIDI and MFI. We provide an overview of this feature in this section.
Regardless of the format that you choose in your document's Publish Settings for exporting your sounds, you can individually specify a compression scheme for each sound in the Flash document's library. Furthermore, each format has specific options and settings that we'll examine later in this chapter.
ADPCM (Adaptive Differential Pulse-Code Modulation): ADPCM is an audio compression scheme that converts sound into binary information. It is primarily used for voice technologies, such as fiber-optic telephone lines, because the audio signal is compressed, enabling it to carry textual information as well. ADPCM works well because it records only the difference between samples and adjusts the encoding accordingly, keeping file size low. ADPCM was the default setting for older versions of Flash, such as Flash 2 and 3. It isn't as efficient as MP3 encoding but is the best choice for situations in which compatibility is required with all older Flash Players.
MP3 (MPEG-1 Audio Layer 3): Over the last three years, MP3 has become the standard for digital audio distributed on the Internet. Although MP3 compression delivers excellent audio quality with small files, it's much more processor-intensive than other compressors. This means that slower computers — and we mean slow, as in Pentium I or pre-PowerMac G3 processors — may gasp when they encounter a high bit-rate MP3 audio while simultaneously processing complex animations. As always, it's wise to know your audience. When in doubt, test your Flash movie with MP3 audio on slower computers. Flash Players 4 and higher support MP3 playback.
Note
Not all versions of the Flash Player support MP3 sound. With Flash Player 6 and higher, you can use ActionScript's
System.capabilities.hasMP3property to determine if the hosting player device supports MP3 audio. You can learn more about this use of ActionScript in the Flash ActionScript Bible series (Wiley).Raw (Raw PCM): Flash can export sound to .swf files in a raw audio format. If you use this setting, Flash won't compress any audio. However, uncompressed sound makes very large files that would be useless for Internet-based distribution. As uncompressed sound, audio in the imported sound file retains its original fidelity. We recommend that you use the Raw format only for Flash movies that you intend to export as linear animation for output to video-editing applications.
Speech (Nellymoser): This audio codec introduced with Flash Player 6 is specifically designed for audio sources that contain mostly human speech, such as narration or instructional content. Macromedia licensed audio technology from Nellymoser, Inc., which specializes in the development of voice-only audio codecs. All sounds that use the Speech codec are converted to mono sounds. You can see the real power of this codec in live streaming audio delivered by Flash Media Server, as this codec is incredibly efficient and a fast encoder with a low server and client processor overhead. For example, if you want to use a
NetStreamobject in ActionScript to stream live audio from a microphone, the Speech codec will optimize the audio information very efficiently. You must use Flash Player 6 or higher to play sounds encoded with this format.Device sound: With Flash CS3, you can link device sound files to imported sounds in your Flash movie. You use device sounds specifically for playback of Flash movies on mobile devices enabled with Flash Lite, a version of the Flash Player. Because the desktop Flash Player cannot play device sound file formats, you import regular sound files such as MP3s into your Flash document. These sounds are then used in a proxy fashion — you add the sound to event handlers (keyframes, buttons, and so on) just as you would any other sounds. Before you publish the Flash movie file (.swf), however, you change the settings of the sound file in the Library panel to point to a device sound. When the Flash movie is published, the device sound is embedded and used within the Flash movie, not the original imported sound.
Table 15.1 shows the compatibility of Flash's audio export formats with various platforms.
Table 15.1. Audio Export Formats for Flash Players
Export format | Flash 3 or earlier | Flash 4 and 5 | Flash 6 or higher | Comments |
|---|---|---|---|---|
ADPCM | Yes | Yes | Yes | Good encoding scheme; compatible with all Flash players; works well for short sound effects such as button clicks |
MP3 | No | Yes | Yes | Best general use encoding scheme; ideal for music tracks *Not compatible with Flash Player 4 for the Pocket PC. |
Raw | Yes | Yes | Yes | No compression; lossless; large file sizes |
Speech | No | No | Yes | Excellent compression for human speech; avoids "tinny" sounds for voices; ideally suited for real-time compression with Flash server-side applications |
No | No | No | Sound export feature available in Flash CS3; for use with MIDI and MFI files for playback on mobile devices with Flash Lite |
In the preceding section, we discussed the various sound formats that Flash CS3 can import and export. In addition to covering the merits of the MP3 and Speech codecs, we also explained the uses of platform-specific AIF (Mac) and WAV (Windows) audio files. But we didn't delve into the process of importing sound into Flash CS3. So, let's get started.
Note
When working with sound, you may encounter some interchangeable terminology. Generally, these terms — sound file, sound clip, and audio file — all refer to the same thing, a single digital file in one of several formats, which contains a digitally encoded sound.
Unlike other imported assets, such as bitmaps or vector art, Flash won't automatically insert an imported sound file into the frames of the active layer on the timeline. In fact, you don't have to select a specific layer or frame before you import a sound file. That's because all sounds are sent directly to the Library immediately upon import, regardless of whether you use File
Tip
Flash Players 6 and higher allow a Flash movie to load MP3 files directly. Earlier versions of the Flash Player required Macromedia Generator (or an equivalent server-side application) to transform sound files into Flash movie files (.swf) on the fly. We'll show you how to load and attach sounds with ActionScript in Chapter 29, "Sharing and Loading Assets."
To import a sound file into the Flash CS3 authoring environment, follow these steps:
Choose File

From the Files of type list (Windows) or Enable list (Mac) in the Import dialog box, select All Sound Formats.
Warning
On the Mac OS X version of Flash CS3, you may need to choose All Files in the Show menu in order to select an appropriate sound file.
Browse to the sound file that you want to import.
Note
If you're looking for a sample audio file, you can import the
atmospheres_1.mp3file found in theresourcesfolder of this book's CD-ROM.Click Open.
The sound file you select is imported into your Flash document file (.fla) and arrives in the document's library with its filename intact. If the Library panel is closed, you can open it by choosing Window

Note
Refer to the "Fine-Tuning Sound Settings in the Library" section, later in this chapter, for an explanation of how you can specify unique compression settings for each sound in a document's library.
You may also load sounds from a shared library. Refer to Chapter 29, "Sharing and Loading Assets," to learn more about shared libraries. Chapter 29 also shows you how to preload an MP3 file into a Flash movie file (.swf). To learn how to assign a linkage identifier string to an asset, such as a sound file, refer to Chapter 27, "Interacting with Movie Clips."
You can also import sound files into a Flash document by dragging the sound file from the desktop to the Library panel. On the Mac, you can drag the sound file to the Stage as well. This method can be especially useful when you have searched for a sound file using the operating system's search tool (Start
The interactive experience can be enhanced by the addition of subtle effects. The addition of sounds to correspond with the various states of a button is perhaps the most obvious example. Although this effect can be abused, it's hard to overuse an effect that delivers such meaningful user feedback. Here, we show how different sounds can be added to both the Over (rollOver) and the Down (press) states of a button.
Note
For more general information about creating the buttons themselves, see Chapter 6, "Symbols, Instances, and the Library," and see Chapter 18, "Understanding Actions and Event Handlers," to learn how to add code to buttons.
Because buttons are stored in the Library, and because only instances of a Button symbol are deployed within the Flash movie, sounds that are assigned to a button work for all instances of that Button symbol. However, if different sounds are required for different buttons, a new Button symbol must be created (see the following Tip note for an exception to this "rule"). You can create a new Button symbol from the same Graphic symbols as the previous button (provided it was built out of symbols) or duplicate it in the Library panel using the Duplicate command in the Library's options menu.
Tip
With the Behaviors panel, you can quickly assign different sounds to the various instances of the same Button (or Movie Clip) symbol. You'll learn about behaviors related to sound use later in this chapter.
To add a sound to the Down state of a Button symbol, follow these steps:
Create a new Button symbol (Insert
Drag an instance of the button from the Library (or the document's Library) to the Stage.
Edit the Button symbol by double-clicking it on the Stage, or by choosing Edit from the Library options menu.
Both methods transfer the working environment into Edit mode.
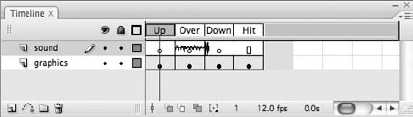
Add a new layer to the button's timeline, label the new layer sound, and then add keyframes to this layer in the Over and Down columns.
Your timeline should look similar to Figure 15.2.
Select the frame of the button state where you want to add a sound for interactive feedback (such as a clicking sound for the Down state), and then access the Property inspector by choosing Window
An alternative method (with the frame selected) is to simply drag the sound from the Library panel onto the Stage.
You should now have the Property inspector open, as shown in Figure 15.3.
Choose the sound clip that you want to use from the Sound menu.
This menu lists all of the sounds that have been imported and that are available in the library of the current movie. In this example, we used the
click.wavsound found in theresourcesfolder of the book's CD-ROM.Use the Sync menu to choose how you want the sound to play.
For this lesson, simply use the default, which is the Event option. We'll defer our exploration of the other options in the Sync menu to a later section.
You have now added a sound to your button state. Remember that you're still in Edit mode, so to test the button, return to the Scene 1 timeline (that is, the Main Timeline) either by clicking the Scene 1 location label at the upper-left corner of the Document window, or by pressing Ctrl+E (
To add a sound to the Over state of a Button symbol, simply retrace the preceding steps, referencing the Over state of the button wherever appropriate. Remember that different sounds can be assigned to the Up, Over, and Down states of a Button symbol. A sound that is added to the Up state will play whenever the mouse rolls out of a button's hit area.
Note
For a completed example of this button, refer to the Flash movie button_sound.fla located in the ch15 folder of the Adobe Flash CS3 Bible CD-ROM. This movie has a button with sounds attached and was made with the same technique we describe in this section.
In addition to the use of sounds to enhance the interactivity of buttons, another popular use for sound in Flash is to provide a background score. The simplest way to achieve this is to place the sound within its own layer in the Main Timeline (Scene 1), at the precise frame in which you want the sound to begin. To do this, you must first import the sound (as we described earlier in this chapter) and create a new layer for it.
Note
If you don't have access to sounds, you can use the sample sound atmospheres_1 to practice. This sound is in the resources folder of the Adobe Flash CS3 Bible CD-ROM. It is available in both WAV and AIF formats.
Adding sound files to the timeline is similar to assigning sound to a button. To add sounds to a timeline, follow these steps:
Add a new layer in the Timeline window and label the layer with the name of the sound.
You can use a name such as "sound" or "background track."
Create a keyframe on the sound layer at the frame where you want the sound to begin.
With that keyframe selected, open the Property inspector.
Make sure you have expanded the view to show all of the sound attributes.
If you remembered to import the sound that you want to use, you can now choose that sound clip from the Sound drop-down menu.
If you find yourself stuck at this point, review the preceding steps and/or retrace your steps through the methodology for adding sound to a button.
From the Effect menu, choose how the sound should be handled by Flash.
The Effect menu offers several preset fading and panning treatments, plus Custom, which invokes the Edit Envelope dialog box. For no special effect, choose None. For more about the Effect presets and the Edit Envelope dialog box, refer to the subsequent section, "Editing Audio in Flash."
From the Sync menu, choose one of four options — Event, Start, Stop, or Stream — to control how you want the sound to be synchronized.
See the next section, "Organizing Sounds on the Timeline," for a detailed explanation of Sync options.
Specify how many times you want the sound to loop.
To loop the sound indefinitely (for example, as a background track), choose Loop in the second drop-down menu in the Sync parameters. If you want the sound to loop only for a specific number of times, choose Repeat in the menu and enter a number in the text field to the right of the menu. For specific information about looping Stream sounds, refer to the next section.
Perform any last-minute editing or finessing of the sound file (see "Editing Audio in Flash" later in this chapter).
Your sound is now part of the timeline. Its waveform is visible on the layer to which it was added. Test your sound by pressing the Enter key on your keyboard, which plays the timeline. Or, for sound with a Sync setting of Stream, manually "scrub" the sound by dragging the Playhead across the timeline. To perform the most accurate test of the sound, use either Control
Tip
If you sync a sound to the timeline using the Stream feature, you should test your Flash movie file (.swf) on various platforms and machines with different processor speeds, especially if the timeline is always playing animation. What looks and sounds good on a fast computer might be less impressive on an older legacy machine, like a first- or second-generation Pentium or PowerMac G3 computer.
The Flash Player can play several sound layers at once within a Flash movie; each layer functions like a separate sound channel, and Flash mixes them on playback. This capability of Flash might be considered a built-in economy sound mixer. There is, however, a practical limit because each sound layer potentially increases the movie's file size, while the mix of multiple sounds may burden the computer it's being run on.
Tip
Flash Player 8 or higher movies can play up to 32 simultaneous sound channels. In older versions of the Flash Player, you are limited to 8 simultaneous sound channels. A stereo sound consumes two channels, and a mono sound consumes one channel.
Because sound is different from other types of Flash content, some users find that increasing the layer height of the sound layers eases working with multiple sounds in the timeline. That's because a taller layer height provides a better visual cue due to the unique waveforms of each sound. To increase the layer height for individual layers, follow these steps:
Right-click (or Control+click on the Mac) the layer in the Timeline window, and then choose Properties from the contextual menu.
At the bottom of the Layer Properties dialog box, change the layer height from the default 100 percent to either 200 or 300 percent.
Note that these percentages are relative to the settings chosen in the options menu (located at the top-right corner) of the Timeline window.
Note
For more information on the Timeline window, see Chapter 4, "Interface Fundamentals." For an actual example of this enhanced viewing, open the file enhanced_view.fla, located in the ch15 folder on the CD-ROM.
Tip
Your movie's frame rate, as specified in the Document Properties dialog box (Modify
Flash CS3 offers a great organization tool for layers in any timeline: layer folders. To nest sound layers in a layer folder, create a new layer folder and then drag each of the sound layers to the folder. As you drop each layer on the folder, it will nest within the folder.
In film editors' lingo, to synchronize, or sync, means to precisely match picture to sound. In Flash, sound can be synchronized to the visual content of the timeline. Flash sync affords several options for the manner in which the audio clip is related to graphics or animation on the timeline. Each of these sync options is appropriate for particular uses, which the following sections discuss.
The Sync options in the sound area of the Property inspector control the behavior of sound in Flash movies, relative to the timeline in which the sound is placed. The Sync option you choose depends on whether your sound is intended to add dimension to a complex multimedia presentation or to add interactivity in the form of button-triggered sound, or whether it is intended to be the closely timed soundtrack of an animated cartoon.
Event is the default Sync option for all sounds in Flash, so unless you change this default to one of the other options, the sound automatically behaves as an Event sound. Event sounds begin with the keyframe in which they occur and then play independently of the timeline. If an Event sound's duration is longer than the remaining frames of its timeline, it continues to play even though playback on the timeline has stopped. If an Event sound requires considerable time to load, the movie pauses at that keyframe until the sound has loaded completely. Event sounds are the easiest to implement and are useful for background sound scapes and other sounds that don't need to be synced. Again, Event is the default Sync setting in the Sound menu of the Property inspector.
Warning
Event sounds can degrade into a disturbing inharmonious round of out-of-tune sound loops. If the timeline holding the Event sound loops before the sound has completed, the sound begins again — over the top of the initial sound that has not finished playing. After several loops, the resulting effect can become intolerable. To avoid this effect, use the Start Sync option.
The Start Sync option is similar to an Event option, but with one crucial difference: If any instance of that sound is already playing, then no other instance of that sound can play. In other words, the Start Sync option tells the sound to begin playing only if other instances have finished playing or if it's the first instance of that sound to play. This option is useful if you want to avoid the layering problem we discussed in the previous caution note for Event sounds.
Note
Start sounds are actually a type of Event sound. Later in this chapter, when we refer to Audio Stream and Audio Event settings in the Publish Settings dialog box, realize that Start sounds belong to the Audio Event category.
The Stop Sync option is similar to the Start Sync option, except that any and all instances of the selected sound stop playing when the frame containing the Stop Sync option is played. This option comes in handy when you want to mute a specific sound in a crowd of others. For example, if you created a sound mixer with an arrangement of Button instances, you could assign the Stop Sync option to a mute button for each of the sounds in the mixer.
Stream sounds are similar to a traditional soundtrack in a video-editing application. A Stream sound locks to the timeline and has priority over visual content. When you choose a Stream sound, the Flash Player attempts to pace the animation in sync with the sound. However, when animations either get too complex or are run on slower machines, the Flash Player skips — or drops — the frames as needed to stay in sync with the Stream sound. A Stream sound stops when the Playhead reaches the last frame that includes the waveform of the Stream sound; likewise, a Stream sound pauses if the timeline containing the Stream sound is stopped. A Stream sound can be scrubbed; by dragging the Playhead along the layer's frames in the Timeline window, the Stream sound plays in direct relationship to the content as it appears, frame by frame. This is especially useful for lip-sync and coordinating the perfect timing of sound effects with visual events.
To use sound effectively, it's important to understand how Stream sounds work. When a Flash document is published as a Flash movie file (.swf) and the Sync option for a sound is set to Stream, Flash breaks the sound into chunks that are tied to the timeline. The bytes within the movie are arranged according to the linear order of the Main Timeline (that is, Scene 1). As such, if you have a Stream sound that stretches from frames 1 to 100 of the Main Timeline and the movie contains a total of 200 frames, the Stream sound's bytes will be evenly distributed over the first 50 percent of the file's bytes.
Tip
When adding sounds to the timeline, no matter how many times you tell a Stream sound to loop, a Stream sound will stop playing wherever the visual waveform in the Timeline window ends. To extend a Stream sound's duration, add as many frames as necessary to a Stream sound's layer.
The default behavior of an Event sound is to play through to the end, regardless of the length of the timeline on which they exist. However, you can stop any sound, including Event sounds. Place another instance of the same sound at the keyframe where the sound should stop and assign this instance as a Stop sync option. This Stop setting can be on any layer, and it will stop all instances of the specific sound.
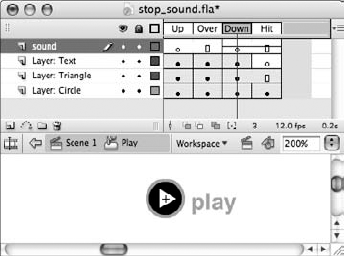
In this section, we'll show you how to stop an Event sound using two different methods. The first method uses a Stop sound on a keyframe in the Main Timeline (Scene 1). The second method uses a Button instance with a Stop sound on its Down state.
Create a Flash AS 2.0 document that has an Event sound placed on the first keyframe and has enough frames on the timeline to display the entire waveform of the sound.
Note
You can use the
enhanced_view.flafile from the book's CD-ROM as a practice file. If you use this file, change the sync setting of the sound to Event in the Property inspector.Create a new layer in the Timeline window, and name this layer stop sound.
On the stop sound layer, pick a frame that's about five seconds into the sound displayed on the original layer.
Create a keyframe on this frame in the stop sound layer.
With this keyframe selected, open the Property inspector.
In the Sound menu, choose the same sound file that was used in the original sound layer.
In the Sync menu of the Property inspector, choose Stop.
As a Stop sound, this setting will tell the Flash Player to stop any and all instances of the sound that is specified in the Sound menu.
Save your Flash document, and test it (Control
When the Playhead reaches the keyframe with the Stop sound, you should no longer hear the Event sound.
Now, we'll show you how to play and mute an Event sound by clicking buttons. You can place an Event sound on one Button symbol instance, and then a Stop sound on another Button symbol instance.
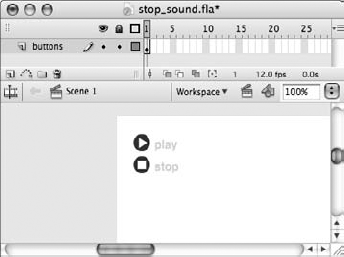
In a new Flash AS 2.0 document, create a copy of the Play and Stop buttons from the classic buttons
To do this, drag each of the buttons from the Buttons Library panel to your document's Stage. Close the Buttons Library when you are done. Rename Layer 1 to buttons. Your document's Stage should resemble Figure 15.4.
Import a sound file to use as your Event sound.
You can use the
atmospheres_1.mp3sound file from the book's CD-ROM.In the document's Library panel, double-click the Play button to edit the symbol.
In the Timeline window, create a new layer and name it sound.
Insert a keyframe on the Down state of the sound layer.
Select the keyframe made in Step 5 and open the Property inspector.
Select the imported sound's name in the Sound menu, and leave the Sync menu at the default Event setting.
When you are finished, your document should resemble Figure 15.5.
Double-click the Stop button in the Library panel.
Repeat Steps 3 through 7. This time, however, choose Stop in the Sync menu for the atmospheres_1 sound.
Save your document and test it (Control
In Test Movie mode, click the Play button. You should hear the imported sound begin to play. When you click the Stop button, the sound should stop playing.
You may have noticed that, if you click the Play button repeatedly, new instances of the sound will begin to play, overlapping with the original playing sound instance. Regardless, the Stop Sync option will stop all of them. If you want to prevent the Play button from enabling this type of overlap, go back to the sound keyframe on the Play button and change its Sync option to Start.
Note
You can find a completed example of the Play and Stop buttons exercise as stop_sound.fla, located in the ch15 folder of the book's CD-ROM.
You can also stop a single instance of a Stream sound. To do this, simply place an empty keyframe in the sound layer at the point where the sound should stop.
Open the
enhanced_view.flafile, located in thech15folder of the book's CD-ROM.Switch the layer view of the atmospheres_1 layer back to 100% in the Layer Properties dialog box.
Select the first frame of the atmospheres_1 layer.
In the Property inspector, switch the Sync option to Stream.
Select frame 60 of the atmospheres_1 layer, and insert a blank keyframe (F7).
This is the point where the Stream sound will stop playing.
Save your Flash document, and test it (Control
Notice that the sound stops playing at frame 60. You can open your Bandwidth Profiler (View
The Bandwidth Profiler also reveals something we touched upon earlier: Stream sounds export only the actual portion of the sound that's used in the timeline. In our example, 60 frames' worth of the atmospheres_1 sound was about 12K (at default MP3 compression, 16 kilobits per second, or Kbps).
You can stop the sounds that are playing in all timelines (including Movie Clips) at any point by doing the following steps in a Flash AS 2.0 document:
If there isn't already an actions layer on your timeline, add a layer, label it actions, and select the frame that occurs at the point where you want all sounds to stop. Make this frame into a keyframe.
With the keyframe selected, open the Actions panel by pressing the F9 (or Option+F9 on Mac) key, or by navigating to Window
The title bar of the Actions panel should read Actions — Frame.
Click the Global Functions booklet in the left pane of the panel, and then click the Timeline Control booklet.
Double-click the
stopAllSoundsaction.The ActionScript code,
stopAllSounds();
appears in the Script pane of the Actions panel, as shown in Figure 15.6.

Figure 15.6. Any sound that's currently playing stops when the movie reaches a keyframe with a
stopAllSounds()action.Tip
You can also use shortcut keys to type ActionScript code into the Script pane. Click the Script pane, and type Esc+s+s in succession — not simultaneously. The code for the
stopAllSounds()actions should type itself into the Script pane. To view available shortcut keys in the code booklets of the Actions panel, choose Esc Shortcut Keys in the options menu of the Actions panel.Save your Flash document, and then test it with Control
When the movie's Playhead reaches the frame with the
stopAllSounds()action, every sound that is currently playing stops.
The stopAllSounds() action stops only sounds that are playing at the time the action is executed. It will not permanently mute the sound for the duration of the movie. You can proceed to re-initialize any sounds any time after the stopAllSounds() action has executed. If you want to stop playback again, you will have to enable another stopAllSounds() action or use a Stop sound.
One of the features of Flash CS3 is the Behaviors panel. This panel enables you to quickly add interactive functionality to elements of your Flash movie. There are five behaviors in the Sound category of the Behaviors panel. In this section, you learn how each of these behaviors works.
Note
Behaviors are essentially prewritten ActionScript code blocks that appear on event handlers, such as keyframes, Button instances, and Movie Clip instances. Just as Dreamweaver behaviors add JavaScript code to HTML documents, Flash behaviors add ActionScript code to your Flash documents.
You can see all of the Sound behaviors by clicking the Add Behavior (+) button in the top-left corner of the Behaviors panel and choosing the Sound menu item (see Figure 15.7).
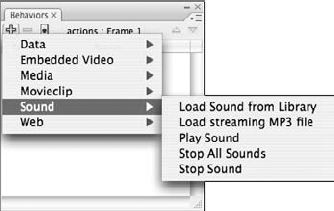
This behavior locates a sound item in the Flash movie's library and establishes a reference to that sound, so that the sound can be played later. This behavior can also be used to play the sound.
Warning
You must use this behavior before you can use the Play Sound behavior we discuss later in this section.
In practice, you will use this behavior to set up references to any sounds that you wish to use the Play Sound behavior. For example, if you have three sounds in your Library and you want to prepare all three for later use in your Flash movie, you would add three Load Sound from Library behaviors to the first frame of a layer in your Flash document. In the following steps, you learn how to add this behavior to a Flash document.
Note
In the following exercise, you can use the atmospheres_1.wav or atmospheres_1.aif sound file from the resources folder of this book's CD-ROM.
Create a new Flash document by choosing File
In the New Document dialog box, select Flash File (ActionScript 2.0) and click OK.
Import a sound file into the Flash document. Choose File
You can import one of the sound files from the book's CD-ROM. For this example, we refer to the
atmospheres_1.wavfile.Once the sound is imported into the document's library, open the Library panel (Ctrl+L or

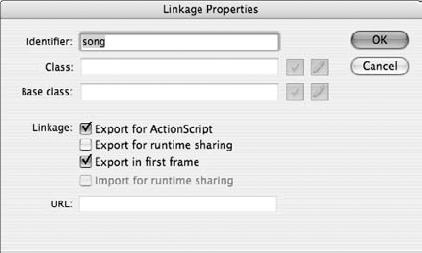
You need to create a linkage identifier for the newly imported sound in order for the Load Sound from Library behavior to locate the sound in the library.
Select the sound file in the panel, and right-click (or Control+click on the Mac) the sound file.
Choose the Linkage option in the contextual menu.
In the Linkage Properties dialog box, select the Export for ActionScript check box.
The sound filename automatically populates the Identifier field. You can leave the name as is, or rename the identifier term. For this example, use the term "song," as shown in Figure 15.8. Click OK to close the dialog box.
Now, you are ready to access the linked sound in a behavior.
In the Timeline window, rename Layer 1 behaviors.
Select frame 1 of this layer, and open the Behaviors panel (Shift+F3).
In the top-left corner of this panel, click the Add Behavior (+) button, and choose Sound
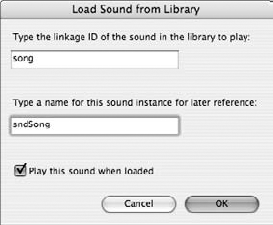
A dialog box opens, in which you can enter the parameters for the behavior.
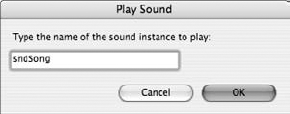
In the Linkage ID field, type the identifier you specified in Step 7.
In the sample, we used the term "song." In the Identifier field, type a unique instance name for this sound. For this example, use sndSong. Refer to Figure 15.9. The Play this sound when loaded check box is checked by default. As such, the
atmospheres_1.wavsound will play as soon as frame 1 is loaded. When you are finished, click OK to close the dialog box.Save your Flash document (File
Choose Control
As soon as the Flash movie starts, you will hear the
atmospheres_1.wavsound begin to play.
Note
The audio options for Audio event in the Flash tab of the Publish Settings dialog box (File
Note
You can find the completed file, loadsound_behavior.fla, in the ch15 folder of this book's CD-ROM.
This behavior, as the name implies, loads an MP3 file at run time directly from the Flash Player environment. Instead of attaching a sound from the movie's library, this behavior can access an external MP3 file residing on a publicly accessible Web server. Note that "streaming" here means that the MP3 file will begin playback as soon as enough of the file has buffered into the Flash Player.
Note
Technically, this type of loading is called a progressive download — it's not true streaming like audio or video from a Macromedia Flash Communication Server application.
In the following exercise, you learn how to use this behavior to play an MP3 file from a remote Web server.
Create a new Flash document by choosing File
In the New Document dialog box, select Flash File (ActionScript 2.0) and click OK.
Rename Layer 1 to behaviors.
Select this layer's first frame, and open the Behaviors panel (Shift+F3).
In the top-left corner of this panel, click the Add Behavior (+) button, and choose Sound
When this behavior's dialog box opens, there are two options: Sound Location and Identifier.
In the top field, type the URL to an MP3 file that has been copied to a publicly accessible folder on your Web server.
You can use the following URL to test this example:
http://www.flashsupport.com/mp3/atmospheres_1_short.mp3In the Identifier field, type sndBg.
This identifier allows you to target the sound with another behavior or in your own ActionScript code.
Click OK to close the dialog box.
See Figure 15.10 for more details.
Save your Flash document as loadmp3_behavior.fla.
Test your movie by choosing Control
As soon as the movie loads, the MP3 begins to stream into the Flash Player. When enough of the sound has buffered, the MP3 file automatically plays.

Note
You need to have a connection to the Internet in order for this example to work. If you would like to test this example with a local MP3 file, make a copy of the MP3 file directly to the same location as your Flash document. Then, change the URL in the behavior's parameters to atmospheres_1_short.mp3, omitting the www.flashsupport.com/mp3/ portion.
Note
You can find the completed file, loadmp3_behavior.fla, in the ch15 folder of this book's CD-ROM.
As indicated by the previous note, you can specify relative URLs (or file locations) in the Sound Location field for this behavior's parameters. For example, if you save your Flash movie file (.swf) in the same location or folder as your MP3 file, you can simply specify the MP3 filename in the Sound Location field. You can also use relative path notation. For example, /myfile.mp3 would load the myfile.mp3 file located one directory above (that is, the parent folder) the Flash movie's location.
The Play Sound behavior plays a sound that has been set up with the Load Sound from Library or Load streaming MP3 file behavior. Remember that the Load streaming MP3 file behavior automatically begins playback of the MP3 file, and the Load Sound from Library behavior has an optional parameter that automatically begins playback as well. You can use the Play Sound behavior to
Play a sound that was only set up by the Load Sound from Library behavior, where the Play this sound when loaded check box was not selected
Replay a sound that finished playing or was stopped by the Stop Sound behavior (discussed later in this section)
In the following steps, you learn how to add a Play Sound movie to a Button instance.
Note
Use the loadsound_behavior.fla file you created earlier in this section. You can find this file in the ch15 folder of the book's CD-ROM as well.
Open the
loadsound_behavior.fladocument.Select frame 1 of the behaviors layer in the Timeline window, and open the Behaviors panel. Double-click the Load Sound from Library behavior in the Action column of the panel. In the Load Sound from Library dialog box, clear the Play this sound when loaded check box. You do not want the sound to automatically play when the sound loads because you will assign a Play Sound behavior to a button in a later step. Click OK to accept the new setting.
Create a new layer named buttons, and place this layer below the existing behaviors layer.
Save your Flash document as
playsound_behavior.fla.It's always good practice to resave an older document with a new name whenever you are changing the scope of your document.
Open the Buttons library by choosing Windows
In this Library, navigate to the classic buttons
Make sure you have selected the first frame of the buttons layer before you drag the symbol.
Select the new Play instance on the Stage, and open the Behaviors panel (Shift+F3).
In the top-left corner of this panel, click the Add Behavior (+) button, and choose Sound
In the Play Sound dialog box, type sndSong in the Identifier field.
Remember that the sound loaded in the
loadsound_behavior.flafile had this same identifier. See Figure 15.11.Save your Flash document, and test the movie (Control
When you click the Play button, you hear the
sndSonginstance play.
Note
You can find the completed file, playsound_behavior.fla, in the ch15 folder of this book's CD-ROM.
The Play Sound behavior is the first Sound behavior discussed in this section that has different events from which you can choose in the Behaviors panel, as shown in Figure 15.12.
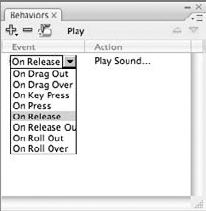
If you prefer the Play Sound behavior to activate with a different mouse event, you can choose another option in the Event combo box.
This behavior inserts the stopAllSounds() function into the code of the selected event handler (that is, a keyframe, a Button instance, or a Movie Clip instance). As we discussed earlier in this chapter, the stopAllSounds() function halts the playback of any and all playing sounds.
In the next exercise, you'll learn how to stop the playback of multiple sounds with the Stop All Sounds behavior.
Note
Use the loadmp3_behavior.fla document as a starting point for this exercise. You can find this document in the ch15 folder of this book's CD-ROM. This exercise also requires the robert_video.flv file located in the resources folder of the CD-ROM. Make a copy of this file to your local hard drive.
Open the
loadmp3_behavior.fladocument, and create a new layer named video.Place this layer below the existing behaviors layer.
Save your Flash document as
stopallsounds_behavior.fla.The video file that you import in the next step has a frame rate of 24 fps. As such, you need to change the frame rate of this Flash document to match.
Click anywhere on the Stage of your document, and press the Esc key to deselect any selected objects.
In the Property inspector, change the frame rate from 12 fps to 24 fps.
Remember that this document already plays the streaming MP3 file located on the
flashsupport.comWeb server. Now, you will add a video to the Flash movie, to act as a second sound source.Select the first frame of the video layer, and import the
robert_video.flvvideo file by choosing FileOn the first stage of the import process, titled Select Video, accept the defaults and click the Next button. In the Deployment stage, select the radio button labeled Embed video in SWF and play in timeline and click the Next button. In the Embedding phase, accept the defaults and click the Next button. On the Finish Video Import phase, click the Finish button. After the video file has been imported, the video layer frames will expand to include all of the frames in the
robert_video.flvclip.Note
On the Mac, the Next button in the Video Import wizard is labeled as Continue.
Create a new layer, and rename it buttons.
Place this layer at the bottom of the layer stack.
On frame 1 of the buttons layer, drag an instance of the Stop button from the Circle Buttons folder of the Buttons Library (Window
Place the instance below the video object.
Select the new Stop instance, and open the Behaviors panel.
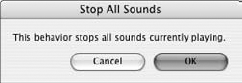
Click the Add Behavior (+) button in the panel, and choose Sounds
When you choose this behavior, you see a dialog box describing this behavior (see Figure 15.13).
Click OK.
Save your Flash document, and test the movie (Control
As the movie plays, you hear the streaming MP3 file and the video's audio track play. If you click the Stop button, all of the sounds stop playing.
Note
You can find the completed file, stopallsounds_behavior.fla, in the ch15 folder of this book's CD-ROM.
You may have noticed that if you allow the movie to continue to play, the movie eventually loops back to the first frame and repeats. You can add a stop() action to the last frame of the timeline to prevent the Flash movie from looping.
Note
You learn how to apply basic actions to Flash timelines in Chapter 18
Tip
To decrease publishing (or testing) time, change the Audio stream compression option to Speech in the Flash tab of the Publish Settings dialog box (File
Although Flash was never intended to perform as a full-featured sound editor, it does a remarkable job with basic sound editing. If you plan to make extensive use of sound in Flash, we recommend that you consider investing in a more robust sound editor. You'll have fewer limitations and greater control over your work.
Note
You can find an archived version of the "Working with Audio Applications" chapter from the Macromedia Flash MX Bible (Wiley, 2002) at www.flashsupport.com/archive. That chapter discusses several popular sound editors that are commonly used in concert with Flash.
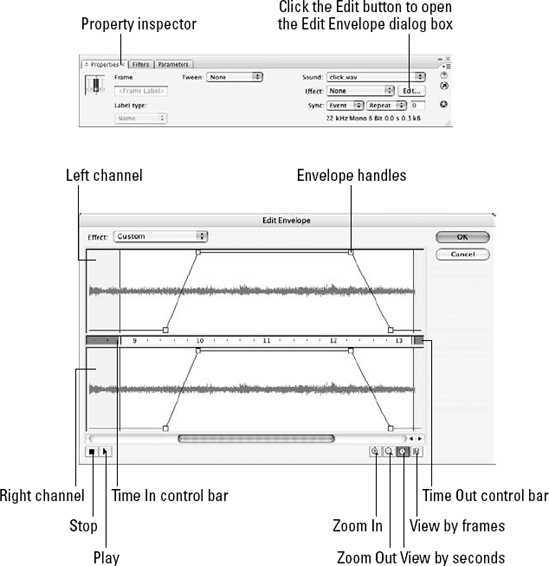
Flash CS3 has basic sound-editing controls in the Edit Envelope dialog box, which is accessed by clicking the Edit button in the Property inspector. (As you may recall from previous sections, you must first select the keyframe containing the sound, and then open the Property inspector.) The Time In control and the Time Out control, or Control Bars, in Edit Envelope enable you to change the In (start) and Out (end) points of a sound. You use the envelope handles to create custom Fade-in and Fade-out effects. The Edit Envelope dialog box also enables you to edit each sound channel separately if you are working with a stereo (two-channel) sound.
Note
The edits you apply to a sound file in the Edit Envelope dialog box affect only the specific instance you have assigned to a keyframe. The original file that resides in the Flash document's Library panel is neither changed nor resaved.
A sound's In point is where the sound starts playing, and a sound's Out point is where the sound finishes. The Time In control and the Time Out control are used for setting or changing a sound's In and Out points. Here's how to do this:
Start by selecting the keyframe of the sound you want to edit; then access the Property inspector.
Click the Edit button in the sound attributes area of the Property inspector to open the Edit Envelope dialog box, shown in Figure 15.14.
Warning
You can not edit the In and Out points if your sound is set to Loop in the Property inspector. Make sure you have it set to Repeat. Oddly, you can go back and set it to Loop after you have set In and Out points in Repeat mode.
Drag the Time In control and Time Out control (located in the horizontal strip between the two channels) onto the Timeline of the sound's waveform to define or restrict which section will play.
Use the envelope handles to edit the sound volume by adding handles and dragging them up or down to modulate the volume.
Click the Play button to hear the sound as edited before returning to the authoring environment.
Rework the sound if necessary.
When you've finessed the points and are satisfied with the sound, click OK to return to the Property inspector.
You can apply a handful of preset fades and other effects to a sound by selecting the effect from the Effect menu located in the sound attributes area of the Property inspector. For many uses, the Flash presets will be more than sufficient, but if you find yourself feeling limited, remember that more subtle effects can be created in an external sound editor. We describe Flash's preset effects in detail here:
None: No effect is applied to either of the sound channels.
Left Channel/Right Channel: Plays only the right or left channel of a stereo sound.
Fade Left to Right/Fade Right to Left: This effect lowers the sound level of one channel while raising the level of the other, creating a panning effect. The effect occurs over the entire length of the sound.
Fade In/Fade Out: Fade In gradually raises the level of the beginning of a sound clip. Fade Out gradually lowers the level at the end of a sound. The default length for either effect is approximately 25 percent of the length of the clip. We've noticed that even if the size of the selection is edited with the control bars, the duration of the Fade In/Fade Out remains the same. (Thus, a 35-second sound clip with an original default Fade In time of 9 seconds still has a 9-second Fade In time even when the selection's length is reduced to, say, 12 seconds.) You can resolve this problem by creating a custom fade.
Custom: Any time you manually alter the levels or audio handles within the Edit Envelope dialog box, Flash CS3 automatically resets the Effect menu to Custom.
For maximum sound-editing control within Flash, use the envelope handles to create a custom fade or to lower the audio levels (or amplitude) of a sound. In addition to creating custom fades, you can lower the levels creatively to create subtle, low-volume background sounds. Here's how:
Select the keyframe of the sound you want to edit.
Click the Edit button of the Property inspector to open the Edit Envelope dialog box.
Click the envelope lines at any point to create new envelope handles.
After handles have been created, you can drag them around to create your desired volume and fading effects.
The lines indicate the relative volume level of the sound. When you drag an envelope handle downward, the line slopes down, indicating a decrease in the volume level, while dragging an envelope handle upward has the opposite effect. The Edit Envelope control is limited to eight envelope handles per channel (eight for left and eight for right).
Tip
You can remove envelope handles by dragging them outside the Edit Envelope dialog box.
Other useful tools in the Edit Envelope dialog box warrant mention. Refer to Figure 15.14 for their locations.
Zoom In/Zoom Out: These tools either enlarge or shrink the view of the waveform, and they are particularly helpful when you're altering the In or Out points or envelope handles.
Seconds/Frames: The default for viewing sound files is to represent time in seconds. But viewing time in frames is advantageous for syncing Stream sound. Toggle between viewing modes by clicking either the Seconds or Frames button at the lower right of the Edit Envelope dialog box.
This option appears in the Property inspector, yet a measure of its functionality occurs in conjunction with the Edit Envelope dialog box. The Repeat/Loop drop-down menu and field is used to set the number of times that a sound file will repeat (or loop indefinitely). You can use a small looping selection, such as a break beat or jazz riff, for a background soundtrack. Or loop a short ambient noise for an interesting effect. To test the quality of a looping selection, click the Edit button, which takes you to the Edit Envelope dialog box, where you can click the Play button for a preview of your loop. If the loop isn't perfect or has hiccups, use the In and Out control bars and envelope handles to trim or taper off a blank or adversely repeating section.
Tip
Flash links looped sounds and handles them as one long sound file (although it's really one little sound file played repeatedly). Because this linkage is maintained within the editing environment, the entire expanse of a looped sound can be given a custom effect in the Edit Envelope dialog box. For example, a simple repeating two-measure loop can be diminished over 30 loops. This is a subtle effect that performs well, yet is economical in terms of file size. Note, however, that this applies only to Event sounds.
You need to be aware of several considerations when preparing Flash sound for export. For Web-based delivery, the primary concern is to find an acceptable middle ground between file size and audio quality. But the concept of acceptability is not absolute; it is always relative to the application. Consider, for example, a Flash Web site for a record company. In this example, sound quality is likely to be more important than file size because the audience for a record company will expect quality sound. In any case, consideration of both your audience and your method of delivery will help you to determine the export settings you choose. Luckily, Flash CS3 has capabilities that enhance the user's experience both by optimizing sounds more efficiently and by providing improved programming features to make download delays less problematic.
There are two ways to optimize your sound for export. The quickest, simplest way is to use the Publish Settings dialog box and apply a one-setting-optimizes-all approach. This can work well if all of your sound files are from the same source. For example, if all of your sound material is speech-based, then you may be able to use global settings to encode all of your Flash sound. However, if you have a variety of sound sources in your movie, such as a combination of musical scores along with narrative tracks, then the Publish Setting dialog box may not deliver the highest possible level of optimization.
If you demand that your Flash movie has the smallest possible file size, or if your Flash project includes audio from disparate sources, or uses a combination of audio types — such as button sounds, background music, speech — it's better to fine-tune the audio settings for each sound in the Library. This method gives you much better control over output.
Note
This chapter discusses only the audio-centric Publish features of Flash CS3. We explain general Publish Settings features in greater detail in Chapter 21, "Publishing Flash Movies."
To take a global approach to the control of audio output quality, choose File
Tip
You can also access the Flash tab of Publish Settings using the Property inspector. Click the document's Stage or Work Area, and in the Property inspector, click the Settings button to the right of the Publish label.
The Flash tab of the Publish Settings dialog box has three options for controlling audio quality:
Audio Stream: Controls the export quality of Stream sounds. To customize, click Set. This gives you a number of options, which we describe in the section that follows. Flash supports MP3, which is the optimal streaming format.
Audio Event: Controls the export quality of Event sounds. To customize, click Set. This gives you the same number of options as the Set button for Audio Stream. We describe these options in the section that follows.
Override Sound Settings: If this box is checked, Flash uses the Publish Settings rather than the individual audio settings that are fine-tuned in the Library panel for the current document. For more information, see the section "Fine-Tuning Sound Settings in the Library," later in this chapter.
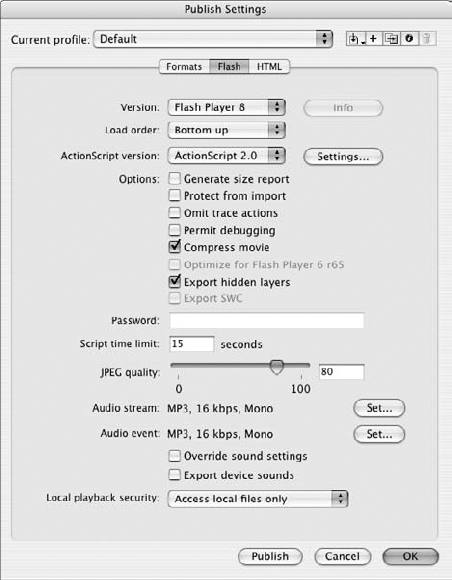
Figure 15.15. The Flash tab of the Publish Settings dialog box has several options to control audio quality.
Audio stream and Audio event have individual compression settings, which can be specified by their respective Set button options. If you click either Set button on the Flash tab, the same Sound Settings dialog box appears — it is identical for both Audio Stream and Audio Event, which means that the same options are offered for both types of sound. The Sound Settings dialog box, shown in various permutations in Figure 15.6, displays numerous settings related to the control of audio quality and audio file size. The type of compression you select governs the specific group of settings that appear.
Note
The impact of individual sound settings may be overridden by another setting. For example, a Bit Rate setting of 160 Kbps may not result in good sound if the Quality is set to Fast. Optimal results require attention to all of the settings. It's like a set of interlinked teeter-totters: A little experimentation will reveal the cumulative or acquired impact of each setting on the others. However, the need to experiment here is hobbled by the lack of a preview mechanism. By contrast, tuning a sound in the Library is much more serviceable because there's a sound preview button adjacent to the settings controls. For more about this workflow, refer to the following section of this chapter, "Fine-Tuning Sound Settings in the Library."
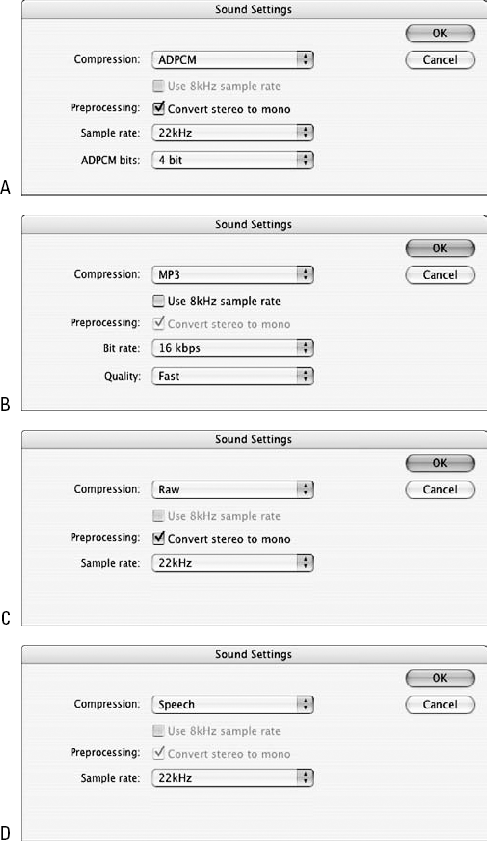
The specific options that are available in the Sound Settings dialog boxes are always related to the compression, or audio-encoding scheme, selected in the Compression drop-down menu. That's because different compression technologies support different functionalities:
Disable: This option turns off all sounds that have been assigned in the Property inspector to keyframes in any timeline. If this option is selected, only sound that has been linked and attached for use in ActionScript will play in the movie (see Chapter 27, "Interacting with Movie Clips," for more information on this use). All other sound sources assigned in the movie will be omitted from the final movie file (.swf ). No additional options accompany this setting.
ADPCM: With ADPCM selected in the Compression menu, the following options are available:
Convert Stereo to Mono: Mixes the right and left channel of audio into one (mono) channel. In sound-engineer parlance, this is known as "bouncing down."
Sample Rate: Choose from sampling rates of 5, 11, 22, or 44 kHz. Increasing the sample rate of an audio file to something higher than the native sample rate of the imported file simply increases file size, not quality. For example, if you import 22 kHz sounds into the Flash movie, selecting 44 kHz will not improve the sound quality. For more information on sample rates, see Appendix C, "Digital Audio Basics," on the CD-ROM.
ADPCM Bits: Set the number of bits that ADPCM uses for encoding. You can choose a rate between 2 and 5 bits. The higher the ADPCM bits, the better the audio quality. Flash's default setting is 4 bits.
MP3: If you select MP3 in the Compression menu, you can set the following options:
Convert Stereo to Mono: Mixes the right and left channel of audio into one (mono) channel. This is disabled at rates below 20 Kbps because the lower bit rates don't allow stereo sound.
Bit Rate: MP3 measures compression in Kbps. The higher the bit rate, the better the audio quality. Because the MP3 audio compression scheme is very efficient, a high bit rate still results in a relatively small file size. Refer to Table 15.2 for a breakdown of specific bit rates and the resulting sound quality.
Quality: Choose Fast, Medium, or Best quality. These settings determine how well Flash CS3 will analyze the sound file during compression. Fast will optimize the audio file in the shortest amount of time, but usually with less quality. Medium will analyze the sound waveform better than the Fast setting but takes longer to compress. Best is the highest-quality setting, but it takes the longest time to compress the sound file. Note that the file size of the final compressed sound will not be affected by any Quality setting — it simply instructs Flash how well it should analyze the sound during compression. The longer Flash takes to analyze a sound, the more likely the final compressed sound will capture the high highs and the low lows. If you have a fast computer processor, then we recommend you use the Best setting during your final Flash movie publish. During development and testing, you may want to use Fast to avoid long waits.
Raw: When Raw (also known as Raw PCM audio) is selected in the Compression menu, there are two options:
Convert Stereo to Mono: Mixes the right and left channels of audio into one (mono) channel.
Sample Rate: This option specifies the sampling rate for the Audio Stream or Audio Events sounds. For more information on sample rate, please refer to Appendix C, "Digital Audio Basics," on this book's CD-ROM.
Speech: When the Speech codec is selected in the Compression menu, there is only one option available: Sample Rate. Any sound compressed with the Speech codec will be converted to mono (one-channel) sound. Even though the Speech codec licensed from Nellymoser was designed for 8 kHz, Flash CS3 "upsamples" this codec to those frequencies supported by the Flash Player. See Table 15.3 for an overview of these sampling rates and how they affect sound quality.
Table 15.2. MP3 Bit Rate Quality
Sound quality | Good for | |
|---|---|---|
8 Kbps | Very bad | Best for simulated moonwalk transmissions. Don't use this unless you want horribly unrecognizable sound. |
16 Kbps | Barely acceptable | Extended audio files where quality isn't important, or simple button sounds. |
20, 24, 32 Kbps | Acceptable | Speech or voice. |
48, 56 Kbps | Acceptable | Large music files; complex button sounds. |
64 Kbps | Good | Large music files where good audio quality is required. |
112–128 Kbps | Excellent | Near-CD quality. |
160 Kbps | Best | Near-CD quality. |
Table 15.3. Speech Sampling Quality
Sample rate | Sound quality | Good for |
|---|---|---|
5 kHz | Acceptable | Sound playback over extremely limited data connections, such as 19.2 Kbps wireless Internet modems used by mobile devices. |
11 kHz | Good | Standard telephone-quality voice audio. |
22 kHz | Excellent | Not recommended for general Internet use. While this setting produces higher fidelity to the original sound, it consumes too much bandwidth. For comparable sound, we recommend using a midrange MP3 bit rate. |
44 kHz | Best | See description for 22 kHz. |
Tip
As a general rule, if you use the Publish Settings to control audio export globally, we recommend choosing MP3 at 20 or 24 Kbps. Doing so result in moderate to good sound quality (suitable for most Flash projects), and the ratio of file size to quality will give reasonable performance. A range of 20 to 24 Kbps is an acceptable data rate for speech and short sound effects, while 96 to 128 Kbps is a better data rate for longer sounds and music.
Although this is becoming less of an issue with the desktop versions of the Flash Players, it may still be important to consider that MP3 or audio playback may not be supported by all Flash Players, especially device-based players. You can use Flash Player 6 and higher features in the ActionScript language to check the capabilities of the Flash Player installed on a user's system. Using the System.capabilities object, you can check to see whether an MP3 decoder is installed. The specific property is
System.capabilities.hasMP3
Tip
In FlashLite 1.1 or higher, you can use the _capMP3 global property at runtime to determine if MP3 playback is supported on a particular device.
More importantly, though, you can script your movies to check whether the Flash Player has access to general audio output. Some devices with the Flash Player may not have any audio output. This property is
System.capabilities.hasAudio
Warning
These additions to the ActionScript language are only available in Flash Player 6 or higher. Earlier versions of the Flash Player will not recognize these objects or properties.
The Publish Settings dialog box is convenient because it permits you to tweak a minimal set of sound adjustments, whereupon Flash exports all of your "noncustomized" Stream sounds or Event sounds at the same rate and compression. However, if you have many sounds and you are seriously concerned about obtaining the ideal balance of both optimal sound quality and minimum file size, you will need to export them at different rates and compressions. Consequently, for the fullest level of control over the way in which Flash compresses sound for delivery, we recommend you optimize each sound, individually, in the Library panel. In fact, it would be impossible for us to overemphasize this bit of sound advice: We recommend you optimize each sound, individually, in the Library.
Tip
As you become more advanced with Flash CS3, particularly with ActionScript, you will likely want to load MP3 files directly into Flash Player 6 or higher movies, as they play in the Web browser. We'll discuss these features in Chapter 29, "Sharing and Loading Assets."
Audio settings in the Library panel are similar to those we discussed previously for the Publish Settings dialog box. These settings appear in the Sound Properties dialog box, shown in Figure 15.17. To access these settings, either (a) double-click the icon of the sound in the Library; or (b) select the sound as it appears in the Library and (i) click the Properties button, or (ii) choose Properties from the Library panel's options menu; or (c) right-click the sound symbol in the Library and choose Properties.
Tip
Flash CS3 also enables you to access the compression settings alone for a sound file by right-clicking (or Control+clicking on the Mac) the sound file in the Library panel and choosing Export Settings from the contextual menu. The options in the Sound Settings dialog box are the same compression settings that we discuss in this section.
The top half of the Sound Properties dialog box displays status information about the sound file: To the far left is a window with the waveform of the selected audio; to the right of the waveform is an area that displays the name of the file together with its location, date, sample rate, channels, bit depth, duration, and file size.
Note
The file location indicates the full absolute path to the sound file (for example, C:Inetpubwwwrootmysound.mp3) if you save your Flash document file (.fla) in a volume or hard drive that is different than the location of the sound file.
The lower half of the dialog box is titled Export Settings. The first setting is a menu used to select the Compression scheme. The Compression options, and the subsequent compression-related options that appear in the other settings, are exactly the same as the sound options of the Publish Settings dialog box we discussed earlier in this chapter.
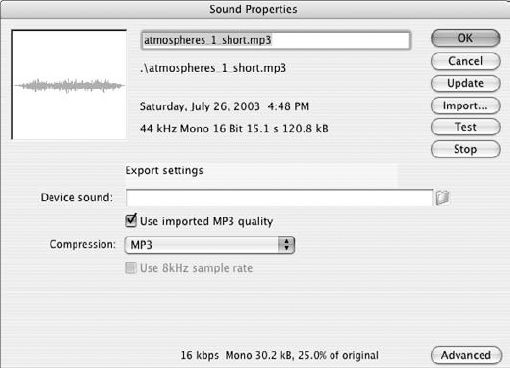
Figure 15.17. The Sound Properties dialog box enables you to control the compression settings and to precisely balance all other related settings for each individual sound in the Library.
Note
If you imported an MP3 file, the Sound Properties dialog box automatically displays and enables the Use imported MP3 quality check box. The data rate of the imported MP3 file is then used for any Event sound compression. However, if you use the MP3 file for Stream sounds, the MP3 file is recompressed according to the Stream sound settings in the Publish Settings dialog box.
Estimated results are displayed beneath the Export Settings. Here, the estimated final file size (after compression) of the clip is displayed, together with the compression percentage. This is an extremely important tool that is easily overlooked.
Warning
The estimated final file size is just that, an estimate. In our tests, the file size reported in the Sound Properties dialog box was consistently different from the actual file size reported by the size report generated during publishing. You can generate a text file containing detailed information about your final movie by enabling Generate size report in the Flash tab of the Publish Settings dialog box. Once enabled, you can view the size report in the Output window in Test Movie mode.
The buttons to the right of the Sound Properties dialog box offer the following options:
Update: Click this button to have Flash check for an update of the audio file (if the original MP3, WAV, or AIFF file has been modified), and update it accordingly. Generally, this works only on the machine on which the audio file was originally imported. If you stored your files on a network server, then all the members of your Flash production should be able to use this feature.
Import: This enables you to import another audio file into the Flash environment. The imported audio file will overwrite the existing sound displayed in the Sound Properties dialog box, but will retain the original sound's name. This feature is useful if you originally imported a placeholder or low-quality sound and need to specify a new file to be used in its place.
Test: This excellent feature enables you to audition the export quality of the sound based on the options that you've selected from the Compression menu (and supporting options in the Export Settings).
Stop: Click this button to stop (silence) the sound that has been auditioned using the Test button.
Fine-tuning your audio in the Sound Properties dialog box of the Library panel has three benefits. Foremost of these benefits is the ability to set specific compressions and optimizations for each individual sound. Another benefit is the Test button. This is an excellent way to audition your audio file and to know what it will sound like when it is exported with different compression schemes and bit rates — hearing is believing. Finally, the estimated results, which display how each setting will affect the compressed file size, is a powerful tool that helps you obtain the desired balance of quality and file size. In contrast, optimizing sounds with the Publish Settings is more of a blind process — it is not only more global, it's also more of a painful trial-and-error method.
One of the coolest things about Flash audio is that you can combine the two methods of controlling sounds, using both the Publish Settings and the Library panel's Sound Properties dialog box to streamline your work flow while still maintaining a relatively high degree of control over sound quality. (This method works best if you already have some experience with sound behavior in Flash.)
For example, let's assume that you have three different Event sounds in your Flash project. Two of these are simple button sounds. You decide that you won't require specialized compression for the sound used with the buttons. So, based on your prior experience of sound behavior in Flash, you go directly to the Publish Settings and set Event sounds to publish as MP3 at 48 Kbps with Best quality.
Note
We assume that you have left the sounds used for the buttons untouched in the Library panel, leaving the Compression setting in the Sound Settings dialog box at Default. The Default option tells Flash to handle the compression for these sounds with the Publish Settings.
But the third sound is a loop of background jazz music that you want to be heard at near-CD quality. For this sound, you access the Sound Properties dialog box and try a number of combinations — and test each one — until you find a balance between file size and audio quality that pleases your ears. For example, you may decide to assign this sound to export as an MP3, stereo at 64 Kbps, with Quality set to Best.
Here are a few final notes about sound and some pointers to more complex sound-related topics that may help you work with sound files in Flash CS3.
Adobe has licensed the Fraunhofer MP3 codec, which supports streaming MP3 with a constant bit rate. However, neither Flash CS3 nor any Flash Player supports Variable Bit Rate (VBR), or VBR MP3, encoding for Stream sounds. VBR MP3 is a variant of MP3 that uses specialized algorithms to vary the bit rate according to the kind of sound that is being compressed. For example, a soprano solo would be accorded a higher bit rate than a crashing drum sequence, resulting in a superior ratio of quality to file size. There are a number of sound applications, such as Apple iTunes and the MP3 creation packs available for Windows Media Player, that export VBR MP3. If you have access to a sound application that exports VBR MP3, you'll be happy to know that you can import your VBR MP3 sound files, which are (theoretically) optimized for file size and quality beyond the compression capabilities of Flash CS3, and that you can maintain the compression of such files by doing the following:
In the Flash tab of the Publish Settings dialog box, leave the option to Override Sound Settings unchecked.
In the Sound Properties (or Export Settings) dialog box for each sound in the Library panel, choose MP3 for the Compression option in Export Settings and select the Use imported MP3 quality check box.
The Sync option (located in the Property inspector) for the sound cannot be set to Stream.
If you choose to use VBR MP3 files in your Flash documents, you may need to test the following options of VBR compression in your MP3 creation software:
Bit rate: Test the minimum bit rate that VBR will use for the MP3 file. Regular MP3 files use CBR, or Constant Bit Rate, which keeps the sound's bit rate steady through the entire sound file. With VBR, the bit rate can vary in ranges that you specify. Some higher bit rates, such as 320 Kbps, may not import well into the Flash CS3 authoring tool.
Quality: Most VBR-enabled MP3 software enables you to also pick an arbitrary quality setting for VBR MP3 files. Using terminology like Lowest, Medium Low, and High (and several in between), or percentages (1–100%), you can alter the quality of the bit rate. Note that this "quality" is not necessarily used in the same manner that Flash CS3 refers to quality for MP3 compression.
You may find that Flash CS3 will give you an import error for some VBR- (and CBR-) encoded MP3 files. If a particular setting creates an MP3 file that can't be imported into Flash CS3, then try another bit rate and/or quality combination. However, we have found that Flash CS3 has inconsistent behavior when it comes to importing MP3 files. For example, you may find that one VBR setting/combination does not work for a particular sound file, but that it works fine for others. Even more strangely, MP3 files that won't import into the Flash CS3 authoring environment will load just fine into Flash Player 6 or higher at runtime via ActionScript.
Note
You can find more information about VBR encoding at the following URL:
www.fezguys.com/columns/057.shtml
We also recommend reading the "null sound" Flash tutorial at
www.bluegelmedia.com/tutorials/av/null_sound_technique.htm
This tutorial shows you how to use a Stream sound to kick other Event sounds into streaming mode. Robert Reinhardt contributed a chapter to August de los Reye et al's Flash Design for Mobile Devices (Wiley, 2002) covering this technique.
It goes without saying that every Internet content creator strives to make every file and data transaction as small and efficient as possible to accommodate the majority of slow network connections in use today. As a Flash designer or developer incorporating sound into your projects, you'll want to properly plan sound usage in an effort to avoid 1MB .swf file downloads.
Table 15.4 explores many of the available network bandwidths that are in use on the Internet. However, as you've likely experienced, it's highly unusual to actually get the full download (or upload) speed out of your network connection. Variables such as network congestion, server load, and phone line conditions affect the quality of your network speed. Using the same formula that Adobe uses to determine approximate download speeds in the Bandwidth Profiler (within Test Movie mode), we calculated estimated bandwidth speeds for the connection speeds shown in Table 15.4. Because Flash CS3 displays compressed sound information in Kbps units, we converted these connection speeds into Kbps bit rates. More important, though, we also provided a 50-percent portion of this bit rate, as you'll likely need to save room for other Flash material, such as vector artwork, bitmap graphics, and animations.
Table 15.4. Bit Rates for Flash Movies
Hardware support | Theoretical bandwidth | Estimated bandwidth | Percent of theoretical | 100% bit rate | 50% bit rate |
|---|---|---|---|---|---|
14.4 Kbps | 1.8 KB/s | 1.2 KB/s | 67 | 9.6 Kbps | 4.8 Kbps |
19.2 Kbps | 2.4 KB/s | 1.6 KB/s | 67 | 12.8 Kbps | 6.4 Kbps |
28.8 Kbps | 3.6 KB/s | 2.3 KB/s | 64 | 18.4 Kbps | 9.2 Kbps |
33.6 Kbps | 4.2 KB/s | 2.8 KB/s | 67 | 22.5 Kbps | 11.2 Kbps |
56 Kbps | 7 KB/s | 4.7 KB/s | 67 | 37.6 Kbps | 18.8 Kbps |
64 Kbps | 8 KB/s | 5.4 KB/s | 67 | 43.2 Kbps | 21.6 Kbps |
128 Kbps | 16 KB/s | 10.7 KB/s | 67 | 85.6 Kbps | 42.8 Kbps |
256 Kbps | 32 KB/s | 21 KB/s | 67 | 168 Kbps | 84 Kbps |
384 Kbps | 48 KB/s | 32 KB/s | 67 | 256 Kbps | 128 Kbps |
768 Kbps | 96 KB/s | 64 KB/s | 67 | 512 Kbps | 256 Kbps |
1.5 Mbps | 192 KB/s | 129 KB/s | 67 | 1,032 Kbps | 516 Kbps |
11 Mbps | 1,408 KB/s | 943 KB/s | 67 | 7,544 Kbps | 3,772 Kbps |
Using Table 15.4 as a guide, try to plan your Flash project for your target audience. Actually, you may have more than one target audience. As such, you may need to develop several versions of your sound assets, with each version targeted to a specific connection speed.
Once you've decided your target audience(s), you can determine the maximum Kbps that your sound files should use. Table 15.5 shows you the bit rates of Raw, Speech, and ADPCM mono sounds. We don't include MP3 bit rates here because they're already calculated (and available) in the Compression menu of the Sound Properties dialog box: 8, 16, 20, 24, 32, 48, 56, 64, 80, 112, 128, and 160 Kbps. In Table 15.5, we show bit rates that are suitable for analog modem connections (14.4, 28.8, 33.6, and 56 Kbps) in bold.
Note
If you'd like to see the actual sample rate used by Flash CS3's MP3 compression options, see Table 15.7.
Table 15.5. Mono Bit Rates for Streaming Sound
Sampling rate | Raw | Speech | ADPCM 2-bit | ADPCM 3-bit | ADPCM 4-bit | ADPCM 5-bit |
|---|---|---|---|---|---|---|
5 kHz | 80 Kbps | 10 Kbps | 10 Kbps | 15 Kbps | 20 Kbps | 25 Kbps |
11 kHz | 176 Kbps | 22 Kbps | 22 Kbps | 33 Kbps | 44 Kbps | 55 Kbps |
22 kHz | 352 Kbps | 44 Kbps | 44 Kbps | 66 Kbps | 88 Kbps | 110 Kbps |
44 kHz | 704 Kbps | 88 Kbps | 88 Kbps | 132 Kbps | 176 Kbps | 220 Kbps |
In Tables 15.6 and 15.7, we calculate the file sizes that 1 second of mono (one-channel) sound occupies in a Flash movie file (.swf). Use the values in these tables as multipliers for your sound file's actual length. For example, if you know that you have a 30-second soundtrack file, the final Flash movie file size (containing just the audio) would be about 60K with ADPCM 3-bit, 5 kHz compression. Regardless of the actual content of the digital audio, these encodings will produce consistent file sizes based on length and resolution.
Table 15.6. File Sizes in Bytes (KB) for One Second of Mono Audio
Sample rate | Raw | Speech | ADPCM 2-bit | ADPCM 3-bit | ADPCM 4-bit | ADPCM 5-bit |
|---|---|---|---|---|---|---|
5 kHz | 11,037 (10.8) | 1,421 (1.4) | 1,397 (1.4) | 2,085 (2.0) | 2,774 (2.7) | 3,463 (3.4) |
11 kHz | 22,061 (21.5) | 2,829 (2.8) | 2,777 (2.7) | 4,115 (4.0) | 5,532 (5.4) | 6,910 (6.8) |
22 kHz | 44,109 (43.1) | 5,581 (5.5) | 5,541 (5.5) | 8,296 (8.1) | 11,051 (10.8) | 13,806 (13.5) |
44 kHz | 88,205 (86.1) | 11,085 (10.8) | 11,065 (10.8) | 16,576 (16.2) | 22,086 (21.6) | 27,597 (27.0) |
Table 15.7. File Sizes in Bytes (KB) for One Second of Mono MP3 Audio
Bit rate | Size | Output sample rate | Bit rate | Size | Output sample rate |
|---|---|---|---|---|---|
8 Kbps | 1,263 (1.2) | 11 kHz | 32 Kbps | 4,487 (4.4) | 22 kHz |
16 Kbps | 2,511 (2.5) | 11 kHz | 48 Kbps | 5,605 (5.5) | 22 kHz |
20 Kbps | 3,135 (3.1) | 11 kHz | 56 Kbps | 5,605 (5.5) | 22 kHz |
24 Kbps | 3,369 (3.3) | 22 kHz | 64 Kbps | 8,543 (8.3) | 44 kHz |
10,716 (10.5) | 44 kHz | 128 Kbps | 17,112 (16.7) | 44 kHz | |
112 Kbps | 14,980 (14.6) | 44 kHz | 160 Kbps | 17,112 (16.7) | 44 kHz |
Note
You may notice that some bit rate settings in Table 15.7 create the same file size for the MP3 compression. This is a known bug of Flash CS3. You may also find that the Convert Stereo to Mono option for MP3 compression does not affect the outcome of some settings.
Sometime you may be handed a Flash document file (.fla) that has sound embedded within it and be told that the original sounds have either been lost or are no longer available. Here's how to extract a sound from such a file:
Back up the file.
If the original file is named
sound.fla, you might resave it assound_extraction.fla. If you want to start with an exercise file, save a copy of theenhanced_view.flafile, located on the book's CD-ROM. You can skip Steps 2 through 7 if you are using this file.Add a new layer in the Timeline window, at the top of the layer stack.
Label this layer sound extraction.
With the first frame of this layer selected, open the Property inspector.
In the Sound menu, specify the sound file from the Library that you wish to export.
Add enough frames to the sound extraction layer so that you can see the entire waveform of the sound file.
Delete all other layers.
Open the Library panel and locate the sound that needs to be extracted from the file.
In the example file, the sound is named
atmospheres_1.wav. Note that any other assets within this file are irrelevant to this process. That's because Flash will use only Library items that have actually been used within the movie.Double-click the sound icon for
atmospheres_1.wavin the Library panel to invoke the Sound Properties dialog box.Set the Compression to Raw.
This ensures that the sound will be exported as uncompressed audio.
Select a sample rate that matches the one listed to the right of the waveform display, near the top of the Sound Properties dialog box.
If the sound is specified as a Stereo sound, make sure the Convert Stereo to Mono option is unchecked.
Access the Flash tab of the Publish Settings dialog box, and make sure that the Override Sound Settings check box is not checked.
Now you're ready to extract the sound file from the Flash document file (.fla). You've created a movie that will ignore all other assets in the library except this sound, and you've told Flash to export the sound with the original sample rate of the sound, as uncompressed (Raw) audio.
Choose File
If you're using the Windows version of Flash CS3, choose WAV Audio as the file type. If you're on a Mac, choose QuickTime.
For Windows users, the Export Windows WAV dialog box appears with those sound specifications. In the Sound Format menu, make sure the audio specifications match those of your audio source in the Library panel; then click OK. For Mac users, the QuickTime Export Settings dialog box appears. Here, click the QuickTime settings button in the lower-left corner. Ignore all of the options except Sound Format. In this menu, select the sound setting that matches the specifications of the sound file. For this example, this setting should be 44 kHz 16 Bit Stereo. Click OK.
For Windows users, the process is complete. You now have a WAV copy of your Flash movie sound asset. For Mac users, you still have a couple of steps to complete:
Open the exported QuickTime movie in the QuickTime Player Pro. You must have the Pro version installed.
Choose File
Select Sound to AIFF in the Export menu.
Click the Options button, and in the Sound Settings dialog box, set the Compressor to None and choose a sample rate, bit depth, and channel type that match the sound from the Flash document. For this example sound, this should be 44.1 kHz, 16 bit, and Stereo. Click OK.
Note
If you're using Apple QuickTime Pro 7 or higher, choose Linear PCM in the Format menu and the sampling settings that match your source audio in the Flash movie.
Finally, specify a filename and location for the exported file, and click Save.
Note
We defer several sound-related topics until after our discussion of Flash CS3's ActionScripting capabilities. Work your way to Chapter 27, "Interacting with Movie Clips," and Chapter 29., "Sharing and Loading Assets."
Note
We'd like to know what you think about this chapter. Visit www.flashsupport.com/feedback to send us your comments.
Flash movie files (.swf) can use four types of audio compression: ADPCM, MP3, Raw, and Speech. ADPCM is compatible with all versions of the Flash Player. MP3 is compatible with most versions of Flash Player 4 and higher. The Speech codec is compatible only with Flash Player 6 and higher.
When sound is imported to a Flash document, it's added and displayed in the Library panel. You can assign sounds from the Library panel to a keyframe on a timeline. You can also use sounds with ActionScript.
Sounds can be assigned to the Up, Over, and Down states of a Button symbol.
The Sync options control how a sound will play in relation to the rest of the timeline.
Use the Loop setting in the Property inspector to multiply the length of the original sound.
Stream sounds force the Flash Player to keep playback of the timeline in pace with the sound.
Use a
stopAllSounds()action to stop all sounds that are currently playing in the movie.The Effect menu in the Property inspector contains useful presets for sound channel playback. You can perform custom edits with the Edit Envelope dialog box.
Global audio compression is controlled in the Flash tab of the Publish Settings dialog box.
Use the Sound Properties dialog box in the Library panel to customize the audio compression schemes of individual sounds.
The Sound Properties dialog box enables you to test different compression settings and to hear the results. The Export Settings section of this dialog box also provides useful file size information.
You can bring and export Variable Bit Rate (VBR) MP3 sound files into Flash without degrading the encoding; however, Flash itself cannot encode using VBR.