Controlling code hints and syntax coloring
Organizing and editing code
Using the Output panel
Knowing the Flash Debugger panel
Assigning breakpoints
Debugging a Flash movie remotely
External code files
Troubleshooting guidelines
Is there anything worse than sitting at your computer, scratching your head, utterly frustrated because something won't work as planned? Chances are it is something really minor. This chapter focuses on tools, methods, and techniques you can use to fix these sorts of problems.
Many problems can occur while you are creating your movie. ActionScript errors, movie structure and design components, and external technologies, such as XML and server-side processes, may cause problems. Debugging your Flash document can seem like an overwhelming task, but with the right tools, it's not as daunting. In this chapter, we review a few tools that can help you. At the end of the chapter you find a good practices list, troubleshooting guidelines, and testing matrices that you can use to sort out common issues and problems that often occur when you are developing with Flash.
Note
This chapter discusses techniques to optimize and debug ActionScript 1.0 and 2.0 Flash content. Refer to the Flash ActionScript 3 Bible (Wiley) and the Flash CS3 Help panel for more information about debugging ActionScript 3.0 content.
The Actions panel and Script editor in Flash CS3 is the primary place for adding interactivity to your movies, which you do by writing your own ActionScript code.
Note
Whenever you open or create an ActionScript file (.as) in Flash CS3, you are using the Script editor to type your code. You do not use the Actions panel whenever you edit an .as file in Flash CS3.
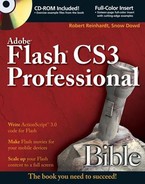
If you have code hints enabled when you are typing ActionScript, a pop-up window appears containing relevant syntax, method, and event completion tips. This very useful tool is helpful when you are writing ActionScript because it reveals the suggested syntax of the function or method. Flash CS3's code hints, however, work best when it knows what class of object you are addressing. For example, if you name your Movie Clip instance with an _mc suffix, the Actions panel knows that the object is a MovieClip object. When writing code, the most relevant action out of several suggestions is highlighted in the code hints pop-up menu, as shown in Figure 33.1.
If you press the Enter key at this time, the method or function is completed for you. The cursor is then positioned at the end of the line and a tooltip pops up, providing the necessary parameters for the function or method you are typing. As you type your code, the tooltip makes the parameter you are writing bold. Refer to Figure 33.2 for an example of the Code Hints tooltip.

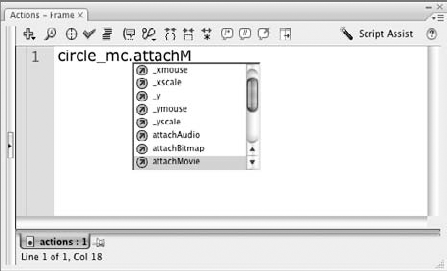
If you use ActionScript 2.0's strict typing for variable declarations, you can forego the use of suffixes for your instance names. Flash CS3 can automatically show you the code hints for a class of objects if you declare the object's type. For example, if you type the following code into the Actions panel, Flash CS3 knows that holder is a MovieClip object:
var holder:MovieClip = createEmptyMovieClip("holder", 1);Tip
If you're following along and typing this code into the Actions panel, notice that the Code Hints menu appears after you type the colon ( : ) following the holder term. This hint menu displays most of the class names available in ActionScript.
Then, if you refer to holder later in your code (as shown in Figure 33.3), the code hints for the MovieClip class appear.
Code hints remove a lot of the guesswork from writing ActionScript. Using this feature is often faster than traversing the massive list of nodes in the Actions toolbox. There are a few settings you can modify to customize the way code hints work and act.
We'll walk you through the options to customize code hints:
Choose Edit

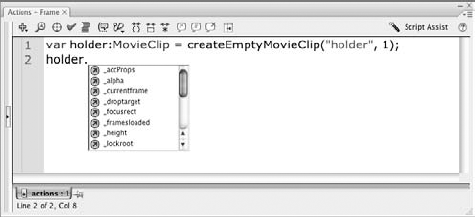
Select the ActionScript category. We will focus on the Editing options section.
Tip
You can also access this tab in the Preferences dialog box by selecting Preferences from the Actions panel options menu.
The Automatic indentation check box should already be selected. When you type code into the Script pane, this option controls how your code indents. Adjust the Tab size value to increase or decrease the spacing of the indentation.
Make sure the Code hints check box is selected in order to enable them. We recommend keeping the Delay slider at a value of 0 seconds, which makes the code hints appear automatically as you type. Refer to Figure 33.4 to see how the ActionScript Editor tab should appear.
If you prefer not to have Code Hints on all the time, you can invoke a code hint whenever needed. While typing your code in the Script pane, do one of the following:
Click the Show Code Hint button in the Action panel's toolbar.
Select Show Code Hint from the Actions panel options menu.
Press Ctrl+spacebar (Windows) or Control+spacebar (Mac).
Flash CS3 offers you the capability to choose how your ActionScript is colored. This feature is known as syntax coloring, and it helps to visually "divide" your ActionScript. There are many elements to ActionScript such as variables, functions, constants, and statements. Using syntax coloring makes it much easier to read ActionScript. Set up your Syntax color settings so that they are easy to read but also follow common "standards" in syntax highlighting.
Create a new Flash document by choosing File
Select the first frame of Layer 1 and open the Actions panel by choosing Window
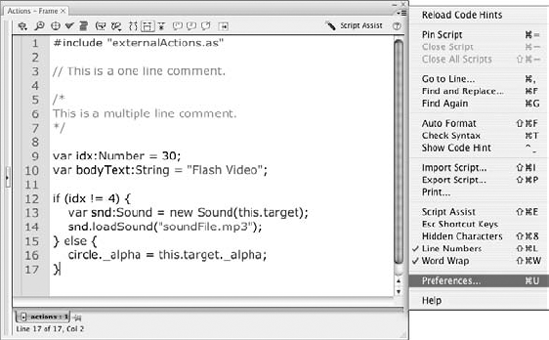
Enter the code shown in Listing 33.1 into the Actions panel. This code can be used for testing and modifying syntax coloring because it uses most of the different elements of ActionScript.
Example 33.1. Sample Code to Aid Syntax Color Settings
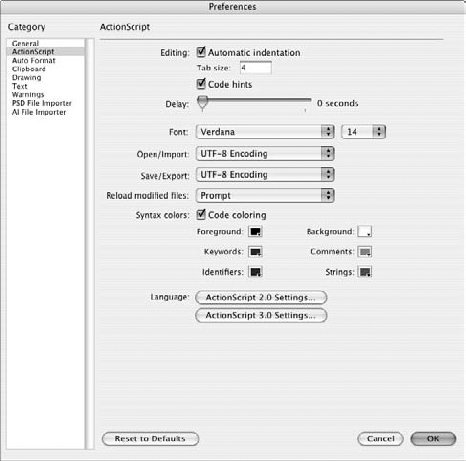
#include "externalActions.as"

// This is a one line comment.

/*
This is a multiple line comment.
*/

var idx:Number = 30;
var bodyText:String = "Flash Video";

if (idx != 4) {
   var snd:Sound = new Sound(this.target);
   snd.loadSound("soundFile.mp3");
} else {
   circle._alpha = this.target._alpha;
}
Open the Preferences dialog box (to the ActionScript tab) by selecting Preferences from the Actions panel options menu. See Figure 33.5.
Refer to the Syntax colors section in the ActionScript category. You can turn syntax coloring on or off by selecting or clearing the check box next to Syntax colors, respectively.
Select the Foreground color chip and choose black (
#000000) from the pop-up swatch menu. The Foreground option sets the default color of the text in the Actions panel. (Unless you changed this setting earlier, the default value should already be black.)Select the Keywords color chip and choose blue (
#0000FF) from the pop-up swatch menu. This blue color highlights all keywords such asvar, if, andelse.Select the Identifiers color chip and choose a medium green (
#009900). This color is used to highlight terms that are methods and properties of classes, as well as class names themselves.Set the Background color chip to white (
#FFFFFF). You should use white because it is likely you will spend hours at a time typing ActionScript, and black text on a white background has high contrast and is more forgiving on your eyes than a colored background might be. (Unless you changed this setting earlier, the default value should already be white.)Set the Comments color chip to a bright orange (
#FF9900). Most programming applications use a gray for the comment color. We have chosen an orange as we believe that commenting code is a very important (and often neglected) part of authoring (and learning) code. Using a more visible color helps comments stand out more easily from the rest of the code.Finally, select red (
#FF0000) in the Strings color chip. Red is a common color for strings in many programming packages that have syntax coloring.Click OK to close the Preferences dialog box. Make sure you have the Actions panel open and frame 1 of Layer 1 selected so that you can see the colors in use.
You can modify these colors if you prefer something different — the point of these steps is to illustrate where you can change the colors of your ActionScript code and visibly see those changes on the test code we provide.
In this section, we discuss methods and options for storing, writing, and positioning your code. In Flash CS3, there is often more than one way to perform the same action — if you don't thoroughly think about why and where to place your code, you can run into trouble quickly. Using the following methods and suggestions can help you avoid common mistakes.
Writing online applications in Flash often requires you to write a lot of code. While writing code, it is easy to name an object or variable without thoroughly thinking it through. Naming your objects and variables descriptively is a good idea. If you don't, you will find it hard to come back to your files and remember what each object and variable is intended for. Using Search and Replace enables you to easily rename poorly or improperly named variables or objects. It enables you to identify and change the incorrect string in one step, leaving Flash to replace all occurrences of the string.
However, there are traps when doing this. The following list contains points to remember:
If you change the name of a variable, you must also change each reference to the variable across all timelines.
Search and Replace replaces strings even if they make up a larger part of a code string. For example, the line
sou = new Sound();will be modified to the linesit = new Sitnd();when you replaceouwithit. So, if you use this feature, be mindful of the implications of searching for strings existing within other strings. A good method of avoiding this problem is to use a space whenever possible, remembering to replace the initial space with another in the replacement string. This step is necessary so your code formatting isn't modified.
Step through the following example to learn how to use Search and Replace to modify a block of code:
Note
You will find component_definition.fla in the ch33 folder on this book's CD-ROM. Copy this file to a location on your hard drive. We use this example code in a Search and Replace function.
Choose File
Select frame 1 of the actions layer.
Open the Actions panel (F9, or Option+F9 on Mac).
Open the Replace dialog box by doing one of the following:
Choose Replace from the options menu of the Actions panel.
Click the Find/Replace icon on the toolbar of the Actions pane.
Press Ctrl+F (Windows) or

Type [Author name] into the Find what field.
Type your name (for example, "John Smith") in the Replace with field. You will be replacing "[Author name]" with your name.
From here you can search for each instance of the string before choosing to replace it. To do this, click Find Next. However, if you want to simply replace all instances of "[Author name]," choose Replace All. For this example, choose Replace All.
Choosing Find Next is a good method for overcoming the problem when a string is found within a larger string. You can choose Find Next; when it finds the string on its own, you can replace it by choosing Replace. If it finds the search string within a larger string, simply choose Find Next to move forward.
Tip
You can also use the global Find and Replace feature in Flash CS3 to search your entire document for specific ActionScript terms. Choose Edit
There are several ways to position your code effectively, but first there are two considerations to make. On one hand, your code needs to be effective and work well; it must be positioned properly in order for the application to work successfully. On the other hand, you need to make the application easy to build and edit. It needs to be quick and simple in order to modify sections without being laborious and taking up valuable time better spent coding.
The project requirements also dictate how you place your code. We use the scenario that follows to explain some good coding concepts and how and where to place your code.
You are creating a coloring book aimed toward children. The requirements state the application must have a paintbrush tool with different brush styles and sizes, a line tool with different widths available and a stamp tool used to place user-defined images on the drawing canvas. Each of the tools has a corresponding button and a range of options used to modify the properties of the tool. The user clicks on the canvas to start drawing or stamping. Building this application would require a combination of different functions. Functions can be grouped into the following two main categories:
Multipurpose functions: A multipurpose function can be used many times and by more than one source. A multipurpose function should be written in the most generic way possible, but still meet its criteria. The coloring book application would benefit from a multipurpose function used to modify the cursor. For example, when the user clicks the line tool, the function
changeDrawingTool()might be called with the string"line"passed as the parameter. This function would then callchangeCursor()to handle the cursor being changed andmodifyOptions()to modify the options panel, which would reflect the current tool being used.Chain functions: The most effective functions are self-contained, perform one specific task, and can be used by many sources. However, there is an exception to the rule: chain functions. Chain functions group many other functions to perform several actions at once. Using chain functions enables you to write neater code and make it easier to understand.
An example of a chain function for the coloring book application would be
startDrawing(). This might call the following functions:getColor(), which gets the current color ready to draw;followMouse(), which is used to trace the path of the mouse; anddraw(), which actually draws the path to the canvas using values fromfollowMouse().A major benefit of using chain functions is you split up code into smaller chunks, which can then be easily accessed by other methods. For example, the
startDrawing()function could have all of the code from thegetColor(), followMouse(), anddraw()functions within it. However, it would make thegetColor()function inaccessible. This function could be used for more than one purpose. For example, if you passedred, green, andbluevalues to the function, it could set the color for the user, rather than just retrieve the value the user has set.Note
The Hangman game discussed in Chapter 32, "Creating a Game in Flash," uses many functions chained together within an organized event model.
Note
After you start to write more sophisticated code, such as chain functions, you may want to explore the concepts of true object-oriented programming in ActionScript. In this edition of the Flash Bible, we've gone to great lengths to replace many code examples with object-oriented design patterns.
There are many places you can write code in Flash: in a frame, in and on Movie Clips, and on buttons. Your code can interact with any other object within the current movie structure including all levels and nested objects. This makes ActionScript an easy language to use for referencing and modifying objects from anywhere within a movie structure. It also allows for poor coding placement, however. It is very important to take note of where you place your code. "Spaghetti code" is a common term to describe poorly placed code residing on multiple timelines and interlinked in an unclear way. It is quite easy to run into the trap of creating such code.
Centralized code is the key to making an application easy to use and edit. Centralized code does not necessarily mean all of your code should be written on frame 1 of the Main Timeline. Creating centralized code means making observations about what the code is being used for, where it applies, how often it will be used, and how many objects will use the code.
Creating centralized code is different for each project. Here is a list of key concepts to follow when centralizing your code:
Reusable code: Determine if a certain block of code is going to be reused by more than one object. If so, it is suitable for turning it into a function or a method, or possibly even a listener for objects that broadcast events.
Same code, multiple objects: If a block of code is going to be used across a range of objects, such as buttons, you should place the code in a function and execute it from each button.
Function parameters: Use functions to your advantage. If you have a block of code repeated across a number of objects referring to the objects' properties, you can centralize the code and make it much more manageable. Create a function in a central location and set up parameters to parse needed information about each object to the function. When you want to modify the block of code, you only need to do it once instead of on every object.
A naming convention is a method and style used to name objects, variables, frames, symbol instances, and many other aspects of Flash development. You can have different naming conventions for each area, such as frames and variables. However, you should keep this practice to a minimum and use it only if necessary. There are common naming conventions used by most ActionScript and JavaScript code writers. Here is a list of rules that you may use to help you to create a naming convention:
Alternate capitalization: The first word is entirely lowercase, all subsequent words start with a capital letter, and all spaces are removed. This method is also known as InterCaps or "camel case" and is used by many programming languages. ActionScript's predefined functions also follow this rule. A good example of this is the method name
createEmptyMovieClip()of theMovieClipobject — notice that the E, M, and C of this keyword are capitalized. This rule can be applied to objects, variables, frame names, and symbol instance names.Warning
Flash Player 7 and higher force case-sensitivity in ActionScript code, regardless of whether it's ActionScript 1.0 or 2.0. Be extremely diligent about adhering to your own naming conventions in code.
Descriptive: Creating successful names for your ActionScript elements is a careful process. The most effective names are descriptive, making them easy to read in context and easy to understand the next time you read the code. Try to shorten names as much as possible while keeping them descriptive. For example, a function used to get the current local time could be named
getLocalTimebecause it is descriptive and short.Class capitalization: Many coders don't use this rule, but it does help when you are creating large applications with dozens of variables, functions, and objects. You can capitalize every word of your class names rather than every subsequent word after the first. This makes it easy when you are coding to distinguish between variables and functions, or objects.
Acronyms: Using an acronym when you are creating global variables, functions, or objects is a great idea. This ensures when you mix your ActionScript with someone else's you won't have conflicting names. Your acronym should be short and have something to do with the project you are creating. For example, if you are creating an online e-mail reading/sending/writing program named FlashMail, you might want to add FM to all variable names, functions, and objects, such as
FMComposeNewMessage.
A particular problem with writing ActionScript is returning to your code to modify it at a later date — most of us don't have computer-like memories. Commenting your ActionScript while writing it is an excellent idea that overcomes this problem by helping you remember how the code is constructed and/or works.
It may take slightly longer to write your code with commenting, but it is worth the trouble. Follow these rules to effectively comment your code:
Blocks of code: You don't need to comment every line in your code. Rather than doing this, comment each block or the different sections of your code. If the ActionScript is obvious, such as setting a
MovieClipobject's X position to 10, you wouldn't write// Set the movie clip's position to 10. A more effective comment would be// Align the movie clip with other objects.Natural language and punctuation: Your comments should contain all punctuation and grammar, as if you are writing a formal letter. It is quite easy to write something that makes sense to you but not to others, but using punctuation ensures that your comments are easy to understand to everyone who reads them.
Be descriptive: It is important to be as descriptive as possible. This also helps you remember what your code is doing when you come back to it.
Multiline or single-line comments: There are two methods to comment in ActionScript. You can use
/* comment in here */or// comment here. The first method is used to create multiline comments; you can enter down to a new line and what you type will still be commented. The second method is used for single-line comments. A good practice is to reserve multiline style commenting for more important comments or if you want to catch the reader's attention.
As you have seen earlier in this chapter and other chapters in the book, the ActionScript 2.0 language can use strong data type declarations. If you are starting a project from scratch in Flash CS3 for Flash Player 6 or higher, we strongly recommend that you try to use ActionScript 2.0 and strong typing. If you're an experienced programmer, we'd further encourage you to use Flash Player 9 and ActionScript 3.0. Strong typing simply means that you declare variables with data types. If you try to perform an illegal operation with a specific data typed variable or object, Flash CS3 will inform you in the Output panel — this is a definite bonus for developers during the debugging process.
Add the code shown in Listing 33.2 to frame 1 of an otherwise empty Flash document. If you click the Check Syntax button in the toolbar of the Actions panel, you'll see the following error in the Output panel:
**Error** Scene=Scene 1, layer=Layer 1, frame=1:Line 1: Type mismatch in
   assignment statement: found Number where String is required.
     var nPercent:String = (nLoaded/nTotal)*100;
Example 33.2. A Sample Script Using Strong Data Typing
var loaded:Number = this.getBytesLoaded();
var total:Number = this.getBytesTotal();
var percent:String = (loaded/total)*100;
The error message tells you that the expression used to set the value of percent returns a Number data type, not a String. If you change the data type of percent to a Number, then the code will not return an error:
var percent:Number = (loaded/total)*100;
Declaring data types with your variable declarations forces you to think clearly about how your code will be used.
The Output panel is used to send messages and notifications while troubleshooting your movies. When you test a Flash movie file (.swf), Flash CS3 checks your ActionScript for syntax errors and sends any error messages to the Output panel.
Note
Many multimedia authoring applications, such as Macromedia Director, won't let you leave the script window until the syntax is correct. With Flash, it's entirely possible to write incorrect syntax within a block of code and close the Actions panel with the error intact. Flash notifies you, though, when you publish or test the movie if it finds an error.
The Output panel itself is packed with functionality, enabling you to do the following:
Print the contents of the panel.
Copy the contents of the panel to the Clipboard.
Save the contents of the panel to a text file.
Search for a specific string within the contents of the panel.
Clear the current contents of the panel.
These commands can be accessed via the options menu in the upper-right corner of the Output panel.
The Output panel is not only used by Flash CS3 to send syntax error messages to you, but you can also use it to view any data while testing a movie.
Using the trace() action can be a valuable tool when you debug your code. It is very simple to use and is sometimes better to use than the Debugger panel, which we discuss later in this chapter. Each time you call the trace() action, a new line is created and nothing is replaced. This makes it a great asset when you are debugging code such as for() loops. You can also save all data sent to the Output panel to a text file and review it later. A debugging session with the Debugger panel can't be saved.
Note
You can use the Output panel and the Debugger panel together to more effectively analyze every aspect of your Flash movie during testing.
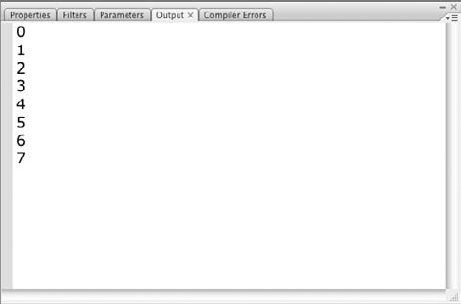
In this exercise, you create a simple frame loop and repeatedly send some information to the output window.
Open Flash and create a new Flash file (ActionScript 2.0).
Rename Layer 1 to actions.
Select the first frame of the actions layer and open the Actions panel (F9, or Option+F9 on Mac). Add the following code to the Script pane:
var count:Number = 0;
This code declares a variable named
count, with aNumberdata type. Its value is set to 0.Select frame 2 of the actions layer and press the F7 key to insert an empty keyframe. Select frame 2, and open the Actions panel. Insert the following code:
trace(count++);
This code will send the value of
countto the Output panel and then increment the value ofcountby one.Select frame 3 of the actions layer and insert an empty keyframe (F7). With frame 3 selected, open the Actions panel. Add the following code:
this.gotoAndPlay(2);
This action tells the Flash movie to constantly loop the second frame. As such, the
trace()action repeatedly sends messages to the Output panel.Test the movie to see the result of using the
trace()action by choosing Control
Warning
If you close the Output panel before closing the Test Movie window, it will continue to re-open because the trace() action will be executed the next time frame 2 is played.
Tip
You can slow down the rate of trace() messages for this example by changing the movie's frame rate in the Modify
Note
You can find this example, trace_loop.fla, in the ch33 folder of this book's CD-ROM.
The trace() action can also send expressions to the Output panel. In this example, you write an expression inside the trace() action and the result is sent to the Output panel.
Create a new Flash file (ActionScript 2.0).
Rename Layer 1 to actions, and select the first frame. Open the Actions panel (F9, or Option+F9 on Mac). Type the following code into the Script pane of the Actions panel:
var foo:Number = 5;
var bar:Number = foo;

trace(bar == foo);
The first line of this code declares a variable
foo, which is equal to 5. The second line declares a variable namedbar, which is equal tofoo. The expression inside thetrace()action uses the equality operator to evaluate ifbaris equal tofooand sends the result to the Output panel. The equality operator is used to compare two expressions. If the two expressions are equal, the result istrue. If they aren't equal, the result isfalse.Test the movie by choosing Control
Close the Test Movie window and the Output panel and add the following line of code to the end of the actions list:
trace(bar != foo);
This code uses the inequality operator instead of the equality operator in the expression. Again, the result is sent to the Output panel. The inequality operator is used to compare two expressions. If the two expressions aren't equal, the result is
true. If the two expressions are equal, the result isfalse.Test the movie again by choosing Control
Simulating the trace() action online
You can only use the trace() action with ActionScript 1.0 and 2.0 in Test Mode within Flash CS3, or when you use the Debugger panel with a remote Flash movie. You might like to use something similar to the trace() action when testing in a browser. Follow these steps to make a Flash/JavaScript version of the trace() action using a JavaScript alert dialog box:
Open Flash and create a new file by choosing File
Select the first frame of Layer 1 and enter the following code using the Actions panel. This code simulates a
trace()action. It uses a JavaScript alert dialog box to display any information you send to the alert function. When testing this in Flash CS3, a browser window is opened to display messages.function alert (alertString) { getURL("javascript:alert('" + alertString + "'),"); } alert("this is a test");Anytime you want to send an alert to the browser, use
alert("any text or expression in here").
Also, make sure the allowScriptAccess parameter of the OBJECT tag and attribute of the EMBED tag in HTML is set to "always" when you test the Flash movie and HTML locally. Otherwise, the Flash movie is prohibited from communicating with JavaScript. For more information on this Flash Player attribute, refer to Chapter 21, "Publishing Flash Movies."
Note
You can find the completed file, trace_expression.fla, in the ch33 folder of this book's CD-ROM.
Although these are simple examples, the trace() action can be used to send the result of almost any equation that can be written on one line to the Output panel, assuming all variables referenced in the expression have been predefined.
The Output panel is used for troubleshooting, displaying syntax errors, and viewing trace() action values. It can also be used to view all objects or variables currently in your movie.
The List Object and List Variables commands, available in the Debug menu of the Test Movie environment, are very useful when debugging large applications in Flash CS3.
List Objects: This command sends the current level, frame number, symbol names, Button, Movie Clip, or text field instance names, target paths, text blocks, and vector shapes to the Output window. The List Objects command displays the information in a hierarchal format. If you have five objects within a Movie Clip instance named
foo, each of these objects will be indented beneath thefoodeclaration.List Variables: This command sends all properties of any ActionScript objects, variables, and data currently in your Flash movie to the Output window. Functions are also listed when this command is executed.
Warning
List Objects is frame dependent. If frame 1 of a movie has different objects than frame 5, executing List Objects on each of those frames sends different results to the Output panel.
Tip
The data sent to the Output panel from the List Objects command is a little confusing. It reports a vector graphic as being a "shape:." However, a Graphic symbol is also reported as being a "Shape:." Hence, there is no way to distinguish whether it is a vector shape or a graphic.
Follow these steps to test the List Objects and List Variables commands:
Create a new Flash file (ActionScript 2.0).
Populate frame 1 with multiple objects, inserting a Movie Clip instance, a text field, a Button instance, a block of text (Static text), and a simple vector shape. You might try nesting some objects three or four Movie Clips deep to see the hierarchy of information within the Output window.
Test your movie by choosing Control
Choose Debug
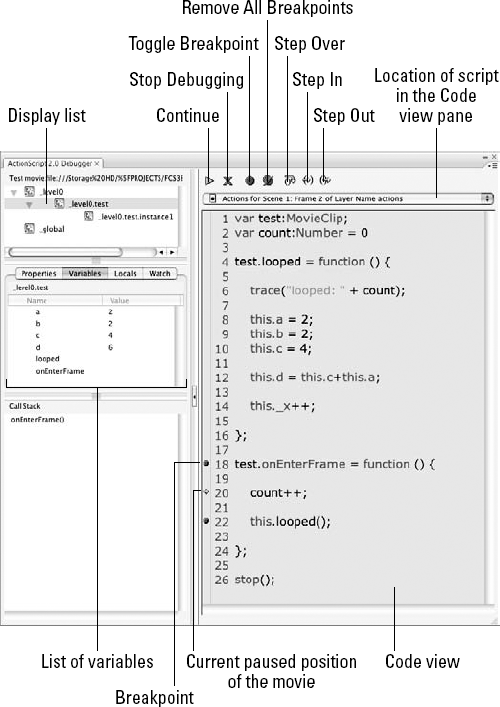
ActionScript has evolved as a language with each release of Adobe Flash. Indeed, if you're only starting to use Flash and ActionScript, it can seem quite overwhelming. Because there's so much you do with ActionScript, Adobe has included a Debugger panel (see Figure 33.7).
The Debugger panel enables you to find errors in your code while your movie is playing in the Flash Player. As well as debugging local movies in Test Mode, you can also debug remote Flash movies that reside on a server. The Debugger panel can be a valuable tool when you are testing your movie and solving problems.
To Activate the Debugger and test your movie, choose Control
While you are testing, you can use the Debugger panel to view or modify all variables in your movie. This is very useful because you will see the results of any change in a variable's value straightaway, as your movie is running.
Follow these simple steps to view variables in the Debugger that exists in your movie:
Note
You can find debugging_code.fla in the ch33 folder on this book's CD-ROM. Copy this file to a location on your hard drive. We will use it in the next few examples.
Choose File
Enter Debug mode by choosing Debug
Select Continue (that is, the play button in the toolbar of the panel) to start the movie playing.
Select the Variables tab. This is where all of the variables are displayed.
Select the
_level0.testMovie Clip from the Display list to see the variables that exist in that timeline.Select the
_level0target to see the variables change in the Variables tab.Note
Because there is a breakpoint added to the actions on frame 2, you need to press the Continue button each time the breakpoint is encountered during playback. Breakpoints are discussed later in this chapter.
Follow these simple steps to modify variables in the Debugger panel that exist in your movie:
Open the
debugging_code.fladocument.Enter Debug mode by choosing Debug
Select Continue to start the movie playing.
Select the
_level0target from the Display list.Select the Variables tab.
Double-click on the Value field for the
countvariable and enter 70 as its new value. When you click the Continue button, you will see how the value of thecountvariable increases to 70 and increments from there.Tip
All objects, either user defined or predefined ActionScript objects, will appear in the variable list. However, you can only change the values of some properties and variables.
Using the Debugger panel to monitor the value of multiple variables can get quite confusing, especially if you need to compare variables that exist on different timelines. Employing the Watch list is an easy way to monitor the value of certain variables in a manageable way.
After you have added a variable to the Watch list, you can view it regardless of which Movie Clip you have selected in the Movie Clip list.
There are two options for adding a variable to the Watch list.
Open the
debugging_code.fladocument.Start a debugging session by choosing Debug
Select Continue to start the movie playing.
Select the
_level0target from the Display list.Select the Variables tab to show all variables from the
_level0namespace.Right-click (Windows) or Control-click (Mac) on the
countvariable and select Watch. A little blue dot appears indicating that it is in the Watch list.Select the Watch tab to view the Watch list. You will see the
countvariable and its value change as you progress through the debugging session.
Alternatively, you can perform the following steps to add a watch to the Flash movie.
Repeat Steps 1 and 2 from the previous method.
Select the Watch tab.
From the Debugger panel's options menu, choose Add Watch. Alternatively, you can right-click (Windows) or Control+click (Mac) the empty area of the Watch tab and choose Add.
Double-click the new entry (
<undefined>) in the Named column and type in the correct path and name of the variable you want to watch.Warning
If you type in an incorrect path or variable name, the variable value will be undefined in the Watch list.
There are three methods to remove a variable from the Watch list. The first method involves the following steps:
Navigate to the variable using the Display list and the Variables tab.
Right-click (Windows) or Control+click (Mac) the variable you wish to remove and deselect the Watch command. The little blue dot will be removed.
The second method involves these steps:
Select the Watch tab.
In the Watch list, right-click (Windows) or Control+click (Mac) on the desired variable and select Remove.
Alternatively, the third method involves these steps:
Select the Watch tab.
Highlight the variable you no longer need and select Remove Watch from the Debugger options menu.
The Properties tab of the Debugger panel displays the properties of all the Movie Clip instances, including the Main Timeline (_root, displayed as _level0) in your movie. Follow these steps to view and edit movie properties while debugging.
Perform these steps to view the properties of any Movie Clip timeline in the movie:
Open a file that you want to debug.
Enter Debug Mode by choosing Control
Select a Movie Clip instance from the Display list. Choose something other than
_global.Select the Properties tab to view the properties of the selected Movie Clip instance. The properties that appear in a different color from the majority of the properties are read-only and cannot be changed.
Tip
For processor intensive Flash movies that use the drawing API, try changing the
_qualityproperty of the_level0timeline to "LOW" to see increased performance.
Perform these steps to edit a specific property of a timeline or object in the Debugger panel:
Follow Steps 1 through 3 of the previous exercise.
Double-click the Value field of the property you wish to alter and enter the new value.
Note
If you enter an incorrect value, such as a string when a number is required, the Debugger panel ignores the change, reversing the value to its last valid state the next time you reselect that Movie Clip instance.
Perhaps one of the most useful features of the Debugger panel is the option to set and use breakpoints. A breakpoint is a position in your ActionScript code that halts playback of a movie while you are in Debug mode.
Using breakpoints, the Debugger panel enables you to step through a block of ActionScript line by line. You can define when the Flash movie will halt and when it will proceed. You can choose to execute a function or to step through the function. Choosing to step through a function will halt your movie on every line of the function waiting for your action. This is very valuable and makes it easier to find (often simple) problems in your ActionScript.
Note
You can find the debugging_code_nobreaks.fla and debugging_code.fla files in the ch33 folder of this book's CD-ROM. Make a copy of this file to a location on your hard drive. This file is used in the next few sections.
You can set, delete, or remove all breakpoints in the Actions panel while authoring a Flash document.
Follow these steps to apply a breakpoint to a specific line of ActionScript code:
Open the
debugging_code_nobreaks.fladocument.Select frame 2 of the actions layer, and open the Actions panel (F9, or Option+F9 on Mac).
Place the cursor on line 18. The Debugger stops the movie at a line where a breakpoint exists, only executing the code before the breakpoint. Breakpoints should be positioned on lines where you think an error exists or just before the point where you think an error is occurring.
Do one of the following:
Click the gutter to the left of the line number.
Click the Debug Options button in the toolbar of the Actions panel (look for the stethoscope icon), and from its menu choose Set Breakpoint.
Right-click (Windows) or Control+click (Mac) the line of code and select Toggle Breakpoint. A red dot in the gutter indicates lines that have breakpoints, as shown in Figure 33.8.

Perform the following steps to delete a breakpoint from a line of code in the Actions panel:
Place the cursor on the line where a breakpoint exists.
Click the red dot in the gutter area. The red dot will be removed.
Tip
To remove all breakpoints from the code, follow Steps 1 and 2 and select Remove All Breakpoints instead of Remove Breakpoint.
Also, if you edit ActionScript files (.as) in Flash CS3, you can now add breakpoints within the file.
After you have started debugging your movie, you can add and remove breakpoints. You can remove a single breakpoint or remove all breakpoints.
Follow these steps to add a breakpoint in the Debugger panel:
Open a fresh copy of the
debugging_code.fladocument from this book's CD-ROM.Select frame 2 of the actions layer.
Enter Debug mode by choosing Debug
Before you press the Continue button on the Debugger panel, choose the actions for frame 2 from the drop-down menu below the toolbar of the Debugger panel. You should see the ActionScript code from frame 2 of the actions layer displayed.
Place a cursor on line 12.
Do one of the following:
Click the gutter area to the left of the line number.
Click the Toggle Breakpoint button in the toolbar of the Debugger, which will add a breakpoint if none exists on that line. (It will remove a previously defined breakpoint if one exists.)
Right-click (Windows) or Control-click (Mac) and select Set Breakpoint.
When the debugger reaches the line where you placed the breakpoint, it halts playback of the movie, waiting for your response.
After the breakpoint is set, click the Continue button. The debugger pauses the movie when the code execution reaches your breakpoint. When the breakpoint is reached, you can analyze various aspects of the movie in the Variables, Properties, and Watch tabs of the Debugger panel. You need to click the Continue button to resume playback of the movie.
To remove a breakpoint in the Debugger panel, follow these steps. This example continues from above. You should use the same file, so make sure you are still in Debug Movie mode.
Place the cursor on line 12.
Do one of the following:
Click the red dot of the breakpoint in the gutter area.
Click the Toggle Breakpoint button, which removes the breakpoint. If you push it a second time, the breakpoint will be re-set.
Right-click (Windows) or Control+click (Mac) and select Remove Breakpoint.
Warning
Changes you apply to breakpoints while using the Debugger panel in Debug Movie mode only exist for that debugging session. When you return to authoring mode, the breakpoints you added (or removed) during the debugging session will not be saved.
Using breakpoints and the Debugger panel, you can step through lines of your code while the movie is playing. This is a very powerful feature, enabling you to pinpoint the exact position of a problem in your code.
When you start a debugging session by choosing Debug
Note
Make a copy of the debugging_breakpoints.fla document from the ch33 folder of this book's CD-ROM.
Open the
debugging_breakpoints.fladocument. We built the ActionScript in this movie to demonstrate the process of stepping through lines of code.Debug the movie by choosing Debug
As the movie is initially paused, click the Continue button to start debugging. Refer to Figure 33.7 to easily locate the Continue button.
When the Debugger panel reaches the first breakpoint at the line
test.onEnterFrame = function (), it will stop and wait for you to choose an action. The little yellow arrow in the gutter indicates the current position of the movie.You can choose one of the following actions:
Step Out: If you are debugging inside a user-defined function, Step Out will cause the debugger to execute everything within the function and continue playing, until it reaches the next breakpoint outside of the function. However, if there is a breakpoint below the line where you have selected Step Out within the function, the debugger will halt the movie and wait for your action.
Note
If you click Step Out on a line that is not inside a function, it performs the same actions as if you had clicked Continue.
Step In: If you position a breakpoint on a line where a function is called, such as line 22 in frame 2 on the actions layer of
debugging_code.fla, the debugger will move to line 4 — the first line within the function you "stepped into." Click Step In to proceed to the next line in the function. Clicking Step In within a function will proceed and pause the movie to the next line, regardless of whether it has a breakpoint. Click Continue to move through the lines until another breakpoint is reached, skipping lines without one.Note
If you click Step In on a line that is outside of a function, it performs the same action as if you had clicked Continue.
Step Over: Clicking Step Over on a breakpoint tells the Debugger to ignore the line of code where the breakpoint occurs and moves the player to the next line of your code. If you choose Step Over on a line where a function is called, it moves to the next line and calls the function in the process.
Note
If you click Step Over on a line where a function is called and the function has a breakpoint inside of it, the Debugger will halt the movie at the breakpoint line.
Continue: Choosing Continue will start the movie playing until the next breakpoint is reached.
Stop Debugging: Selecting this option will stop the Debugger from processing the actions any further. However, your movie will still continue to play.
Toggle Breakpoint: If you click this button, it will turn the breakpoint off because one already exists on that line. You will need to click either Continue or Step In to advance the movie. However, the Debugger will not halt the movie at this line again as the breakpoint has been removed. Pressing Toggle Breakpoint a second time will set a breakpoint.
You can debug a Flash movie file (.swf) using the stand-alone, ActiveX, or plug-in versions of the Debug version of Flash Player 9. Debugging your file remotely is very useful if you have a Flash movie that references server-side scripts on your production server that only run properly when your Flash movie is running on the same server.
Note
You can find the debugging_code.fla file in the ch33 folder of this book's CD-ROM. Make a copy of this file on a location on your hard drive.
Note
You need a Web server to use this feature of the Debugger panel. If you have a Web server on your local machine, you can test your files there. Otherwise, you need to upload your files to a remote Web server.
Follow these steps to enable remote debugging and debug the example Flash movie file (.swf):
Open Flash and open the
debugging_code.fladocument.Open the Publish Settings by choosing File
Clear the HTML check box. You can test by directly referencing the Flash movie file (.swf) on your server — you don't necessarily need the HTML document to debug the movie.
Select the Flash tab of Publish Settings and select the Debugging Permitted check box. If you want your Flash movie to be protected from prying eyes, you should enter a password in the Password field. The password will not be hidden in the authoring document. Anyone who has access to the Flash document file (.fla) will be able to view the password.
Press the Publish button in the Publish Settings dialog box. This creates a Flash movie file (.swf) with debugging enabled. Flash also generates a Flash debug file (.swd). The Debug version of Flash Player uses this file when remotely debugging a movie. Both of these files should be uploaded to the same directory of your Web server.
Note
If you do not upload the .swd file, you can still debug remotely. However, you will not be able to step through the code, because breakpoints will be ignored.
Press OK to close the Publish Settings.
Open the Debugger panel by choosing Window
Enable Remote Debugging in Flash CS3 by selecting Debug
Upload the Flash movie file (.swf) and debug file (.swd) to your Web server.
Make sure Flash CS3 is open. Without Flash CS3 open, you will not be able to debug the movie.
In your preferred Web browser, open the remote Flash movie file (.swf). You must make sure the Debug release of Flash Player 9 is installed in the browser you choose. See the "Using the Debug version of Flash Player 9" sidebar later in this chapter.
The Remote Debug dialog box will open as soon as the Flash movie loads into the browser (see Figure 33.9).

Figure 33.9. The Remote Debug dialog box as it appears from the browser running the debugged Flash movie
Warning
If the Remote Debug dialog box doesn't open, it means that the Debug release of Flash Player 9 can't find the .swd file. You can still remotely debug your movie, but any breakpoints will be ignored. Right-click (Windows) or Control-click (Mac) any area of the Flash movie's stage and select Debugger from the player's contextual menu.
From the Remote Debug dialog box, select either of the following options:
Localhost: Select this option if the Flash CS3 authoring application is on the same machine that's running the remote Flash movie in the browser.
Other Machine: Select this option if the Flash movie file (.swf) you are debugging and the Flash CS3 application aren't on the same machine. In this case, you need to enter the IP address of the machine with the Flash CS3 application.
Tip
Don't lose sight of how powerful the "Other Machine" option is during debugging. If a movie is working correctly on your computer but not on an associate's machine, you can have your associate download and install the debug player. When your associate goes to the remote Flash movie in his or her browser, supply the tester with your machine's public IP address in the Other Machine field of the Remote Debug dialog box. Your machine must have Flash CS3 running, and it must not be behind a firewall in order for the debugging session to work properly. Note that the tester does not need to have Flash CS3.
After the Flash movie file (.swf) and the Debugger have successfully connected, a password prompt appears. Enter the password and select OK.
Note
If you didn't enter a password when you published your Flash movie, leave the password field blank and click OK.
You are automatically taken into Flash CS3. You can start debugging just as if the movie was running in Debug Movie mode on your computer. The only difference is that you will need to switch back and forth between the Web browser and Flash CS3 to see any visual changes in the Flash movie.
Using the Debug version of Flash Player 9
Two versions of Flash Player 9 ship with Flash CS3: the Debug version and the release version. When you enter the Debug Mode of Flash CS3 by choosing Debug
In order to debug a remote .swf file, you need to use the debug version of Flash Player for your browser. You will find it in the following directory: <Flash CS3 program directory>PlayersDebug. Run the appropriate installer for your preferred browser.
In <Flash CS3 program directory>PlayersRelease, you will find the Release version of Flash Player 9. You can reinstall the original plug-in (without the debugging features) at any time.
Periodically, Adobe may release updates to both the Debug and Release versions of the Flash Player. Check www.adobe.com/support/flash for updates.
Macromedia has successfully deployed Flash Player technology over the years. You can now find the Flash Player on many platforms, including Windows, Mac, and Linux, but it also exists on devices such as the Pocket PC (PDA handhelds), mobile phones, and the Sony PlayStation.
With the availability of the Flash Player on many platforms and devices, it is very important that you test your Flash movies across all possible mediums. Thoroughly testing your movie on multiple player versions is a crucial step in planning a successful application built with Flash CS3. Doing this can save you much trouble further down the road if your application is more successful than you initially planned.
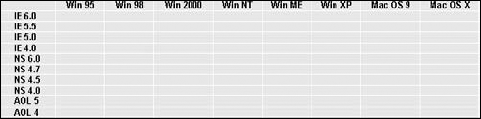
Figure 33.10 shows an example of a testing matrix. Such matrices should be used before a launch of any commercial application. Testing across all of these different configurations can be a little time consuming but it ensures maximum compatibility of your application. There is little point to releasing a product that doesn't correctly work for your target audiences.
Regular testing of your product, both at the end of the development and especially during the development cycle, will ensure an easier transition from development to release.
Flash CS3 is easily extensible; there are various areas in which you can place code. This can be the cause of major problems — because there are many available options, you need to make sure the code is correctly placed so your movie is manageable and easy to use. In Flash CS3, you have the option to store your code in an external .as file.
Once you have an .as file to use in a project, it is easy to make the ActionScript within the file available to your movie. The #include command is used to load any code from an external file and put it in the Flash movie file (.swf) published or tested by Flash CS3. If you edit the .as file included in your movie, the changes will not automatically become part of an already published Flash movie file (.swf). The #include command is only executed at the time you publish or test the .swf file.
This simple example shows you how to include an external ActionScript file in a movie.
Note
You can find externalActions.as in the ch33 folder on this book's CD-ROM. Make a copy of this file to a folder on your hard drive. externalActions.as contains a trace() action that will appear in the Output panel once you have entered Test Mode.
Create a new Flash file (ActionScript 2.0).
Save the Flash document to the same location on your hard drive where you copied the
externalActions.asfile.Select the first frame of Layer 1 and open the Actions panel (F9, or Option+F9 on Mac). In the Script pane, type the following code:
#include "externalActions.as"
Warning
Do not include a semicolon after the
#includedirective, such as#include "externalActions.as";. Doing so results in a compiler error, preventing the file from being included in the Flash movie.Test the movie by choosing Control
Now that you know how to use the #include directive, you can start to store larger amounts of code within .as files. One of the primary benefits of using .as files is that you can easily share the same ActionScript code from one Flash document to another.
Note
Read Chapter 31, "Applying HTML and Text Field Formatting," to see more Flash documents that use the #include directive.
Warning
Don't confuse the #include directive with the import keyword in ActionScript 2.0 code. You can think of the #include directive as a copy and paste of the code from an ActionScript file (.as) into the current script shown in the Actions panel. The import keyword, however, simply loads an ActionScript 2.0 class into the ActionScript compiler so that it can check for errors within your code. For example, if you use the #include directive in several places throughout your Flash document's actions, then the referenced document is inserted into those places when you publish or test the .swf file. With an imported class file, however, the code is only stored once within the Flash movie.
If you prefer not to use the #include command to incorporate the code in your Flash movie file (.swf) at runtime, you can simply import the file directly into Flash 8 using the Actions panel.
Note
Continue to use the externalActions.as file for this exercise.
Open Flash CS3 and create a new Flash document.
Save this file to the same location as the
externalActions.asfile.Select the first frame of Layer 1 and open the Actions panel (F9, or Option+F9 on Mac).
Select Import Script from the options menu of the Actions panel.
Browse to the folder where you saved
externalActions.as, highlight it, and click OK. Flash CS3 will import the file and put it in your movie.Warning
When you import ActionScript from a file using this method, the contents of the Script pane will be overwritten and replaced with the contents from the ActionScript file.
Tip
Flash CS3 does not parse the file and check for incorrect syntax when importing. You should check the syntax of the code once it has imported to make sure it is correct. To do this, choose Check Syntax from the options menu of the Actions panel.
Just as you can import the contents of an external file, you can export the contents of the Script pane to an .as file. This will enable you to take advantage of the editing capabilities in the Actions panel while still leveraging the usefulness of external ActionScript files.
Open a Flash document that contains some ActionScript code. You can use the
debugging_code.fladocument from the exercise earlier in this chapter.Select a frame containing ActionScript code, and open the Actions panel.
Select Export Script from the options menu of the Actions panel.
Save the new .as file to a preferred location on your system.
When working with a team of developers on one project, it can get quite difficult to manage the development of an application. Many "newbie" applications are built within one .fla file, which poses a problem because only one person can work on the file at any given time. It can become very confusing and file versioning errors may occur.
A great way to reduce dependency on other team members is to break the .fla file up as much as possible. This may include breaking a project into several Flash document files (.fla), which are then combined using the loadMovie() method command at runtime. Another effective method is to use external code files for storing data. For each block of code performing a separate task, or each custom object you are using in your application, you can store the ActionScript in an external file. This makes it easy for many people to work simultaneously on one application.
Note
For more information on Flash project management, see Chapter 3, "Planning Flash Projects." This chapter discusses the Project panel featured in Flash CS3.
With Flash CS3, you can build ActionScript routines (and even your own custom classes) suitable for re-use across a variety of situations. For instance, you may have a block of code that you use to initiate a connection to a server-side script, or an Adobe Flash Media Server application. Storing such code in external code files is an easy way to include them in your next project without much effort.
An ActionScript library is a set of code used for a specific purpose. It can be any block of ActionScript, from simple variable declarations to more advanced ActionScript objects. This sort of code is well suited for being stored in an external text file, and easily included in many projects.
Note
It's beyond the scope of this chapter to discuss the use of custom class files. Refer to Chapter 32, "Creating a Game in Flash," for an example of a Flash document that uses ActionScript 2.0 classes.
Troubleshooting problems with a Flash movie can be quite difficult. Depending on the complexity of your movie(s), it can be quite involved. The two main areas where you can experience problems with your movie are as follows: the structure and design of your movie, or your ActionScript code. However, this can be extended to other technologies your movie may use. For example if you use a Web server that relays XML data back and forth, the problem could lie in the connection and processing of data and may have nothing to do with the Flash movie. Similar issues can exist if you're using Flash Remoting or Flash Communication Server applications. We have compiled these troubleshooting checklists to help you solve some problems that may occur during your Flash development.
The following list will help you alleviate the need for troubleshooting your movie and prevent many problems from occurring:
Planning: Planning can be a tedious task. However, it can also be the start to a very successful project. If you plan your project from start to finish, you can pinpoint potential problem areas before you have even begun.
Note
We are not referring to a time schedule, but the processes and methods you use to satisfy the requirements of a project.
Incremental file saving or version control software: A major problem may arise in your movie that can slow production. It may be easier to revert to the last saved version in your movie. This can be an easy task by incrementally saving a new copy of your movie at each milestone.
Note
We strongly suggest using version control solutions such as CVS (Concurrent Versioning System) or SVN (Subversion), both of which are open-source client/server solutions. Version control software enables you to "check out" a set of files, make updates, and then check the files back into an account on the server. These systems enable you to check the same file in iterations, without the hassle of renaming the file each time you store (or commit) the file to the system.
If you don't have the time to learn and integrate a version control solution, we suggest using the file name_version number naming convention as a useful naming structure. Some examples of this convention are
movie_01.fla, movie_02.fla, and so on.A milestone should be considered a significant point in your project — a step closer to completion of your project.
Regular testing: While you create your movie, you should start testing early in the development process. Regular and thorough testing can help point out problems that may occur down the track.
Not only should you test regularly, but you should also test in the target environment. (You can use the testing matrices we discussed earlier in this chapter.)
Comments: When you write ActionScript code, you should comment each function or block of code. Many problems can arise as a result of simply not remembering what each function or block of code does. Without comments, you might accidentally skim over the exact trouble location because you can't remember what the function does or how it works. Comments should be short and concise, going into detail if necessary.
Not only should you comment your ActionScript, but you should also comment your frames. Have a layer named "comments" in your movie. On any given keyframe of this layer, place a comment in the Frame Label field of the Property inspector to remind yourself what a particular frame does or is used for.
Naming conventions: Make sure all aspects of your movie are named properly, including ActionScript. Make sure you've given each function a descriptive name. This should also be applied to variables and objects. Your naming conventions should extend beyond ActionScript; you should name each layer, scene, and symbol descriptively.
Rest: If you find a lot of simple problems occurring, chances are you are just tired and overworked. A lot of problems arise when you are mentally exhausted. Often the best thing to do is get some sleep and come back refreshed. Typos are a common problem when you get tired. Take regular breaks also — they really do help.
The following is a list of guidelines that you should follow when you are not too sure where your movie is faulting. Both developers and designers should read these general guidelines; often, simple mistakes cause problems in your structure and ActionScript.
Locked, hidden, or Guide layers: A common problem occurs when you accidentally lock or hide a layer. It is easy to overlook ActionScript that resides on an object that you can't see, due to the layer being locked or hidden. Also, any object residing in a Guide layer will not be included in the generated .swf file.
Warning
ActionScript code on a Guide layer will be exported with your Flash movie. If you're intentionally using a Guide layer to prevent elements on that layer from being exported, make sure you don't have any conflicting ActionScript on any keyframes of the Guide layer.
Naming conflicts: It is quite easy to give multiple objects the same name. This can occur in ActionScript or in naming frames and objects. A good practice is to make sure that each variable, function, object, and property has a unique name.
allowScriptAccess: When working with Flash movies in combination with JavaScript or VBScript, theallowScriptAccessattribute of the<embed>and<object>tags in HMTL has to be set to true. Without it, Flash movies cannot communicate with JavaScript. You can learn more about this type of interactivity in Chapter 22, "Integrating Flash Content with Web Pages."
This checklist is a simple guide to problems relating to the structure and layout of your movies.
Graphics or Movie Clips: Problems occur when you think an object is a Movie Clip but it is really a Graphic symbol. You can't name a Graphic symbol or reference it in ActionScript code.
Edit mode: It is quite easy to become confused as to which timeline or editing mode you are in. You may think you are editing on the Main Timeline, when in fact you are two timelines deep.
Action placement: Be sure you haven't confused the type of action you're using on a particular object. There are three types of action modes in Flash 8: Frame, Movie Clip, and Button actions. Often, these are confused and become a problem. For example, you may accidentally add actions to a keyframe when you mean to add them to a Movie Clip instance.
Note
While not related to ActionScript or coding, a common bitmap problem that designers encounter is bitmap shift, where a bitmap image appears to be in a different X and Y position at runtime than it appeared on the Stage at author-time. You won't likely see bitmap shift occurring in Flash Player 7 or higher. See the tech note at Macromedia's site:
www.adobe.com/support/flash/ts/documents/bitmaps_shift.htm
This is a list of common problems that may occur when you are writing ActionScript. Problems in your project can spread far and wide; these might also be caused by one or more trouble areas that we covered in the general or designer guideline sections. It is to your advantage to read all the troubleshooting areas to maximize your chance of solving problems.
Object and frame label names: Make sure you have correctly named your objects and frame labels using the Property inspector. Doing this can alleviate many problems, which may be caused by a poor naming structure. Names are case sensitive in Flash Player 7 and higher! As such, make sure you have the name correct, both on the frame or object and in your ActionScript code where you are referencing the frame or object.
Paths: When referencing objects, frames, or variables, make sure you have the path correct. It can be quite confusing using relative paths such as
thisand_parent, and this can often be the source of major problems.Tip
You can use the Insert Target Path button in the Actions panel to help target nested Movie Clip instances. See Chapter 19, "Building Timelines and Interactions," for more details.
Conflicting namespaces: When creating an object or declaring a variable, make sure it isn't the same as a predefined object or variable name in ActionScript. Likewise, make sure you have unique objects and variable names.
Conflicting frame actions: Many simple problems are caused by conflicting frame actions. You may have a
stop();action on Layer 1 at frame 20 and aplay();action on Layer 2 at frame 20, which would stop your movie from stopping. As such, you should keep your actions on one layer per timeline. For more information on this topic, see the sidebar "Layer order and execution order" in this chapter.Layer order and execution order
The order of your layers determines the order in which your ActionScript is executed. If the layers are not ordered properly, it can cause problems in your ActionScript code. Follow these steps to set up an example to illustrate this problem:
Open Flash CS3 and create a new Flash file (ActionScript 2.0).
Choose Insert
Open the Actions panel by choosing Window
Select frame 1 of the top layer and enter this code:
var i:Number = 20;.Select frame 1 of the middle layer and enter this code:
var i:Number = 30;.Select the frame 1 of the bottom layer and enter this code:
trace(i);.Test the movie by choosing Control
Drag the topmost layer beneath the second layer, so you have reversed the
ideclaration order.Test the movie by choosing Control
The layer order specified on the Flash tab of the Publish Settings dialog box also controls the order in which Flash draws the layers over a slow network or modem connection.
Confining the problem: Make sure the problem exists with the Flash movie. When you work with server-side elements, the problem could be on the server. You may have a problem with the connection or with database information being passed back and forth. Make sure you test your server-side scripts for errors also. Oftentimes, developers will create non-Flash interfaces in HTML to test the functionality of server-side elements to isolate any problems before integrating the same data with a Flash movie.
Strings or expressions: A common problem is using a string when an expression should be used and an expression when a string should be used. When you are writing code in the Actions panel, make sure you have quotes when you are writing a string and no quotes when you are referring to an object, function, or variable. For example,
trace(test);will try to send the value of test to the Output panel, rather then send the string "test" to the Output panel.
There are many Web sites out there built solely for the Flash community. You should leverage from the huge knowledge base available at these Web sites. Post your messages in forums and mailing lists; more often than not, others have come across the same problems. Most of these sites also offer a huge resource — downloadable open source code — which you can peruse to work out how certain tasks are performed.
These resources are invaluable and an excellent way to learn more about Flash. However, you should download the examples and figure out how they work. If you simply download them and use them, you won't learn anything. Trying to understand them and working through all of the code is an excellent method for learning Flash.
The following list of excellent Web sites is devoted to the Flash community:
FlashSupport:
www.flashsupport.comCommunity MX:
www.communitymx.comUltrashock:
www.ultrashock.comMoock.org:www.moock.orgPerson13.com:www.person13.comFlash Kit:
www.flashkit.comWere-Here.com:www.were-here.comActionScript.com:www.actionscript.com
Note
We'd like to know what you think about this chapter. Visit www.flashsupport.com/feedback to send us your comments.
Use code hints in the Actions panel to help you determine the correct syntax for your ActionScript code.
While you develop an application, testing regularly — including testing on target mediums — can make the difference between a good application and an excellent application. You should get in the habit of testing the test matrices to ensure that your product will perform on most commercially available and accepted programs and platforms.
You can often remove the need for troubleshooting through regular testing. However, if you think a problem lies within your ActionScript, use the Debugger in combination with the Troubleshooting guidelines to find and fix the problem.
When you create code-intensive projects, use the Debugger regularly; you can use Breakpoints effectively and to your advantage. Using Breakpoints regularly to debug your code is often the most effective method because of its flexibility and ease of use.
You can design and use your own testing matrices if the ones that we provide in this chapter aren't conclusive enough for your platform. You may need to update the testing matrices over time as the Flash Player becomes available on more platforms.