Understanding Flash text field types
Creating text boxes and choosing text types
Using the Property inspector to specify styles and alignment
Applying live filters to create text effects
Controlling font export and display
Using font symbols and shared libraries
Troubleshooting font management
Reshaping and manipulating text characters
For designers who love fonts, Flash is a dream come true. Even if you never plan to animate anything, you may want to use Flash simply to see your fonts displayed how you want them, wherever and whenever you need them on the Web. Of course, there are a few exceptions to this unequivocal freedom, but Flash has options that give you text styles to meet nearly any project criteria.
Because Flash is a vector program, it enables you to integrate most fonts within the movie without any fuss. For standard text content, this means that fonts don't have to be rendered into bitmap elements—the .swf files that Flash publishes (or exports) will include all the necessary information for the font to display properly on every browser as long as the Flash Player is installed.
In this chapter, we introduce the various text types available in Flash and explain how and why they are used. This chapter also covers some basic font management issues and offers strategies for handling fonts in your project files (.fla) as well as in your published movies (.swf).
Flash includes some nifty Static text options for handling vertical and right-to-left-reading text. We will show you these options, along with the other character and paragraph controls and the live filters available in the Property inspector. In this chapter, we will also touch on some features for optimizing text and working with international character sets in Flash.
Typography is the formal term for the design and use of text. Although Flash has the capability to deliver finely designed typography to your audience, this is no guarantee that it solves all type design challenges. Unfortunately, no matter how well Flash renders text, it can't disguise bad design or make up for a designer's lack of knowledge about working with type. As with color, sound, animation, or any other specialized area of production, the amount you can learn about typography is really only limited by your interest.
Although many people can get by without ever studying typography formally, they are missing the chance to leverage one of the most powerful and complex tools of graphic design. Computers have changed the way that final designs are created, but they have not changed the fundamental principles and uses of typography. The best part about studying typography is that your knowledge will be equally useful no matter what medium or digital tool you are working with.
Because type is such an important and long-standing aspect of design, there are innumerable resources available to guide and inspire you. Just wander through the graphic design section of any bookstore or do a search online for typography, and you will find something that can introduce you to the basics or help develop the skills you already have.
This chapter includes some common typography terms that are familiar to most people who have designed with text. Although a more detailed explanation of the source and meaning of these terms is beyond the scope of this book, you will be able to follow visually how things like tracking and leading apply to text in Flash.
If you are unfamiliar with typography, here are some excellent resources to get you started:
The Elements of Typographic Style by Robert Bringhurst (Hartley and Marks Publishers, 2004): This is a manual of typography and book design that concludes with appendices of typographic characters, currently available digitized fonts, and a glossary of terms.
Jan Tschichold: A Life in Typography by Ruari McLean (Princeton Architectural Press, 1997): This is an inspiring and informative biography of the life and work of one of the most influential masters of modern typography.
Type in Use: Effective Typography for Electronic Publishing by Alex W. White (W. W. Norton & Company, 1999): This book offers a concise primer on the history of publication design and includes many useful examples of effective strategies for designing pages with type.
The End of Print by Lewis Blackwell and David Carson (Chronicle Books, 2002) and David Carson 2ndsight: Grafik Design after the End of Print by Lewis Blackwell (Universe, 1997): These colorful books chart the creative evolution of one of the most legendary mavericks of contemporary graphic design who has become an inspirational teacher and lecturer.
Flash allows you to include text in your projects in a variety of ways. Often one Flash project will contain several different text types, each suited to a specific kind of content. We describe the steps for creating text boxes and editing type later in this chapter, but will begin here with an overview of the three main text types used in Flash:
Static: Static text boxes are used for display type or text content created at author-time (in the .fla), that won't change at run time (in the .swf).
Dynamic: Dynamic text fields are used to hold text content that is generated at run time from a live data source, or text that will be updated dynamically, such as weather information or sports' scores.
Note
Even if your text content is not auto-updated, there are benefits to storing and editing text in a format such as .XML that can be loaded into Flash without having to open or republish the .FLA file. This workflow is described in Chapter 30, "Sending Data In and Out of Flash."
Input: Input text fields are exactly what they sound like, fields created for text that users enter at runtime. You use input text fields whenever you need users to do things such as enter passwords or answer questions.
Note
For the purpose of brevity, we often refer to both Dynamic and Input text fields as editable text fields because both text-field types can be modified at runtime (unlike Static text boxes, which can be modified only at author-time).
Note
You will find examples of text field styles in the textSamples.fla file in the ch08 folder on the CD-ROM.
The Text tool is used to create text boxes and to enter and modify type. When you first create a text box in Flash, the default text type is Static, but you can assign it a different text type in the Property inspector at any time. Subsequent text boxes are automatically assigned the type style you have selected most recently. This makes it quicker to create a series of text boxes of the same type, but it means you should double-check the settings if you need text boxes of different types.
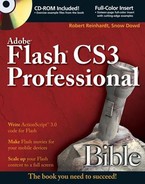
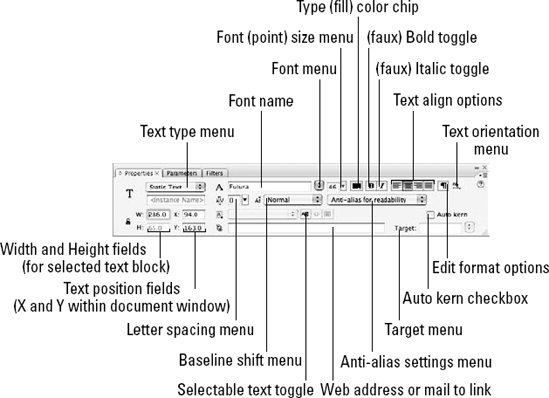
Figure 8.1 shows the basic controls that appear in the collapsed Property inspector when the Text tool is selected from the Tools panel.
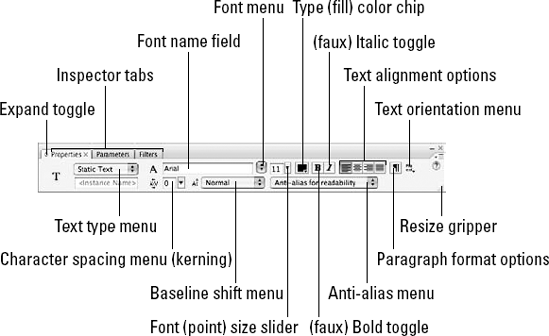
Figure 8.1. The basic text options that appear in the (collapsed) Property inspector when the Text tool is active or a Static text box is selected on the Stage
Note
To switch views in the Property inspector from Properties to either Parameters or Filters, simply click the relevant tab if the Property inspector is open or use the Window
Although the term Static text sounds limiting, this type of text box actually offers the most design options at author-time. Static text boxes can be scaled, rotated, flipped, or skewed, assigned alpha levels, and modified with filters while preserving editable text characters. Static text can also be animated or layered like any other graphic element in Flash. By default, Flash embeds the outlines for any fonts used in Static text for display on other machines, but you may also choose to specify a generic device font to reduce the size of your final movie or to eliminate antialiasing (or smoothing) on small text.
Tip
An improved rendering engine that was introduced with Flash Player 8, and precise authoring controls in the Property inspector, make it easier to find a setting that renders smooth, legible text, even at small point sizes. If it turns out that you still prefer aliased text, simply choose the Bitmap text (no antialias) setting from the drop-down menu and you will get the same result as you did with the Alias text button in Flash MX 2004.
The Link entry field is another helpful feature in the Property inspector that allows you to select sections of Static or Dynamic (horizontal) text and enter a URL to create a text link to a Web page or to an e-mail address in your Flash movie without any additional coding.
By default, Static text boxes are horizontal, and they can be either expanding boxes, which allow you to keep typing along one line as it extends to fit the type, or fixed-width boxes, which constrain your text box to a set width and auto-wrap the text to fit. These two types of text fields look the same when you select them by clicking once with the Selection tool, but when you double-click, you can see the text box handle icon that indicates the current behavior of the box. Figure 8.2 shows the respective icons for expanding, or label, text and for fixed-width, or block, horizontal Static text.
Figure 8.2. The handle icons for expanding (left) and fixed-width (right) horizontal Static text boxes
Tip
All text boxes and text fields in Flash have handles that make it possible to resize the text area just by clicking once with the selection tool and then dragging one of the handles. Scaling the text area does not change the size of the type as it does in some other applications.
Static text boxes in Flash include the option for left-to-right-reading or right-to-left-reading vertical text boxes. Have you ever wanted a line of text characters to stack vertically, but found it tedious to use a hard return between each letter? Thanks to vertical text, you can easily switch your type alignment from horizontal to vertical, with characters that are either stacked or rotated. This eliminates the headache of trying to read sideways while editing type—with a simple menu choice you can switch from vertical to horizontal and back again with no hard returns or freehand rotations required. Figure 8.3 illustrates how the vertical text and rotate text options change the orientation of Static text.

Figure 8.3. Vertical text box orientations: (A) vertical expanding, (B) vertical fixed-height left to right, (C) vertical fixed-height left to right with rotate option, (D) vertical fixed-height right to left, and (E) vertical fixed-height with rotate option
Aside from giving designers authoring in English more options for cool layouts, this feature makes Flash much friendlier for designers authoring in language sets that require vertical or right-to-left character flow. As we describe in the "Vertical text options" section later in this chapter, you can modify the alignment of vertical text to anchor it to the top, center, or bottom of the text box.
Although the default orientation for text in Flash is horizontal and left to right, you can modify the Vertical text settings in the Text category of the Flash Preferences dialog box, as shown in Figure 8.4 (File

Editable text, like Static text, begins as a block, but when it's converted to Dynamic or Input behavior, these editable text boxes are referred to as text fields. Think of an editable text field as an empty window with a name attached to it. When text or data is sent to the Flash movie (.swf), it is sent to a specific named text instance, which ensures that it will be displayed in the proper window or editable text field. Dynamic text fields can display information supplied from a database, read from a server-side application, or loaded from another Flash movie (or another part of the same Flash movie).
Because Dynamic text fields are generated or edited on the fly (at runtime), there are limitations on how much you can control the appearance of the text at author-time. You cannot apply special formatting or shape modifications (such as skewing or kerning) directly to Dynamic text fields. However, Flash recognizes Dynamic text field instances the same way other Movie Clip instances recognize Dynamic text field instances, so you can assign a name to a Dynamic text field instance and use ActionScript to control its appearance.
Note
All editable text fields are recognized as nameable instances of the Text Field object. You should only use variable names to identify editable text fields for backwards compatibility with legacy versions of the Flash Player (Flash Player 5 or older), and the variable name or var attribute of a text field should not be the same as its instance name.
You can author Dynamic text horizontally in expanding or fixed-width fields, but you cannot rotate or modify it with the Vertical text option. Figure 8.5 shows how a Dynamic or Input text field will display when it's unselected (A) and how the field type is indicated by the handle icons when the text is double-clicked. If you plan to work with multiline text fields, but you have limited space for the text, you can set the text field behavior to scrollable in the Text menu (Text
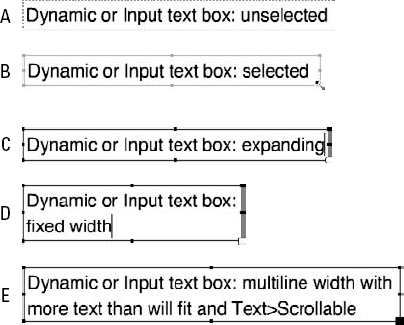
Figure 8.5. An unselected Dynamic or Input text field is indicated in the authoring environment by a dashed outline (A); when selected, you can adjust the size of the field by dragging any of the handles on the blue outline (B); when double-clicked for editing, the field displays either an expanding handle icon (C), or a fixed-width handle icon (D); and if the text field is set to be scrollable, the square handle changes from white/empty to black/filled (E).
When the Render text as HTML button in the Property inspector is toggled on, Flash recognizes rich text formatting, such as links and font styles indicated in Dynamic text with HTML tags, and applies them when the text is rendered in the Flash movie (.swf).
Tip
If you change the size of an expanding text field by dragging one of the selection handles, the field automatically converts into a fixed-width text field. To change a fixed-width text field into an expanding text field, double-click the square fixed-width handle icon.
Although Flash is neither an illustration program, like Illustrator, nor a traditional page-layout program, like InDesign, its text-handling capabilities are robust and easy to use. While you can create nearly any style of text directly in Flash, you can also import text created in other applications as vector artwork. With compatible applications such as Illustrator and FreeHand, you can even preserve your type as editable text boxes when it is imported to Flash.
The Text tool, shown in Figure 8.6, delivers a broad range of control for generating, positioning, and modifying text. Although the Text tool is located in the Flash Tools panel, when the tool is active, the controls for working with text are in the Property inspector.
To create text in your current Flash document, click the Text tool in the Tools panel (or press T on your keyboard) to activate it. You may choose to create new text in your Document window with either of two methods:
Label text: To enter text on one extending line, click on the Document Stage and begin typing. To control the width of a line of label text, you can either enter hard returns with the Enter or Return key as you type, or you can convert the label text into block text by dragging any of the handles to a specific width or height—the round label text icon will change to a square block text icon to indicate that the box is now constrained.
Tip
If your text continues beyond the viewable area of the Document window, you can add some line breaks, click and drag to move the label text box, or choose View

Block text: To define the area that will constrain your type by auto-wrapping as you enter more characters, click on the Document Stage and drag the text area to the width that you want. You can change the width of your block text at any time by dragging the handles that appear when the text area is selected or in Edit mode. Refer to Figure 8-2 (right image) for an example of the square box text icon.
Tip
Convert a text block into label text by double-clicking the square corner icon (visible in Edit mode), which will be changed to a round icon to indicate that the box is now extending instead of constrained.
Note
You can use the blue handles that appear when you select a text box with the Selection tool to change the size of your text boxes or text fields without double-clicking or using the Text tool to enter Edit mode. However, the icons that indicate whether a text box is extending (label text) or constrained (block text) are only visible in Edit mode.
One characteristic of the Flash text tool that might surprise you is that Static text boxes that do not contain any text are cleared from the Stage. As long as a Static text box contains even one character, it remains on the Stage until you delete or move it manually. Adobe Illustrator has adopted this same behavior because it eliminates the hassle of a project cluttered by empty invisible text boxes. Editable text fields will remain visible even if you have not entered any text characters at author-time.
Flash handles text as a group, which allows you to use the Text tool to edit the individual letters or words inside a text area at any time by clicking on the text box and then typing or drag-selecting specific characters. To select the whole block or group of text, you can click once anywhere on the text with the Selection tool.
To delete individual characters, click and drag to select them with the Text tool or use the Backspace key (the Delete key on a Mac). To delete a whole group of text, select it with the Selection tool and then use the Backspace key (or Delete key).
Tip
Double-clicking a text block with the Selection tool invokes Edit mode and activates the Text tool—this enables you to modify the individual characters or change the text box style, without having to switch to the Text tool first. Holding down the Shift key as you use the arrow keys to move left or right in a text field will select the text as the cursor moves across it.
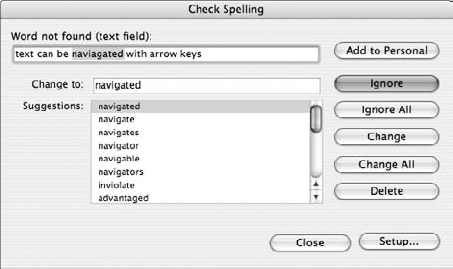
You can use most common text-editing/word-processing commands in Flash. Cut, Copy, and Paste move selected text within Flash and also between Flash and other applications that handle type. Flash provides a built-in Check Spelling command and a handy Search and Replace command.
The Check Spelling settings are quite sophisticated, and you can customize them using the Spelling Setup dialog box available from the application menu (Text
After you choose your settings, you can choose Text
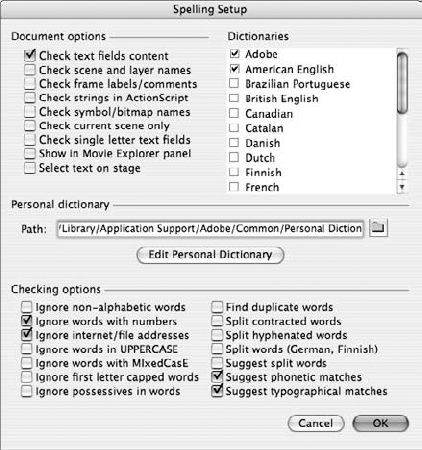
Figure 8.7. The Spelling Setup dialog box gives you a range of settings to control how the Check Spelling command is applied to your documents.
The Movie Explorer panel makes it easy to find and modify text if you are working with a complex document. To access this feature if it is not already open, use the application menu (Window
To see all the text used in your current document: Set the Movie Explorer to Show Text with the option button at the top of the panel. The contents of each text box will be listed along with the font and point size that is used.
To search for a specific item: Enter the font name, instance name, frame number, or ActionScript string in the Find field of the Movie Explorer panel.
To edit the contents of individual text boxes: Double-click any listing in the Movie Explorer panel, and type in the field as you would if you were editing a filename in any other list.
To specify a new font or font size: Select any text item listing that you want to change in the Movie Explorer and then simply change the font settings in the Property inspector. Use Shift+select to select multiple items in the Movie Explorer if you want to apply a change to more than one text box at a time.
To copy text: Use the Copy command in the Movie Explorer options menu to copy a currently selected line of text to the Clipboard. Or to copy all the text in your current document to the Clipboard without having to select items individually in the Movie Explorer, use the Copy All Text to the Clipboard command in the Movie Explorer options menu.
The Text tool does not include options in the Tools panel because the extensive text controls are centrally located in the Property inspector. You create all Flash text in text blocks or boxes using the same Text tool, but when you create text, you can assign it specific behavior with the Property inspector.
Although you can always access font style and size menus from the application menu (Text
When working with Static text, you can modify both the font and paragraph attributes with the following options (shown in Figure 8.9):
Text type menu: This drop-down enables you to specify Static Text, Input Text, or Dynamic Text for your text box type. Set this behavior first to invoke the relevant options in the Property inspector.
Font field (and menu): When the Text tool is active, this field displays the name of the current font. Click the arrow button to invoke a scrolling menu of available fonts. Choose a font from this scrolling menu to set the font for the next text element that you create. Or, to change the font of existing text in the Document window, first select individual characters with the Text tool or the whole group with the Selection tool, and then choose a different font from the scrolling menu. When you select a font from the Property inspector menu, you'll see a preview of the highlighted font in the style or typeface that will display.
Font size: You can select the size of your type either with a pop-up slider or in a point size entry field. When the Text tool is active, it displays the current font size in the entry field. You can change the font size by typing a specific point size number in the field. If you click the arrow button to the immediate right of the text entry field, a pop-up slider enables you to select a font size—as you move the slider, the font size number updates in the entry field.
Type Color chip: Click this button to invoke the Swatches pop-up menu, which in addition to offering current and temporary swatches, also enables you to acquire a color from anywhere within the interface by sampling with the dropper arrow.
Bold and Italic: The Bold option is a radio button that toggles selected text between Normal and faux Bold. The Italic option is another radio button. It toggles selected text between Normal and faux Italic.
Note
Many computer programs (including Flash) that handle type permit you to approximate a bold and/or italic version of a font, even if this style is not available in the original installed font; this has led to some confusion about font styles. If a font was originally designed to include a bold or italic version, it will be appropriately named in the font menu (such as Century Schoolbook Bold) and will be selected as a separate typeface. With many fonts, the faux bold or italic style may display very similarly to the designed Bold or Italic style, but with well-designed fonts, the shapes and proportions of individual characters are designed separately for each style. Theoretically, the original designed letter shapes for each style should look better than a normal letter shape thickened with an outline to create a faux Bold style, or slanted to create a faux Italic style.
Text Orientation menu: This pop-up menu enables you to select the flow direction for your text. The default is Horizontal, which orients text from Left to Right in rows along a horizontal baseline. The vertical text options are Vertical Left to Right, and Vertical Right to Left—these options automatically orient the text in columns that progress from left to right or from right to left, respectively.
Note
If you select a Vertical text orientation, the other text formatting options will apply slightly differently than they do to the Horizontal text orientation. See the section "Vertical text options" for descriptions of the controls that are relevant to vertically oriented type.
Text Align options: The top-right area of the panel displays four buttons for the arrangement of text: Left, Center, Right, and Full Justification. When you're editing, the alignment you choose affects only those paragraph(s) you've selected. When entering text, use these options to predetermine the alignment before text entry, and all subsequent text will be aligned accordingly.
Letter spacing menu: You use this value field and slider to change the space or tracking between individual letters. The default setting of 0 applies the built-in tracking and kerning of the font, while any setting between +1 and +60 adds space between characters, and any setting between −1 and −60 decreases space between characters (extreme settings cause the letters to overlap).
Tip
With a section of text selected, you can use Ctrl+Alt+arrow keys (

Baseline shift: Three options are in this drop-down menu. Normal resets text to the baseline. Superscript shifts Horizontal text above the baseline and Vertical text to the right of the baseline. Subscript sets Horizontal text below the baseline and Vertical text to the left of the baseline.
Anti-alias option menu: Use this menu to select the level of antialiasing (or smoothing) to apply when the Flash Player renders your type. If you do not want to include font outlines in your file, select Use device fonts and text will be rendered using a font that is available on each user's computer.
Auto kern check box: If the font includes built-in kerning information, which evens out the spaces between letterforms, select this to activate automatic kerning.
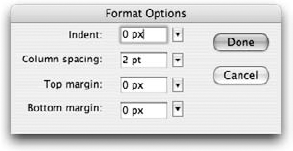
Paragraph Format Options: The Edit format options button (paragraph icon) invokes the paragraph Format Options dialog box shown in Figure 8.10, with additional text controls.
Note
The default units of measurement (pixels) for both the margin and indentation entries of the paragraph Format Options dialog box are determined by the Ruler units setting on the file. You can change Ruler units in the Document Properties dialog box, which you access from the application menu with Modify
Selectable: Use this toggle button to make selected text, or text that's entered subsequently, selectable when it's displayed on users' machines. This allows users to copy and paste your text into other text-editing applications or browser windows.
Link entry: This option is only available for Horizontal Static or Dynamic text fields. By selecting a text box or an individual word in the Document window, and then entering a URL in this Link entry field, you can add a hyperlink to selected text. The text link will be identified in the authoring environment with a dotted underline—the underline will not be visible in the published .swf file, but the mouse pointer will change to indicate a link when it is over the text.
Target menu: This menu is accessible after you enter a URL in the Link field, and it allows you to select a destination for the loaded URL. The options will be familiar to anyone who has worked with HTML page structures. For more information, refer to the description of the
getURL()action in Chapter 18, "Understanding Actions and Event Handlers."

Some of the text settings in the Property inspector are also available from the application Text menu:
Under Text
Under Text
Under Text
Plain: Ctrl+Shift+P (
Bold: Ctrl+Shift+B (
Italic: Ctrl+Shift+I (
Subscript
Superscript
Under Text
Align Left: Ctrl+Shift+L (
Align Center: Ctrl+Shift+C (
Align Right: Ctrl+Shift+R (
Justify: Ctrl+Shift+J (
Under Text
Increase: To increase text character spacing by one half-pixel, press Ctrl+Alt+→ (
Decrease: To decrease text character spacing by one half-pixel, press Ctrl+Alt+← (
Reset: To reset text character spacing to normal, press Ctrl+Alt+↑ (
Scrollable: The final item in the Text menu is an option that is only available when an editable text box is selected. When applied to a Dynamic text field, this option makes it possible to enter and scroll through text that extends beyond the frame of the text box. Apply this option by choosing Text
Some of the options that are visible in the Property inspector change slightly when you choose a Vertical orientation for your text box.
Text Align options: These buttons now function to align the arrangement of text in a vertical text box to Top, Middle, Bottom, and Full Justification. When entering text, use these options to predetermine the alignment before text entry, and all subsequent text will be aligned accordingly.
Auto kern check box: On Vertical text, this setting can be overridden by the Vertical text settings in the Flash Preferences dialog box (refer to Figure 8-4). When No Kerning is selected in Preferences, then the Auto-Kerning toggle in the Property inspector will only apply to Horizontal text.
Rotate toggle: This very handy button (which appears to the right of the Text Orientation menu) flips the characters in your Vertical text box so that the type is turned sideways—or actually resting on the vertical baseline. This is an effective alternative to creating Horizontal text and then using Free Transform to rotate the text box 90 degrees.
Edit format options: The Edit format button invokes the paragraph Format Options dialog box (see Figure 8.11) with additional text controls specifically for vertical text.
The options available for Dynamic and Input text are predominantly the same, but there are a few important options that are unique for these two Editable text types. Figure 8.12 shows the Property inspector as it displays when you specify Dynamic behavior for your text. We label only the additional options not shown in Figure 8.9 here.

Figure 8.12. The additional options available in the Property inspector when Dynamic text behavior is selected
The following options are common to both Dynamic and Input text:
Text field instance name: As we described previously, this identifier allows the Flash Player to put your dynamic data in the correct field.
Line type: Use this drop-down menu to choose how your text will be organized in the text field. Choose between Single Line, Multiline (with line breaks), and Multiline with no text wrap.
HTML text: When this toggle is turned on, Flash preserves rich text styles when displaying Dynamic text. This includes font, font style, hyperlink, paragraph, and other formatting consistent with permissible HTML tags. You can also enable HTML so that the entry field will accept formatting that has been assigned to it in the Actions panel. For more information on this, refer to Chapter 30, "Applying HTML and Text Field Formatting."
Text border: Use this toggle to draw the text field with a border and a white background that will be visible in your published movie (.swf).
Variable: This field is now redundant with the Instance name field, but if you use it for backwards compatibility, you should assign it a different name than your instance to avoid confusion.
Character embedding: When preparing a file for export, you can control how much font information is included with the .swf. The Embed button invokes the Character Embedding dialog box (see Figure 8.13), in which you can specify that no characters are embedded by clicking the Don't Embed button; or you can pick from a long list of character or glyph sets to be embedded. You can also enter a more selective range of characters by typing them directly into the field at the bottom of the dialog box (under "Include these characters:"). The Auto Fill button automatically loads all the unique glyphs or characters in the currently selected text box into the Include field to be embedded with the final .swf. The counter for total number of glyphs (at the bottom of the dialog box) updates based on your settings to show the total number of unique glyphs that will be embedded with the final exported file.
Note
The Character Embedding options include international language sets and specialized sets such as music symbols. These glyph sets can be very large, but this is a useful feature if you are creating dynamic text fields that will need to display specialized characters.
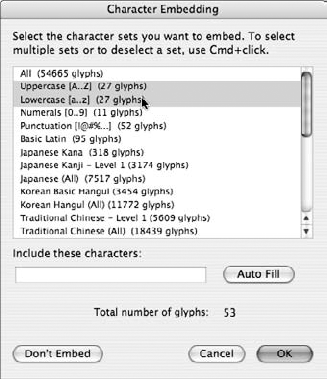
Figure 8.13. The Character Embedding dialog box for specifying embedded font information to be exported with your final .swf
The Link and Target value fields are not available in the Property inspector when Input text behavior is selected, because you cannot add links to text that users will be entering. The only additional control available in the Property inspector for Input text fields is the Maximum Characters value field. Use the Maximum Characters value field to specify the maximum number of characters that a user can enter in this particular text field. The number of characters can be limited to any number between 0 and 65,535. This feature is generally used for controlled content, such as passwords.
By default, Flash embeds all fonts used in Static text boxes in order to deliver WYSIWYG (what-you-see-is-what-you-get) display in the published movie (.swf.). As long as font outlines are available for the text you use in your Flash document (.fla), the published movie (.swf) displays consistently, regardless of which fonts the user has installed on his machine.
In order to edit a Flash project (.fla), you need to have the original fonts available, unless you are willing to view the document with a substitute font in the authoring environment. If you select a text box that is displayed with a substitute font, you should still see the name of the original font listed in the Property inspector, although it will be marked by parentheses. As long as the font formatting is not modified, Flash preserves all the original font information so that when the document (.fla) is opened again on a machine that has the original font, any edits that were made using the default font are rendered correctly. Although you can make text edits while working with a default font, you need to have the original font installed in order to publish the final movie (.swf) with the design intact.
The consistent text display of embedded fonts is what endears Flash to type-obsessed designers, but there is a small price to pay: Every embedded font adds to the final file size, and antialiasing (smoothing) can sometimes make fonts too blurry. The good news is that for most projects, the additional weight is not an issue, and the antialiasing controls in Flash make it easy to customize the level of antialiasing as needed. If file size is a critical issue, you may choose to use device fonts or a runtime shared library. If you prefer the look of bitmap (aliased) fonts, that setting is still available in the Font rendering menu (see Figure 8.14).

Figure 8.14. The Font rendering menu makes it easy to choose a setting that will suit your design style and file size requirements.
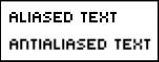
Figure 8.15 compares aliased with antialiased text in two published .swfs: one with Anti-alias for readability applied (left) and one with Anti-alias for animation applied (right).

Figure 8.15. The two default settings for antialiasing in Flash 9 (readability and animation) render more smoothly than Bitmap text.
Note
Antialiased text looks smoother on screen but looks blurry compared to aliased text when it's converted to a printed graphic. For a truer comparison between these different text options, please refer to the files in the textSmoothing folder inside the ch08 folder on the CD-ROM.
The Anti-alias for readability setting does an amazing job of rendering smooth, legible type, even at small sizes. This setting has only two drawbacks: It contributes to larger file sizes and it can only be rendered with Flash Player 8 or higher. The Anti-alias for animation setting smoothes text almost as well as the Anti-alias for readability setting but it ignores kerning information in order to create slightly smaller files and to render animated text more quickly. This is the only antialiasing option that will render on older versions of the Flash Player.
Warning
Advanced Flash antialias settings (Anti-alias for readability and Custom antialias) will not render if text is skewed or flipped, but work fine if text is rotated or scaled. The advanced antialias settings do not carry over to files that are exported in .png format or printed. If the more advanced antialias settings "break," the text will be auto-rendered with the more simplified Anti-alias for animation setting.
If you feel the need to polish your text further, use the Custom antialias controls (shown in Figure 8.16) to adjust the thickness and sharpness of the rendered text. With a little trial-and-error, you should find the exact level of antialiasing that suits the size and style of the font you are using.
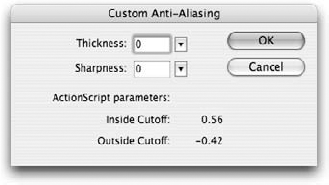
Figure 8.16. Custom antialias controls make it possible to find a setting that smoothes text just how you like it.
The settings ranges for thickness and for sharpness are different, but for both, "normal" is 0. Select a higher number to increase the level of the effect and choose a lower number to decrease or reverse the effect. Figure 8.17 illustrates "high," "normal," and "negative" combined settings, but these settings are really only meaningful if you adjust them individually and observe the results on your own specific font sample.
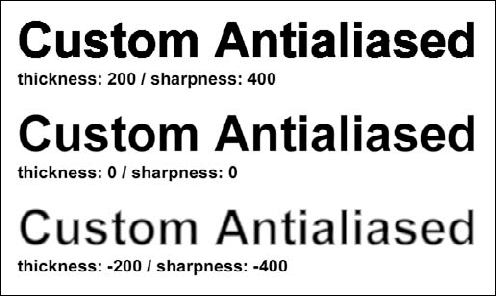
Figure 8.17. The combination of thickness and sharpness set in the Custom Anti-Aliasing dialog box will determine the look of your rendered antialiased text.
Warning
Antialias for readability and Custom antialiasing settings only work on files published for Flash Player 8 and higher. To make your files compatible with older versions of the Flash Player, you must use Anti-alias for animation, bitmap (aliased) text, or device fonts. For very large text (larger than 48 point), the more simplified Anti-alias for animation setting is recommended over the advanced Flashsettings. It is best to apply advanced antialiasing options to improve the legibility of very small text or unusual text styles on projects that do not need to be backwards compatible.
Note
If you are working on OS X, you may not notice much difference between aliased and antialiased text because the system applies automatic smoothing on any screen text, even on application menu lists. Although this feature cannot be turned off completely, the text smoothing controls in your System preferences panel (in the Appearance category) allow you to specify between the lowest setting (only smoothes text larger than 12 points) and the highest setting (only smoothes text larger than 4 point). The default setting smoothes any text larger than 8 points.
The Bitmap text option makes it possible to quickly convert any selected text from antialiased to a prerendered aliased outline that will be embedded with the final .swf. The aliased outline will add less to your file size than the antialiased font information, if the font is at a size below about 24 point. Another advantage of using the Bitmap text option is that you can create a "custom" aliased outline from any font on your machine, which gives you many more creative options than the three basic device fonts. Unlike device fonts, text converted to aliased outlines in Flash can also be rotated or scaled—although it doesn't always look that great, at least it does display in the published .swf.
Despite the benefits of using bitmap text, we can't say it's a great option because it doesn't always give you the crisp, clean results you might hope for. In fact, this feature is only really useful when it's applied to fonts in the mid-size range. When it's applied to fonts between 12 and 24 point, the Bitmap text feature will render a fairly crisp outline and will eliminate the "blur" associated with antialiased text smoothing. Unfortunately, when it's applied to smaller text (between 6 and 11 point), most fonts completely fall apart and became illegible blocky pixel shapes. On text larger than 24 point, the Bitmap text feature usually makes the text look rough and can bloat the file size more than including standard font outlines will.
Device fonts are three basic font style designators identified by a preceding underscore in your font menu. These fonts will be familiar to anyone who has worked with HTML text. Although they are not as exciting as some custom fonts, entire design styles are based on these "generic" fonts—think minimal and unpretentious. You will find the three device font designations, _sans, _serif, and _typewriter, in either the Property inspector font menu or in the application menu under Text
To give you an idea of how device fonts relate to installed fonts, _sans usually becomes Arial or Helvetica, _serif usually becomes Times or Times New Roman, and _typewriter becomes Courier. Because these settings utilize the default fonts on the user's machine, Flash doesn't have to include their outlines in the exported .swf, and the final movie file size is reduced.
Device fonts are always available and always take little time to render, but they cannot be rotated or skewed and occasionally they will vary slightly in their metrics from player to player and across platforms. Another important difference between standard embedded fonts and device fonts is that embedded fonts will be antialiased or smoothed by Flash, while device fonts will be unsmoothed or aliased.
You will notice that even if you have not used one of the device fonts from your font menu, you can still select the Use Device Fonts setting in the Text rendering menu. This is a terrific "compromise" option if you strive for more specific control over the Flash Player's font choices, but still want to take advantage of the file size savings afforded by device fonts. When the Use Device Fonts setting is applied, the font is not embedded—only the Font name, Font family/style (serif/sans serif/monospace), and other information are added to specify the font, which adds no more than 10 or 15 bytes to the final .swf file. This information is used so that the Flash player on the user's system will know if the font is installed or not. If the original font is available, it will display exactly as you designed it. If the original font is not present, then the Flash Player will still know whether the substitute font should be serif or sans serif.
The Use Device Fonts option also works as a toggle to turn off antialiasing. This means that even if the user has all the fonts used in your Flash movie installed, Use Device Fonts changes how the type displays:
When Use Device Fonts is selected: No antialiasing or smoothing is applied to the device font, whether it is available on your system or not.
When Use Device Fonts is not selected: The font outline is embedded and all characters are smoothed (even if the font is available). Smoothed text can sometimes be too blurry at small point sizes.
To accurately preview the Use Device Fonts setting on your machine, if you have a font manager (as most Web designers do), you need to make sure you're careful about your font activation settings. Make sure activation is turned off for the fonts that you want to test so that the Flash player will not find them when it renders the movie (.swf)—this enables you to see what might happen to your design when your system auto-substitutes other fonts.
For best results with this specific Use Device Fonts option, we suggest that you limit your font selection to those fonts that most of your audience is likely to have (all those common fonts that come installed with their machines), or those that will translate into one of the default device fonts without wreaking havoc on your design. It is better to be conservative and design your layout using Times, Arial, and Courier than to go wild with custom fonts that will most likely be substituted very differently when the movie is viewed on someone else's machine. Otherwise, for unusual fonts, we suggest that you either embed the full font outline information (and apply one of the antialias settings) or, for limited areas of text (such as headlines), that you use the Bitmap text option to generate a custom aliased outline or break the text apart to manually create vector shapes, as we describe later in this chapter.
Although Flash does an amazing job of displaying fonts consistently and cleanly, even on different platforms, the success of your font export depends entirely on the quality and completeness of the font information available when the Flash document is created (.fla). Because Flash can access font information on your system while you are working in the authoring environment, many of the font display problems that can come up during production will only be visible when the Flash movie (.swf) is published.
To display fonts in the published movie (.swf), the Flash Player relies on the font information embedded in the movie, or on the fonts installed on the user's system. If there are discrepancies between the information available to the Flash Player and the font information that was available to the Flash authoring application when the document was created, you will run into font display problems.
When you encounter problems with fonts (as you almost always do at some point), a good guide to font management is indispensable. We can't describe everything that can go wrong when working with fonts here, and solutions will often vary depending on how you are storing and managing your fonts. Ideally, you should find resources that are specific to the platform and programs you are using.
Tip
A good general guide to some basic font-management techniques for Mac users is How to Boss Your Fonts Around by Robin Williams (Peachpit Press, 1998). Even if you are a Windows user, this book can give you some basic background on how fonts and font management utilities work.
TrueType, Type 1 PostScript, OpenType, and bitmap fonts (Mac only) can all be used in Flash. Although Flash exports the system information about the fonts that are used, a damaged or incomplete font may still display correctly in the authoring environment (.fla). However, the exported movie (.swf) will appear incorrectly on other systems if the end-user doesn't have the font installed. This is due to the fact that Flash can display the font within the editor by using the screen font; it does not recognize that particular font's outline and can't export information needed to display the text in the .swf. You can avoid font display problems by using the universal device fonts (_sans, _serif, or _typewriter fonts).
If Flash cannot find font information on your machine to match what is specified in a file (.fla) when you open it in the authoring environment, you will be notified by the Missing Fonts alert box (shown in Figure 8.18) and prompted to select fonts installed on your system to substitute for display.
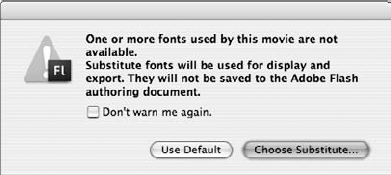
Figure 8.18. The Missing Fonts alert box appears when fonts used in a Flash file (.fla) are not found on the local machine.
Note
If you publish or export a document without viewing any of the scenes containing missing fonts, the alert box only appears when Flash attempts to publish or export the .swf.
The first time that a scene with missing font information is displayed in the authoring environment, you will be prompted by the Missing Fonts alert box to choose one of the following options:
Choose Substitute: To specify individual substitutions from the fonts available on your system for each missing font, click this button to invoke the Font Mapping dialog box (see Figure 8.19). This dialog box lists all fonts specified in the document that Flash can't find on your system. To choose a substitute font for a missing font, select the font name in the Font Mapping list and then choose a font installed on your machine from the Substitute font pop-up menu. Click OK to apply the settings and close the dialog box.
Use Default: This button substitutes all missing fonts with the Flash system default font and dismisses the Missing Fonts alert box. If you don't use the button on the first alert box, you have another chance to choose this setting by using the System Default button in the Font Mapping dialog box (see Figure 8.19).
Turn Alert Off: To disable the alert box in the current document, select the Don't warn me again check box.

Even though the text is displayed in a substitute font, Flash includes the name of the missing font in the Property inspector font menu (see Figure 8.20). Flash preserves the original font specification when the file is saved so that the text displays correctly when the document (.fla) is opened on a system with the missing fonts installed. You can even apply the missing font to new text by selecting it from the font menu in the Property inspector.
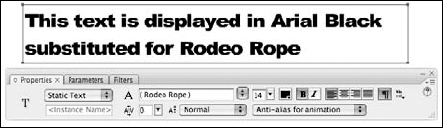
Figure 8.20. The missing font name is displayed in the font menu, even when text is displayed in a substitute font in the authoring environment.
Because appearance attributes such as size, leading, and kerning may render differently with a substitute font, you may have to adjust any modifications you make while viewing text in a substitute font when the document is opened on a machine with the original font available.
To turn the Missing Fonts alert box off for all documents, clear the Warn on missing fonts check box in the Warnings category of Flash Preferences (Edit
To view all the missing fonts in the currently active document or to reselect font mappings, choose Edit
Using Miniml Fonts in Flash, by Craig Kroeger
For those of you who are not familiar with Miniml fonts, these are bitmap fonts designed by Craig Kroeger and J. D. Hooge to remain crisp (aliased) in Flash, and they can be used as an alternative to generic device fonts. These aliased fonts are particularly useful at small sizes, where antialiasing can reduce legibility. This is a real concern when designing Flash applications for devices. (See Figure 8.21.)
There are free versions of the Miniml fonts, included on this book's CD-ROM in the ch8 folder—you may use these to test what you can do with them. Professional versions of these fonts are available at www.miniml.com.
There is also a sample source file (Miniml.fla) on the CD-ROM that shows how the fonts are used in various text field examples. In order for the Miniml fonts to work properly (with no antialiasing), consider these guidelines:
Select font: When the Miniml fonts have been installed on your system, you can select them from the Font menu in the same way as any other available font.
Font size: Miniml fonts must be set to 8 points or any multiple of 8 (16, 24, 32, and so on). The numbers in the font name refer to the font style, not what point size it should be set to.
Vertical Static text: Miniml fonts can be used on a vertical axis when they are rotated with the rotate option in Flash (not rotated manually or with Transform settings).
Spacing Static text: Only Static text can have adjusted character spacing. When adjusting the character spacing, use whole-pixel values to keep the text aliased. Professional Miniml fonts have versions with increased Letter spacing for use with Dynamic or Input text fields.
Paragraph alignment: Do not use Center paragraph alignment—only use Left or Right.
Embed font: You must embed the Miniml fonts when using Dynamic or Input text fields. In Character Options, select the Select All Characters check box to embed the complete font. To reduce overall fill size, only embed the characters you need in your text. Static text is automatically embedded.
Snap to Pixels: Use the Snap to Pixels feature under View
Using Miniml fonts in motion: When you are using Miniml fonts in animation, round the _x and _y values to whole values to keep them crisp. Use the following ActionScript to round the numbers down to the closest integer:
_x = Math.floor(_x);
_y = Math.floor(_y);
Preview in the Flash Player: Preview your finished movie in the Flash Player (.swf) to see the aliased text displayed correctly because it may appear antialiased in the authoring environment (.fla).
This may seem like a lot of rules, but following them will help you get the most out of Miniml.

Note from the authors: This tutorial was written as a guide for using a specific series of pixel fonts (called Miniml fonts) designed by Craig Kroeger and J. D. Hooge, but much of the advice that Craig and J. D. offer for using these fonts can be applied to any bitmap or pixel fonts that you use with Flash. There are many sources for bitmap fonts, but hopefully the free versions that Craig and J. D. allowed us to include on the CD-ROM will give you an idea of their benefits and limitations.
Using Font symbols and Shared libraries in your Flash authoring workflow offers several benefits that can make it worth the little time it takes to set them up. Although you can nest a Static text box inside any other symbol type if you want to reuse a specific text element in your movie, this does not change how the text is published in the Flash document. Using instances of a symbol to place repeated text elements, such as logos or taglines, offers the same benefits as converting artwork into symbols—you can make changes to the symbol stored in the Library and it will be propagated to every instance in your document, and you can also modify the appearance of individual instances without changing the original symbol.
The difference between text nested in another symbol type and a real Font symbol is that Font symbols can actually be used to store the display information for an entire font. When placed into a runtime Shared library, Font symbols can be used to link text in one movie to the font display information in a source movie; this allows you to use custom fonts without having to embed the font information in every Flash movie (.swf) individually. This workflow is especially effective on projects that involve multiple .swf files using the same custom fonts. The bonus is that if your client suddenly decides that they prefer "Leonardo script" to "Chickenscratch bold" (or whatever font switcheroo they might come up with), you can make the change in your source Font symbol without even opening any of the other files (as long as the new font is given the same name and it still fits in your layouts).
This all sounds great so far, right? Now for the reality check: Because you are storing font information in a separate file from your layouts, there is one more factor that you have to manage. The source font library (.swf) can be in the same directory as your other movie (.swf) files or it can be stored on a completely different server. It is very important to decide on the storage location of your source font files (.fla and .swf) before you begin linking text in your other Flash documents (.fla) to shared Font symbols because the URL that defines the relative or absolute path is stored in each .fla file and your font links will be broken if you later change the source movie's location.
Note
Runtime shared assets do not need to be available on your local network when you are editing .fla documents that rely on linked assets, but the shared asset .swf must be available at your specified URL in order for the published movies (.swf) to display the linked assets at runtime.
As you can imagine, having your font links fail is a major disaster, so many developers believe that relying on an external font source isn't worth the risk. On the other hand, there is always an element of uncertainty with Web delivery, so it might not be fair to eliminate what is otherwise an excellent way to optimize font management in your Flash layouts. As with any Web production, just be sure to test early and often as you develop a Flash project that uses shared fonts.
You can use Shared libraries to store other symbol types, but it is best to organize different kinds of assets in separate .fla files. For now, we'll focus on making Font symbols and creating a source file for a Shared font library.
Font symbols can be integrated in your workflow in two ways. If you plan to use Font symbols within a Flash document (.fla) simply as a way to make edits faster in that one document, and you don't mind exporting the font information with every .swf, you can create a Font symbol directly in the main Library of your current document and rely on author-time sharing to update instances of the font. However, if you want to save file size by linking to the Font symbol information for runtime sharing, you should open a new Flash document before creating your Font symbols. In either case, the initial steps for creating a Flash Font symbol are the same:
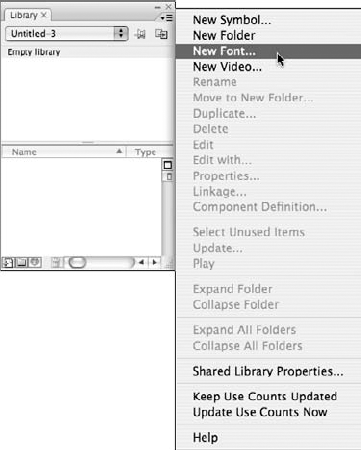
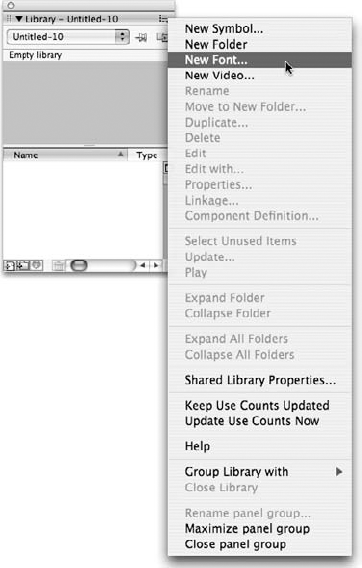
Open the Library panel where you want to store the Font symbol.
From the Library options panel, choose New Font (see Figure 8.23).
The Font Symbol Properties dialog box appears so that you can enter a name for your Font symbol and select the font you want to embed in the file (see Figure 8.24). The name that you enter shouldn't be the same as the original font name but rather should indicate how the font is being used in your project. For example, if you are using an Impact font for your titles, instead of naming the Font symbol "Impact," you could name it "titleFont" or some other name that will inform you (and the rest of your team) how the font is being used.
If you also want the option to use faux Bold or Italic style on text linked to your Font symbol, select the Style check boxes for Bold and/or Italic to include these characters with the embedded font. Select the Bitmap text check box to create aliased outlines of your font symbol. If you choose to render an aliased outline of a font, you also need to enter the font size that you want to use by typing it in the Size field. This will increase the size of your source movie only—the additional size will not be passed on to other .swf files that link to the Font symbol for runtime sharing.
Warning
If you create a Font symbol without the Bold or Italic options selected in the Font Symbol Properties dialog box and then try to apply the options in the Property inspector to create faux Bold or Italic style on text that is linked to the symbol, you will encounter one of two problems. If the text you are modifying is in a Static text box, then the applied styles will display, but the additional font information for the modified characters will be exported with your published file, thus increasing the size of the .swf. If the text you are modifying is in a Dynamic or Input text field, the text will not display in the published .swf file because the Flash Player will not find the font information needed to render the Bold or Italic type on-the-fly. These same rules apply to aliased outlines rendered at a specific font size.
Now when you browse the font menu available in the Property inspector or from the application menu (Text

The next step required to use the Font symbol in your project depends on how you choose to integrate Font symbols into your workflow. As we mentioned earlier in this chapter, using symbols for author-time asset sharing can make it easier to propagate changes throughout a document, but any assets used in your document will still be embedded in each movie (.swf) that you publish. Creating a separate library for storing symbols and linking these as runtime shared assets in multiple movies takes a little more work, but it gives you the benefit of both streamlined updates and smaller file sizes. The most appropriate workflow depends on the scope and content of your particular project and on how willing you are to manage the risks involved with using runtime shared assets.
If you intend to use a Font symbol as an author-time shared asset only, you can simply leave it in your current Library so that the font is available in the font menu whenever you want to use it in your project. You will be able to modify any of the text boxes that use your Font symbol in the same way as any other text. There is no limit on the number of colors or sizes that you can use or on what you can type into each text box.
The main reason that this is a more flexible workflow than simply nesting text inside other symbols for reuse is that you can actually change the content used in individual text boxes that reference a Font symbol, while you can only modify the appearance of text that is nested in a symbol instance.
The process for updating instances of a Font symbol used within one Flash document (.fla) is much the same as updating any other symbol type or imported asset stored in the Library:
Open the current document Library and select the Font symbol that you want to modify.
Choose Properties from the Library options menu or from the contextual menu.
In the Font Symbol Properties dialog box, simply select a new font from the font menu, but don't change the font name that you had previously chosen. (Now it makes sense why naming your Font symbol with the same name shown in the font menu isn't a good idea, right?)
You will find that all text that was in your old font will be updated to the new font that you have chosen, while maintaining all other formatting and style attributes.
In order to make your Font symbol available for use in other Flash movies without having to embed the font information in each file, you will need to create links from individual destination files to your source file or Shared library. This workflow optimizes file sizes by eliminating the storage of redundant font information between linked movies. As with HTML files, you have to specify a path in order for the Flash Player to locate font information in one movie (.swf) for text display in another. Because the font information is retrieved from an .swf file by the Flash Player and supplied to another .swf for text display, it is referred to as runtime asset sharing.
If you have already followed the steps to create a Font symbol in an otherwise empty Flash document (.fla), the next part of the process is to enter an identifier and a location (path) that will "lead" the Flash Player to your Shared library. As we mentioned previously, you will need to know where the published source movie (.swf) will be stored before you can create font links to other documents. The location (or path) can be relative or absolute.
Tip
To keep your linkage intact while preserving source file version numbers as you develop your project, you might want to use the Publish Settings dialog box to give your published source .swf a generic name (such as titleFontSource.swf) while using a more specific naming convention for your source .fla files (such as titleFontSource101.fla). This eliminates the hassle of going back to your destination movies and changing the linkage information if you decide you need to move to a new version name to keep track of modifications to your source file (.fla).
To help clarify how runtime shared fonts are stored and accessed, we will walk through the three possible scenarios for Font symbol use and show you how each is displayed in the authoring environment (.fla) and in the published movie (.swf).
Note
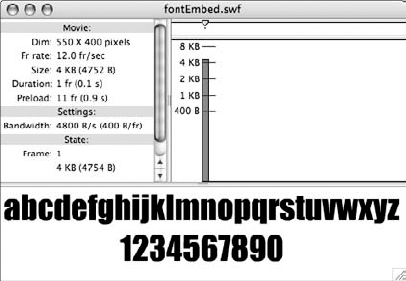
The Flash files illustrated in this section are included in the ch8 folder on the CD-ROM. You will find both the fontSource files (Shared library file) and the fontLink files (destination document) in the fontSymbols_complete folder with final linkage properties. As long as the files are kept together in the same storage location, the font linkage should remain intact. If you want to use unfinished files to complete the steps in this section, open the files in the fontSymbols_start folder. We have also included a fontEmbed example file with the same text entered on the Stage, but with embedded font information (including uppercase, lowercase, and punctuation for Impact), instead of linked font information to demonstrate the difference in file size.
The first file you will be working with is a source document, or the Flash document that contains the Font symbols that you want to use as runtime shared assets.
Warning
If you are using the files from the CD-ROM to follow this example, you may need to modify the Font symbol in fontSource.fla to match a font that you have on your system (instead of "Impact") before you can use Test Movie to publish the .swf file (Step 5).
Open your source document and select your Font symbol in the Library. If you are looking at the files on the CD-ROM, open
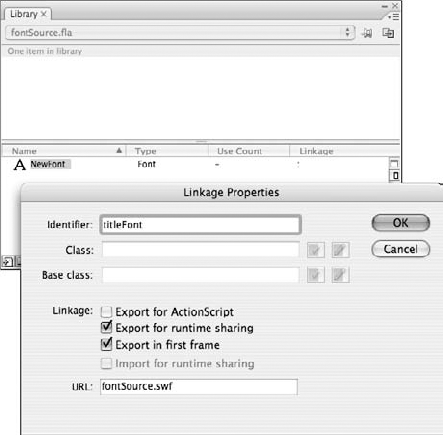
fontSource.flafrom thefontSymbol_startfolder and select the Font symbol called NewFont in the Library.Open the Linkage Properties dialog box (see Figure 8.26) by choosing Linkage from the Library options menu or from the contextual menu.
Select the Export for runtime sharing check box. Notice that Export in first frame will automatically be selected as well—leave that check box selected for now.
Change the original font symbol name (in our example
NewFont) to an identifier that will help you to remember what this Font symbol is used for in your project (such astitleFont). The identifier will be displayed after the Font symbol name in the Library.Warning
Don't close the Linkage Properties dialog box until you have completed the next step.
The URL field is where you enter the path to the storage location for the source movie (.swf) that you will publish after you have finished choosing settings in the source document (.fla.) The link can be relative or absolute depending on how you will be storing your project .swfs:
If you are planning to keep the source movie (.swf) in the same folder as your individual destination movies (.swf), then all you need to enter in the URL field of the Linkage Properties dialog box is the name of your source .swf file—in our example
fontSource.swf.If the source .swf file will be stored in a different folder or even on a separate server than the destination (linked) .swf files, you need to enter an absolute path (Web address) in the URL field to specify the exact storage location of your source .swf file, such as
http://yourserver.com/projectdirectory/sourceName.swf.
Now you can save your source .fla file to the final storage location using File

You have successfully created and saved a runtime shared asset. Now you can create another Flash document that references the font information stored in fontSource.swf so that you can use your custom font without having to embed the font information:
Create a new Flash document or open the
fontLink.flafile from the CD-ROM, and make sure that you have the Library panel for the current document open.There are two ways of linking another document to the font information in your Shared library:
If you have already created a document that uses Font symbols as described in the section on author-time sharing and decide to link to a runtime shared asset instead, you can enter the identifier and the URL of the Shared library movie (.swf ) in the Linkage properties for any Font symbol in your Library. Enter the identifier and the URL exactly as they appear in your font source file, but use Import for runtime sharing instead of Export for runtime sharing (see Figure 8.28). You should now find that all instances of the Font symbol in your current document are updated with the Font information stored in the shared asset movie (.swf)—as long as it is available on your server when you publish the movie for your current document.
Note
To enter linkage information manually, you need to have a Font symbol in the document Library selected so that you can access the Linkage Properties dialog box from the options menu or from the contextual menu.
If you are authoring a document (.fla) that does not yet contain any Font symbols and you want to link to your runtime shared asset, you can simply drag the Font symbol from the source library into the current document Library. With your destination document and Library panel open, choose File
When a Font symbol in your Library has the identifier and URL entered in its Linkage properties, you can use the linked font in your document by selecting it from your font menu and using the Text tool as you normally would. When you publish your movie (.swf), you will notice that your file size is much smaller than it would be with embedded font information. For an example of this, compare the file size listed in the Bandwidth Profiler shown in Figure 8.29 (linked = 143 B), with Figure 8.30 (embedded = 4754 B).
If you decide that you want to disable runtime sharing for a Font symbol in a destination document, you can clear the Import for runtime sharing check box in the Linkage Properties dialog box. The font information for the characters used in your file will now be embedded with the .swf file, so the file size will be larger, but the Flash Player will no longer require access to the shared asset.


Warning
Text rendered with advanced antialias settings (Anti-alias for readability or Custom anti-aliasing) must be embedded. For text using linked font information, use the Anti-alias for animation setting.
In addition to all of the text-handling capabilities we discussed earlier in this chapter, there are some fun ways that you can modify the appearance of text to create custom effects. Static text fields can be scaled, skewed, or flipped and the color or alpha can be changed while keeping the text editable. In older versions of Flash, if you wanted to create a drop shadow or special fill effect, it was necessary to break the text apart to create individual shapes. One of the biggest design features introduced with Flash 8 and carried over to Flash 9 was the live Filters that can be applied to text or graphics to create special effects that can easily be added, combined, or removed while preserving the original, editable object.
Note
We have included the Flash files for the modified text shown in this section on the CD-ROM. If you want to look at these in the Flash authoring environment, you can open the file modifyText_manual.fla or modifyText_filters.fla in the ch8 folder.
Figure 8.31 illustrates some of the ways that text can be modified without using filters. Any of these styles of manually modified text are compatible with older versions of the Flash Player.
Tip
If you plan to animate individual text characters, you can quickly move each letter onto its own layer by first applying the Break apart command (Ctrl+B or

Figure 8.31. Text boxes can be modified with Free Transform options (top). To create individual characters, apply Break apart once (middle), and apply it again to create graphic text (bottom). Graphic text can be modified like any other shape in Flash.
Custom text information adds to your file size, so it is best to reserve these treatments for special text such as titles or graphics. If you are working with longer sections of text (such as an article or a story), it is better to use common fonts or device fonts to help keep your files smaller and to make the text easier to read.
Tip
With long sections of text, you may need to add scrolling, and this is much easier to do if you use Dynamic text or live Filters. If you use modified Static text or graphic text, it is still possible to add scrolling behavior by creating animation and controls manually, but this is more time-consuming and requires your final .swf to have more information embedded in it.
By selecting a text box with the Free Transform tool, you can scale your text by dragging the transform handles, but this is not recommended as a way to increase the size of text unless it has been broken into vector shapes. Flash has to interpolate the normal font outlines to scale text this way, so it can result in jagged edges when the movie is published. When sizing text, it is much better to simply choose or enter a larger point size in the font menu to ensure a clean outline when the text is exported.
If you want to use the same font attributes on a variety of text boxes, it is often best to modify one text box so that it has all the qualities you want—including color, size, font, style, and line or character spacing. You then have two options for transferring these attributes to other text boxes using the Eyedropper tool:
To modify existing text boxes: You can select other text boxes with the Selection tool and then activate the Eyedropper tool in the Tools panel and click on your modified text to sample its attributes and transfer them to all the other selected text boxes simultaneously. This is much more efficient and consistent than trying to remember what settings you used and changing them manually on different text boxes.
To set attributes for new text boxes: You can load the visual attributes of any manually modified text into the Property inspector by activating the Eyedropper tool and clicking on the text to acquire its appearance. The Text tool is automatically activated after text is sampled, so you can immediately begin creating new text with the settings now loaded in the Property inspector.
The Break apart command (Ctrl+B or
Graphic text can be modified using any of the drawing tools, reshaped with the Selection and Subselect tools, or distorted with any of the Free Transform options. You can also select special fills, such as bitmaps or gradients, to create patterned text, or use the Eraser tool to delete pieces of the letter shapes (see Figure 8.32).

However, after text characters have been converted to lines and fills, they can no longer be edited as text. Even if you regroup the text characters and/or convert the text into a symbol, you can no longer apply font, tracking, or paragraph options. To streamline your workflow, consider how you can combine graphic text with normal text for some effects—rather than converting all text into graphic shapes.
There are a few tips and guidelines to remember when converting text to shapes in Flash:
To convert text characters to component lines and fills, you must first select or highlight the text characters that you want to convert. Then choose Modify
Rotation and Break apart can only be applied to fonts with available outline information, such as TrueType fonts.
On Macs, PostScript fonts can only be broken apart if a type manager is installed that will handle PostScript fonts.
Bitmap fonts disappear from the screen if you attempt to break them apart.
Breaking apart a text field that has Filters applied to it will remove the Filters before the text is converted into shapes.
As you experiment with graphic text, you may want to refer to some of the other chapters that cover working with shapes.
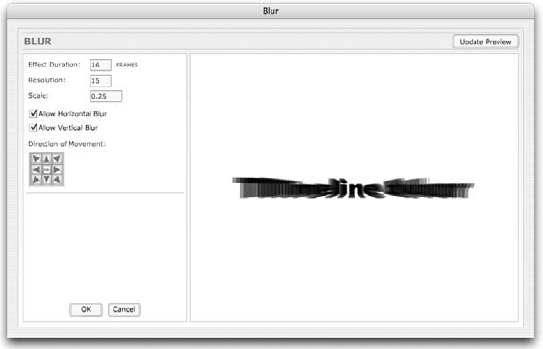
Flash MX 2004 introduced a series of "ready-made" effects that can be applied and modified using the Timeline Effect Settings dialog box. To apply these effects, select a Static text box with the Selection tool and use the contextual menu or the Insert menu to browse to Timeline Effects and choose one of the effects in the drop-down menu. When you select an effect to apply, a dialog box pops up to allow you to tweak the settings to get exactly the look you want before Flash renders the final Graphic symbols that create the effect. Figure 8.33 shows the dialog box with a preview of the animated Blur effect created by default settings. You can modify the scale, direction, and duration of the blur animation and use the Update Preview button to test different settings.
You can go back and adjust the settings for your effect by selecting the text and choosing Modify
Warning
If you manually edit a Timeline Effect Graphic symbol in Edit mode (by double-clicking it on the Stage or in the Library), you lose the option to go back and adjust the settings for the effect.
Although Filters (described in the next section) offer a much more flexible way to modify the look of text, even if it is changed at runtime, Timeline Effects are a great shortcut for making animation. If you need a good-looking drop-shadow or blur, Filters are the best approach, but if you want exploding text or an animated blur, Timeline Effects will do the trick quickly.
Warning
The possibilities for combining Timeline Effects with Filters are interesting but not always reliable. The Expand and Explode animated Timeline Effects are intensive and will generally ignore your Filter effects. Even if they are rendered properly, Filters cannot be added or edited after you have applied a Timeline Effect. Fortunately, if a Timeline Effect doesn't work out as you hoped, you can always remove it and your Filters will be restored and editable again.
Flash Filters open up the possibilities of creative text treatments like never before. With one handy little tab added to the Property inspector (Filters), you can modify your text without breaking it apart. Filters can even be applied to Dynamic text because they are rendered at run time; they're "live." Filters are easy to add and combine and you can edit the content of your text field at any time without breaking the effect. Figure 8.34 shows just a few simple examples of how you can modify text fields using Flash Filters.
Filters can be found in the Property inspector under the Filters tab. If you don't see the Filters tab, try opening it from the application menu: Window

Figure 8.34. A few of the effects that can be added to text using Filters while preserving the editability of the text field

Figure 8.35. Adding and combining Filters on text fields is easy with the Filter tab in the Property inspector.
Note
We'd like to know what you thought of this chapter. Visit www.flashsupport.com/feedback to fill out an online survey with your comments.
Flash offers robust and well-organized text editing controls, but you can make the most of these tools only if you are familiar with, at least, the basic principles of typography.
Studying the history of type in visual communications is one of the most practical and inspiring things you can do to improve your design skills.
The option for converting any font into an aliased outline that can be embedded with the final movie (.swf) introduced with Flash MX 2004 is still available in Flash 9—this overrides the default smoothing or antialiasing that can make some text look slightly blurry.
Complete font information must be available on your system in order for Flash to render and export the text properly to the final movie (.swf). If you need to open a Flash file (.fla) that includes fonts not available on your system, you can choose temporary substitute fonts without damaging the original font information stored in the file.
Creating Font symbols and storing them in Shared libraries for either author-time updates or runtime linkage can help you to manage large projects by centralizing font sources and making updates faster and easier.
You can add visual interest to your text with Timeline Effects and Filters while still keeping options open for editing the content of the text field.
Live Filters in Flash are an easy and amazingly versatile method of adding style to all types of text fields. Because Filters are rendered dynamically, they can be applied to Dynamic text even if the content changes at runtime.