Lesson 4. Update macOS
Goals
![]() Configure automatic software update settings
Configure automatic software update settings
![]() Automatically update Apple-sourced software
Automatically update Apple-sourced software
![]() Manually update Apple software
Manually update Apple software
Adding new capabilities is the very reason “software” exists. It’s expected that you will add new applications to increase the capabilities of your Mac and, as products are refined, add new software updates as well. In this lesson, you will configure and use the macOS software update technology, which is an automatic method to keep all your Apple-sourced software up to date. You will also explore an alternative to automatic software updates: manually downloading and installing software update packages.
Reference 4.1 About Automatic Software Updates
Keeping current with software updates is an important part of maintaining a healthy computer. For that reason, macOS includes an easy-to-use software update mechanism that automatically checks the Apple servers via the Internet to make sure you’re running the latest Apple-sourced software. Automatic software update checking is enabled by default as soon as you start using your Mac.
Note
In macOS Sierra, both administrator and standard accounts are allowed to install system software updates via the Mac App Store. If your organization restricts this type of activity for nonadministrator users, you can disable automatic software updates, as covered later in this lesson.
Both automatic and manual software updates require an Internet connection to download update installers. The automatic software update mechanism checks only for updates of currently installed Apple-sourced software, including software bundled with macOS and any software purchased from the Mac App Store.
For most users, Mac App Store software updates require appropriate Apple ID authentication. If you have not previously signed in to the Mac App Store from the computer you’re working on, you will be required to authenticate with an Apple ID. If a Mac App Store item was installed with a different Apple ID and you wish to update the item, you must authenticate with the Apple ID used to purchase the original item.
Note
Some software updates require that you also agree to a new Apple Software License Agreement.
Note
Institutions taking advantage of Volume Purchase Program (VPP) Managed Distribution can install Mac App Store items on macOS computers without signing an Apple ID in to the Mac App Store. You can find out more about Apple management technologies at https://support.apple.com/business-education/.
Automatic Software Update Behavior
macOS features automatic software updates for all items you installed from the Mac App Store, including macOS itself and applications created by either Apple or third parties. The Mac App Store provides a single location for updates to all Apple software. The Mac App Store is integrated with Notification Center to let you know as soon as new updates are available.
More Info
Although it’s covered here in terms of its update abilities, using the Mac App Store to install new applications is discussed further in Lesson 16, “Install Applications.”
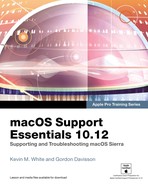
By default, important macOS updates (for example, security updates) are automatically downloaded and installed. Other macOS and Mac App Store updates are automatically downloaded in the background but not installed. When updates are ready to be installed, notifications let you know by displaying “Updates Available” in a banner.
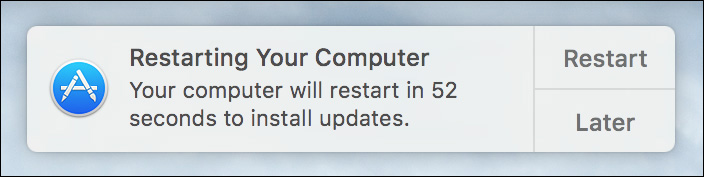
From the banner you can click Install or Later. If you click Install, macOS immediately installs the updates and restarts the Mac if necessary. If you click Later, you can select an option to update the software at a more convenient time. This is useful because some system updates prevent you from using the Mac while the installation completes, and they may require a restart. The last item in the banner menu, “Turn On Auto Update,” allows you to enable automatic updates for Mac App Store items. This option is not enabled by default in macOS Sierra.
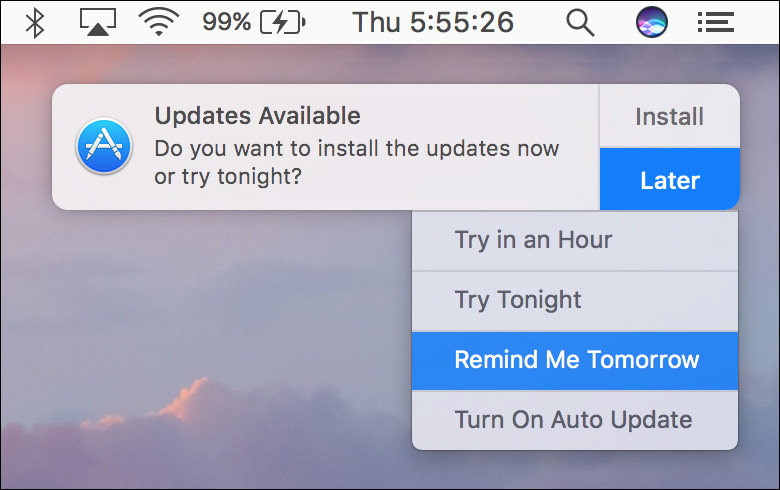
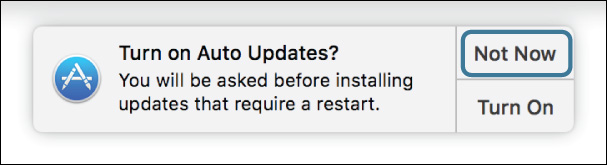
Again, by default in macOS Sierra, Mac App Store updates don’t automatically install. You may receive an additional banner notification to “Turn on Auto Updates?”
Clicking the Turn On button from this notification enables automatic installation for Mac App Store items. As stated previously, by default, important system and security software are always updated.
After deferring updates, when you are ready to install updates or want to manually check for new updates, you can do so at any time using the following methods:
![]() In the About This Mac window, click the Software Update button.
In the About This Mac window, click the Software Update button.
![]() In the Mac App Store preferences, found in the System Preferences application, click the Check Now button.
In the Mac App Store preferences, found in the System Preferences application, click the Check Now button.
![]() In the toolbar of the Mac App Store, click the Updates button.
In the toolbar of the Mac App Store, click the Updates button.
Tip
When software updates are available, a number badge (indicating the number of available updates) will appear next to the Mac App Store icon, the Mac App Store toolbar Updates button, and the Mac App Store selection in the Apple menu. Also, when you try to restart or shut down the computer, you may be reminded to install available updates.
Mac App Store Update Details
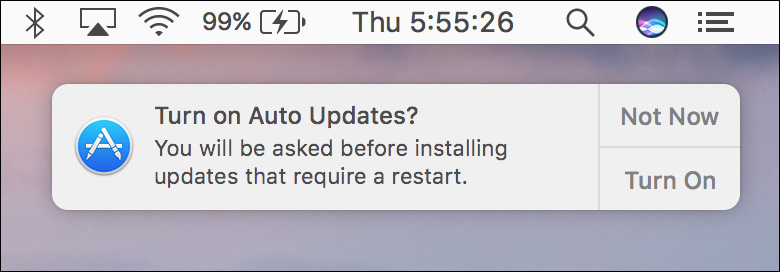
When the Mac App Store opens to show you new updates, each update is listed with information about the software update contents. The information provided includes the update name, the version, and a description. Updates that require a system restart include a notice below the update’s name.
The Updates list is split into three sections:
![]() At the very top are macOS software updates. This section contains only updates for macOS itself or updates for Apple software installed outside of the Mac App Store. Thus, updating these system items does not require that the user be signed in to the Mac App Store. (This is similar to the software update mechanism available in earlier versions of macOS.) To simplify the view, multiple software updates in this top section are hidden. You can see all the updates and their descriptions by clicking the More link next to the Update button in the top section.
At the very top are macOS software updates. This section contains only updates for macOS itself or updates for Apple software installed outside of the Mac App Store. Thus, updating these system items does not require that the user be signed in to the Mac App Store. (This is similar to the software update mechanism available in earlier versions of macOS.) To simplify the view, multiple software updates in this top section are hidden. You can see all the updates and their descriptions by clicking the More link next to the Update button in the top section.
![]() In the middle are individual Mac App Store updates. Items purchased from the Mac App Store, aside from macOS itself, always appear as separate update items. In this screenshot, both Xcode and Microsoft Remote Desktop require updates. Again, you can see more information about any individual software update by clicking the More link in the description. If the Install macOS Sierra application is still on the system, you may also notice that an update appears for this application within the Mac App Store updates. The purpose is to update any older macOS installer with the latest version.
In the middle are individual Mac App Store updates. Items purchased from the Mac App Store, aside from macOS itself, always appear as separate update items. In this screenshot, both Xcode and Microsoft Remote Desktop require updates. Again, you can see more information about any individual software update by clicking the More link in the description. If the Install macOS Sierra application is still on the system, you may also notice that an update appears for this application within the Mac App Store updates. The purpose is to update any older macOS installer with the latest version.
![]() At the very bottom are previously installed updates. This section lists only updates installed by this user from the Mac App Store within the last 30 days. It does not list updates installed outside of the Mac App Store or by other users. You can view a complete list of installations by using System Information, as covered later in this lesson.
At the very bottom are previously installed updates. This section lists only updates installed by this user from the Mac App Store within the last 30 days. It does not list updates installed outside of the Mac App Store or by other users. You can view a complete list of installations by using System Information, as covered later in this lesson.
Note
If you don’t believe the items listed in the Updates view to be accurate, you can refresh available updates by choosing Store > Reload Page from the menu bar or by pressing Command-R.
To install a single update, simply click the corresponding Update button, or click the Update All button to install all available updates. If none of the updates requires a restart for installation, the software automatically installs without any further interaction.
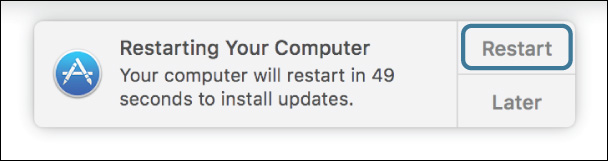
However, if any of the updates requires a restart after the install process, you are given the option to restart or again defer the installation. If the update items have already been downloaded, a notification displays.
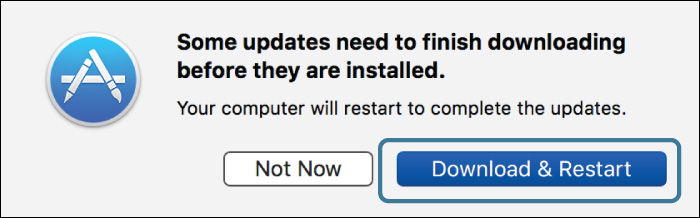
If any of the update items haven’t been downloaded, a different dialog appears so that you can confirm you want to download the items and then restart.
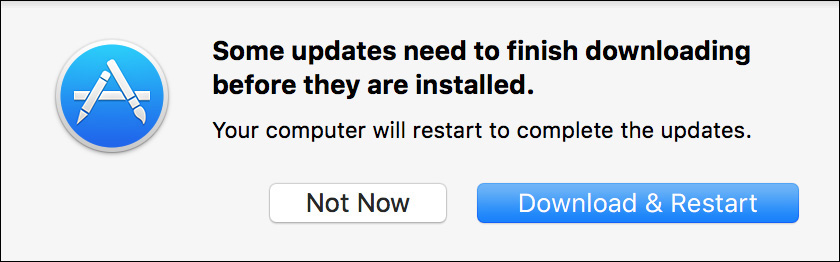
In either case, when you select a restart option, the system verifies the downloaded updates, logs out the current user, installs the updates, restarts the system, and then automatically logs back in to the user account that initiated the updates. In the case of an update that requires a restart, through much of the update process the computer will be unusable by the user.
Note
Some system updates may require that you accept new Apple Terms and Conditions, verify your Apple ID, or both. In these cases, the update will not complete until a user interacts with these dialogs.
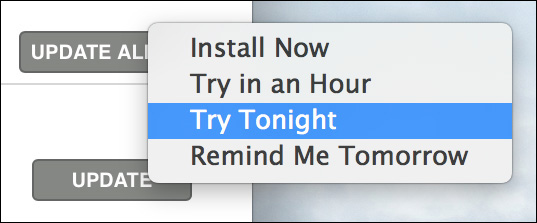
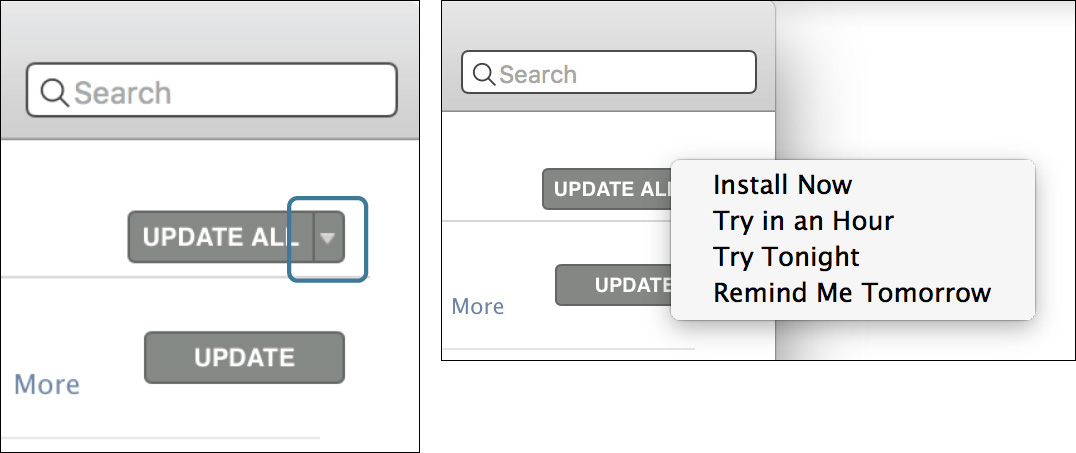
You can, of course, choose the Not Now button, but you will eventually have to restart to take advantage of the new software. Alternatively, if updates requiring a restart are already downloaded, you can choose an automatic installation option from the Later pop-up menu in the restart notification (shown previously) or from the pop-up menu to the right of the Update All button in the Mac App Store. As you can see in the following screenshot of the Later pop-up menu in the Mac App Store, you can choose to automatically defer the software installation and system restart to a time when it’s more convenient.
About New Mac Bundled Applications
New Mac computers come with iMovie, GarageBand, Pages, Numbers, and Keynote installed along with macOS. Updating these applications requires that the user’s Apple ID owns licenses of the applications. To facilitate this on new Mac systems, a user may “adopt” or “accept” the free application licenses that came bundled with the Mac in the Mac App Store with his or her Apple ID. For more information about accepting these applications, see Apple Support article HT203658, “Accept bundled apps using the Mac App Store.”
Older Mac computers upgraded to macOS Sierra that also have a previous version of iMovie, GarageBand, and the iWork suite of applications can upgrade, for free, to the latest Mac App Store versions. The software update process automatically detects these updates, but you have to authenticate with an Apple ID to accept the licenses for the new versions. For more information about updating these applications, see Apple Support article HT201064, “Update iMovie, Pages, Numbers, Keynote, and Apple Remote Desktop apps that came with your Mac.”
Tip
Once a user’s Apple ID owns a license for an application, that user can install the application on any other Mac by signing in to the Mac App Store. In other words, a user can accept the bundled applications from a new Mac and then sign in on an older Mac to install the latest versions of the applications.
Automatic Software Update Preferences
App Store preferences, accessed via the System Preferences application, enable you to control the software update automation. Changes made in App Store preferences apply systemwide, so these settings will affect all users and how they interact with the Mac App Store.
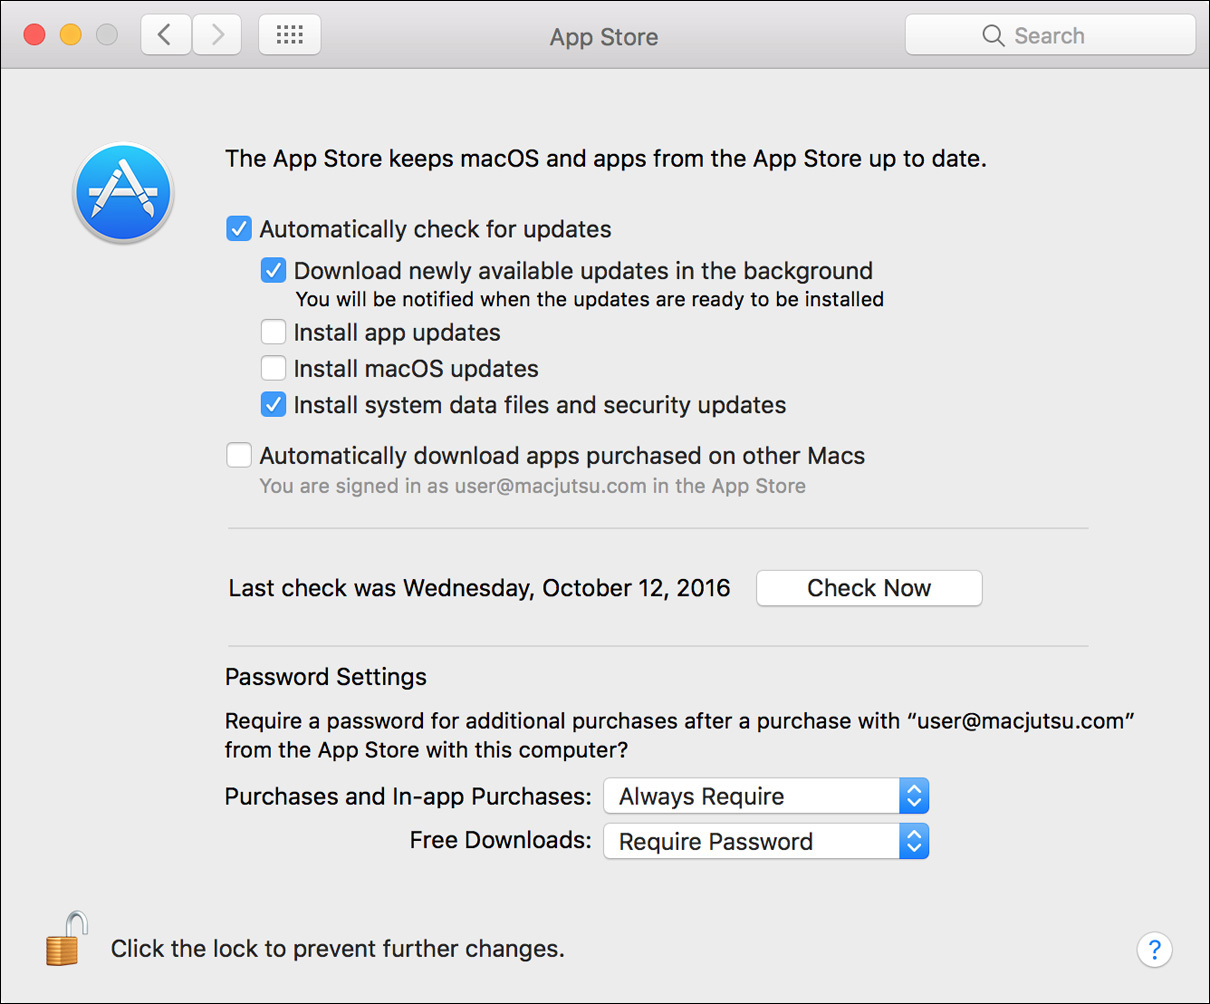
From the App Store preferences, you can enable or disable the following Mac App Store and automatic software update options:
![]() Automatically check for updates—When this option is enabled, the system checks for updates once a day. Note that “check” means that only a small amount of Internet bandwidth is needed to determine whether updates are needed.
Automatically check for updates—When this option is enabled, the system checks for updates once a day. Note that “check” means that only a small amount of Internet bandwidth is needed to determine whether updates are needed.
![]() Download newly available updates in the background—In this case, the update system may need to use a large amount of bandwidth to download updates. It’s not uncommon for macOS system updates to weigh in at over 1 GB. Also, because this option will automatically download updates for applications purchased from the Mac App Store, systems with more applications will likely use more bandwidth.
Download newly available updates in the background—In this case, the update system may need to use a large amount of bandwidth to download updates. It’s not uncommon for macOS system updates to weigh in at over 1 GB. Also, because this option will automatically download updates for applications purchased from the Mac App Store, systems with more applications will likely use more bandwidth.
![]() Install app updates—This option is not enabled by default, but as covered previously, the system prompts you to enable this option via a notification. Once it’s enabled, you are notified after new Mac App Store items are automatically updated or if you need to quit the application to apply the update. Importantly, automatic Mac App Store updates do not require a system restart.
Install app updates—This option is not enabled by default, but as covered previously, the system prompts you to enable this option via a notification. Once it’s enabled, you are notified after new Mac App Store items are automatically updated or if you need to quit the application to apply the update. Importantly, automatic Mac App Store updates do not require a system restart.
![]() Install macOS updates—This option is not enabled by default, but as covered previously, you can also enable this option via a notification. Once it is enabled, you will be notified after new macOS system items are automatically updated, as long as they don’t require a restart. Again, any macOS updates that require a system restart allow you to restart immediately or wait until later.
Install macOS updates—This option is not enabled by default, but as covered previously, you can also enable this option via a notification. Once it is enabled, you will be notified after new macOS system items are automatically updated, as long as they don’t require a restart. Again, any macOS updates that require a system restart allow you to restart immediately or wait until later.
![]() Install system data files and security updates—If Apple deems these updates important enough that they should always be installed, it’s a best practice to leave this option enabled. Keep in mind, though, that some system and security updates require that the system be restarted.
Install system data files and security updates—If Apple deems these updates important enough that they should always be installed, it’s a best practice to leave this option enabled. Keep in mind, though, that some system and security updates require that the system be restarted.
![]() Automatically download applications purchased on other Macs—This feature is disabled by default. If this feature is enabled, when you are signed in to the Mac App Store with an Apple ID, new installations made from another Mac using the same Apple ID will automatically install on this Mac as well. This is handy for those who use multiple Mac systems.
Automatically download applications purchased on other Macs—This feature is disabled by default. If this feature is enabled, when you are signed in to the Mac App Store with an Apple ID, new installations made from another Mac using the same Apple ID will automatically install on this Mac as well. This is handy for those who use multiple Mac systems.
![]() Password Settings—These settings likewise apply only if a user is signed in to the Mac App Store with an Apple ID. Adjusting these settings will reduce the number of times users have to authenticate their Apple ID when making multiple purchases and free purchases.
Password Settings—These settings likewise apply only if a user is signed in to the Mac App Store with an Apple ID. Adjusting these settings will reduce the number of times users have to authenticate their Apple ID when making multiple purchases and free purchases.
In App Store preferences, you can also click the Check Now/Show Updates button to manually open the Updates section of the Mac App Store.
More Info
Standard users can be individually restricted using parental controls, which include the ability to block access to the Mac App Store. You can find out more about parental controls in Lesson 5, “Manage User Accounts,” and more about the Mac App Store in Lesson 16, “Install Applications.”
Reference 4.2 Manually Install Updates
Before the Mac App Store or automatic software updates, all Mac software was acquired and installed manually. Fortunately, the Mac operating system has always featured relatively simple software installation. In fact, many applications require only that the user copy a single application file to the local Applications folder. On the other hand, more complex software may require multiple resources to be placed in a variety of specific locations on your Mac.
A prime example of a complicated software installation is any system software update. In some cases, it may be more convenient to manually install an update, as opposed to using automatic software update via the Mac App Store. For example, perhaps you need to install a particularly large software update for a system with limited Internet bandwidth. It may be better to manually download the update to a portable flash disk at a location with more bandwidth, and then use the flash disk to apply the update to the Mac that needs it. An experienced macOS support specialist will always have an external disk with the most common large updates handy for just such an occasion.
Tip
You have the option of manually downloading and installing Apple software updates. You can find all Apple updates at http://support.apple.com/downloads/. After you download the updates, use the Installer application to apply them.
Installer Application
The Installer application makes complicated application installations simple. Often, software developers will create an “installer package” with all the instructions and resources necessary for the Installer application to set up the new software on your system.

Note
Third-party software developers may choose to use a proprietary, non-Apple installer for their product. These installers do not use the PKG or MPKG file type and often behave differently from the Apple Installer.
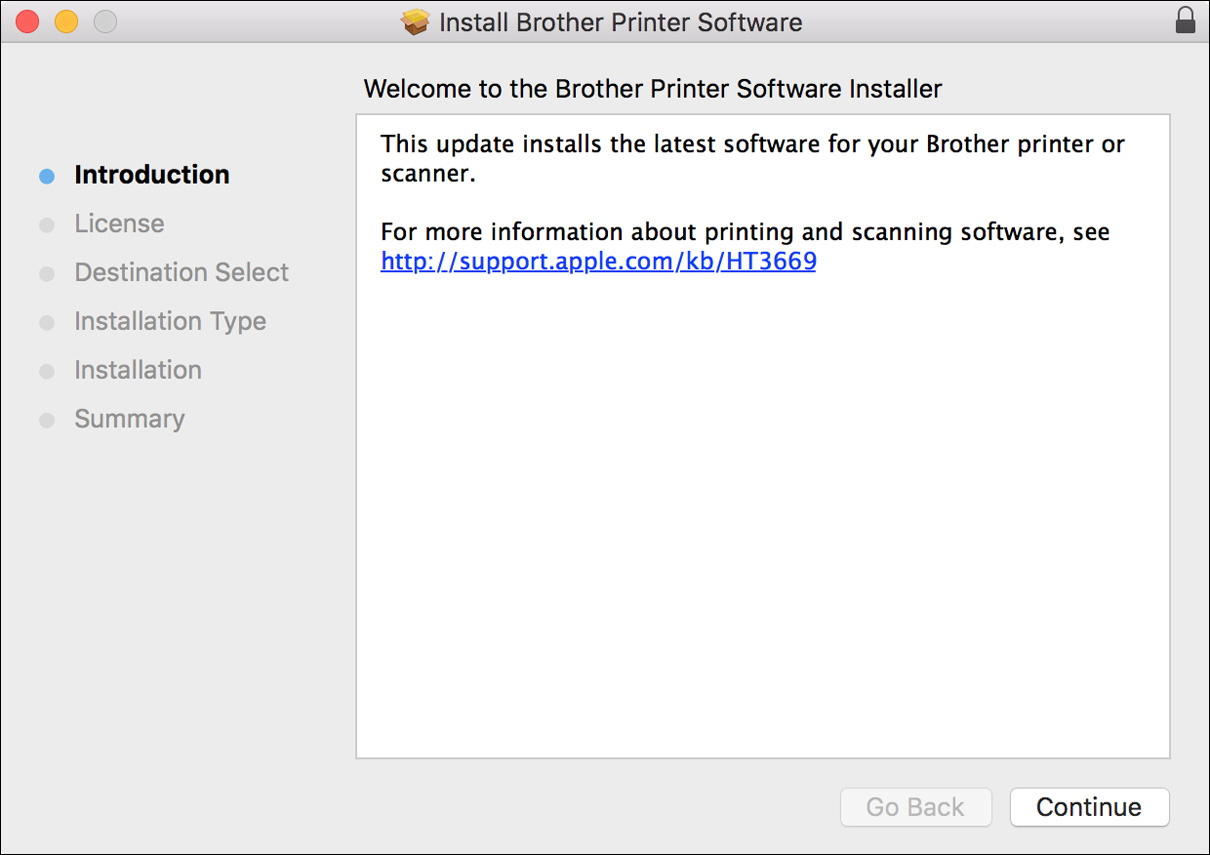
Double-clicking one of these software installer packages opens the Installer application and begins the installation process. Much like the macOS installation process, the Installer application guides you through the steps necessary to install or update software. This may include agreeing to software licenses, selecting a destination, selecting package options, and authenticating as an administrator user.
Unlike the Mac App Store, the Installer application requires administrator access to install many items. This security mechanism is in place because anyone is allowed to make and distribute traditional macOS installer packages, including those who may have nefarious goals. Another mechanism in macOS, known as Gatekeeper, also provides an additional level of protection against unknown installation packages and software. You can find out more about application installations and Gatekeeper in Lesson 16, “Install Applications.”
Tip
In an effort to save space, after installation is complete, you will be prompted to delete the original installer package since it’s often no longer needed.
Advanced Installer Features
If you’re curious about what an installation package is actually doing to your Mac, you have two ways to find out. First, you can view the Installer log at any time while using the Installer application by choosing Window > Installer Log or pressing Command-L. The Installer log is a live view of any progress or errors reported during the installation process.
Tip
After installation, you can access the Installer log from the /Applications/Utilities/Console application. Once Console is open, select the /var/log/ folder in the Reports column and then the install.log item in the log list column.
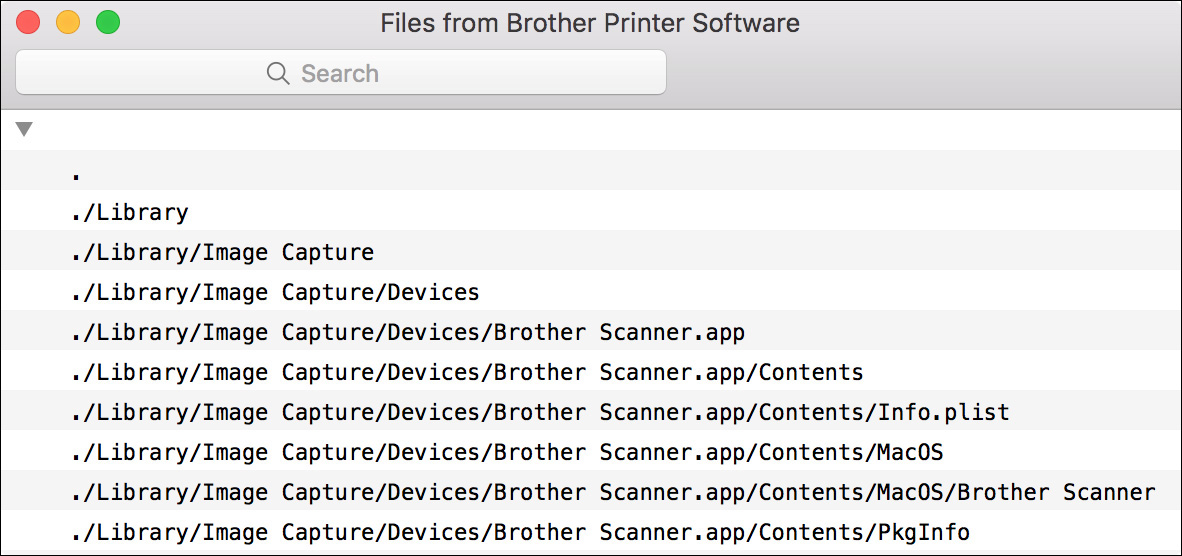
The second method allows you to inspect the contents of an installer package before installation. After opening an installer package in the Installer application and passing the initial welcome and license screens, you can preview the list of files to be installed by choosing File > Show Files or pressing Command-I.
Tip
Save time looking for what you need by using the search field in the toolbar when examining the Installer log or file list.
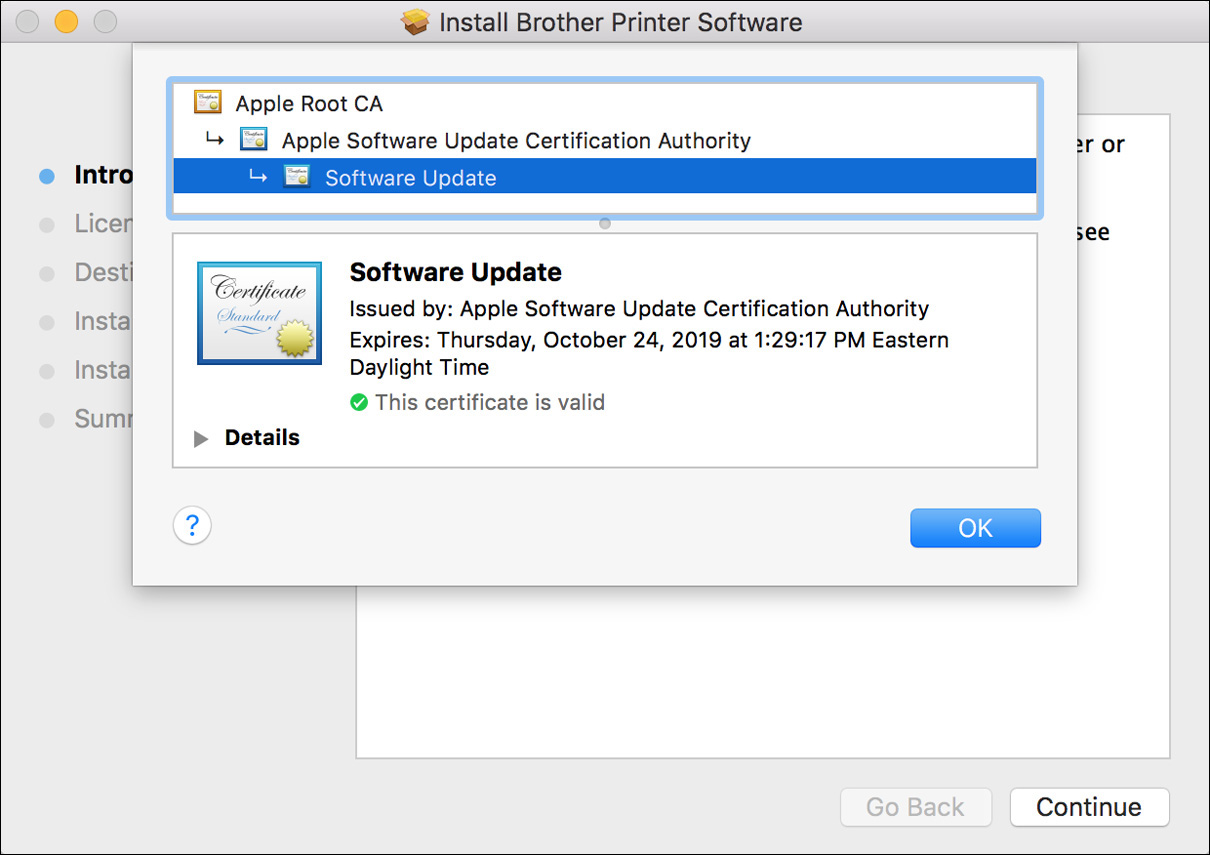
Apple has endeavored to increase the security and reliability of software installation packages by supporting signed packages. These packages contain special code used to validate the authenticity and completeness of the software during installation. This makes it nearly impossible for malicious parties to insert illegitimate files in trusted installation packages. You can recognize a signed installer package by the small lock icon in the far right of the installer window title bar. Clicking this icon displays details about the signed package, including its certificate status.
Reference 4.3 Examine Installation History
The automatic software update mechanism in macOS makes it incredibly easy for the average user to maintain an up-to-date system—so much so that the user often isn’t even aware of how many updates or installations have been applied. Yet from a support perspective, it’s important to know exactly which installations have taken place.
As you may have seen, the update screen in the Mac App Store shows recently installed updates. However, this list of updates doesn’t show the complete history of all installations, but only recent installations from the Mac App Store, and only for the currently logged-in user account.
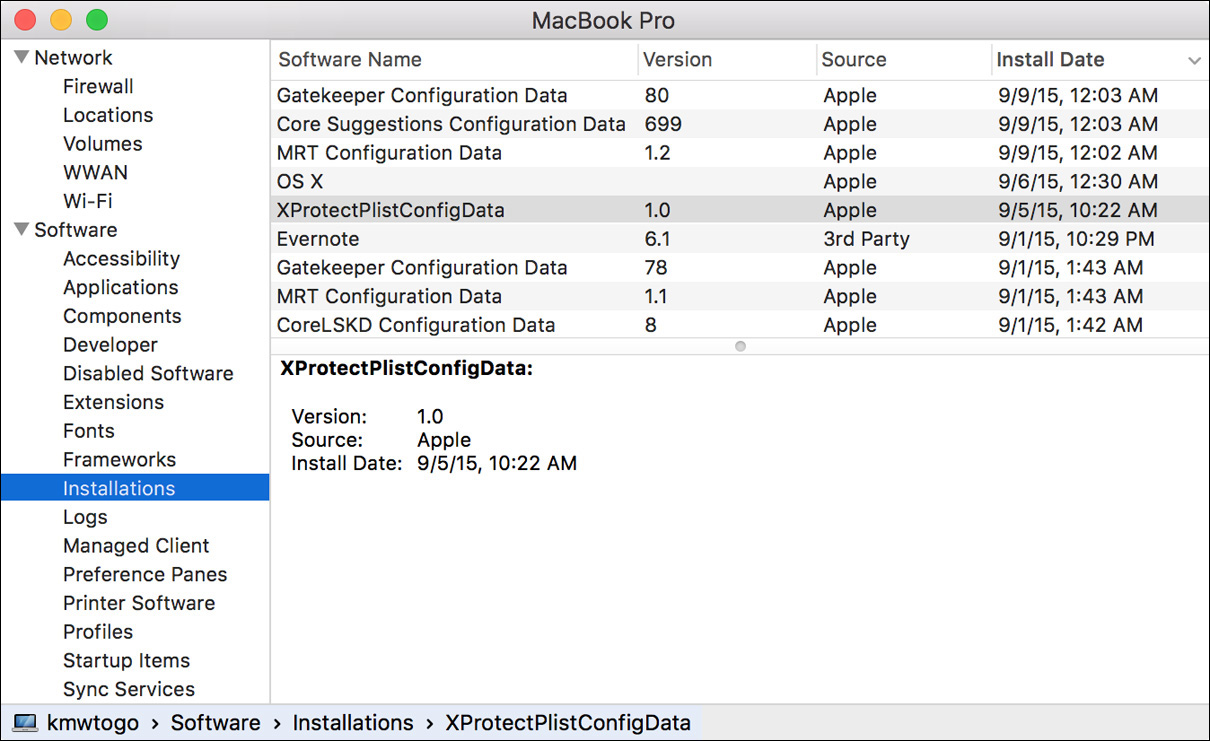
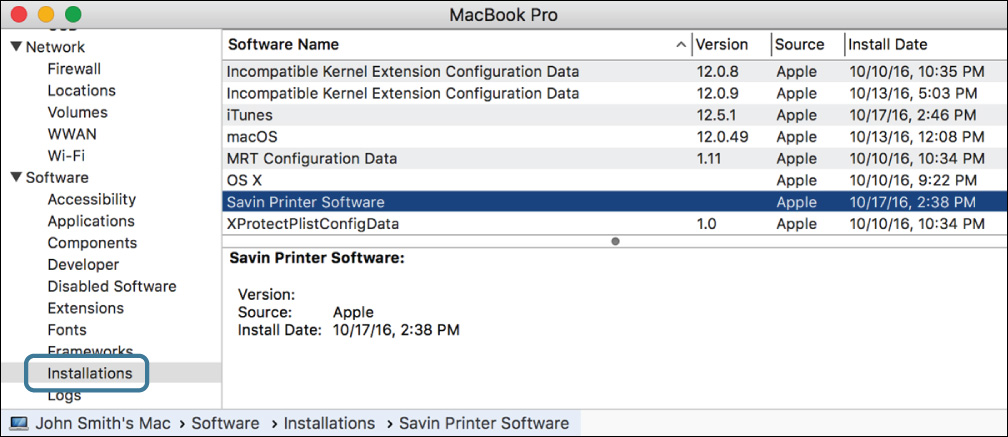
Fortunately, the System Information application features a complete installation history report. To view this history, open /Applications/Utilities/System Information, and then select the Installations item in the left column. This interface shows all software installed via the Mac App Store or the Installer application, including both new and update installations from either Apple or third parties. You can see the name, version, acquisition source, and date installed.
Exercise 4.1 Manually Install Software Updates in a Classroom
![]() Prerequisites
Prerequisites
![]() This exercise is for students performing these exercises in a classroom environment. If you are following these exercises independently, perform Exercise 4.2, “Manually Install Software Updates Independently,” instead.
This exercise is for students performing these exercises in a classroom environment. If you are following these exercises independently, perform Exercise 4.2, “Manually Install Software Updates Independently,” instead.
![]() You must have created the Local Admin account (Exercise 2.1, “Configure a New macOS System for Exercises,” or Exercise 2.2, “Configure an Existing macOS System for Exercises”).
You must have created the Local Admin account (Exercise 2.1, “Configure a New macOS System for Exercises,” or Exercise 2.2, “Configure an Existing macOS System for Exercises”).
If your instructor has chosen to download any software updates and distribute them as part of the student materials, you can follow these steps to install them. Your instructor will tell you whether you need to do this.
Install Updates from StudentMaterials
1 In the Finder, open the Lesson4 folder in the StudentMaterials folder. Remember that you created a shortcut to the StudentMaterials folder in your Dock.
2 For each software update in this folder (note: your instructor may additionally specify an order in which they should be installed), do the following:
![]() Open the disk image file. After a short time, a new volume mounts. It contains the update package.
Open the disk image file. After a short time, a new volume mounts. It contains the update package.
![]() Open the update package. The installer opens and walks you through the installation process.
Open the update package. The installer opens and walks you through the installation process.
![]() Continue through the installer prompts, and agree to the license agreement if required.
Continue through the installer prompts, and agree to the license agreement if required.
![]() When prompted, authenticate as Local Admin again (password: ladminpw, or whatever you chose when you created the account). Installing software updates manually requires administrator privileges.
When prompted, authenticate as Local Admin again (password: ladminpw, or whatever you chose when you created the account). Installing software updates manually requires administrator privileges.
![]() When each update has installed, click Close or Restart as appropriate.
When each update has installed, click Close or Restart as appropriate.
3 Repeat these steps until all the updates have been installed.
4 If you did not restart, eject the disk image or disk images before proceeding. You can do this by Control-clicking in the background of the image’s window and choosing Eject from the shortcut menu or by using the Eject button next to the disk image’s name in the Finder sidebar.
Exercise 4.2 Manually Install Software Updates Independently
![]() Prerequisites
Prerequisites
![]() This exercise is for students performing these exercises independently. If you are performing these exercises in a classroom environment, perform Exercise 4.1, “Manually Install Software Updates in a Classroom,” instead.
This exercise is for students performing these exercises independently. If you are performing these exercises in a classroom environment, perform Exercise 4.1, “Manually Install Software Updates in a Classroom,” instead.
![]() You must have created the Local Admin account (Exercise 2.1, “Configure a New macOS System for Exercises,” or Exercise 2.2, “Configure an Existing macOS System for Exercises”).
You must have created the Local Admin account (Exercise 2.1, “Configure a New macOS System for Exercises,” or Exercise 2.2, “Configure an Existing macOS System for Exercises”).
If you want to keep a copy of an update or want to install additional software (such as printer drivers) available for download from the Apple Support site, this exercise shows you how to download and install updates manually.
Download an Update from the Internet
1 Open Safari.
2 Navigate to https://support.apple.com/downloads/.
This page shows the featured updates Apple has made available for download. If you do not see the update you want, you can either click one of the categories under “Browse Downloads by Product” or use the Search Downloads field to find the update you need.
The following screenshots use the Savin Printer Drivers package as an example, but you can choose any update for which your computer is eligible.
3 When you find the update you want to install, click its Download button.
4 Wait for the download to complete. Note that a progress indicator in the Safari Downloads button, near the top right of the window, shows the status of the download.
5 Click the Downloads (down-arrow icon) button near the top right of the window.
6 Click the View (magnifying glass icon) button next to the update you downloaded.
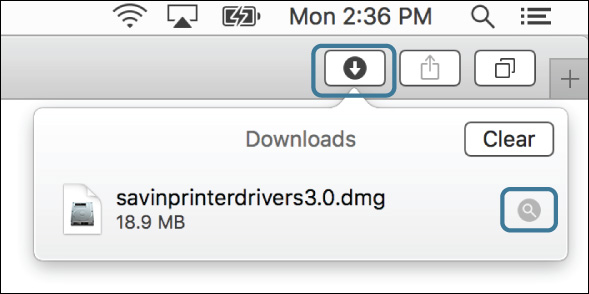
Your Downloads folder opens in the Finder, and the disk image containing the update is selected.
Install the Update
1 Open the disk image file.
The disk image mounts, and you will see the installer package it contains.
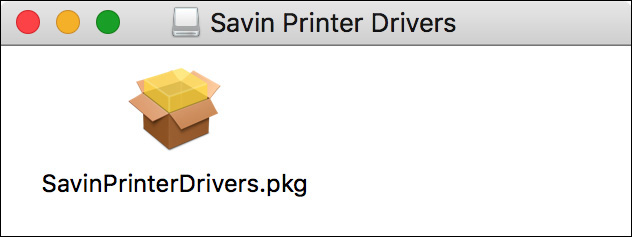
2 Open the installer package.
The installer opens and walks you through the installation process.
3 Continue through the installer prompts, and agree to the license agreement if required.
4 When prompted, authenticate as Local Admin (password: ladminpw, or whatever you chose when you created the account).
Manual software updates usually require administrator privileges to install.
5 After the update installs, click Close or Restart as appropriate.
6 If you are prompted to move the installer to the trash and if you do not want to reuse the package on another Mac, click “Move to trash.”
7 If you did not restart, eject the disk image before proceeding. You can do this by Control-clicking in the background of the image’s window and choosing Eject from the shortcut menu or by using the Eject button next to the disk image’s name in the Finder sidebar.
Exercise 4.3 Use Automatic Software Update
![]() Prerequisite
Prerequisite
![]() You must have created the Local Admin account (Exercise 2.1, “Configure a New macOS System for Exercises,” or Exercise 2.2, “Configure an Existing macOS System for Exercises”).
You must have created the Local Admin account (Exercise 2.1, “Configure a New macOS System for Exercises,” or Exercise 2.2, “Configure an Existing macOS System for Exercises”).
In this exercise, you will use the automatic update feature of the Mac App Store to check for, download, and install updates for macOS. You will also see how to view installed software and updates.
Check Your App Store Preferences
1 From the Apple menu, choose System Preferences.
2 Select the App Store preference pane.
Notice that by default the system automatically downloads new updates in the background and then notifies you when they are ready.
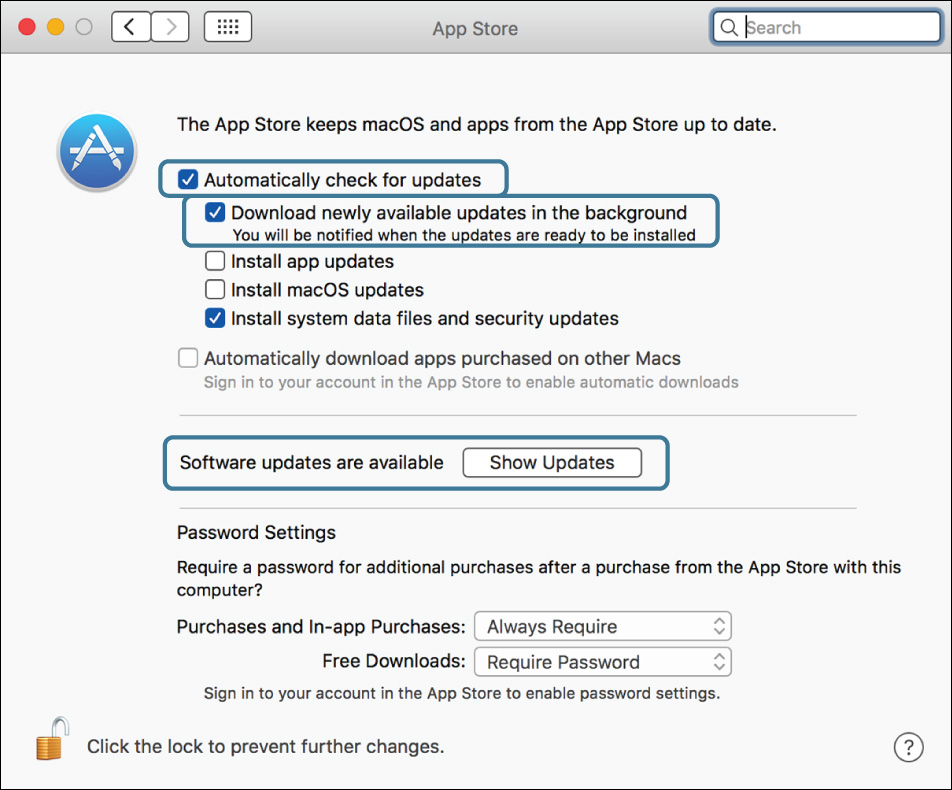
Near the middle of the preference pane, there is a line that either shows the last time updates were checked (and has a Check Now button) or indicates updates are available (and has a Show Updates button).
3 Click the Check Now or Show Updates button.
The App Store application opens, and its Updates tab is selected. Note that you can also open the App Store application directly from the Apple menu.
Update Your Software
1 Wait as the App Store checks for new software.
2 If you see a message that says “No Updates Available,” your computer is up to date. Skip the rest of this section and proceed to “Check Installed Updates.”
3 Click the small triangle next to the Update All button. A pop-up menu appears, with options to install updates later.
4 Click elsewhere to dismiss the pop-up menu.
5 Decide which updates you want to install on your computer.
6 If there is more than one update, you can click More to see a detailed list. Click the Update buttons for the updates you want to install, or click Update All if you want all available updates.
7 If any of the updates are subject to license agreements, you are prompted to agree to them. Read the agreements, and if they are acceptable, click Agree.
8 If you are prompted to restart your computer, click Restart or Download & Restart.
9 If a dialog appears asking if you want to automatically update macOS, click Not Now to keep your current update preference.
10 If the update restarted your computer, log back in to the Local Admin account. If you are prompted to sign in with your Apple ID, select “Don’t sign in,” click Continue, and then click Skip in the confirmation dialog.
11 Reopen the App Store application and check for additional updates. Some updates must be installed in sequence, so you may have to repeat the update process several times.
12 When all updates have been installed, quit the App Store and System Preferences.
Check Installed Updates
1 Hold down the Option key while you choose System Information from the Apple menu. Note that the System Information menu item appears in place of About This Mac only when the Option key is held down.
System Information opens and displays its report.
2 In the Software section of the sidebar, select Installations.
A list of installed software and updates appears, including the updates you just installed. You can select specific updates from the list to get more information about them.
3 Quit System Information.